
CMMG packs their lower parts kits in color-coded plastic bags. That way you can have just the parts you need, for the task at hand.
You can invest in a standard lower parts kit (also known as the LPK) or a premium trigger set. The safety comes in your choice of regular or ambidextrous. I’m not a big fan of ambidextrous triggers, simply because my trigger finger tends to rest in the space occupied by the offside lever on such a design.
The rear takedown pin (covered in Chapter 4) must be in place as you install the stock, there’s no way to go back and do it after the stock is on. The front is different.
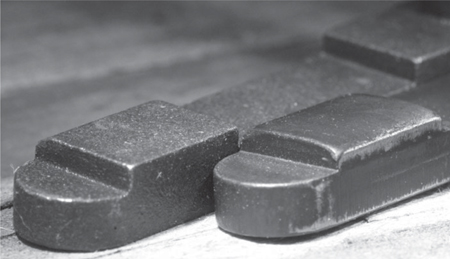
The dual push pin system of the M16, including the AR-15s that fit them, use nominal 0.250 inch diameter pins with machined heads. The thick head pin is the front, flat head the rear. These have grooves machined into the side where the detent pin rides. The groove has two small depressions at each end. The depressions keep the pin in place when fully opened or closed. To allow the upper to be removed, the groove is closed on each end so the pins do not leave the lower when they are pressed out.
CMMG packs their lower parts kits in color-coded plastic bags. That way you can have just the parts you need, for the task at hand.
A long time ago, in a galaxy far, far away, Colt manufactured AR-15 rifles for the non-military market with the infamous “large pin” in the front position. (These were made from the early 1970’s to the early 2000’s.) This pin is 5⁄16 inches in diameter, or nominal .312 inches. The center of its pin hole is offset from that of a regular small pin. The large pin does not use a spring and plunger, but instead is drilled and tapped on the end to the left side of the receiver. Colt fitted a screw threaded bolt there. The head of the large pin and the screw-thread bolt are slotted for screwdrivers. To disassemble the Colt large pin upper, you need a pair of large blade screwdrivers. It is possible to use adapter pins to fit the mismatch together. That is, a large pin and the other a small pin. But it is really not worth it unless you are really stuck with one due to local laws. It's usually best to leave a large head upper and lower assembled as a set.
Installing or removing the front takedown pin takes a bit of fussing. Starting from a bare receiver, you’ll need the spring and detent, front takedown pin (the front has a flat on the side of the pin head) a 1⁄8- or 3⁄32-inch drift punch and the assembly tool.
Insert the assembly tool into the receiver takedown holes from the left side. Use the tool with the bored hole in the lower receiver pin holes. Push the spring through the hole, into the receiver. Depress the detent. Use the punch to compress the detent and spring. When these have been compressed far enough for the installation tool to turn, rotate it a quarter-turn. The detent and spring are now trapped in the receiver. Remove the punch.
Some parts are, shall we say, marginal. The mag catch on the right kept dropping magazines, and it’s no wonder why. The locking edge is so rounded it’s a miracle it worked at all.
If the receiver lacks a buttstock, stand it on the rear flat. However, one with a buttstock may have to be stood or placed on the seat of your chair, between your legs. Make an inverted “V” with your left hand thumb and forefinger. Place your fingers over the tool at the location of the detent. With your right hand holding the front takedown pin, use the pin to press the assembly tool out of the receiver, while using that V shape of your fingers to keep everything compressed.
You want to prevent the detent and spring from launching themselves. Once down, the detent will snap into the groove (unless you pressed the takedown pin in groove-side toward the detent, in which case it is already captured) and the assembly is done.
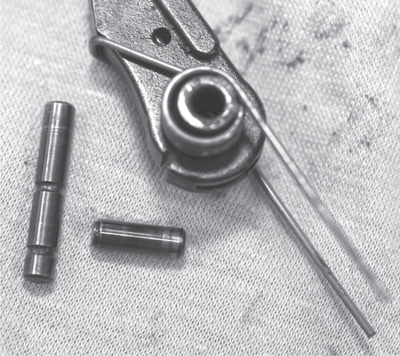
Spare parts are good to have. This broken hammer pin brought this rifle to a complete stop.
To remove the pin, get an angled edge inside the groove to lever the detent back. A 1⁄8-inch Allen wrench, with the inside edge of the short leg filed on an angle, is the preferred tool. A small screwdriver like those used on eyeglasses will also serve the purpose. The trick is to lever the detent back so it no longer captures the front takedown pin. Once the detent is compressed, rotate the takedown pin. Cover the area with your free hand when you pull the detent out of the lower. Failing to cover this spot almost assuredly results in the detent and spring launching across the room, lost forever to the search party you’ve assembled to find it.
The pistol grip captures the safety/selector spring. Take that spring and wrap a tiny little triangle of masking tape around the end. This will let you stuff it into the pistol grip, keeping it from falling out.
Next, slide the screw and washer into the pistol grip, holding in place with a screwdriver.
The trick here is to not push the pistol grip all the way down onto the receiver flange. Doing so leaves the screw without guidance, causing it to wobble back and forth. Press the pistol grip on only far enough that it won’t fall off, lining it up by eye. The gap between the inside of the pistol grip and the receiver creates an alignment for the screw. Gently rotate the screw until you feel the threads catch. If you are too heavy handed, you can cross-thread it, and make a mess of your lower receiver.
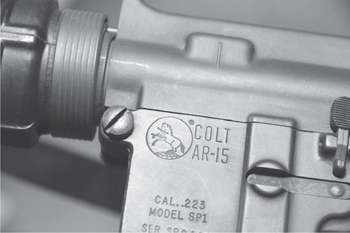
This is one of the Colt rifles with the two-headed hydra takedown pin. Leave it alone and build on something else.
Once the threads catch, and you have the screw turned in a few turns, push the pistol grip all the way down, making sure you don’t pinch the spring and that the selector plunger is still in its seat. Tighten, and you’re done.
The easiest way to install the mag catch is to use two buttons for the job. Drop the spring into the hole. Press one button in. Then push the second button down on top of the first one, depressing it deeper into the hole. Screw the L-shaped catch and shaft in from the other side. You want the tip of the threaded shaft to be flush with the first button, and no more.
Check that the edges of the catch aren’t rounded, a condition which can cause magazines to fall out.
There is no reason on this green earth to screw around with fitting uppers to lowers. Yes, the military does it, but that doesn’t mean it’s necessary.
Uppers and lowers fit together, more or less. You see, the dimensions are available, but the exact specs aren’t, unless you are an honest-to-goodness military supplier. So just check fit. You don’t even have to install takedown pins in the lower to check the fit. Slip the upper onto the lower. Line up the holes and slide the front takedown pin through. Note the fit of the rear pin. Is it too tight for the pin to pass through? Try a different set. Do the upper and lower have excessive wobble? Same thing.
This is easy enough to do, and can be done in a gun shop. Bring your lower (just the lower) in to check the fit when buying a new upper. Then again, the current state of manufacturing, with everyone using CNC machining centers, means that mismatches are far less common. Most everything fits snug. You can also buy an upper with your lower, and have the retailer or supply house fit the pair before shipping.
Take five minutes to check the fit. Life is too short to have a wobbly AR.

Standard LPKs deliver a mil-spec trigger pull and look. If you want something else, you’ll have to hunt down the parts that give you the look or performance you desire.
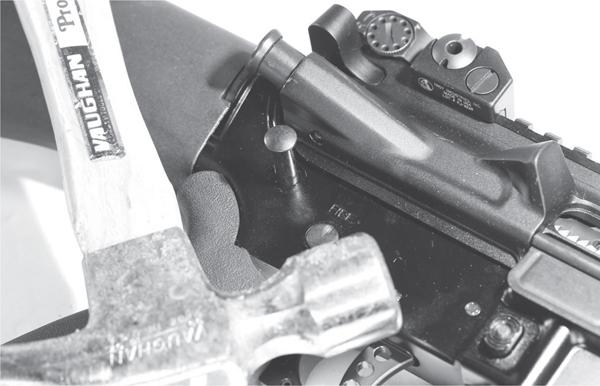
If you need a hammer to get the rear takedown pin in or out, the fit is too tight. Uppers and lowers are common and cheap now, make sure yours fit before you leave the store.