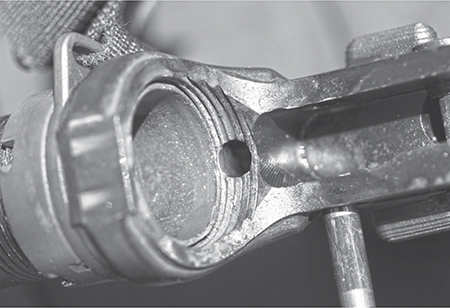
This buffer retainer was not installed correctly. The buffer tube wasn’t screwed in far enough, just one more thread was needed.
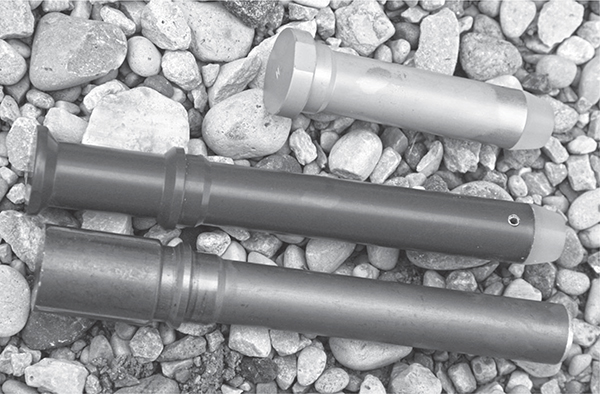
Without a good stock on your rifle, you basically have a handgun. And while ARs can be handguns — the ever-popular AR pistols — we’ll cover them later. First here’s a look at AR-15 stock types and how they get replaced or upgraded.
Start by removing the stock from a standard A1 or A2 rifle. Why? First, because you are going to be taking the fixed stock off of a rifle (or carbine) so you can install a telestock. Second, you should know how the various parts work in the rifle, and not be limited just to the telestock layout. And finally, there are differences between the two that are important to know so you don’t find yourself in a predicament in the future.
Make sure the rifle is unloaded and remove the upper from the lower. With the fixed-stock lower in hand, put your thumb over the end of the buffer tube. Use a small screwdriver to depress the buffer retainer. Once you push the retainer down far enough, the buffer will want to pop out. Control it until you can get a hold of it, and then pull the buffer and spring out of the tube. Set them aside someplace safe because you will not be using them with the telestock.
Keep the safety on and, using a medium or large flat-blade screwdriver, unscrew the top screw in the buttplate. The lower screw only serves to hold the sling swivel in place so you can ignore it for now. The top screw has a hole drilled through it; this is a drain hole. If your rifle has gotten dunked, the water trapped in the buffer tube will not otherwise drain out and will impede proper function should you fire it. Water is an incompressible substance. Lacking that drain hole the moving buffer will pump the air out of the tube and the water will bring it to an immediate stop. You’ll have a short-stroke on that shot and each one after until the water is out.
As you unscrew the top screw, the stock will slowly move away from the receiver. That is because the rear takedown plunger spring is pushing on it. The stock holds the spring in place, so when you loosen the stock, the spring pushes on it. Take care to let the stock move back straight. If you let it spin around the tube, the stock will launch the spring and you’ll probably be ordering a replacement. Not fun, and you know how I know this.
This buffer retainer was not installed correctly. The buffer tube wasn’t screwed in far enough, just one more thread was needed.
Remove the screw once it’s free and pull the stock off the tube. The plunger might want to fall out and get lost, so remove it as well. If you don’t do that, the rear takedown pin can become loose and fall out. To save headaches remove everything and set the small parts aside. You’ll need them later.
As you talk to the various factions of the AR cognoscenti, sooner or later someone will claim a buffer tube is really a receiver extension. It isn’t worth getting into fisticuffs with this type of person, but do anticipate that he will be correcting you on your terminology every other time he’s within earshot. Yes, the military manuals and Colt call it a receiver extension. The rest of the world calls it a buffer tube. Call it a buffer tube.
The result was the retainer went for a stroll, and ended up rattling around in the lower receiver until it found some mischief it could make.
Put a thumb over the buffer retainer. Hold the lower receiver and, with your other hand, wring the buffer tube loose. Then spin it off. Once the tube has moved by a couple of threads, it will have uncovered the spring-loaded retainer, which will pop out unless you’ve restrained it. Once you have the retainer and spring out, and the tube spun off, you now have a lower retainer that is ready for a new stock assembly.
A buffer with built-in springs can have some uses, but for the most part I’m with the mil-spec crowd here.
To install the telestock, you’ll need a castle nut wrench and a spring-loaded center punch. A regular punch and a hammer can also be used. Like the fabulously awful mil-spec barrel nut wrench, the typical and historical stamped-steel castle nut wrench is to be avoided. Instead, get one that is robustly machined — one that will work.
Pull the new telestock and its parts from the plastic bag in which it was shipped. Examine the buffer and spring. Note that they differ from the rifle buffer and spring. The telestock buffer is obviously different, it’s shorter and has only one flange. You cannot use the telestock buffer in a rifle tube, nor the rifle buffer in a telestock assembly.
The telestock buffer tube has a spline down the bottom, which is the guide rib for the sliding part of the stock. Inside the slot, on the spline, are a series of circular notches. These are the locations the telestock pin locks into, keeping it in place when you have adjusted it.
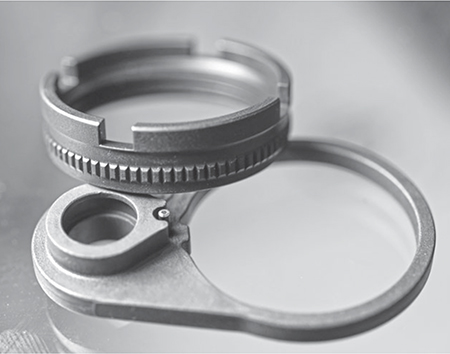
On the telestock tube are a nut and plate. In most instances, the nut (called the castle nut), is threaded on backwards. The plate is the extra gizmo you need to keep the takedown plunger and spring in place.
Spin the nut off and remove the plate. You can leave the stock on the tube if it is already there. If it isn’t, don’t bother putting it on yet. First check the fit of the tube. Insert the tube into the receiver by hand until it has almost covered half of the buffer retainer shaft. Adjust the tube so the spline is pointed down and eyeball the fit of the tube in the receiver. You want the tube to cover the rear third or so of the retainer hole, but not have the tube stock forward of the top ring of the receiver at the inside edge. If it protrudes there, it will interfere with the upper as you close the action in assembly. Traditionally, the telestock tube has been machined with the front face of the tube squared-off on a lathe. However, the better brands, and the later designs, have the front edge machined with the top edge cut back, leaving a protruding lip with which to catch the retainer without interfering with upper receiver fit.
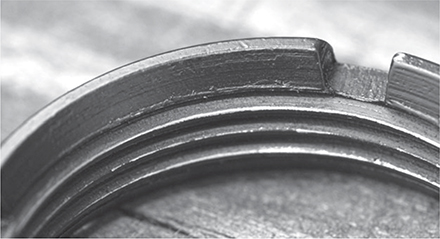
A badly machined, imported castle nut, with insufficient threads to hold on tightly. No wonder this kept coming loose.

Here is a castle nut with properly machined threads.
If everything fits, you’re ready to get on with assembly. If you need to make it fit, you have two choices: File to fit or return for a different/better assembly.
Making it fit should be a simple — if not nerve-wracking — matter for your first-time operation. You’ll need a bench vise, a large flat file and a circular file. Remove the tube from the receiver. Carefully clamp (it is a hollow aluminum tube, after all) the buffer tube, open end up in the vise. Use your flat file to remove some aluminum with a few strokes. Re-install the tube in the receiver and check the fit. It is as simple as filing until the upper clears the top edge of the tube. Then, once it clears, use the circular file to blend the bottom edge of the tube to the contour of the receiver. This does two things. It keeps you from having a shelf sticking in the way of the lower, and prevents having a sharp corner in the filed area, which could act as a stress riser. Once it fits, knock the sharp edges off that you have created by filing, and get to assembly. When you go to assemble, you can leave it white, use some aluminum finish or even spray paint to cover the bright aluminum.
In the old days, I occasionally had to do a bit more. After lining up the spline, and the top edge was dressed back so it fit, the bottom lip extended forward so much it held the retainer down too far to hold the buffer. I used a smaller circular file to put a small notch in the center of the bottom lip so the retainer had enough clearance. Having done this a few times in the past, it is interesting and amusing to see top-tier makers churning out buffer tubes with exactly those features — cut-back tops to clear the upper and a notched lip to give the retainer breathing room.
Now it’s time to install parts. Fair warning: the first few times you do this it will seem that you need three hands to accomplish the assembly. That’s not the case but it does take a bit of practice.
Spin the castle nut on with the large slots toward the buttplate. Screw it back onto the tube as far as it will go. Grasp the oval plate. Notice that it has a punched-in oval boss. That boss goes onto the tube, pointing toward the muzzle. Slide it all the way back on the tube until it is pushed up against the castle nut. Begin turning the tube into the receiver. Once it is on far enough that it won’t fall off, press the buffer retainer spring and retainer into their tunnel, holding them down with a thumb. Rotate the buffer tube until it traps the buffer retainer. Adjust the tube in or out until it holds the plunger in, clears the receiver ring and has the spline pointed down. Now install the rear takedown pin, push the plunger in and stuff the spring in behind it.
Push the retaining plate down the tube to the back of the receiver. Nestle the boss into the machined receiver recess as you use the plate to compress the retaining spring into the receiver. Once it is in place, hold it there while you hand-turn the castle nut down to the receiver to trap all the parts in place.
PWS makes a beautifully engineered castle nut and retainer plate, with a built-in ratchet system.
With the parts in place, inspect one more time to make sure everything lines up. Make sure the retainer is trapped, not just that the edge of the retainer is catching or merely being pinned down. Install the stock on the buffer tube. Turn the receiver upside down and use the stock as your gauge. Is the spline centered and orientated downward? If it’s tilted now it will surely be off when you tighten things. Get it straight.
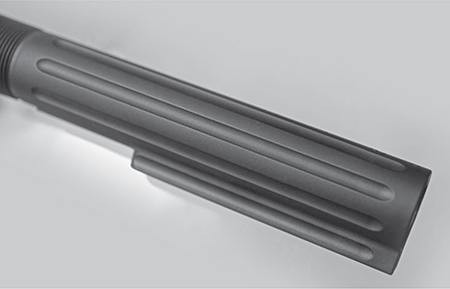
You can tell the PWS buffer tube from others as it has flutes to lighten it.
Place the receiver on a clean, level bench with the muzzle direction to your right and the open top of the receiver away from you. The pistol grip and stock are your placeholders. Tighten the castle nut. Put some of your body weight into the castle nut wrench, but don’t make it “farmer tight.” Check one more time that the tele-slider is correctly aligned with the vertical axis of the receiver. If not, loosen the castle nut, tweak the stock back to vertical — or slightly past — and then tighten again. Why a bit past? The tightening action of the castle nut will pull the stock to vertical.
You aren’t done yet. The small notches on the castle nut (the ones pressed against the receiver plate) are there for you to stake the plate. Place your spring-loaded punch against the plate at the notch near the plate’s edge, pressing until the punch snaps and upsets the steel. Do this a few more times until you have a good bit of metal punched from the plate into the small notch. Repeat on a second notch. You will find that you can generally only reach two notches easily, which is plenty. The purpose of staking is to keep the castle nut from unscrewing when you shoot. The vibrations of shooting can loosen the nut.

PWS took the extra steps to capture the buffer retainer, clear the upper receiver, and extended it to be a crash pad for carrier tilt in piston guns.
Generally speaking, I am against the use of Loctite at the castle nut. You don’t need it and it makes disassembly harder. However, there are exceptions. Some receiver end plates are made of hardened steel, particularly the ones with added loops for sling attachments. If the plate is too hard to stake, then you have to loosen the castle nut, squirt a bit of degreasing aerosol into the uncovered thread area and dribble a few drops of blue Loctite into the gap. Dab the Loctite into the gap between the castle nut and the receiver plate, then tighten and let the stuff wick into the threads and gap between plate and nut.

The Vltor EMOD, with its built-in storage compartment.
There’s one new receiver plate/castle nut assembly that doesn’t require staking. Primary Weapon Systems has designed one with a built-in ratchet lever. The castle nut has 124 notches (they counted them, I refuse to do that, so I’ll take their word for it) and the notches catch on the ratchet. The ratchet notch has a built-in negative angle, so you can easily tighten, but the ratchet resists loosening. If you want to take it off, you have to use a small screwdriver or other lever to pull the ratchet out of engagement, otherwise it won’t let go.
The subject of buffers has been one of continuing confusion for some years now. The use of buffers in rifles, in particular ARs with A1 or A2 stock assemblies, is simple. It’s Hobson’s choice — use the originals, because they haven’t changed and don’t need to be. The rifle buffer is the longer, two-flanged one. The rifle spring is the one with 41 to 43 coils. (Yes, you can, and should, count them, just so you know for sure and know what they look like.)
When it comes to rifle buffers and the spring, more is not better. You do not want a heavier buffer, and you do not need a longer or stronger spring. Regular readers of mine know the record: a rifle we encountered in a class that had an “extra strong” spring that was so strong the rifle would not work. The spring had no less than 50 coils!
Carbine buffers have one rim, are shorter in length, with recoil springs sporting 37 to 39 coils. Despite the buffer being lighter, and the spring being shorter, they are correct for use in telestock tubes. Actually, they work pretty well ... when they work. When they don’t work, you need to tend to them. Carbines, unlike rifles, can benefit from some buffer improvements.
The buffer in both rifles and carbines is built as a dead-blow hammer. The weights inside are meant to rattle back and forth. When the bolt-carrier assembly closes, the carrier strikes the rear of the barrel extension. Steel-on-steel is a near-perfect elastic collision, and the result is a bouncing carrier. In semi-auto fire this does not matter as it is done several eons before your finger can press the trigger again. However, in full-auto fire, the autosear can release the hammer, bouncing the carrier as the hammer falls. If the hammer happens to come forward when the carrier has bounced, and is far enough back (it doesn’t take much), the bottom edge of the carrier prevents the hammer from contacting the firing pin. The result is the hammer resting on the firing pin with a loaded round in the chamber.
I had this happen in a class a few years ago. A Deputy from a nearby county arrived in our class (he wasn’t a student) with a malfunctioning select-fire SBR carbine. He had driven over from two counties away because his issued duty carbine was malfunctioning. After a brief description of the problem, I had him load and fire into the backstop. Sure enough, his rifle stopped. We opened it up, and yes, the hammer was forward, and there was a live round in the chamber. I pulled out the buffer weight (standard carbine) and replaced it with an H3 marked buffer. He then did three, full-mag dumps in full auto. Relieved, and with a grin on his face, he thanked me effusively, then pulled a carton of departmental-issue ammo out of his trunk and tossed it into the back of my pickup truck. Problem solved, tool fixed, and troubled mind relieved. That was worth a carton of ammo that the county had supplied to him for practice. His explanation was, “I would have shot up more than that trying to fix it on my own. You saved the county that much of my time by fixing it right away and getting me back on patrol.”
This was the kind of thing we had to do (back in the good ol' days) to get our faces properly behind a scope clamped onto the carry handle.
So, the weights inside are held to the rear of the carrier by inertia as the carrier goes forward, and then when the carrier stops, the weights move forward inside of the buffer an extra fraction of an inch and hit the inside front face of the carrier just as the carrier would be bouncing.
Again, for semi-auto work, this doesn’t matter. What does matter is that the weights are steel. When the carbine is a regular (more-or-less) 16-inch or so barreled upper, the steel weights work OK. However, if you shorten the barrel, install a suppressor, or do both, you have problems. Not bounce problems, but mass and inertia problems.
The shorter barrels need larger ports in order to deliver enough gas to the system in much shorter dwell time. This changes the timing and force of the gas arrival; many SBRs benefit from a heavier buffer. Buffers are made heavier at the manufacturer by substituting one or more of the steel weights with identically sized ones made of tungsten. One swapped weight is an “H” buffer, two swapped an H2 and all three an H3.
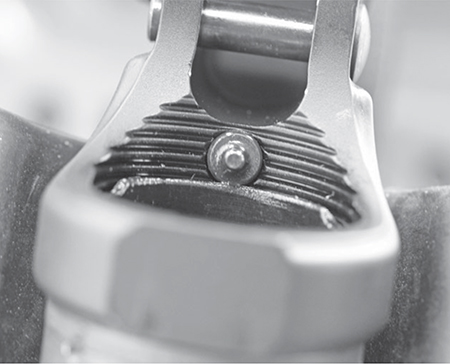
Here the buffer retainer is just barely being held in place. With time, this will most likely pop out and cause trouble.
Generally speaking, if you have buffers to try, use the heaviest in your carbine, with the following limits: Use the lightest-power ammo you typically use, and keep your AR dirty and dry. Use the heaviest buffer that will still lock open in those conditions, when the magazine is empty. The brass will be less abused and you will feel less recoil.
A quick aside, the Army, as they are wont to do, re-invented the wheel by upgrading buffers and congratulated themselves for being so clever. They added a new buffer to inventory, with instructions on where, when and in what rifle or carbine to install it. They call it the H6 buffer. It’s comprised of six weights, each half the size and thickness of the regular weights and fits inside of the buffer assembly. I have been told they are packed in there so that they do not move and do not act as a dead-blow hammer. Time will tell if that particular aspect induces malfunctions.
If you have an H3, you have a buffer that weighs the same as the H6, but has the dead-blow attribute — so don’t go changing unless higher command orders you. The H3 is better than the H6.
A special case is the pistol-caliber conversion, particularly the 9mm. Colt only ever made the AR in 9mm (no .40 or .45) so if you have a .40 or .45 you have something really off the beaten path. The Colt 9mm buffer is a special one, with extra weight added by means of a steel sleeve over the buffer body. The 9mm carbines and sub machine guns, or SMGs are not gas-operated, they are straight blowback, and need the extra mass to control timing and force of recoil. In a 9mm, the heavier the buffer, the better.
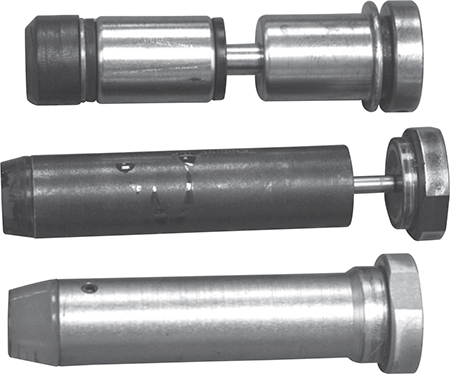
Top, a standard carbine buffer. Middle, a JP Enterprises competition lightweight buffer. Bottom, the original Armalite buffer, less than two ounces.

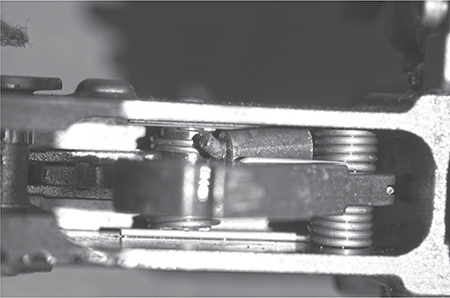
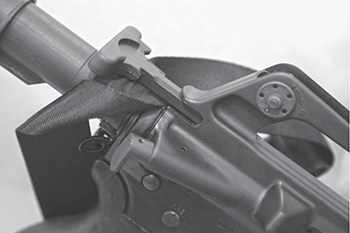
A properly positioned buffer tube and a securely held buffer retainer. You want yours to look like this.
Buffers are made simply by lathe-turning rods of 6061 aluminum, anodizing, installing the weights and end cap. The synthetic cap keeps the buffer and tube from being hammered as the buffer weight bottoms out in the recoil stroke. The soft synthetic end cap is held in by means of a roll pin, and we have seen some of those pins work loose as of late. Check on your buffer occasionally just to make sure it isn’t one magazine away from disintegrating. (Trust me. That would be bad.)
While the relatively soft synthetic cap provides a bit of recoil relief, that didn’t keep people from improving it. The improvement comes in the form of a buffer, modified to have an internal or external spring on a shaft, which acts as a spring-loaded plunger. When the buffer bottoms out, the plunger soaks up more recoil while allowing the buffer mass to continue moving. This spreads the recoil impulse out over a longer period (measured in hundredths of a second, but still enough to notice) making the system seem softer in recoil. The total is the same, but the time is increased. Think of it as credit in monthly payments. The total cost is the same, but you get more time to deal with it.

The carbine using this buffer didn’t work so well. Once we swapped out this buffer for a proper one it worked just fine.
So, what are the drawbacks? For one, such buffers tend to be lighter than the heaviest ones available. They provide a decreased recoil impulse when the system bottoms out, but do so with more velocity than they would have had with a heavier buffer. If the rod bends, or the spring wears or breaks, the advantage is lost. And they cost more than the standard and heavy buffers. Still, they do work. If you can feel the difference and are willing to pay the price, then go for it.
The buffer spring is full-diameter — it fills the aluminum tube in which it rests. Attached to it is a hard plastic stock. When the gun is fired, the cycling spring rubs against the tube, transmitting noise directly to your jawbone. One of the mechanisms of hearing is bone conduction. You hear things in part because your bones, being hard mineral structures, conduct sound relatively well. That’s why ear plugs do not offer as much protection as over-the-ear muffs do. The muffs cover some of the bone that would be conducting noise.
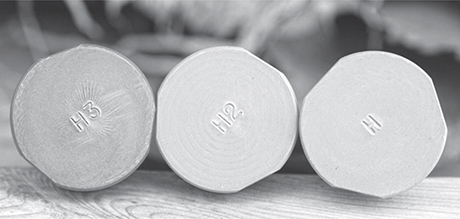
Buffers for carbines are marked as to their weight, with a stamping on the front face.

Inspect your buffer. This one gave up the ghost in the rifle and had to be wrestled out.
Well, the buffer tube conducts the noise directly to your jaw, and then to your ear. Some find the noise noticeable, even annoying. Others don’t notice it or their face offers enough dampening to keep bone conduction to a minimum. Yes, having a fat face can protect your hearing.
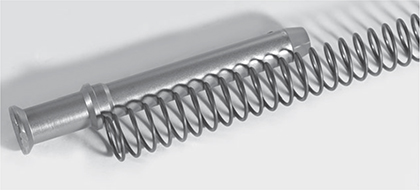
John Paul of JP Enterprises solved that problem by building a recoil spring along the lines of the spring-loaded buffer, but more. The entire recoil spring assembly is a captured system with weights and spring on a central rod. You do not need a buffer with this design as it has its own buffer mass built in. Installation is easy. Open the upper and lower. Pull out the standard buffer and spring. Install the JP system with the weights to the front. Close, reload and continue.
Paul, not being one to leave things alone, improved it to the v.2.0 system, offering a .308 version.
The big advantage is no spring boing. The spring rides on its own central rod, thus it cannot contact the buffer tube — nor rub against it.
Buffers may be durable but they do not last as long as carriers. The biggest problem is cheaply made or counterfeit buffers. I’ve seen them with mangled plastic backs made out of a cheap substitute polymer. (How can you get cheaper than plastic? They manage somehow.) For a while back in the 1980s and 1990s, we saw plastic molded buffers that were filled with lead shot. Those were awful. If you have one in a Colt (Colt even made and used them for a while, but not on military rifles), replace it and do not regret changing a factory-original setup. On this score Colt did wrong, and you should not suffer as a result.
The Rock River Operator stock is solid and comfortable.
One really egregious buffer I saw a while ago was made from lathe-turned heads (the nailhead-looking part) married to tubing. It probably would have worked fine except that the maker was even cheaper than cheap and didn’t use seamless tubing. The tube split on the seam, driving the plastic part into the buffer body until the weights inside stopped it. We had to wrestle that one out of the stock because it was binding on the spring.
Then there are those that are lathe-turned, but not anodized. The faces that rest against the carrier on these get chewed to pieces in short order.
And who can forget the particularly craptastic buffers that had a single steel weight inside. Yes, it clacked back and forth when you shook it, and caused the most spectacular malfunctions.
To see if your rifle has the proper parts, unload, open it up, and pull the buffer and spring out. Shake the buffer. Do you hear the weights clacking back and forth? Good. If you hear shot rustling around in there replace the buffer. Count the coils. 37 to 39 for carbines, 41 to 43 for rifles.
What happens if you put a rifle setup into a carbine tube and vice-versa? On the one hand nothing; and on the other, lots of bad things. The rifle buffer and its spring will not fit into the telestock carbine buffer tube. You can’t get them in far enough past the retaining plunger to close the upper and lower. To save you from yourself, they are just too big.
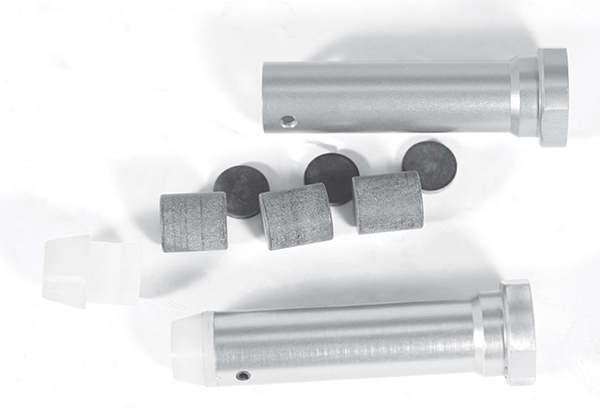
Here is a carbine buffer, disassembled next to an intact one. You can see the three weights and their fiber-synthetic pads.
Unfortunately, the carbine weight and spring will fit very nicely inside of the rifle buffer tube. That’s not good because the carbine buffer will travel too deeply into the tube when you fire. This allows the carrier to travel further back. It will stop only when the carrier key bangs against the edge of the buffer tube or the ring of the lower receiver into which the buffer tube is screwed.
If you are lucky, the only damage will be gas key screws getting sheared off, causing the rifle to stop working. If the screws do not shear, the key will hammer into the receiver until it breaks the receiver. Ouch. The lower is the part with the serial number; therefore, you will be replacing it with one that has a different serial number, and in some jurisdictions that can be a problem.
Can you swap upper and lower assemblies? This is a question that comes up in classes. The short answer is yes. You can put a fully-assembled 20-inch rifle upper onto a lower receiver that has a carbine telestock on it. You do not change anything in the lower.
I have been in correspondence with an acquaintance in the military, and it seems his unit is doing just that. They placed an order for a truckload of complete telestock assemblies, and are in the process of swapping fixed stocks off of M16A2, A3 and A4s, replacing them with telestocks. Yes, the resulting rifle still has a 20-inch barrel, but at least the stocks can be adjusted for use with body armor — and they are a little bit handier in use.
You can also park a 16-inch carbine upper onto a rifle-stock lower. Colt did exactly this back in one of the so-called assault weapon ban panics, and it turned out to be a nice, handy, lightweight carbine.
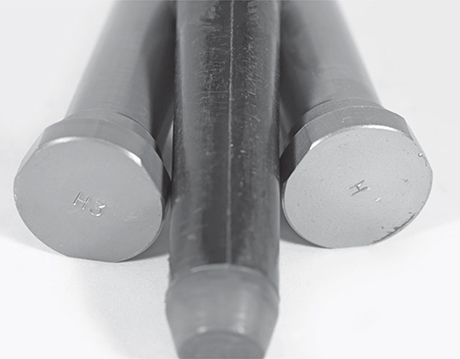
The H is on the right, the H3 on the left, and in-between is one of the really bad plastic ones with lead shot. Avoid that one like the plague.
The gas system of the upper is tuned to deliver the correct amount of gas to the carrier, regardless of the barrel length. The buffer system is designed to deal with a carrier that is cycled with a certain amount of force regardless of the barrel length.
As long as the uppers and lowers involved are correctly assembled with the proper parts, you can swap uppers and lowers to your heart’s content.
Now, that guidance is engineering advice. If there are legal reasons you cannot swap uppers and lowers, well then don’t do it.
When the US government was sending surplus M16A1 rifles to police departments, some agencies did just that. They took lightweight rifles with 20-inch barrels, removed the fixed stock and all its parts, and replaced them with telestock assemblies. This allowed officers to fit the now shorter rifles into the overhead racks of their vehicles — and then get them out in an emergency without a crowbar and two assistants.
The departments that were more flush with cash swapped the uppers as well, and simply put carbine-length (or shorter machine guns for which there is no minimum barrel length) uppers on the lowers, swapped the stocks and issued them. They also secured all the parts — uppers, fixed stocks, and the auto sear — locking them in the arms room. If the government ever wants the rifles back, they’ll want them returned in the same configuration in which they were shipped. Understandable wear is OK, but modified and rebuilt to non-government standards? No, you aren’t shipping that back.
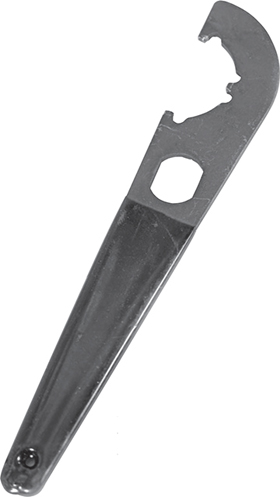
Get a good castle nut wrench, something with three teeth to grab the nut slots with authority.
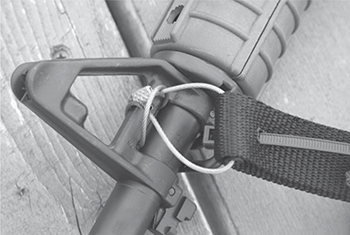
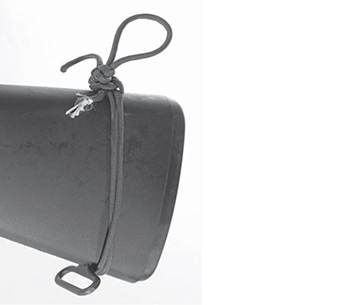
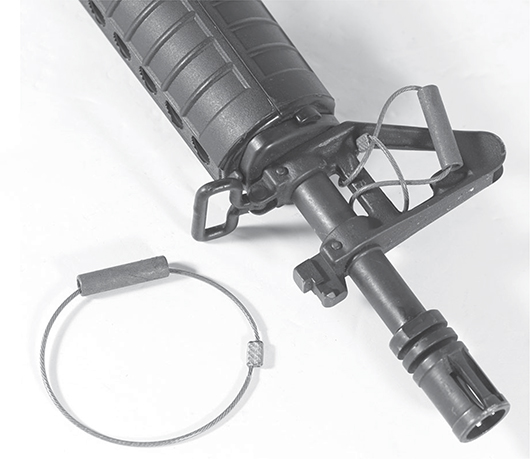
A front sling swivel can be as simple as a loop of braided stainless cable.
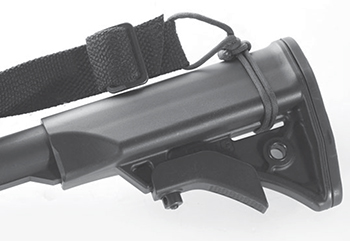
Make sure you keep your sling under control. Too much can be too much.
A loop of 550 cord, properly tied and sealed, makes a lightweight and compact sling attachment system.
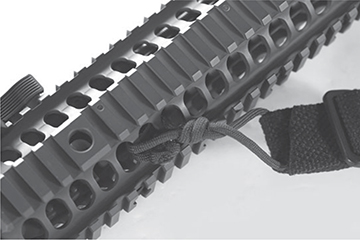
You can simply tie 550 cord to your free-float handguard.

Midwest Industries, among others, make a bolt-on sling swivel that also works as a hand-stop.
Want a top-mount sling on your fixed stock? This works and is cheap.
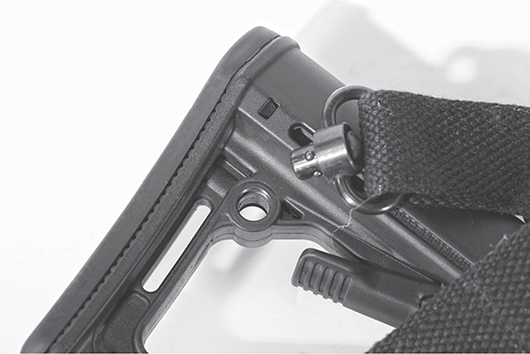
Those little circular holes in many stocks and forearm designs are the sockets for the QD sling system.
Visit your local hardward store and, for as little as $10, you can get enough material to make as many of these loops as you need to sling up all your ARs.
The rifle tube is the rifle tube, that’s it, there is no other. If you have a rifle tube your problems are zero. Telestock tubes, on the other hand, come in two sizes — military and commercial. Why? The military specs call for the tube to be made by means of forging. The aluminum bar from which it's made is pounded (forged) into the shape of a rod with a rib. The rod is then bored out, threaded, and the exterior profiled, while the rib is machined for the locking latch and detents. The profiling makes the tube walls as thin as possible, yet retains maximum strength. This reduces them below the diameter of the thread tops. If you look at a military-diameter tube you will see that the threads have been topped-off on the back end of the threaded portion.
The commercial tubes are made by means of extrusion. Heated bars of aluminum are forced through a die shaped like the telestock tube. They are then bored out and threaded. They are not profiled. These do not have the threads topped off.
The commercial tube is generally 1.17 inches in diameter, but can vary quite a bit, while the mil-spec tubes are 1.14 inches and are quite close to that dimension. If you have a commercial stock, it will rattle loosely on a military buffer tube. And unless you have a really big mallet, you are not going to get a military stock on a commercial tube.
You have to know which you have if you plan to replace the telestock slider and stock for one that has the features you want. A dial or digital calipers will quickly tell you which one you have.
Why the difference? Forging is expensive. The 7075-T6 alloy of which forgings are made add to the cost. 6061 aircraft aluminum extrudes beautifully; even if it is a bit gummy to machine. So if you want to save money making telestock assemblies use extruded 6061, and do not waste time and effort profiling the tubes down to 1.14 inches. Simply extrude to the final dimension of 1.17 inches, bore out, machine the rib trough and thread the ends.
The threads are the same for both as they have to fit into the lower receiver. That means that all the castle nuts, retaining plates, etc. will fit both types without a problem. Actually, if there is a problem, it isn’t because one is commercial and the other is mil-spec diameter.
The rifle buffer weight is longer, with two flanges, and won’t fit in the carbine tube nor allow the action to cycle.
The telestock slides on a rib in a slot with bored recesses. The original telestock had two positions — open or closed. As time went by, the number of recesses has increased, with six, even seven settings now available. The lever on the stock unlatches, allowing you to slide the stock forward and back. But how to remove it?
The small rib on the rear of the receiver is where the rear takedown spring and plunger reside.
Pivot the latch and slide the stock all the way back. Now, instead of causing it to pivot by depressing, grasp it in one hand and pull the whole thing away from the buffer tube. You will then have moved the post enough to clear the rear lip of the rib. The stock simply slides off the end.
Which stock should you use? That depends.
Are you after compact size, light weight, comfort in shooting or one with a cup holder to keep your coffee off the ground while you consult the map? (OK, a bit of a joke there, but only a bit. Stocks can be had that do almost anything.)
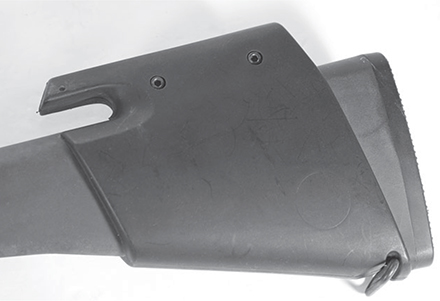
The lightest is the simple, ribbed M4 stock. Lighter still is the old retro XM177 CAR stock but only if you get the plastic one. The aluminum choice (which was the original type) is heavier than almost anything. Here you are on your own. The wedge-shaped Socom stock, or Crane stock, is very comfortable to shoot, but it is heavier and bulkier than the M4. You can have stocks with storage compartments in them — to store batteries or cleaning gear. There's even a stock that lets you secure a tourniquet to it.
As long as you are willing to put up with the weight, get what works for you.
Let’s look at a few stocks and see what kind of variety you have to select from.
If you want simple and straightforward this will do it. The design is simply a tube with a stock that is a reinforced buttplate. The place where you rest your face is covered with a foam tube. That’s it. Installation is simple and follows the same process that a telestock would. When installing the Ace, or any other telestock for that matter, you have a choice in end plates. The retaining plate for the telestock assembly also keeps the rear takedown spring and plunger captured in the receiver.
You can use a regular plate or one that has looped flanges for attaching a single-point sling. The plates are the same regardless of commercial or military-diameter tube. The M4 Socom is adjustable, with two different sized versions available. There are 7.5–9.5-inch and 9.5–11.5-inch lengths. If you want a compact, simple and durable stock, go ACE M4.
No, not small burgers, but the part of the telestock assembly that actually slides back and forth. You can have sliders in an amazing array of colors, shapes, weights and intents. They all slide onto the buffer tube, and once you have determined military or commercial diameter — assuming the stock you want is available in that diameter — then it is simply a matter of taste, comfort, the weight you are willing to pack, and the extra features you simply must have.
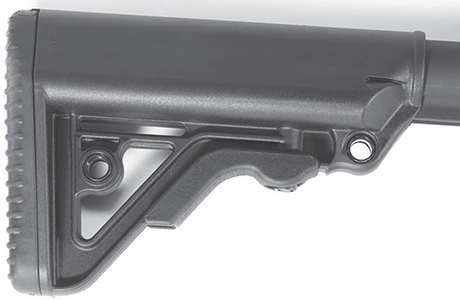
Daniel Defense uses a glass-fiber polymer for the body of their stock, which is over-molded with soft rubber for comfort. The cheekpiece area is wedge-shaped for a solid cheek weld, and has a non-slip but not hard-on-your-face rubber section. There are QD sling swivel sockets and slots for fitting a sling. The bottom of the stock has a connector, its toe serving as a support if you should happen to fall on it or use it to buttstroke a door, face or other object.
Magpul was one of the first in the aftermarket stock segment and pretty much hit like a tsunami. You can have any of 11 different designs, some of which are telestock, and some fixed, in 10 different colors.
Me, I’m pretty much a stick in the mud, and use the MOE or the CTR. But I do have a rifle with a UBR and another with a PRS.
Vltor (ull-tor) makes three stocks — the ARM, which fits onto a fixed stock buffer tube, and the EMOD and IMOD, both of which go onto a telestock buffer tube. They all offer better ergonomics than the M4, with proper wedge-shaped profile and added storage compartments. You also have color choices, black, FDE and Foliage green.
The ARM has QD swivel sockets and sling slots. The EMOD and IMOD have only QD swivel sockets. Of course, if you are doing the 550 cord sling setup I use, there is plenty of room for that.
The Wilson Super-Stoc is reinforced polymer black that features two levers. One is the adjustment latch, which lets you slide it back and forth for length of pull. The second takes all the wobble out, making it feel like it is a solid stock, not a telestock slider. It has sling slots and QD swivel sockets.
The RRA Operator stock, available both as the original and the A2, the latter for a fixed-stock rifle, is solid and comfortable. It has two QD swivel sockets on each side, with a slot for a sling or 550 cord. The storage compartment is underneath the buttplate. So you have a better chance of keeping things dry in there, slide the buttplate down, then weasel out the rubber o-ring sealed plugs to remove whatever you’ve stowed.
Some stock designs use non-standard buffers.