Ah, pizza! Who doesn’t love it!? Did you know pizza is actually ranked the number one food in the world? People say that it’s basically happiness in food form, and I agree. It’s always there for you and never disappoints you—and my Pizza Slice cake is no different! Since my husband, Mr. Cake, is Italian, I wanted to pay tribute to him and to his culture by including this simpler spin on my Pizza cake. Although he’s usually the one who makes the pizza in our house, I’m the only one who can cake a pizza. And you can never have too much pizza, in any form, can you?
This cake will help you get comfortable with very simple cutting, carving, and fondant work, so it’s perfect for beginners or supervised kids. The fun of this cake is using the brûlée torch to brown the crust, making it look like the real thing. I also love that every time you make it, you can change up the toppings. Whether you prefer your pizza Hawaiian-style using candied pineapple and “bacon” gummies, or a classic Margherita with modeling chocolate “cheese” and fondant “basil” pieces, you can always keep this pizza cake fresh—and you don’t even have to wait for delivery!
SERVES 2 TO 4
Makes 2 large slices
Tools
9 × 13-inch cake pan
Serrated knives (large and small)
Ruler or fabric measuring tape
Nonstick mat or board
Small nonstick rolling pin
Brûlée torch
Small offset spatula
2 (12-inch) cake boards
#12 round piping tip
Cheese grater
1½-inch circle cutter
Ingredients
For the cheese
½ recipe Yo’s Modeling Chocolate
For the sauce
¼ cup Yo’s Italian Meringue Buttercream
Gel food colorings: red and crimson
2 tablespoons seedless raspberry jam
For the crust
1 recipe Yo’s Ultimate Vanilla Cake batter
12 ounces white fondant
Ivory gel food coloring
For the Hawaiian pizza toppings
Vegetable oil
Dried pineapple
Strawberry Starburst candies (for ham)
Strawberry mango fruit twists (for bacon)
Black licorice cylinders (for olives)
1 (1-ounce) block white chocolate (for Asiago cheese)
Dried cranberries and yellow sugar confetti sprinkles (for chile flakes)
Day 1: Prep It
1 Make the mozzarella cheese: Prepare the modeling chocolate according to the recipe.
2 Start the sauce: Prepare the buttercream according to the recipe. Cover the bowl tightly with plastic wrap and refrigerate overnight.
3 Start the dough: Preheat the oven to 350°F. Line the bottom of a 9 × 13-inch cake pan with parchment paper (see “How to Bake a Cake”).
4 Prepare the cake batter according to the recipe. Scrape the batter into the prepared pan and spread so that it is smooth in the pan. Bake for 35 minutes, or until a toothpick inserted in the center comes out clean, rotating halfway through. Transfer to a wire rack and let cool completely in the pan. Cover tightly with plastic wrap and refrigerate overnight.
5 Color the fondant by kneading in ivory food coloring until you achieve a light crust color (see here). When the color is fully blended, form the fondant into a ball and wrap tightly in plastic wrap. Set aside in a cool, dry place.
Day 2: Cake It
1 Remove the buttercream from the fridge and let it come to room temperature. This may take a few hours.
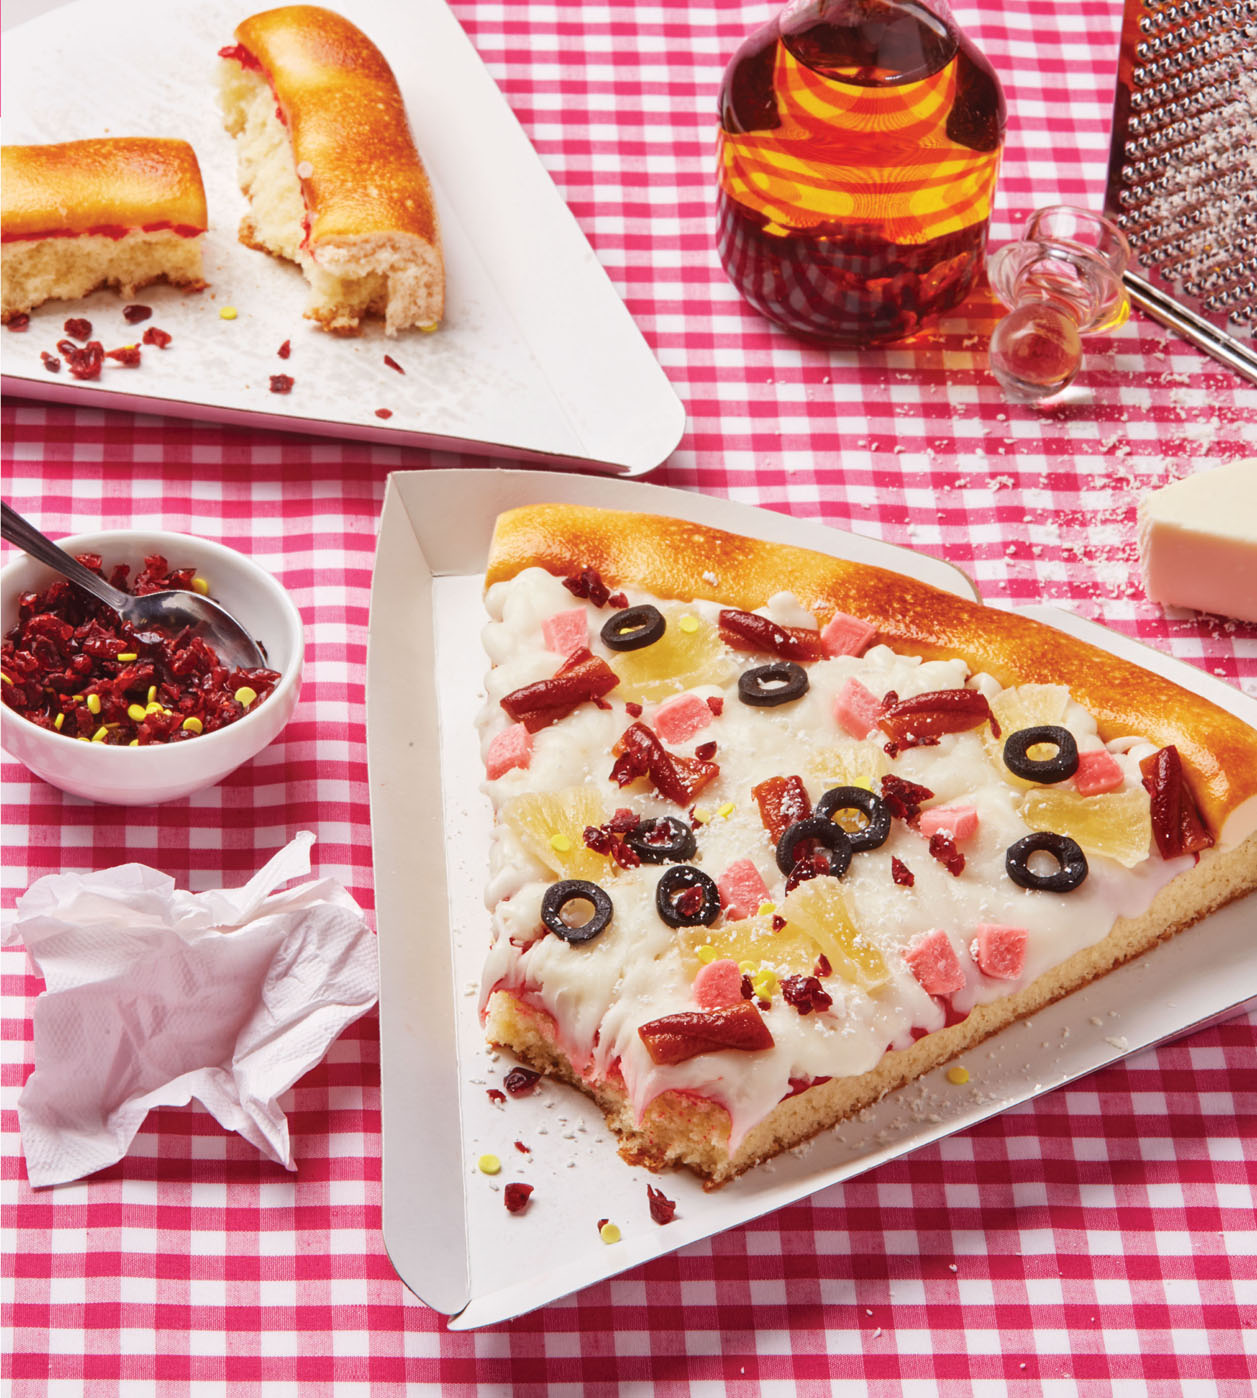
2 Remove the cake from the pan and peel off the parchment. Set the cake right side up, and level it using a serrated knife and ruler so that it is 1 inch in height (see here). For this cake we’ll leave the caramelization on the bottom, as it will look more like the bottom of a pizza slice.
3 Cut two equal triangles from your cake: Turn the cake so a long side is nearest you. With three long cuts, cut out two big triangles—your pizza slices—each with its short “crust” edge along the outer edge of the cake. You will have two smaller triangles on each side that you can enjoy as a snack!
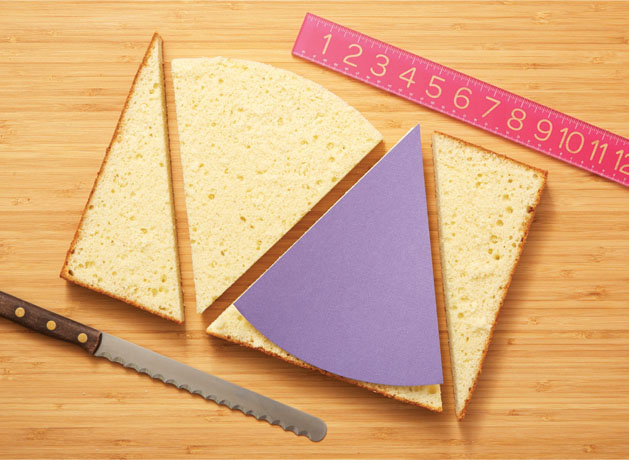
4 Using a small serrated knife, round out the shortest side (where the caramelization is) to make a curved edge for the pizza crust.
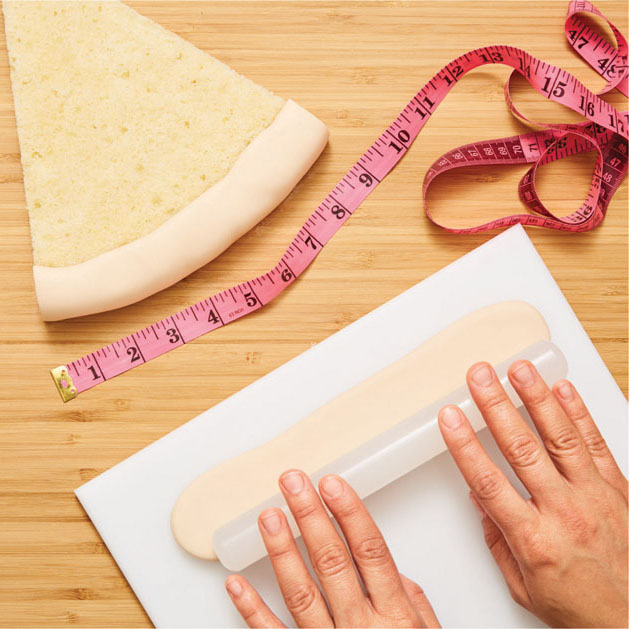
5 On a nonstick mat or board, using a small nonstick rolling pin, roll the fondant into two strips (one per slice) that are long enough to become the outer crust: each should be ¼ inch thick and about 2½ inches wide—wide enough to curl over the edge of your cake to look like a real pizza crust. Wrap the fondant around the curved crust edge, then use a paring knife to trim off any excess fondant from the ends. Make small indents with your fingers and thumbs to create a lifelike doughy crust texture. Put the cakes in the fridge to chill.
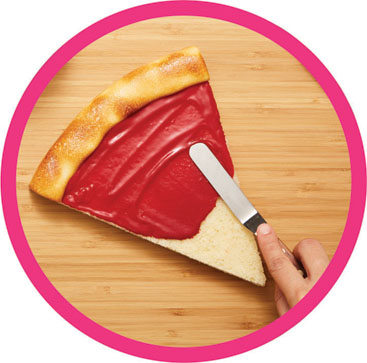
6 While the cakes are chilling, finish the sauce: Stir red and crimson food coloring into the buttercream with a rubber spatula to achieve a bright red tomato sauce color. When you’re happy with the color, whisk in the jam for texture. If the sauce looks clumpy, pop it in the microwave for 5 to 10 seconds and stir; this should help to smooth it out.
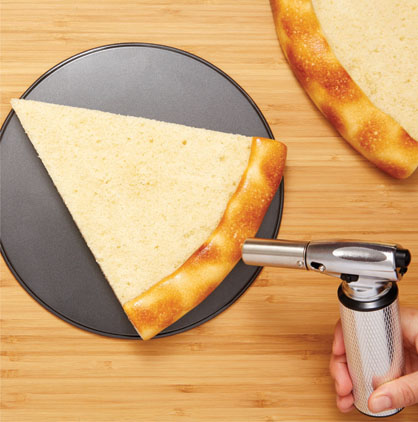
7 Now you’re ready to brûlée your crust. Remove the cakes from the fridge and cover the exposed portions of the cake slices (the parts not covered with fondant) with clean cake pans. This will protect your cake from the heat. Use a brûlée torch to caramelize the fondant crust; don’t hold it too close to the cake, and use a back-and-forth motion. Remove the cake pans and use a small paring knife to carve away any accidentally burned cake.
8 Use a small offset spatula to spread the tomato sauce buttercream on the cake slices, being careful not to get it on the caramelized crust. Feel free to put the slice on a cake board at this point to make it easier to work with.
9 Knead the modeling chocolate into a ball and place it in the freezer for about 30 minutes to firm up a little more before you grate it.
10 Prepare the toppings for my Hawaiian pizza (or see The Toppings Bar): With a paring knife, cut the pineapple pieces into smaller pieces and cut the Starburst candies into small cubes. Cut the fruit twists crosswise and horizontally. Cut black licorice into thin rounds, then use the piping tip to cut out an inner circle from each.
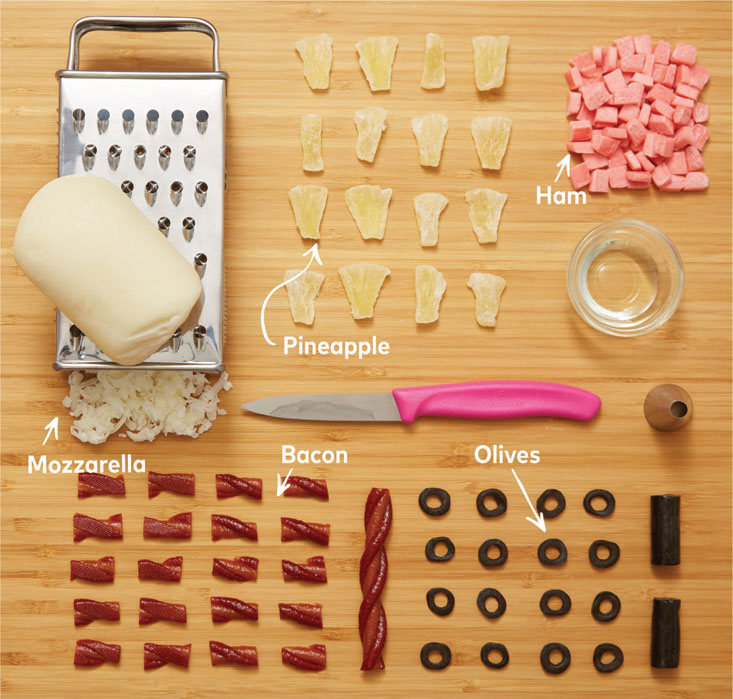
When cutting gummy candies, rub a bit of vegetable oil or vegetable shortening on your knife to keep it from sticking.
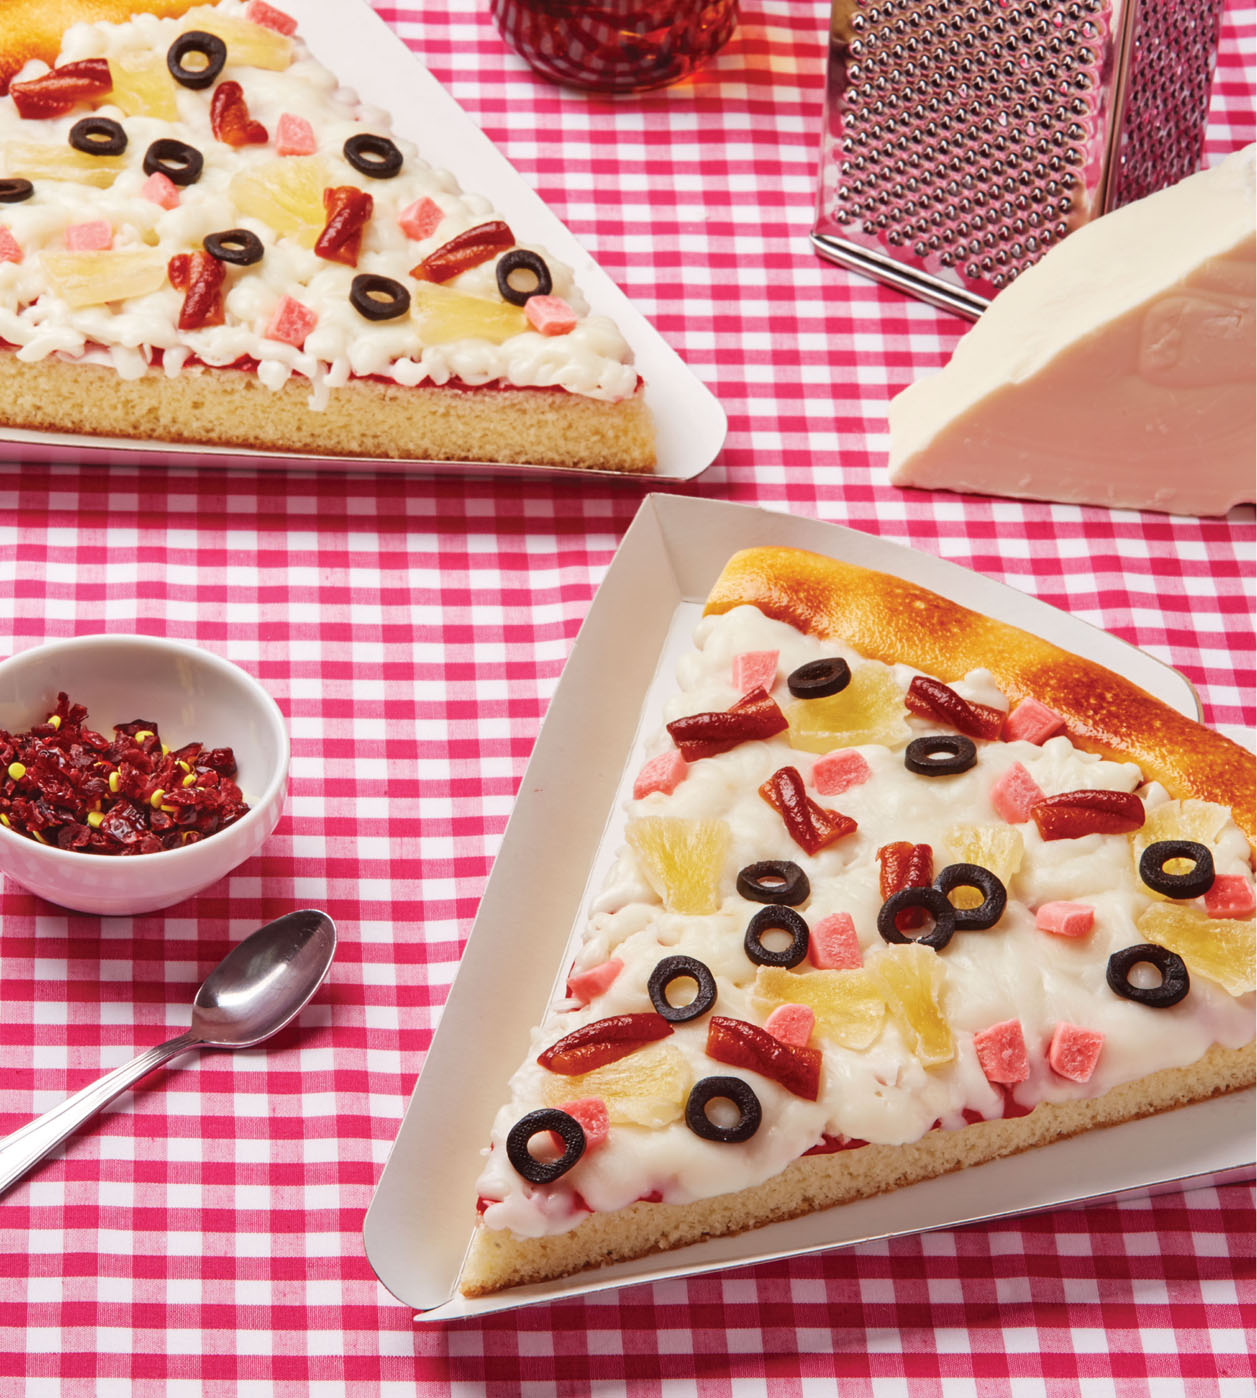
11 Grate the modeling chocolate on the large holes of a cheese grater and sprinkle it over the tomato sauce buttercream to make it look like mozzarella cheese. If the chocolate gets too warm to grate, put it back in the freezer for a bit before continuing to grate.
12 Sprinkle the pineapple, Starburst pieces, fruit twists, and licorice on the pizza cake slices, then top with a little more modeling chocolate cheese. Carefully brûlée the top to partially melt the chocolate cheese—just until it looks like cheese on a pizza.
13 As a finishing touch, finely grate the white chocolate over each slice for an “Asiago” effect and use chopped pieces of dried cranberries and confetti sprinkles as your chile flakes. Serve this while it’s hot and fresh—just like the real thing!
Cake research is important and delicious!
The Toppings Bar
Make your favorite pizza!
Mix and match the toppings in this recipe with whatever lights your creativity (and taste buds) on fire!
• Cheddar cheese: Into modeling chocolate, blend sunset orange, lemon yellow, and golden yellow gel food coloring to achieve a cheesy color. Chill overnight.
• Green olives: Cut green licorice into thin rounds, then use the piping tip to cut out an inner circle from each.
• Green peppers: Thinly slice green wine gums.
• Ground beef: Melt together 2 tablespoons chopped dark chocolate and 2 tablespoons chopped milk chocolate. Stir in ½ cup cocoa puffed rice cereal.
• Pepperoni: Cut red fruit leather with a 1½-inch circle cutter.