
Sometimes appearances can be deceptive. Anyone who’s attempted to recreate a Beyoncé video knows that dancing in heels isn’t as effortless as she makes it look.
Dancing, like caking, is an art form, and while it’s a lot of fun, it often requires hours of patience and practice. So if you’re wondering why a “simple” gift box cake is in level 3, understand that learning how to keep a cake square and straight is a lot like learning how to twirl effortlessly in six-inch heels.
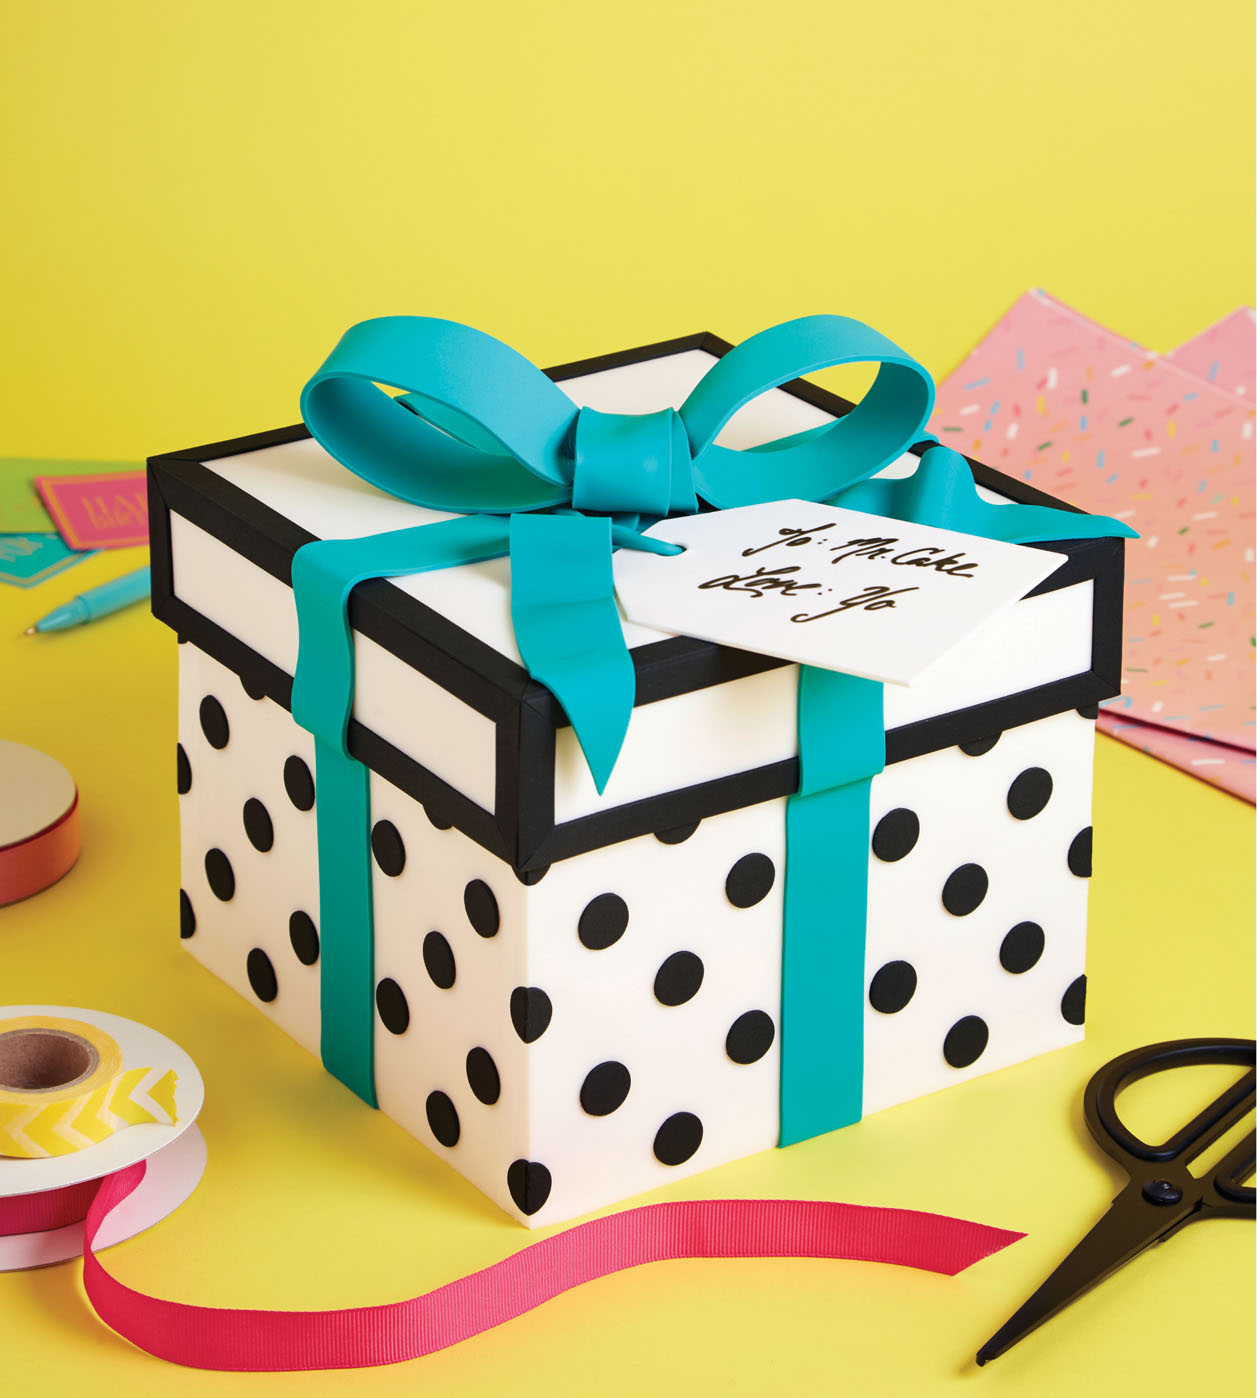
This cake will help you perfect your crumb coat and icing skills. It’s one of those cakes where what happens on the inside, particularly during the multiple icing phases, affects the look of the outside. For your gift box to look like a real, straight-edged box, the icing can’t be crooked, and that takes Bey-level practice. But this cake isn’t all “werk.” The fun of it is in how versatile it is—each time you make it, you can customize the size, color, and pattern as you hone your skills. Now get your wind machine out and get ready to upgrade your cake game!
SERVES 10 TO 15
Tools
12-inch square cake pan (3 inches deep)
Sir Squeeze-A-Lot bottle (see here)
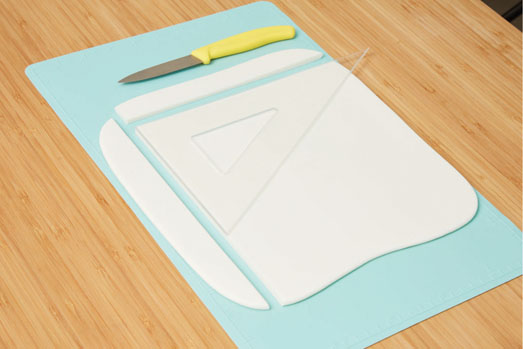
Nonstick mat or board
Rolling pins: small nonstick and wooden
Ruler and fabric measuring tape
Round piping tips: #803 and #807
Serrated knife
10-inch square cake drum
Spatulas: small offset and large straight
Bench scraper
Fondant smoother
Set square
4 (10-inch) square cake boards
Paintbrush
Paper and tools to create a template
Straight pin
Ingredients
1½ recipes Yo’s Ultimate Chocolate Cake batter
1 recipe Yo’s Italian Meringue Buttercream
Gel food colorings: lemon yellow, pink, royal purple, and turquoise
1 recipe Yo’s Simple Syrup
5 ounces gum paste
Confectioners’ sugar for rolling fondant
3 pounds white fondant
Clear piping gel
6 ounces black fondant
½ recipe Yo’s Royal Icing
Vegetable shortening for kneading gum paste if needed
Food coloring marker for writing
Day 1: Prep It
1 Preheat the oven to 350°F. Line the bottom of a 12-inch square cake pan with parchment paper (see “How to Bake a Cake”).
2 Prepare the cake batter according to the recipe. Pour it into the prepared pan. Bake for 1 hour, or until a toothpick inserted in the center comes out clean, rotating the pan halfway through. Transfer to a wire rack and let cool completely in the pan. Cover tightly with plastic wrap and refrigerate overnight.
3 Prepare the buttercream according to the recipe. Put 1 cup of buttercream into each of three separate bowls. Color each bowl of buttercream a different color (see here). I made yellow, pink, and purple. Cover the bowls, including the uncolored buttercream, tightly with plastic wrap and refrigerate.
Since this cake is black and white on the outside, any buttercream colors will look great on the inside, so use your favorites!
4 Prepare the simple syrup according to the recipe. Let cool to room temperature. Pour into your Sir Squeeze-A-Lot bottle and refrigerate.
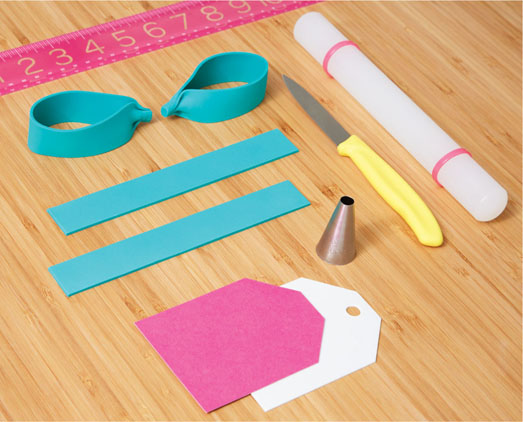
5 Dye 4 ounces of the gum paste a bright teal by kneading in a little less than ⅛ teaspoon turquoise food coloring. On a nonstick mat or board, using a small nonstick rolling pin, roll out half of the teal gum paste to about  -inch thickness. Wrap the remaining teal gum paste tightly in plastic wrap and set aside in a cool, dry place.
6 Make the bow pieces: Using a paring knife and ruler, cut the rolled-out gum paste into two strips, each 1 inch wide and 7 inches long. Fold the strips into loops like ribbon. Glue the tips together with a dab of water and then pinch the ends together. You’ll need two loops for the bow on the gift box, but I like to have one or two extra loops on hand in case one breaks, so feel free to make extra. Set aside to dry overnight.
7 Make the gift tag pieces: Roll out the remaining white gum paste paper thin (or as thin as possible). Using a template or a gift tag as a guide, cut out a tag shape. Use a #803 piping tip to cut out a hole in the top of the tag. Set aside to dry overnight.
Day 2: Cake It
1 Remove all the buttercreams from the fridge and let them come to room temperature. This may take a few hours.
2 Remove the cake from the pan and peel off the parchment. Set the cake right side up, and level it using a serrated knife and ruler (see here).
3 Use the ruler to mark the midpoint along the edge of the cake on all four sides. Using a ruler and serrated knife, use these marks as a guide to divide your cake into 4 equal squares.
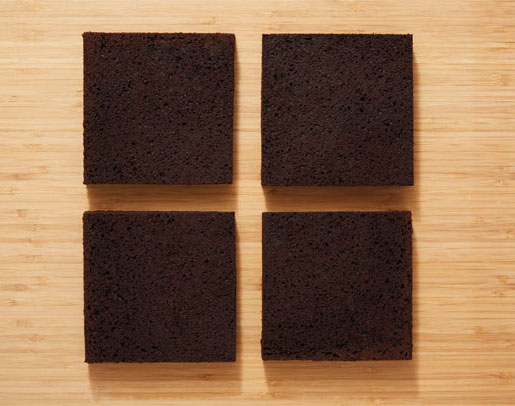
4 Lay out the four squares on a clean work surface and shower them with simple syrup. Let the syrup soak in fully before continuing.
5 On a 10-inch square cake drum, stack and fill the cake squares, spreading a different color of buttercream (but not the uncolored one) over each layer with a small offset spatula. (Do not spread buttercream on the top cake layer.)
6 After the cake layers are stacked and filled, measure the height of the cake on all sides to make sure it’s even. If it’s not perfectly level, use the ruler and serrated knife to even it out.
7 Use the offset spatula to crumb coat the cake with some of the uncolored buttercream (see here). Transfer to the fridge to chill for 20 to 30 minutes, until the crumb coat is firm to the touch.
8 Using a large straight spatula, apply another layer of buttercream over the crumb coat, trying to get it as smooth as possible. (Reserve some buttercream for touch-ups later.) Square cakes are hard to ice, so don’t be discouraged if it’s not perfect. Just take your time building up corners and edges until you’re happy. Chilling the cake in between icing attempts really helps! Return the cake to the fridge for 20 to 30 minutes, until the buttercream is firm to the touch.
A bench scraper can come in handy for smoothing sides and getting corners sharp.
9 Measure the width and height of all four sides of the cake. Dust the work surface with confectioners’ sugar and roll out four slabs of white fondant until ¼ inch thick and slightly wider and taller than the sides of the cake. Trim them to the exact height of the sides of the cake.
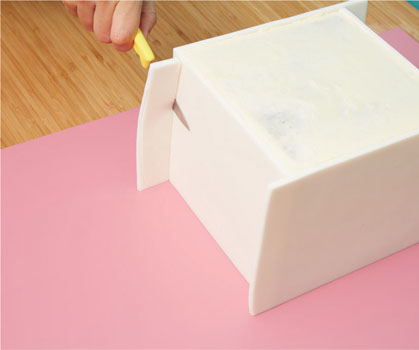
10 Apply two slabs of the white fondant to two opposite sides of the cake one at a time, smoothing the fondant onto each side with a fondant smoother. Trim away the excess from the sides with a sharp paring knife, holding the blade of the knife flush with the side of the cake as you slowly cut downward. Repeat to cover the other two sides.
11 Knead the white fondant scraps together and roll out into a piece that’s ¼ inch thick and slightly larger than the top of the cake. Using a ruler as your guide, cut out a perfectly straight line along one side of the fondant. Using a set square to ensure you have a perfect corner where the two sides meet, cut a second straight line. Do not cut the other two sides; you want them to slightly hang over those sides of the cake.
12 When all four sides are covered with fondant, the fondant may still be higher than the cake in some areas. Fill these with uncolored buttercream in order to level off the top.

13 Pick up the fondant and line up the perfect corner with one corner on top of the cake. Make sure the two cut sides of the fondant slab are flush and lined up with those two sides of your cake.
14 Trim away the excess fondant from the other two sides: Place a 10-inch square cake board on top of the cake. Put one hand underneath the cake drum and one hand on top of the cake board; holding the cake firmly but without squeezing it, quickly flip the cake upside down. Remove the cake drum. Cut away the excess fondant on the base, holding the blade of the knife flush against the side of the cake. Leave the cake upside down for now.
15 Make the sides of the lid: Roll out another slab of white fondant until ⅛ inch thick and 8 inches square. Cut it into four rectangular bands that are each 1¾ inches wide. In the same manner as you applied the fondant to the sides of the cake, brush the backs of two bands with a bit of piping gel, then smooth the bands onto two opposite sides of the cake at what is now the bottom flush with the cake board. Trim both bands flush with the sides of the cake. Apply bands on the other two sides, trimming away the excess.
16 Make the border design for the lid: Roll out a slab of black fondant as thinly as possible. Cut out strips that are longer than your lid and ⅜ inch wide. Working with one side of the lid at a time, start with the bottom and top borders. Brush two strips with piping gel and glue each one to the top and bottom of the lid. Trim away the excess at both ends. Repeat this step on the remaining three sides of the lid. Center the cake drum on top of the cake and flip the cake right side up.
17 Cut two of your ⅜ inch wide black fondant strips into eight pieces just a little taller than the sides of the lid. Using piping gel, apply a strip vertically to each side of each corner, overlapping the horizontal border strips. Cut diagonally through both the long and the short strips where they overlap in each corner to mimic the mitered corners of a picture frame.
18 Complete the border around the top edges of the lid by applying four long black strips, allowing them to overlap in the corners and then trimming them diagonally like a picture frame.

19 If the seams on the corners are very noticeable, you can hide them by patching with a thin layer of royal icing. Because this cake is white, you won’t have to worry about color matching!
20 Now it’s time to create the polka-dot wrapping paper design. Roll out a sheet of black fondant as thin as you can, then use a #807 piping tip to cut out polka dots.
21 For a perfect polka dot pattern, create a grid template. Measure the width and height of one side of the cake (not including the lid). Cut out a piece of paper to that size. Divide the long side of the paper into four equal columns. Take note of the column width measurement and use it to mark the short sides of your paper, starting at the top and working toward the bottom. Draw horizontal lines at these marks to create rows. The bottom row will not be equal. The template should now look like a grid. Draw an X through all of the full size squares.
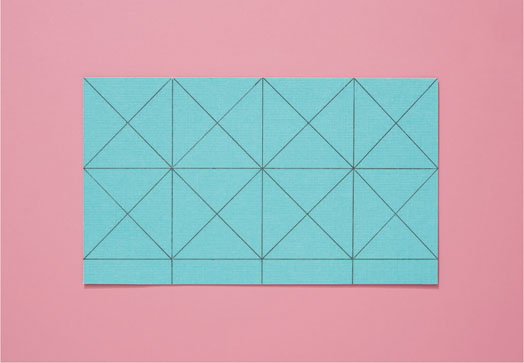
Believe me, math isn’t my favorite subject. If you find achieving the perfect polka-dot pattern overwhelming, skip the template and freehand it, arranging the polka dots however you like. After all, gift wrap comes in lots of different styles!
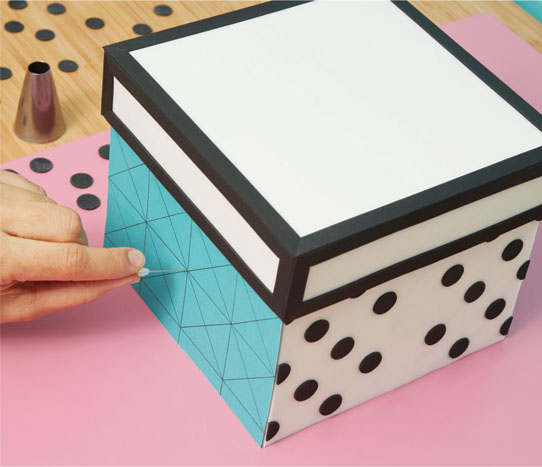
22 Set the paper template against the side of the cake so that the shortest row is at the bottom. With a straight pin, poke holes through the paper and into the fondant underneath at all the corners of the boxes and the middle of each X. Remove the template. Use piping gel to apply the black dots to the white fondant where the pinpricks are—except down the middle line: don’t put polka dots there, as that is where the gum paste ribbon will go. Repeat to decorate the remaining three sides of the cake, trimming the dots at the edges to make them look like they wrap around the corners of the gift box.
23 My favorite part of wrapping a gift is putting a pretty bow on top! Unlike fondant, gum paste sets up pretty quickly, so I suggest rolling out and applying only two bands at a time. If the gum paste starts cracking as you work with it, start over by kneading it (with a little vegetable shortening if needed) and rerolling. Don’t be discouraged—if at first you don’t succeed, try again! Measure from the base of one side, up and over the lip of the lid, and to the middle of the top of the cake. Roll out some of the teal gum paste as thin as possible into a piece that is that length and a little more than 2 inches wide. Working quickly, cut it into two bands that are 1 inch wide. Use piping gel to attach one band on one side, from the midpoint of the base, up over the lid, and to the center of the top. Repeat on the opposite side, then trim the bands where they meet in the center.
24 Roll out two more bands in the same fashion and apply them to the other two sides. Trim them where they meet in the center, but this time pinch each end in the same way you pinched the bow loops. This will start to create the look of the knot for the bow.
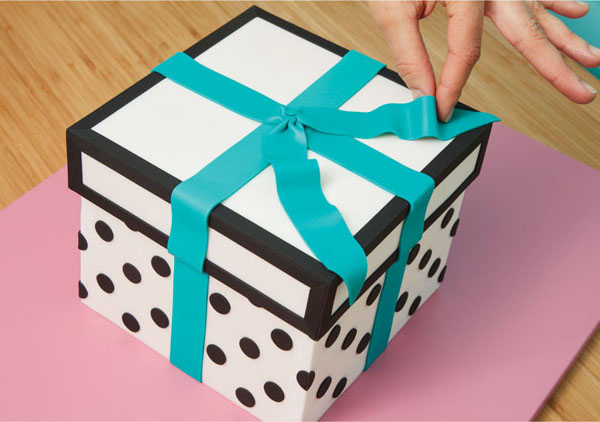
25 Create the tails of the bow: Roll out more teal gum paste and cut two bands 1 inch wide and shorter than the side bands. Cut one end of each on the diagonal. Pinch the straight ends, then use piping gel to attach the tails to the top center of the cake where the other gum paste pieces meet. Create movement and slight waves in the tails and glue them down with piping gel.
26 Attach the bow loops to the top with royal icing as glue. Roll out a bit more teal gum paste and cut a band that is the width of the bow loops. Wrap it over where the bow loops join so it looks like the knot in the center of the bow, then remove it and trim it to fit. Attach it to the bow with royal icing.
27 Write a message on the gift tag with a food coloring marker. To make the string to attach it, take a small ball of leftover teal gum paste and roll it out with your fingertips into a thin cord. Feed the cord through the hole in the tag and pinch it together at the ends. Set the tag on your gift and tuck the ends of the string under the bow. No one will be disappointed with this chocolaty gift!
