Canning is a science; canning is an art. Canning requires a bit of common sense, the ability to read, and the willingness to follow instructions; to know and understand the very basics of culinary discipline—like how to peel a carrot or chop an onion without peeling or chopping a finger. The really good news is that the art of canning requires a minimum amount of study, the understanding of only a few very basic concepts, and a willingness to spend the time necessary to create products that will have and hold a fresh flavor unlike anything that can be purchased anywhere, regardless of price. If this might be you and your desire, then become a student—and welcome to a new world. After a few pages and your first foray into the world of “putting things up,” you and your family’s dining life will change forever and for the better.
There are two distinctly different canning modalities: low acid and acid/acidified. Low acid involves a procedure where higher than boiling temperatures, produced by steam under pressure, heat a product for a specified time and temperature to produce a safe and sterile product. The process involves pressure vessels, extreme heat, and critical timing. The home preserver using this method is often putting away raw produce for use later in the year. This might work for a handful of garden varieties, but the majority of basic put-up produce requires such high heat applications that even out-of-season, fresh, store-bought imports are a better, more nutritious, and often the less expensive course. Consequently, I do not recommend this method for standard canning practices.
The second is acid and/or acidified mixtures, a method where jarred recipes are sterilized and rendered safe by a combination of an acid level, a temperature that is lower than boiling water, and a vacuum. This method of canning involves a process where the home preserver prepares for storage-completed recipes using fresh, ripe-harvested, often local, produce. There is no equal to such preserved jars, and this becomes the focus of Putting Up More.
Nearly half the meals eaten in the United States are consumed away from home or are made with foods commercially prepared. Fast food is unhealthy, restaurant food is expensive, and prepared foods for home consumption are most often produced with the lowest-bid commodities or, put bluntly, the cheapest stuff available. The problem compounds further because gourmet home cooking takes skill, talent, and often lots of training. And preparation takes time, often more time than is available; plus, fancy meals are expensive to prepare, very expensive. Home canning ushers in a successful alternative. Home “put up” recipes like many in this book and in the previous volume, Putting Up, can turn the simplest of fares into exciting “restaurant-grade” presentations while affording superior dining experiences. Along with the recipes in this book are many personal successes and best uses for each along with a step-by-step narrative.
But the advantage of home preserving isn’t just for dining. When family members get involved in the canning process, not only do they build a ready-made pantry of relishes, pickles, preserves, sauces, and soups to enhance what otherwise might be just another lackluster meal, they create an activity spanning from the harvest or purchase of produce, to preparing and readying the recipe, to finally going through the canning process. There are tasks aplenty for almost all ages and activities that build unity, strengthening the family bond. I cannot tell you the numbers of people from all over the country who come to our local farmers market booths to sample, only to begin reflecting (sometimes with a tear) upon the days of their youth with a parent or grandparent. They speak as if those were the best times of their childhood, and they might well have been. The simple art of canning can do that for a family, for it binds them close from field to table!
There was a time not so long ago when families dined and entertained at home. Weekend dinner parties were common occurrences. Friends got together and enjoyed each other’s company, conversation, and food. During the workweek, breakfasts and suppers were important family times. These mealtimes provided a special closeness and a very personal education unique to each family unit. For the children, it was an extra and beneficial training exercise, for as they listened to parents discuss the day, they learned how to conduct their lives. And for those young minds, sharing their day and their trials while getting advice and counsel firmly integrated them as family participants and built their integrity.
We have traveled far from those easier times and fine family standards. If we take a moment to look back at the 1950s, ’60s, ’70s, and even the early ’80s, this was the way. Life was simple and filled with purpose. Somewhere along the journey, maybe wanting more time and money caused us to forsake the simple rules of living. But natural forces have their way. Today, when single dollars are again meaningful, are fewer, and have farther to go, the process begins to reverse. Where once we all dined out too often or ate separately, eating at home together is “lookin’” good!
Putting Up More is intended to provide exceptional recipes for home canning, and it contains many breakfast, lunch, dinner, and snack suggestions utilizing the recipes you have preserved and stored in the pantry. Each time you open a jar, you might be lending dignity to what otherwise could have been a common nibble. Even quick, inexpensive, and simple home cooking will become the adventure that dining out used to be, and restaurants once again will become reserved for that very special occasion.

Background
I was first exposed to the art of canning by observing my grandmother. She not only put up recipes for the family but also had a successful commercial cannery business. After attempting just about everything one might do in a lifetime, I returned to my roots with my son, and we began working together side by side. For twelve years we owned and operated the premier South Carolina “small batch” cannery. When it comes to canning, we know our stuff. We specialized in original old time Southern recipes, the put-up jars that once graced farmers’ breakfast tables, Southern sideboards, and dinner tables. Our company and its products have been featured on numerous radio and television shows; in local, regional, and national newspapers; in magazines and books. We were never able to meet all the demands for our products simply because we refused go the way of commercialism. Using only the freshest vine-ripened produce, the best fresh herbs, and the finest and often the most expensive ingredients, we wanted our products to taste just like a grandmother’s efforts, and they did. My first volume, Putting Up, featured all those wonderful Southern recipes. In the same tradition, this volume offers a host of new recipes created with produce available to all from around our nation and beyond.
Help as Needed
Anyone can preserve fine recipes. It just takes a little reading, studying, some understanding, a small standard stocked kitchen, and a few specific canning items—thankfully, all inexpensive. If you cannot find locally what you search, in the back of this volume is a resource section. It is designed to help with your needs and wants as they pertain to canning. From dried herbs and spices to equipment and canning glass, it is all there.
Sometimes folks new to the canning process become overwhelmed. Like taking any first step, it can be scary. But, just to be sure, a friend with know-how is probably nearer than you might think. And if not, don’t fret; help is just a website away. Feel free to ask me. I have an active website containing a specific section devoted just to canning and the two books I have written. I always attempt to respond promptly.
Canning Science
This volume is intended to be a companion to my first book, Putting Up. In that book, I wrote about canning safety measures in intricate detail along with the whys of each. This not only provided a bastion of safe canning practices but also imparted the knowledge to allow a home canner to safely create or prepare and preserve recipes beyond what are found in books or the already tried. In this book, I have omitted many of those details so as not to be redundant; however, I still have provided all the essentials for safe, controlled, precision canning. These are the same safety measures the Food and Drug Administration requires of all commercial canneries. For the home canner, these simple measures and tests will ensure a safe and worry-free canning experience. They are for your safety; it is imperative that you use them!
Preserving Methods
There are many ways of preserving fruits and vegetables: drying, freezing, and canning. When one combines multiple ingredients to create an acid or acidified recipe to be preserved by canning, one of two systems is used.
Hot Packing is by far the easiest canning system and is the one most often used. After the ingredients are prepared, placed in a pot, cooked to the proper consistency, and brought to the correct temperature as described in a recipe, the product is scooped from the pot, poured into sterile jars, and filled to the fill ring or canning line (a molded circular ring just below the lid threads). Last, a sterile lid is applied, tightened, and the jar inverted for a minimum of 2 minutes.
Water Bathing is used when hot packing will not work. When a recipe calls for large chunks of produce, like dill pickles for example, it becomes unfeasible to pour the hot ingredients into jars. Therefore, the jars are packed with the solids of the recipe by hand and are then placed in a jar holding rack that is part of a water bath system. The liquid pickling solution is heated to boiling and then poured into each jar just to the canning line, no further. This is most important because liquids will expand as they heat. If the liquids flow over the top, the ability to seal will be impaired.
The center jar, known as the cold jar because it is always filled first, will hold a thermometer inserted thru a temporary makeshift lid with a small hole in the center (a 1-minute homemade project). The remaining jars, usually six, are loosely capped with sterile lids so air can flow out; once tightened, an excellent vacuum can be created as the jars cool. The rack is lowered slowly and carefully into the boiling water bath. The water level in the bath cannot go beyond the fill rings, or canning lines. Again, this is critical when water bathing because one cannot allow water to enter the loosely sealed jars. The water in the bath will stop boiling as the jars are lowered in. At the first signs of boiling, lower the heat slightly to prevent bubbling water from entering the loosely capped jars. When the prescribed temperature for the recipe is reached, wait 2 additional minutes before removing the rack. Once out of the bath, tighten each jar’s lid, replace the lid on the center jar, and finally invert all jars for a minimum of 2 minutes.
Safe Canning Practices
With both hot packing and water bathing, there are four requirements that must be met to always ensure a finished product is free of bacteria, will remain free of bacteria, and will be safe to ingest: sterilization, vacuum, acidity, and temperature.
Sterilization: Bacteria-free workspaces, utensils, and equipment, as well as canning jars and lids are essential. This is accomplished by sterilization. In days past, boiling water was used to complete some parts of this feat, and it was time-consuming. The way the FDA requires a commercial canner to sterilize is through the use of sodium hypochlorite mixed with water, a solution of 200 parts per million. The home canner can accomplish this by mixing one-quarter cup of bleach containing 6-percent sodium hypochlorite for each 2 gallons of water in a sink. At the time of this writing, a quarter cup of Clorox meets this requirement. Always make a deep enough solution to cover upright standing jars. Using a clean dishcloth wetted in the solution, wipe all working surfaces.
Jars and canning lids must be clean and free of bacteria before canning. The best way to accomplish this is to wash both and rinse them well before soaking the jars upright in the sterilizing solution for 2 minutes. Afterwards, the jars should drain upside down on the sterile countertop until ready for filling.
As for the lids, the center section of a two-piece canning lid must be new, never used before, and the only part that must be sterile; the easiest way is to put the lids with their associated rings in a colander, submerge for 2 minutes, and put aside to drain. Once the process is complete, put the canning tools in the bleach water for 2 minutes. Last, rinse and wring the cloth for a second time in the sterile solution because it will be used again later to clean jar rims that get fouled during the canning process (more on this later).


Vacuum: A vacuum is created when the hot matter in the jar shrinks as it cools. The vacuum is maintained because new canning lids (again, never reuse lids) have a rubberized seal that marries airtight to the jar lids. When inverted for 2 or more minutes, the jars will be sealed. The hot product softens the rubber, which assists in molding the seal to the jar. If the rim of a canning jar is not chipped or otherwise damaged and is not contaminated with bits of recipe matter left by the funnel or by a drip (this is the function of the bleach cloth), and if the lid is new and the jar is filled to the canning line, then an excellent and proper vacuum will form as the product cools, keeping the preserved product safe, without mold, and fresh-tasting for several years. To see if a good seal has been created, tap the top center of each jar with the back of a teaspoon after the jars have cooled completely. A jar that has not sealed will have a completely different sound than a sealed jar. If a jar has failed to seal and if it is 24 hours or less since canning, the errant jar can be refrigerated and it will be fine. I always perform this vacuum test before I open a jar for the final pH test, if one is required by the recipe (more on this coming up).
Acidity (pH): pH stands for “potential of hydrogen.” It is a measure of acidity. A pH of 7 is considered neutral. Below 7 is acidic and above is basic, or alkaline. pH is by far the most critical factor when canning. Regardless of what is being preserved by water bath or by hot pack, the combined pH can NEVER exceed 4.6. There are NO exceptions. If it does, a deadly toxin can form. Botulinum is one of the world’s most lethal poisons, and there is no way to detect its presence.
When canning jars have cooled, the vacuum that forms creates a “no oxygen” environment (or, technically said, an anaerobic environment), the ground necessary for the toxin’s generation. Botulinum is odorless and tasteless, and it does not cause lids to bulge like some people believe. Bulging lids are caused from other bacteria because of improper canning practices, like improperly sealed lids, improper canning temperatures (too low), or non-sterile jars or lids.
Further compounding the challenge, produce once safe to put up may no longer be presumed safe. Advancements created by genetic engineering have altered the pH levels of some fruits and vegetables. Since the first cans of tomatoes were sealed, tomatoes fell into a pH range of approximately 3.8 to 4.5; today, one can purchase a near pH 7 (low acid) tomato. Therefore, it becomes more than just prudent to test every finished product that is specified as acidified in the recipe notes with the exception of acidified, sugar saturated , a group where large amounts of sugar reduce the internal water content of vegetables, thus ensuring safety against botulinum. This is a special category reserved for pepper jellies and certain jams. All others get tested, no exceptions!
The recipes in this book are safe. They all fall well below the 4.6 level, allowing for significant margins of error. Still, an ingredient can get forgotten when a phone is answered, vinegar with a less than the standard 5 percent acidity gets inadvertently used, a tomato that has a pH below 4.6 gets replaced with a genetically engineered low-acid tomato. Things happen. Testing prevents mishap. Just before a recipe is canned is the time to make the first pH test. This is called the preliminary pH test.
-
Hot-pack method: just before canning, take a small tear of a test paper and read the pH by comparing the color to the chart. If it is too high, follow the instructions in the recipe canning notes to rectify.
-
Water-bath method: test the pH of the liquid in the center (cold) jar. If it is too high, something is missing in the recipe, or low-acid or diluted vinegar was used. See the recipe’s canning notes for guidance.
In both water bath and hot pack methods, a final pH test needs to be performed after twenty-four hours when the product has cooled and the acids and bases have all combined. For hot pack items, this is easy. Open a jar, dip in the paper, and test. For water bath products, the solids need to be rinsed with distilled water, crushed in a solution of distilled water, and the results of the water read. In the back of this book, you will find a source for purchasing pH paper and pH meters. Do not attempt to put up acidified foods without testing.

Temperature: The higher the temperature, the more bacteria gets killed, at least to a point. The canning temperature of a recipe is ultimately determined by the pH of the whole, or the combined acidity created by all ingredients in the recipe. The table below shows the minimum safe canning temperature based upon acidity. I always add 3 degrees when hot-packing to account for the cooling caused by the hot product flowing into a cool jar.
| Maximum pH | Minimum Degrees F |
|---|---|
| 3.9 and lower | 182 degrees F |
| 4.1 | 185 degrees F |
| 4.2 | 190 degrees F |
| 4.3 | 195 degrees F |
| 4.4 | 205 degrees F |
| 4.5 | 210 degrees F |
NOTE: I use pH paper as well as sophisticated testing equipment; yet, I never, Never, NEVER can anything above pH 4.2. Instead, I bring the pH down to my personal, comfortable safe level.

Canning Basics
1. Don’t rush. If one does not have time to finish a project at leisure, it is best not to begin. Haste can lead to real problems when canning.
2. Use only jars specifically designed for canning. Preserving jars are tough. They can take the rapid change from cold to hot. The sealing surface is machined to ensure a perfect seal. Although they are initially expensive, they can be used over and over. They are worth the extra money.
3. Canning lids (the center section if using two-piece lids) may be used only once. Packs of twelve replacement lids are available at almost all stores selling canning jars. At discount stores, they sell for about a dollar. The outer ring of the two-piece lid is more expensive than the flat center disc but can be used many times, so be sure to save them. Furthermore, they can be removed after twenty-four hours, minimum.
4. Pick or buy locally when able and only use the freshest, ripest produce available. This is the single greatest key to making products that are superior to other products.
5. Get organized before the process begins. Create the sterile workplace and sterilize all jars and lids. Prepare the produce; have other ingredients out, measured, and ready to use. Count the number of ingredients in the recipe and the number on the counter as a cross check. As each ingredient is used, clear away any remainder or containers like measuring cups. When the counter is again empty, the recipe should be complete.

6. Calibrate the canning thermometer once a month to ensure you are measuring at the correct temperature. (See section below on Specialized Equipment.)
7. Have pH paper ready for performing the initial pH test as the product comes to temperature. When visible, it means the test will not be forgotten.
8. Consider the canning process as separate from recipe preparation:
-
Turn the jars right side up.
-
Get the lids organized (in the rings) and ready.
-
Have the canning funnel nearby at ready.
-
Hot packs:
-
Perform the initial pH test.
-
Fill jars, seal, and invert.
-
-
Water baths:
-
Place loaded jars in water bath rack.
-
Fill center jar or assigned cold jar with the solution first, then fill the others.
-
Check pH of center jar liquid by removing a teaspoonful and testing.
-
Place special homemade lid on cold jar and insert thermometer.
-
Loosely fit the lids to the remaining jars and lower them into the bath with water not exceeding the canning or fill line.
-
When temperature is reached, wait 2 minutes, carefully remove jars from water bath, replace thermometer lid, tighten all lids, and invert jars for 2 minutes.
-
Specialized Equipment
There are a few items that are unique to canning. I’ll address only those items not found in a commonly stocked home kitchen. The good news is, when combined, these unique canning items are not expensive, and most should be locally available.
Pots: Generally, a recipe is designed around six to eight jars of finished product, and often one is able to double the recipe; therefore, a large pot is desirable. Not any metal pot will do. The pot used for mixing and heating a recipe must be nonreactive or, more simply put, stainless, enameled iron, or copper with the interior clad of tin or stainless steel. Aluminum and raw cast iron are excellent heat conductors but are taboo for canning because acid reacts with either metal. A stainless pot with a thick conductive metal bottom sandwiched in works great and, if affordable, thick-sandwiched sides will distribute heat even better. I use two pots, a 12-quart and a 22-quart stainless steel, each with a thick-sandwiched bottom only. I found these most reasonably priced at Walmart. They work just fine.
Water Bath System: This “system” is comprised of a flimsy enameled pot and a galvanized rack. Kits come in several sizes, each made specifically for quarts, pints, or half pints. Be sure to purchase the correct size. The kits are available most anywhere canning supplies are sold. I hate to keep pushing a store that has destroyed so many “ma and pa” industries, but I got mine at Walmart. Online, there are stores that sell just the racks. There are also some upscale units on the market. One does not have to purchase a system. Often I use a pot that has a deep-set steamer insert because it holds more jars. The important thing to remember about any water bath process is that the jars cannot touch the bottom of the pot. The one advantage of a rack is the ease of handling. It does make a difference.
Thermometer: A chef’s pocket meat thermometer is perfect, but it must be the kind that is adjustable. Don’t bother with digital; they are not adjustable. Get one with a dial that has a hex nut on the back for adjusting. Submerge the meter’s probe at least halfway into distilled boiling water, wait a few seconds until the needle has stabilized, and read. Adjust to 212 degrees if you live at sea level. If you don’t, adjust according to the chart below.
| Altitude & | Temperature at Which Water Boils |
|---|---|
| Sea level | 212 degrees F |
| 1,000 feet | 210 degrees F |
| 2,000 feet | 208 degrees F |
| 3,000 feet | 206 degrees F |
| 4,000 feet | 205 degrees F |
| 5,000 feet | 203 degrees F |
| 6,000 feet | 201 degrees F |
Pure water (distilled) boils at the levels above when at altitude; however, if one needs a higher temperature than can be achieved naturally when water bathing, add some salt to the water to increase the boiling point. Just for the record, seawater boils at 218 degrees. The extra 6 degrees will give all the heat needed up to 6,000 feet, not that you’ll find a bunch of seawater at 6,000 feet, but one can replicate seawater by adding 6-1/2 tablespoons of salt per gallon of water. Another way is to reduce the water bath temperature necessary by increasing the acidity of the recipe slightly. Most of this is a moot point because, for safety’s sake, nobody should be canning at pH 4.4 or above anyway. Again I reiterate, my maximum safe, self-imposed limit for home canning is 4.2. I stick to this like religion.

Spatula: I consider this specialized because it might be different from what many kitchens have. I use a metal, perfectly flat-tipped, rounded-edge spatula like commercial grills have for flipping burgers. Used to stir the pot, the flat tip ensures all matter on the bottom is shifted so there will be no burning. The curved edges pick up the stuff along the curved edges of the pot. I have perfected a motion that sweeps around the bottom and sides, especially careful to catch the edges, then zigzags across the bottom, leaving no area to burn. Burnt taste gets canned right along with all the good flavors. Stirring correctly is a most important part of canning.
pH Paper: This might sound like canning is getting complex, but it is not. I buy rolls of short-range 3.4 to 4.8 pH paper. Test strips are more expensive and the range is not as tight. I purchase mine directly from the manufacturer (see the resource section). Tear off a small section about 2 inches in length and dip the strip in the product to test the pH before canning. Compare the color on the tear against the color chart provided with the paper.
After 24 hours do a more comprehensive test. When hot packing, I put up a very small jar (4 ounces) right along with my regular canning just for this purpose. For water bath products, test the liquid before canning. If okay, continue. You’ll need to open a jar for the 24-hour test. Place a tiny amount of the canned product rinsed with distilled water in a small bowl, mash completely, add distilled water, mix well, and test. As long as the indication falls below pH 4.3, it is safe and has a significant margin of error; it will be within the pH guidelines of the recipe, and the product will have the correct acidity flavor.
pH Meter: Not a requirement, but for those of us who want extreme accuracy and further peace of mind, meters are available and are reasonably priced. The Food and Drug Administration requires commercial canners to use pH meters instead of paper when canning over pH 4.0. This is a bit extreme, but like someone once commented, it’s not their money!
Canning Jars and Lids: Not any jar will do. A canning jar is constructed using tempered glass that can quickly expand and contract without breaking. The neck of the jar is separately constructed and fused to the body. It provides a very smooth machined surface to make contact with the rubbery lid material, thus providing a good seal and, consequently, a good vacuum. There is a molded ring around the base of the throat of the jar called the canning line, or fill line. This is unique to canning jars; located just below the threading, it is there to remind the canner of minimum level for a good vacuum and maximum level for water bath products, and represents the exact liquid quantity the jar is deemed to hold.
Canning Funnel: Generally made from plastic, although I have owned a few fancy stainless ones, these funnels have a large throat that snuggly fits into a canning jar. They provide three services: they keep the product going into the jar instead of onto the canning table; they keep the edge of the jar from getting contaminated with product that may later prevent a good seal; and, lastly, when the jar is filled to a point inside the throat of the funnel, the contents of the jar have reached the correct fill level.
Weighing Scale: Food scales are expensive, but a scale is necessary occasionally. Using a less expensive postal scale will work perfectly. A good one for kitchen use weighs from 0 to 4 pounds. It is accurate and will serve the purpose.
Specialized Ingredients
Vinegars: Not all vinegars are alike. The two most common varieties you’ll see are white (also called distilled) and cider. Both MUST be 5 percent acidity to perform correctly when used for canning. Below 5 percent and the final pH might be too high, maybe even lethal. Cider vinegar not only must be 5 percent, it must be made from real apples. Watch for the word “flavored” as a dead giveaway that the stuff is a fake. Fake cider vinegar defeats the purpose of home canning. When we can junk, we get junk! One might as well buy commercial. Some of the recipes in this book use balsamic vinegar. This is a very special, very flavorful vinegar. It is expensive but delicious. Usually the acid percentage is higher, often 6 percent or greater. The recipes in this book presume a 6 percent acidity level. With vinegars, always use the prescribed recipe quantity as a minimum. It is okay to use more to thin a recipe if too thick, but do not use less than prescribed. Recipes too dense can also be thinned with distilled water.
Distilled Water: It is important to have a gallon jug of this water available right along with other canning supplies. Available at most grocery stores, the water has a neutral pH, so it does not affect the acidity of a recipe. Not so with tap water or bottled water. Tap water is artificially made alkaline to protect pipes. This will raise the pH of recipes. One will use distilled water to add to recipes and to perform final pH testing on water bath products; it is used to measure pH on any recipe where oils have a tendency to coat the pH paper, which prevents accurate readings. When this happens, place a tablespoon of product in a half cup of distilled water, mix well, and read. And just a side note here: It does not matter how much distilled water one uses when taking the pH measurement; the reading will be the same with a cup, a quart, or a swimming pool full.
Citric Acid: This is canning-specific. It will be found in the canning section of grocery stores or in most establishments selling canning jars. This high-power acid is used in tiny (and I mean tiny) quantities to significantly drop the final pH of a product. This book has few recipes requiring citric acid but suggests using it to lower the pH in others. It is a good product to keep handy if you plan on being a home canner. If a preliminary pH is not to your liking, often a dash of citric acid (a granulated substance) works wonders where the acidifying agent for the recipe might make a final product too liquid. Besides vinegar and citric acid to acidify recipes, use wine and fruit juices like lemon, apple, or orange. When formulating a new recipe, be creative but always test the pH before canning; even better yet, measure as one proceeds and always again 24 hours later.
Canning Salt: This salt is very different from ordinary table salt. It contains nothing other than sodium chloride. Normal table salt has anti-caking agents included, and some have iodine, which will turn some canned products purple. Still others like sea salt have many trace minerals, some of which might even rust your product after canning. Use only pure salt or canning salt. Small boxes are available where canning jars are sold. The last chapter gives a big cost-saving suggestion when purchasing salt.
Sugar: There are several types. Each recipe will specify which type to use: dark brown, light brown, raw, or if nothing is mentioned other than “sugar,” it means just plain white, granulated. Some people desire to keep processed or refined sugars out of their canning as much as possible. Honey can be used as a substitute (an expensive substitute) for white sugar in all but jams and jellies, but it is not a one-to-one substitution. For each cup of sugar called for, only add 0.75 to 0.875 cups of honey. Realize also that honey introduces additional liquid into the recipe, so some liquid from some other additive will have to be cooked out before canning or the finished product might be overly liquid. One can also substitute honey for brown sugar. For this substitution, add 2 tablespoons of molasses to each cup of honey used. For me, I’ll just stick with the sugar. All these sweeteners have nearly the same initial effects on our bodies, none of them great, although raw honey (not processed) is not only naturally acidic, it is processed within the body as a mild alkaline just like fresh fruits, a big positive that white and brown sugars do not possess. Put another way, honey fights off long-term maladies where other sweeteners like white sugar accelerate their arrival.
Herbs: There is no comparison between fresh and dried, and this is another way home put-up products shine and are classified as incredible. Always use fresh and always put herbs in the pot just before testing the pH. Fresh herbs get their flavors cooked out quickly, so add, test, and can.
Helpful Hints in the Canning Kitchen
Plan Ahead
Know what you are going to do and how you intend to do it. Read through a recipe several times, answering all questions that come up before you begin.
Equipment
It is important to have the correct equipment. One will be working with liquids sometimes much hotter than boiling water, measuring acids, handling glass, and working against time. Proper equipment ensures all goes smoothly and without mishap.

Measuring
Recipe measurements will often be in cups, or a division or multiple of a cup. Below are the various measurements that are derived from the cup.
Dry Measure
| 16 tablespoons = 1 cup |
| 3 teaspoons = 1 tablespoon |
| 2 cups = 1 pint |
| 2 pints = 1 quart |
| 4 quarts = 1 gallon |
Liquid Measure
| 1 cup = 8 fluid ounces |
| 2 tablespoons = 1 fluid ounce |
| 1 pint = 16 fluid ounces |
| 1 quart = 32 fluid ounces |
| 1 gallon = 128 fluid ounces |
From these primary measures, one can calculate most called-for kitchen measures. For example, calculate the measure that is sometimes seen: 1/3 cup. Since 16 tablespoons is not divisible by 3, converting tablespoons to teaspoons (48) and dividing by 3 gives us 16, or 5 tablespoons and 1 teaspoon. We can then calculate 1/3 cup in the simplest measurement: (1/3 cup = 1/4 cup + 1 tablespoon + 1 teaspoon).
When measuring liquids (not dry measures like sugar or flour), a cup holds 8 ounces. So, 2 tablespoons equals 1 fluid ounce. And for the sake of kitchen measuring, most liquids the consistency of water are equal to a pound per pint. This is not true with honey and other thick liquids.
Common Kitchen Terms
Some common terms are used in this book since everyone has a slightly different idea as to what is meant by specific cutting instructions. This is what is described:
Purée: to mash, blend, process, or make smooth (no lumps) by any other means
Mince: to chop into very fine tiny pieces but not purée
Chop: to rough-cut into pieces as described: fine (bigger than minced), medium (halfway between fine and large), large (about 1/2- to 3/4-inch chunks)
Dice: to cut into squares: small (about 3/8 inch), medium (about 1/2 inch), large (about 5/8 inch).
Turning up the Heat
Sometimes a recipe calling for hot peppers just doesn’t have the kick one might desire. There is the option to change the type of pepper, thereby “firing up” a recipe. Heat is a personal choice, and what is too hot for one is not even beginning for another. If a recipe calls for a jalapeño or the optional jalapeño to spice up a recipe, do not add two to make it hotter. This could affect the final pH of the recipe. Instead, if more or less heat is one’s desire, use the table below to select a pepper with a heat rating that will make your recipe the level of spiciness you desire.
Peppers are measured on the Scoville Scale—the higher the number, the hotter the pepper. My first book, Putting Up, explains how this came to be. Below are some of the more common hot peppers along with their Scoville heat rating.
| Type Pepper | Scoville Units |
|---|---|
| Bell | 0 |
| Anaheim | 1,000–1,500 |
| Jalapeño | 2,500–3,500 |
| Serrano | 5,000–15,000 |
| Chile | 15,000–30,000 |
| Cayenne | 30,000–50,000 |
| Thai | 50,000–100,000 |
| Scotch Bonnet | 100,000–300,000 |
| Habanero | 150,000–350,000 |
| Red Habanero | 350,000–850,000 |
| Naga Jolokia | 850,000–1,000,000 |
| Capsaicin | 15,000,000–16,000,000 (sorry, Hotties, not for food—this is the pure chemical used in pepper sprays to ward off attackers) |
Pepper Caution
Regardless of which pepper one might select, be certain to wear protective rubber gloves when handling hot peppers. If peppers are touched when gloves are not worn, an act that may be regretted for the following twelve hours, rub hands together with 2 tablespoons of sugar and then wash well with soap and water. Rinse and then coat hands with whole milk for several minutes before rinsing again. Still, if one processes a lot of peppers, plan on feeling the heat from capsaicin, the chemical responsible for hot in hot peppers, for up to twelve hours. And if one does feel heat on hands, be most careful not to rub eyes or touch other sensitive body parts. Best, just wear the gloves.

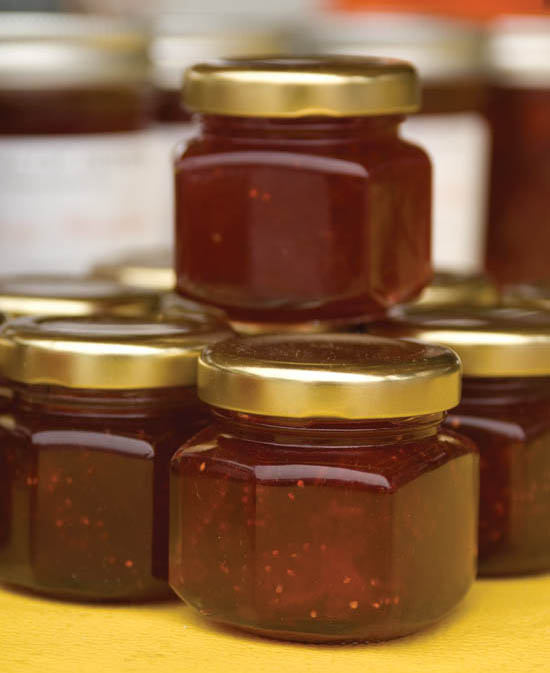
Preserves—Jams—Jellies
Collectively called jams, these are some of the easiest recipes to produce, but there are some specifics that must be learned, many more than with complex recipes. Each recipe calls for “looking for signs of jelling.” Jams will drip off the spatula like water until the pectin begins creating the jelling chains. This is evidenced by elongated drips of slightly slower moving liquid. As seconds pass, this becomes more pronounced. When the last drips have trouble falling from the spatula and actually look like they are jelled, it is getting close to the time to can.
Canning prematurely and jelling may take many hours. The fruit that floats to the top of the jar will need to be shaken over and over again for the duration until final setting up. But there is a fine window when canning jam—if overcooked, the finished product will be rubbery and hard. But even when done correctly, the whole particles will still need to be distributed throughout the jar. After the 2-minute inverted time, each hot jar should be righted and gently shaken to disperse the whole pieces. Keep an eye on the jars and shake every few minutes until jelling locks in place all particulates in the jar.
Putting in the sugar when a recipe calls for standard powdered pectin is straightforward, but when one decides to double the recipe, the sugar must be divided and introduced in two stages. First, half the sugar is poured into the pot during the first rolling boil. The pot is then brought to the first signs of a second boil before the remaining sugar is introduced. This process ensures the temperature of the jam does not drop so low as to prematurely damage the jelling of the product.
I am asked all the time about the quantity of sugar in a recipe and if it can be reduced. You will find the definitive answer in the “Too Much Sugar?” sidebar. If you reduce the sugar in your recipe , then you haven’t read this important piece of information, which will determine the success of your venture.
pH Testing
Recipes that call for pH testing do so because the recipe is acidified. A first pH test is done just before canning, a time when an incorrect pH level can be adjusted with ease. Canning note #2 (see description of canning notes) gives a suggestion of the initial pH level along with instructions on how to lower to a safe 4.2 threshold. Reading pH paper is easy. Just compare the color of the torn-off strip from the roll with the color chart provided with the roll. On short-range 3.4 to 4.8 paper (only), if it’s green, then it’s a green-light to process; if it’s blue, it can kill you! The only way any recipe in this book will test blue (above 4.5) is if (1) too much of something alkaline was used, like a strong base vegetable; (2) not enough of something acidic was used, like a fruit; or (3) an acidifying agent was left out, was inaccurately measured, or was an incorrect acid percentage. Still, it must be remembered that fruits and vegetables all have a pH range, so one must ALWAYS TEST.
Temperatures
These are critical measurements in the practice of good, safe canning and should not be taken lightly. The scale for minimum canning temperature versus maximum pH has been calculated to ensure bacteria will not grow in a finished product. If this temperature is exceeded, no additional bacteria are killed but flavors are often diminished. Therefore, canning temperature becomes a critical factor. All temperatures in this text are stated in degrees Fahrenheit, and the canning temperature takes into account the initial cooling effect created by a cold, empty jar.
Canned Ingredients
We have become conditioned to the “tin” flavor that often accompanies some canned products, especially tomatoes. To remove a metallic taste, empty the contents into a small nonreactive pot or skillet and cook on high, stirring constantly at a near boil, for 2 or 3 minutes.

Peeling Fruits
The scald method is quick. With fruit like peaches or tomatoes (at room temperature), cut a small X in the bottom of each before dunking in boiling water for as little time as necessary to loosen the skin, generally under a minute. Remove and plunge into cold water (ice helps). The skins should slide or slough right off. If peaches or similar fruits are not picked when ripe, the process becomes more difficult to impossible. Try again, increasing time in half-minute increments. Ripe-picked fruits are what one wants to be using, so this should not be a problem.

Bay Leaves
Left in the recipe, these crisp leaves pose a potential danger to diners and, thus, should be removed before canning—not always a simple chore. One solution is to count the number of required leaves, place in the smallest saucepan available with a little water, bring to a boil for 10 minutes or hold until the water is half boiled out, whichever is longer. Pour the flavored water into the recipe and either dispose of the leaves or place one in each canning jar as required by the recipe.
