STRUCTURAL MATERIALS
There is a thrill in looking in a hardware store, hobby shop, parts catalog, or even your
basement workshop and contemplating the ways in which different things that catch
your eye can be used in creating your own robot. New materials, while sometimes costly,
can give your robot a professional look, especially when the time is taken to paint and finish
the structure. At the other end of the scale, with a bit of imagination, some pieces of
pipe could be built into the chassis of a robot, or some old steel shelving could be used as
the basis for a gripper with the throttle linkage from an old lawnmower as the gripper's
actuator. Most robots end up being a combination of newly built and reclaimed parts that
give them a Frankenstein look that, surprisingly enough, is quite endearing.
In this chapter, you will be introduced to many of the different materials that are used in
building robots along with some comments on attaching the various pieces together and finishing
the final product. When you are starting out, remember to start small and don't invest
heavily in any one type of material or fastener. Each time you begin a new robot or feature,
try a different material and see what works best for you.
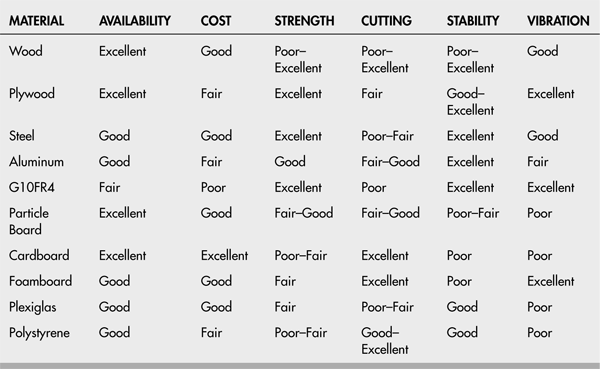
In Table 3-1, different materials that are often used for robots are listed along with their
unique characteristics. This chart will be referred to throughout the chapter and is a good
one to go back to when you are trying to decide what material would be best for your robot. Availability is how easy it is for you to get the materials. Although some materials obviously
are superior, they can be difficult for you to find. The strength rating is relative; depending
on the actual material purchased, it can vary considerably. Cutting indicates how easy it is
to cut a material precisely and end up with a smooth edge. The measurement of how little the material's dimensions change over time or temperature is stability, and vibration lists
how well a material will stand up to the vibration of working on a robot.
TABLE 3-1 Robot Structural Materials Comparison Chart
Paper probably does not seem like a very likely material to use in the development of
robots, but it, along with related products, are often overlooked as materials that are easy
to work with and allow fast results. There are a variety of different paper products to choose
from and by spending some time in an artists' supply store, you will probably discover some
products that you never thought existed. There are a number of different papers, cardboards,
foam-backed boards, and so on that could be used as part of a robot's structure.
Like anything, it just takes a bit of imagination.
You may not have thought of this, but paper and cardboard are excellent materials for
building prototypes of your robots or different parts of them. Even if you have the correct
tools for cutting and shaping wood and metal, you can still cut sample parts from a piece of
cardboard much faster to ensure proper fit and clearances to other parts. Many people start
by building a prototype structure out of the material they are going to use in the robot with
the idea that they can cut, saw, drill, or sand the piece into shape as necessary.
Experimenting on the actual robot material is a lot more work (and potentially more expensive) than first cutting out a piece of cardboard or foam-backed paper and trimming
it (using either scissors or a hobby knife) into the correct shape. Once the cardboard has
been trimmed to the correct shape, it can be pulled out and measured to find the exact
changes, which are then transferred to the drawings used for cutting the real material into
shape.
Along with scissors and a hobby knife, you might want to also invest in a cutting board
(which can be found at the artists' supply store) designed to be impervious to the sharp edge
of the knife and some white glue. An obvious way to ensure that the cardboard or foam-backed
paper is at the correct dimensions is to glue a printout of the piece that is going to
be used in the robot. There is one area that can be a concern if paper products are used for
prototyping robot structures and that is the thickness of the material. Only in very rare cases
will the cardboard or whatever material you are using for prototyping be the same thickness
as the final material. This isn't a major concern because with a little bit of thinking ahead
there will be no problem, but it is something to keep in the back of your mind.
There are many different wood products to choose from for use in a robot's structure and
each one has its own characteristics that affect its suitability in different areas of the robot's
structure. The biggest advantages of wood are its ability to be worked using inexpensive
hand tools and its fairly low cost. Even for more exotic hardwoods, which can be quite difficult
to work and are relatively expensive, you will find that they can be shaped with
patience along with care, and even if the piece ends up being ruined replacement pieces
can be purchased for just a few dollars.
When using woods as structural pieces in your robot, you are advised to use the hardest
woods that you can find (such as maple, cherry, and oak). Very hard woods will obviously
handle the greatest loads and, more importantly, will resist splitting at bolt attachment
points. Soft woods like spruce and balsa should be avoided for obvious reasons. When fastening
pieces of wood to other pieces, nuts and bolts should be used (and not screws which
cut their own threads) to minimize the chance that the wood will be damaged and split or
the holes will open up due to vibration.
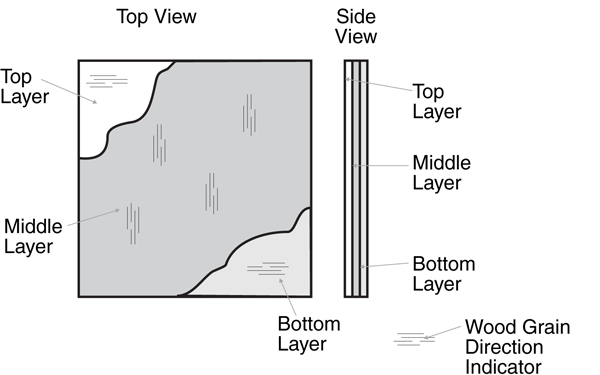
Along with solid pieces of wood, there are a number of composite products that you
might want to consider. The most commonly used composite wood product is plywood (Fig.
3-1), which consists of several sheets of wood glued together in such a way that its strength
is maximized. Plywood is often manufactured from softer woods (such as spruce) with the
final product being much stronger than the sum of its parts. Home construction plywoods
should be avoided; instead you should look at aircraft quality plywood (which can be found
in small sheets at hobby stores). Aircraft quality plywood is manufactured from better quality
woods to more exacting quality levels to ensure that they can withstand large forces and
vibration at a fairly light weight—just what is desired in a robot.
Other composite wood products include chipboard and particle board in which varying
sizes of wood cuttings are glued together to form a sheet of material. These materials tend
to be very heavy and do not have very good structural qualities in terms of mechanical strength and vibration resistance. Some of the better quality particle boards may be suitable
for use in large robots, but for the most part they should be avoided.
There are probably more different types of plastics than of paper products, woods, and
metals combined. Determining the correct type of plastic for a specific application can be a
very intensive task and take an unreasonably long period of time. Instead, you more likely
will pick up a piece of plastic that you either find as raw material for sale or want to modify
an existing product—which for all intents and purposes is the level of consideration required
for most hobby robot projects.
There are three major types of plastics you can consider:
Thermoset plastics are hard and have a tightly meshed molecular structure. They generally
cure or harden in a mold using chemicals, and during the process they tend to put out
a lot of heat. Thermoset plastics can only be shaped by machining as heating them up will
destroy the molecular bonds and render the material useless. Thermosets are used in hard
plastic toys, appliances, and other products requiring structural strength.
You have most likely encountered elastomer plastics and thought that they were rubber
bands. Elastomers have a similar molecular structure to thermosets, but they are much looser, resulting in elastic characteristics. Like thermosets, elastomers cannot be shaped by
heating.
Thermoplastics tend to be manufactured as sheets of material of varying thicknesses for
a variety of different purposes. At one thickness extreme they are used for plastic bags; and
at the other, Plexiglas. Thermoplastics have a long, linear molecular structure that allows
them to change shape when heated (unlike the other two types of plastics). Along with Plexiglas,
which could be used as a structural material for a robot, sheets of polystyrene (the
same material used to make plastic toys and models) can be formed into covers and bodies
for a robot using heat and a vacuum-forming process.
Metal stock is available from a variety of sources. Your local home improvement store is the
best place to start. However, some stock may only be available at specialized metal distributors
or specialized product outlets, like hobby stores. Look around in different stores and
in the Yellow Pages and you're sure to find what you need.
Extruded stock is made by pushing molten metal out of a shaped orifice. As the metal exits
it cools, retaining the exact shape of the orifice. Extruded aluminum stock is readily available
at most hardware and home improvement stores. It generally comes in 12-ft sections,
but many hardware stores will let you buy cut pieces if you don't need all 12 ft. Even if you
have to buy the full 12-ft piece, most hardware stores will cut the pieces to length, saving
you the trouble of doing it yourself.
Extruded aluminum is available in more than two dozen common styles, from thin bars
to pipes to square posts. Although you can use any of it as you see fit, the following standard
sizes may prove to be particularly beneficial in your robot-building endeavors:
- 1-by-1-by-
 -in angle stock
  -by-
-by- -by--in channel stock
 -by-
-by- -by--in channel stock
- Bar stock, in widths from 1 to 3 in and thicknesses of to
 in
in
You've no doubt seen those shelving products where you nail two U-shaped metal rails on
the wall and then attach brackets and shelves to them. The rails are referred to as standards,
and they are well suited to be girders in robot frames. The standards come in either aluminum
or steel and measure by by in. The steel stock is cheaper but considerably
heavier, a disadvantage you will want to carefully consider. Limit its use to structural points
in your robot that need extra strength. Another disadvantage of using shelving standards
instead of extruded aluminum is all the holes and slots you'll find on the standards. The holes are for mounting the standards to a wall; the slots are for attaching shelving brackets.
If you are going to use shelving standards, plan to drill into the sides of the rails rather than
the base with the holes and slots because this will make integrating them into robots much
easier.
by by in. The steel stock is cheaper but considerably
heavier, a disadvantage you will want to carefully consider. Limit its use to structural points
in your robot that need extra strength. Another disadvantage of using shelving standards
instead of extruded aluminum is all the holes and slots you'll find on the standards. The holes are for mounting the standards to a wall; the slots are for attaching shelving brackets.
If you are going to use shelving standards, plan to drill into the sides of the rails rather than
the base with the holes and slots because this will make integrating them into robots much
easier.Galvanized mending plates are designed to strengthen the joint of two or more pieces of
lumber. Most of these plates come preformed in all sorts of weird shapes and so are pretty
much unusable for building robots. But flat plates are available in several widths and lengths.
You can use the plates as-is or cut them to size. The plates are made of galvanized iron and
have numerous predrilled holes to help you hammer in nails. The material is soft enough so
you can drill new holes, but if you do so only use sharp drill bits.
Mending plates are available in lengths of about 4, 6, and 12 in. Widths are not as standardized,
but 2, 4, 6, and 12 in seem common. You can usually find mending plates near
the rain gutter and roofing section in the hardware store. Note that mending plates are
heavy, so don't use them for small, lightweight robot designs. Reserve them for medium to
large robots where the plate can provide added structural support and strength.
Most hardware stores carry a limited quantity of short extruded steel or zinc rods and
squares. These are solid and somewhat heavy items and are perfect for use in some
advanced projects, such as robotic arms. Lengths are typically limited to 12 or 24 in, and
thicknesses range from to about in.
to about in.You will need a way to connect all your metal pieces together. The easiest method is to use
galvanized iron brackets. These come in a variety of sizes and shapes and have predrilled
holes to facilitate construction. The  -in-wide brackets fit easily into the two sizes of channel
stock mentioned at the beginning of the chapter: by by in and by by in. You need only drill a corresponding hole in the channel stock and attach the pieces
together with nuts and bolts. The result is a very sturdy and clean-looking frame. You'll find
the flat corner angle iron, corner angle (L), and flat mending iron to be particularly useful.
-in-wide brackets fit easily into the two sizes of channel
stock mentioned at the beginning of the chapter: by by in and by by in. You need only drill a corresponding hole in the channel stock and attach the pieces
together with nuts and bolts. The result is a very sturdy and clean-looking frame. You'll find
the flat corner angle iron, corner angle (L), and flat mending iron to be particularly useful.It is very common to design and contract a quick turn, printed circuit assembly house to create
custom PCBs for your robots, but up until just a few years ago it wasn't possible to get
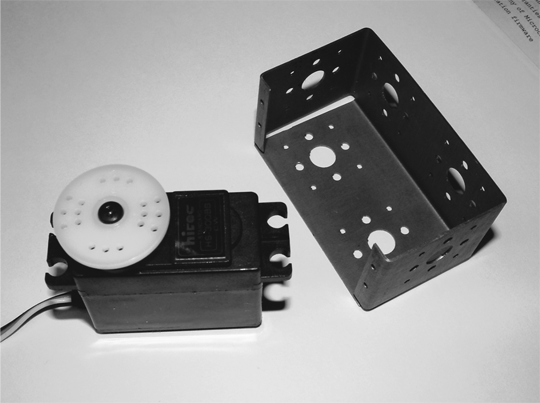
the same service for mechanical parts built from metal or plastic. Today, there are a number
of companies that will take your mechanical designs (some will even provide you with
design software free of charge) and turn them into prototypes in just a few weeks (like the
one in Fig. 3-2). Using a quick turn mechanical prototype shop for preparing plastic and metal parts will save you the time and money needed to buy the comparable equipment and
learn how to use it.
The quick turn mechanical prototype process is still new and you can expect there to be
changes over time as it matures. You may find that when you use the quick turn prototypes
the choices for materials, finishes, and manufacturing processes are overwhelming. To learn
about your options, you should go to your local library and look for references on mechanical
design and structural metals and plastics. When you order your first prototypes, keep the
order small to minimize costs and maximize the speed with which you receive the parts.
Once you have decided upon the materials used to build your robot, you will now be left
with the task of deciding how to hold them together. What do you think is the number one
problem most robots have when they are brought out for a competition? Most people
would think of things like dead batteries or codes that can't work in the actual environment
(problems with light background noise or the running surface), but it is very common for
robots to fall apart or break because the different parts are not held together very well. Part
of the problem is the use of an unsuitable material for the structure (like one that breaks during
use), but the overwhelming problem is the use of inappropriate adhesives (glues) and fasteners
for the robot's structural parts.
Fasteners is the generic term used to describe the miscellaneous nuts and bolts, nails,
screws, and other devices that have been developed over the years to hold things together.
Fig. 3-3 shows the operation of some common fasteners, and the more commonly used
items are listed in the following sections.

Number 6, 8, and 10 nuts and pan-head stove bolts ( ,
,  , and
, and  , respectively) are good
for all-around construction. Get a variety of bolts in ,
, respectively) are good
for all-around construction. Get a variety of bolts in ,  , 1, 1, and 1 in lengths. You
may also want to get some 2 and 3-in-long bolts for special applications.
, 1, 1, and 1 in lengths. You
may also want to get some 2 and 3-in-long bolts for special applications.
, , and , respectively) are good
for all-around construction. Get a variety of bolts in , , 1, 1, and 1 in lengths. You
may also want to get some 2 and 3-in-long bolts for special applications.Motor shafts and other heavy-duty applications require -in 20 or  -in hardware. Pan-head
stove bolts are the best choice; you don't need hex-head carriage bolts unless you have
a specific requirement for them. You can use number 6 () nuts and bolts for small, lightweight
applications. Or for even smaller work, use the miniature hardware available at
hobby stores, where you can get screws in standard
-in hardware. Pan-head
stove bolts are the best choice; you don't need hex-head carriage bolts unless you have
a specific requirement for them. You can use number 6 () nuts and bolts for small, lightweight
applications. Or for even smaller work, use the miniature hardware available at
hobby stores, where you can get screws in standard  ,
,  , and
, and  sizes.
-in 20 or -in hardware. Pan-head
stove bolts are the best choice; you don't need hex-head carriage bolts unless you have
a specific requirement for them. You can use number 6 () nuts and bolts for small, lightweight
applications. Or for even smaller work, use the miniature hardware available at
hobby stores, where you can get screws in standard , , and sizes.While you're at the store, stock up on flat washers, fender washers (large washers with small
holes), tooth lock washers, and split lock washers. Get an assortment so you have a variety
of nut and bolt sizes. Split lock washers are good for heavy-duty applications because they
provide more compression locking power. You usually use them with bolt sizes of in and
above.
in and
above.All-thread comes in varying lengths of stock. It comes in standard thread sizes and pitches.
All-thread is good for shafts and linear motion actuators. Get one of each in , , and -in 20 threads to start. If you need small sizes, hobby stores provide all-thread rod (typically
used for push-pull rods in model airplanes) in a variety of diameters and threads.
, , and -in 20 threads to start. If you need small sizes, hobby stores provide all-thread rod (typically
used for push-pull rods in model airplanes) in a variety of diameters and threads.Coupling nuts are just like regular nuts except that they have been stretched out. They are
designed to couple two bolts or pieces of all-thread together, end to end. In robotics, you
might use them for everything from linear motion actuators to grippers. Locking nuts have
a piece of nylon built into them that provides a locking bite when threaded onto a bolt. It is
preferable to use locking nuts over two nuts tightened together.
An often overlooked method of fastening structures together is the blind or pop rivet. This
fastener consists of a flanged aluminum tube with a steel rod running through it and a ball
at the end. When the ball is pulled into the tube, the tube distorts and flares outward, providing
two wide ends to hold together pieces of material. When a certain amount of tension
has been placed on the steel rod, it "pops" off, leaving a permanent fastener that is quite a
bit shorter over the surface of the material than nuts and bolts. Rivets are quite vibration
resistant, and despite being labeled as permanent, they can be drilled out in a few seconds.
Adhesives is a ten-dollar word to describe glues. While many people dismiss glues as not
being appropriate for use in robots, by following a few simple rules (namely keep the surfaces
to be glued together clean, and rough them up with sandpaper to give more surface
area for the glue to hold onto), they can be as effective as any of the other methods presented
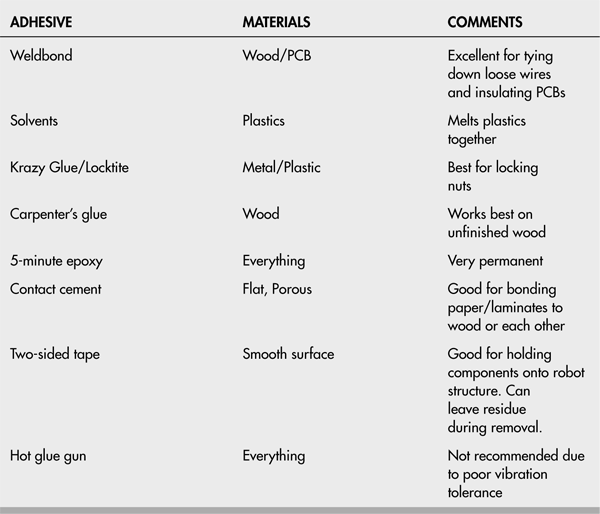
in this chapter and can be a lot easier to work with. Table 3-2 lists a number of the
most commonly used adhesives and some of their characteristics and uses.
TABLE 3-2 Adhesives and the Materials They Are Designed For
While the list of fastening methods in the previous sections seems comprehensive, there are
still a number of different methods that you can use to hold your structural parts together
that are useful in a variety of different applications. The following list describes methods
used on different robots that have resulted in structures that are stronger, lighter, and easier
to build than using the traditional methods previously described. Some of these suggested
fastening methods may seem fanciful, but remember to "never say never"—there are situations
where each one of these solutions will be optimal.
- Welding is useful for large heavy robots built on a steel frame or chassis. With the proper tools and training, robot structures can be precisely assembled quite quickly. Training is critical as all types of welding can be dangerous. Oxyacetylene torches can also be used for heating up and bending steel parts—but only if you know what you are doing.
- The next time you open a car's hood to look in the engine compartment, take a look at the myriad of fasteners in there. Cable ties and hose clamps are generally specialty items, but chances are you will run across a few applications that are helpful to the robots you are working on.
- Nothing has been written to say that robot structures have to be permanently fastened together. If you are unsure about the best configuration for the parts of your robot or if different parts are needed for multiple robots, why don't you mount them with velcro, magnets, or in a way that allows them to be removed and replaced quickly and easily.
- There are a number of robots that are held together by steel cables and turnbuckles (threaded cable connectors that can be used to adjust the tension on a cable). These robots definitely have a unique look and can be made very light and very rigid.
- Finally, why do the parts have to be fastened together at all? A robot built from interlocking parts could be particularly fascinating and an interesting response to the need for coming up with robot components that can be taken apart and put back together in different ways. Electrical connections made when the parts are assembled together could provide wiring for the robot and prevent invalid configurations from being created.
You don't always need to buy new (or used or surplus) to get worthwhile robot parts. In fact,
some of the best parts for hobby robots may already be in your garage or attic. Consider
the typical used VCR, for example. It'll contain at least one motor (and possibly as many as
five), numerous gears, and other electronic and mechanical odds and ends. Depending on
the brand and when it was made, it could also contain belts and pulleys, appropriate motor
drivers, digital electronics chips, infrared receiver modules, miniature push buttons, infrared
light-emitting diodes and detectors, and even wire harnesses with multipin connectors. Any
and all of these can be salvaged to help build your robot. All told, the typical VCR may have
over $50 worth of parts in it.
Never throw away small appliances or mechanical devices without taking them apart and
looking for usable parts. If you don't have time to disassemble that CD player that's skipping
on all of your compact discs, throw it into a pile for a rainy day when you do have a
free moment. Ask friends and neighbors to save their discards for you. You'd be amazed
how many people simply toss old VCRs, clock radios, and other items into the trash when
they no longer work.
Likewise, make a point of visiting garage sales and thrift stores from time to time, and
look for parts bonanzas in used—and perhaps nonfunctioning—goods. Scout the local thrift
stores (Goodwill, Disabled American Veterans, Salvation Army, Amvets, etc.) and for very
little money you can come away with a trunk full of valuable items that can be salvaged for
parts. Goods that are still in functioning order tend to cost more than the broken stuff, but
for robot building the broken stuff is just as good. Be sure to ask the store personnel if they
have any nonworking items they will sell you at a reasonable cost.
Here is just a short list of the electronic and mechanical items you'll want to be on the
lookout for and the primary robot-building components they have inside.
- VCRs are perhaps the best single source for parts, and they are in plentiful supply (hundreds of millions of them have been built since the mid-1970s). As previously discussed, you'll find motors (and driver circuits), switches, LEDs, cable harnesses, and IR receiver modules on many models.
- CD players have optical systems you can gut out if your robot uses a specialty vision system. Apart from the laser diode, CD players have focusing lenses, miniature multicell photodiode arrays, diffraction gratings, and beam splitters, as well as micro-miniature motors and a precision lead-screw positioning device (used by the laser system to read the surface of the CD).
- Old disk drives (floppy and hard drives) also have a number of components that are very useful in robots. Along with the motor that turns the disk, the stepper motor that moves the head is well suited for use in robot arms or even small walking robots. Later in the book, opto-interrupters will be discussed and the typical disk drive has at least two of these that could be used in a robot.
- Fax machines contain numerous motors, gears, miniature leaf switches, and other mechanical parts. These machines also contain an imaging array (it reads the page to fax it) that you might be able to adapt for use as robotic sensors.
- Mice, printers, old scanners, and other discarded computer peripherals contain valuable optical and mechanical parts. Mice contain optical encoders that you can use to count the rotations of your robot's wheels, printers and scanners contain motors and gears, and scanners contain optics you can use for vision systems and other sensors on your robot.
- Mechanical toys, especially the motorized variety, can be used either for parts or as a robot base. Remember to keep the motor drivers (as will be discussed later in the book). When looking at motorized vehicles, favor those that use separate motors for each drive wheel (as opposed to a single motor for both wheels), although other drive configurations can make for interesting and unique robots. Don't limit yourself!
You can change your robot from appearing like something that you cobbled together in
your garage over a weekend to a much more professional looking and polished piece of
machinery by spending a few minutes over a few days putting on a paint finish. Few people
think about finishing a robot's structure, whether it's made of wood or metal, but there
are a number of tangible benefits that you should be aware of:
- Eliminating the dust on the surface of the material, allowing for effective two-sided tape attachment (and removal).
- Smoothing wood surface and reducing the lifted fibers that appear when the wood gets moist or wet over time.
- Eliminating wood fibers will also produce more effective glue bonds.
- Eliminating splinters and minimizing surface splintering when drilling into wood.
- Allowing for pencil and ink marking of the surface to be easily wiped off for corrections. This is not possible with bare wood and many metals.
You should consider using aerosol paint to finish the structural pieces of your robot. When
properly used there is very little mess and no brushes to clean up. From an auto-body supply
house, you should buy an aerosol can of primer (gray is always a good choice) and from
a hardware store buy an aerosol can of indoor/outdoor (or marine) acrylic paint (such as
Krylon brand) in your favorite color. Red catches the eye, isn't overwhelming, and if there
is a blemish in the material or your work, it will become hidden quite nicely. The process
outlined here is usable for metal and wood, although wood will tend to have more blemishes
and its grain will be more visible than for the metal.
Set up a painting area in a garage or some other well-ventilated space by laying down
newspaper both on a flat surface as well as a vertical surface. Next, lay down some bottle
caps or other supports for the materials you are going to paint. You will want to finish the
ends of the material and don't want to end up with paint flowing between the material and
the support (or the newspaper for that matter).
Lightly sand the surfaces that you are going to paint using a fine-grain sandpaper (200
grit at least). You may also want to sand the edges of the material more aggressively to take off any loose wood or metal burrs that could become problems later. Once you have finished
this, moisten the rag and wipe it over the surface you have sanded to pick up any
loose dust.
Shake the can of primer using the instructions printed on the can. Usually there is a small
metal ball inside the can and you will be instructed to shake it until the ball rattles easily
inside. Apply a light coat of primer; just enough to change the color of the material. Most
primers take 30 minutes or so to dry. Check the instructions on the can before going on to
the next step of sanding and putting on new coats of paint or primer
After the first application of primer, you will probably find that a wood surface is very
rough. This is due to the cut fibers in wood standing on end after being moistened from the
primer. Repeat the sanding step (along with sanding the ends of the wood and then wiping
down with a damp rag) before applying another coat of primer. After the second coat is put
down, let it dry, sand very lightly, and wipe down again.
Now you are ready to apply the paint. Shake according to the instructions on the aerosol
can and spray the material again, putting on a thin, even coat. You will probably find that
the paint will seem to be sucked into the wood and the surface will not be that shiny. This
is normal. Once the paint has dried, lightly sand again, wipe down with a wet cloth, and
apply a thicker coat of paint.
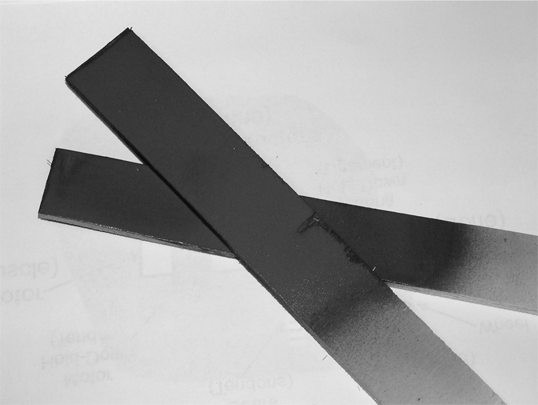
When this coat has dried, you'll find that the surface is very smooth and shiny. Figure 3-4 shows what can be done with some strips of plywood over a couple of nights. Some of the
grain of the wood will still be visible, but it will not be noticeable. You do not have to sand
the paint again. The material is now ready to be used in a robot.
To learn more about . . . |
Read |
|
How to solder |
Chapter 7, "Electronic Construction Techniques" |
|
Building electronic circuits |
Chapter 7, "Electronic Construction Techniques" |
|
Building mechanical apparatus |
Part II, "Robot Construction" |