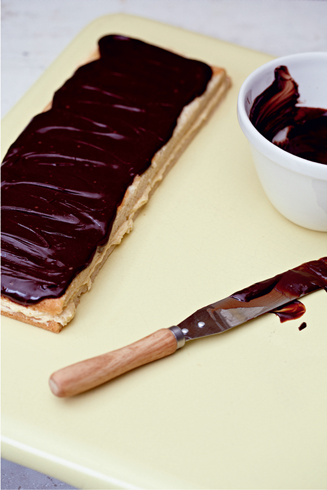
Decorate with strips of candied peel
Recipes from Mary, Paul and the bakers
- Mary’s Angel Food Cake with Lemon Curd
- Mary’s Spiced Whole Orange Cake
- Mary and Paul’s Chocolate Creation
BAKER’S RECIPE
A richly flavoured, very moist cake with plenty of spice, sandwiched and topped with a vibrant orange cream cheese icing.
MAKES 1 LARGE CAKE
YOU WILL NEED: 2 × 20.5CM DEEP SANDWICH TINS, GREASED WITH BUTTER AND BASE-LINED
For the cake
4 large free-range eggs, at room temperature
175ml light olive oil
115g light muscovado sugar
115g dark muscovado sugar
225g plain flour
2½ teaspoons baking powder
½ teaspoon freshly grated nutmeg
1 teaspoon ground cinnamon
¼ teaspoon ground cloves
375g carrots (6–7 medium), coarsely grated
75g walnut pieces
75g desiccated coconut
100g raisins
finely grated zest of 1 large navel orange
For the candied peel
1 large navel orange
20g caster sugar
3 tablespoons water
For the drizzle syrup
juice of 1 large navel orange
juice of 1 medium lemon
50g caster sugar
For the icing
135g unsalted butter, at room temperature
200g full-fat cream cheese, at room temperature
115g icing sugar
4 tablespoons Orange Curd (see here), well chilled
50g walnut halves, to decorate
1 Heat your oven to 180°C/350°F/gas 4. Start by making the cake. Put the eggs, olive oil and both muscovado sugars into a large mixing bowl. Whisk with an electric mixer for 4–5 minutes until very frothy. Sift the flour, baking powder and spices into the bowl and gently fold in with a large metal spoon. Add the carrots, walnut pieces, coconut, raisins and grated zest to the bowl and fold in until thoroughly combined.
2 Spoon the mixture into the prepared tins and spread evenly. Place in the heated oven and bake for 30–35 minutes until a skewer inserted into the centre of each cake comes out clean.
3 While the cake layers are baking, make the candied peel and the drizzle syrup. Using a vegetable peeler, carefully shave strips of coloured peel off the orange, leaving all the white pith on the fruit. Cut the strips into very thin shreds and put them into a small pan. Add water to cover. Bring to the boil, then simmer gently for 10–12 minutes until soft. Drain the shreds, then return them to the pan and add the sugar and 3 tablespoons water. Heat gently until the sugar has dissolved, then simmer for a few minutes until the mixture becomes thick and syrupy. Pour the candied peel on to a heatproof plate and leave until cold.
4 For the drizzle syrup, put the orange and lemon juices in the rinsed-out pan that you used for the candied peel. Add the sugar and heat gently until it has dissolved, then bring to the boil and boil for 1 minute. Remove from the heat and keep warm.
5 When the cake layers are ready, remove from the oven and set the tins on a wire rack. Prick the cakes all over with a cocktail stick, then quickly spoon 3 tablespoons of the hot drizzle syrup over each cake. Leave to soak in and cool completely in the tins.
6 To make the icing, put the butter into a large bowl and beat thoroughly with an electric mixer or wooden spoon. Beat in the cream cheese until smooth and evenly combined. Sift in the icing sugar and mix in, on low speed if using an electric mixer. Stir in the chilled orange curd. Cover and chill the icing until it is firm enough to spread.
7 When ready to assemble the cake, turn out the cake layers on to a large board. Spread half of the icing over the top of each sponge, then set one on top of the other. Transfer the cake to a serving platter. Swirl the icing on the top of the cake using the handle of a teaspoon. Decorate with the strips of candied peel and walnut halves. Store in an airtight container in a cool spot. Best eaten within 4 days.
Decorate with strips of candied peel
Use this to flavour butter icing as well as the cream cheese frosting and filling here. Or spread on buttered scones for tea.
MAKES ABOUT 100G
3 large navel oranges
2 large free-range eggs, at room temperature
juice of ½ medium lemon
75g caster sugar
75g unsalted butter, diced
1 Finely grate the zest from the oranges into a medium heatproof mixing bowl. Cut 1 or 2 of the oranges in half and squeeze out the juice into a measuring jug – you need about 100ml. Pour the juice into a small pan and boil rapidly until reduced to about 2 tablespoons. Add this reduced juice to the bowl containing the zest and leave to cool a bit until lukewarm.
2 Lightly beat the eggs in a small bowl with a fork, just to mix. Add to the heatproof bowl with the lemon juice, sugar and butter and set the bowl over a pan of simmering water. Stir constantly with a wooden spoon until the butter has melted and the sugar dissolved. Keep stirring until the mixture thickens, but don’t let it get near to boiling.
3 Quickly pour the curd into another heatproof bowl. Leave to cool, then cover with clingfilm and chill thoroughly. The curd can be kept in the fridge for up to 2 days.
TECHNICAL CHALLENGE
A pure white, light-as-air sponge mixture made with a great many egg whites – the yolks are used to make lemon curd. The cake is covered with whipped cream and finished with a bright topping of lemon curd and passionfruit.
MAKES 1 LARGE CAKE (TO SERVE 12–15) PLUS 2 × 350G JARS LEMON CURD
YOU WILL NEED: 1 × 25CM ANGEL FOOD CAKE PAN WITH LEGS, 2 × 350G STERILISED JAM JARS
For the cake
125g plain flour
300g caster sugar
10 large egg whites, at room temperature
finely grated zest of 2 large unwaxed lemons
1 tablespoon lemon juice
1 teaspoon cream of tartar
½ teaspoon salt
For the lemon curd
10 large egg yolks
400g caster sugar
finely grated zest of 2 large unwaxed lemons
juice of 4 large lemons – about 200ml
175g unsalted butter, cubed
For the topping
300ml whipping cream, well chilled
½ teaspoon vanilla extract
2 passionfruits
1 Heat your oven to 170°C/325°F/gas 3. Place the oven shelf in the bottom third of the oven.
2 Sift the flour and 100g of the caster sugar into a bowl and set aside. Put the egg whites into a very large bowl and whisk with an electric mixer on high speed for 1 minute until frothy. Add the lemon zest and juice, cream of tartar and salt and continue whisking for 2–3 minutes until soft peaks will form when the whisk is lifted. Whisking on high speed, add the remaining 200g sugar a tablespoon at a time, then whisk until the whites form firm but not stiff peaks.
Whisk until firm peaks form
3 Sprinkle a third of the flour mixture over the egg whites and gently fold in with a large metal spoon or plastic spatula until combined. Repeat with the remaining flour mixture, in 2 batches, folding gently to keep as much air in the mixture as possible.
4 Transfer the mixture to the ungreased pan, then gently run a knife through the centre of the mix to dislodge any large pockets of air. Place in the heated oven and bake for 45–50 minutes until a skewer inserted into the centre of the cake comes out clean.
5 Remove the pan from the oven and immediately turn it upside down on its cooling legs. (If your pan doesn’t have legs, turn the pan upside down and support the centre hole on a jam jar or can of food so that the surface of the cake is exposed to the air as it cools.) Leave to cool for at least 1 hour. Run a palette knife around the inner and outer edges of the cake to loosen it from the pan, then invert the pan on to a plate and use a palette knife to loosen the cake from the base of the pan, if necessary. Leave to cool completely on a wire rack.
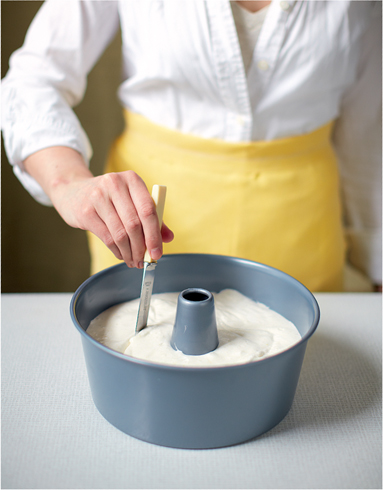
Run a knife through the centre of the mix in the tin
6 Meanwhile make the lemon curd. Mix together the egg yolks, sugar and lemon zest and juice in a large pan. Cook gently over low heat, stirring with a wooden spoon (make sure to stir the sides and base of the pan thoroughly) for 5–7 minutes until the mixture thickens enough to coat the back of the spoon. Remove from the heat and stir in the butter until melted and smooth.
7 Strain the lemon curd through a sieve into a large jug. Fill two 350g sterilised glass jars with curd and seal each with a lid. When the curd is completely cold, store the jars in the fridge for up to 2 months. Put the remaining lemon curd in a bowl, cover with clingfilm and leave to cool – this will be used for topping the cake.
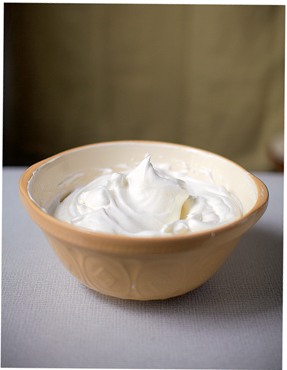
8 When ready to assemble the cake, whip the cream with the vanilla extract until it will form soft peaks when the whisk is lifted. Spoon the cream over the cold cake and, using a palette knife, coat the top and sides, smoothing as you go.
9 Cut the passionfruits in half and scoop out the seeds and pulp. Stir into the reserved, cooled lemon curd and drizzle over the angel food cake before serving.
Mary’s tip: To make a home-made angel food pan, use a 25cm loose-bottomed cake tin and set an empty, clean fizzy drink can in the centre.
Mary’s tip: You could reserve some lemon curd and serve it in a small jug with the cake, if you prefer.
SIGNATURE BAKE
This cake has a wonderful citrus flavour. Add a little more spice if you want it to be very spicy. You’ll need a food processor to make it.
MAKES 1 MEDIUM CAKE
YOU WILL NEED: 2 × 20CM DEEP SANDWICH TINS, GREASED AND BASE-LINED
For the cake
1 small, thin-skinned orange
275g self-raising flour
2 teaspoons baking powder
275g caster sugar
275g baking spread, taken straight from the fridge
4 medium eggs, at room temperature
1 teaspoon ground cinnamon
1 teaspoon ground mixed spice
For the orange icing
50g unsalted butter, softened
175g icing sugar, sifted
250g full-fat mascarpone cheese
To decorate
1 large, thin-skinned orange
50g caster sugar
1 To make the cake put the whole orange in a small pan. Cover it with boiling water from the kettle, then boil for 30 minutes until soft when prodded with the tip of a small knife (top up with more boiling water as needed). Drain the orange and leave to cool.
2 Heat your oven to 180°C/350°F/gas 4. When the orange is cold, cut it in half and remove any pips. Put the whole orange, including the skin, into a food processor and blitz until you have a medium chunky texture. Remove 2 tablespoons of the mixture and save for the icing. Scoop out the remaining pulp into a bowl and set aside.
3 Add the remaining cake ingredients to the processor (no need to rinse out the bowl) and blitz until just smooth – be careful not to overbeat the mixture. Remove the blade, then carefully stir in the orange pulp using a plastic spatula.
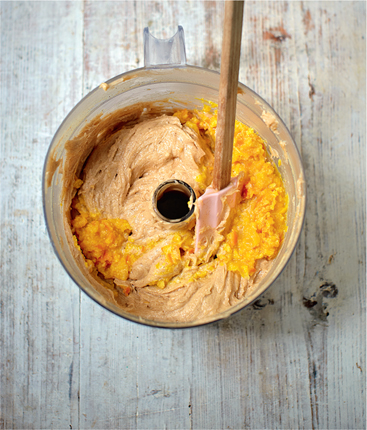
Carefully stir in the orange pulp
4 Divide the cake mixture equally between the prepared tins and spread it out evenly. Place in the heated oven and bake for 30–35 minutes until the sponges are well risen, lightly golden brown and shrinking away from the sides of the tins. Allow to cool in the tins for a few minutes, then turn out the sponges on to a wire rack. Peel off the paper and leave to cool completely.
5 To make the icing, put the soft butter into a mixing bowl and gradually beat in the icing sugar using a hand-held electric mixer. When the mixture is very smooth add the mascarpone and beat together until thoroughly combined. Add the reserved 2 tablespoons of orange pulp and mix in evenly with a wooden spoon.
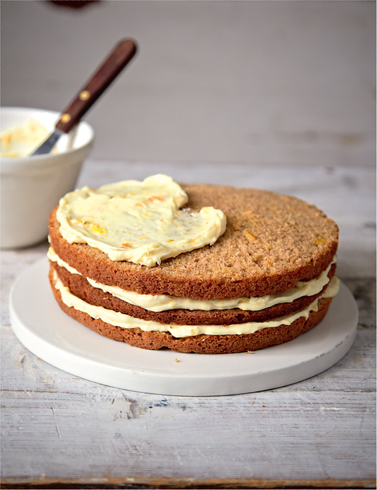
Sandwich the 4 layers
6 Carefully slice each sponge in half horizontally to make 2 layers. Divide the icing into 4 portions, then use to sandwich the 4 layers, finishing with icing on the top.
7 For the decoration, use a rinder or canelle peeler to take long, thick strips of coloured peel from the large orange. Alternatively, thinly peel the orange using a vegetable peeler, then cut the peel into fine pencil-thin strips. (Use the leftover orange for juice or a fruit salad.) Put the orange peel strips into a small pan. Cover with boiling water from the kettle and add half the sugar, then boil for 1 minute.
8 Drain the strips and place them on a small sheet of baking paper. Sprinkle over the remaining sugar and toss the strips gently to coat (they will curl). Leave in a warm place to dry out for as long as possible – overnight is best. Decorate the cake with the orange curls. This cake is best eaten on the day it is made, but can be kept for up to 3 days in a cool place.
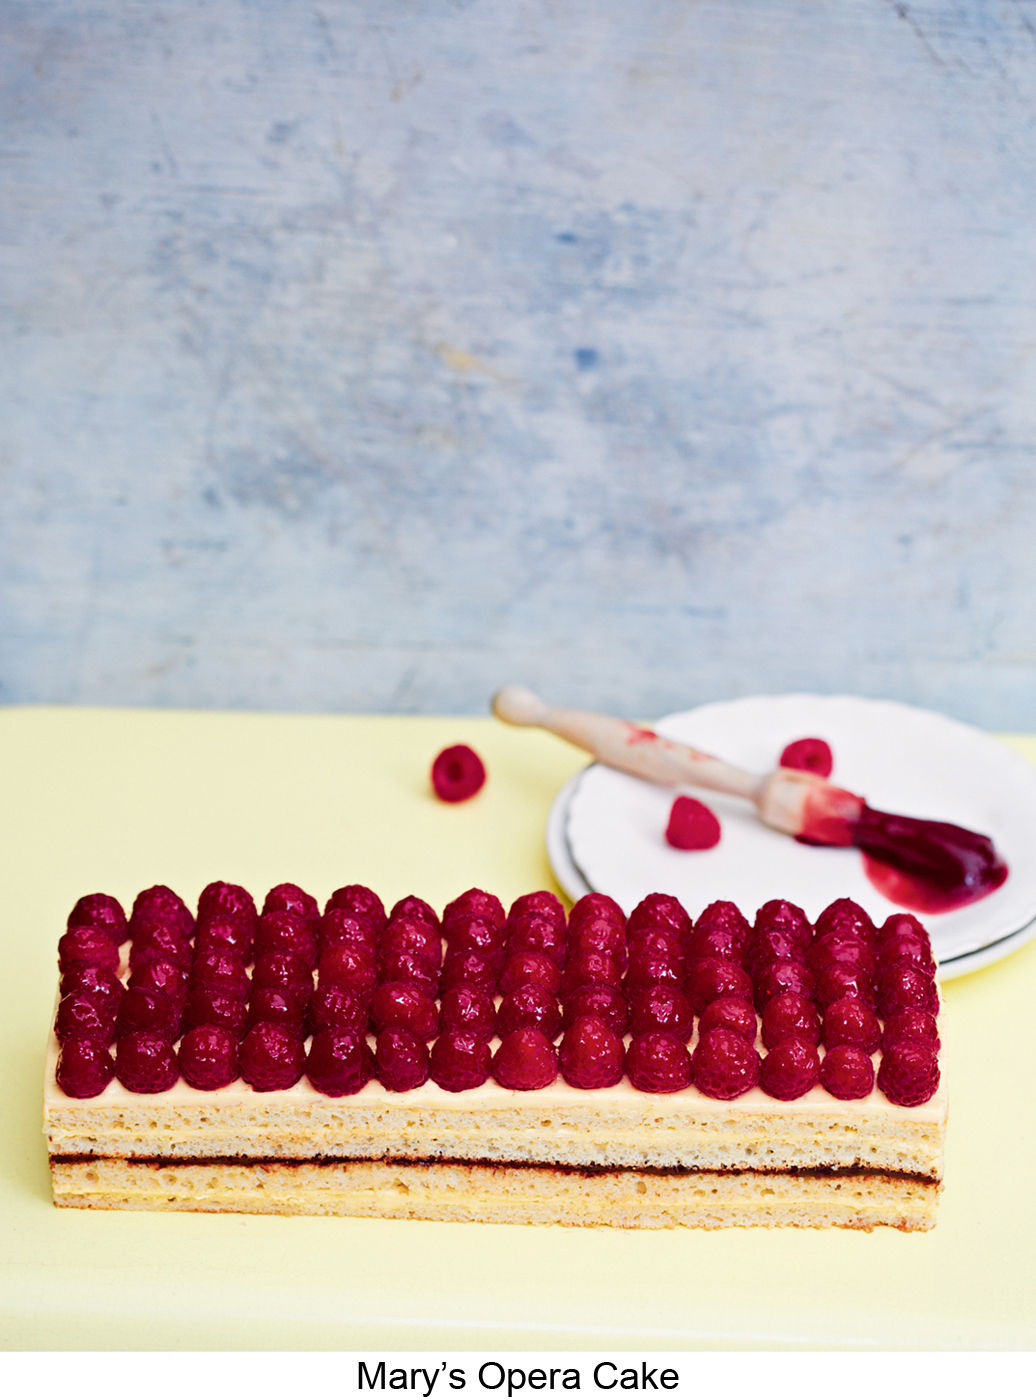
SHOWSTOPPER CHALLENGE
A richly flavoured cake made from 4 layers of almond sponge, soaked in a kirsch syrup and sandwiched with a French vanilla buttercream and dark chocolate ganache. The perfect decoration is simple and very elegant – tiny glazed raspberries. The cake is made in an everyday swiss roll tin so that anyone can have a go at making this showstopper cake at home – if they are feeling adventurous!
SERVES 8
YOU WILL NEED: 1 SWISS ROLL TIN, 23 × 33CM, BUTTERED AND LINED WITH BAKING PAPER
For the kirsch soaking syrup
100g caster sugar
200ml water
3 tablespoons kirsch
For the joconde sponge
3 medium egg whites, at room temperature
15g caster sugar
100g ground almonds
100g icing sugar, sifted
3 medium eggs, at room temperature
30g plain flour, sifted
30g unsalted butter, melted
For the ganache
100ml double cream
100g dark chocolate (about 36% cocoa solids), broken into small pieces
For the crème au beurre
3 medium egg yolks
75g caster sugar
3 tablespoons water
225g unsalted butter, cubed and softened
2 teaspoons vanilla paste
To decorate
70–80 small raspberries
200g seedless raspberry jam, melted
1 To make the soaking syrup, put the sugar and water into a small pan. Heat gently, stirring frequently, until the sugar has dissolved, then bring to the boil. Simmer for 4–5 minutes until the syrup has reduced by half. Remove the pan from the heat, add the kirsch and set aside to cool completely.
2 Meanwhile, make the sponge. Heat your oven to 220°C/425°F/gas 7. Put the egg whites into a spotlessly clean mixing bowl (note: the yolks will be used later on for the crème au beurre) and whisk with an electric mixer until they will stand in stiff peaks. Whisk in the caster sugar a teaspoon at a time, whisking between each addition, to make a glossy meringue. Cover the bowl with clingfilm and put on one side.
3 Tip the ground almonds and icing sugar into the bowl of a large free-standing electric mixer (or a large mixing bowl if using a hand-held electric mixer) and add the whole eggs. Whisk together at high speed for 3–5 minutes until doubled in volume. Gently fold in the flour using a large metal spoon or plastic spatula, then gently fold in the meringue in 3 batches. Pour the melted butter down the side of the bowl and fold in until it is evenly incorporated.
4 Turn the mixture into the prepared tin and level the surface with a palette knife; make sure the mixture goes right into the corners of the tin. Place in the heated oven and bake for 5–7 minutes until a pale golden colour and springy to the touch in the centre. While the cake is baking, lay a sheet of baking paper over a wire rack. Turn out the cooked sponge on to the paper-lined rack, peel off the lining paper and leave to cool completely.
5 To make the ganache, gently heat the cream in a small pan until just bubbling. Remove the pan from the heat and add the pieces of chocolate. Stir until melted, smooth and glossy. Pour into a bowl and leave to set until firm but spreadable.
6 For the crème au beurre, put the egg yolks into the washed and dried bowl of your large electric mixer fitted with the whisk attachment. Put the sugar into a small pan with the water and dissolve over gentle heat, then boil steadily until the syrup reaches 110°C on a sugar thermometer. With the electric mixer running at high speed, slowly pour the syrup over the egg yolks, then continue whisking until the mixture is very thick and mousse-like. Gradually whisk in the butter, then whisk in the vanilla paste.
7 To assemble the cake, slice the sponge in half horizontally, so you have 2 thin 23 × 33cm sponges. Now cut each sponge in half lengthways, so you have 4 sponges each 11.5 × 33cm.
8 Place one of the sponges on a cake board and brush with a quarter of the kirsch syrup. Spread over a third of the crème au beurre. Top with another sponge and brush with another quarter of the syrup, then spread the chocolate ganache over the surface. Set a third sponge on top, brush with half of the remaining syrup and spread over half of the remaining crème au beurre. Add the final sponge, brush with the remaining syrup and spread the rest of the crème au beurre evenly on top.
Spread ganache on the second sponge layer
9 Arrange the raspberries on top of the cake in 14–16 rows of 5, then carefully brush the berries and the top of the cake with the warm melted jam to glaze. Refrigerate the cake for 2 hours to firm up the layers – this makes it easier to trim. Before serving, neatly trim the sides of the cake with a sharp knife to reveal the layers.
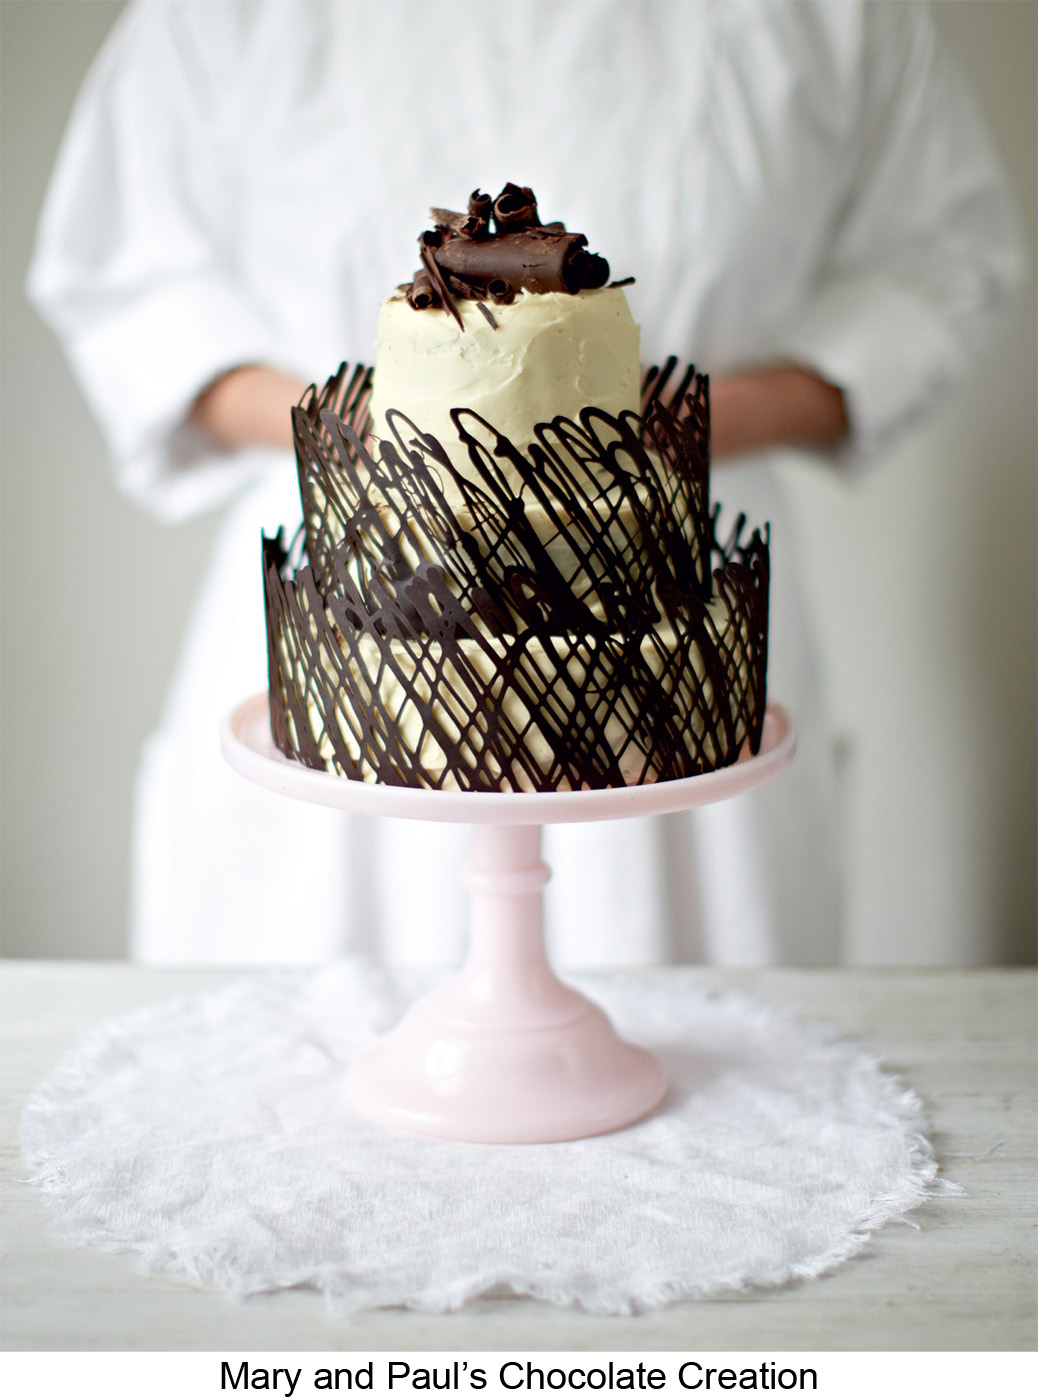
SHOWSTOPPER CHALLENGE
A truly impressive ‘wow’ creation for a special occasion, here is a stack of rich chocolate sponge cakes, filled and covered with a creamy white chocolate ganache and decorated with chocolate lace collars and curls.
MAKES A 3-TIER CAKE
YOU WILL NEED: 2 × 20CM DEEP SANDWICH TINS, 1 × 15CM CAKE TIN AND 1 × 10CM CAKE TIN, ALL GREASED AND THE BASE AND SIDES LINED WITH BAKING PAPER, A SUGAR THERMOMETER
For the cakes
125g cocoa powder, sifted
200ml boiling water
6 large eggs, at room temperature
100ml milk, at room temperature
350g self-raising flour
1 tablespoon baking powder
200g unsalted butter, softened
550g caster sugar
For the white chocolate ganache
400g white chocolate
300ml double pouring cream (not thick spooning cream)
300g full-fat cream cheese, at room temperature
6 tablespoons apricot jam, to glaze
For the chocolate lace collars
200g dark chocolate (about 70% cocoa solids
For the chocolate curls
100g plain cooking chocolate (also called chocolate cake covering)
100g plain chocolate (about 36% cocoa solids)
1 Heat your oven to 180°C/350°F/gas 4. Put the cocoa powder into a large heatproof bowl and stir in the boiling water until smooth. Lightly beat the eggs with a fork in a small bowl, just to mix, then add to the cocoa mix together with the milk, flour, baking powder, butter and sugar. Beat with a wooden spoon or electric mixer until the mixture has become a smooth, thickish batter.
2 Divide the cake mixture among the prepared tins so the 2 sandwich tins are each half full, and the 2 smaller cake tins are each two-thirds full. Spread the mixture evenly. Place all 4 tins in the heated oven. Bake until well risen and the tops spring back when lightly pressed: 25–30 minutes for the sandwich cakes, 35–40 minutes for the 10cm cake and 45–50 minutes for the 15cm cake. Check halfway through the baking time and rotate the tins if the cakes are cooking unevenly.
3 Allow the cakes to cool in their tins for a few minutes, then turn them out on to a wire rack. Peel off the lining paper, then leave them to cool completely. (The cakes can be made up to a day in advance and kept well wrapped or in an air tight container until needed.)
4 While the cakes are cooling make the white chocolate ganache. Break or chop up the chocolate into even-sized pieces. Heat the double cream in a medium-sized pan until just hot enough to melt the chocolate – small bubbles will have appeared around the edge of the pan. Drop the chocolate into the cream and stir gently until melted and smooth. Remove from the heat and leave to cool until stone cold.
5 Beat the cream cheese in a bowl to soften it, using a wooden spoon. Gradually beat in the cold chocolate cream. Keep covered, at room temperature, until ready to use.
6 To assemble the creation, cut the 10cm and 15cm cakes in half horizontally, then sandwich the cut cakes back together with some of the ganache. Sandwich the two 20cm sponges together with more of the ganache. Now stack up the cakes on a cake board or platter: put the 20cm sponge cake sandwich on the board first, then set the 15cm cake in the centre of the sponge and top with the 10cm cake, sticking each tier to the one underneath with a little ganache.
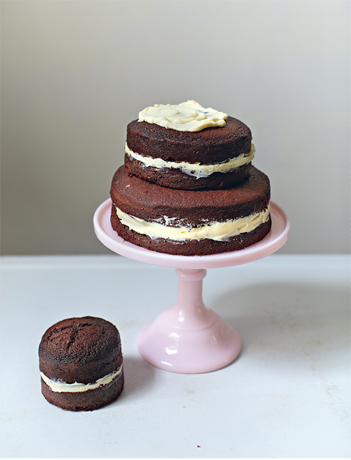
Assemble the tiers of the cake
7 Warm the apricot jam in a small pan to melt it, then brush all over the stacked cakes. Using a palette knife spread the remaining chocolate ganache over the layered cakes to cover completely.
8 To make the chocolate lace collars, break or chop up the dark chocolate into even-sized pieces. Put 150g of the chocolate into a heatproof bowl, set over a pan of hot water and stir until the chocolate melts and reaches a temperature of 47°C. Remove the bowl from the heat, add the remaining chocolate and stir until smooth and the chocolate has cooled to 31°C.
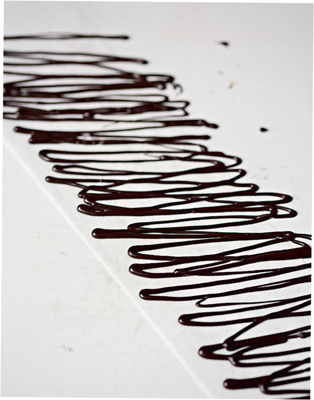
Create a lace effect on the strips of paper
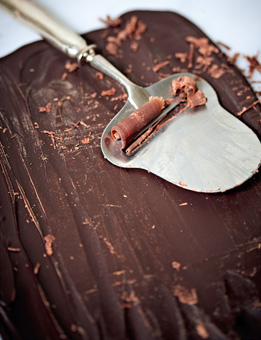
9 Cut 2 strips of baking paper or acetate, one measuring 10 × 45cm (for the middle tier) and the other 10 × 60cm (for the bottom tier). Lay the strips on the worktop. Pour the chocolate into a piping bag fitted with a fine writing tube. Holding the bag vertically over the paper, let the chocolate fall out while moving the bag up and down, to create a lace effect on the strips of paper. Don’t worry if the chocolate falls outside the paper strips – just gently move the chocolate on to the paper before it sets and sticks to the worktop (see photo here).
10 Leave the chocolate lace to cool for about 15 minutes until just set and firm enough to wrap around the sides of the cake tiers. The ganache on the cake should not have set completely and will be sticky, helping you fix the collar around the cake. Once you have done this, leave the chocolate collars to set completely – about an hour – before carefully peeling off the paper or acetate. (Don’t be tempted to set the chocolate collars in the fridge as this could dull the chocolate so it doesn’t shine when the paper is removed.)
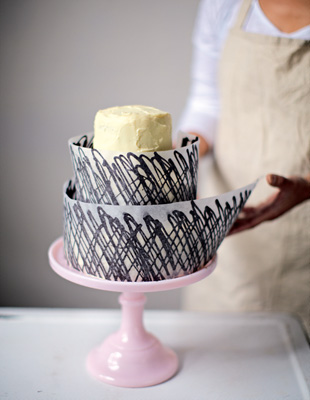
Assemble the lace collars
11 To make the chocolate curls, break or chop up both chocolates, put into a heatproof bowl and melt as before, stirring gently. As soon as the chocolate is smooth pour it over a cold marble or granite surface (or a similarly cold, solid surface) to create a sheet of chocolate about 5mm thick. Leave to cool until just set. Using a cheese plane or a potato peeler, gently shave off very thin slices, starting at the top of the chocolate sheet and continuing down to the bottom in one movement. As you shave off the slices they will curl up.
Shave off chocolate curls
12 Sprinkle the curls over the top tier of the cake. Store the finished cake in a cool place, but not in the fridge, until ready to serve. This cake is best eaten on the day you assemble and ice it.
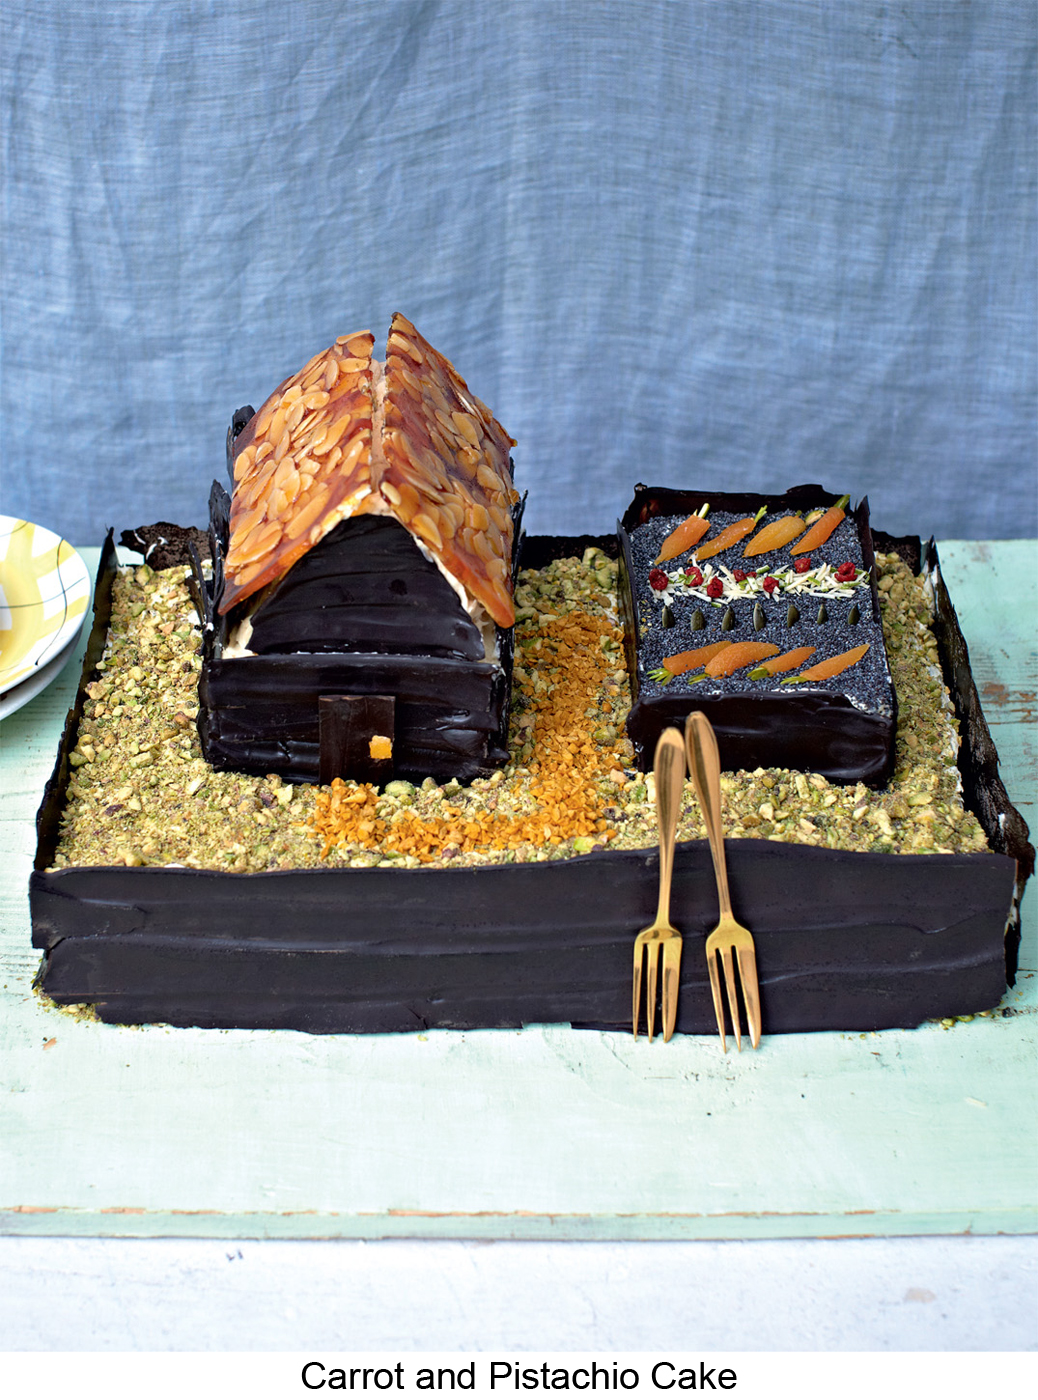
BAKER’S RECIPE
Both the carrot cake, flavoured with spices, nuts and raisins, and the buttercreams are dairy-free. Chocolate ‘planks’ are used to clad the shed and make the fencing surrounding the plot and the veg garden. You can fill the veg patch with shapes of dried apricot and sliced pistachios for carrots, seedlings made from shreds of lime peel, tomato vines made from lime peel and goji berries and so on.
MAKES 1 LARGE CAKE
YOU WILL NEED: 1 TRAYBAKE TIN OR ROASTING TIN 23 × 30 × 5CM, GREASED AND BASE-LINED; A 20.5CM SQUARE CAKE TIN, GREASED AND BASE-LINED
For the carrot cake
800g self-raising flour
½ teaspoon salt
1 tablespoon baking powder
1 tablespoon ground cinnamon
1 tablespoon ground mixed spice
½ teaspoon ground ginger
finely grated zest of 4 limes
750g carrots, grated
200g shelled, unsalted pistachios, chopped
100g pecan nuts, chopped
300g raisins
9 large eggs, at room temperature
500g light brown muscovado sugar
360ml corn or sunflower oil
250ml coconut milk
For the pistachio buttercream
200g dairy-free spread (or unsalted butter), softened
500g icing sugar, sifted
200g shelled, unsalted pistachios, coarsely ground
1 tablespoon lime juice, or to taste
For the plain buttercream
100g dairy-free spread (or unsalted butter), softened
350g icing sugar, sifted
juice of 1½ limes
For the wooden planks
600g dark chocolate (about 70% cocoa solids), tempered (see here)
For the decoration
70g poppy seeds (for the soil)
100g shelled unsalted pistachios, ground (for the grass)
2 tablespoons freeze-dried mango pieces (for the path)
plus your choice of ‘fruit’ and ‘veg’ for the plot (see here)
For the shed roof
225g caster sugar
80ml water
100g flaked almonds
1 To make the cake, heat your oven to 180°C/350°F/gas 4. Sift the flour, salt, baking powder and spices into a very large bowl. Add the lime zest, grated carrots, all the chopped nuts and raisins and mix thoroughly, breaking up any clumps of carrots. Break the eggs into another bowl, add the sugar, oil and coconut milk and mix well with a wire hand whisk. Add this mixture to the flour mixture and mix everything together well with a wooden spoon.
2 Transfer the mixture to the 2 prepared tins, filling them both to the same height. Place in the heated oven and bake for 40–45 minutes until a skewer inserted into the centre of each cake comes out clean. Leave to cool in the tins set on a wire rack.
3 While the cakes are cooling, make the pistachio buttercream. Beat the spread (or butter) with an electric mixer until creamy, then beat in the icing sugar, using slow speed at first. When all the sugar has been incorporated beat at a higher speed for a minute or so until light. Stir in the ground nuts and enough lime juice to make a spreadable icing. Cover and leave at room temperature until needed.
4 Make the plain buttercream in the same way, to make a smooth icing that can be piped. Cover and leave at room temperature until needed.
5 For the ‘wooden planks’, first cut strips of baking paper to be used as templates for the chocolate. For the fence, cut two 6 × 30cm strips and two 6 × 21cm strips. For the veg patch, cut two 4 × 9cm strips and two 4 × 14cm strips. For the shed cut ten 2 × 14cm strips (for the long sides), five 2 × 10cm strips (for the back), ten 2 × 2.25cm strips (for the front) and one 3 × 5cm strip (for the door) as well as two triangles with a 9cm base and 6cm high (for the gable ends). Set all of these cut paper shapes on a very large sheet of baking paper.
6 The tempered chocolate should be cool and star ting to thicken. Spread it fairly thickly – about 3mm – over the paper shapes using an offset palette knife. The chocolate shouldn’t be too smooth – you want it to have a textured ‘wooden’ grain. Leave to set (the chocolate must be completely firm before you assemble the cake.)
7 When ready to assemble, turn out the cakes and trim the tops so they are completely flat. Split the larger cake in half horizontally and sandwich the 2 layers with some of the pistachio buttercream. Set on a large serving board. Spread more of the pistachio buttercream over the top of the cake.
8 Use the smaller cake to make the shed. Cut two 9 × 13cm rectangles. Split each in half horizontally to make a total of 4 layers. Sandwich 3 of the layers together with pistachio buttercream (this is the shed). Spread pistachio buttercream over the fourth layer and save to make the veg patch.
9 Make the roof with the piece of cake left over from the shed (which will be about 20.5 × 7.5cm). Cut it lengthways in half. Trim one of the pieces into a 3-sided prism shape and stick it in place on top of the shed with pistachio buttercream. Cut the remaining piece of cake in half horizontally, then cut each of these 2 slices into a triangle 6cm high with a 9cm base. These are gable ends of the roof – stick them on to the ends of the prism shape with pistachio buttercream. Cover the whole shed with a thick layer of plain buttercream. Set the shed in place near one end on the large cake, and place the veg patch near the other end.
10 Next attach the fence around the sides of the large cake and around the veg patch. First spread (or pipe) plain buttercream on to the sides of the cake and on to the cake surface where you are going to place the veg patch fence. Carefully peel the chocolate strips away from the paper and press them on to the cake (make sure your hands are clean and very dry). In the same way attach the ‘planks’ to the shed, slightly overlapping them, to cover the sides, and the chocolate triangles to cover the gables.
11 Fill the veg patch with poppy seeds (soil), and cover the area around the shed and veg patch with pistachios (grass). Add a pathway with the mango pieces.
12 To make the roof covering, put the caster sugar and water into a medium pan and heat gently, stirring frequently, until the sugar has dissolved. Meanwhile, arrange the flaked almonds on a silicon mat or an oiled baking sheet to make two 7 × 14cm rectangular shapes. (Leave space between the rectangles.) Once the sugar has dissolved, bring the syrup to the boil and boil rapidly until it turns to a dark caramel. Working quickly, carefully pour the caramel over the almond rectangles to cover them. Leave to set.
13 When the caramel is firm, lift each rectangle off the mat in one piece. If necessary trim it to fit, then press on to the 2 sides of the roof (if the caramel breaks or cracks, just glue it in place with plain buttercream). Add ‘fruit’ and ‘vegetables’ to the patch: we made a strawberry patch, using sliced almonds for straw, lime zest for leaves and squashed goji berries for strawberries, as well as a carrot patch made of sliced, dried apricots with sliced pistachio nuts for carrot tops!