
This cute animal basket makes the perfect bed for your pet. The size given here is suitable for a cat or small dog, but it can easily be increased in size for larger dogs. The toy, which is made from scraps of fabric, will keep your pet company while the cord that fastens it to the basket will ensure that it never strays too far away. You could even fill the toy with catnip to make the perfect playmate for your feline friend.

Take 1.5-cm/½-in. seam allowances throughout unless otherwise stated.
3 hours
1. Fold a piece of paper in half and then into quarters. Tie a piece of string around a pencil. Pin the string to the folded corner of the paper, leaving a 24-cm/9½-in. length of string. Draw a quarter circle on the paper and cut out. This will be the paper pattern for the base of the basket. Lay the paper pattern on a double thickness of patterned fabric and cut out.

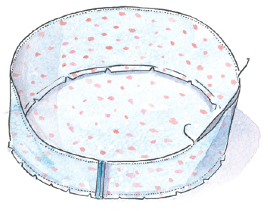
2. Enlarge the side-panel template (see instructions), trace onto paper and cut out. Pin the paper pattern onto your chosen fabric and cut out. With right sides together, pin and machine stitch the ends together and press open the seam.

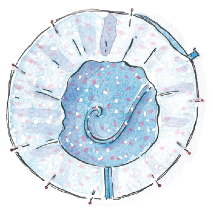
3. With right sides together, pin and stitch the side panel onto one of the base circles. Make small snips all the way around the seam allowance and press the seam open.

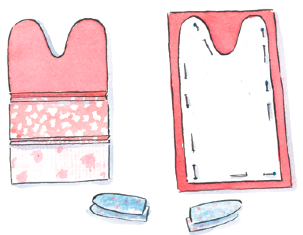
4. To make the toy, cut a 9 x 13-cm/3½ x 5-in. piece of plain fabric, a 5 x 13-cm/2 x 5-in. strip of patterned fabric and a 6 x 13-cm/2¼ x 5-in. strip of patterned fabric. With right sides together, pin and machine stitch the strips together. Trace the toy template on page 171 onto paper and cut out. Pin the pattern onto the fabric panel and cut out. Then pin the paper pattern onto plain fabric and cut out. Cut four arms from patterned fabric.

5. With right sides together, stitch two arm pieces together, leaving the straight side open. Fill with stuffing. Repeat with the remaining two arm pieces. Pin the two pieces for the toy together with the arms in between, aligning the raw edges. Stitch all around, leaving a 4-cm/1½-in. gap in one side. Turn right side out and fill with stuffing. Stitch the opening closed and sew on buttons for eyes and a bow at the neck.

6. Cut a 78 x 6-cm/31 x 2½-in. strip of patterned fabric. Fold it in half lengthways, wrong sides together, and then fold the raw edges in to the centre crease. Machine stitch along the length, stitching as close to the edge as possible.

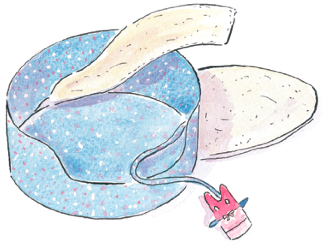
7. Using the template, cut out the inner side panel. With right sides together, pin and machine stitch the ends together and press open the seam. Pin and machine stitch the inner side panel onto the remaining base circle, inserting one end of the fabric ribbon into the seam, and leaving an opening of about 20 cm/8 in. Make small snips all the way around the seam allowance. Press.

8. With right sides together, pin and machine stitch the outer side panel to the inner panel. Make small snips around the curved sections and turn right side out. Press.

9. Using the paper patterns that you cut earlier, cut out wadding pieces and insert them through the opening into the base and around the sides to form a basket shape. Hand stitch the opening closed and sew the toy onto the end of the fabric ribbon. Make a few stitches around the inside base of the basket through all the layers to hold the wadding in place.
