File sharing requires a compromise between convenience and security. You want to make some of the files stored on your computer available to other people, but you probably have other files that contain information you would prefer to keep private. Therefore, Windows and other network operating systems allow you to assign different files or directories to different access levels. Some files are available to every network user, while others might be limited to specific users, and still others are only available to the file's owner.
One of the most common network systems for sharing files, printers, and other resources is the Server Message Block (SMB) protocol. This protocol is at the core of Microsoft Windows networking, and it also works with Macintosh OS X and Linux/Unix systems. Therefore, exchanging files among computers that run different operating systems is not a problem, even though the files themselves might not always be compatible (for example, you probably can't run a program written for Windows on a Linux system).
Many operating systems support more than one networking protocol, but when you run a mixed network, or if it's remotely possible that a visitor with a different kind of computer (such as a Mac or Linux laptop) might want to connect to your network, it's best to use the most common protocols.
Control of file sharing rests with the computer that holds each file, so other people can't open and read your files without your permission—even if they have a login account (or they're using a guest account) on the same computer. In order to share files with other users, you must turn on your operating system's file-sharing service and then assign an access level (universal, limited, or none) to each folder or directory. This chapter explains how to set up file sharing in Windows XP and Vista, Macintosh OS X, and in the Gnome and KDE environments used by many Linux and Unix distributions.
Windows XP uses a set of programs called Simple File Sharing to exchange files among computers on a network. In XP Home Edition, Simple File Sharing is always on; in XP Professional, file sharing is normally turned on, but you can turn it on or off.
To turn Simple File Sharing on or off in XP Professional, follow these steps:
From the Windows Desktop, open My Computer.
Select the Tools menu and choose Folder Options.
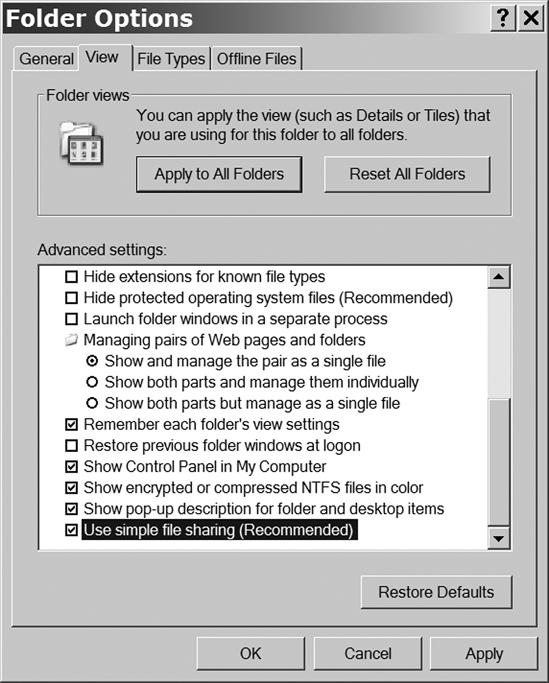
In the Folder Options window, click the View tab to open the window shown in Figure 12-1.
In the Advanced Settings box, scroll down to the bottom.
To turn Simple File Sharing on or off, click the Use simple file sharing (Recommended) checkbox. The file-sharing function is active when you see a checkmark in the checkbox.
Click OK to save your setting and close the Folder Options window.
In spite of its name, Simple File Sharing offers five access levels, which you might consider more complicated than simple. However, each of the five levels is useful in certain situations.
Level 1 | My Documents (private) | Files are only accessible to the file owner. |
Level 2 | My Documents (default) | Files are accessible to the file owner and administrators. |
Level 3 | Locally shared documents | Other users on this computer have read-only access; the file owner and administrators have full access. |
Level 4 | Read-only shared documents | Local and network users have read-only access; the file owner and administrators have full access. |
Level 5 | Read and write | All users have full read and write access. |
Warning
If you want to restrict access to any of your files, be sure to protect your Windows user account with a password.
The owner of Level 1 files and folders is the only person who can read them. All the files in a Level 1 folder are also private.
Level 1 files and folders are only possible within your user profile (the My Documents, My Music, My Pictures, and other folders in <drive letter>:\Documents and Settings\<username>).
To assign a folder or disk drive to Level 1 access, follow these steps:
From the Windows desktop, open My Computer.
Select Documents and Settings and then select the username folder.
If the folder you want to assign to Level 1 is not visible in the My Computer window, open the drive or folder that contains that folder.
Right-click the drive or folder icon.
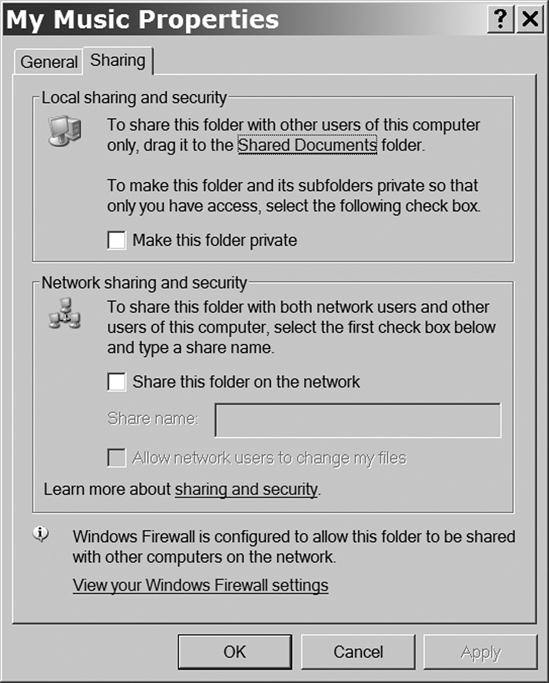
Select Sharing and Security from the pop-up menu. The Properties window shown in Figure 12-2 will appear.
Check the Make this folder private checkbox to limit access to the files in this folder. Click again to remove the checkmark and allow other users to see this folder.
Click OK to save your choice and close the Properties window.
Files stored in Level 2 drives and folders are accessible to the owner of those drives and folders and to anybody with an administrator-level account on the computer where the folders and files are stored. Other users on this computer and all users on other computers connected to this computer through the network can't open these files.
To assign a drive or folder to Level 2, follow these steps:
From My Computer, right-click the drive or folder icon you want to assign to Level 2. A pop-up menu will appear next to the icon.
Select Sharing and Security. A Properties window will appear with the Sharing tab visible.
Disable the Make this folder private option and the Share this folder on the network option. If a checkmark appears in either box, click the box to remove it.
Click OK to save your choice and close the Properties window.
The owner of Level 3 folders and files and any user with an administrator-level account on the same computer can read, change, or delete Level 3 folders and files; all others using the same computer can read or open these files, but they can't change or delete them. In Windows XP, Power Users can also change and delete Level 3 files. These files are not accessible through the network.
All Level 3 files and folders are located in the <drive letter>:\Documents and Settings\All Users\Shared Documents folder. To assign a file or folder to Level 3, simply copy or drag it to the Shared Documents folder.
If you expect to create many Level 3 files and folders, consider creating a shortcut to Shared Documents on the Windows Desktop. Dragging an icon to a shortcut has the same effect as dragging a file or folder directly to the original folder.
Level 4 drives, files, and folders are accessible through the network as read-only documents. Anybody with a network connection can open and read a Level 4 file, but only the file owner and the administrator of the local computer can change or delete the file.
To assign a drive, folder, or file to Level 4, follow these steps:
From My Computer, right-click the icon of the drive or folder you want to assign to Level 4. A pop-up menu will appear.
Select Sharing and Security from the pop-up menu. A Properties window like the one in Figure 12-3 will appear with the Sharing tab visible.
In the Network Sharing and Security section of the Properties window, check the Share this folder on the network option.
Make sure a checkmark does not appear in the Allow network users to change my files checkbox. Click the box to remove an existing checkmark.
Click OK to save your changes and close the Properties window.

Level 5 drives, files, and folders have no protection against changes or deletions by any network user. Anybody with access to a Level 5 file, whether on the same computer or through the network, can add, change, or delete that file. In a Level 5 folder, any user can also create a new file or folder or delete an existing one.
Obviously, Level 5 is the lowest level of security (essentially no security at all), so you should only use Level 5 for files that you want to allow everybody on the network to change or delete. As added protection, make sure your network is protected with a firewall; if the network includes one or more Wi-Fi access points, be sure to use WPA encryption.
On the other hand, don't let these security concerns scare you away from using Level 5 access when it's appropriate. In a business where two or more people work together on the same project, you will want to allow those involved to create or make changes to the relevant documents. On a home network, you may want to provide universal access to music, photos, and video files, and documents such as school term papers that a parent might want to review before they're turned in. And if you share files between your home or office computer and a laptop, you will want to allow Level 5 access between the two.
To assign the contents of a drive or folder to Level 5, follow these steps:
From My Computer, right-click the icon of the drive or folder you want to assign to Level 5. A pop-up menu will appear.
Select Sharing and Security from the pop-up menu. A Properties window will appear with the Sharing tab visible. This window is the same one you used to assign files or folders to Level 4 (Figure 12-3).
In the Network Sharing and Security section of the Properties window, check the Share this folder on the network option.
Check the Allow network users to change my files checkbox.
Click OK to save your changes and close the Properties window.