Starting with OS X 10.2, the Macintosh operating system supports Windows file sharing (SMB), so that's the best way to exchange files between an up-to-date Mac and another computer through a network. I'll discuss connecting older Macs to a network later in this section.
If your home or business uses Macintosh computers exclusively, you could use one of the older Apple sharing services, but you're on your own for that; we're concerned here about connecting your Mac to a non-proprietary network.
When a Macintosh is connected to an SMB (Windows) network, it appears the same as any other computer connected to the network: You can find drives, directories, files, and other resources connected to the Mac directly from your Windows or Linux/Unix desktop.
In most cases, connecting a Mac to a Windows network is a plug-and-play process. Simply plug an Ethernet cable into the socket or turn on your Wi-Fi adapter and the computer will automatically detect the network. However, your computer won't accept connections from the network unless the user logged in on the other computer also has an account on your Mac. Unlike Windows, Mac OS X won't accept connections from a guest account.
To establish a new account in Mac OS X, follow these steps:
From the Apple menu, select System Preferences.
Select View ▸ Accounts.
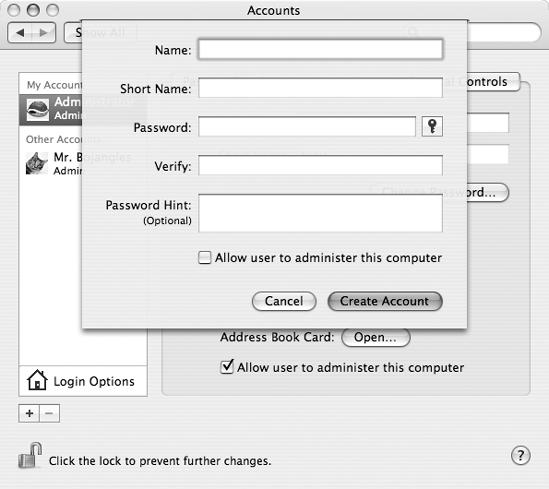
In OS X 10.2, select New User; in later versions, click the + button. The window shown in Figure 12-12 will appear.
Type the name and a short name for the new account. The short name should be identical to the user's Windows or Linux/Unix username.
Type the user's password in the appropriate field.
In OS X 10.2, check the Allow user to log in from Windows checkbox and then click OK.
Close the System Preferences window.
When an existing user wants to connect to a Mac, the user's computer should automatically set up the link in versions later than OS X 10.3, but sometimes you have to instruct the Mac to accept the link. This is always required in OS X 10.2. Follow these steps to allow a user to log in from a Windows network:
From the Apple menu, select System Preferences.
Select View ▸ Accounts.
Select the account you want to authorize.
If the computer requests a password, type it in the appropriate field.
Check the Allow user to log in from Windows checkbox. The system will instruct you to reset your password.
Enter your existing password or a new password and click the Save button.
Confirm that you can now log in to the Mac from another computer connected to the network. If it works, the process is complete.
If you can't log in to the Mac from another computer, try changing the user's password.
Each computer on the network should use the same SMB workgroup name, but the default in Mac OS X is WORKGROUP, which is probably not the name your Windows network uses.
To change the workgroup name on a Mac, follow these steps:
Select Applications ▸ Utilities ▸ Directory Access.
Click the padlock icon to identify yourself as an administrator.
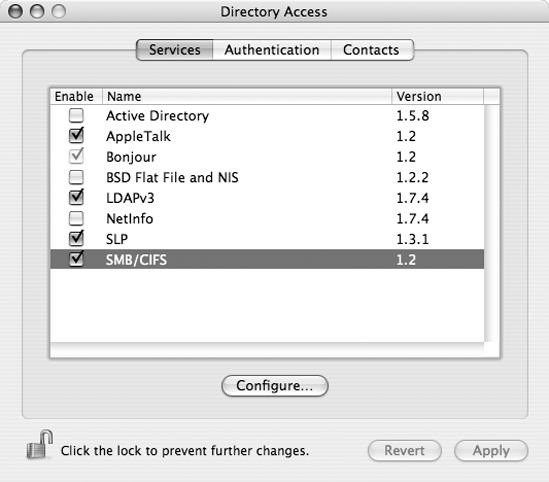
Select SMB/CIFS from the list of services, as shown in Figure 12-13.
Select Configure. The program will scan the network and display a list of workgroups. On most small networks, you will see only one workgroup name.
Select the workgroup name you want to use and click OK.
Click Apply and quit Directory Access.
Before you can share files through a Mac, you must turn on Windows file sharing:
From the Apple menu, select System Preferences.
Select View ▸ Sharing.
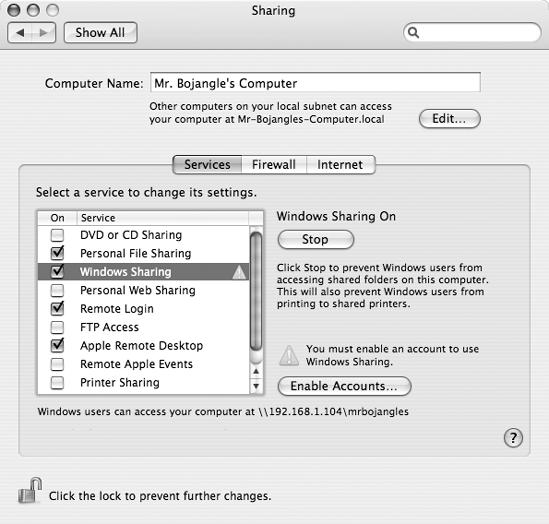
Check Windows Sharing in the Service column, as shown in Figure 12-14. The list of network preferences will now include Windows Sharing On.
To view or open a shared file on another computer through the network, follow these steps:
Click the Finder icon in the dock, and select Connect to server from the Go menu.
When the Connect to Server dialog appears, either browse to find the share you want or type the address, using this format: smb://<ServerName>/<ShareName>.
Click the Connect button to make the connection.
Apple did not include SMB file sharing in Mac OS until OS X 10.2. You can use one of the Apple sharing services to share Mac files using older software with another computer through a network, but the process is somewhat different.
To share files from OS X 10.1 or 10.2 with another computer on the same network, select Go ▸ Connect to Server. A list of other computers will appear. Select the name of the computer that contains the files you want to use and click the Connect button.
To connect to another computer from OS 8 or 9, follow these steps:
From the Apple menu, select the Chooser.
Click the AppleShare icon.
If a list of AppleTalk Zones appears, choose the zone that includes the computer you want to reach.
Select the name of the computer that contains the file or other resource you want to open from the list, and click the OK button.


