
More and more city dwellers are getting in touch with their inner farmer and putting a chicken coop in the backyard. A friend of mine has quite the brood and once gave me a trio of chickens. Since it’s kind of country to have chickens in the city, I named them Patsy, Tammy, and Loretty—not Loretta, but Loretty, just like husband Doolittle called the Queen of Country Music in the biographical movie, Coal Miner’s Daughter.
Having fresh eggs in the fridge was a pleasure. A few weeks later we had a security breach, and I found a trail of bloody feathers leading to the dog “playing” with her chicken. It was Tammy. Somehow in this tragic death, it seemed appropriate that it was Tammy since her namesake led such a hard life. A few months later, we were gifted with another chicken. There are laying hens and eating hens, and we indicated their intended use by their designated name. Although I had no intention of asking Mama for a lesson on how to wring a chicken’s neck, the latest addition was meant to be an eating hen and had a big full chest. We named her Dolly.
When taping any segments involving eggs at Martha Stewart Living Television, we used eggs freshly gathered from Martha’s hens. Among the various residents at her palais de poulet were Araucana chickens that produce the distinctive powder blue eggs. As kitchen director, I was responsible for ensuring we composted for the garden, recycled, and saved any bits appropriate for chicken feed, resulting in very little trash. (Martha, taking a cue from simple country living, has been defining green for decades.) Once a rubber band was found in the feed, and I held my breath for a few days, hoping none of the flock fell to foul, not fowl play.
Many of the same farmers that sell eggs at my local farmer’s market also sell both unpasteurized and pasteurized milk as well as fresh and cured cheeses. I guess if you’ve got chickens running around, a cow or a goat or two won’t hurt. In Georgia, unpasteurized milk is for “pet consumption only.” There’s a raging debate about the raw milk and folks use suberterfuge and tacit methods to secure their dairy demands.
Along with the renewed interest in locally grown foods, there’s a desire to seek out locally produced dairy. We’re going back to the foods of our ancestors. One of my favorite yogurt and cheese makers, Atlanta Fresh, receives their milk fresh daily from Johnston Family Farms in Newborn, Georgia. Within a few days of receiving the milk, they make yogurt and cheese. Once you taste dairy products made only a handful of days ago, you quickly understand the difference.
Choosing Eggs
While I was living and working as an assistant to Anne Willan in France at Château du Fëy, my list of chores did not include feeding chickens and gathering eggs, but I did buy them at the farmer’s market.
At the farmer’s markets across France, eggs are sold at room temperature and, indeed, we did not always store eggs in the refrigerator. In the United States, however, we are instructed to always store eggs in the refrigerator due to the possibility of contamination from salmonella. Salmonella is an anaerobic bacteria that may enter our digestive tracts via contaminated food, causing abdominal pain and violent diarrhea. The symptoms usually last only a day or two in healthy people, but can lead to serious complications for the very young, pregnant women, the elderly, the ill, and those with compromised immune systems.
Egg whites and yolks left runny or raw increase the chances of a person contracting salmonella, since the product has not sustained enough heat to kill the bacteria. The shells of eggs may also be contaminated with salmonella, and when you crack the shells, the bacteria can contaminate the egg inside. Unfortunately, you can’t see or smell salmonella bacteria on eggshells, so it’s important to always practice good food safety when handling raw eggs.
In recent years there have been massive egg recalls that suggest factory farming is the culprit. Many chefs and cooks prefer to buy their eggs directly from small local farms. However, the United States FDA egg safety requirements don’t apply to farms with fewer than 3,000 hens. While it may be easier to keep smaller facilities disease free, salmonella contamination can happen at any farm, both conventional and organic, so if you buy eggs from the farm, be sure that the farmers refrigerate their eggs, keep their facilities pest controlled and clean, and care for the chickens properly.
The experience of gathering an egg still warm from the hen is certainly not available to all, but the egg is still imminently incredible, edible, and economical. Eggs and dairy come to mind for breakfast, but give a few of these recipes a try in the evening with “breakfast for dinner.” Cheesy, eggy goodness is obligatory on lazy, delicious weekend mornings meant to indulge and delight, a welcome respite from the harried, hectic workweek. Basic to Brilliant, eggs and dairy are exactly what they are cracked up to be.
If you actually hard boil an egg, you are fairly likely to have overcooked, sulfurous eggs with shattered shells, tough plumes of rubbery white, and a green ring around a chalky yolk.
Hard cooking, also known as coddling, is the best technique for cooking eggs in the shell. The process involves bringing the eggs to a boil, removing the pan from the heat, covering the pan, and setting a timer.
Soft eggs are barely set at 4 minutes.
Mollet eggs are allowed to set for 5 to 7 minutes; the white is set and the yolks are warm but runny. Mollet eggs are perfect with crisp fingers of buttered toast.
At 10 minutes of coddling, the whites are firm and set and the yolk is firm yet barely soft at the center, excellent for creamy egg salad.
For deviled, Easter, hard cooked, and sieved eggs for mimosa garnish, let them coddle for 12 minutes; any longer and the egg will begin to overcook.
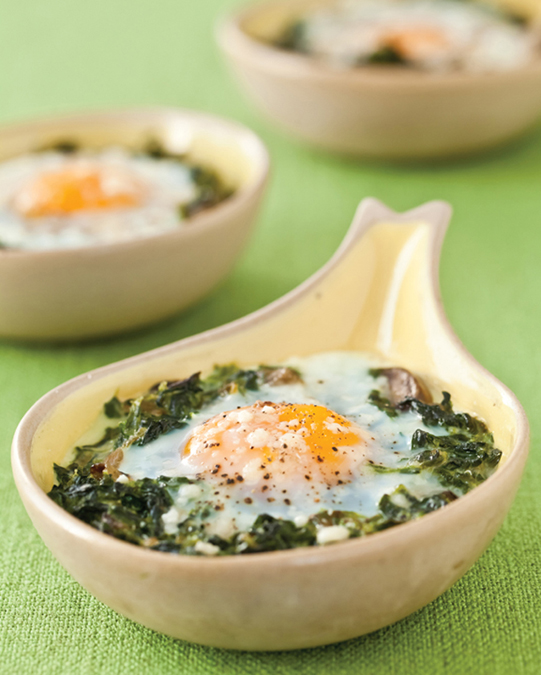
Oeufs en Cocotte, the Brilliant version of Skillet-Baked Eggs with Mushrooms and Spinach
SERVES 4
As a professional cook, I have a wall of cookware: copper from France; enamel-coated French or Dutch ovens (the nationality depends on the manufacturer); high-tech, stainless-steel sauté pans; thin pots for boiling pasta. If I go into a fancy, tricked-out designer kitchen, and there’s a rack with all the same kind of pots, I know that person doesn’t actually cook. Different pots are needed for different reasons. And even with all my expensive professional cookware, the pan I reach for the most is, without hesitation, my grandmother’s cast-iron skillet.
I am generally a fan of using frozen spinach in recipes that require a lot of spinach. It’s always a good idea to have a bag or box in the freezer for a quick meal, and certainly on a weekend morning.
16 ounces fresh baby spinach or 1 (12-ounce) bag thawed frozen leaf spinach
2 tablespoons unsalted butter
1 onion, preferably Vidalia, finely chopped
6 ounces mixed mushrooms (such as cremini, chanterelle, morel, shiitake, and white button), thinly sliced
1 clove garlic, very finely chopped
⅓ cup heavy cream
⅛ teaspoon freshly grated nutmeg
Coarse salt and freshly ground black pepper
4 large eggs
2 tablespoons finely grated Parmigiano-Reggiano cheese (½ ounce)
Position the oven rack in the upper third of the oven and preheat to 450°F. Prepare an ice-water bath by filling a large bowl with ice and water.
To cook the fresh spinach, heat ½ inch water in a large skillet over high heat. Add half the spinach and cook until wilted, about 30 seconds. Add the remaining spinach, cover, and cook over medium-high heat until tender, about 60 seconds. Drain well in a colander, then set the colander with spinach in the ice-water bath to set the color and stop the cooking, making sure the spinach is submerged. Remove the colander with spinach to drain. Working with a handful at a time, squeeze the freshly cooked, or thawed frozen, spinach between two dinner plates or by hand to remove any excess liquid. Set aside.
In the same skillet, heat the butter over medium heat. Add the onion and cook until translucent, 3 to 5 minutes. Increase the heat to medium-high, add the mushrooms, and cook, stirring occasionally, until softened and any liquid is released, about 4 minutes. Add the garlic and cook until fragrant, 45 to 60 seconds. Add the cream, nutmeg, and spinach. Season with salt and pepper and bring to a simmer. Remove the pan from the heat.
Using the back of a spoon, make 4 nests in the spinach-cream mixture in the skillet. Break an egg into each indentation. Season the eggs with salt and pepper and sprinkle with the cheese. Bake until the whites are set and the yolks are still runny, about 8 minutes. Serve immediately.

Oeufs en Cocotte is made by cooking an egg in a petite casserole or ramekin, nestled on top of other ingredients, including vegetables or meat, with an optional topping of grated cheese. Cocotte translates to “casserole,” but also “hen”—as well as “love” or “darling.” When I was working in France, my chef’s father would affectionately call me cocotte. You can imagine my immediate concern that he was calling me a casserole. There is something absolutely “darling” about serving individual dishes of baked eggs.
To do so, simply divide the spinach-cream mixture among 4 small ramekins. Top each with an egg, then sprinkle with the cheese. Bake until the whites are set and the yolks are still runny, about 8 minutes.
SERVES 4
It makes me madder than anything when I burn something I’m cooking. It’s absolutely the most idiotic thing to do in the kitchen, and it’s usually a result of not being dedicated, of not paying attention, of not being focused. I have a confession: Occasionally (actually often), I burn toast.
Being dedicated means doing something the right way and following through. It is tempting to not be dedicated, to take a shortcut, but, in reality, it’s much easier to do things right to begin with, rather than try to fix a mistake. Great ingredients aren’t enough. Making a great base for a dish is not enough. Cooking a dish until it’s right is not enough. It takes all these things; it takes real dedication to all these steps even for something as simple as scrambled eggs and toast. Having said that, don’t be scared even when saddling up to the stovetop to prepare these Perfectly Soft Scrambled Eggs. At the end of the day, it’s just eggs and toast.
4 slices brioche, challah, or best-quality sandwich bread
2 to 3 tablespoons unsalted butter, at room temperature
5 large eggs
2 tablespoons low-fat or whole milk
1 tablespoon finely snipped fresh chives
Coarse salt and freshly ground white pepper
Position an oven rack 4 inches below the broiler and preheat the broiler. To make the toast, arrange the brioche slices on a baking sheet and spread the top sides with 1 tablespoon of the butter. Broil until brown, 2 to 3 minutes. Turn the bread and broil the other side. Remove the toasts from the oven and slice into triangles. Place on a clean cutting board and cover with a paper towel to keep warm.
Meanwhile, fill the bottom of double boiler with water and bring to a simmer over medium heat. Melt 1 tablespoon of the butter in the top of the double boiler. Whisk together the eggs and milk in a bowl. Add the eggs to the butter in the double boiler and cook until small curds form and the eggs are creamy and almost set, 5 to 7 minutes. Remove from the heat just before the eggs fully set, because the eggs will continue cooking a bit after being removed from the heat. Add the remaining 1 tablespoon butter and the chives. (The last bit of butter is decadent and optional, but it will stop the cooking and ensure the eggs don’t overcook in the residual heat.) Taste and adjust for seasoning with salt and white pepper. Serve immediately with the toast.

These Ham Crisps are just a little detail, something so simple, but just different enough not to be confused with fried ham, they lift these Basic eggs to Brilliant.
Preheat the oven to 400°F. Line a rimmed baking sheet with a silicone baking liner or parchment paper. Place 8 slices thinly sliced country ham, prosciutto, or Serrano ham on the prepared baking sheet without crowding. Bake until crisp, about 10 minutes. Serves 4. Serve alongside the scrambled eggs and toast.
SERVES 4
I usually wind up making egg salad when I have to abort making deviled eggs because my eggs are too fresh. Very fresh eggs are difficult to peel. For deviled eggs, the trick is to think ahead and buy and refrigerate eggs for about seven days in advance of cooking. This allows the eggs to take in air, which helps separate the membranes from the shells. Every time, without fail, it occurs to me how nice old-fashioned egg salad is and I wonder why I don’t start this recipe with intent, rather than as a backup plan. Why don’t we start now?
6 large eggs
2 tablespoons mayonnaise
½ teaspoon Dijon mustard
1 teaspoon freshly squeezed lemon juice
2 teaspoons chopped fresh tarragon, chives, dill, or fennel fronds
Coarse salt and freshly ground white pepper
1 small bunch watercress, tough stems removed
8 slices white sandwich bread or brioche, cut ½ inch thick
To hard cook the eggs, place the eggs in a saucepan and add water to cover them by 1 inch. Bring to a boil over high heat (you will see bubbles around the sides of the pot). Remove from the heat, cover, and let stand for 10 minutes for slightly soft eggs for egg salad, or 12 minutes for firmer eggs for deviled eggs and such. Drain the eggs and rinse them under cold running water. Set aside to cool completely.
To peel the eggs, tap each egg gently on the counter or sink all over to crackle it. Roll the egg between your hands to loosen the shell. Peel, starting at the large end, while holding the egg under running cold water; this facilitates peeling and also removes any stray shell fragments.
Halve the eggs and place in a bowl. Using a pastry blender or a fork, mash the eggs until slightly coarse. (I like the pieces of white to be about the size of an almond so that they don’t become too small when you fold in the dressing.) In a small bowl, combine the mayonnaise, mustard, lemon juice, and tarragon. Add to the mashed eggs and season with salt and white pepper. Stir to combine. Taste and adjust for seasoning with salt and white pepper.
Place 4 slices of the bread on a clean work surface. Divide the egg salad equally among the bread and top with the watercress. Top with the remaining 4 slices of bread. Using a serrated knife, halve on the diagonal. Serve immediately.
The flavor of smoked salmon marries well with egg salad.
To prepare a Brilliant (and admittedly slightly prissy) canapé, place the slices of brioche on a clean work surface. Place 4 to 6 ounces very thinly sliced smoked salmon in a single layer on the bread. Top the salmon with a thin, even layer of egg salad. Then, using a round cutter and pressing straight down, cut out individual, bite-size open-face sandwiches. When you are ready to serve, garnish each canapé with a single tarragon leaf. Serve immediately. (To make ahead, prepare the canapés and arrange on a rimmed baking sheet without the final tarragon leaf garnish. Spray a sheet of plastic wrap with flavorless nonstick cooking spray. Press the wrap directly on the surface of the egg salad. Refrigerate for up to 24 hours.)
SERVES 4 AS A MAIN COURSE, 8 AS A FIRST COURSE
I first learned to make this dish while living in northern Burgundy, famous for centuries for the wine produced in the region. When I describe this dish and how our humble egg is prepared—runny poached eggs in red wine sauce with sautéed mushrooms—many people wrinkle their noses. Then they taste it and wipe their plates clean. This Burgundian recipe is one of the classics of French cooking and is absolutely delicious.
In a nod to the extravagance of the dish, I am suggesting here toasted bread instead of the traditional butter-fried croutons.
1 tablespoon unsalted butter
1 onion, preferably Vidalia, chopped
1 carrot, chopped
1 celery stalk, chopped
1 clove garlic, crushed
2 tablespoons all-purpose flour
1 (750-ml) bottle red wine (such as Pinot Noir)
2 cups homemade beef stock or reduced-fat, low-sodium beef broth
2 sprigs thyme
2 flat-leaf parsley stems, plus leaves for garnish
1 bay leaf, preferably fresh
½ teaspoon whole black peppercorns
8 large eggs
1 tablespoon distilled white vinegar
4 thick slices bacon, cut into lardons
15 to 20 pearl onions, peeled
4 ounces white button mushrooms, sliced
Coarse salt and freshly ground black pepper
8 slices best-quality white bread, toasted
2 tablespoons all-purpose flour
To make the sauce, heat the butter in a large, heavy saucepan over medium heat. Add the onion, carrot, and celery and cook until tender, 3 to 5 minutes. Add the garlic and cook until fragrant, 45 to 60 seconds. Add the flour and cook, stirring constantly until the vegetables are coated. Add the wine, stock, thyme, parsley, bay leaf, and peppercorns. Bring to a boil, decrease the heat to a simmer, and cook until the sauce is concentrated and reduced by half, 20 to 25 minutes.
To make the poached eggs, fill a large bowl with water and set aside (use hot water if serving them immediately, cold if making the eggs ahead). Fill a large saucepan with 3 inches of water, add the white vinegar, and bring to a boil over medium-high heat. Break one of the eggs into a ramekin or teacup. Using the handle (not the bowl) of a wooden spoon, swirl the water to create a whirlpool, which will help the eggs hold their shape. Decrease the heat to medium-low so the water is at a gentle boil and slide the egg into the center. Adjust the heat, if necessary, to keep the water just at a bare simmer and poach the egg until the white is solid and the yolk is firm but still soft to the touch, 3 to 4 minutes. Using a slotted spoon, remove the egg and transfer to the bowl of water; set aside. Return the water to a very gentle boil, and repeat the process with the other eggs. The eggs can be poached up to 12 hours ahead and refrigerated in a sealed container. To serve them, reheat briefly in hot water.
Heat a large skillet (I know, I know, it’s a lot, but stay with me) over medium heat. Add the bacon and cook until brown, about 5 minutes. Transfer to a plate lined with paper towels. Discard all but 1 tablespoon of the bacon drippings, reserving it for another use. Add the pearl onions and cook them until brown and just tender, shaking the pan often so they color evenly, about 10 minutes. Add the mushrooms and stir to combine. Cook until all the vegetables are tender, 2 to 3 minutes. Add the reserved bacon and stir to combine.
Strain the red wine sauce over the mushroom-onion mixture, pressing to extract all the liquid and
flavor. Bring to a boil, then decrease the heat to simmer. Taste and adjust for seasoning with salt and pepper. Keep over low heat.
To serve, reheat the
eggs by immersing them in hot water for 1 minute. Set the warm toasts on warmed serving plates Drain the eggs on paper towels. Place one on each piece of toast. Spoon the sauce over the eggs. Garnish with parsley and serve immediately.
Personally, I think the original recipe is Brilliant on its own, although all components of the recipe are Basic, there are a lot of elements and steps. But, I didn’t want to dumb down this classic dish just to make the Basic to Brilliant concept work. How then to elevate this dish to truly Brilliant other than shaving over piles of black truffles or using expensive wild mushrooms in the dish? Quail eggs.
Substitute 3 quail eggs for each chicken egg for a total of 24 quail eggs. Gently tap the narrow part of the quail egg on the side of a bowl. Use your fingers to break off the top or narrow part of the shell, taking care not to rupture the yolk inside. (Skip the swirling part of creating a vortex; these eggs are so small they poach easily without it.) Proceed with the Basic recipe. Serve 3 quail eggs per person for an appetizer. (I think 6 eggs lined up would be a bit much, regardless of size.) Alternatively, for a real chef-inspired touch, serve the eggs individually in soup spoons as hors d’oeuvres. Instead of toast, make small toasted cubes of bread. Place a poached quail egg in a spoon. Top with the red wine–mushroom mixture. Garnish with a toasted bread cube and chopped parsley.
Pearl onions can be a bear to peel. To peel pearl onions, bring a small pot of water to a vigorous boil. Add the onions and cook until the skin begins to loosen, 2 to 3 minutes. Transfer to a bowl of ice water, then drain immediately. Use a paring knife to remove the top papery layer of skin, leaving the root end intact but trimming away the roots. Alternatively, you can sometimes find frozen peeled pearl onions in the freezer section of your grocery store. If you are using frozen onions, add them to the mushrooms after the mushrooms have cooked, not before. The frozen onions only need a few minutes of cooking.

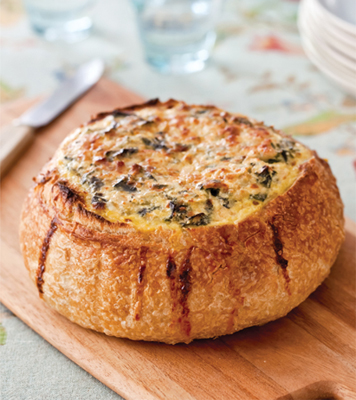
Kale Omelet, served the Brilliant way, Baked in a Sourdough Boule.
SERVES 6 TO 8
Bagged greens may have saved a Southern foodway. Meme would have never used them, and Mama thinks they have too many stems, but this generation? I love the prewashed bags of winter greens. Lazy? Well, of course it is. When I am able to purchase kale or collards from my local farmer’s market, I do; but for convenience, bagged kale, turnip, collard, and mustard greens are a great time-saver. For this recipe, give them a quick rinse under cold running water to freshen them, pick out the larger tough stems, and give the leaves another few chops with a knife.
I am pretty adamant, however, about not using nonstick skillets—except with eggs and delicate creatures such as the Classic Crêpes or Parmesan Tuile, or when trying to use less oil, as with the Panfried Shrimp Po-Boy. For cooking and searing of meats, nonstick doesn’t allow the fond, the yummy browned bits, to develop. For egg cookery, however, I think nonstick is essential.
3 slices thick bacon, cut into lardons, or 2 tablespoons canola oil
1 onion, preferably Vidalia, chopped
5 cups hearty greens (such as kale, chard, or mustard greens), cleaned, tough stems removed, and chopped
Coarse salt and freshly ground black pepper
2 tablespoons water
6 large eggs, lightly beaten
½ cup freshly grated Parmigiano-Reggiano cheese (2 ounces)
¼ teaspoon red pepper flakes
¾ cup ricotta cheese (6 ounces)
1 tablespoon canola oil
Preheat the oven to 350°F. Line a plate with paper towels.
Heat a large nonstick ovenproof skillet over medium heat. Add the bacon and cook until crisp and brown, 5 to 7 minutes. Using a slotted spoon, transfer the bacon to the prepared plate; set aside.
Pour off all but 1 tablespoon of the drippings (reserve the excess fat for another use or dispose). Alternately, heat 1 tablespoon of oil in the skillet over high heat until shimmering. Add the onion and cook over medium heat, stirring occasionally, until golden, 4 to 6 minutes. Decrease the heat to medium-low, add half the greens, and toss until they begin to wilt, about 1 minute. Add the remaining greens and season with salt and pepper. Add the water. Toss to coat. Decrease the heat to low. Cover and cook, stirring occasionally, until the greens are wilted and tender, about 15 minutes. Using a slotted spoon, transfer the greens to a large bowl, leaving any cooking liquid behind.
Rinse and dry the skillet. To the greens, add the eggs, ¼ cup of the grated cheese, the reserved bacon, and red pepper flakes. Stir to combine. Fold in the ricotta. Season with salt and pepper.
Return the now-clean skillet to the stovetop over medium-high heat. Add 1 tablespoon canola oil and rotate the skillet to coat the bottom of the pan. When the oil is shimmering, pour in the egg mixture and spread evenly with a rubber spatula. Cook over medium-low heat until the omelet is barely set at the edges, 5 to 7 minutes. Sprinkle the remaining ¼ cup grated cheese over the eggs.
Transfer the skillet to the oven and bake until set, 15 to 20 minutes. Remove from the oven and, using a butter knife or long spatula, loosen the omelet from the sides of the skillet. Give the skillet a shake and slide the omelet out onto a clean cutting board. (Don’t use a knife in the nonstick skillet!) Using a serrated knife, slice into wedges and serve immediately.
Your brunch guests will certainly think this is Brilliant.
Preheat the oven to 350°F. Line a rimmed baking sheet with a silicone baking liner or parchment paper. Slice off the top of an 8-inch round sourdough or firm white loaf; remove the bread in chunks, leaving a shell. Reserve the bread for another use. Prepare the filling. Instead of returning the egg and kale mixture to the skillet, transfer the mixture to the prepared boule. Top with remaining ¼ cup grated cheese. Bake until the eggs are set, 45 to 50 minutes. Transfer to a rack to cool slightly. Present on a wooden cutting board with a serrated knife. Serve immediately or at room temperature.
SERVES 8
Being from Georgia, I am a huge supporter of Vidalia onions. Much in the way that France regulates food and wine with appellation d’origine contrôlée, the Georgia state legislature got together in 1986 and decided that Vidalia onions had to be grown within a certain region of Vidalia, Georgia. This is an unusually sweet variety of onion, due to the low amount of sulfur in the soil. If Vidalia onions are unavailable, use another sweet onion, such as Walla Walla or Texas Sweet.
A strata, also known as a breakfast casserole, is a great dish that can be made, and indeed should be made, the day before. The flavors marry, the bread soaks up the savory custard, and the dish sets before baking. The next day, all you have to do is set it out at room temperature to take the chill off, then bake it. This dish is a favorite for family gatherings as well as morning tailgates during football season.
2 tablespoons pure olive oil, plus more for the pan
8 ounces pork, turkey, or chicken breakfast sausage, in bulk or removed from casing
1 onion, preferably Vidalia, thinly sliced
1 red bell pepper, cored, seeded, and thinly sliced
1 yellow bell pepper, cored, seeded, and thinly sliced
Coarse salt and freshly ground black pepper
2 cloves garlic, very finely chopped
12 slices firm white sandwich bread, cut into 1-inch squares
½ cup freshly grated Cheddar, Gruyère, or mozzarella cheese (about 2 ounces)
6 large eggs
2½ cups low-fat or whole milk
Leaves from 2 sprigs thyme, chopped
Brush a large baking dish with oil; set aside.
Heat the oil in a large skillet over medium heat. Add the sausage and cook until it starts to brown, 3 to 5 minutes. Drain off most of the cooking fat, leaving about 1 tablespoon. Add the onion and cook, stirring occasionally, until a rich golden, 6 to 8 minutes. Add the bell peppers and season with salt and pepper. Cook until the peppers are tender, about 5 minutes. Add garlic and cook until fragrant, 45 to 60 seconds.
Place half of the bread squares in the baking dish, and top with half of the sausage-vegetable mixture. Sprinkle half of the cheese over the vegetables and top with the remaining bread and sausage-vegetable mixture. In a bowl, whisk together the eggs, milk, and thyme. Season with salt and pepper. Pour over the bread and vegetables. Cover and chill the strata for at least 3 hours, and up to 12 hours.
Preheat the oven to 350°F. Let the strata stand at room temperature for 20 minutes.
Sprinkle the remaining ¼ cup cheese over the strata. Bake until puffed and golden brown around the edges, 30 to 45 minutes. Remove to a rack to cool slightly before serving.
Basic strata is made Brilliant for serving to brunch guests when baked as individual portions. In a large sealable plastic container, combine the bread, sausage-vegetable mixture, egg mixture, and half the cheese. Seal and refrigerate for 3 to 12 hours. When you are ready to finish, preheat the oven to 350°F. Brush a standard 12-cup muffin tin with oil. Spoon the mixture into the tins, filling each cup no more than two-thirds full. Bake for about 30 minutes, until golden brown and set. Remove to a rack to cool slightly. Serve warm or room temperature.
SERVES 1
While I was living and working in France for Anne Willan, we had a photo shoot for her cookbook, Cook it Right, an exhaustive tome that documents the various states of “doneness” (and over- and underdoneness) of everything from whipped cream to braised pheasant. When it was time to shoot the proper folding of an omelet, our “hand model,” the talented writer and editor Marah Stets, was not able to execute the business-letter fold at the angle needed by the photographer. In her defense, (and yours, if you struggle), it can be tricky, which is why most omelets you see are simply in folded half. I am not even sure when the last time was that Anne had made an omelet, but she simply grabbed the skillet and spatula and, like a pro, quickly produced a perfect fold on demand.
3 large eggs
Coarse salt and freshly ground black pepper
2 tablespoons chopped fresh mixed herbs (such as flat-leaf parsley, chervil, tarragon, and chives)
1 teaspoon unsalted butter
In a bowl, beat the eggs, salt, pepper, and herbs with a fork. Melt the butter in an 8-inch nonstick skillet. When the butter foams, add the eggs. Holding your fork flat, stir the eggs quickly while shaking the pan back and forth. Continue so the eggs set uniformly.
When the eggs are lightly set but still moist, incline your pan forward so most of the egg gathers at the far end of the pan. Stop stirring. The mass of eggs should thin out around the edges at the near end. Using your fork, fold this thin edge toward the center of the omelet, enclosing the thick, moist center.
Press the fold into place, creating a rounded edge. Run your fork between the edge of the pan and the far edge of the omelet to loosen. Using the palm of one hand, tap the handle gently where it joins the pan to shake the omelet and make it twist and lift onto itself, so the lip rises above the edge of the pan. Fold this lip back toward the center of the omelet, meeting and overlapping the edge of the other lip. Press with the flat of the fork to shape the omelet into a point at each end.
Holding a warmed serving plate, tap the underside of the pan against the counter at the omelet end, so the omelet moves against the edge of the pan. Invert the omelet onto a plate. Press with the flat of the fork to shape the omelet into a point at each end. Smile and serve immediately.

Sometimes simple and Basic are best, but most things, eggs included, are made better and therefore Brilliant with the addition of warm melted cheese. This technique is particularly handy when you are serving omelets for brunch—unless you have your own personally staffed omelet station. Position an oven rack 4 inches below the broiler and preheat the broiler. Slide the omelet into an oval gratin dish brushed with 1 tablespoon room-temperature butter. Repeat the process with additional omelets, if desired. Sprinkle 1 tablespoon grated Gruyère cheese over each omelet. Place under the broiler and cook until bubbly and lightly toasted, 3 to 5 minutes. Serve immediately.
SERVES 4 TO 6
There’s lots of feta cheese out there, but true feta is made in Greece, and according to the European Union, you can’t call it feta unless it was produced there. Like Georgia’s own Vidalia onions or French Champagne, it isn’t technically feta unless it’s made where it’s supposed to be made—in Greece. Having said that, many of the local dairies that are popping up across the United States raise sheep and goats and are producing delicious award-winning local feta, or fetalike, cheese. One of my favorites in the Atlanta area is Decimal Place Farms. Seek out your local cheeses at your farmer’s market, Whole Foods Market, or specialty food store.
16 ounces feta cheese, cut into ¼-inch squares
1 tablespoon whole cumin seeds
2 teaspoons whole coriander seeds
1 teaspoon red pepper flakes
Finely grated zest of 1 orange
1½ cups best-quality extra-virgin olive oil
Leaves from ½ small bunch basil, chopped
2 sprigs rosemary
2 bay leaves
Place the feta in a sealable airtight container or glass jar. Set aside. Combine the cumin, coriander, and red pepper in a small skillet over medium-high heat. Shake the skillet gently until the spices are fragrant, about 1 minute. Place in a piece of cheesecloth and add to the feta along with the orange zest and olive oil. Add the basil, rosemary, and bay leaves and mix gently.
Cover and refrigerate for at least 1 day and up to 1 week. Bring to room temperature before serving.
The cheese is phenomenal on its own, but wrap it in smoky, sweet grilled zucchini and it’s a Brilliant summer snack or side dish.
Prepare a charcoal fire using about 6 pounds charcoal and burn until the coals are completely covered with a thin coating of light gray ash, 20 to 30 minutes. Spread the coals evenly over the grill bottom, position the grill rack above the coals, and heat until medium-hot (when you can hold your hand 5 inches above the grill surface for no longer than 3 or 4 seconds). Or, for a gas grill, turn on all burners to high, close the lid, and heat until very hot, 10 to 15 minutes. Meanwhile, slice 4 small zucchini lengthwise into even strips about ½ inch thick. Brush both sides of each strip with some of the seasoned feta oil. Season with coarse salt and freshly ground black pepper.
Place on the grill and cook until just tender and lightly charred, about 3 minutes. Turn the zucchini over and cook until the strips start to soften, about 2 minutes more. Remove to a rack to cool slightly. When cool enough to touch, roll up 1 feta square inside each strip of zucchini. Secure with a toothpick or skewer. Return to the grill to heat through, about 2 minutes. Remove to a warmed serving place. Season with freshly ground black pepper and serve immediately. Serves 4 to 6.
SERVES 4 TO 6
Similar to its better-known cousin, Brie, true Camembert is a creamy cow’s milk cheese from Normandy, France. This is an astonishingly good, simple, little Basic recipe. A “little black dress” so to speak, perfect to whip out at the last minute for a delicious nibble as an aperitif or autumn snack.
Look for local Camembert-style cheeses and give them a try, too. (If your cheese doesn’t come in a box, you can use aluminum foil to enclose it during the baking step.) I like to use Green Hill, made by my friends at Sweet Grass Dairy in Thomasville, Georgia.
1 (8-ounce) round Camembert, in a wooden box
1 baguette, diagonally sliced ¼ inch thick
2 tablespoons pure olive oil
1 clove garlic, halved
Preheat the oven to 375°F.
Remove and discard the paper labels and any plastic from the Camembert. Return the cheese to its box and place on a rimmed baking sheet. Bake until soft and heated through, 20 to 30 minutes.
Position an oven rack 4 inches below the broiler and preheat the broiler.
To make the toasts, arrange the baguette slices on a baking sheet and brush the top side with some of the olive oil. Broil until brown, 2 to 3 minutes. Turn the toasts and broil the other side. Remove the toasts from the oven. While warm, rub the oiled side of each toast with a cut surface of the garlic clove. Transfer to a rack to cool. (The toasts may be made up to 2 days ahead and kept in a sealable plastic bag at room temperature.)
Once the Camembert is warmed, use a serrated knife to remove the top rind. Serve the warm cheese with the garlic toasts.
Garnishes, the little something-something added at the end of cooking or just before serving, can quickly and quietly elevate a simple and delicious basic dish to something Brilliant. For our cheater’s fondue, instead of serving with garlic toasts, serve boiled new potatoes for dipping, along with cornichons and Dijon mustard.
Scrub 1 pound of red new potatoes about the size of Ping-Pong balls under cold running water. Using a vegetable peeler or paring knife, remove a narrow strip around the equator of each potato. Then, using a paring knife, halve the potatoes vertically so that each half has a “racing stripe.” Place the potatoes in a saucepan and add water to cover. Season with salt and pepper. Bring to a boil over high heat, then decrease the heat to simmer. Cook until tender and easily pierced with a knife, about 20 minutes. Drain well in a colander. Pat dry with paper towels. Season with coarse salt and freshly ground black pepper. Serve with the Camembert and with small bowls of cornichons and Dijon mustard.
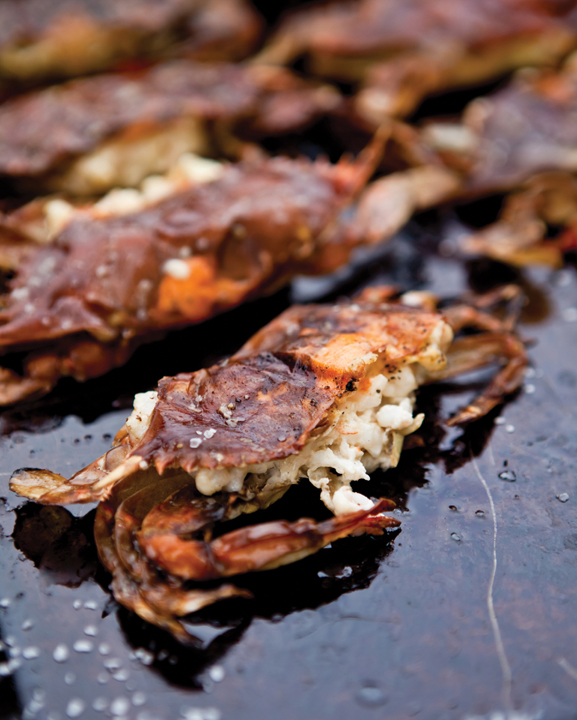
Grilled Soft Shell Crabs with Lemon Gremolata
 Skillet-Baked Eggs with Mushrooms and Spinach