
Fluffy cake with thick, candied caramel icing; tottering, shaggy coconut cakes; blistered pockets of fried pies; and tins of aggressively crunchy nut brittle—it’s not a Southern bakeshop, it’s a Southern celebration and that’s just the beginning. Meme and Dede started baking fruitcakes to enjoy and give as gifts months before Christmas, carefully tucking each one, swaddled in stained, bourbon-drenched cheesecloth, tightly in a tin. In the week before a holiday, we make cakes and pies and hold them in sealable containers, mounded high in the laundry room to keep them out of harm’s way—and seclude them from premature nibbles, I am sure. Mama pulls out her candy thermometer for Christmas almost as soon as the Thanksgiving dishes are done.
The phenomenon is not limited to fall and winter; spring brings legions of tea cakes, coated in a snowy blanket of confectioners’ sugar, separated and stacked on creased sheets of waxed paper. Summer is filled with buttery fruit cobblers and freshly churned ice cream on the screen porch. Weddings and baby showers mean freshly polished silver platters of meringues and mints; funerals bring foil-wrapped plates of fudge and even more layer cakes. On holidays, holy days, and gatherings of all shapes and sizes, Southerners lay out the desserts.
When Southerners are happy, we eat, and when we’re sad, we eat. And it seems my people are pretty partial to sugar. Today sugar is abundant and moderately priced, but that was not always the case. There was a time when sugar was so precious and rare it was presented to royalty in jewel-covered boxes. Sugar was one of the first commodities, besides precious metals, to be transported from the colonies to Europe. Slavery was at the core of the sugar trade and ensured maximum production and maximum profits for the plantation owners.
Sugarcane has been grown in the South since colonial times. Granted, the majority of U.S. sugar is now made from beets, but more than half of the country’s supply of cane sugar is currently produced in Florida; cane for sugar is also grown in Louisiana and Texas. Sugarcane grown for syrup is produced over a wider area of the country, in small pockets extending from eastern Texas to South Carolina. It’s in our backyard, too. Port access to the major sugar-producing tropical islands to our south is through the Gulf of Mexico and the Atlantic coast. One way or the other, we’re nearly surrounded by sugar. In today’s vernacular, the Southern sweet tooth laughingly could be considered a by-product of a locavore diet.
If the South is home to sideboards filled with homemade cakes and pies, France is home to jewel box pâtisseries filled with exquisitely executed pastries and confections lined up like sugary soldiers, nestled in their pristine paper cups. The choices are overwhelming: perfectly sculpted pastel macaroons, exquisite crisp swirls of pale ivory meringues, petite tartlets exploding with carefully placed fruit, chocolate-glazed éclairs, layered Napoleons, sturdy cream puffs filled with crème Chantilly, delicate almond calissons, and boozy, intoxicated babas au rhum are just a sampling of the artist’s palette.
Southern desserts have reflected a decidedly European character throughout the centuries. Even with the heavy influence of former African slaves in the savory kitchen, the sweet kitchen remained primarily Western European. Many early colonial recipes originated in cookbooks brought over from Europe, including sugar candy, candied fruits and flowers, sugar-coated nuts, marzipan, brittles, and toffee. Others include sweet cakes, cookies, and meringues. Grunts, buckles, slumps, and bread and fruit puddings would be fairly familiar to my ancestors. Layer cakes, archetypical Southern desserts, haven’t been a part of American history for nearly as long. Predictable cake baking was not possible until the advent of more reliable stoves and of baking powder, commercially available in the 1850s. Many of the early Southern desserts are similar to the Sweet Biscuits with Stewed Blackberries or Nut Brittle. It wasn’t until later that sweets like Dede’s Burnt Caramel Cake and Pineapple Upside-Down Cake became part of the Southern celebration.
Here is a collection of recipes for your own celebrations. Beignets to brittle, I think you’ll enjoy every sugary bite.
SERVES 6
Blackberries are one of the more complicated summer fruits, thick in the mouth like wine, musky, and sharp with sweet and sour edges. Wild blackberries grow prolifically throughout the South, and my sister and I picked them with Dede in the woods near a pond. We would each grab one of his mighty gnarled, thick hands, and we’d all skip sort of sideways down the hill, slapping our thighs. He called it the “buzzard lope” for reasons never understood. Once we were near the bushes, he tromped through the grass first in his well-worn brown leather boots to make sure the area was free of snakes. My sister and I ate at least one berry for every berry that went into the bucket. We’d return an hour or so later with stained smiles, blackened teeth, and sweaty red faces.
Expensive store-bought blackberries can’t hold a candle in my mind to the juicy jewels we harvested as kids with Dede. Those berries tasted sweeter from the love that went into picking them and the memories made from them.
2 cups White Lily or other Southern all-purpose flour or cake flour (not self-rising), plus more for rolling out
3 tablespoons sugar
1 tablespoon baking powder
1 teaspoon fine sea salt
¼ cup (½ stick) cold unsalted butter, chilled and cut into small pieces
1 cup low-fat or whole milk, plus more for brushing
12 ounces fresh blackberries or thawed frozen blackberries
¾ cup cold water
⅓ cup sugar
Pinch of fine sea salt
2 tablespoons all-purpose flour
½ teaspoon pure vanilla extract
½ tablespoon unsalted butter, chilled
Unsweetened whipped cream, for garnish
Preheat the oven to 500°F. Line a baking sheet with a silicone baking liner or parchment paper.
To make the biscuits, combine the flour, 1 tablespoon of the sugar, baking powder, and salt in a bowl. Using a pastry cutter or two knives, cut the butter into the flour mixture until it resembles coarse meal. Pour in the milk and mix gently until just combined.
Turn the dough out onto a lightly floured surface. Knead lightly, using the heel of your hand to compress and push the dough away from you, then fold it back over itself. Give the dough a small turn and repeat eight or so times. (It’s not yeast bread; you want to barely activate the gluten, not overwork it.) Using a lightly floured rolling pin, roll the dough out into a 12-inch square about ¼ inch thick.
Using a pastry cutter, cut the dough into strips about 2 inches wide and 4 inches long. Liberally brush the dough with milk and sprinkle over the remaining 2 tablespoons of sugar. Using an offset spatula, transfer the dough strips to the prepared baking sheet.
Bake until a deep golden brown, about 10 minutes. Remove to a rack to cool.
To make the blackberries, combine the blackberries with ½ cup of the water, the sugar, and the salt in a saucepan. Bring to a boil over high heat and cook, stirring with a whisk or crushing with a potato masher, until the berries are pulpy, 3 to 5 minutes. In a liquid measuring cup, combine the remaining ¼ cup water and the flour. Stir well with a fork or small whisk until well combined and no lumps remain. Whisking constantly, slowly add the flour mixture to the berries and bring to a boil. Cook until slightly thickened, another 3 to 5 minutes. Add the vanilla and remove from the heat. Add the butter and stir to combine.
To serve, divide the sweet biscuits among serving bowls and ladle over the blackberry mixture. Garnish with the whipped cream. Serve immediately.

A fool, at least the one found in the pastry kitchen, is a fruit and whipped cream dessert and is very simple on its own. Using it as a garnish for the Sweet Biscuits with Stewed Blackberries is a Brilliant way to layer the flavor of the fruit.
Combine ½ cup blackberries and 1 tablespoon sugar in a food processor fitted with a metal blade and process until puréed. Strain through a fine-mesh sieve. Discard the contents of the sieve. In a bowl set over a bowl of ice, combine ½ cup heavy cream and ¼ teaspoon pure vanilla extract; whisk until stiff peaks form. Using a large rubber spatula, gently fold the berry purée into the cream. Makes about 1 cup. Spoon on top of the biscuits and stewed berries in place of the plain whipped cream. Serve immediately.
SERVES 6
Clafoutis is a batter pudding originally from the Limousin region of France. This country dessert is traditionally made with cherries that have not been pitted, but that’s asking for a trip to the dentist. There were grand cherry trees in the garden at La Varenne, and we made this dessert often in the summer. One of the chores I had as an apprentice was to pick cherries and make jam. The traditional confiture pot is a large, solid-copper basin with sloped sides that create a large surface area for moisture evaporation. My cohort in much of the jam making was food writer Amanda Hesser. We would prepare dinner for twenty and somehow put up ten liters of jam at the same time. Sometimes, overwhelmed with the crop, we’d cheat a bit and macerate the cherries in vodka and sugar to make kirsch.
Unsalted butter for the baking dish
⅓ cup granulated sugar, plus more for the baking dish
1 pound sweet cherries, pitted
¼ cup all-purpose flour
Pinch of fine sea salt
4 large eggs
½ cup low-fat or whole milk
½ cup heavy cream
¼ cup kirsch, brandy, or Cognac
Confectioners’ sugar, for garnish
Preheat the oven to 350°F. Butter a 1½-quart shallow baking dish and sprinkle it with granulated sugar. Place the cherries in the dish; set aside.
Sift the flour, granulated sugar, and salt into a bowl and make a well in the center. Add the eggs to the well and stir with a whisk until mixed. Stir in the milk and cream and continue stirring to draw in the flour until the batter is smooth. Pour the batter over the cherries.
Bake until just set, about 35 minutes. Sprinkle the kirsch over the hot pudding. Allow to cool to room temperature. Cut into wedges and place on serving plates. Dust with confectioners’ sugar and serve immediately.
One of the techniques that I like to employ in the kitchen is layering flavor. Not simply using the same ingredient again and again, but doing it with thought and purpose.
To take our Basic recipe to chef-inspired Brilliant, prepare
Cherry Coulis. Put 8 ounces sweet cherries, pitted, in a blender and blend until smooth. Depending on the sweetness, add 1 tablespoon confectioners’ sugar, or to taste. Add a dash of freshly squeezed lemon juice and a tiny pinch of fine sea salt. Strain the purée through a fine-mesh sieve. Makes 1 cup. Spoon the coulis around the edge of each serving plate. Top with a slice of the claufoutis. Serve immediately.
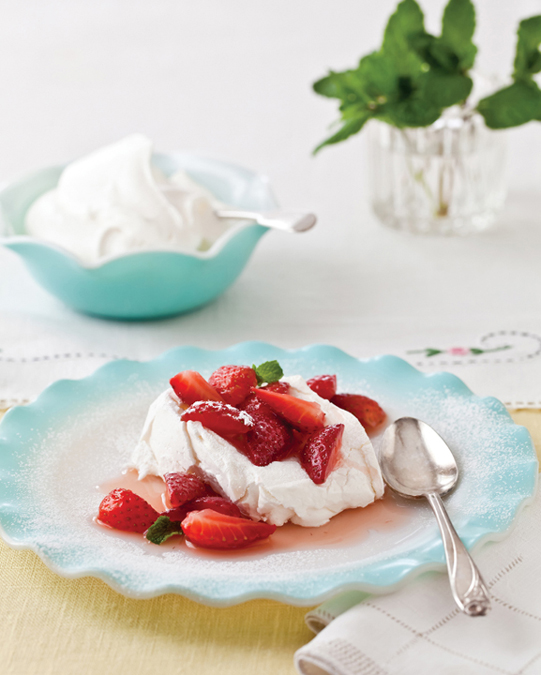
Meringue Pillows with Strawberries and Cream
SERVES 6
When I was eighteen, I went to visit my friend Alton Irby in London. I got a job waiting tables at an Italian trattoria. I was awful; there’s a reason I work in the kitchen instead of the dining room. Alton and I spent every last pence we earned eating at fancy restaurants. One day I headed off to see Kew Gardens. On the way I stopped at a market and bought strawberries and clotted cream to enjoy in the park. When I walked up to the gate and counted my heavy English coins, I discovered I didn’t have enough money to visit the gardens and also return home. So, I sat on the park bench looking through the garden gate, eating my strawberries and cream. Not very posh, silly little girl. I still think of that experience anytime I taste strawberries and cream. And, years later, I still need to make it to Kew Gardens.
Unsalted butter and all-purpose flour for the pans, if using parchment paper
4 large egg whites
½ teaspoon fine sea salt
1 cup granulated sugar plus 1 tablespoon, or to taste
1 teaspoon pure vanilla extract
1 to 2 pints strawberries, hulled and quartered lengthwise
2 tablespoons Grand Marnier, or to taste
Fresh mint leaves, for garnish
Confectioners’ sugar, for garnish
Whipped cream, for garnish
Preheat the oven to 400°F. Line 2 rimmed baking sheets with silicone baking liners or parchment paper; set aside. (If you are using parchment paper, it is necessary to butter and flour the parchment. Then, before shaping the pillows, dab a little bit of meringue at the corners to hold the paper in place.)
In the bowl of a heavy-duty mixer fitted with the whisk attachment, beat the egg whites on high speed with a pinch of salt until frothy. Gradually add the 1 cup granulated sugar and vanilla, beating at high speed until the whites hold stiff, glossy peaks.
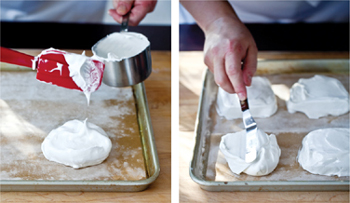
Using a rubber spatula, spoon three 1-cup blobs of meringue onto each prepared baking sheet, leaving 2 to 3 inches of space between the blobs. Using a small, wet offset spatula, shape the blobs into rectangles, creating 3 smooth pillows. Repeat with the remaining ingredients on the second baking sheet to make 6 pillows.
Decrease the oven temperature to 200°F. Place the baking sheets in the oven; bake until the meringues are crisp on the outside but have a marshmallow consistency inside, about 1½ to 2 hours. Check the consistency by poking into the bottom of one meringue pillow. If the meringues start to brown, decrease the oven temperature to 175°F. Remove from the oven and let cool completely on a wire rack.
Meanwhile, combine the strawberries, Grand Marnier, and the remaining 1 tablespoon granulated sugar in a bowl. Refrigerate until ready to serve.
When you are ready to serve, using your hands or the back of a knife, gently crack the meringue pillows and place on small plates. Top with the macerated berries. Garnish with mint, a dusting of confectioners’ sugar, and a dollop of whipped cream. Serve immediately.

A
dacquoise is a meringue “cake,” often, but not always, containing nuts, and layered with fruit, cream, or frosting. It’s a Brilliant presentation.
Preheat the oven to 200°F. Draw two 8-inch circles on parchment paper. Turn the paper upside down. Butter and flour the parchment paper. Instead of making home style pillows, pipe the meringue into rounds. Prepare the meringue and spoon into a piping bag fitted with a large round tip. Dab a little bit at the corners of the paper to hold the paper in place. Pipe the meringue in coils, starting at the center of a circle and working to the outside edge. Repeat on the second circle. Smooth the tops with a small, wet offset spatula. Transfer the parchment liner and meringue coils to the oven and bake until dry, about 2 hours. (As long as it is not too humid, the meringue rounds can be made several days in advance and stored in an airtight container at room temperature.)
When you are ready to serve, place a meringue round on a chilled serving plate. Spoon over the strawberries and whipped cream and top with the second round to create a cake. Dust with confectioners’ sugar. Take a picture! Serve immediately.
Meringue is a combination of egg whites and sugar whipped to form a thick, stiff foam. Different textures are achieved by varying the methods of mixing the sugar and egg whites, and varying the baking times and temperatures. Meringue can be made soft to top a pie, or dried in the oven to make a dacquoise or meringue cookie.
A French meringue is the simplest meringue; it is made by beating sugar into egg whites until stiff and fluffy.
A Swiss meringue is made by heating egg whites and sugar in a double boiler until the mixture reaches 110°F to 120°F. Then the mixture is beaten until stiff. This technique ensures that the sugar is completely dissolved and stabilizes the meringue.
An Italian meringue is the most stable meringue. It is made by heating a sugar syrup to the soft-ball stage, 232°F to 240°F, then beating the hot syrup into the egg whites. Adding butter to the finished meringue makes it buttercream frosting.
SERVES 8
This recipe was inspired by my experience cooking in North Georgia at Persimmon Creek Vineyards. I made it with sheep’s milk, but first, I had to milk the sheep. It’s not so easy. The ewe is positioned on the milking stand and her head is secured between two wooden bars. There’s a whole rhythmic movement that starts with grabbing the udder, pushing up, and then fanning your fingers and pulling down. (I will say this: the barn was clean—no take-your-breath-away animal odors.) Owner Mary Ann says her hands are too small to milk two teats at once. I have serious, thick, working chef-girl hands and still couldn’t manage to get two going at once. But I did have some success, and it was very satisfying: a whole scant ¾ cup of satisfaction!
Persimmon Creek is crystal clear, sparkling, and beautiful. I tromped down the creek bank and was overcome with the scent of crushed wild mint. Large, dark evergreen sprigs with dark, almost purple stems were growing along the bank. I encouraged the guests to eat mint bite by bite with the berries. It’s more than just an obligatory garnish; it lends bright flavor. Take a nibble next time you see mint on your dessert plate.
1 teaspoon canola oil
2 cups heavy cream
½ cup sugar
1 cup firmly packed fresh lemon verbena, lemon balm, or mint leaves
2 (¼-ounce) packets powdered gelatin (about 2 tablespoons)
6 tablespoons cold water
2 cups buttermilk
Pinch of fine sea salt
Mint-Blueberry Compote (recipe follows)
Mint sprigs, for garnish
Lightly oil eight 1-cup custard cups.
Heat the heavy cream and sugar in a small, heavy saucepan over medium heat until the sugar dissolves. Remove from the heat and stir in the lemon verbena. Cover and let steep for 10 minutes.
Sprinkle the gelatin over the cold water in a bowl; let stand for 5 to 10 minutes to “bloom” and absorb the water. Meanwhile, return the cream to the heat and bring back to a simmer. Strain, discarding the leaves. Pour the strained cream mixture over the gelatin and stir until the gelatin is completely dissolved. Add the buttermilk and salt. Stir to combine.
Divide the mixture among the prepared cups. Chill until firm, at least 2 hours, but 4 hours is even better.
To serve, run a sharp knife around the edge of each panna cotta and unmold onto chilled serving plates. Spoon over the compote. Garnish with mint. Serve immediately.
MAKES ABOUT 1½ CUPS
½ cup water
½ cup sugar
Finely grated zest of 1 lemon
2 cups blueberries (10 ounces)
1½ tablespoons freshly squeezed lemon juice
Pinch of fine sea salt
¼ cup finely chopped fresh mint
Combine the water, sugar, and lemon zest in a 1-quart heavy saucepan and bring to a boil. Boil uncovered for 5 minutes. Stir in the blueberries and simmer, stirring occasionally, until the blueberries begin to burst, 3 to 5 minutes. Remove from the heat and stir in the lemon juice, salt, and mint. Serve warm or at room temperature.
Serve classic shortbread with the panna cotta and blueberry compote. The combination of herbs and the juxtaposition of textures, temperature, and flavors are perfectly Brilliant.
Preheat the oven to 300°F. Cream ½ cup (1 stick) unsalted butter, at room temperature, in the bowl of a heavy-duty mixer fitted with the paddle attachment. Add 1 cup all-purpose flour; ⅓ cup confectioners’ sugar, sifted; and a pinch of fine sea salt. Mix until just combined. Pat into an 8-inch round cake pan; crimp the edges with the tines of a floured fork. Bake until firm and slightly browned, 30 to 35 minutes. Remove to a rack to cool slightly. Immediately score into 8 wedges. Let cool completely. Invert onto a clean work surface. Slice with a serrated knife. Makes 8. Serve alongside the panna cotta and blueberry compote.
MAKES ABOUT 32
Beignets evoke New Orleans and make my heart beat faster. I don’t care how touristy it is, there’s nothing like sipping a deliciously bitter cup of coffee with chicory in the French Market and licking confectioners’ sugar off your fingertips—or your love’s. Memories like that can last a lifetime. When my sister and I were little, Mama made beignets from the Café du Monde mix, leavened dough rolled out and cut into strips. In France, they use a version of pâte à choux to make beignets. Both are sugary and sublime.
1 cup water
½ cup (1 stick) unsalted butter
1 teaspoon plus 1 cup granulated sugar
¼ teaspoon fine sea salt
Finely grated zest of 2 oranges
1 cup, plus 2 tablespoons all-purpose flour
4 large eggs
1 teaspoon pure vanilla extract
Vegetable shortening, for frying
Confectioners’ sugar, for serving
Line a baking sheet with paper towels. Set aside. In a small saucepan, combine the water, butter, 1 teaspoon granulated sugar, salt, and half the zest and bring the mixture to a rapid boil. Remove the pan from the heat and add the flour all at once, stirring vigorously. Cook the paste over low heat, beating briskly, until the ingredients are thoroughly combined and the dough leaves the sides of the pan and forms a ball. Remove the pan from the heat. Add the eggs one at a time, beating well after each addition. By hand or with an electric mixer set at medium speed, beat the paste until it is smooth and glossy. Stir in the vanilla.
Fill a heavy-bottomed saucepan, deep fryer, or Dutch oven no more than one-third full with shortening. Heat to 370°F. Using an ice cream scoop, carefully drop the dough by teaspoonfuls into the shortening. Fry the beignets in batches, turning them once or twice, until golden brown, 3 to 5 minutes. Using a slotted spoon, remove to the prepared baking sheet to drain.
Combine the remaining orange zest and 1 cup granulated sugar in a bowl. While the puffs are still warm, roll them in the sugar and orange zest mixture until evenly coated. Just before serving, sprinkle the beignets with the confectioners’ sugar. Serve immediately.
Pets de Nonne are a delicate dessert with an indelicate identity. Certainly coined by a mischievous schoolboy, the term translates to “nun’s farts.” One Brilliant bite and you won’t care what they’re called.
Using a paring knife, make a small hole in the bottom of each beignet. Prepare a batch of
Pastry Cream and place it in a piping bag fitted with a small round tip. Pipe the cream into the beignets. Serve immediately.
MAKES 32
According to French food lore, these traditional buttery bites that are also known as financiers (pictured at the beginning of the chapter) originated at a bakery located in a financial district and were shaped like bars to mimic gold bullion. Other versions of the tale insinuate that they are called financiers because they are so rich. I am not certain what the real story is, but they are, in a word, addictive.
Chefs love toys—knives, pots, and pans. If the expression “she who has the most toys wins” is true, pastry chefs can go ahead and claim the victory. Silicone molds, mats, and baking liners revolutionized the pastry kitchen, and now many of those toys are available online and in cookware and gourmet shops. Mini muffin pans are great, but to give your tea cakes a restaurant touch, seek out a GastroFlex or Flexipan baking mold at your local cookware store.
1 cup (2 sticks) unsalted butter, plus more for the molds
¾ cup ground pecans or almonds
¾ cup all-purpose flour, sifted
2½ cups confectioners’ sugar, sifted
½ teaspoon fine sea salt
8 large egg whites, at room temperature, whisked just until frothy
½ teaspoon pure vanilla extract
Preheat the oven to 425°F. Using a pastry brush, butter mini muffin cups or silicone molds with butter. Set aside.
In a small heavy saucepan, melt the butter over medium heat until it stops sputtering and starts to brown, 5 to 7 minutes. (For more about clarified, or, alternatively, brown butter, see
Clarified and Brown Butter.) Remove from the heat and let cool to lukewarm.
Thoroughly mix the pecans, flour, confectioners’ sugar, and salt in a heavy saucepan. Add the egg whites and whisk until well combined. Set the saucepan over low heat and whisk constantly until the mixture is just warm to the touch. Remove from the heat and whisk in the butter, leaving behind the dark brown milk solids. Fill the prepared molds about two-thirds full.
Bake until golden brown, 18 to 20 minutes. Transfer to a rack to cool slightly and before inverting onto the rack. Repeat with the remaining batter.
Many things in the world would be better, even Brilliant, if served with chocolate. Serve the tea cakes with a warm bowl of Chocolate Ganache for dipping and prepare to receive the accolades.
Combine 1¼ cups heavy cream and 2 tablespoons unsalted butter in a saucepan over low heat just until simmering. Remove the pan from the heat. Add 12 ounces best-quality semisweet chocolate, finely chopped, and stir until the chocolate is melted. Makes about 2 cups. Serve the tea cakes on a platter with the warm ganache on the side for dipping.
Once bakeware, such as mini muffin tins and cake pans, are washed and dried, put them a low oven for about 30 minutes to make sure they are perfectly dry.
MAKES ABOUT 4 DOZEN
Mama’s always called these cookies tea cakes, but they are also known as Mexican wedding cookies, butternuts, butterballs, and snowballs (pictured at the beginning of the chapter). I don’t care what you call them, they are good. Mama likes to make them so you can just pop them in your mouth, “not that big, but not so scrawny that they look undernourished.” As if.
1 cup (2 sticks) unsalted butter, at room temperature
¼ cup granulated sugar
1 teaspoon pure vanilla extract
2 cups cake flour (not self-rising)
1 cup chopped pecans
½ teaspoon fine sea salt
½ cup confectioners’ sugar, for rolling
Preheat the oven to 300°F. Line a rimmed baking sheet with a silicone baking liner or parchment paper.
In the bowl of a heavy-duty mixer fitted with the paddle attachment, beat the butter, granulated sugar, and vanilla on medium speed until light and fluffy. Add the flour, pecans, and salt, beating on low speed after each addition until well blended. Using a small ice cream scoop, shape the dough into 1-inch balls. Place 1½ inches apart on the prepared baking sheets.
Bake until the bottoms of the cookies are lightly browned, about 30 minutes. Transfer to a wire rack to cool slightly. While still warm, roll the cookies in the confectioners’ sugar until evenly coated. Transfer to a wire rack set on top of a rimmed baking sheet to cool completely. Store in a tightly covered container at room temperature for up to 1 week.
The cookie melts in your mouth in a flood of sugared butter. A Brilliant addition to your dessert repertoire is to use the dough for a tartlet base.
Place about ¼ cup dough in a 4-inch tartlet shell. Smooth the bottom and sides. Bake for 15 minutes until golden brown. Fill with
Pastry Cream or whipped cream and top with fruit. Serve immediately. Makes 12.
MAKES 2 DOZEN
I’ve used the same pecan company, Pearson, for more than a decade. For many years, Mary Pearson and I never met, but we talked often on the phone. Funny thing is, she actually lives right down the street from my cousin. When we finally did meet, sweet Mary grabbed my cheeks and said, “You are real!”
These petite pies are a holiday staple and keep well in an airtight container for a week or so (pictured at the beginning of the chapter). To bring out their flavor after they’ve been in storage for a few days, simply pop them in a 350°F oven for a few minutes, and they will taste freshly baked.
½ cup (1 stick) unsalted butter, at room temperature
1 (3-ounce) package cream cheese, at room temperature
1 cup all-purpose flour
¼ teaspoon fine sea salt
1 large egg
¾ cup firmly packed dark brown sugar
1 tablespoon unsalted butter, melted
½ teaspoon pure vanilla extract
⅛ teaspoon fine sea salt
½ cup chopped pecans
2 dozen perfect pecan halves, for decoration
Preheat the oven to 350°F. Set out a nonstick mini muffin tin or grease a standard mini muffin tin.
To make the crust, in a heavy-duty mixer fitted with the paddle attachment, cream together the butter and cream cheese on medium speed until smooth. Add the flour and salt and continue to beat on low speed until a dough forms. Divide the dough equally into 24 balls, each about the size of a gumball. Press the balls of dough into the muffin cups, using your thumb to press the dough against the sides to form a shell. Set aside.
To make the filling, combine the egg, brown sugar, butter, vanilla, and salt in a bowl. Sprinkle ½ to 1 teaspoon nuts into each shell. Top with a teaspoon of the egg mixture. Place a pecan half in the center.
Bake for 15 minutes. Then decrease the temperature to 325°F and bake until set, 10 to 15 minutes more. Remove to a rack to cool.

I generally like my bourbon in a glass with ice, but it does belong in the kitchen, as well. Smoky, sweet bourbon enhances the flavor of the rich, fatty pecans, taking a simple home-style holiday favorite to Brilliant.
Place the pecans in a bowl, cover with ¾ cup bourbon, and let soak for at least 30 minutes. Drain the bourbon-soaked pecans through a fine-mesh sieve, reserving the bourbon for another use. (See first sentence.) Preheat the oven to 350°F. Spread out the nuts in a single layer on a rimmed baking sheet and toast, shaking once or twice, until toasted and fragrant, about 5 minutes. Watch closely to avoid burning the nuts. Proceed with the recipe. Sip and savor.
MAKES 1 (10-INCH) PAN
The flavor of this cookie resembles the taste of a Snickers bar—even without the caramel, and especially so when you follow my chef-inspired Brilliant suggestion to refrigerate the dough. If you do want to use caramels, I suggest using the old-fashioned Brach’s caramels. Unwrapping the caramels is a perfect job for the kids while you are measuring out the ingredients. When I was a little girl, my grandfather always had a pocketful of caramels or peppermint candy. We played a game where he put one in his closed palm. Holding out both hands he said, “Jack in the bush.” My sister and I squealed and giggled, “Cut ’em down!” He then asked, “How many licks?” I replied, “One,” tapping the hand I thought contained my sweet prize. Of course, my sweet, doting grandfather always gave his grandchildren the prize whether we guessed correctly, or not.
My first forays into baking, like many aspiring young chefs, involved chocolate chip cookies. This blondie is essentially a big chocolate chip cookie. If you don’t have a cast-iron skillet, run out and get one. No, seriously, you can use an 8-inch square pan, but you still do need to own a cast-iron skillet.
1½ cups all-purpose flour
½ teaspoon baking soda
½ teaspoon fine sea salt
¼ teaspoon baking powder
½ cup (1 stick) unsalted butter
1 cup firmly packed dark brown sugar
1 teaspoon pure vanilla extract
1 large egg, lightly beaten
1 cup semisweet chocolate chips
½ cup unsalted peanuts, chopped
15 caramel candies, halved (optional)
Preheat the oven to 350°F.
Whisk together the flour, baking soda, salt, and baking powder in a bowl.
Heat the butter in a 10-inch cast-iron skillet over low heat. Add the brown sugar, stirring until dissolved.
Add the butter mixture to the flour mixture. Add the vanilla and egg. Fold in the chocolate chips, peanuts, and caramels. Transfer the batter to the buttery skillet, smoothing the surface with a spatula.
Bake until a cake tester inserted into the center comes out clean, 20 to 25 minutes. Place on a wire rack to cool. Slice while still slightly warm.
This may seem ridiculous for a dump-and-stir chocolate chip bar cookie, but covering and chilling the dough in the refrigerator for a minimum of 24 hours, and preferably 36 hours, allows the dough and other ingredients to fully soak up the liquid of the eggs. A long hydration time is important for two reasons. Eggs, unlike water, are gelatinous and slow moving, and the butter coats the flour, deterring the absorption. Giving the cookie dough a resting time in the refrigerator solves those problems. The result is a cookie richer with the flavors of toffee and caramel.
MAKES 3 (8-INCH) ROUND LAYERS
My dear friend Claire is a very talented cook and pastry chef. Our friendship took root in the hours commuting to Connecticut where she was my supervisor when we worked for Martha Stewart. She is strong minded, direct, to the point, and was a fierce boss at times, but quickly became one of the people in my life I love most. Looking for shells on the beach with Claire and her precious daughter, Ruby, is one of my favorite activities. Whenever I visit her in South Florida, I plead with her to make me this cake.
Claire and I have an “escape route.” We’ve always said that if life becomes too absurd, we’ll just move to France, open a BBQ joint, and call it Ruby-Doo BBQ. I’ll tend the pit, and she’ll make this dark chocolate cake to serve with milk and fried pies. Personally, I think the idea of a French BBQ joint is wonderfully absurd enough to work, and that, in a nutshell, is our business plan.
This amount of batter will also make a 13 × 18-inch sheet cake.
1 tablespoon unsalted butter, at room temperature, for the pans
1½ cups unsweetened cocoa powder, plus more for the pans
3 cups all-purpose flour
3 cups sugar
1 tablespoon baking soda
1½ teaspoons baking powder
1½ teaspoons fine sea salt
½ teaspoon ground ginger
3 large eggs
1½ cups warm water
1½ cups buttermilk
¾ cup canola oil
1½ teaspoons pure vanilla extract
Chocolate Ganache Frosting (recipe follows)
Preheat the oven to 350°F. Butter a 13 × 18-inch sheet cake pan or three 8-inch round or square cake pans. Line the bottoms with parchment paper, butter the parchment, and dust with cocoa.
Combine the cocoa powder, flour, sugar, baking soda, baking powder, salt, and ginger in the bowl of a heavy-duty mixer fitted with the paddle attachment. Give it a turn or two with the paddle to mix and combine. Then, with the mixer on low speed, add the eggs, water, buttermilk, oil, and vanilla. Beat on low speed until smooth, stopping and scraping down the sides of the bowl once or twice. Divide the batter among the prepared pan(s).
Bake, rotating the pans once, until a tester inserted into the center comes out clean, 25 minutes for the baking sheet, 35 to 45 minutes for 8-inch layers. Remove to racks to cool, about 20 minutes. For cake rounds, once partially cooled, invert and lift off the pans, turn right side up on the rack, and let cool completely.
To make a layer cake, when you are ready to frost, place the first layer on a cake stand. Using a long serrated knife, trim the top off the cake layer to make a flat surface. Set the layer aside. Repeat with the second layer. Using a small offset spatula, evenly cover the top of the first layer with 1 cup of the frosting. Spread the frosting so that it extends beyond the edges of the layer. Place the second cake layer, cut side down, on top of the frosting; press to make it level. Cover with 1 cup of the frosting. Top with the third cake layer. With the small offset spatula, spread the entire cake with about 1½ cups of the frosting, creating a “crumb coat,” a thin layer that seals in the crumbs. Refrigerate until firm, about 15 minutes. Then, using a clean offset spatula, generously coat the chilled cake with the remaining frosting. Store in an airtight container in the refrigerator up to 3 days.
MAKES 6 CUPS
12 ounces best-quality semisweet chocolate, finely chopped
12 ounces best-quality bittersweet chocolate, finely chopped
3 cups heavy cream
1 teaspoon pure vanilla extract
¼ teaspoon fine sea salt
Combine the chocolates in a large bowl. Heat the cream in a heavy saucepan over medium-high heat until simmering and small bubbles appear at the edge of the saucepan. Add the vanilla and salt. Stir to combine. Pour over the chocolate and let sit for 3 minutes. Using a spatula, stir until completely smooth. Transfer to the refrigerator and chill, stirring every 20 minutes, until cool enough to spread, about 2 hours.
Freezing cake layers is a simple but Brilliant technique for sealing in moisture and tightening the cake’s crumb. Bakers swear by it. This creates an easier surface to frost and prevents a lot of crumbs from forming. Crumbs in icing will quickly ruin the overall look of a cake. Once the cake rounds have cooled completely on the wire rack, wrap them tightly in plastic film. Freeze until completely firm, several hours or up to overnight.
SERVES 8 TO 10
You know how the world is divided into two camps? People who like chocolate and people who don’t? I am firmly in the likes chocolate camp. I am not so much a dessert person as a chocolate person. Menu planning is more involved than just assembling a collection of dishes that taste good. They have to taste good together. This rich, decadent, over-the-top dessert is best after a full-flavored dinner. It would be a perfect ending to a meal with the Garlic-Stuffed Prime Rib Roast or the Pork Belly with French Market Red-Eye Gravy, two main courses that need something substantial to end the meal.
2 tablespoons unsalted butter, cut into small pieces, plus more for the pan
3 baguettes, sliced ½ inch thick and halved crosswise
1½ cups whole milk
1½ cups heavy cream
½ cup sugar
½ teaspoon fine sea salt
10 ounces best-quality bittersweet chocolate, finely chopped
1 teaspoon pure vanilla extract
¼ teaspoon ground cinnamon
6 large eggs
Whipped cream, vanilla ice cream, or crème fraîche, for serving
Preheat the oven to 325°F. Generously butter a large baking dish.
Place the bread in the prepared baking dish. Set aside.
Combine the milk, cream, sugar, and salt in a saucepan over medium-low heat. Cook, stirring occasionally, until the sugar is dissolved; do not allow it to boil. Remove from the heat and add the chocolate, vanilla, and cinnamon; whisk until smooth.
Whisk the eggs in a large bowl. Slowly whisk in the chocolate mixture until combined. Pour the mixture over the bread and let soak at room temperature for 1 hour, pressing down on the bread occasionally. Distribute the butter evenly over the soaked bread.
Place the baking dish in a roasting pan. Pour in enough hot water to reach halfway up the sides of the dish. Bake until the center is just set, about 50 minutes. Transfer to a wire rack to cool slightly. Serve warm with a dollop of whipped cream.
The intense bittersweet chocolate in the pudding is matched in intensity with rich
Caramel Sauce made with fresh goat cheese.
Make the sauce, using goat cheese instead of cream. Spoon the warm bread pudding onto warmed serving plates. Top with vanilla ice cream and drizzle some sauce over the top. It’s over-the-top Brilliant.
Cream is the layer of butterfat that rises to the top of milk before homogenization. There has to be a certain amount of fat present for cream to whip. Some substitutions can be made in cooking, even baking, but without some kind of stabilizer, a dairy product with less than 30 percent butterfat will not whip.
Half-and-half: 10.5 to 18 percent fat
Light, coffee, or table cream: 18 to 30 percent fat
Medium cream: 25 percent fat
Whipping or light whipping cream: 30 to 36 percent fat
Heavy whipping cream: 36 percent fat or more
Extra-heavy, double, or manufacturer’s cream: 38 to 40 percent fat or more. Available in specialty stores and gourmet markets.
MAKES 1 (8-INCH) CAKE
The original version of this recipe was in Anne Willan’s Cooking with Wine. It’s made in a food processor, which makes for a very simple “dump and stir” cake. Another benefit is that it is amazingly moist and will last for several days tightly wrapped in plastic wrap.
There’s something autumnal about this cake—perhaps it is the rich golden brown color. I like to serve a wedge of this cake with a slice of pear and drizzle the yogurt with honey.
1½ cups all-purpose flour
1 cup sugar
¾ cup medium-grind yellow cornmeal
¾ cup pecan halves
Finely grated zest of 2 lemons
4 teaspoons baking powder
½ teaspoon fine sea salt
½ cup (1 stick) butter, chilled and cut into pieces, plus more for the cake pan
2 large eggs, lightly beaten
1 cup dry white wine
1 cup low-fat or whole-milk plain Greek-style yogurt, for serving
Preheat the oven to 350°F. Generously butter an 8-inch round cake pan. Set aside.
In a food processor fitted with a metal blade, combine the flour, sugar, cornmeal, pecans, zest of 1 lemon, baking powder, and salt. Pulse to combine. Add the butter and pulse until the mixture forms crumbs that start to clump together, about 30 seconds. Add the eggs and wine and pulse just until smooth. Pour the batter into the prepared cake pan.
Bake until the cake starts to shrink from the sides of the pan and springs back when lightly pressed in the center with a fingertip, about 45 minutes.
Transfer to a wire rack to cool slightly for about 10 minutes, then turn out onto a wire rack to cool completely. Meanwhile, combine the yogurt and the remaining lemon zest and set aside. Serve the cake warm or at room temperature, garnished with the yogurt.
A garnish of candied lemon zest elevates this cake to Brilliant and echoes the zest in the batter and in the lemony yogurt dollop.
Line a rimmed baking sheet with a silicone baking liner or waxed paper. Set aside. Use a sharp vegetable peeler to remove the zest from 2 lemons, reserving the fruit for another use. Using a small paring knife, scrape off the bitter white pith and discard. Cut the peel into ¼ × 3-inch strips. Meanwhile, bring a small pot of water to a boil over high heat. Add the zest and cook for 2 minutes. Drain. In the same saucepan, combine ¼ cup sugar and 2 tablespoons water and bring to a boil over medium heat, stirring constantly until the sugar dissolves. Add the blanched zest, cover, decrease the heat, and simmer for 3 minutes. Remove from the heat; cool completely. Strain through a fine-mesh sieve; discard the syrup. Separate the pieces of zest and allow to dry on the prepared baking sheet. Sprinkle over ¼ cup sugar and, using your fingers, toss well to coat. Use as a garnish for the lemon yogurt. Keeps for up to 2 days in an airtight container.
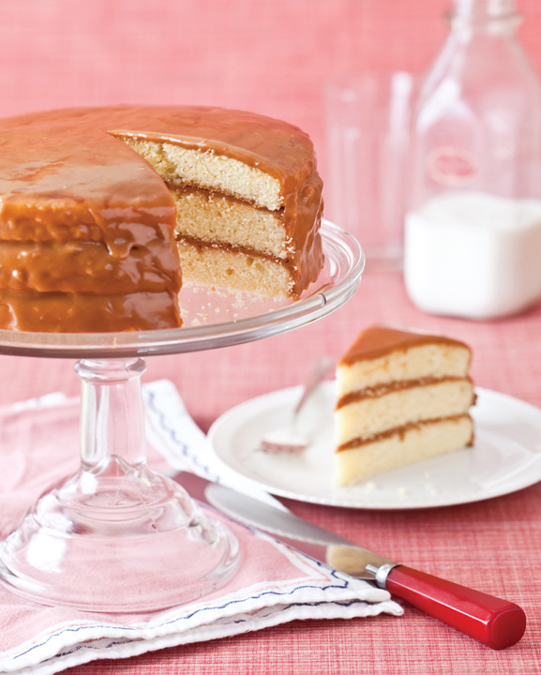
Dede’s Burnt Caramel Cake
MAKES 3 (9-INCH) ROUND LAYERS
Dede’s diminutive nickname was not indicative of his size; he was an absolute mountain of a man. Tall and with broad shoulders and massive trunks for arms, he was very handsome in his youth. I know he swept my grandmother off her feet with his dark hair and sapphire blue eyes. She was a college-educated Southern lady and he was a country boy with a limited education. His larger-than-life physical presence commanded respect. In truth, he was a gentle giant who experienced only one fight in his entire life. He cried at the sound of an organ playing or the moving piano chords of a well-played hymn. He loved this caramel cake and sat in the kitchen with Meme as she baked it, then whipped the icing for her by hand.
Dede was the father of three girls, and my mother was his baby girl. He had his own unique sort of language, a potpourri of nicknames and personal colloquialisms. His wife, Meme, was referred to as “Beloved.” Mama’s special nickname was “Frazz Horn.” She was spoiled absolutely rotten by him, as were we. This manly man lavished attention on his brood of women and always said he never wanted sons, scoffing, “Boys are nothing but trouble.”
1 cup (2 sticks) unsalted butter, at room temperature, plus more for the pans
3 cups all-purpose flour, plus more for the pans
1 teaspoon baking powder
2 cups sugar
4 large eggs, at room temperature, well beaten
1 cup whole milk
1 teaspoon pure vanilla extract
Burnt Caramel Icing (recipe follows)
Preheat the oven to 350°F. Butter and flour three 9-inch round cake pans and line the bottoms with waxed or parchment paper. Butter and flour the paper. Sift together the flour and the baking powder.
In the bowl of a heavy-duty mixer fitted with the paddle attachment, cream the butter and sugar on medium speed until light and fluffy, about 3 minutes. Add the flour mixture to the butter-sugar mixture, alternating between the dry and wet ingredients in three portions, starting and ending with the dry ingredients. Pour into the prepared pans.
Bake until a cake tester inserted into the center of each cake comes out clean and the cakes start pulling away from the sides of the pans, about 25 minutes. Remove to a rack to cool slightly. Invert onto the rack to cool completely.
To assemble the cake, place one cake layer on a cardboard cake round. Spread with the still-warm frosting. Repeat with remaining layers, placing the final layer bottom side up. Working quickly, use a small offset spatula to spread the icing gently around the cake. Let stand for 2 hours to allow the icing to set before serving. Store in an airtight container for up to 1 week.
MAKES ABOUT 2 CUPS
2½ cups sugar
½ cup (1 stick) unsalted butter
1 cup heavy cream, plus more if needed to loosen
2 teaspoons pure vanilla extract
¼ teaspoon fine sea salt
In a heavy cast-iron skillet, heat ½ cup of the sugar over medium-high heat. Stir until dissolved, then do not stir again; simply shake the pan occasionally until the mixture reaches the caramel stage 320°F to 335°F on a candy thermometer.
Meanwhile, in a heavy saucepan, combine the remaining 2 cups sugar, the butter, and the cream Bring to a boil, stirring occasionally.
When the sugar reaches the caramel stage, immediately pour it into the cream mixture and stir to combine. Cook over medium heat, stirring once or twice, until the mixture reaches the soft-ball stage, 232°F to 240°F. Remove from the heat; add the vanilla and salt and stir to combine. Place on a rack and set aside until just cool enough to touch, 10 to 15 minutes.
Transfer the mixture to the bowl of a heavy-duty mixer fitted with the whisk attachment. Beat on high speed until creamy, 5 to 7 minutes.
I’ll be honest, this icing is a bear. That’s why caramel cakes are so special. A couple of helpful hints: when you are ready to frost the cake, place the bowl of icing in a bowl of warm water to keep it loose and fluid. Also, if it starts to set too firmly, you may need to add warm heavy cream to loosen it. That, holding your tongue right, and practice are the keys to a successful caramel frosting.
Claire helped me come up with this sophisticated addition to the quintessential Southern dessert. I wanted to accompany the very sweet cake with a savory apple mixture. She took it one step further by inserting the apple mixture between the layers. A Brilliant idea that only a French-trained pastry chef would do. You have permission to serve it on the side.
Heat 2 tablespoons unsalted butter in a large skillet. Add 2 small Granny Smith apples, cored and diced. Sprinkle over 1 tablespoon sugar. Cook until just tender, about 5 minutes. Add 1 cup hazelnuts,
toasted and skins removed, then chopped, and 1 teaspoon finely chopped fresh rosemary. Season with 1 teaspoon fleur de sel or coarse salt. Stir to combine. When assembling the cake, spread 1 cup Apple Hazelnut Compote between the layers. Once the cake is fully decorated, garnish the top with 8 whole hazelnuts and tiny rosemary sprigs.
MAKES 1 (9 × 13-INCH) CAKE
We didn’t grow up drinking soft drinks, but Mama made this cake for family gatherings and special occasions. Southern sweet tea famously has its place, but occasionally only the “pause that refreshes” will do. To my mind, there is nothing better than an ice-cold Coke Classic served in the iconic little six-ounce bottle. That quick pssst when the bottle top is pried from the lid, the crackling of the bubbles, and best yet? The icy slush that forms in the neck of the bottle when it’s superchilled? Heaven. Some crazy Southerner thought it would be good in a cake, too.
½ cup (1 stick) unsalted butter, plus more for the pan
2 cups granulated sugar
2 cups all-purpose flour
3 tablespoons unsweetened cocoa powder
1 cup Coca-Cola
1 teaspoon baking soda
½ cup buttermilk
2 large eggs
1 teaspoon pure vanilla extract
1 (16-ounce) box confectioners’ sugar
½ cup (1 stick) unsalted butter
3 tablespoons unsweetened cocoa powder
¼ cup Coca-Cola
1 teaspoon pure vanilla extract
1 cup chopped pecans
Preheat the oven to 350°F. Butter a 9 × 13-inch glass baking dish.
To make the cake, in a bowl, sift together the granulated sugar and flour.
In a saucepan, combine the butter, cocoa, and Coca-Cola. Bring to a boil over medium-high heat. Pour over the dry ingredients; stir to combine. Combine the baking soda and buttermilk in a liquid measuring cup. Add the buttermilk mixture, eggs, and vanilla to the flour mixture and stir to combine. Pour into the prepared pan.
Bake until a cake tester inserted into the center comes out clean, about 35 minutes.
Meanwhile, prepare the icing. (It needs to go onto a still-warm cake.) Sift the confectioners’ sugar into a large bowl. Combine the butter, cocoa, and Coca-Cola in a heavy saucepan. Bring to a boil, then pour over the sifted sugar. Stir to combine, then stir in the vanilla and pecans. Spread over the warm cake. Set aside to cool completely. When cool, cut into squares and serve.
Some recipes for this cake contain miniature marshmallows. I abhor store-bought marshmallows and think they are far too sweet for this cake. However, I couldn’t resist the Brilliant idea of a toasted topping of Seven-Minute Frosting.
Line 20 standard muffin cups with paper liners. Prepare the Coca-Cola cake. Divide the batter evenly among the lined cups, filling each cup three-quarters full. Bake, rotating the tins halfway through, until a cake tester inserted into the center of a cupcake comes out clean, about 25 minutes. Remove the muffin tins to a rack to cool slightly, then remove the individual cupcakes to the rack to cool completely. Meanwhile, prepare the Seven-Minute Frosting. Combine 1½ cups sugar with ⅔ cup water and 2 tablespoons light corn syrup in a small saucepan; clip a candy thermometer to side of the pan. Bring to a boil over medium heat, stirring occasionally until
the sugar dissolves. Continue boiling, without stirring, until the syrup reaches 230°F. In the bowl of a heavy-duty mixer fitted with the whisk attachment, whip 6 large egg whites on medium-high speed until soft peaks form. With the mixer running, add 2 tablespoons sugar, beating to combine. As soon as the syrup reaches 230°F, remove from the heat. With the mixer on medium-low speed, pour the syrup down the side of the bowl in a slow, steady stream. Increase the speed to medium-high; whisk until the mixture is completely cool (test by touching the bottom of the bowl) and stiff peaks form, about 7 minutes.
Spoon the frosting into a pastry bag fitted with a large open-star tip. Pipe the frosting onto each cupcake, swirling the tip slightly and releasing as you pull up to form a peak. Hold a small kitchen blowtorch about 4 inches from the surface of the frosting and wave it back and forth until the frosting is lightly browned, like a toasted marshmallow. Serve immediately. Makes about 20 cupcakes.
MAKES 1 (10½-INCH) CAKE
My dear friend, the lovely and talented Angie Mosier, is an amazing baker, writer, and teacher. As a food and prop stylist, her phenomenal simple, clean, and refined sense of style shines through. But for all her fancy pedigree, Angie is the absolute “salt of the earth,” with an intelligent and inspiring relationship with food. She gets it.
Angie has a very egalitarian view of the upside-down cake, and has expressed appreciation for the canned yellow fruit and garishly red maraschino cherries. Admittedly, my recipe is prissy, maybe even somewhat elitist, using fresh pineapple and dried cherries and topped with boozy whipped cream. You know, I don’t think Angie would disapprove. She would simply reach into her cupboard for the absolutely perfect plate.
1 pineapple (about 3½ pounds), peeled and left uncored
1 cup cake flour (not self-rising)
¾ teaspoon baking powder
¼ teaspoon baking soda
1¼ cups granulated sugar
¾ cup (1½ sticks) unsalted butter, at room temperature
½ cup firmly packed light brown sugar
1 vanilla bean, split and scraped, or 1 tablespoon pure vanilla extract
2 large eggs
½ cup sour cream
Whipped cream, for serving
Preheat the oven to 350°F. Line a baking sheet with a silicone baking liner or parchment paper.
Using a wide mandoline or a chef’s knife, slice the pineapple as thinly as possible. Set aside.
Sift together the flour, baking powder, and baking soda.
Heat ½ cup of the granulated sugar in a 10-inch cast-iron skillet. Cook until deep amber, about 5 minutes. Remove the pan from the heat. Add ¼ cup of the butter, stirring vigorously with a wooden spoon. Spread the caramel evenly over the bottom of the skillet, and sprinkle with the brown sugar.
Center 1 pineapple slice in the skillet. Place pineapple slices around it in a tightly overlapping circle. Layer a second circle, completely covering the bottom and at least halfway up the sides. Place a final slice in the center of the skillet.
In a heavy-duty mixer fitted with the paddle attachment, cream the remaining ½ cup butter, remaining ¾ cup granulated sugar, and the vanilla. Add the eggs one at a time, mixing well after each addition, and the sour cream. Slowly add the sifted flour, scraping down the sides of the bowl with a rubber spatula as needed. Pour the batter into the pineapple-lined skillet.
Place the skillet on the prepared baking sheet and transfer the baking sheet to the oven. Bake until golden brown and a cake tester inserted into the center comes out clean, about 45 minutes.
Remove from the oven and pour the excess liquid from the skillet into a measuring cup. Carefully invert the cake onto large plate and drizzle the reserved liquid over the top. Set aside to cool slightly. Using a serrated knife, cut into wedges and place on serving plates. Top with the whipped cream and serve.
Adding some rum to crème anglaise adapts it Brilliantly to the Pineapple Upside-Down Cake.
Prepare the
Basic Crème Anglaise. Add 2 tablespoons dark rum. Stir to combine. Makes about 2 cups. Spoon ¼ cup of the Dark Rum Crème Anglaise onto chilled serving plates. Top with a wedge of the cake. Serve immediately.
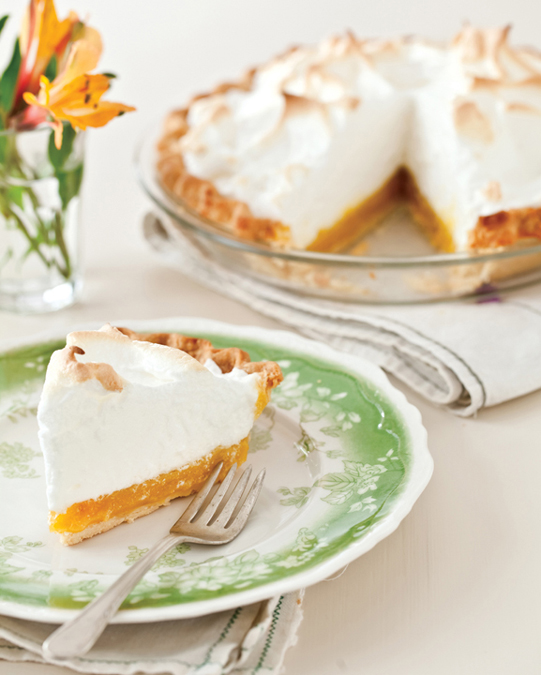
Old-Fashioned Lemon Meringue Pie
MAKES 1 (8-INCH) PIE
One of my worst mistakes in the kitchen involved lemon filling. My boss requested several quarts of lemon curd. At the time I had never had lemon curd; all I knew was lemon meringue pie. So, I looked up the recipe for lemon filling, whipped up a batch, and packed it up for her weekend party. Monday rolled around, and my head almost rolled, too. Lemon curd is a lemon-flavored custard thickened only with eggs and butter. Lemon pie filling has cornstarch and, it seems, was completely unacceptable. Believe me, I got on top of that one so as not to make that mistake again. No mistake about it, you’ll love this Old-Fashioned Lemon Meringue Pie.
This intensely lemon-flavored filling is balanced by a heaping mountain of sweet meringue.
6 large egg yolks
Finely grated zest of 1 lemon
Juice of 4 to 6 lemons (½ cup)
1½ cups sugar
4 teaspoons cornstarch
3 large egg whites
French Pie Crust, blind baked and cooled
Whisk together the egg yolks, lemon zest, lemon juice, 1 cup of the sugar, and cornstarch in a saucepan. Place over medium heat and bring to a boil. Cook, whisking constantly, until thick, about 5 minutes.
Pour the mixture into a baked and cooled pie shell. Refrigerate until firm and set, at least 45 minutes and up to 2 hours; any longer and the crust will become too soggy.
To brown the pie in the oven, preheat the oven to 350°F. Put the whites in the bowl of a heavy-duty mixer fitted with the whisk attachment. Beat on high speed until frothy. With the mixer on high speed, add the remaining ½ cup sugar in a slow, steady stream and beat until stiff peaks form, 3 to 5 minutes.
Remove the pie from the refrigerator and top with meringue, covering the entire surface. Transfer to the oven and bake until browned, 3 to 5 minutes. Alternatively, hold a small kitchen blowtorch about 4 inches from the surface of the pie and wave it back and forth until the meringue is lightly browned. Serve immediately.
Old-Fashioned Lemon Meringue Pie is a diner-worthy Basic; serve it with a scoop of
lemon ice on the side, and you have white-tablecloth-restaurant Brilliant.
In a saucepan, combine 1 cup sugar, ½ cup light corn syrup, and 2½ cups water; bring to a boil over medium-high heat. Cook until the sugar completely dissolves, about 2 minutes. Remove from the heat; add 1 cup freshly squeezed lemon juice. Pour the mixture into a bowl; chill over an ice bath or overnight in the refrigerator. Freeze the mixture in an ice cream maker according to the manufacturer’s directions. Makes 1 quart. Store in an airtight container in the freezer for up to 1 month.
SERVES 8
Simple free-form tarts can be as beautiful as the finest carefully prepared pastry. I love using pâte sucrée, essentially a sugar cookie dough, in this recipe. It will crack and break while you are working with it, but it’s really like modeling clay in that you can just pinch it back together.
La Varenne Sweet Pie Pastry
1½ pounds Granny Smith apples (about 5)
⅓ cup sugar, plus more for sprinkling
Juice of ½ lemon
1 tablespoon all-purpose flour
Pinch of fine sea salt
½ cup unsweetened applesauce
¼ cup Calvados, applejack, bourbon, or Cognac
1 tablespoon unsalted butter, chilled and cut into small pieces
1 tablespoon cold water, for brushing
1 cup heavy cream, chilled
On a silicone baking liner or parchment paper, roll out the pastry to ¼ inch thick. Transfer to a baking sheet. If it cracks or breaks, simply pinch the dough to seal. Cover loosely with plastic wrap and refrigerate until firm, about 30 minutes.
While the pastry is chilling, peel and core apples, then cut into ⅛-inch slices. Toss the slices with the sugar, lemon juice, flour, and salt. Set aside. Combine the applesauce with 2 tablespoons of the Calvados. Set aside.
Preheat the oven to 425°F.
Place the baking sheet with the chilled pastry on a clean work surface. Spread the applesauce over the pastry, leaving a 2-inch border. Top the applesauce with the sliced apples, mounding them slightly. Fold the edges of dough over, partially covering the apples, and leaving the center uncovered. If the pastry cracks or breaks, simply pinch the dough to seal. Dot the apples with the butter. Brush the edge of the pastry with water and sprinkle with sugar.
Bake until the pastry is golden brown and the apples are tender, 40 to 45 minutes. Let cool on a rack to warm or room temperature.
Just before serving, beat the cream in a chilled bowl over ice using an electric mixer or chilled whisk until the cream holds soft peaks. Add the remaining 2 tablespoons Calvados and beat until incorporated. Slice the tart and serve the slices topped with dollops of the cream.
Release your inner pastry chef. Garnishing the Basic Country Apple Tart with oven-dried apple chips is Brilliant.
Preheat the oven to 200°F. Line 2 baking sheets with silicone baking liners; set aside. Using a chef’s knife, cut off the bottoms of 2 apples. Using a mandoline, thinly slice the whole apples (with the seeds), making sure each slice is uniform in thickness. Place the apple slices in a single layer on the prepared baking sheets. Sift 2 tablespoons confectioners’ sugar over the apple slices. Bake for 1 hour; then rotate the pans top and bottom. Continue baking until the apples are dry and crisp, 45 to 60 minutes. Transfer to a wire rack to cool. Store in an airtight container for up to 2 days.
MAKES 1 (8-INCH) SQUARE
Who doesn’t like fudge? And, better yet, what busy cook doesn’t like a Basic dump-and-stir candy made from essential pantry ingredients, with no candy thermometer required? Sign me up. This fudge will do duty for a school bake sale, is great to have around on for a family gathering or tailgating weekend, and, when Brilliant, is suitable for a grown-up supper club (pictured at the beginning of the chapter).
1 cup unsalted butter (1 stick) more for the pan
½ teaspoon fine sea salt
1 (16-ounce) box confectioners’ sugar, sifted
¼ cup low-fat or whole milk
½ cup unsweetened cocoa powder
½ cup chopped walnuts, peanuts, or pecans, toasted
1 teaspoon pure vanilla extract
Brush an 8-inch square baking dish with butter.
Melt the butter with the salt in a heavy saucepan over low heat. Whisk in the confectioners’ sugar and milk until very smooth. Add the cocoa; stir until combined and remove from the heat. Add the walnuts and vanilla; stir until combined. The fudge will have a very smooth, shiny texture.
Spoon the fudge into the prepared dish. Transfer to the refrigerator until set, at least 2 hours. Or, if you just can’t wait, slip it in the freezer. Run a knife around the edge of the pan and invert the firm block of fudge onto a clean work surface. Using a long utility knife, slice into 1⅓-inch cubes. Heat the knife in hot water and pat dry before each cut for the smoothest slices. Store in an airtight container at room temperature for up to 1 week.
Basic chocolate fudge is always welcome, but make it a fudge pop and it’s Brilliant. Before the mixture has fully set, score the surface to make 1⅓-inch-size pieces. Insert a wooden skewer (or a peppermint stick during the holidays) into the center of each square. Carefully cut into cubes. Refrigerate to set. Place 1 cup finely chopped nuts or crushed peppermint candy in a bowl. Firmly press each side of the block in the topping to coat. Makes about 3 dozen pieces.
MAKES 2 POUNDS
In the South, peanuts are traditionally used for making brittle for gift giving at the holidays. Mama always has a tin on hand for company. Try a health-food store or grocery store with a robust health-food section for the raw nuts. I prefer using raw nuts because the nuts toast in the hot sugar; dry-roasted nuts can become too dark and taste burnt in the final brittle.
2 cups sugar
1 cup light corn syrup
½ cup cold water, plus more for brushing the pan
Pinch of fine sea salt
3 cups unsalted raw peanuts (Spanish or blanched), cashews, almonds, or macadamia nuts, or a combination of nuts, coarsely chopped
1 tablespoon unsalted butter, at room temperature, plus more for the baking sheet
1 teaspoon pure vanilla extract
1 teaspoon baking soda
Butter a rimmed baking sheet or marble slab, or line a rimmed baking sheet with a silicone baking liner.
In a heavy saucepan, combine the sugar, corn syrup, water, and salt and bring to a boil over medium-high heat, stirring until sugar has dissolved. Continue cooking, without stirring, until the mixture reaches the
hard-ball stage on a candy thermometer (250°F to 266°F) swirling the pan occasionally; wash down sides of pan with a pastry brush dipped in water to prevent crystals from forming. Stir in the nuts and continue cooking, stirring frequently to prevent the nuts from burning, until the mixture is light amber and the nuts are golden brown, about 5 minutes.
Remove the pan from the heat; stir in the remaining 1 tablespoon butter and the vanilla. Carefully stir in the baking soda; the mixture will foam up in the pan. As soon as it is combined, pour it onto the prepared baking sheet or marble slab.
Using an oiled offset spatula, quickly spread into an even layer about ½ inch thick. Slip the oiled spatula under the hot candy to loosen the edges and bottom. Let stand until completely cool, 45 to 60 minutes.
Break the brittle into large pieces, and layer between pieces of waxed paper in an airtight container. Store at room temperature up to 1 month.
Line a baking sheet with waxed paper. Combine 6 ounces semisweet chocolate chips and 1 tablespoon vegetable shortening, in a microwave-safe bowl. Microwave, uncovered, on medium-high for about 1 minute. Remove and stir with a rubber spatula. Some chips may not have melted, so microwave again in 10-second intervals, stirring after each interval, until the chocolate and shortening are smooth and just melted. Let cool slightly. Dip the cooled brittle in the melted chocolate and shake off the excess. Sprinkle with additional chopped nuts, if desired. Place on the prepared baking sheet. Refrigerate until set.
- Have all the ingredients for your recipe measured and ready to go. Candy making requires that you react quickly. You do not have time to measure ingredients between steps.
- Make sure the kids know sugar mixtures are hot and can be dangerous. Candy is best made by older children.
- Wear oven mitts and a long-sleeve shirt.
- Use a large, sturdy pot or pan that won’t overflow. If you think it might not be big enough, use a larger one.
- Keep a metal bowl of ice water on hand to plunge your hand into if caramelized sugar drips on it.
- The bowl of ice water also can be used for dipping the bottom of the saucepan to stop the cooking.
- Remove the saucepan of cooking candy when the candy thermometer registers at least 2°F below the temperature specified in the recipe. The temperature will continue to rise a little.
- To dissolve the sugar for easy cleanup, as soon as you’ve spooned the brittle out of the saucepan, fill the pan with hot water and return it to the stovetop over low heat with the spoon and thermometer.

 Sweet Biscuits with Stewed Blackberries