For lattice- or full-topped fruit pies, prepare the crust for crimping by rolling and pinching the excess dough overhang inward so it makes a crust “wall” that just sits on top of the pan rim, incorporating the top pastry round or lattice as you go. Next, use the index finger and thumb of one hand to create a letter C that the thumb of your opposite hand fits perfectly into. Hold this C at the outside of the crust “wall” and push inward while simultaneously pushing your opposite thumb into the center of the C from the inside of the crust “wall.” Use this as your mold to crimp the edges of the pie all the way around, making sure the final fluted crust sits directly on top of the pan’s rim.
Cut a few vents in a full-topped pie to allow steam to escape while baking.
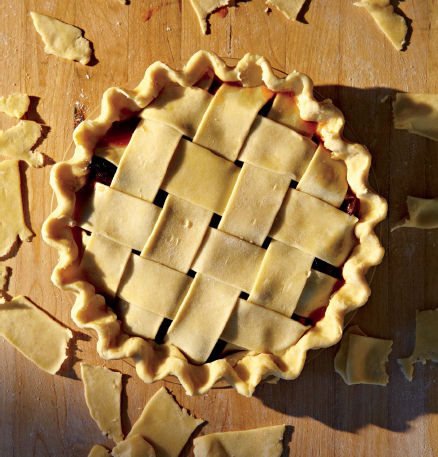
Develop your own crimping style. It’s your signature.
Shaping a Galette
We consider galettes a part of the extended pie family—pie’s cool older cousin, perhaps. They are fun and easy to make with piecrust, require no pie pan, and are the perfect solution when you have a small amount of a certain fruit or when you want a small dessert.

To shape a galette is not difficult. There are a few key things to remember: (1) do not overfill the galette with the filling or it will collapse, and (2) chill the galette very well before baking. We usually like to start with the dough in a large circular shape; sprinkle it with a little sugar and flour; place the filling in the middle and allow it to spread out a little, about 3 inches from the edge; and then fold the edges in, crimping the dough tightly to itself in a circle, almost creating a little satchel, but leaving an opening in the center. The galette will inevitably leak some filling onto the tray, but baking on parchment paper or a silicone baking mat (such as Silpat) will help make cleanup easy.

You can also cut decorative edges into your galette. The main thing to consider is the symmetry of the pattern, which will determine how the edges will fold in. For example, in the Lemon Verbena Raspberry Galette (see here), we cut triangle shapes all around an ample center circle, creating a sort of star whose points could be folded in. For the Gooseberry Galette (see here), we used a biscuit cutter to create a flower shape with a circle in the center and petals that are evenly spaced and folded in. Be creative in how you shape your galette; it is, after all, by definition a free-form pastry.
Prebaking
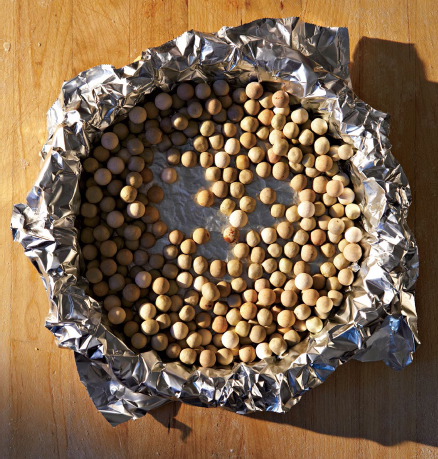
When baking custard, cream, or other liquid-based pie fillings, you often need to give the crust a baking head start to ensure that it spends enough time in the oven overall. This step is called prebaking, or blind baking. The pie shell is lined with foil, and a heat-conductive material (pie weights or beans, for example) stands in for the filling; without this replacement, the dough will melt down into the pan and you won’t be baking pie any longer. With it, you’ll have a crisp, flaky crust to offset your perfectly textured buttermilk chess, or sweet corn custard, or buttered rum cream, or…
Have your crust rolled, crimped, and rested in the refrigerator for at least 30 minutes. When it’s fully chilled, use a fork to prick all over the bottom and sides, 15 to 20 times. This step, called docking, helps eliminate the air bubbles that can form when the dough is exposed to heat and also prevents the crust from shrinking. Place the crust in the freezer.
Position the oven racks in the bottom and center positions, place a rimmed baking sheet on the lowest rack, and preheat the oven to 425°F. Have ready 1 egg white whisked with 1 teaspoon of water to brush the crust with during baking. This glaze acts to moistureproof the bottom and sides of the crust that will be exposed to the filling. It’s not totally necessary but does make for a better final product.
When the crust is frozen solid (about 10 minutes), line it tightly with a piece or two of aluminum foil. Make sure the crimped edges are completely covered and there are no gaps between the foil and the crust.
Partial Prebaking: For Fillings That Will Be Baked
Pour the pie weights or beans into the pan and spread them so they are concentrated more around the edge of the shell than in the center. Place the pan on the preheated baking sheet and bake for 20 minutes, until the crimped edges are set but not browned.
Remove the pan and the baking sheet from the oven, lift out the foil and pie weights, and let the crust cool for a minute. Use a pastry brush to coat the bottom and sides with a thin layer of egg white glaze (1 egg white whisked with 1 teaspoon of water) to moistureproof the crust. Return the pan, on the baking sheet, to the oven’s middle rack and continue baking for 3 more minutes. Remove and cool completely before filling.
Full Prebaking: For Fillings That Are Fully Cooked
Pour the pie weights or beans into the pan and spread them so they are concentrated more around the edge of the shell than in the center. Place the pan on the preheated baking sheet and bake for 20 minutes.
Remove the pan and the baking sheet from the oven, lift out the foil and pie weights, and let the crust cool for a minute. Use a pastry brush to coat the bottom and sides with a thin layer of egg white glaze (1 egg white whisked with 1 teaspoon of water) to moistureproof the crust. Return the pan, on the baking sheet, to the oven’s middle rack and continue baking for 8 to 10 more minutes, or until the crust is golden brown all over. Remove and cool completely before filling.
Finishing and Troubleshooting
If your crust develops holes on the bottom or sides while baking, patch them, when baking is done, with a small amount of raw dough while the crust is still hot from the oven. As the dough melts, you can spread it like putty to seal it to the baked crust.
If your crust shrinks, you may be able to reshape it if it hasn’t fully set yet. While it is still hot, use a clean, folded kitchen towel to apply gentle, even pressure to the edges to push them back up and into place.
Baking Fruit Pies
Our favorite choice for glazing the top crust is a simple egg wash for the deep golden color it gives the baked crust. You can also use milk or cream or just leave the glaze off altogether. Sprinkling sugar on the top is also optional; we’ve found our customers like the little bit of texture and crunch that comes from a sprinkle of demerara sugar.
Baking on a rimmed baking sheet is a necessity—fill your kitchen with the smoke of burned butter just once and you’ll know why. In a pinch, make a baking tray from aluminum foil with the edges folded up to catch runoff.
Starting the pie on the lowest rack of the oven helps to set the bottom crust and ensure proper and thorough browning. Moving to the middle rack partway through baking allows the top crust to brown evenly. If at any point the top crust is getting too dark, you can use a crust shield (see here) or lower the oven temperature to finish.
To tell if a pie is fully baked, look for the juices to be bubbling throughout and, if you are using a glass plate, pick it up to be sure the bottom is fully browned and not still pale and raw in the center. When baking an apple pie, test for doneness with a skewer—the apples should be soft but not mushy; you want them to maintain some structure.
Baking Custard Pies
Custard pies are by far more finicky and less forgiving than fruit pies. There is a finite window of time in which they must be removed from the oven; miss that window and you’ll end up with either an underbaked, runny mess or an overcooked curdled filling. Practice makes perfect when working with custards, and even we miss the mark occasionally.
That said, there are a few cues you can look for to identify when a custard is perfectly cooked.
Generally, as it nears finishing, the outer 2 inches of the custard will be set and puffed up slightly, while the center will remain a liquid that will slosh a bit, independent of the outer ring, when the pan is shaken. At this point, check the pie’s progress every 30 to 60 seconds.
When the center just changes from liquid to barely set, pull the pie from the oven. When the pan is lightly shaken, the filling should still be jiggly but moving as one. The residual heat will continue to cook the filling as it cools.
Check individual recipes for more specific instructions.
Let the Pie Cool Before You Slice It
It’s no secret that the minute a fresh pie comes out of the oven, everyone wants a slice. You might be tempted to cut into that freshly baked, steaming-hot pie, but you’d do yourself and the pie a favor to let it cool before you do. Giving the pie ample cooling time, at least 1 hour, will yield a pie that slices and plates so much better than a pie straight out of the oven. You really do need to give all that delicious filling that you so attentively prepared some time to cool and set.

In the shop, we use slicing guides to slice our pies into six, seven, or eight slices. If you are going to be making a lot of pies and you want all your slices to be portioned exactly, you could purchase a slicing guide from a restaurant supplier, but more than likely you’ll want to just slice the pie in as big or as small slices as your pie eaters request. We recommend using a serrated knife for fruit pies and a straight-bladed paring knife for custards. Slide the blade through the slice at least three times to ensure that you’ve gotten the crust sliced all the way through (and to avoid disaster when scooping it out for the plate). Use a traditional triangle-shaped pie server for ease in removing the slices from the pan—especially the first one!