
An example of a slideshow in the Oakland Museum of California app.
The next step is the fun part. Interactivity is where digital content differs from traditional print content and can offer a more engaging experience with video, web content, panoramas and much more. There are so much interactive elements you can add to your folio. A word of warning: once you start adding interactivity, you can’t stop. Also, know that any interactive content you add to one orientation needs to go on the other.
Using InDesign, you can take your files and add interactivity using the Folio Overlays and other panels. Adding interactivity in InDesign adds an interactive layer that is on top of the design content (overlayed)—the design content is flattened into a JPEG, PNG or PDF. That’s why it’s called the Folio Overlays panel.

An example of a slideshow in the Oakland Museum of California app.
InDesign has a fair amount of built-in interactive features that we’ve been able to add to PDF and Flash content created InDesign. A folio supports most but not all of these interactive features.
Here’s what is supported by the digital publishing workflow:
• Video and audio (Media panel).
• Buttons (Buttons and Forms panel—CS6/CC, Buttons panel—CS5/CS5.5).
• Hyperlinks (Hyperlinks panel).
• Multi-State Objects (Object States panel).
• You can also create web content overlays, image sequences, pan and zoom images, panoramas and scrollable frames.
Here’s what isn’t supported by the digital publishing workflow:
• Forms (Buttons and Forms panel—CS6/CC, not available in CS5.5 and earlier anyway).
• Animation (Animation panel). There are a lot of other options for creating animated content, including HTML content and content from Adobe Edge Animate, or similar programs.
• Some hyperlink and button actions.
• Bookmarks, cross-references and page transitions.
Unfortunately, this listing I’ve given you is very generic and doesn’t take into account the different levels of support that the supported devices offer. To find out what DPS feature is supported on what OS/device, check out this chart: http://helpx.adobe.com/digital-publishing-suite/help/supported-feature-list.html.
NOTE: In interactive content, only basic transparency effects such as opacity and multiply are supported. Blending modes are not supported.
The following types of interactivity are referred to as “pass-through” overlays, which means they are not resampled when the app is created. In other words the source files are added directly to the app, so if you have a video file with a huge file size it’ll be added directly to the app the user downloads.
• Videos (and audio clips)
• Image sequences
• Panoramas
• Pan and zoom images
TIP: Use either JPEG or PNG image format for these overlays. Use PNG images only if the images include transparency. Compressing overlay images and video can significantly reduce the size of the folio.
The following interactive overlays are resampled as PNG images, similar to the way background content is resampled. You can use any image format for these overlays when you create them.
• Slideshows (Multi-State Objects)
• Buttons
• Audio controller skins
• Scrollable Frames
In this book, we won’t cover, in detail, every single method of creating interactivity, but we’ll cover a large number of features. Let’s get started.
The first type of interactivity we will cover is linking. There are lots of methods for adding links to your folio, and most of them you may have already used if you have created an interactive PDF in InDesign. The first type of link you will create will be on the TOC, so that users can tap to go to an article.
1. Choose Window > Workspace > Digital Publishing (CS6 or CC users) or Interactive (CS5 or CS5.5) to show most all of the interactive panels we can utilize, if you haven’t already.
2. Choose File > Open and navigate to the DPSIntro > TOC_Article > TOC.indd (for CC users), DPSIntro_preCC > TOC_Article > TOC_h.indd (for CS5/CS5.5 users) or DPSIntro_preCC > TOC_Article_CS6 > TOC.indd (for CS6 users). Click Open.
3. In the TOC document (with the vertical layout showing in CS6 or CC), select the Type tool and select the heading text “COVER” in the first column.
4. Open the Hyperlinks panel (Window > Interactive > Hyperlinks). The Hyperlinks panel can be used to add links to selected text. As you’ll see later, using the Buttons and Forms panel (Buttons panel in CS5 or CS5.5) is usually a better way of adding links to a selected frame.
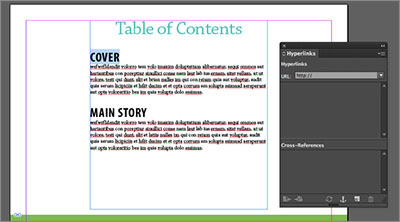
The text selected and Hyperlinks panel open
5. Click the Create New Hyperlink button at the bottom of the panel.
• In the New Hyperlink dialog box, change the following options:Link To: choose URL.URL: type “navto://Cover” NOTE: the “navto://” is a way to navigate to other articles in your folio.
• “Cover” is the name of your article exactly as it appears in the Folio Builder panel.
• Shared Hyperlink Destination: deselect.
• This is important since shared hyperlink destinations are better avoided in a DPS workflow.
Click OK.
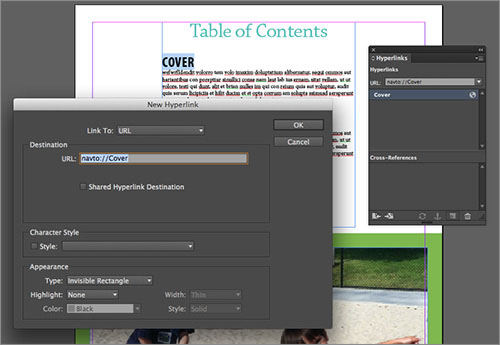
Add the hyperlink to the text.
TIP: If you want to link to a page in an article, you can follow the same steps to create a link, except for one addition. If you add “#1” to the URL (like this: “navto://Main#1), you can link to the second page. Zero is the first page of an article. You can also simply type in an http://www.website.com address to link to a URL. If you want to have the user tap to open their email software and send an email the link would look like this “mailto:brian@brianwoodtraining.com” (replace “brian@brianwoodtraining.com” with another email address, of course).
6. Add a link to the text “MAIN STORY” that links to the Main article (follow the previous steps).

Add a link to the “MAIN STORY” text.
7. Choose File > Save to save the file.
InDesign CS5 or CS5.5 users will need to add the links to the TOC_v.indd file as well. InDesign CS6 or CC users can simply update the text frame in the portrait orientation (which you’ll do next). When you created the alternate layout—the text frames between the different layouts were linked.
8. In InDesign CS6 or CC, choose Window > Links to open the Links panel (if it’s not already showing). Select the text link listed in the panel and click the Update Link button at the bottom of the Links panel. Look in the Hyperlinks panel and you will see another two links appear.

Update the text in the alternate layout (CS6/CC).
NOTE: Since we can’t test the folio links in InDesign, you can use one of the methods in the chapter 10, “Testing the Folio” to test it at any point in this process.
9. Close the file.
Next, you’ll add a button to the folio. Buttons are created using the Buttons and Forms panel (Buttons panel in CS5 or CS5.5). They’re great because they can have links applied, like to a website, but they can also be used as a trigger for interactive content such as a video or a slideshow and they can change appearance when the user interacts with the button.
TIP: Buttons are downsampled to 72 ppi, causing text in the button to appear pixelated in some cases. A way to get around this limitation is to place an image for a button and create an invisible button that has the link on top of that image.
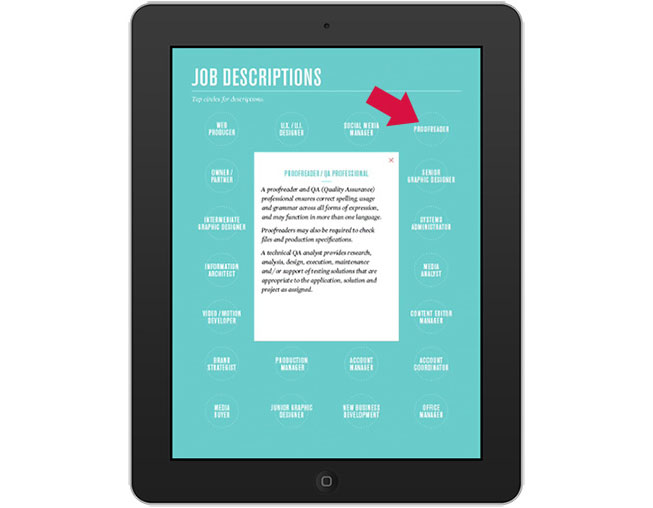
A button in an app that triggers content.
1. Choose File > Open and navigate to the DPSIntro > Main_Article > main_h.indd (InDesign CC) or DPSIntro_preCC > Main_Article > main_h.indd (InDesign CS5/CS5.5/CS6). Click Open.
2. Open the A-Master page in the Pages panel.
3. With the Selection tool, click the logo in the lower-right corner of the page.
4. Open the Buttons and Forms panel (Window > Interactive > Buttons and Forms), or the Buttons panel in CS5 or CS5.5. Click the Add Action button and choose Go to URL.

Add a button link to the logo.
5. In the Buttons and Forms panel, set the following options:
• Type: Button (default setting).
• Name: logolink (you don’t have to name your buttons, but it’s a best practice).
• Event: On Release or Tap (the default setting). The Event in a button is pretty much useless on a device like a tablet since there is no mouse, and therefore no ability to hover.
• URL: your desired URL, for example: http://www.askbrianwood.com.
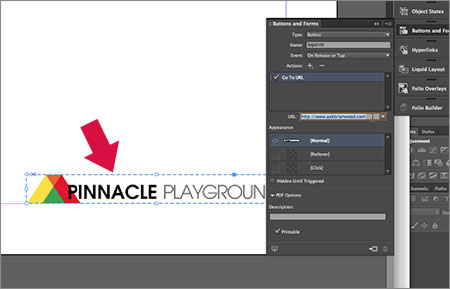
Add a button link to the logo.
TIP: When you add interactivity like a button action to content, the object on the page will have a dashed line border when selected. That makes it easier to see which content has interactivity.
NOTE: When you click the Add Action button, you will see a listing of actions that a button can have. Unfortunately DPS doesn’t support all of these actions. See the figure below for which are supported.
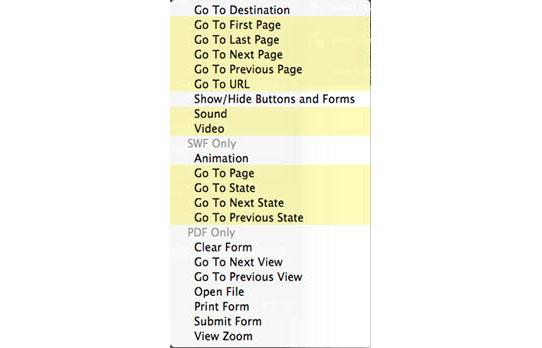
Supported actions in DPS (highlighted in yellow).
TIP: You can change the appearance of the button when the user taps it on the device. The [Normal] state of the button can have the initial button appearance, and the [Click] state can have a different appearance. The [Click] state appears when the button is tapped on the device. The [Rollover] state is not supported on mobile devices—something I learned the hard way. To change the appearance of the [Click] state, with the button selected on the page, click the Appearance named [Click] in the Buttons and Forms panel and change the appearance of the button directly on the page.
6. Choose File > Save.
7. Open the Folio Overlays panel. With the logo button selected, you will now see two options in the panel: Open in Folio and Open in Device Browser. Make sure that Open in Device Browser is selected to open the link in the device browser (outside of the folio) and select Ask First to show a dialog box giving the user a choice of opening the browser or not.
Be careful about setting links to open in the device browser since the user will leave the app interface to go to the device browser. That can be confusing to the user, especially when they’re trying to find their way back to the app content. It depends on the type of link, so test to see what works best for your situation.
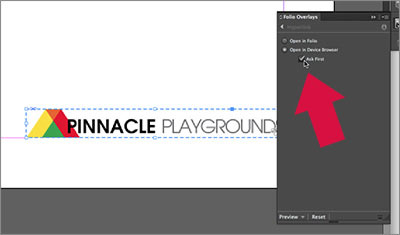
Edit the button options.
NOTE: The Folio Overlays panel settings are not available for text hyperlinks. You cannot change settings for text hyperlinks; they are set to Open in Folio by default.
8. Click Preview at the bottom of the Folio Overlays panel and choose Preview on Desktop to preview the folio with the local Adobe Content Viewer application. Click the logo button and a message will appear asking if you want proceed. Click OK to see it open in your browser. Close the browser and the Adobe Content Viewer and return to InDesign.
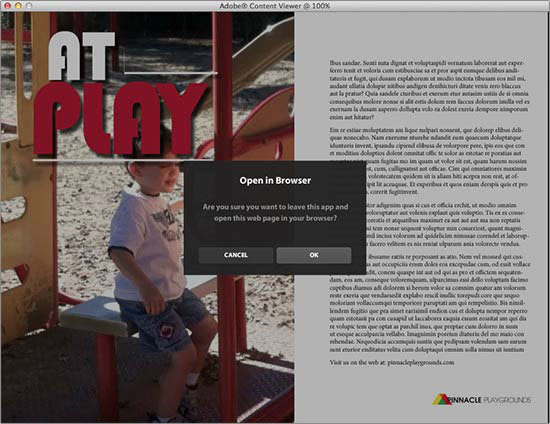
Test the folio locally.
All of us need to add the links to the Main_v.indd file as well. This is one of the hardships of creating a dual-orientation layout, and will force you to think about the best workflow for your situation.
Video is a powerful type of interactive content that can be linked to in your folio or embedded. You need to consider the size of the app and whether or not to embed the video since embedding adds the file size of the video to the file size of the app. Another thing to consider is if you link to online videos, such as from YouTube.com, users will need an internet connection to see it. Video files are pass-through content, which means that they are not resampled in any way, rather the video file goes straight into the app as is.
For video files, use H.264 (a standard for video compression) MP4 files (.mp4). They can be up to 1920x1080 (for the HD iPad), but I wouldn’t suggest videos that large since larger video dimensions usually mean larger file sizes. If the video isn’t coded correctly, you can recode it to H.264 .mp4 using Adobe Media Encoder or a tool such as Miro Video Converter. For audio files, use MP3 files (.mp3).
NOTE: If you’re a Pro or Enterprise user targeting Android devices, use Baseline Profile when creating the video for optimal compatibility with those devices.
Next, you will place a video. For a dual orientation article, you can place a video file that has been saved in two sizes (so it’s two video files)—one for each orientation. If the video files are to be embedded, then placing two video files requires two video files rather than one to be embedded, which will mean larger file sizes. Also, if the user switches orientation and there are two separate video files, the video playback will not be continuous.
1. With the main_h.indd file still open, navigate to page 3, with the yellow background and the heading Kids Love Our Playgrounds!
2. Choose View > Fit Page in Window.
3. Choose File > Place. In the Place dialog box, navigate to the DPSIntro > HTMLResources folder (InDesign CC) or DPSIntro_preCC > HTMLResources folder (InDesign CS5/CS5.5/CS6 users) and select playground.mp4. Click Open.
The HTMLResources folder must be named exactly as you see (it’s case sensitive). It can contain content such as HTML content, images, CSS, PDF, videos and more that you want to link to in multiple articles. Later, you will create a .zip from the contents of this folder and add it to the folio so that it can be embedded when the app is created.
NOTE: As of DPS version 2, although PDF is now supported on Android, linking to PDF files in the HTMLResources.zip file is not supported on Android. It’s a bit of a tangent, but I figured I’d mention it here.
4. Click the left side of the page to place the video file. Shortly after placing the video, a poster should appear. This is a frame of the video that is used as a placeholder image. Position the video below the text, horizontally in the center of the page, and leave it selected.

Place the video.
Now that the video is placed, you can set up some playback options, if you like.
5. Open the Media panel (Window > Interactive > Media). In the Media panel, set the following options:
• Play on Page Load: deselected (the default setting). You can force the video to play when the page appears.
• Loop (Except PDF): deselected (the default setting). Looping currently doesn’t affect the video in your folio.
• Poster: choose Choose Image. In the Choose Image for Poster dialog box, select the playground_poster.jpg from the DPSIntro > HTMLResources folder (or DPSIntro_preCC > HTMLResources folder for CS5/CS5.5/CS6 users). You can also choose From Current Frame, scrub the video timeline in the Media panel, then click the Click to Set Current Frame as Poster button (looks like a circular arrow). After you set the poster image, it should show on the page in place of the video content.
• The remaining options in the Media panel do not apply to videos in a folio.

Set the Media panel options.
Aside from setting media options for the video in the Media panel, there are other video options available in the Folio Overlays panel. You’ll take a look at them next.
6. With the video frame selected, open the Folio Overlays panel (Window > Folio Overlays). Set the following options:
• Autoplay: deselected (the default setting). This is the same as selecting Play on Page Load in the Media panel.
• Play Full Screen: deselected (the default setting).
• Tap to View Controller: selected. By default tapping will pause/play the video. With this selected, tapping the video will show a control bar at the bottom of the video. This is for iOS only.
• Do Not Allow Pause: deselected (it’s dimmed). This option is only available if autoplay is selected. This is for iOS only.
• Stop on Last Frame: selected. Otherwise the video area can go blank. This is for iOS only.

Set Folio Overlays panel options for the video.
7. At the bottom of the Folio Overlays panel, choose Preview on Desktop from the Preview menu. This will open the Adobe Content Viewer application on your machine and preview just that page. If your device (iPad, etc.) is still connected via USB to your machine, you could also test on that. Make sure to test in the landscape orientation since that’s the orientation of the video! Can’t tell you how many times I’ve messed that up.

Preview the folio.
8. Back in InDesign, select the video on the page and choose Edit > Copy.
9. Open the file DPSIntro > Main_Article > main_v.indd (InDesign CC) or DPSIntro_preCC > Main_Article > main_v.indd (InDesign CS5/CS5.5/CS6). On page 3, choose Edit > Paste. Position the video so it looks good.

Add the video to the portrait layout.
10. Choose File > Save. At the bottom of the Folio Overlays panel, click Preview and choose the method you want to preview the folio with.
TIP: You can also create buttons that control a video since there is an action called “video” in the Buttons and Forms panel (InDesign CC) or Buttons panel (InDesign CS5/CS5.5) that allows you to play, pause, stop or continue a video.
The next type of interactivity you will create is a Multi-State Object (MSO). MSOs can be used for slideshows, showing and hiding different types of content and much more. MSOs are created using the Object States panel and are one of the most useful interactive elements.
Let’s take a look at creating a simple image slideshow using the Object States panel.
1. Go to the main_h.indd file by clicking the tab, and go to page 4.

Add the video to the portrait layout.
On the right side of page 4, there are 3 images that are stacked on each other. You will use these images to create the slideshow.
2. With the Selection tool, select all three large images.
NOTE: You can use any image format for an MSO (slideshow). The content for a slideshow is resampled in the folio.
Next, you’ll align the images so that they are directly on top of each other. You don’t have to do this, but it makes for a neater slideshow if the images don’t appear in different locations.
TIP: You can have images and groups that are in different locations on the page in the same MSO. When a state in the MSO is selected, the content for that state shows and the rest of the states contents are hidden.
3. Choose Window > Object and Layout > Align to open the Align panel. Click the Align Horizontal Centers button ![]() and Align Vertical Centers button
and Align Vertical Centers button ![]() to align them to each other. If you need to, drag them back to the right side of the page.
to align them to each other. If you need to, drag them back to the right side of the page.
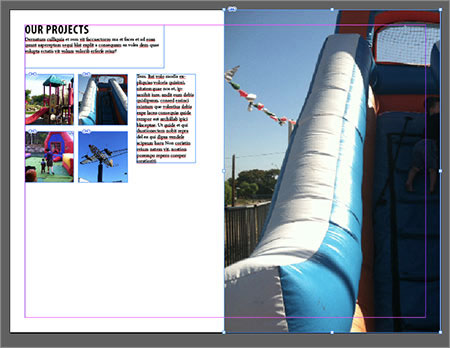
Align the images and position them like in the figure.
4. With the images selected, open the Object States panel (Window > Interactive > Object States).
5. With all three images selected, click the Convert Selection to Multi-State Object button at the bottom of the Object States panel (![]() ). In the Object States panel, change the name to Projects Slideshow. The name isn’t something you have to change, but it can make it easier to work with the MSO later.
). In the Object States panel, change the name to Projects Slideshow. The name isn’t something you have to change, but it can make it easier to work with the MSO later.
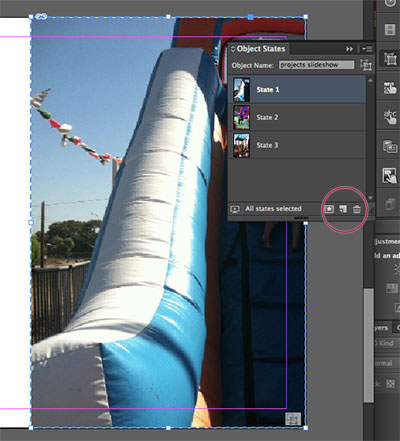
Create the Multi-State Object (MSO).
TIP: An MSO can be made of just about anything. If you were to create a group from content like text and images, and then created an MSO from the selected group, the group would be treated as a single state in the MSO.
6. Click each of the states in the Object States panel to see how it works. Each state is an image, in this case. When you click a state, the other states are hidden. The images are grouped together and are now treated as a single MSO.
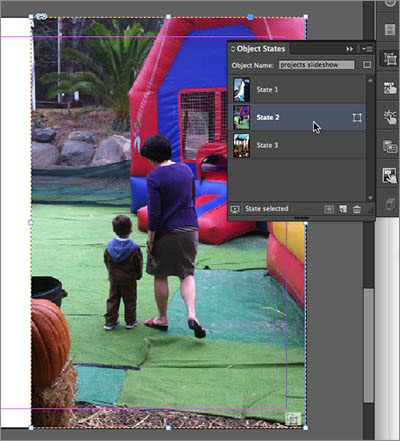
Test out the states of the MSO.
Now that the MSO is created, you can set some options in the Folio Overlays panel.
7. Open the Folio Overlays panel. Deselect and then reselect the MSO on the page.
In the Folio Overlays panel, you will see a series of options available for what InDesign calls a slideshow. You can treat the MSO as a self-running slideshow and set options like Autoplay and Tap to Play/Pause, but in our case, we are going to control the slideshow with a series of buttons (the smaller thumbnails on the left side of the page). So you will leave these options deselected.
Leave all of the options in the Folio Overlays panel at their default settings (see the figure). Most of the settings are self evident (like Autoplay), but a few I think aren’t so let’s talk about them. The option Swipe to Change Image is specifically for the touch devices we are targeting—allowing users to swipe back and forth to change the images. The Hide Before Playing option can be a great way to create a tooltip, for instance, since the MSO is hidden before it is triggered to play (and appear) by a button or other type of trigger.

Set the slideshow options in the Folio Overlays panel.
The option Export Format in PDF Articles is important. Like we mentioned at the beginning of this chapter, when you work with certain overlays (the interactive content we can add), some of the overlay content is resampled and some is pass through. The source assets of slideshows, scrollable frames, and buttons are resampled as PNG images. You can use any image format for these overlays. That means that the images and other content for our MSO are compressed when the app is created. In other words, they are resampled as PNG images or vector content. The menu option at the bottom of the panel allows for two choices: Raster or Vector. If the overlay (slideshow) contains text and vector content (maybe a group of content), choose Vector to maintain quality. If the MSO contains just images, you can choose Raster.
Now that the slideshow is in place, you will control the slideshow with a series of buttons. I’m going to show you how to create the first, then you can finish—getting a little practice along the way.
8. With the Selection tool, click the first thumbnail image on the left side of the page to select the image frame (see the figure after step 9).
9. Open the Buttons and Forms panel (Window > Interactive > Buttons and Forms)(it’s the Buttons panel in CS5 or CS5.5). Click the Add Action button (+) and choose Go to State. This allows you to show one of the states in the MSO and hide the others. Set the following options:
• Type: Button (default setting).
• Name: Projects_slide1. You don’t have to name your buttons, but it’s a best practice.
• Event: On Release or Tap (the default setting). The Event in a button is pretty much useless on a device like a tablet since there is no mouse, so there is no ability to hover.
• Object: make sure that Projects Slideshow is chosen. You will only see the one MSO because the Object menu only shows MSOs on the active page.
• State: Choose State 3 (or whichever state thumbnail shows the same image as the selected thumbnail).
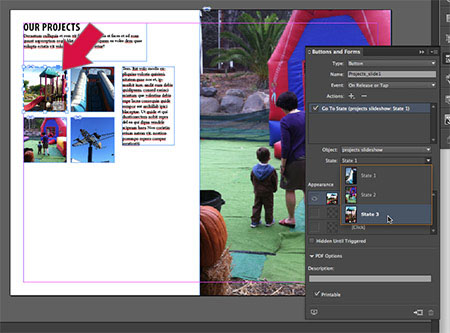
Set the button options for the MSO.
Now try selecting a few of the other image thumbnails on the left side of the page, one at a time, and applying the Go to State action to them to show the correct state of the slideshow MSO.
10. Choose File > Save. At the bottom of the Folio Overlays panel, click Preview and choose which method you want to use to preview the folio.
NOTE: You will need to have the device in the landscape orientation and scroll down to page 4 to see the content.
At this point, the MSO is only on the one article orientation. You can select all of the thumbnails and the MSO and copy/paste to the other layout orientation—replacing the content that is already there and reconfiguring it to better fit the layout.
TIP: You can hold off on creating the other orientation of a document until after you’ve added the overlay content to the source orientation. You can also delete the alternate layout and recreate it later.
Another type of interactive overlay you can create is a scrollable frame. Suppose that you had an article that talked about a certain recipe. You want users to see the entire recipe, but it won’t fit on a single page. You can add a frame to a page that allows that content to scroll within the page by swiping the recipe list. It’s really easy to create and can be useful for lots of things like a long article, showing a series of products and more.
Next, you’ll create a scrollable area for some article text.
1. With the main_h.indd file open, go to page 2.
The first step is to create a frame that will contain the scrolling content. The container will be created using the Rectangle Frame (or Rectangle) tool and the scrolling content will be pasted into the frame. The scrolling content can have different types of content including (but not limited to) text, images, buttons, or grouped content .
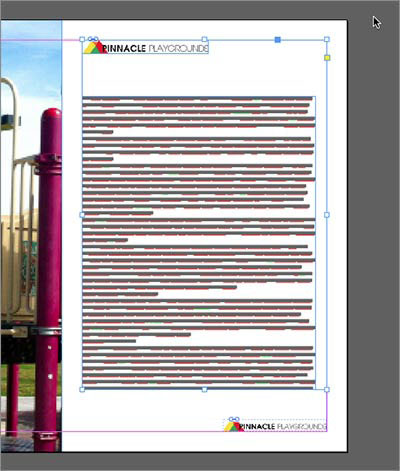
2. Zoom out a bit to see the text frame and logo off of the right side of the page. This is the content that will scroll.

View the content that will be in the scrollable frame.
3. Select the Rectangle Frame tool in the Tools panel. Click and drag a frame that is about the same size and position as the frame you see in the figure after this step. We’ll call this the container frame. You can add all kinds of formatting to the container frame like a stroke or background color, if you like.
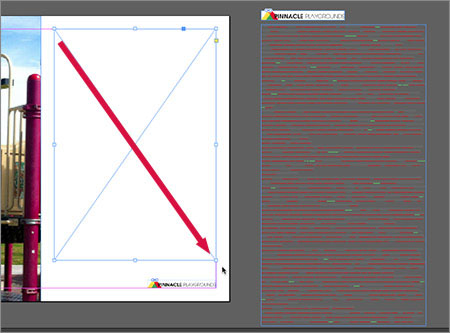
Create the container frame.
NOTE: If you add a border to the container frame, the content inside may butt right against the stroke, so you will need to make an allowance for that by repositioning the content later.
4. With the Selection tool selected, drag across the logo and text frame off the right edge of the page to select them. Choose Edit > Group to group the content.

Group the content.
5. Drag the grouped content onto the page, on top of the container frame you created in the previous step. Line up the left edge of the group with the left edge of the container frame and the logo in the group with the top edge of the container frame. Unless you want the content to be cut off or scroll horizontally, you need to make sure that the content is not wider than the container frame. It does, however, need to be taller than the container frame because otherwise there would be no need to make it scroll.
6. With the Selection tool, double-click the text frame in the grouped content. Make sure the text frame in the group is narrower than the container frame by a bit. If you choose (you’ll see how in step 9), there will be a small scrollbar that appears just inside of the right edge of the container frame when the user scrolls. This can cover up some of the content, so leave a 15 pixel allowance or so on the right side. Also, make sure that the text frame doesn’t have overset text—the red plus, like you see in the figure.

Position the grouped content.
NOTE: You may need to also resize the height of the text frame so that all of the text fits.
7. Press the Escape key to select the group again. With the group selected, choose Edit > Cut.
8. Select the container frame and choose Edit > Paste Into. The grouped content is pasted into the container frame. At this point, you could double-click the container frame to select the group and reposition it if needed (maybe to be farther from the stroke).
Paste the grouped content into the container.
TIP: In order to indicate that the frame is scrollable, some designers will add a scroll arrow or some sort of instruction indicating that there is more content. Here is a visual example from an app called Wired 19.05-free.
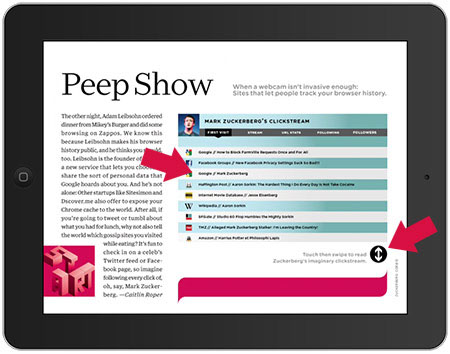
Example of leading the user to interactivity.
9. Make sure that the container frame is selected, and open the Folio Overlays panel.
Notice that some of the options in the panel are dimmed meaning you can’t select them. InDesign indicates which overlays can be applied to selected content in the panel using this method.
10. Click the Scrollable Frame option in the Folio Overlays panel—you may need to scroll down in the panel to see it. With the options showing, set the following:
• Scroll Direction: Vertical (You can choose which direction the container frame can scroll or let InDesign decide by choosing Auto Detect.)
• Scroll Indicators: deselected (the default setting). The scroll indicators are scroll bars that appear when you swipe in the container area to scroll the content. This is what I was referring to earlier in step 5.
• Initial Content Position: select Use Document Position. If you positioned the content in the container frame manually, then make sure to select Use Document Position.
• Export Format in PDF Articles: Vector. In this case, since the content is not pass-through, it’s resampled. Choosing Vector will keep the text as text.

Set the scrollable frame options.
11. Choose File > Save. At the bottom of the Folio Overlays panel, click Preview and choose which method you want to use to preview the folio.
NOTE: In order to test on a device, the device must not be asleep and Adobe Content Viewer must be open on the device. Also, make sure you test in the correct orientation.
There are so many things you can do with a scrollable frame. You can even include buttons, links, video and more in the container area. Try creating a scrollable frame that scrolls horizontally.

Scrollable frame horizontal example—in the zoomed out view, you can see that it’s just one page.
A simpler type of interactivity that you can add to a folio is Pan & Zoom. You can display a larger image in a smaller frame and allow the user to pan and zoom it. This can be great for displaying a product and allowing users to zoom in on details of the product, for instance.
In the figure below, the entire image on the right can be tapped to invoke the pan and zoom capabilities. The designer added an icon to indicate that this can be done.
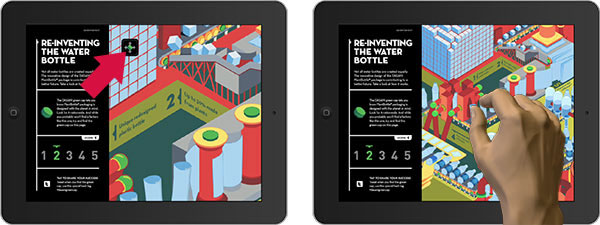
A Pan and Zoom example (Wired 19.05-free app).
Next, you’ll take an existing image on a page and apply the Pan & Zoom overlay to it.
1. While on page 2 of the main_h.indd file, click to select the large image on the left side of the page. This image is a JPEG, but you could also place a PNG to be used for the Pan & Zoom image. Those are the only two format choices for Pan and Zoom.
2. Select the Direct Selection tool in the Tools panel and select the image in the frame.
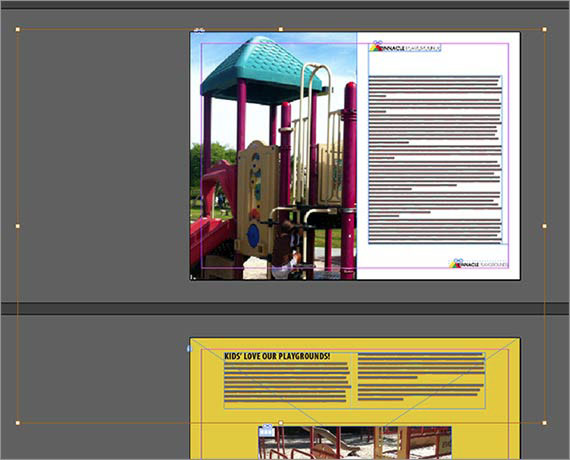
The image size relative to the frame.
Notice that the image is much larger than the frame it’s in. That’s the idea—the user can zoom in based on the image size percentage and can pan until the image edge reaches the frame edge. So, if the image is placed at 100 percent and cropped, the user can pan and pinch to zoom out to fill the image frame. If the image is reduced in size in InDesign to, say, 50 percent and is cropped, then the user can zoom up to 100 percent (50 percent more and back to 50 percent, as well as pan.
3. Press the Escape key to select the image frame again.
4. In the Folio Overlays panel, click the Pan & Zoom option. Select On. That’s it.
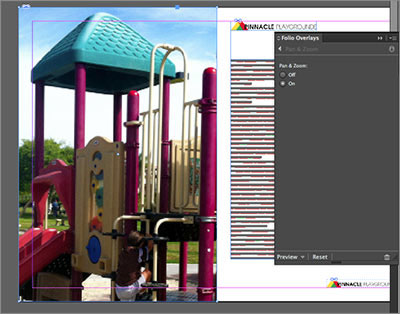
Apply the Pan and Zoom overlay.
5. Choose File > Save.
6. At the bottom of the Folio Overlays panel, click Preview and choose which method you want to use to preview the folio. In Adobe Content Viewer on a device, you will need to tap the image to begin zooming and panning.
NOTE: You will need to have the device in the landscape orientation and scroll down to page 2 to see the content. You will also need to add this interactivity to page 2 in the portrait orientation at some point.
NOTE: If you preview on the desktop Adobe Content Viewer (locally), you can double-click the image to pan, but you can’t zoom easily. The trackpad on my Mac laptop allows me to pinch zoom, though.
TIP: You can place an image on top of the Pan & Zoom image that is the same size as the frame to be used as a placeholder. When the user taps the Pan & Zoom image, the placeholder image is hidden. If the user double-taps the Pan & Zoom image, then the placeholder image reappears. Some designers use an image with an icon to indicate Pan & Zoom capabilites.
Another type of interactivity we can add is HTML content via a web content overlay. This is my favorite type of overlay content because it offers so many possibilities. You can display a web page, say a YouTube video, right on the page without having the user go to an in-app browser. You can also embed local HTML content included within the app. When adding a web content overlay that depends on an internet connection, such as a YouTube video or a Twitter feed, make sure your page can live without it. Users without an internet connection will see either nothing or a placeholder you supply.
Next, you’ll add a YouTube video to your folio. To accomplish this, InDesign CS5 or CS5.5 users have a few more steps to follow than InDesign CS6 or CC users.
For CS5 or CS5.5 users, follow the next steps for adding a web content overlay. InDesign CS6 or CC users can jump to the CS6 or CC instructions that follow.
NOTE: InDesign CS5 or CS5.5 users will need a text editor or a program like Adobe Dreamweaver to insert HTML content.
1. With main_h.indd open, go to page 3. This is the page that contains the video. Instead of a local video, you will insert a video from YouTube.
2. With the Selection tool, select the video file frame and delete it.
3. Open a text editor or a program like Adobe Dreamweaver. Create a new blank file and save it as youtube.html in the Main_article folder. Leave it open.
NOTE: The page you create does not need any HTML tags in it. It can be blank.
4. Open a browser and go to YouTube.com. On the site, search for the phrase “mill park cleanup.” Click on the link to the video attributed to askbrianwood.com (that’s me). Right-click on the video and choose Copy Embed Code.
NOTE: currently, for version 27 of DPS, you should not use the Share > Embed method since there is a bug associated with that method.
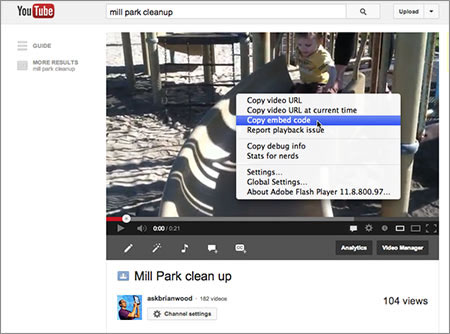
Get the code from YouTube.com.
NOTE: Pay attention to the width and height in the code that is pasted from youtube.com. You will create a frame in InDesign that is at least that size. Also, make sure that the Enable Privacy-Enhanced mode is not selected.
5. Paste the code in your text editor or Dreamweaver and save the file as youtube.html in the Main folder.

Paste the code into your page.
NOTE: If you are working in Dreamweaver, make sure that Code view is selected before you paste!
6. In InDesign, select the Rectangle Frame tool and draw a frame that mirrors the size you saw in the YouTube code.
7. Open the Folio Overlays panel and click the Web Content option. In the options, set the following:
• Click the folder icon to the right of the URL or File option. Navigate to the Main folder and choose the youtube.html file and click OK.
TIP: You could also type in a web URL to show in the frame.
• Auto Play: selected. This is important! If not selected, the user will need to click the frame. Also, you can set a delay if the page needs to load.
• Transparent Background: selected. This way if there is a color in the background of the web page, it will become transparent.
• Allow User Interaction: selected. With this selected, users can interact with the web content, like clicking a link.
• Scale Content to Fit: deselected. This is the default setting.
• All Access to Entitlement Information: deselected. This option is only available to Professional and Enterprise customers, and allows you to create a Web Content overlay that displays different content for different users depending on how the folio was obtained

Insert the HTML content into the page.
NOTE: You may see a warning message about the Flash player. That’s OK.
8. Choose File > Save. At the bottom of the Folio Overlays panel, click Preview and choose which method you want to use to preview the folio.
TIP: For users who don’t have an internet connection, you can also add an image or text as a placeholder on top of the web overlay content. That text can say something like “Click to watch the video” or “You need an internet connection to view this video.” If the user taps the placeholder on the video, the video will pop on top of the placeholder and play. Know that all interactive content is always above static (non-interactive) content.
NOTE: You will need to have the device in the landscape orientation and scroll down to page 3 to see the content. You will also need to add this interactivity to page 3 in the portrait orientation.
For those of you in InDesign CS6 or CC, you can insert web content directly into an InDesign document using the Object > Insert HTML command. That’s how you’ll insert the YouTube video next.
1. With main_h.indd open, go to page 3. This is the page that contains the video. Instead of a local video, you will insert a video from YouTube.
2. With the Selection tool, select the video frame and delete it.
3. Open a browser and go to YouTube.com. On the site, search for the phrase “mill park cleanup.” Click on the link to the video attributed to askbrianwood.com (that’s me). Right-click the video on the page and choose Copy Embed Code.
NOTE: Currently, for version 27 of DPS, you should not use the Share > Embed method.
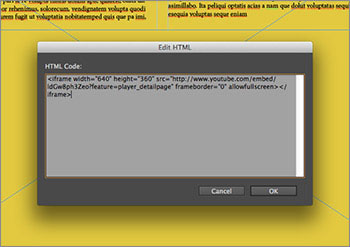
Get the code from YouTube.com.
4. In InDesign, choose Object > Insert HTML. The Insert HTML dialog box will open—this is where you will paste YouTube embed code. Paste the code into the Insert HTML dialog box and click OK.

The video on the page—it shows a message and then the video.
NOTE: You may see a warning message about the Flash player. That’s OK.
TIP: You can also just paste HTML content onto a page without choosing Object > Insert HTML. To edit the HTML content, you can right-click on the frame that is created and choose Edit HTML.
5. Open the Folio Overlays panel and click the Web Content option. Set the following options:
• Auto Play: selected. This is important—if not selected, the user will need to click the frame. Also, you can set a delay if the page needs to load.
• Transparent Background: selected. This way if there is a color in the background of the web page, it will become transparent.
• Allow User Interaction: selected. With this selected, users can interact with the web content, like clicking a link.
• Scale Content to Fit: deselected. The default setting.
• All Access to Entitlement Information: deselected. This option is only available for Professional and Enterprise customers.
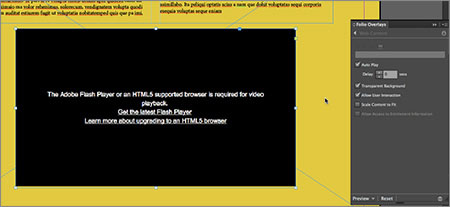
Set the Web Content overlay options.
6. Choose File > Save. At the bottom of the Folio Overlays panel, click Preview and choose which method you want to use to preview the folio.
NOTE: You will need to have the device in the landscape orientation and scroll down to page 3 to see the video content. You will also need to add this interactivity to page 3 in the portrait orientation.
TIP: For users who don’t have an internet connection, you can also add an image or text as a placeholder on top of the web overlay content. That text can say something like “Click to watch the video” or “You need an internet connection to view this video.” If the user taps the placeholder on the video, the video will pop on top of the placeholder and play. Know that all interactive content is always above static (non-interactive) content.
HTML Overlays allow you to add more functionality to your DPS app that you can’t do with InDesign and other overlays. You can create HTML content that includes HTML5, CSS and JavaScript. Just know that not everything that works in a web browser will work in the app, so testing is required.
Up next, you are going to add a tabbed navigation interface to a page in your folio. The tabbed navigation is made of HTML5, CSS and JQuery and was created in Adobe Dreamweaver CC (the Creative Cloud version of Dreamweaver). Here’s what the files look like in a browser:
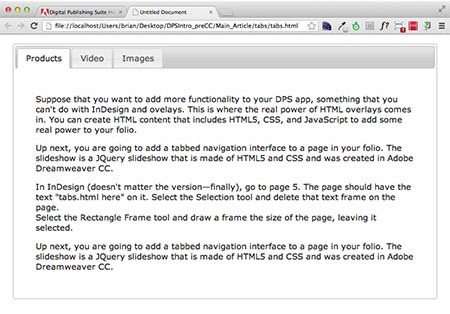
The tabbed panel HTML we are going to insert into the folio.
I would suggest putting the local HTML content in its own folder within an article folder. If you put the content for a web overlay in a folder, all of the content of that folder is inserted into the folio, so put only what you need in the HTML content folder.
NOTE: You could also put all of the files necessary to run the tabs.html file in the HTMLResources folder if you decide that you want to use any of the files for other articles later on.
1. In InDesign, go to page 5 of the main_h.indd file. The page should have the text “tabs.html here” on it. Select the Selection tool and delete that text frame on the page.
2. Select the Rectangle Frame tool and draw a frame the size of the entire page, leaving it selected.

Draw a rectangle frame.
The HTML content that you are going to insert is set to 100 percent width, which means that it will scale to fill the container (the frame in InDesign). If you create your own HTML content, you will need to consider a couple of things. First, there are two orientations if you have a dual-orientation folio. Second, it is local HTML so an internet connection isn’t required. Third, all of the files necessary to run the HTML—scripts, CSS, images—are best if they are local. That means they are in either the HTMLResources folder or they are in the article folder. If you link to content that is already on the web like scripts (think JQeury), users will need an internet connection to access it.
3. In the Folio Overlays panel, select the Web Content option and set the following options:
• Click the folder icon to the right of the URL or File option. Navigate to the Main_article > tabs folder and choose the tabs.html file. Click OK.
TIP: Since you are adding the web content overlay to the landscape orientation, you need to add it to the portrait orientation as well—yes, I sound like a broken record. You can add a different HTML file to the other orientation if it works better for your design. Just know that the app would have to load both files—which means you should test it.
• Auto Play: selected. This is important—if not selected, the user will need to click the frame. Also, you can set a delay if the page needs to load.
• Transparent Background: selected. This way if there is a color in the background of the web page, it will become transparent.
• Allow User Interaction: selected. With this selected, users can interact with the web content, like clicking a link.
• Scale Content to Fit: deselected. This is the default setting.
• All Access to Entitlement Information: deselected. This option is only available for Professional and Enterprise customers.

Apply the Web Content overlay.
4. Choose File > Save. At the bottom of the Folio Overlays panel, click Preview and choose which method you want to use to preview the folio. The Video tab in the HTML content has a YouTube video that you will need an internet connection to see.
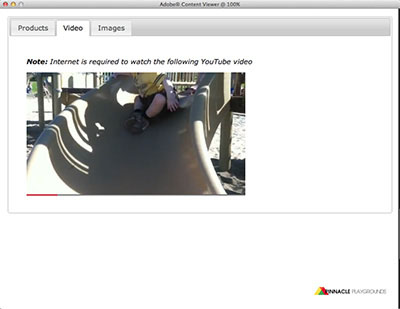
Previewing the folio locally.
NOTE: You will need to scroll down to page 5 to see the tabs.html content.
The last type of interactivity we will discuss is an image sequence. Image sequences can be used for lots of things like swiping to change the color of a product or showing an object that rotates around a fixed point and more. An image sequence requires a series of images that are named in sequential order with ascending suffixes like “image001.jpg,” “image002.jpg,” and so on. The images can be created using an application like Adobe Photoshop, and they should be saved as either JPEG or PNG and usually 72 ppi. The images will also need to be in their own folder within the article folder. Compress the images as much as you can and only use PNG for images with transparency. Make sure that they are the correct size for the area in your InDesign document; don’t resize in InDesign. The images for an image sequence are pass-through, which means that they are not resampled. If the images are large in file size, their file size will be directly added to the folio size.
You can create the images for an image sequence in several ways. My favorite is to create an animation, 3D object, or import video into Photoshop CS6 Extended or CC, and later and export as an image sequence (File > Export > Render Video in Photoshop). This method can lead to some really creative content.
TIP: Other DPS overlays that require the source files to appear in their own folder are panoramas, audio controller skins and local web content files.
1. In the main_h.indd file, go to page 6. Select the Rectangle Frame tool and drag to create a small rectangle on the page. Don’t worry about the size or position yet.
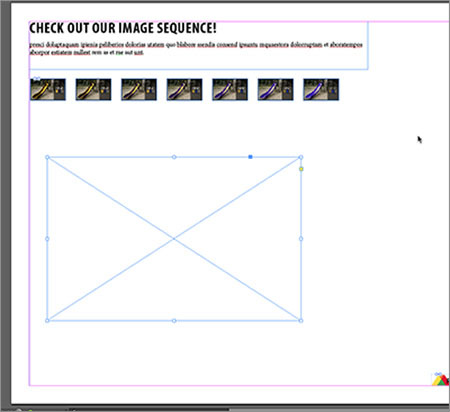
Create a placeholder frame on the page.
TIP: You could also place an image first that is the same dimensions as the images in the sequence. This image is treated like a poster for the sequence, and it would appear before the user interacts with the sequence. Some designers will add an icon to the poster image in the sequence indicating that users can interact with it.
NOTE: When you place an image in a sequence, don’t resize it in InDesign. It can lead to some unexpected results.
2. With the frame selected, open the Folio Overlays panel. Select the Image Sequence option and set the following options in the panel:
• Click the folder icon to the right of the Load Images option. In the Choose a Folder dialog box, navigate to the Main_article > Links > slide folder( InDesign CC) or DPSIntro_preCC > Main_article > Links > slide folder for (InDesign CS5/CS5.5/CS6 users) and select the folder. Click Open. The rectangle will resize to fit the image.
When you loaded the images in the previous step, you probably saw the other images in the folder. How many you create depends on the effect you are trying to achieve. To give you an idea: Adobe suggests at least 30 images for a 360-degree rotation of an object. Just remember—the more images, the longer and possibly smoother the sequence can be, but the bigger the file size.
NOTE: Did you see the folder named HD in the slide folder? To learn more about that, see the sidebar after this section called Different Assets for SD and HD iOS Devices.
3. Drag the image into the lower-left corner of page 6. Make sure that the image is not outside of the edges of the page.
4. In the Folio Overlays panel, set the rest of the options:
• Show First Image Initially: selected (the default setting). Deselecting this can be useful if you wanted to hide the sequence and trigger it with a button, for instance.
• Auto Play: deselected (the default setting). This would run through the image sequence when the page appears.
• Tap to Play/Pause: selected. This should really be deselected when you want to control the sequence with a button or other device. For the options that appear when you select this option, try out some different settings and test them—it all depends on what you’re trying to achieve. I typically don’t loop content, since it autoplays, but it could be useful in certain design situations.
• Swipe to Change Image: selected (the default setting). This setting allows the user to swipe to transition between the images in the sequence.
• Stop At First And Last Image: selected. If you didn’t have this selected, as the user swipes across the image, the sequence would eventually reach the end (the last image in the sequence) and then start over.
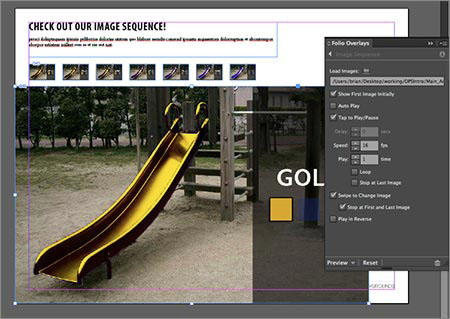
Add the sequence images and change the options.
For panoramas, image sequences, videos, pan & zoom images and audio controller skins, you can include two different sets of assets for iOS devices like iPad and iPhone: SD and HD. So for the image sequence you just created, you could create an HD set of images. To do this, place the SD version of the content in InDesign and apply the overlay like you normally would, but using the SD assets. Create a subfolder called “HD” in the folder containing the SD assets. In the HD folder, use high-resolution images with identical names to the SD assets—the HD versions should be twice the dimensions as the SD assets. For instance, if you had SD images that are 500x300, the HD images would need to be 1000x600. The viewer on the SD iPad (iPad 1, iPad 2 and Pad mini) displays the SD set of assets, and the HD iPad (iPad 3) viewer displays the assets from the HD folder. You’ll find that this is a great option, but you may not need it. You’ve got to test the folio on SD and HD iOS devices (like iPad) to see if it’s necessary. As a matter of fact, some publishers will create assets for the pass-through overlays that are between SD and HD resolution at roughly 108 ppi. For our example, I actually placed the letters HD on the HD images so you could see them if previewing on an HD device.

Images on an iPad mini, an SD device, (left) and on an iPad 3, an HD device (right).
5. Choose File > Save. At the bottom of the Folio Builder panel, click Preview and choose which method you want to use to preview the folio. If you preview on a device, swipe horizontally to see the effect.
NOTE: You will need to scroll down to page 6 and orient the device in landscape orientation to see the sequence content. Also, I find that previewing from the Folio Overlays panel won’t preview the HD files on an HD device. That’s why it’s important to go to the Folio Builder panel.
Well, there you have it. That’s the bulk of the interactive overlays that you can add to your folio. We didn’t cover every one. I’ve seen some really creative uses of the interactive overlays in apps—even nesting slideshows in an MSO, and much more. If you want to get a glimpse of just what is possible, I suggest you to go to your device and go to the app store. Search for the app called DPS Tips by Bob Bringhurst and install it. It has all of the content we covered here and much more for you to explore.