Chapter 9
Building the Foundation, Sills, and Floor
You’ve found a suitable building site, checked with your city (if necessary), and drawn up your plan. Besides the materials listed below, you’ll need the tools listed in chapter 1. You’ll need a good set of tall sawhorses. You can also build your own sawhorses, as described in chapter 1, but add 6" to 8" to the length of the legs. You’ll also find a shovel and a wheelbarrow helpful for digging, hauling gravel, and mixing concrete (optional).
Foundation and Flooring Materials
Foundation base
- 12 2⁄3-cubic-foot bags 1⁄2" to 3⁄4" crushed rock; or gravel (8 cubic feet total); or
- 12 similar-size bags dry premix concrete
Temporary layout stakes
Foundation blocks
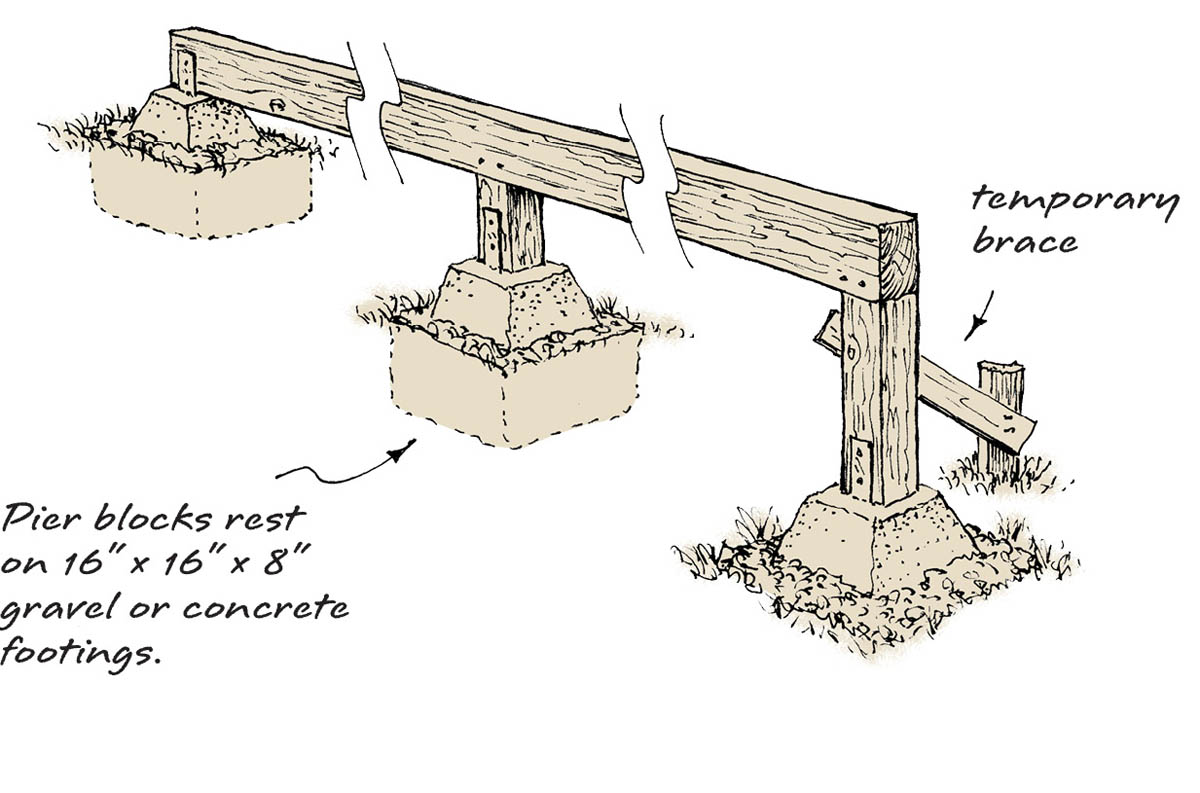
- 6 concrete pier blocks (see the drawing below)
Foundation sills
- 2 4×6s, 16 feet long, pressure-treated
Rim joists
Floor joists
Posts
- 1 or 2 4×4s, 8 feet long, pressure-treated (optional; you’ll need these if the ground is sloped)
Permanent bracing
- 2 or 3 1×6s, 8 feet long, pressure-treated (optional; you’ll need these if the ground is sloped)
Batter board stakes
- 12 cut from 2×4s, each stake from 2 to 4 feet long
Batter boards and temporary bracing
- 6 1×3 or 1×4 furring strips, 8 feet long
Floorboards
- 4 4 × 8-foot sheets 3⁄4"-thick tongue-and-groove OSB or plywood
Adhesive
- 4 tubes construction adhesive
Nails
- 5 pounds of each 16d coated sinkers;8d coated sinkers
- 2 pounds 6d coated sinkers
- 1 pound 6d or 8d duplex nails
Project
Building the Foundation
The foundation will consist of six concrete pier blocks set on gravel or concrete footings.
Set the Stakes
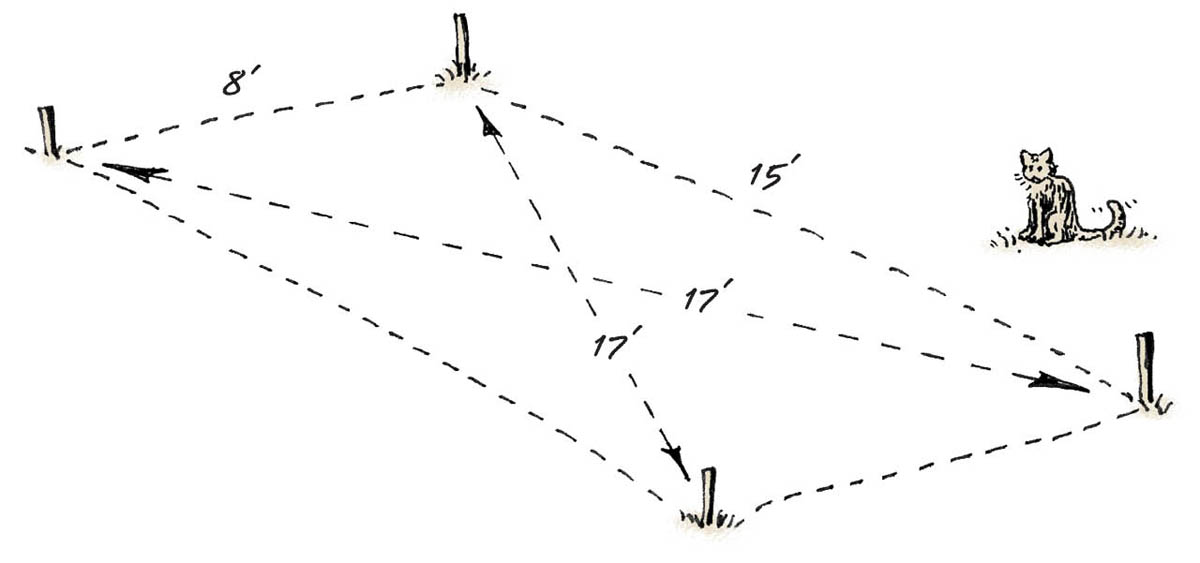
- Step 1. To lay out the foundation approximately, get your tape measure, four temporary stakes, and a hammer. Drive in a stake at each of the corners of an 8-foot by 15-foot rectangle.
- Step 2. Have a friend help you measure the diagonals (from corner to corner), adjusting the stakes as needed until the diagonal measurements are equal. If the ground is level, the diagonals should come out to 17 feet (204"). At this point, the measurement doesn’t have to be exact; it can be off by an inch or so.
- Step 3. Double-check to be sure the stakes are where you want the corners of your building to be.
Put Up Batter Boards
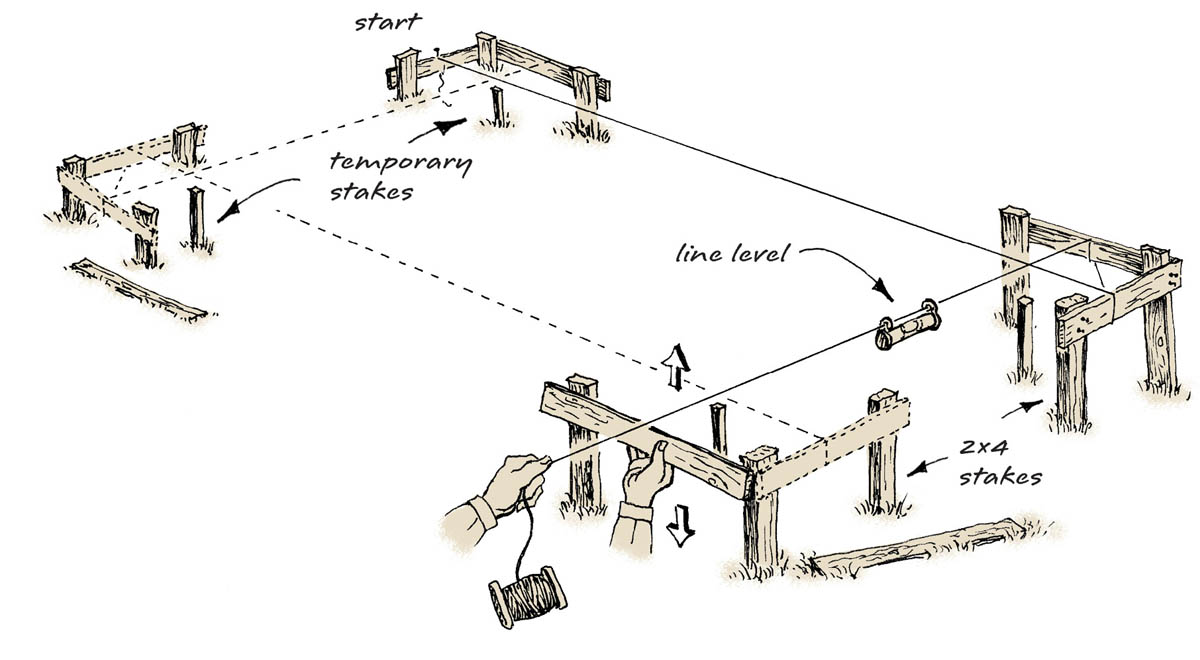
Although these stakes give you an approximate location for your corners, you’ll want to find the exact location by using batter boards and string. Batter boards are temporary L-shaped contraptions that help you find the exact corners of your foundation. The following steps may seem fussy, but if your foundation is crooked, your whole project will be thrown off. So get a friend to help, and you’ll have this done in no time.
- Step 1. Make or buy twelve 2×4 stakes about 2 feet to 4 feet long, depending on whether your site is sloped. Cut eight batter boards, each about 3 feet long, from the 1×3 furring strips.
- Step 2. Measure about 2 feet out from each temporary stake, and pound in three 2×4 stakes in an L formation that encloses the small stake. If your site appears to slope, drive shorter stakes at the uppermost corner and longer ones at the lower corners.
- Step 3. Nail two batter boards to the 2×4 stakes in the highest corner of the foundation. Use 6d or 8d duplex nails. The batter boards should form an L shape and should be level.
- Step 4. The batter boards at all the other corners must be level with the batter boards at this first corner. Attach a string to the top of the first batter board, then pull the string to the next corner, aligning it over the temporary stakes. Have a friend hook a line level to the middle of the string. As your friend watches the level, move the string up or down between the 2×4 stakes, keeping it aligned over the temporary stake. When the string is level, set a 1×3 batter board in place under the string. Have a friend mark the location of its edges on the 2×4 stakes. Then nail it into place, again using duplex nails.
- Step 5. Complete the L formation at this second corner by setting and nailing a second batter board level to the first.
- Step 6. Repeat this procedure to install the batter boards in the remaining two corners of your foundation. Be patient, and remember that this is only a “rough leveling” — it can be off by an inch or two and still work!
Square and Mark the String
Now that the batter boards are up, you’ll need to adjust the string and find the true corners of your foundation.
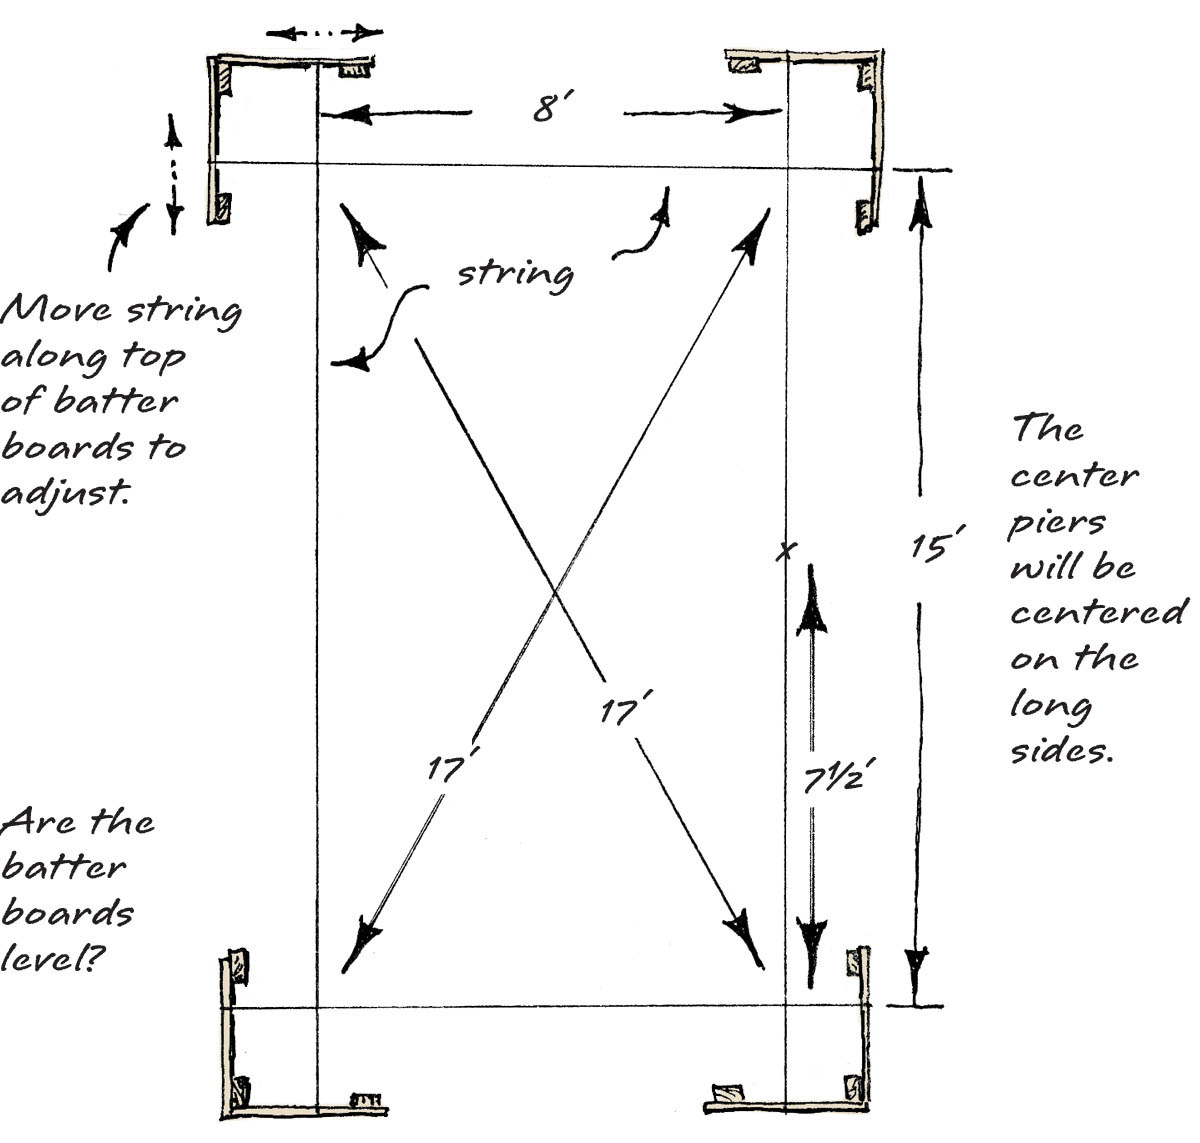
- Step 1. Measure your foundation dimensions at the points where the strings cross in each corner. Have your friend hold the tape hook as steady as possible, at one corner, while you pull it to the next.
- Step 2. Move the strings by sliding them along the batter boards, and check again with the tape, until the foundation rectangle is exactly 8 feet wide by 15 feet long and the diagonals in both directions are 17 feet. This can be a bit tricky, but don’t pull your hair out — you’ll get it eventually, unless the batter boards aren’t level.
- Step 3. Once the strings are set, clearly mark each point where the string meets the batter boards, just in case someone trips over the string later. A pencil mark will work, or use a nail to hold the string in place. With the corners squared and marked, now you can remove the temporary stakes.
- Step 4. Mark the location of the two center piers at the midpoint of the long sides (71⁄2 feet from each corner).
High Winds, Earthquakes, and Concrete Footings
If your shelter is exposed to high winds, or you live in earthquake country, you’ll want to hold down the structure as securely as possible. Using pier blocks set with embedded steel ties in concrete footings will help. Use three 1⁄2-cubic-foot or 2⁄3-cubic-foot bags of premixed concrete per pier block footing. Dump one or more bags of concrete mix into a clean wheelbarrow, then add water according to the instructions on the bag. Mix with a shovel or a garden hoe. Fill each hole with concrete, then immediately set the pier block as described on facing page. When you are done for the day, remember to thoroughly hose off the wheelbarrow and tools.
Set the Pier Blocks
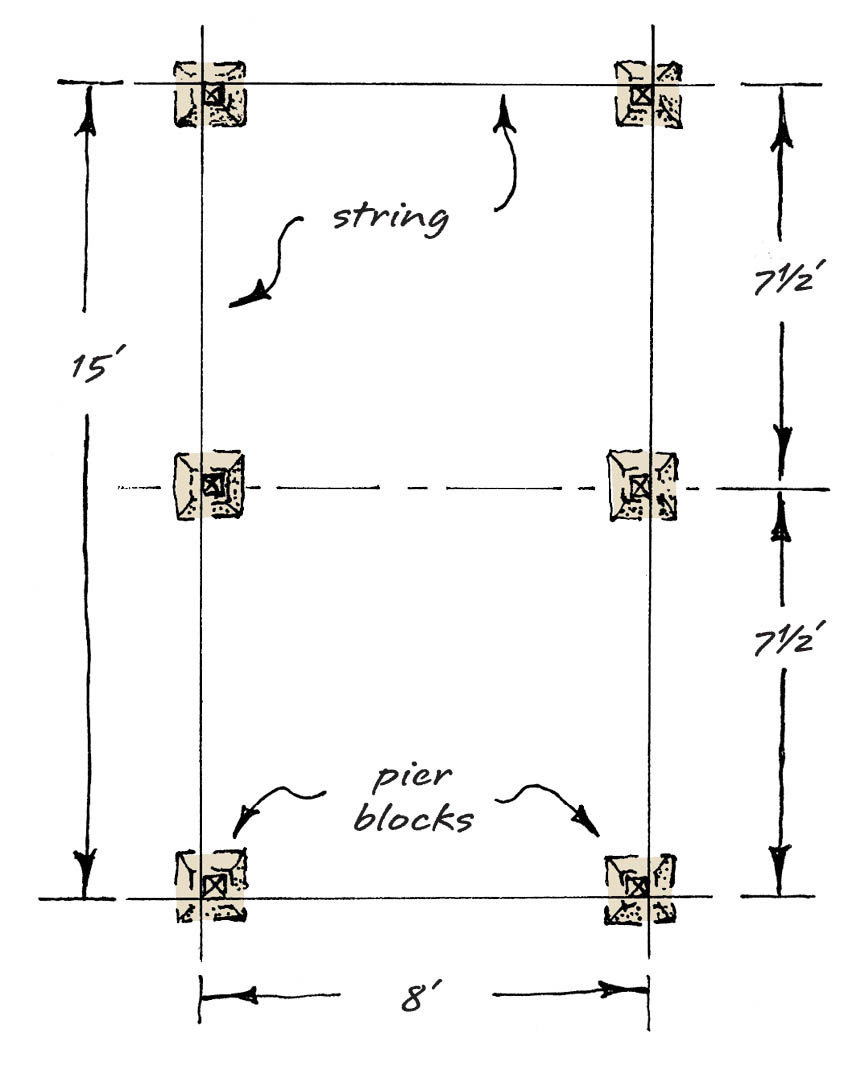
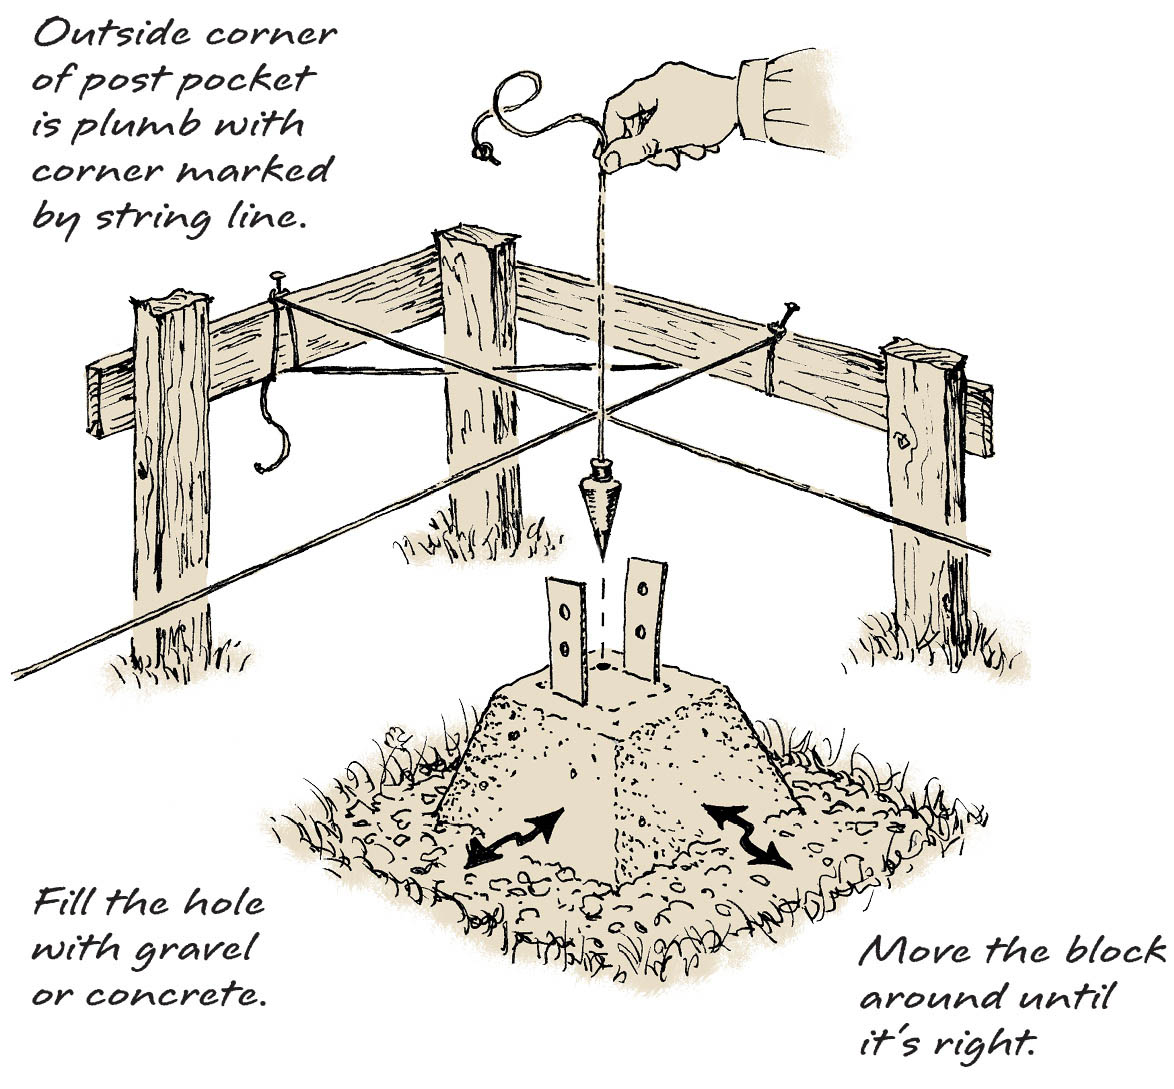
You will set six pier blocks on gravel, or concrete if you wish (see the box on facing page), using your string to get them in the right place. The point where the strings intersect is the exact corner of the building, which is also the outer corner of the post pocket in each corner pier block (see the drawing below). With this in mind, the footing holes are centered slightly inside the string corners. Here’s how to set the blocks:
- Step 1. At each corner, measure out a 16" square on the ground, centered about 2" inside the corner of the string. The two side holes are centered at the 71⁄2-foot mark and about 2" inside the string.
- Step 2. Using a spade, dig each square hole out to 8" deep, then fill it to the top with gravel (or concrete).
- Step 3. As you set a pier block, have a friend lower a plumb bob from the string corner to the pier block, while you jiggle the block into place, firmly setting it into the packed gravel, as shown below. Level the pier block using your 9" level.
- Step 4. For the side pier blocks, set the edge of the block’s post pocket directly under the plumb bob and at the 71⁄2-foot mark.
- Step 5. Repeat for all the piers. Leave the string in place.
Project
Making the Sills
Your floor will be supported by two 4×6 beams, or sills. If the ground is uneven or sloping, you may need to add posts to support the sills.
Set the Sills
- Step 1. Measure and cut two pressure-treated 4×6 sills to exactly 15 feet long. This is a big cut, so draw your cut mark all the way around the sills. If you’re hand-sawing, watch the cut lines on the sides as well as the top for a square cut. With a power saw, cut across the top cut mark, then rotate the sill 90°, saw on through, then rotate it and saw again. You’ll get a clean cut this way.
- Step 2. Set one sill on the highest pier block, and have a friend move it up and down at the other end while you eyeball your level. When it’s level, measure the distance from the underside of the sill to the top of the lower pier blocks. If this distance is only a couple of inches, you can settle the highest pier block lower into the gravel until the sill is resting level on the next pier block. If the distance is 2" or more, you’ll need to support the sill with posts at the lower pier blocks. Just cut a post to length out of cedar, redwood, or pressure-treated 4×4 (or from the 4×6 scraps you just cut off).
- Step 3. Check for level at the middle pier block in the same way, and cut a post to length if necessary.
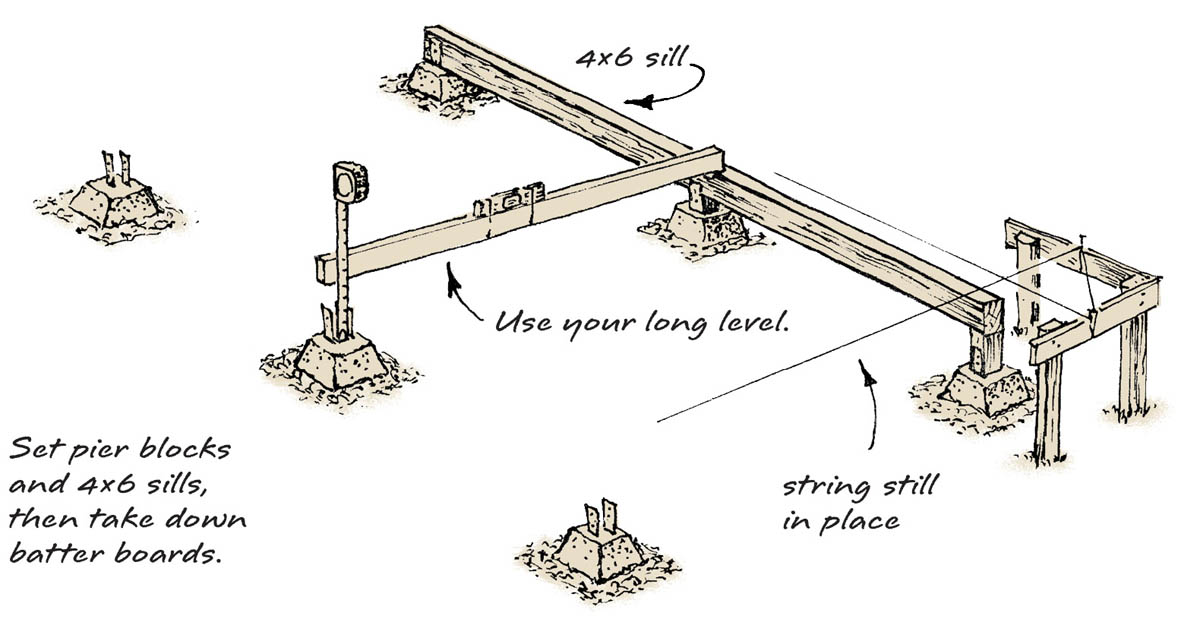
- Step 4. To level the opposite sill, use an 8-foot-long straight board with a level strapped to it as a homemade long level. While your friend holds the level, measure the distance from the top of each pier block to the bottom edge of the level. Account for the height of the sill. If the remaining distance is greater than 2", cut a post to size. If it’s less than 2", you can probably level the pier block simply by shifting it in the gravel base, as long as the gravel remains firmly packed under the pier block.
- Step 5. With your friend’s help, set up and secure the sills to the pier blocks as necessary. Toenail them to the posts with 8d galvanized box nails. If the sills want to lean or fall over, brace them with temporary stakes, as shown below. Don’t take the strings down yet.
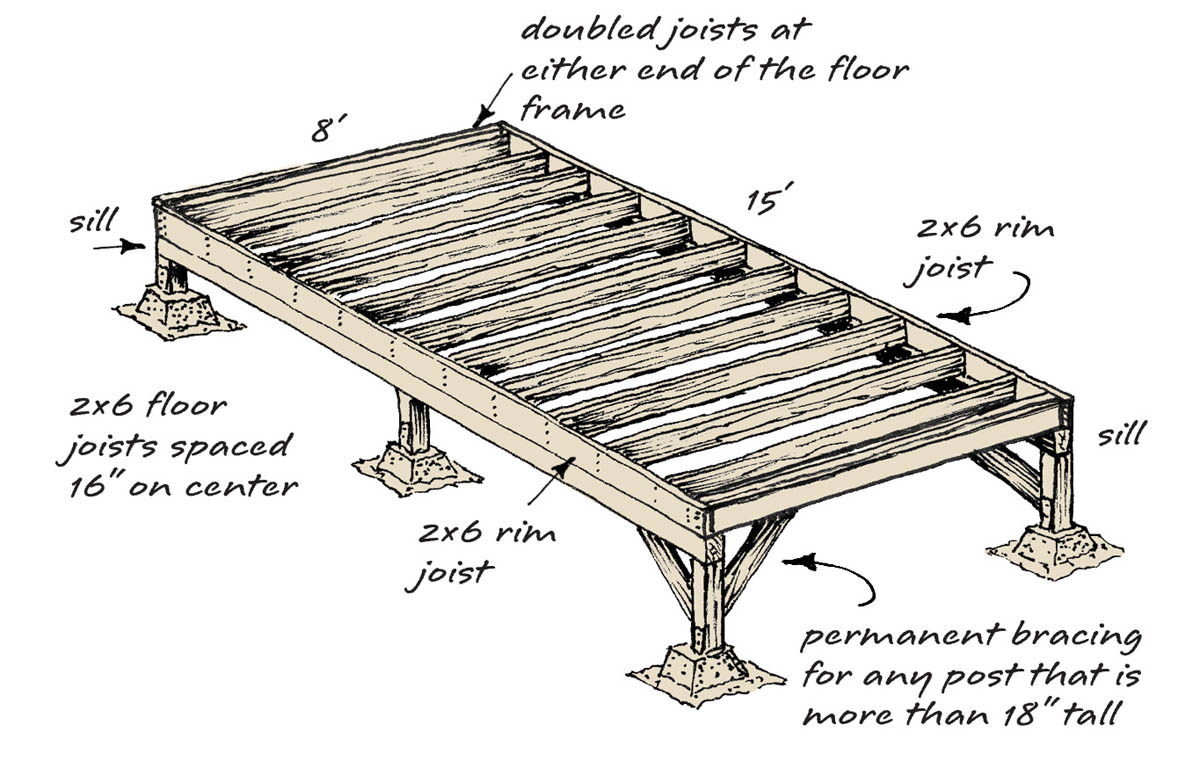
- Step 6. If any of the posts are more than 18" tall, brace them to your beams, with permanent brace boards (see the drawing on page 157). For brace boards, use redwood, cedar, or pressure-treated 1×4s or, better yet, 1×6s. Nail the braces in place with several 8d galvanized box nails at each end. As you nail them, check the sills to make sure they are in line with your strings. Leave any temporary braces in place for now.
- Step 7. When your sills are braced, remove the strings and batter boards . . . finally!
Project
Constructing the Floor
Your hideaway will have a floor made of 2×6 joists covered with sheets of tongue-and-groove OSB flooring.
Install the Joists
- Step 1. Cut two long 2×6s to 15 feet (180") long; these will be the rim joists.
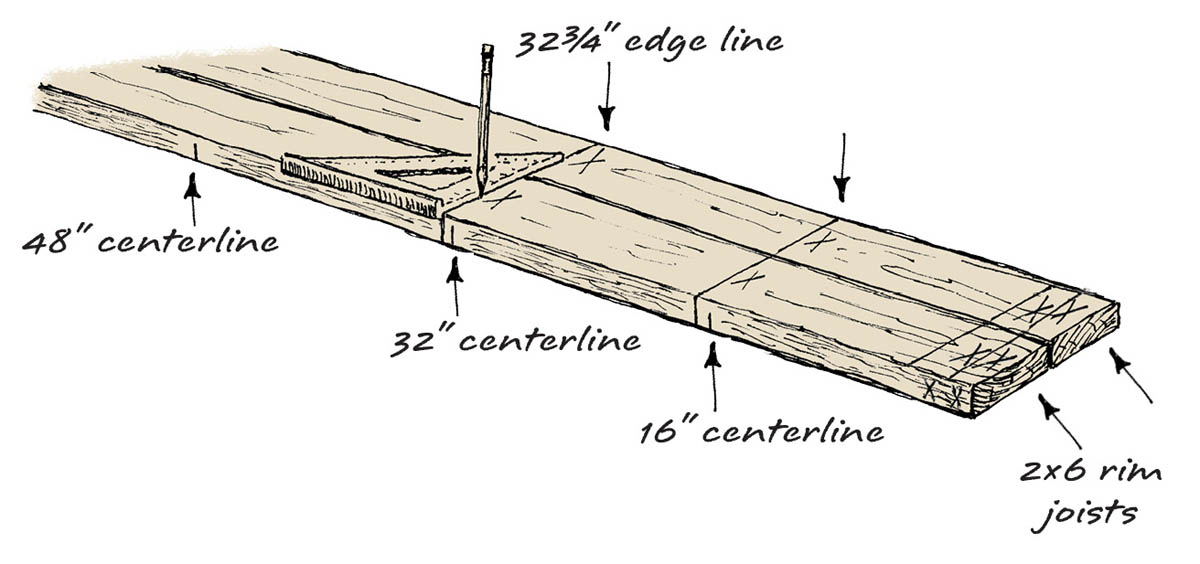
- Step 2. Lay the two rim joists on edge, side by side on your sawhorses. With your tape measure, make centerline marks every 16" along the top edge of both boards.
- Step 3. Measure to the left of each centerline, and make edge marks on both boards. Using your square, draw edge lines (marking the edge of a joist) across both boards, on both the edge and the flat side. Mark an X next to each edge line, and over the centerline, to show which side of the edge marks the joists will meet (see the drawing at right). For added strength, you’ll double the joists at the ends, so mark 2 Xs at each end of the joist.
- Step 4. Set one rim joist on edge on the outer edge of a 4×6 sill (see the drawing at right), and toenail it to the sill. The Xs you drew on the board should face inside the foundation.
- Step 5. Cut fourteen 2×6 joists to 7 feet 9 inches (93") long, and place them on the sills at the Xs. Sight along the edge of each joist with your eye. If it’s bent or bowed, turn it so it bends up in the middle. The joists should end 11⁄2" from the outer edge of the other sill.
- Step 6. Have a friend hold down each floor joist while you nail the rim joist into it with three 16d nails. A framing hammer (see the box on facing page) is useful here.
Heavier Hammering
For framing, I recommend a 22-ounce framing hammer with a smooth (not “waffle”) head. Once you’ve set a 16d nail, hold the hammer handle well away from the head, and use your whole arm to drive in the nail. With fewer hammer strokes, the nail will have less of a chance to bend, and you will last longer. Keep practicing this to get the feel of your hammer.
- Step 7. Set up the opposite rim joist, and check to see that your marks line up the same way.
- Step 8. Nail the rim joist to the ends of all the floor joists, and toenail it into the sill. The joists should fit on the sills as shown on facing page.
- Step 9. Add more permanent braces from the joists to the posts, if necessary, then remove any temporary braces.
Nail Down the Floor
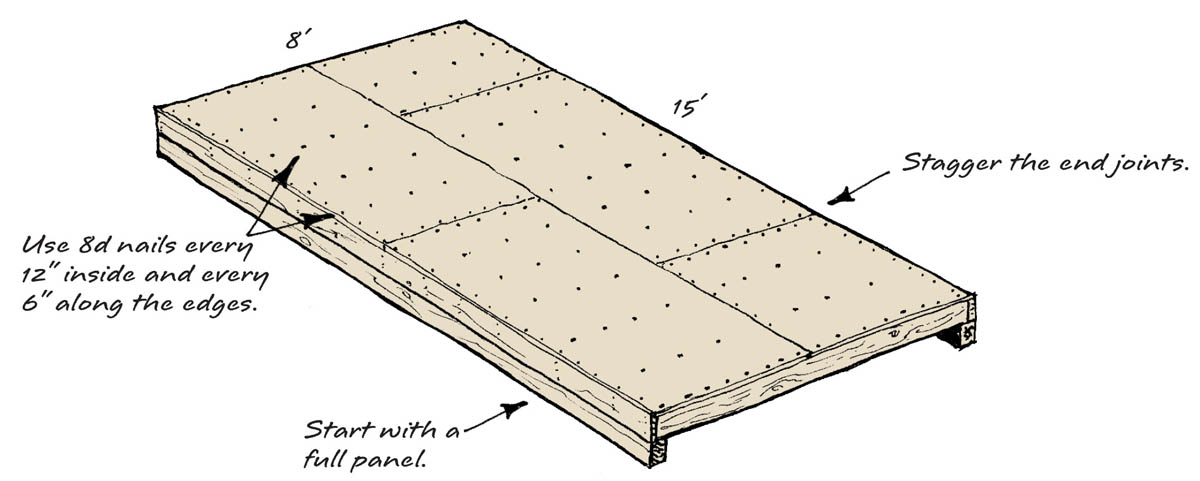
Now that all the joists are nailed together, the next step is to nail down the floor itself. I recommend 5⁄8"- or 3⁄4"-thick tongue-and-groove OSB in 4-foot by 8-foot sheets. It’s inexpensive and strong. Stagger the sheets for extra strength (see the drawing on page 158).
- Step 1. Lay out a full sheet of OSB on your joists, line it up neatly to a corner, then lay another to the end of the floor. The two sheets should join over a joist. Using 8d nails, tack the sheets down so they won’t be pushed out of place when you begin laying the next row of flooring.
- Step 2. You’ll want the seams in the flooring to be staggered, so begin the next row of flooring with a 48"-long sheet. If the tongue-and-groove don’t join easily, set a 2×4 block against the edge and pound the two together with a hammer.
- Step 3. Cut the sheet to size on sawhorses or on the floor. Set your circular saw blade to cut 1" deep or 1⁄4" below your floor panel. Then use a scrap board under your cut to avoid sawing into the floor.
- Step 4. Continue laying and tacking down OSB, staggering the seams, until your floor is covered.
- Step 5. Saw off any overhanging scraps while the sheets are in place, so that the panels are now all tacked down and lined up evenly with the outer edge of the floor framing. See how nicely the panels line up to your square corners? This is where foundation fussiness begins to pay off.
- Step 6. Nail down all the flooring with 8d coated sinkers or galvanized box nails. Use your regular (not framing) hammer for this. Use one nail every 6" on the edges and one every 12" on every inside joist. (To guide your nailing into the inside joists, you can mark the location of the joists right on the panels.)
All right — now you can dance on your new floor!
Flooring Adhesive
Many builders use a construction adhesive such as Liquid Nails on top of the floor joists just before nailing down the flooring, which prevents squeaking from any loose nails and makes a stronger floor. To use adhesive, set a tube in your caulking gun, cut off the tip with a utility knife, and poke a hole through the inside seal. Pump the trigger a few times, then squeeze it gently to squirt out a single line of adhesive on the joists. The adhesive dries quickly, so apply it under one panel at a time.


