Dark Chocolate, Sweet Potato & Black Bean Brownies
Peanut Butter and Jelly Cookies
Peppermint Chocolate Chunk Ice Cream
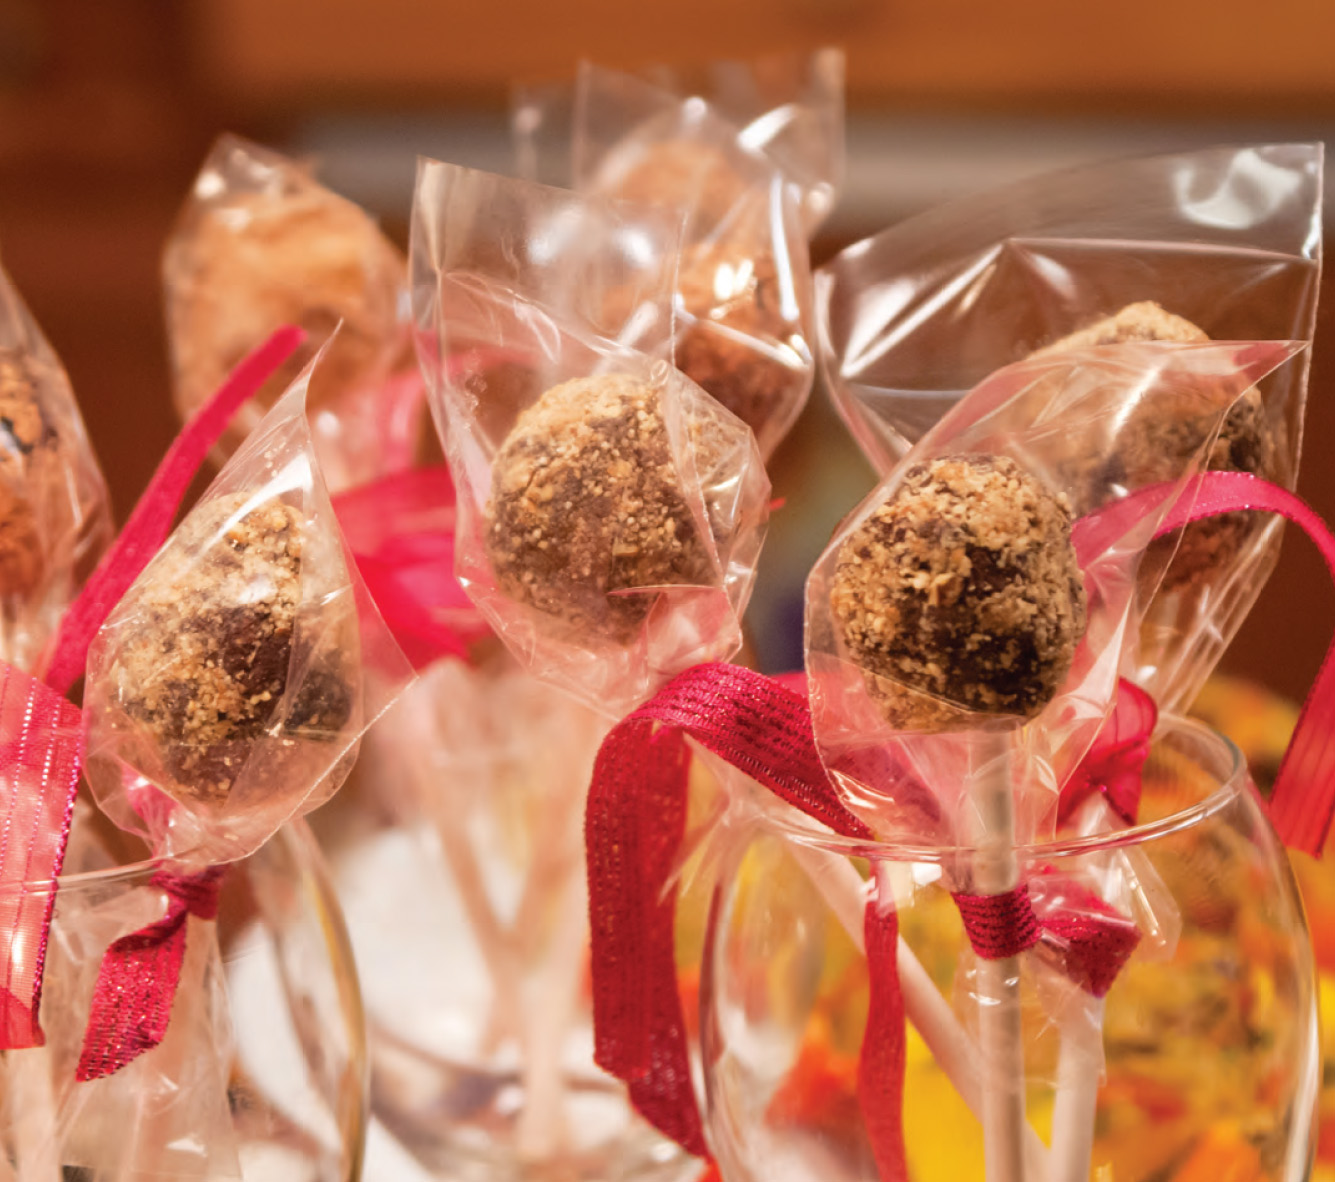
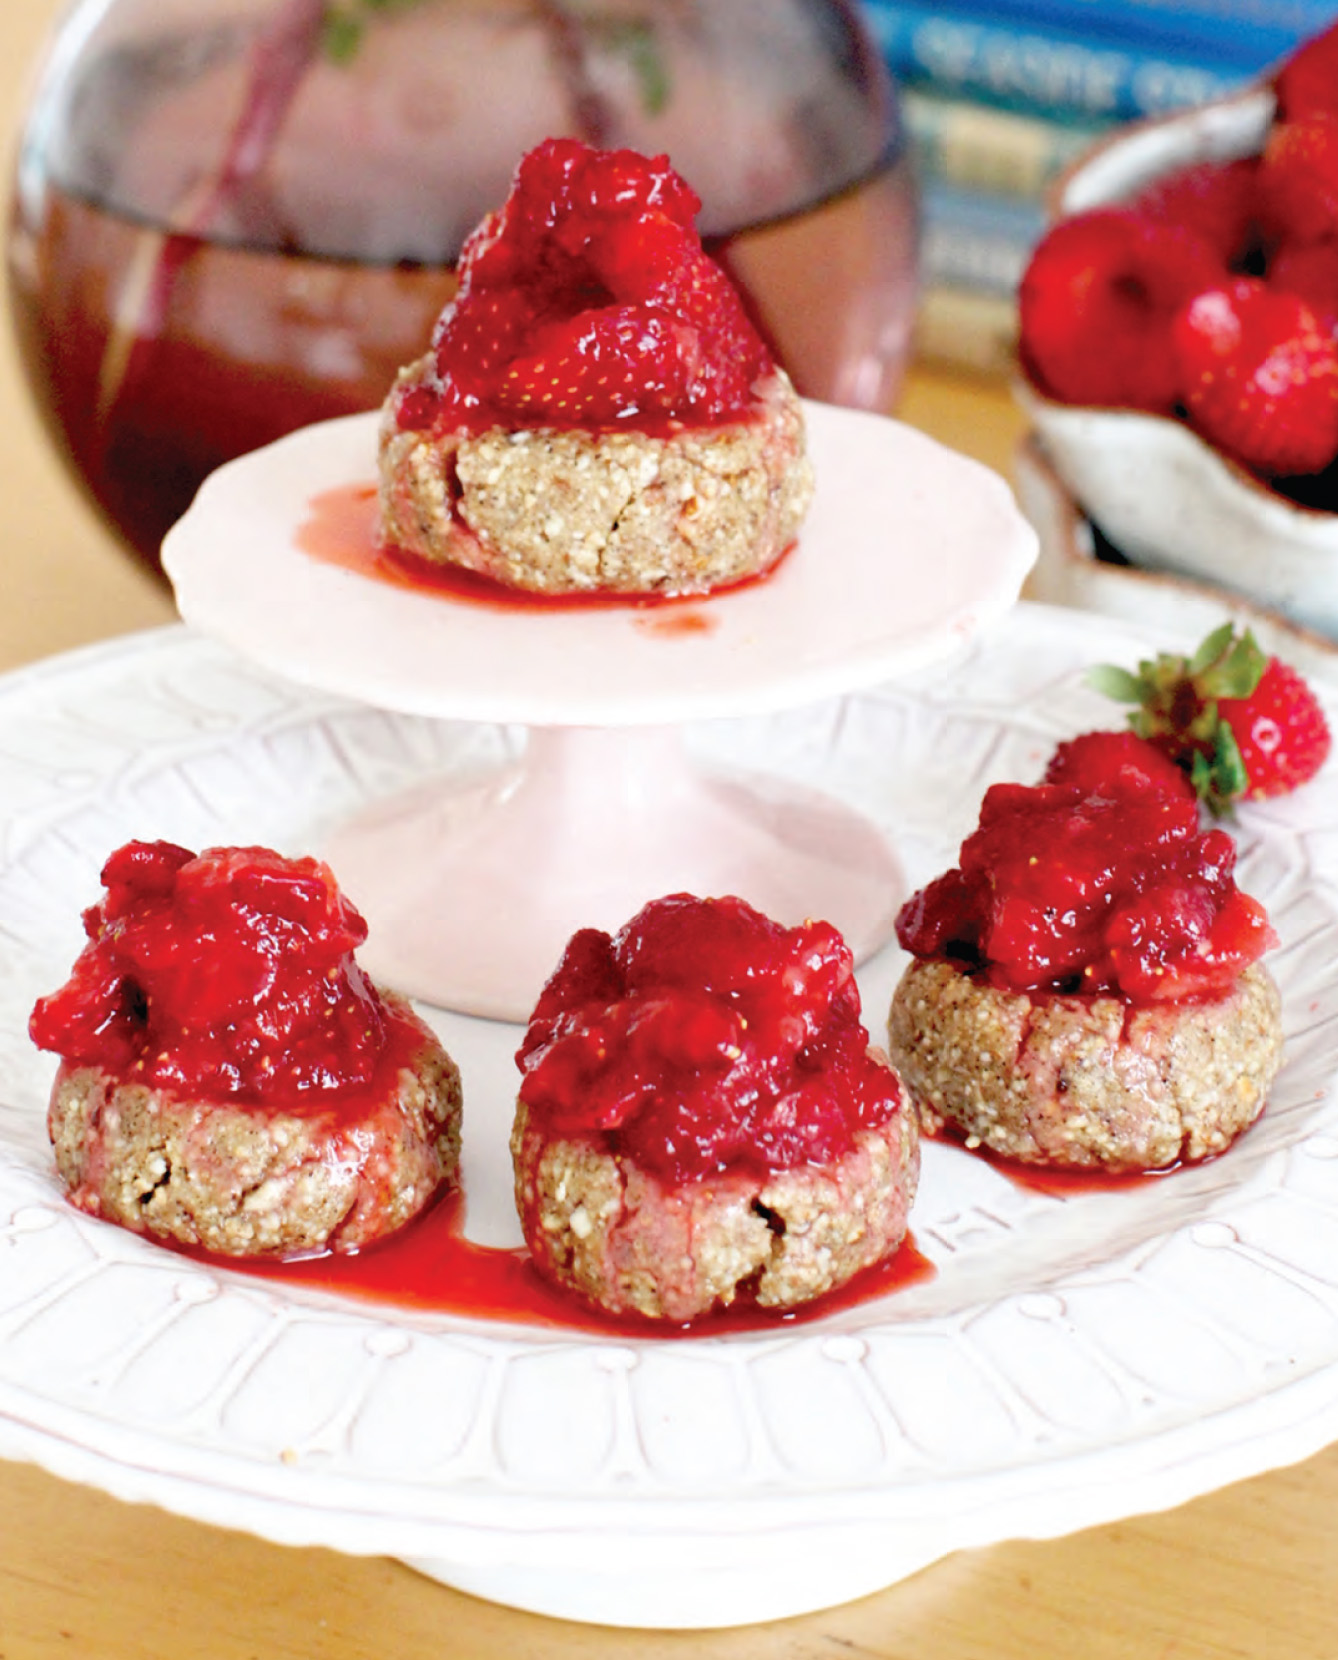
CHOCOLATE DATE-NUT LOLLIPOPS

Fun, fun, fun! That’s how I describe these lovely little lollipops. The dates help to hold the pops together while also standing in for much of the processed sugar. They’re perfect for any party, whether you are entertaining kids or adults!
FOR THE LOLLIPOPS
½ cup vegan dark chocolate chips (grain-sweetened variety works well)
6 large Medjool dates, pitted
¼ cup whole pecans
 teaspoon vanilla extract
FOR THE TOPPINGS
2 tablespoons ground pecans, walnuts, or hazelnuts (optional)
2 tablespoons dark, nondairy cocoa powder (optional)
1. Put the vegan chocolate chips in a double boiler (see Tip) over medium-low heat. When the chocolate has melted, remove from the heat.
2. Meanwhile, put the dates, pecans, and vanilla in a high-performance blending appliance and process to the consistency of soft dough.
3. Transfer the date mixture to a medium bowl, pour in the melted chocolate, and stir until well combined.
4. Put the date mixture in the freezer for 7–15 minutes or until the chocolate has set enough to roll into small balls.
5. Line a small baking sheet with unbleached parchment paper.
6. Spoon out a heaping tablespoon of the chocolate mixture and quickly roll it into a ball. Roll it in one of the optional toppings until completely coated. Place it on the prepared baking sheet.
7. Continue in this way, forming all of the remaining chocolate mixture into balls and coating them in one of the optional coatings.
8. Insert the end of a lollipop stick into each chocolate ball and place all lollipops upright in two separate mugs or shallow glasses, making sure they do not touch each other.
9. Refrigerate for 1–2 hours before serving. For a festive presentation, wrap each lollipop in cellophane and tie with a pretty ribbon.
10. Stored in an airtight container in the refrigerator, leftover lollipops will keep for up to 3 days.
If you don’t have a double boiler, you can improvise one with a heatproof bowl and a saucepan. The bowl should partially (not completely) fit into the saucepan. Fill the saucepan with enough water so that when the bowl rests in the saucepan, the water doesn’t touch the bottom of the bowl. Bring the water to a simmer. Put the ingredients in the bowl and place the bowl in the saucepan.
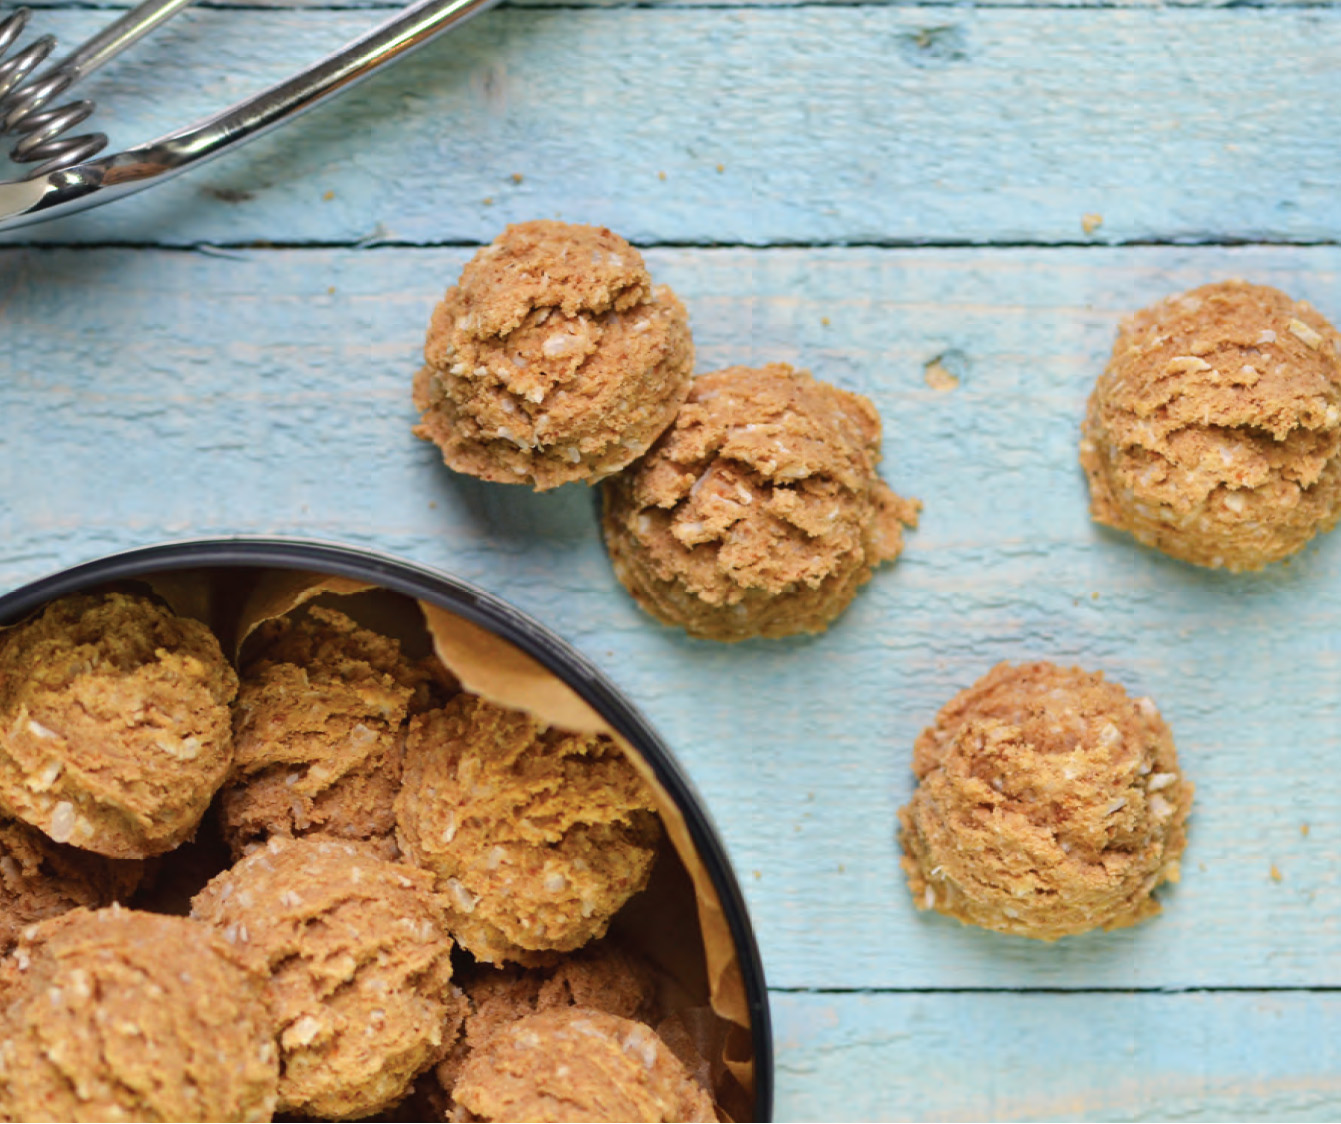
COCONUT PILLOWS

These yummy, nibbly cookies are made nutritious with oat flour, nut butter, and sweetened with maple syrup, orange juice, and a touch of coconut sugar.
1¼ cups oat flour (use certified gluten-free for that option)
½ cup unsweetened shredded coconut
2 tablespoons coconut sugar (can substitute another unrefined sugar)
1 teaspoon baking powder
¼ teaspoon baking soda
teaspoon sea salt
Few pinches of ground cinnamon (optional)
¼ cup nut butter (unsalted; I prefer raw almond butter or cashew, see Tips)
¼ cup maple syrup
2 tablespoons fresh orange juice
½–1 teaspoon orange zest (optional, zest orange before juicing)
1½ teaspoons vanilla extract
1. Preheat oven to 350°F.
2. In a bowl, combine the oat flour, coconut, coconut sugar, baking powder, baking soda, salt, and cinnamon.
3. In a small bowl, first combine the nut butter with the maple syrup, whisking to smooth out.
4. Add in the orange juice, zest, and vanilla and stir through.
5. Add wet mixture to dry and stir until just combined (do not overmix).
6. Place batter in fridge to chill for about 20–30 minutes.
7. After chilling, use a small cookie scoop to place rounds of the dough (about a tablespoon or rounded tablespoon in size) on a baking sheet lined with parchment paper. The batter will be sticky, so rinse the scoop a few times through if you like.
8. Bake cookies for 10 minutes, then remove and let cool on the sheet for 1–2 minutes. Transfer to a cookie sheet.
Depending on the nut butter used, the batter can be thicker or looser. Start with 1¼ cups oat flour and if the batter is a little loose after stirring, sprinkle in an extra tablespoon of flour. Note that the batter will also firm up with chilling.
Other nut butters can be substituted, though almond and cashew are my favorites. If using a seed butter, the batter will need extra sweetness, so adjust with a few teaspoons of maple syrup to taste and a touch more cinnamon.
CLAFOUTI

1 pound strawberries
1 pound ripe bananas (about 3 bananas)
10 ounces sweetened fruit jam
2 cups gluten-free oats
1 teaspoon baking powder
½ cup unsweetened applesauce
1 cup unsweetened apple juice
1. Preheat oven to 350°F.
2. Slice fruit and mix well with jam. Place in an 8 × 8 silicone pan.
3. Place oats in a blender and blend into a flour, then pour oat flour into a bowl. Mix in remaining ingredients and place evenly over fruit.
4. Bake for 45–50 minutes until golden brown.
5. Serve warm with Pear Crème Anglais (p. 247).
PEAR CRÈME ANGLAIS

1 28-ounce jar pears in their own juice (see Tip)
 cup raw cashews (optional)
1 tablespoon vanilla extract
1 teaspoon xanthan gum (optional)
1. Drain pears, reserving juice for another use.
2. In a blender, blend pears until smooth.
3. Add remaining ingredients and blend until incorporated. Chill.
4. Serve over warm Clafouti (p. 246).
You can use fresh pears, but you need to peel them first and they must be ripe and soft.
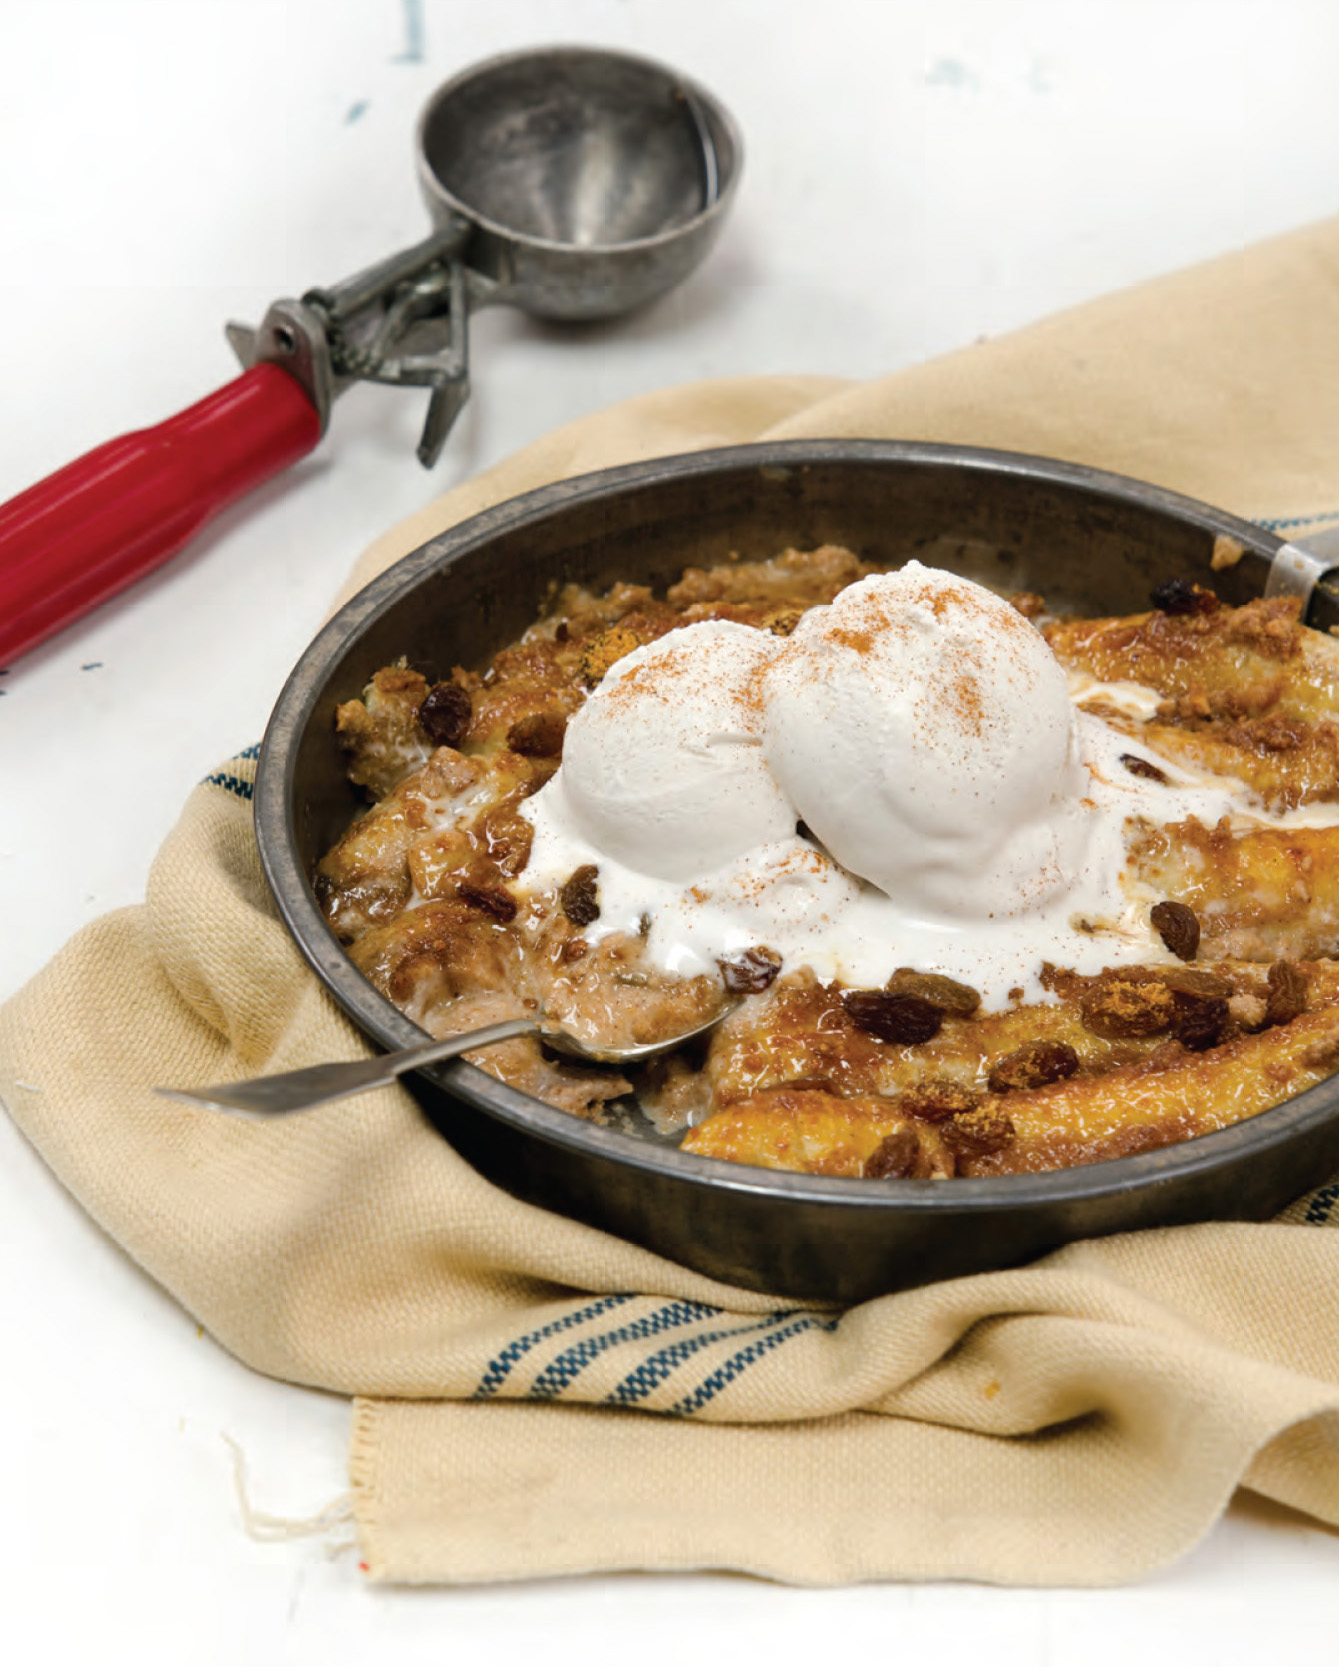
DREAMY BAKED BANANAS

It seems silly that something so basic, so “real,” and so effortless can taste so impossibly dreamy. But dessert food dreams do come true, and this one is especially memorable in the morning if paired with a nondairy ice cream.
2 tablespoons macadamia nut butter (or raw cashew or raw almond butter)
¼ cup nondairy milk
2 teaspoons fresh lemon juice
½ teaspoon vanilla extract
¼ teaspoon ground cinnamon
teaspoon freshly grated nutmeg (optional)
teaspoon sea salt
3 ripe bananas (but not overripe)
2 tablespoons raisins or chopped dates (optional, can substitute or add chopped nuts)
1–2 tablespoons coconut sugar for sprinkling (optional)
1. Preheat oven to 400°F.
2. In a bowl, whisk together the nut butter, milk, lemon juice, vanilla, cinnamon, nutmeg, and salt. It will be thick but should be smooth.
3. Transfer to a baking dish or glass pie plate.
4. Peel the bananas and slice in half lengthwise.
5. Place banana slices in the mixture, then gently flip so both sides are coated.
6. Sprinkle on the raisins or chopped dates, followed by the coconut sugar, if using.
7. Bake for 17–20 minutes. Serve hot or warm preferably. While still good cooled, this dessert is definitely best a little warm—ice cream prefers it that way!
When I make this recipe, our girls polish off the entire dish in a blink. So I’d say it can serve three, but more likely two . . . or maybe that’s just in my house!
STRAWBERRY BABYCAKES

These babies are fuss-free since you don’t have to worry about temperature or timing with these little cuties. Simply pull out your food processor and ice cream scoop and moments later you’ll be biting right into one of these bursting beauties. Superb to serve any time of day!
1 cup strawberries
2 tablespoons fresh lemon juice
cup and 2 teaspoons grade A light amber maple syrup, divided
½ tablespoon chia seeds
1 cup cashews
¼ cup almonds
½ teaspoon vanilla bean
2 teaspoons almond extract
1. Using a paring knife, remove the stem and the white center from the strawberries. Press your thumb into the center of each strawberry to gently spread it open and flatten it.
2. In a small mixing bowl, add the strawberries, lemon juice, 2 teaspoons maple syrup, and chia seeds. Stir gently and let sit while making the cakes.
3. Using a food processor, process the cashews and almonds into a fine flour. Add in the vanilla bean, almond extract, and cup maple syrup and process until mixture holds together (test this by pinching it between your fingers).
4. Using an ice cream scoop, scoop the mixture into a ball and set onto a plate or piece of parchment paper. Once you have all of the “batter” scooped, press your thumb gently in the center of each ball to make an impression about ¼-inch deep but not all the way through.
5. Fill the center of each ball with the strawberry filling.
6. Eat right away or store covered in the fridge.
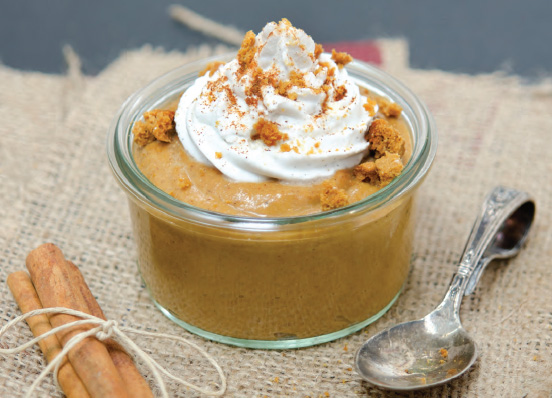
PUMPKIN CHIA PUDDING

If you love pumpkin flavors in baking, you’ll love this “instant” pumpkin pudding! The chia seeds are the magical ingredient to thicken the pudding, and when pureed they are not visible for any little palates that might be, ahem, picky!
¾ cup pure pumpkin (see Tips)
¾ cup unsweetened plain or vanilla nondairy milk (see Tips)
¼ cup maple syrup
1–2 tablespoons coconut sugar (or pinch of stevia, see Tips)
3 tablespoons white chia seeds (black will discolor pudding some)
1 teaspoon ground cinnamon
¼ teaspoon freshly grated nutmeg
teaspoon ground allspice
Pinch of ground ginger (optional, I omit it when making for the kiddos)
teaspoon sea salt (slightly rounded)
½ teaspoon vanilla extract (or vanilla seeds from 1 bean)
Dark chocolate shavings, coconut whipped cream, vegan cookie crumbles for topping (optional)
1. In a blender, add all ingredients. Blend for a minute or more (depending on blender) until the seeds are fully pulverized and the pudding begins to thicken (it will thicken more as it refrigerates).
2. Taste, and if you’d like it sweeter, add 1–2 teaspoons more coconut sugar or maple syrup (not too much maple syrup or it will become loose).
3. Transfer mixture to a large bowl or to 3–4 individual serving bowls (e.g., ramekins), and refrigerate until chilled, about 30 minutes or more (it will thicken more with chilling, but really can be eaten straight away).
4. Serve, sprinkling with optional toppings, if desired.
Canned pumpkin can really vary in consistency. Some are thinner; others a little more loose. I use Farmer’s Market brand, which is very thick and dense and, as a bonus, organic.
If using sweetened vanilla milk, reduce the sweetener to taste.
I love coconut sugar and I think it adds a buttery-sweet note to recipes. You may not need or want it in this pudding, however; the maple syrup may add enough sweetness for your taste (and the type of milk used will also affect sweetness). If you’d rather use stevia, add just 1–2 pinches and test along the way, since too much stevia can ruin the flavor. You can also add a little extra maple syrup, but no more than about 1–2 tablespoons, since the pudding can become a little loose.

RASPBERRY GANACHE FUDGE CAKE

I use carob in my cake to cut down on the caffeine, and because I love carob for its malty rich flavor. This cake is one of my favorites.
FOR THE FUDGE CAKE
3 cups dry walnuts
 cup unsweetened cacao powder or carob powder
¼ teaspoon sea salt
1 cup pitted Medjool dates
FOR THE FROSTING
cup semi-soft pitted Medjool dates
¼ cup agave syrup
½ cup ripe avocado flesh (from about 1 medium avocado)
cup cacao powder
FOR THE FILLING
½ cup raspberries
1. Combine the walnuts, cacao powder, and salt in the food processor and pulse until coarsely mixed. Avoid overprocessing.
2. Add the dates and pulse until mixed well. Shape into two stackable cakes of desired shape and set aside.
3. Combine the dates and agave syrup in the food processor and process until smooth.
4. Add the avocado and process until smooth.
5. Add the cacao powder and process until smooth.
6. To serve, frost the top of one of the cakes with half the frosting and top with the raspberries.
7. Stack the second cake on top and frost the top and side. Serve immediately or place in the refrigerator for a couple hours to firm up.
8. The cake on its own will keep in the fridge for many weeks. The frosting will keep separately in the fridge for 1 week. The assembled cake with raspberries will keep in the fridge for up to 3 days.
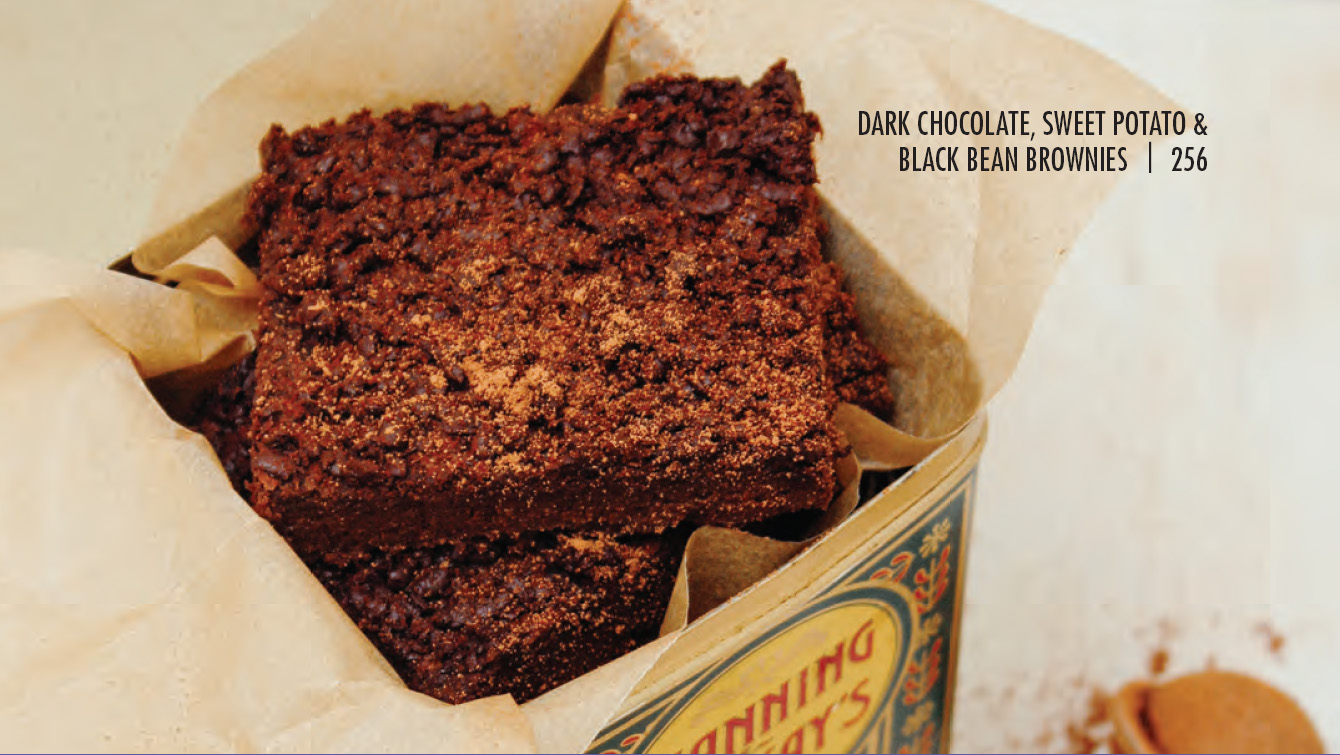
DARK CHOCOLATE, SWEET POTATO & BLACK BEAN BROWNIES SEE PICTURE ON PAGE 241

I do love to sneak unexpected, nutrient-rich ingredients into treats, and this gluten-free recipe is a perfect example. Who knew black beans, sweet potato, and dark chocolate could combine into such fudge-like decadence?
FOR THE WET INGREDIENTS
1 cup dry black beans (soaked/cooked yields 2¼ cups)
cup sweet potato, diced
2 teaspoons vanilla extract
1 3-ounce bar of gluten-free, nondairy dark chocolate
cup grade B maple syrup
¾ cup water
FOR THE DRY INGREDIENTS
1½ cups almond flour
cup Sucanat
½ cup raw cacao powder or cocoa powder
1 teaspoon baking powder
½ teaspoon fine ground sea salt
1. Soak dry beans for 8–12 hours.
2. Rinse beans well and transfer to a pot. Fill pot with enough water to cover beans 3 inches (about 6 cups). Bring beans to a boil, uncovered, and then reduce heat to medium. Cover and let beans simmer for 45–60 minutes until cooked. Check water level every 20 minutes or so, adding more water as necessary.
3. While beans cook, wash, peel, dice, and steam sweet potatoes for 10–15 minutes until easily pierced with a fork. Set aside.
4. Preheat oven to 350°F and line baking dish with parchment paper.
5. Once beans are cooked (and drained if necessary) and potatoes are steamed, place all wet ingredients into the food processor and pulse until very smooth.
6. Sift or stir together dry ingredients.
7. Fold together wet and dry ingredients and transfer to parchment-lined baking dish.
8. Bake for 60 minutes. Remove from oven and allow to cool in baking dish before serving.
You can use canned beans for this recipe, but I recommend starting with dry beans to reduce aluminum intake, to boost flavor, and for optimal digestion and assimilation of nutritional benefits.
If you don’t have a steamer, you can roast diced sweet potato in a glass baking dish at 350°F for 20 minutes or until easily pierced with a fork. Add 2 tablespoons water to the bottom of your dish—it will help soften the potatoes as they roast.
Line your baking dish with one strip of parchment running horizontally and one running vertically, with about 1 inch of parchment up over sides. Parchment paper makes it easy to remove and slice brownies once baked. Just lift out the parchment-wrapped brownies and slice.
For a triple dark chocolate brownie, top batter with shaved chocolate before baking.
Store in an airtight glass container in the fridge for up to two weeks. You can also freeze brownies in an airtight container and simply thaw when you want a treat.

PEANUT BUTTER AND JELLY COOKIES

Like peanut butter and jelly sandwiches packed into sweet cookie confections, these gems truly shine. With a delectable jelly center and crisp base, they make the perfect afternoon snack paired with a tall glass of nondairy milk.
1 cup whole-wheat flour
½ teaspoon baking powder
teaspoon sea salt
cup creamy peanut butter
cup maple syrup
3 tablespoons nondairy milk
1 teaspoon vanilla extract
½– cup raspberry, strawberry, or blueberry preserves, jelly, or jam
1. Preheat oven to 375°F. Line a large baking sheet with unbleached parchment paper.
2. Put the flour, baking powder, and salt in a medium bowl and stir with a dry whisk to combine.
3. Add the peanut butter, maple syrup, nondairy milk, and vanilla to the flour mixture and stir vigorously until smooth and well combined. The dough will be stiff.
4. For each cookie, drop about 1 tablespoon of the dough onto the prepared baking sheet, using a cookie scoop or rounded spoon.
5. With your thumb, press down gently into the middle of each cookie, making a small well. Fill each well with 1 teaspoon of the preserves.
6. Bake for 16–18 minutes, or until the cookies are golden brown around the edges. Put the baking sheet on a wire rack.
7. Let the cookies cool on the baking sheet for 15 minutes before transferring to a serving platter to further cool.
8. Stored in an airtight container in the refrigerator, the cookies will keep for about 3 days.
MINT CHOCOLATE MOUSSE TORTE

FOR THE FILLING
1 pound pitted dates soaked in 16 ounces unsweetened chocolate almond milk
1 tablespoon vanilla extract
1–2 teaspoons peppermint extract, more or less to taste
½ cup raw cacao powder
3 cups walnuts
½ cup unsweetened coconut
FOR THE CRUST
2 cups raw walnuts
¼ cup raw cacao powder
2 cups pitted dates
1 tablespoon vanilla extract
1 teaspoon peppermint extract
½ cup raw cacao nibs
1. To make the filling in a food processor, process soaked dates and extracts until very smooth.
2. Add ½ cup cacao powder and process again until smooth. Place this in a bowl.
3. Process the nuts into a nut butter–like consistency.
4. Add coconut and process again. Add this to the date mixture and stir well by hand until all of the ingredients are completely incorporated. Set aside.
5. To make the crust in a food processor, process 2 cups nuts into a powder. Do not overprocess or you will have a nut butter.
6. Add ¼ cup cacao powder, then add 2 cups pitted dates, a few at a time, until the mixture clumps together. Stop the machine and if you can easily roll a ball from the mixture and it sticks together, you don’t need to add any more dates.
7. Add extracts and process again briefly. Press the crust into a springform pan.
8. Spread filling over the top and freeze until solid.
9. Garnish with raw cacao nibs.
PEANUT BUTTER FUDGE TRUFFLES

FOR THE DATE PASTE
1 pound pitted dates
1 cup liquid (water, unsweetened nondairy milk, or unsweetened juice)
FOR THE CHOCOLATE FUNDUE
1 cup date paste
1 cup peanut butter (no salt or sugar)
½ cup raw cacao powder
½ cup unsweetened nondairy milk
1 tablespoon vanilla extract
Crushed peanuts
1. Soak dates in liquid overnight or for several hours until much of the liquid is absorbed.
2. In a food processor, process dates and liquid until completely smooth. You can store date paste in the refrigerator.
3. Place all ingredients for Chocolate FUNdue in a food processor and process until ingredients are incorporated, scraping down sides if necessary. Chill FUNdue until firm.
4. Using a small retractable cookie scoop, drop FUNdue into crushed peanuts and coat evenly.

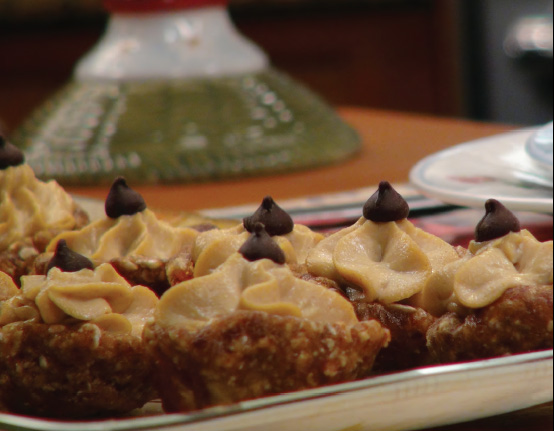
PEANUT BUTTER MOUSSE TARTLETS

Peanut butter has never been yummier than when it is piped into these pretty little fruit-and-seed mini-crusts. These creamy, chewy, and crusty gems are the ideal choice to round out any elegant meal.
12 large Medjool dates, pitted and chopped
½ cup unsalted, raw sunflower seeds
cup cubed firm regular tofu (sprouted variety is preferred)
4 tablespoons creamy peanut butter
4 tablespoons maple syrup
12 vegan chocolate chips
1. Put the dates and sunflower seeds in a food processor and process to a smooth dough.
2. Put the date mixture in a medium bowl and pull it together to form a ball.
3. Divide the date mixture into 12 parts and roll each into a ball.
4. Press each ball into the shape of a cup, one at a time, using the cups in a mini-muffin baking tin as a guide.
5. Using an offset spatula or table knife, carefully remove the date cups from the mini-muffin molds, and place them on a flat tray or plate that has been lined with parchment paper.
6. Put the tofu, peanut butter, and maple syrup in a blender and process until very smooth.
7. Spoon the mixture into a pastry bag fitted with a large star pastry tip (see Tip).
8. Pipe the filling into each of the date cups and top each with a single vegan chocolate chip.
9. Cover and refrigerate for 5–6 hours before serving.
If you do not have a pastry bag, simply spoon the filling into the cups.
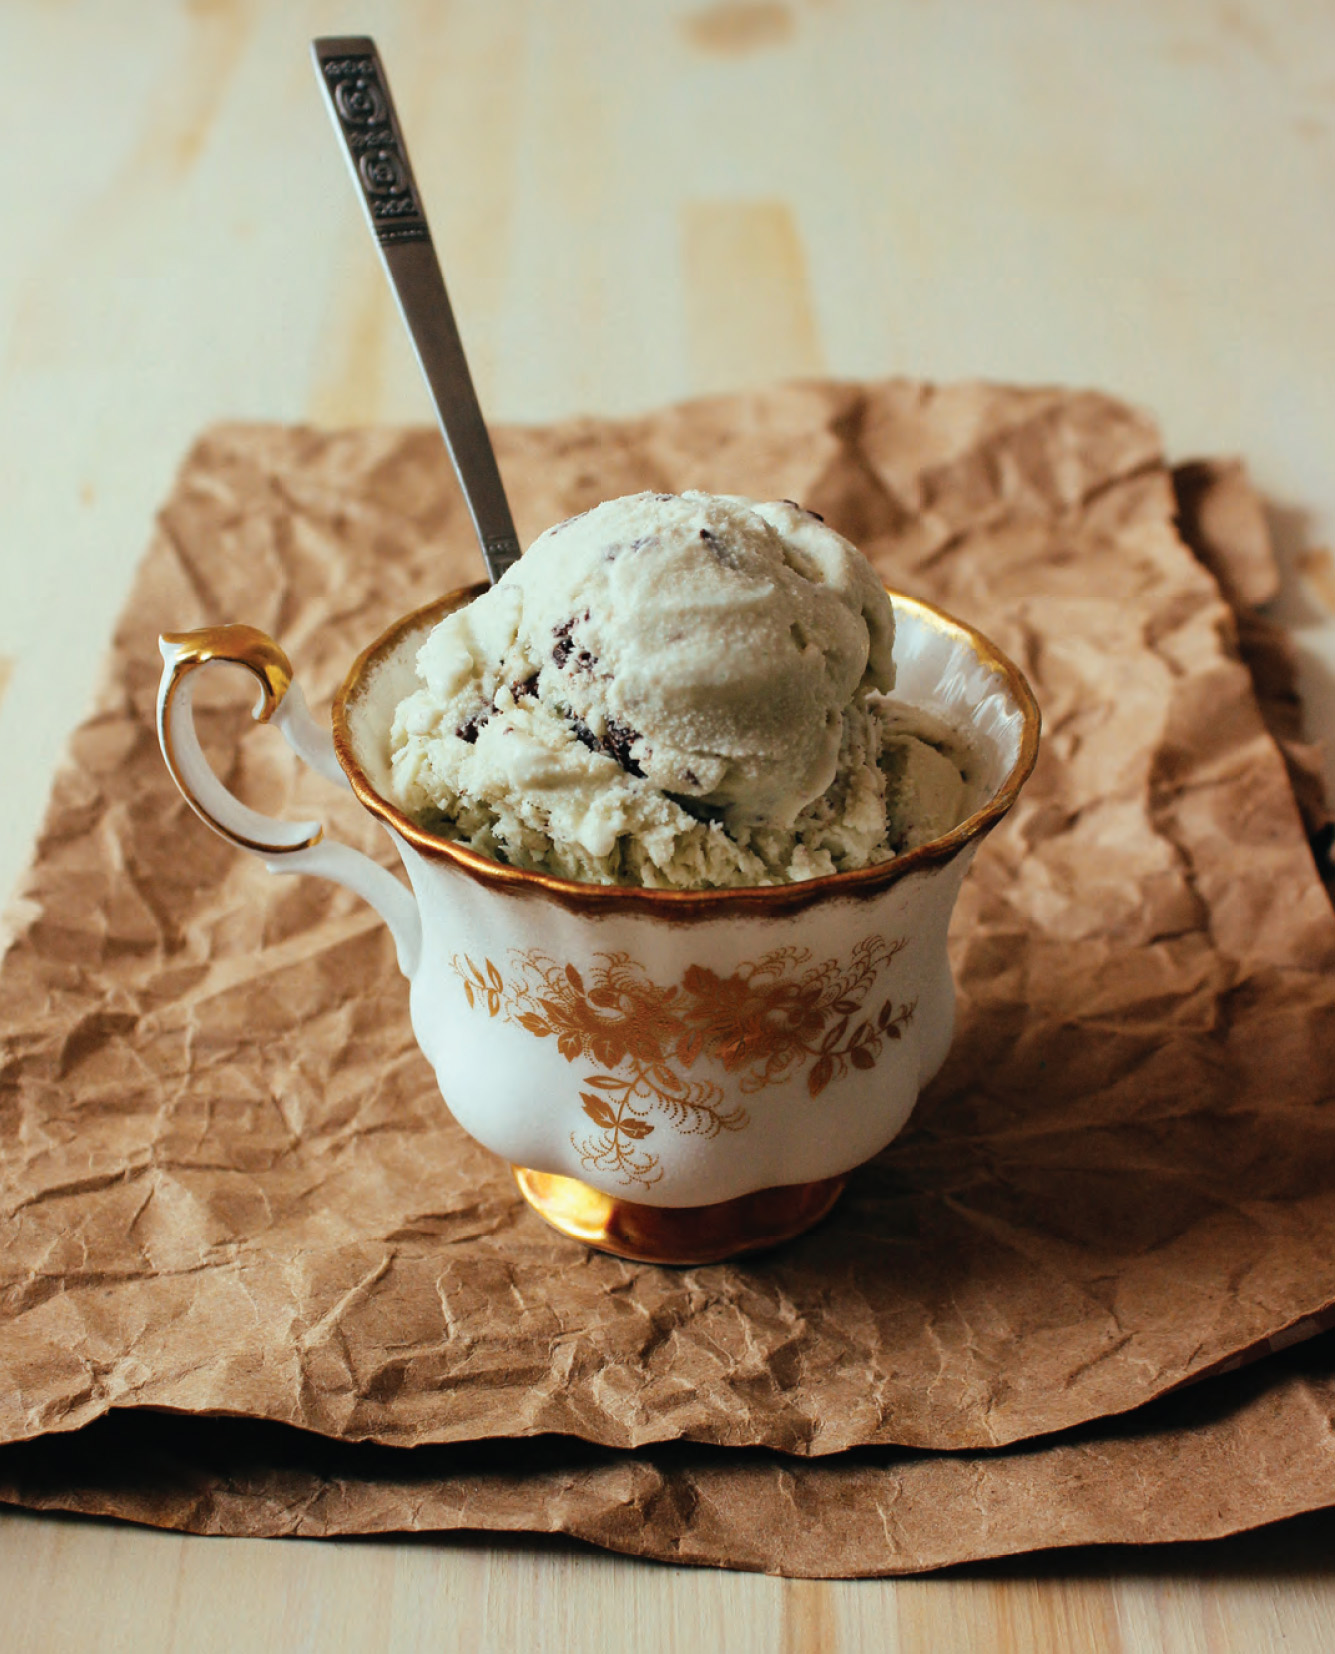
PEPPERMINT CHOCOLATE CHUNK ICE CREAM

A simple and refreshing recipe that can be prepared with or without an ice cream maker.
2 14-ounce cans coconut milk
¼ cup maple syrup
2 teaspoons peppermint extract
1½ teaspoons vanilla extract
10 peppermint leaves (optional)
Pinch of fine ground sea salt
1 3-ounce gluten-free, nondairy chocolate bar, roughly chopped, or ½–1 cup gluten-free, nondairy chocolate chips
1. Blend together all ingredients except chocolate bar.
2. If using an ice cream maker, chill ice cream mixture in the refrigerator until cold, then process in the ice cream maker according to the manufacturer’s instructions. Once firm, fold in chocolate bar and freeze until ready to serve.
3. If not using an ice cream maker, fold chocolate bar into ice cream mixture and freeze until ready to serve.
I often like to prepare this recipe with leaves from a chocolate mint plant. The best place to find chocolate mint? Grow your own!
Make your ice cream green by adding ½–1 teaspoon of liquid chlorophyll—a detoxifying natural “dye.”
Be sure to plan accordingly and thaw your ice cream on the counter for 10–15 minutes before serving.
EASY BREEZY SUNDAY COBBLER

You don’t have to wait until Sunday to make this super simple and satisfying dessert. I love the ease, simplicity, and versatility of this recipe as you can change up the ingredients to come up with your family’s favorite combinations. Have fun experimenting with this unintimidating no-bake cobbler.
3 fresh peaches
3 fresh plums
1 cup pecans
½ cup coconut flour
2 tablespoons and 1 teaspoon coconut nectar, divided
1. Chop the peaches and plums into bite-size cubes.
2. Spread the chopped fruit into a 9-inch glass pie dish or casserole dish.
3. Add the pecans, coconut flour, and 2 tablespoons coconut nectar to a food processor and process until the mixture is crumbly and gently sticks together.
4. Pour the crumble mixture over the fruit covering the entire dish.
5. Drizzle the remaining nectar over the top.
6. You can chill this cobbler, warm it up, or serve it as I do—immediately.


SPICED BLUEBERRY COBBLER

The sweetness of blueberries with a hint of chai spices means big flavor in this easy cobbler. Blueberries have powerful antioxidants and are packed with vitamins A, B, and C to help prevent skin damage caused by stress and the sun. Fresh blueberries are one of the many fruits I enjoy picking in the summertime. They’re delicious straight off the vine and in this crunchy cobbler.
FOR THE CRUST
1 cup dry almonds
1 teaspoon ground nutmeg
1 teaspoon ground cinnamon
½ teaspoon salt
1 cup pitted semi-soft Medjool dates
FOR THE FILLING
4 cups blueberries
¼ cup agave syrup (optional)
1. Combine the almonds, nutmeg, cinnamon, and salt in the food processor and pulse into coarse pieces.
2. Add the dates and process until mixed well. Sprinkle half of the crust into the bottom of a loaf pan.
3. Combine the blueberries and agave syrup, if using, in a mixing bowl and toss to mix well.
4. Scoop into the loaf pan. Top with the remaining crust, press gently, and serve.
5. Will keep for 2–3 days in the fridge. The crust will keep for several weeks when stored on its own in the fridge.
Serve the cobbler parfait-style in a glass: Start with about ½ cup cobbler in the bottom of the glass. Add a scoop of your favorite nondairy ice cream and top with another ¼–½ cup cobbler.
BLUEBERRY DREAMSICLES

This is a recipe the whole family is guaranteed to love. What’s even better is that you can serve these for breakfast or as a snack. The dreamsicles are fun and simple to make; as you blend the mixture, have the little ones pick twigs from the yard to use in the molds.
cup grade A light amber maple syrup
1 lemon, juiced
1 cup blueberries
1 15-ounce can whole coconut milk, chilled for 24 hours
1. In a small mixing bowl, pour maple syrup and lemon juice over blueberries and mix gently.
2. Put coconut milk in a mixer and whip until thickened, adding in the blueberries while whipping. Some of the berries will break down, releasing their juices and creating texture. If you want the berries whole, hand mix them in gently using a rubber spatula.
3. Pour mixture into popsicle molds. Place a 6-inch twig in place of the stem for each. Freeze for 2 hours.
4. Run the mold under warm water for a few seconds and gently pull dreamsicles from mold.

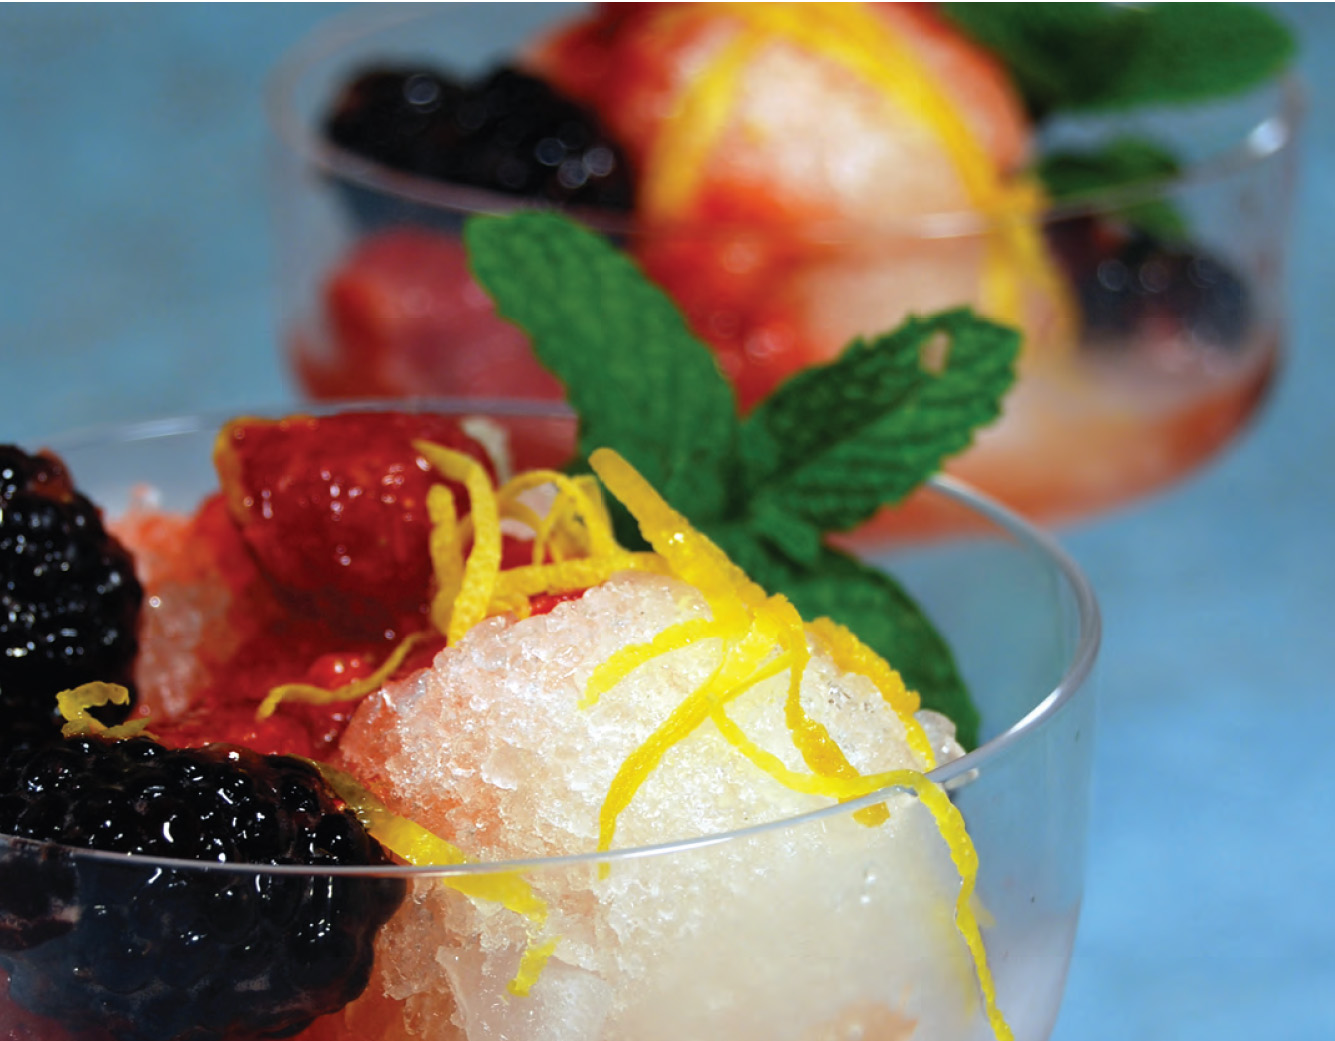
ITALIAN ICES WITH LEMON SYRUP AND TUTTI FRUTTI SAUCE

It takes only a few minutes to make this dessert of refreshing ice, tart lemon syrup, and a beautiful berry sauce. It’s delicious and full of antioxidants and vitamin C to keep our summer skin looking youthful.
FOR THE LEMON SYRUP
4 lemons, zested and juiced
¼ cup agave syrup
FOR THE TUTTI FRUTTI SAUCE
1 cup strawberries
¼ cup agave syrup
1 tablespoon vanilla extract or the seeds from 1 vanilla bean
½ cup blackberries
½ cup raspberries
4 cups ice
1. To make the lemon syrup, combine the lemon juice, zest, and agave syrup in a mixing bowl and mix well.
2. To make the tutti frutti sauce, combine the strawberries, agave syrup, and vanilla in a blender. Gently pulse to a chunky texture. Spoon into a bowl and stir in the blackberries and raspberries.
3. Place the ice in the food processor and chop into tiny pieces.
4. Use an ice cream scooper to tightly pack and scoop the ice into 4 dishes. Top with lemon syrup first, then the tutti frutti sauce. Enjoy immediately.
LEMON-BERRY SORBET

If you can find fresh, in-season berries at the farmers’ market, buy a lot of them, then freeze what you don’t eat and have them handy for tasty treats like this one.
1 quart frozen berries
1 ripe banana, sliced and frozen (optional)
½ tablespoon stevia extract, more or less to taste
¼ cup fresh lemon juice
½ teaspoon lemon zest
2 tablespoons vodka (optional)
1. Place the berries and banana slices, if using, in a food processor and pulse until they are the size of peas.
2. Add the stevia extract, lemon juice and zest, and vodka, if using, and puree until smooth.
3. Place the mixture into a shallow dish and freeze for 2–3 hours, stirring every 30 minutes or so until firm.
I add a banana and a little vodka to this recipe to make the sorbet less icy, but you can leave both out if you prefer. You can also make this dish in your ice cream maker for a smoother texture.
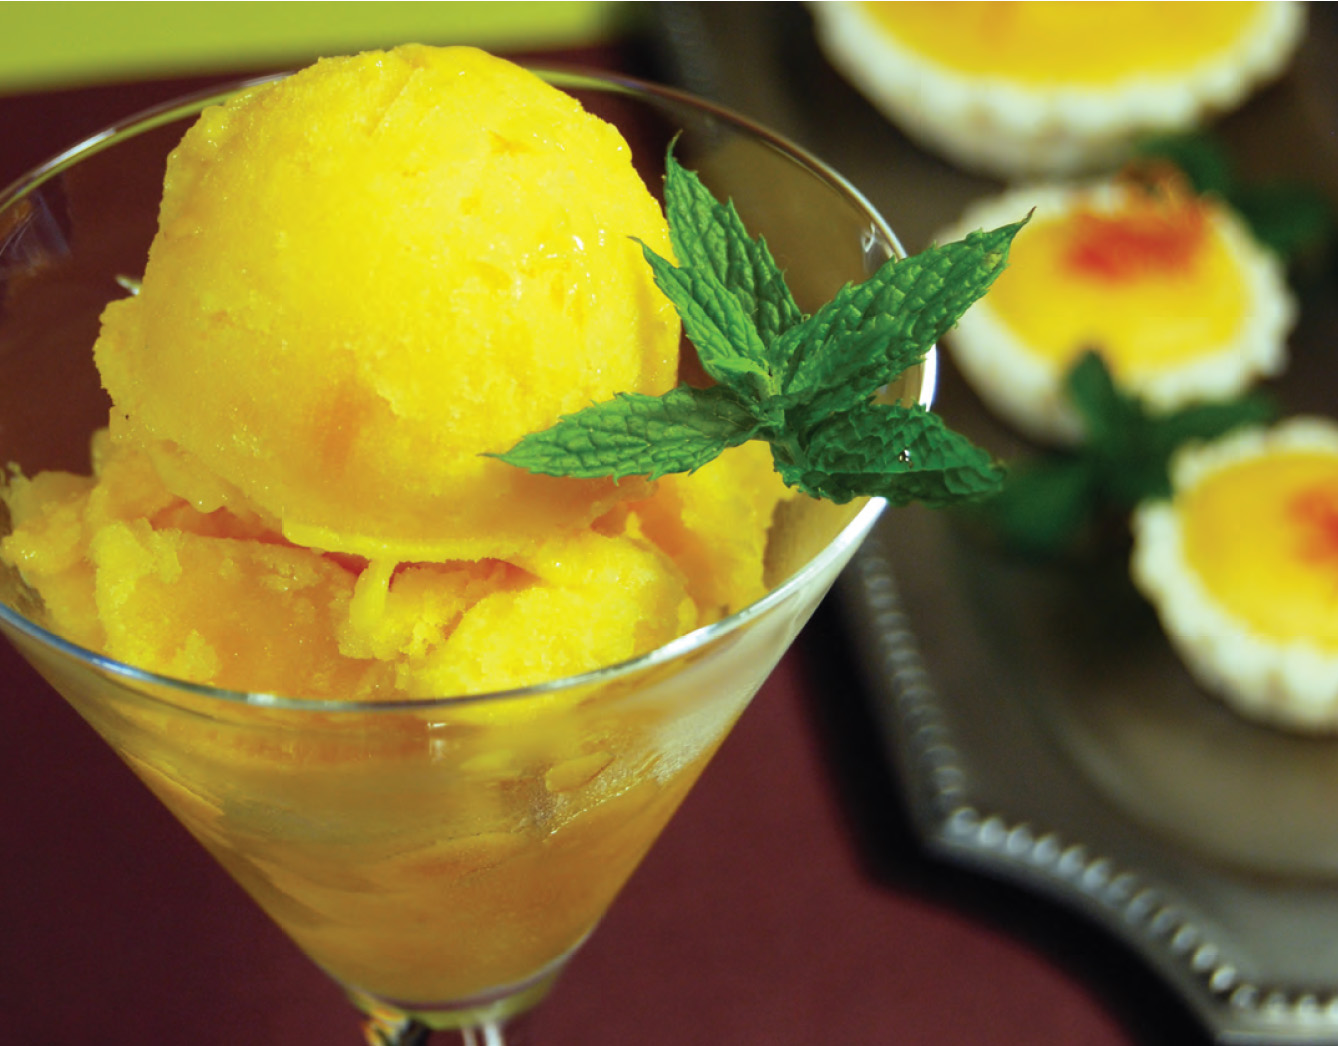
MANGO SORBET

This recipe calls for frozen mangoes, my favorite fruit. I always prefer fresh everything, so I’ll prepare fresh mango a day or two before and then freeze it. Frozen mango from the freezer aisle will work, too.
2 cups chopped frozen mangoes
1 cup water
cup agave syrup
1. Combine the mangoes, water, and agave syrup in a high-speed blender and blend until smooth. Serve immediately. Or for an icier, more solid texture, scoop into a container and place in freezer for an hour or more.
2. To make in an ice cream maker: Chill the mixture in the freezer for an hour or so, then scoop into the ice cream maker and follow the manufacturer’s instructions.
3. Will keep for several weeks in freezer. Let thaw for 10 minutes before serving.
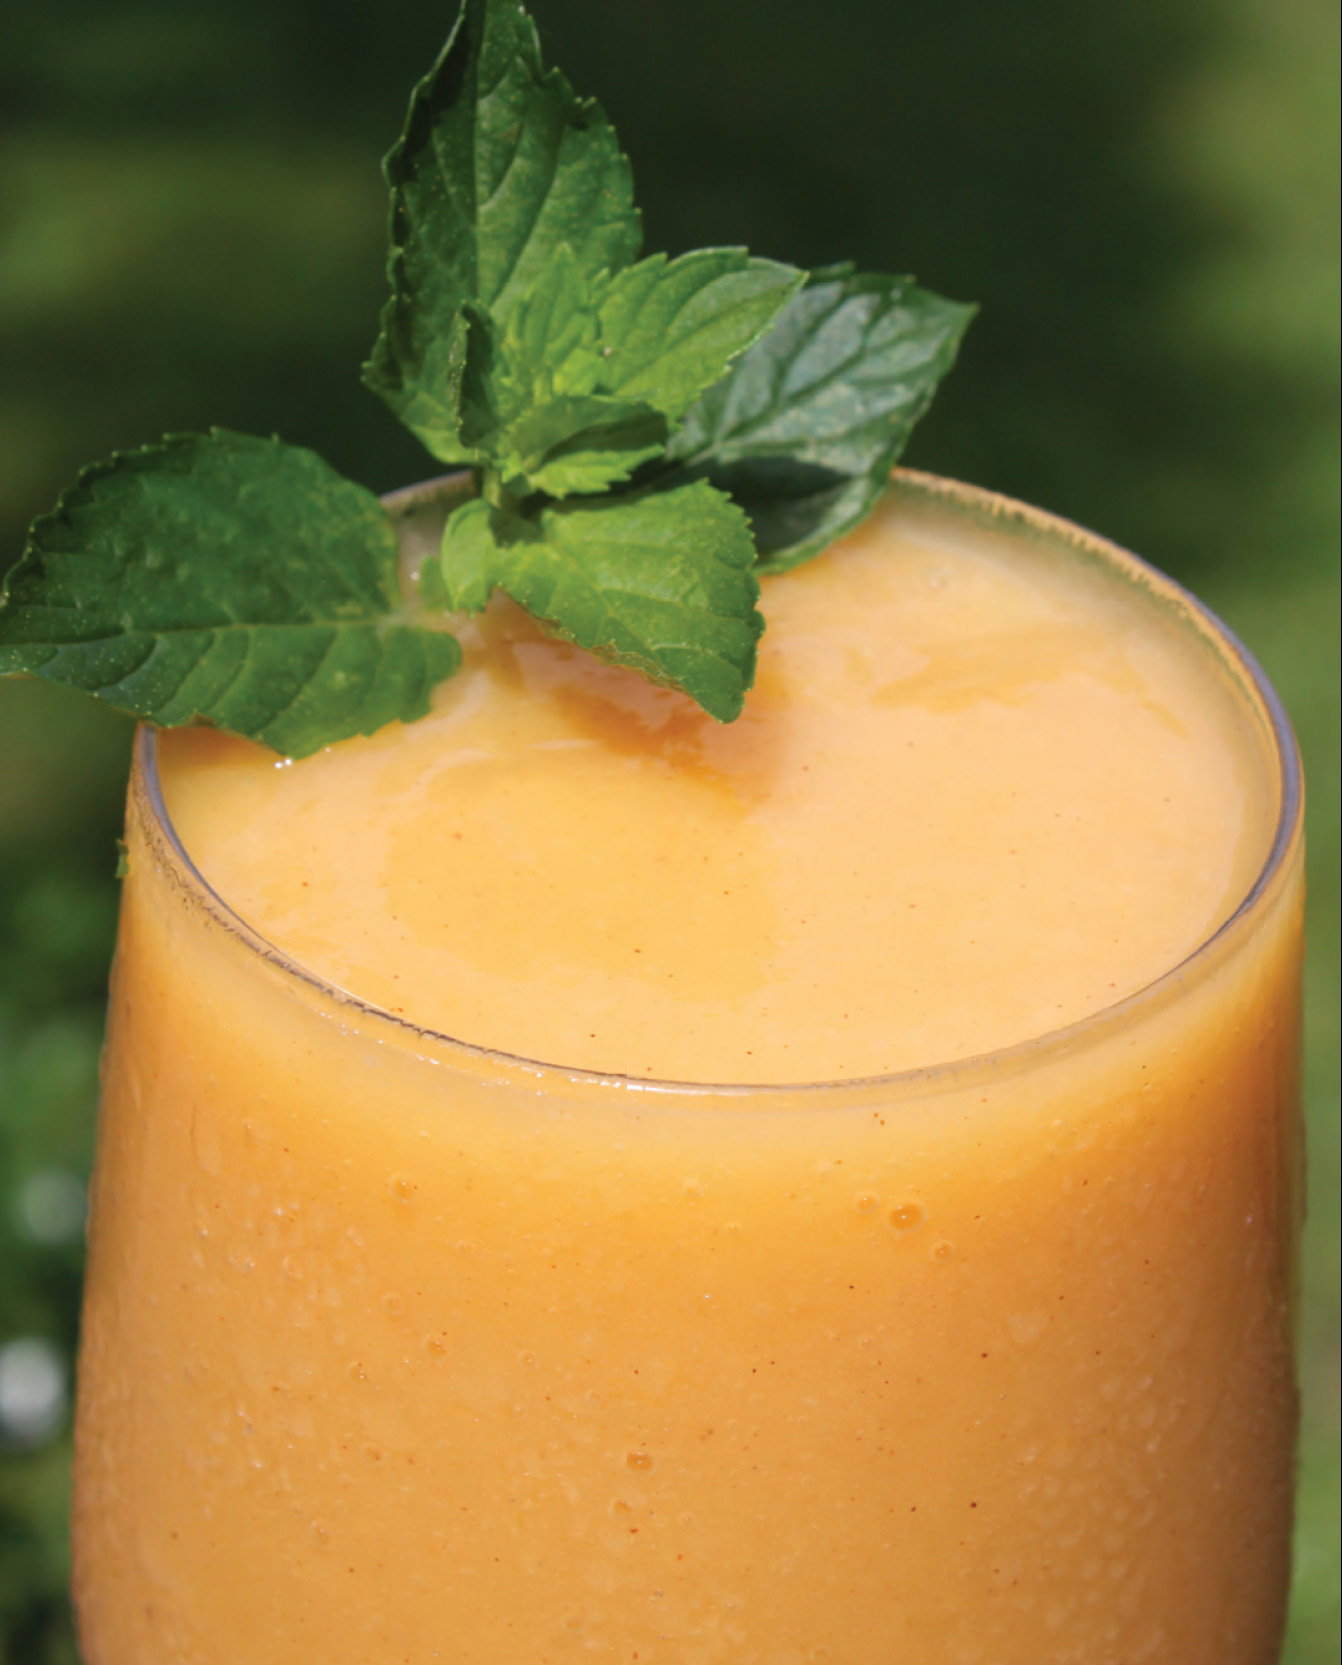
PAPAYA MILKSHAKES

3 cups chopped fresh papaya
1 cup unsweetened almond milk
1 teaspoon vanilla extract
1 teaspoon ground cinnamon
1½ cups ice
¼ cup agave nectar
1. Place all ingredients in a blender.
2. Blend on high speed, stopping occasionally to move any fruit or ice toward the blades. Serve immediately.
CRANBERRY-APPLE CRISP

This dish is delicious served cold the next day with a hot cup of tea.
4 large apples (I prefer Gala or Braeburn)
2 cups 5-Minute Cranberry Relish (p. 214)
2 cups gluten-free oats
1 cup unsweetened apple juice
2 teaspoons ground cinnamon
½ teaspoon ground nutmeg
1 tablespoon vanilla extract
1. Preheat oven to 350°F.
2. Peel, core, and thinly slice apples.
3. Mix with 2 cups cranberry relish and pour into an 8 × 8 silicone baking pan.
4. In a separate bowl, mix oats with apple juice, spices, and vanilla. Stir until well mixed.
5. Evenly place on top of the apple-cranberry mixture.
6. Bake for 50–60 minutes until topping is golden brown.