By now, it should be clear to you that, as a container gardener, the onus is on you to keep your pots and plants looking good, but don’t forget that a container is manageable—it is compact and controllable. Essentially, it’s contained!
Every plant must work hard and earn its place in your container, though, and that’s also where you come in; plants cannot be expected simply to sit there, doing their best, looking their prettiest, without a helping hand from you—a gentle nudge in the right direction. Your work is much easier for containers kept outside because the rain will water them for you and the sun will shine on them but not bake them.
The biggest maintenance issue for you is that the plants’ true nature is being restricted. In a container, a plant may have only a small area of soil to feed from, year after year after year, yet you expect it to perform for you—to flower, to fruit, to produce more and more foliage, and give off delicious scents. It is up to you to make sure that the conditions in that small space give the plant everything it needs to thrive.
REFRESHING THE SOIL
There are two key components to keeping a plant happy: nutrients and moisture (without which, the nutrients cannot be assimilated into a plant’s roots). Soil holds both of these elements and, as you might expect, the quantities needed of each vary according to the particular plant.
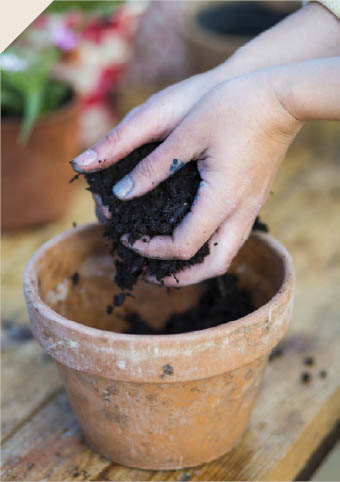
The problem with soil in containers is that, in a limited space, the goodness from the soil is used up fairly quickly, depending on the size of the container, Even if you are supplementing the soil with fertilizers, it is still a good idea to refresh the soil every year or two.
It’s not a tricky job; all you have to do is take the plant or plants out of the container, shake off the soil from the roots and set them aside, and make sure that the plants’ roots don’t dry out while they’re out of the pot. You then need to remove the soil left in the pot (a little more challenging with a large pot!) and replace it with fresh soil. Once the pot is full again, replace the plants and immediately water the newly filled pots so that the roots can make contact with the new soil.
It’s a good idea to refresh the soil of outdoor containers in the winter, when the plants are dormant and therefore won’t be disturbed by the upheaval. If it is very cold, do this in a shed or garage (preferably somewhere unheated) rather than outside so that the roots don’t freeze.
REPOTTING
Repotting is basically moving a plant from one pot to another, often larger, one. It is about replenishing the growing medium as well as increasing the plant’s available space tby putting it into a bigger container.
The best times to repot depend on what you’re growing and the stage of the plants’ growth. If a plant has been happy for a long time in its container but begins to do poorly, consider repotting it. However, before you do so, try reinvigorating it with new soil and see if that does the trick. If a plant that should naturally be a large species looks very sad, or if it starts to topple over in the wind because it has become a bit top-heavy, go straight to repotting.
A seedling needs to be repotted regularly. It should be “pricked out” (gently removed from its pot using a dibber while holding one of the leaves) as soon as its true leaves (second set of leaves) form and then put into successively bigger pots as soon as the roots begin to show through the holes at the base of the container. An annual plant, for example, tends to be bigger and better the larger the container that it’s in. In a hanging basket, you’ll pot the seedling from a plug straight into its final position and let it grow to fill its space, but for most other containers, you’ll put a plant you have grown from seed into successively bigger pots until it’s in its final pot.
For slower-growing plants or plants that you have grown from seed but are now mature specimens, you’ll need to repot far less often. As a container gardener, choosing the size of container gives you control over the growth of your plants. It is certainly not a matter of life and death if you do not repot your plants. In fact, it’s quite the opposite—you need to decide whether you want your plants to express their true nature (as they will in as big a container as you can find) or you use the container to restrict and control their growth to make them better suit your needs. Also consider that some species (Agapanthus being the most notable) actually thrive in a restricted environment. The more root-bound, the better the flowers will be on your Agapanthus plants. Not only that, but they do not like their roots to be disturbed, so if you repot them, they will take some time to recover and may even not flower. (There are only a few examples of such plants. Agapanthus is the most noteworthy and well known example because these kinds of plants are few and far between, though nearly all alpines thrive with restricted roots.)
FEEDING
How much or how little you should feed your plants varies a lot from species to species. If you are growing plants to harvest and eat, they will generally require more feeding than other plants. See page 56 for specifics, but generally a fruiting or flowering plant will need a high dose of potassium, a leafy plant will require nitrogen, and a root plant will require phosphorus.
The one thing to remember is that, in a container, a plant gets all of its food from you. In nature, there are all kinds of mechanisms for providing plants with nutrients, which are lacking in the less-than-natural environment of a plant pot. In a raised bed, there will be more nutrient availability, and if that raised bed sits on earth in your yard rather than on concrete or similar, it will benefit even more from nutrients. Generally, though, as a container gardener it is up to you to make sure that your potted plants are fed properly. Replacing the soil annually may do the job for you. You might also add a little manure to seep down through the soil and keep your plants in good health. This might be all that your containers require, but many of us grow floral, hardworking plants, which can be a little hungrier.
I recommend that you refresh your containers’ soil on an annual or biennial basis and then, for cropping or flowering plants, add a slow-release fertilizer in the spring and then a liquid feed every couple of weeks throughout the growing season. Your containers may need more or less rigorous feeding, but research the requirements for the species you grow and remember that the rule of thumb is usually the smaller the container, the more you will need to do to keep the plants healthy.

CLEAN AS YOU GO
It sounds boring, but containers can be a bit of an annoyance if they become too dirty. They can trap leaves, dust, and debris behind them and, after sitting in the same place awhile, getting watered periodically, with soil falling down their sides, their exteriors can get a bit grubby, too. So get in there and give them a cleaning every few months—you can simply hose down the containers’ exteriors and the ground around them when you’re watering, or you can move the containers, wipe them down, and sweep the areas. You will find that regular cleaning will make your garden or yard look brighter, fresher, and generally better.
WATERING
Water is essential for plant growth. All plants need some moisture, but how much depends on the species. In a temperate climate, plants require water every few days, but remember that it is easier to kill a plant by watering it too much than by not watering it enough. The bigger the container, the less you have to water it, and you definitely do not want your plants to be sitting in water because if soil is permanently moist, it becomes devoid of oxygen and toxic to plants. Bog plants and water plants are exception because they have evolved adaptations that enable them to deal with these conditions.
Generally, you are aiming for a moist but free-draining environment that gives the plants just enough moisture. If you make a plant work hard for its moisture, it will be tougher in the long run and will rely less on water than one that gets a good drink every day.
AUTOMATIC WATERING SYSTEMS
We’ve all been away on vacation or for work and suddenly realized that our beloved plants have been left without any water and may all be wilting, if not dead, upon our return. It’s heartbreaking to get home and see all of your precious progeny lying flat on their shriveled faces on their parched, baked soil. But worry not—there are some little tricks I’ve learned to prevent this devastation.
•Shoelaces: A bottle filled with water with a shoelace dipped in it (right to the bottom) and then pushed into the soil of each pot releases a slow-drip feed to your plants.
•An irrigation system: For those with some money to spend, an irrigation system guarantees that there is always moisture in the soil. Such a system may be solar powered, or it can be connected to a rain barrel, or it can measure the moisture content of the soil so that it only waters when needed. Very clever!
•An overturned bottle: Fill a bottle with water and stick it upside-down in the soil. You can either remove the lid completely or make a little hole in the lid to release the water into the soil, depending how quickly or slowly you want the water to be released.
•Drip trays: Make sure that you leave a little water, about 1 inch (2.5 cm), in the drip tray. That will give you an extra couple of days during which you won’t have to water.
•Leave your pots in the bathtub: When I’m away for a while, I bring my most prized pots inside, leave about 2 inches (5 cm) of water in the bathtub, and put the pots in there. It isn’t a great idea for a long time, but, for a week or so, it’s a lifeline.
•Leave them outside: There’s at least a 50 percent chance of rain, right?
DEADHEADING AND CUTTING BACK
As with all plants, maintaining your container specimens to a high standard helps them perform better. Potted plants have to earn their space even more than plants in the rest of the garden because a container is a natural showcase. There are some basic points to remember to help you with plant maintenance.
The first is deadheading: cutting the dead flowers off the plants. This may not be necessary with all species—some flower repeatedly, others don’t; some produce fruit and seeds, others don’t. So get to know your species. Certain plants will produce flowers prolifically according to how much you deadhead (think sweet peas, cosmos, dahlias, and most other types of bedding plants), while some need the dead flowers left on in order to perform some other function, be it fruit or seed or hips. There is no point in spending hours deadheading when there is no need, but for plants that do respond well to this treatment, it is an essential maintenance task. A little time spent snipping off the old flowers means that your containers won’t be full of brown, messy, old flower heads, and will also increase the flowering window of your plants, helping them to earn their place in your garden.
Another important job for container growers is pruning. Again, how much or how little varies considerably according to what you’ve planted. A bonsai, for example, will need to be pruned by the roots and only on the top to remove dead branches; a box hedge will need pruning once or twice a year to remove the tips and reshape; and a herbaceous perennial will need to be cut back right to the ground during the winter. But there are a few hard-and-fast rules that can guide you (see right).
HOW TO PRUNE
•Cut away any part of the plant that is dead, dying, or diseased.
•Remove crossing branches on any shrub to encourage an open habit (this allows air to circulate around the plant and prevents diseases from taking hold).
•Generally, though not in every single case (Clematis, Wisteria, and silver birch being common exceptions), prune plants once they have finished flowering.
•For coppicing, remove a third of the length of the stems every year. That way, every three years, you will have replaced the whole tree with fresh, new growth.
•Use sharp pruning shears or loppers and always clean them with disinfectant before you cut to prevent spreading diseases from plant to plant.
•Always cut just above a bud.
•Always cut the plant stem on the diagonal so that water does not sit on the wound.
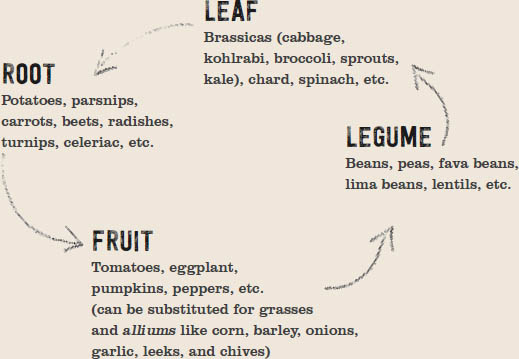
CROP ROTATION
Crop rotation comes up time and again in gardening; in containers, of course, the problems you encounter in the ground are intensified unless you change the soil or compost every year.
Many of us grow vegetables in containers, but we also often grow the same species year after year, particularly if they were successful before. It is an age-old problem: we like a vegetable, but we don’t have much space to grow it, so we buy a container or build a raised bed. With such a small amount of space, why would we want to grow things we don’t like as much? However, crop rotation in edibles is essential, and this may mean growing a few crops that aren’t on your initial wish list. I’m speaking from experience; I received lot of brassicas and, even though I had grown them the previous year, I just stuck them in my raised bed again. I could hardly harvest any of them. As the year progressed, cabbage root fly became more and more problematic, and aphids were rampant. Luckily, there was no clubroot in the soil, or I would have had to either wait twenty years or redo the entire bed. So, my advice is: it’s not worth it. Grow different plants in each container every year, and you will have a much greater success rate.
Crop rotation is also great for biodiversity to mix things up. It keeps pests down, makes the crops perform better, prevents soil erosion, keeps weeds at bay, and has even been suggested to increase the amount of oxygen produced by plants.
In short, if you start right, plant right, feed right, water right, maintain your containers right, and don’t always plant the same plants in the same places, then you should have containers that are not only beautiful but also functional and, importantly, that keep on giving year after year. Isn’t it worth that little bit of thought and effort?
A simple rotation plan for optimal crop health: