
The kernel hides the system’s hardware underneath an abstract, high-level programming interface. It furnishes many of the facilities that users and user-level programs take for granted. For example, the kernel creates all the following concepts from lower-level hardware features:
• Processes (time-sharing, protected address spaces)
• Signals and semaphores
• Virtual memory (swapping, paging, mapping)
• The filesystem (files, directories, namespace)
• General input/output (specialty hardware, keyboard, mouse, USB)
• Interprocess communication (pipes and network connections)
The kernel incorporates device drivers that manage its interaction with specific pieces of hardware; the rest of the kernel is, to a large degree, device independent. The relationship between the kernel and its device drivers is similar to the relationship between user-level processes and the kernel. When a process asks the kernel to “Read the first 64 bytes of /etc/passwd,” the kernel (or more accurately, a filesystem driver) might translate this request into a device driver instruction such as “Fetch block 3,348 from device 3.” The disk driver would further break up this command into bit patterns to be presented to the device’s control registers.
The kernel is written mostly in C, with a sprinkling of assembly language to help it interface with hardware- or chip-specific functions that are not accessible through normal compiler directives.
One of the advantages of Linux and other open source environments is that the availability of source code makes it relatively easy to roll your own device drivers and kernel modules. In the early days of Linux, having skills in this area was a necessity because it was difficult to administer Linux systems without being able to mold the system to a specific environment. Development for other flavors of UNIX is more difficult without specialized knowledge. (Kudos to IBM for having excellent driver development documentation, as they do in many other areas.)
Fortunately, sysadmins can be perfectly effective without ever soiling their hands with kernel code. In fact, such activities are better left to kernel and driver developers. Administrators should focus more on the overall needs of the user community. Sysadmins can tune the kernel or add preexisting modules as described in this chapter, but they don’t need to take a crash course in C or assembly language programming to survive. (This was not always true!)
All the UNIX platforms covered in this book run monolithic kernels, in which the entire operating system runs in kernel space, a section of memory reserved for privileged operating system functions. In a monolithic kernel, services such as device drivers, interprocess communication, virtual memory, and scheduling run in the same address space. This approach contrasts with a “microkernel” architecture, in which many of these services run in user mode (i.e., as regular processes). The pros and cons of the two architectures have been hotly debated for years, but most kernel developers agree that both approaches have merit.
 Linux is also a monolithic kernel at heart, but it allows user-space drivers for
many devices. The Gelato, UIO, FUSE, and FUSD projects each provide interfaces to
devices in user space. Nevertheless, most drivers are still implemented in kernel
mode, generally for performance reasons.
Linux is also a monolithic kernel at heart, but it allows user-space drivers for
many devices. The Gelato, UIO, FUSE, and FUSD projects each provide interfaces to
devices in user space. Nevertheless, most drivers are still implemented in kernel
mode, generally for performance reasons.
Modern monolithic kernels support on-demand loading of modules, so you can incorporate device drivers and other kernel functions as needed without rebuilding the kernel and rebooting. Drivers, filesystems, and new system calls are all commonly implemented as modules. The memory used by a module is allocated and freed as the code is loaded or removed. This feature is particularly useful for embedded systems with limited memory since developers can tune the kernel to eliminate unneeded devices.
A kernel can learn about the system’s hardware in several ways. The most basic way is that you explicitly inform the kernel about the hardware it should expect to find (or pretend not to find, as the case may be). In addition, the kernel prospects for many devices on its own, either at boot time or dynamically (once the system is running). The latter method is the most typical for USB devices: memory sticks, digital cameras, printers, and so on. Linux has reasonable support for a wide array of such devices. AIX and HP-UX have very limited support, and Solaris falls somewhere in between.
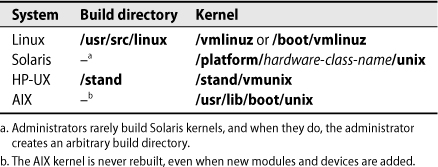
Table 13.1 shows the location of the kernel build directory and the standard name of the installed kernel on each of our example systems.
Table 13.1 Kernel build directory and location by system
A device driver is a program that manages the system’s interaction with a particular type of hardware. The driver translates between the hardware commands understood by the device and the stylized programming interface used by the kernel. The driver layer helps keep the kernel reasonably device independent.
In most cases, device drivers are part of the kernel; they are not user processes. However, a driver can be accessed both from within the kernel and from user space. User-level access to devices is usually through special device files that live in the /dev directory. The kernel maps operations on these files into calls to the code of the driver.
With the remarkable pace at which new hardware is developed, it is practically impossible to keep mainline OS distributions up to date with the latest hardware. Ergo, you will occasionally need to add a device driver to your system to support a new piece of hardware.
Device drivers are system specific, and they are often specific to a particular range of kernel revisions as well. Drivers for other operating systems (e.g., Windows) will not work, so keep this in mind when you purchase new hardware.1 In addition, devices vary in their degree of compatibility and functionality when used with various Linux distributions, so it’s wise to pay some attention to the results other sites have obtained with any hardware you are considering.
Hardware vendors are becoming more aware of the UNIX and Linux markets, and they sometimes provide UNIX and Linux drivers for their products. In the optimal case, your vendor furnishes you with both drivers and installation instructions. Occasionally, you only find the driver you need on some sketchy-looking and uncommented web page. For either case, this section shows you what is really going on when you add a driver to your system.
Most devices have a corresponding file in /dev; network devices are notable exceptions on modern operating systems. Complex servers may support hundreds of devices. Solaris handles this complexity quite nicely by using a separate subdirectory of /dev for each type of device: disk, cdrom, terminal, etc.
By virtue of being device files, the files in /dev each have a major and minor device number associated with them. The kernel uses these numbers to map device-file references to the corresponding driver.
The major device number identifies the driver with which the file is associated (in other words, the type of device). The minor device number usually identifies which particular instance of a given device type is to be addressed. The minor device number is sometimes called the unit number.
You can see the major and minor number of a device file with ls -l:

This example shows the first SCSI disk on a Linux system. It has a major number of 8 and a minor number of 0.
The minor device number is sometimes used by the driver to select or enable certain characteristics particular to that device. For example, a tape drive can have one file in /dev that rewinds the drive automatically when it is closed and another file that does not. The driver is free to interpret the minor device number in whatever way it wants. Look up the man page for the driver to determine what convention it’s using.
There are actually two primary types of device files: block device files and character device files. A block device is read or written one block (a group of bytes, usually a multiple of 512) at a time; a character device can be read or written one byte at a time. Disks and tapes lead dual lives; terminals and printers do not.
Device drivers present a standard interface to the kernel. Each driver has routines for performing some or all of the following functions:

It is sometimes convenient to implement an abstraction as a device driver even when it controls no actual device. Such phantom devices are known as pseudo-devices. For example, a user who logs in over the network is assigned a PTY (pseudo-TTY) that looks, feels, and smells like a serial port from the perspective of high-level software. This trick allows programs written in the days when everyone used a terminal to continue to function in the world of windows and networks. /dev/zero, /dev/null, and /dev/random are some other examples of pseudo-devices.
When a program performs an operation on a device file, the kernel intercepts the reference, looks up the appropriate function name in a table, and transfers control to the appropriate part of the driver. To perform an unusual operation that doesn’t have a direct analog in the filesystem model (for example, ejecting a floppy disk), a program can use the ioctl system call to pass a message directly from user space into the driver.
Device files can be created manually with the mknod command, with the syntax
mknod filename type major minor
where filename is the device file to be created, type is c for a character device or b for a block device, and major and minor are the major and minor device numbers. If you are manually creating a device file that refers to a driver that’s already present in your kernel, check the documentation for the driver to find the appropriate major and minor device numbers.
Under Linux, the udev system dynamically manages the creation and removal of device
files according to the actual presence (or absence) of devices. The udevd daemon listens for messages from the kernel regarding device status changes. Based
on configuration information in /etc/udev and /lib/udev, udevd can take a variety of actions when a device is discovered or disconnected. By default,
it just creates device files in /dev. Udev is covered in detail beginning on page 437.
 On Solaris systems, /dev is actually composed of symbolic links to files in the /devices directory, which is a separate filesystem. The Device File System (devfs) manages
the device files in /devices. These files are created automatically at boot time by devfsadmd, which continues to run after boot to handle update notifications from the kernel.
Administrators can use devfsadm to tweak this process, but most administrators will not need to use it.
On Solaris systems, /dev is actually composed of symbolic links to files in the /devices directory, which is a separate filesystem. The Device File System (devfs) manages
the device files in /devices. These files are created automatically at boot time by devfsadmd, which continues to run after boot to handle update notifications from the kernel.
Administrators can use devfsadm to tweak this process, but most administrators will not need to use it.
 The HP-UX kernel creates devices files at boot time. If new devices are attached
later, administrators must create the device files manually by running the mksf, insf, and mknod commands. The smh tool also incorporates a limited interface for viewing device information.
The HP-UX kernel creates devices files at boot time. If new devices are attached
later, administrators must create the device files manually by running the mksf, insf, and mknod commands. The smh tool also incorporates a limited interface for viewing device information.
 In AIX, the cfgmgr command runs at boot time to configure devices and to install drivers for devices
that weren’t formerly present. It prints warnings for any devices for which the software or drivers are not installed. Once a device is detected, AIX
remembers it by placing an identifier in the Object Data Manager, which we discuss
on page 432. cfgmgr creates files in /dev for devices that are successfully detected and initialized.
In AIX, the cfgmgr command runs at boot time to configure devices and to install drivers for devices
that weren’t formerly present. It prints warnings for any devices for which the software or drivers are not installed. Once a device is detected, AIX
remembers it by placing an identifier in the Object Data Manager, which we discuss
on page 432. cfgmgr creates files in /dev for devices that are successfully detected and initialized.
Given the existence of these various tools for automating the creation of device files, system administrators running current releases of UNIX and Linux should never need to manually manage device files with mknod.
Naming conventions for devices are somewhat random. They are often holdovers from the way things were done under UNIX on a DEC PDP-11, as archaic as that may sound in this day and age.
For devices that have both block and character identities, the character device name is usually prefaced with the letter r for “raw” (e.g., /dev/da0 vs. /dev/rda0). An alternative convention is to store character device files in a subdirectory that has a name that starts with r (e.g., /dev/dsk/dks0d3s0 vs. /dev/rdsk/dks0d3s0). However, an r does not always imply a raw device file.
Serial device files are usually named tty followed by a sequence of letters that identify the interface the port is attached to. TTYs are sometimes represented by more than one device file; the extra files usually afford access to alternative flow control methods or locking protocols.
See Chapter 31 for more information about serial ports.
The names of tape devices often include not only a reference to the drive itself but also an indication of whether the device rewinds after the tape device is closed. Each vendor has a different scheme.
The naming conventions for the files that represent hard disks and SSDs are rather complex on most systems. See Disk device files on page 224 for details.
When the system is installed, it comes with a generic kernel that’s designed to run most applications on most hardware. The generic kernel includes many different device drivers and option packages. Some drivers may also be dynamically inserted into the running kernel. On Linux, the udev system can also manage real-time device changes, such as the insertion of a USB device.
There are various schools of thought on whether production servers should have custom-built kernels. Although there is some potential for performance gains, especially in embedded systems without much memory, the manageability tradeoff for patching and system upgrades is usually a deal breaker. Unless there’s a legitimate need to wring every last ounce of performance out of the system, we recommend using the vendor’s stock kernel.
When it comes to kernel device support, the wise administrator is usually also the laziest. Use the dynamic module approach whenever possible. Avoid building a custom kernel unless it is strictly necessary. On Linux systems, most USB devices can be attached with no administrator intervention.
You can use any one of four basic methods to configure a Linux kernel. Chances are
you’ll have the opportunity to try all of them eventually. The methods are
• Modifying tunable (dynamic) kernel configuration parameters
• Building a kernel from scratch (really, this means compiling it from the source code, possibly with modifications and additions)
• Loading new drivers and modules into an existing kernel on the fly
• Providing operational directives at boot time through the kernel loader, GRUB. See page 82 for more information.
These methods are each applicable in slightly different situations. Modifying tunable parameters is the easiest and most common, whereas building a kernel from source files is the hardest and least often required. Fortunately, all these approaches become second nature with a little practice.
Many modules and drivers in the kernel were designed with the knowledge that one size doesn’t fit all. To increase flexibility, special hooks allow parameters such as an internal table’s size or the kernel’s behavior in a particular circumstance to be adjusted on the fly by the system administrator. These hooks are accessible through an extensive kernel-to-userland interface represented by files in the /proc filesystem (aka procfs). In some cases, a large user-level application (especially an “infrastructure” application such as a database) may require a sysadmin to adjust kernel parameters to accommodate its needs.
You can view and set kernel options at run time through special files in /proc/sys. These files mimic standard Linux files, but they are really back doors into the kernel. If a file in /proc/sys contains a value you want to change, you can try writing to it. Unfortunately, not all files are writable (regardless of their apparent permissions), and not much documentation is available. If you have the kernel source tree installed, you may be able to read about some of the values and their meanings in the subdirectory Documentation/syscnt.
For example, to change the maximum number of files the system can have open at once, try something like

Once you get used to this unorthodox interface, you’ll find it quite useful. A word of caution, however: changes are not remembered across reboots.
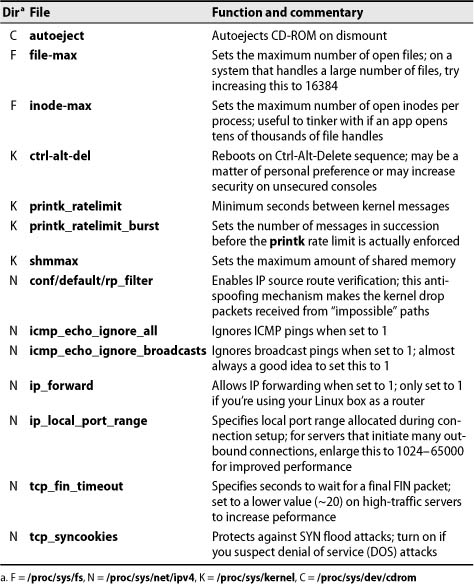
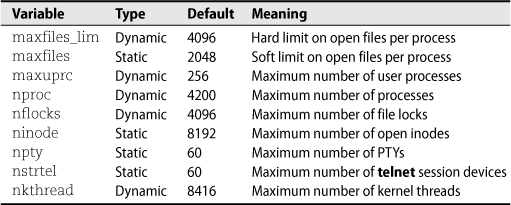
Table 13.2 lists some commonly tuned parameters. Default values vary widely among distributions.
Table 13.2 Files in /proc/sys for some tunable kernel parameters
A more permanent way to modify these same parameters is to use the sysctl command. sysctl can set individual variables either from the command line or by reading a list of variable=value pairs from a file. By default, /etc/sysctl.conf is read at boot time and its contents are used to set initial (custom) parameter values.
linux$ sudo sysctl net.ipv4.ip_forward=0
turns off IP forwarding. (Alternatively, you can just edit /etc/sysctl.conf manu-ally.) You form the variable names used by sysctl by replacing the slashes in the /proc/sys directory structure with dots.
Because Linux evolves rapidly, it is likely that you’ll eventually be faced with the need to build a Linux kernel. Kernel patches, device drivers, and new functionality continually arrive on the scene. This is really something of a mixed blessing. On one hand, it’s convenient to always support the “latest and greatest,” but on the other hand, it can become quite time consuming to keep up with the constant flow of new material.
It’s less likely that you’ll need to build a kernel on your own if you’re running a “stable” version. Originally, Linux adopted a versioning scheme in which the second part of the version number indicated whether the kernel was stable (even numbers) or in development (odd numbers). For example, kernel version 2.6.6 would be a “stable” kernel, whereas 2.7.4 would be a “development” kernel. Today, this scheme isn’t religiously followed, so you’d best check the home page at kernel.org for the official word on this issue. The kernel.org site is also the best source for Linux kernel source code if you aren’t relying on a particular distribution (or vendor) to provide you with a kernel.
A good system administrator carefully weighs needs and risks when planning kernel upgrades and patches. Sure, the new release may be the latest and greatest, but is it as stable as the current version? Could the upgrade or patch be delayed and installed with another group of patches at the end of the month? It’s important to resist the temptation to let “keeping up with the Joneses” (in this case, the kernel hacking community) dominate the best interests of your user community.
A good rule of thumb is to upgrade or apply patches only when the productivity gains you expect to obtain (usually measured in terms of reliability and performance) will exceed the effort and lost time required to perform the installation. If you’re having trouble quantifying the specific gain, that’s a good sign that the patch can wait for another day. (Of course, security-related patches should be installed promptly.)
In this chapter we use path_to_kernel_src as a placeholder for whichever directory you choose for kernel source code. Most distributions install kernel source files in /usr/src. In all cases, you need to install the kernel source package before you can build a kernel on your system; see page 380 for tips on package installation.
The kernel configuration process revolves around the .config file at the root of the kernel source directory. All the kernel configuration information is specified in this file, but its format is somewhat cryptic. Use the decoding guide in
path_to_kernel_src/Documentation/Configure.help
to find out what the various options mean.
To save folks from having to edit the .config file directly, Linux has several make targets that let you configure the kernel with different interfaces. If you are running KDE, the prettiest configuration interface is provided by make xconfig. Likewise, if you’re running GNOME, make gconfig is probably the best option. These commands bring up a graphical configuration screen on which you can pick the devices to add to your kernel (or compile as loadable modules).
If you are not running KDE or GNOME, you can use a terminal-based alternative invoked with make menuconfig. Finally, the older-style make config prompts you to respond to every single configuration option available without letting you later go back if you change your mind. We recommend make xconfig or make gconfig if your environment supports them; otherwise, use make menuconfig. Avoid make config, the least flexible and most painful text-based make target.
If you’re migrating an existing kernel configuration to a new kernel version (or tree), you can use the make oldconfig target to read in the previous config file and to ask only the questions that are new.
These tools are straightforward as far as the options you can turn on, but unfortunately they are painful to use if you want to maintain several versions of the kernel for multiple architectures or hardware configurations.
The various configuration interfaces described above all generate a .config file that looks something like this:
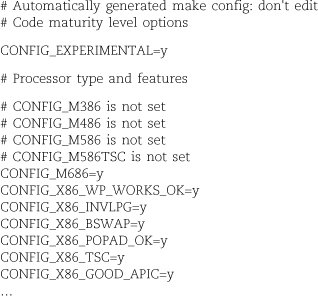
As you can see, the contents are cryptic and do not describe what the CONFIG tags mean. Each CONFIG line refers to a specific kernel configuration option. The value y compiles the option into the kernel; the value m enables the option as a loadable module.
Some things can be configured as modules and some can’t. You just have to know which is which; it’s not clear from the .config file. Nor are the CONFIG tags easily mapped to meaningful information.
Setting up an appropriate .config file is the most important part of the Linux kernel configuration process, but you must jump through several more hoops to turn that file into a finished kernel.
Here’s an outline of the entire process:
• Change directory (cd) to the top level of the kernel source directory.
• Run make xconfig, make gconfig, or make menuconfig.
• Run make dep (not required for kernels 2.6.x and later).
• Run make clean.
• Run make.
• Run make modules_install.
• Copy arch/i386/boot/bzImage to /boot/vmlinuz.
• Copy arch/i386/boot/System.map to /boot/System.map.
• Add a configuration line for the new kernel to /boot/grub/grub.conf.
The make clean step is not always strictly necessary, but it is generally a good idea to start with a clean build environment. In practice, many problems can be traced back to this step having been skipped.
On Linux systems, device drivers are typically distributed in one of three forms:
• A patch against a specific kernel version
• A loadable module
• An installation script or package that installs the driver
The most common form is the installation script or package. If you’re lucky enough to have one of these for your new device, you should be able to follow the standard procedure for installing new software.
In situations where you have a patch against a specific kernel version, you can in most cases install the patch with the following procedure:
linux# cd path_to_kernel_src ; patch -p1 < patch_file
If neither of these cases applies, you are likely in a situation in which you must manually integrate the new device driver into the kernel source tree. In the following pages, we demonstrate how to manually add a hypothetical network “snarf ” driver to the kernel. Linux actually makes this a rather tedious process, especially when compared to some other versions of UNIX.
Within the drivers subdirectory of the kernel source tree, find the subdirectory that corresponds to the type of device you are dealing with. A directory listing of drivers looks like this:
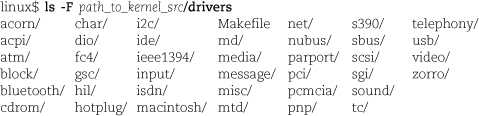
The most common directories to which drivers are added are block, char, net, scsi, sound, and usb. These directories contain drivers for block devices (such as IDE disk drives), character devices (such as serial ports), network devices, SCSI cards, sound cards, and USB devices, respectively. Some of the other directories contain drivers for the buses themselves (e.g., pci, nubus, and zorro); it’s unlikely that you will need to add drivers to these directories. Some directories contain platform-specific drivers, such as macintosh, s390, and acorn.
Since our example device is a network-related device, we add the driver to the directory drivers/net. We modify the following files:
• drivers/net/Makefile so that our driver will be compiled
• drivers/net/Kconfig so that our device will appear in the config options
After putting the .c and .h files for the driver in drivers/net/snarf, we add the driver to drivers/net/Makefile. The line we add (near the end of the file) is
obj-$(CONFIG_SNARF_DEV) += snarf/
This configuration adds the snarf driver (stored in the snarf/ directory) to the build process.
After adding the device to the Makefile, we have to make sure we can configure the device when we configure the kernel. All network devices must be listed in the file drivers/net/Kconfig. To add the device so that it can be built either as a module or as part of the kernel (consistent with what we claimed in the Makefile), we add the following line:

The first token after config is the configuration macro, which must match the token following CONFIG_ in the Makefile. The tristate keyword means that we can build the device as a module. If the device cannot be built as a module, we would use the keyword bool instead of tristate. The next token is the string to display on the configuration screen. It can be any arbitrary text, but it should identify the device that is being configured.
Having managed to link a new device driver into the kernel, how do you tell the kernel it needs to use the new driver? In kernel versions before 2.6, this was a tedious task that required programming knowledge. As part of the recent architectural changes made to the device driver model, there is now a standard way for drivers to associate themselves with the kernel.
It’s beyond the scope of this chapter to explain how that happens in detail, but the result is that device drivers written for version 2.6 (and later) register themselves with the macro MODULE_DEVICE_TABLE. This macro makes the appropriate behind-the-scenes connections so that other utilities such as modprobe (discussed in the Loadable kernel modules section starting on page 434) can enable new devices in the kernel.
At boot time, the Solaris kernel probes for devices and initializes a driver for
each device it finds. It makes extensive use of loadable modules and loads code only
for the devices that are actually present, unless forced to do otherwise.
Depending on your point of view, this automatic configuration makes configuring a custom kernel more or less of a necessity under Solaris than on other systems. In an ideal world, the kernel would correctly identify its hardware environment 100% of the time. Unfortunately, flaky, nonstandard, or just plain buggy hardware (or drivers) can occasionally turn this creature comfort into a torment.
That said, let’s look at how to custom-configure a Solaris kernel, should you ever need to do so.
To make on-demand module loading work correctly, Solaris relies heavily on a particular directory organization. Solaris expects to find certain directories in certain places, and these directories must contain specific types of modules:
• /kernel – modules common to machines that share an instruction set
• /platform/platform-name/kernel – modules specific to one type of machine, such as a Sun Fire T200
• /platform/hardware-class-name/kernel – modules specific to one class of hardware; for example, all sun4u machines
• /usr/kernel – similar to /kernel
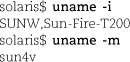
You can determine your platform-name and hardware-class-name with uname -i and uname -m, respectively.
When Solaris boots, it searches the path
/platform/platform-name/kernel:/kernel:/usr/kernel
in an attempt to find a kernel. It first looks for files named unix, and then it looks for files named genunix. genunix is a generic kernel that represents the platform-independent portion of the base kernel.
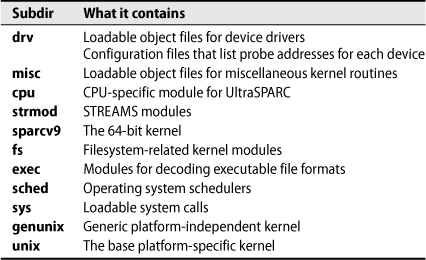
Each of the directories listed above can contain several standard subdirectories, listed in Table 13.3. Since the subdirectories can exist within any of the kernel directories, we use the generic name KERNEL to symbolize any and all kernel directories.
Table 13.3 Subdirectories of Solaris kernel directories
You should not normally have to change any files in these directories unless you install a new device driver. The one exception to this rule may be the .conf files in the KERNEL/drv directory, which specify device-specific configuration parameters. It’s rarely necessary to change them, however, and you should really only do it if a device’s manufacturer tells you to.
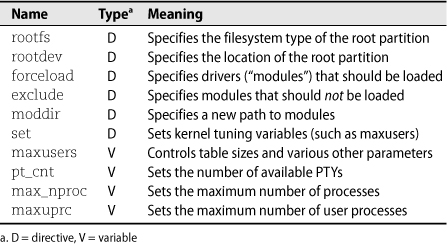
Solaris’s /etc/system file serves as the master configuration file for the kernel. Table 13.4 shows the directives and variables that can appear in this file. Directives are keywords in their own right; variables must be assigned a value with the set directive.
Table 13.4 Directives and variables used in /etc/system
/etc/system is consulted at boot time and can be so badly mutilated that the system no longer boots. boot -a lets you specify a backup copy of /etc/system if you made one. (If you don’t have a backup copy and your existing one doesn’t work, you can use /dev/null.)
Let’s look at a sample /etc/system file for a simple kernel.

These lines specify that the root filesystem will be of type UFS (UNIX File System) and that it will reside on the sd3a disk partition. The syntax used to specify the root device is identical to that used by Sun’s openprom monitor. It varies from platform to platform, so consult your hardware manual or follow the symlinks in /dev that map the weird names to sensible ones. An ls -l after the link has been followed will show the exact long name.

This line (which has been wrapped to fit the page) specifies the search path for loadable modules. This value is suggested by the kernel man page; however, it is not the default, so you must specify it explicitly.
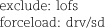
The first line excludes the loopback filesystem from the kernel, and the second forces the generic SCSI driver (sd) to be loaded.
set maxusers=64
This line sizes the kernel’s tables appropriately for 64 simultaneous logins.
Solaris drivers are usually distributed as packages. Use pkgadd to add the device driver to the system. When drivers are not distributed as a package or when package addition fails, it’s trivial to add the drivers by hand because they are all implemented as loadable kernel modules.
Solaris drivers are almost always distributed as object files, not as source code as is common on Linux systems. In this example, we add the device “snarf ” to Solaris. The snarf driver should come with at least two files, including snarf.o (the actual driver) and snarf.conf (a configuration file). Both files should go into the directory /platform/‘uname -m‘/kernel/drv.
Once the .conf file has been copied over, you can edit it to specify particular device parameters. You should not normally need to do this, but sometimes configuration options are available for fine-tuning the device for your application.
After the files have been copied into place, you need to load the module with the add_drv command. (More on loadable kernel modules later in this chapter.) In this case, we load snarf into the kernel by running the command add_drv snarf. That’s it! This is definitely the least painful of our examples.
Since Solaris makes up its view of the world on the fly, debugging a troubled machine can be frustrating. Fortunately, Solaris provides several tools that display the machine’s current configuration.
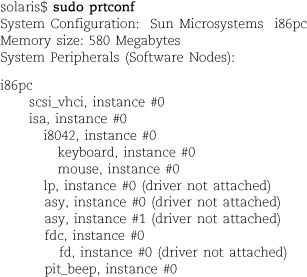
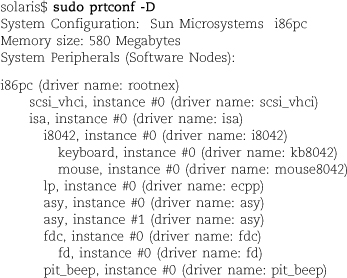
The prtconf command prints the machine’s general configuration, including its machine type, model number, amount of memory, and some information about the configured hardware devices. Lines that describe devices (drivers, really) are indented to show the dependencies among them. The handy prtconf -D option shows the name of the driver for each device.
In the following snippet of prtconf output, several lines state “driver not attached.” This message can have multiple meanings: there is no driver for a device, the device is configured but not attached to the system, or the device is unused and no driver has been loaded.
The prtconf -D display shows which drivers to load in /etc/system.
sysdef is prtconf on steroids. In addition to the information given by prtconf, it also lists pseudo-device drivers, tunable kernel parameters, and the filenames of loaded modules. If you modify the default kernel for an important machine, consider including the output of sysdef in your documentation for the machine.
The modinfo command reports information about dynamically loaded modules. Solaris dynamically loads device drivers, STREAMS modules, and filesystem drivers, among other things. Don’t be surprised if modinfo’s output contains more than 200 entries. See page 435 for more information about modinfo.
HP-UX’s kernel is the most monolithic among our example operating systems, and it
prefers to load most modules statically. It also has a complex and confusing configuration
file. Fortunately, HP provides a handy configuration tool known as kcweb, which runs as a GUI if X Windows and a browser are available, or on the command
line otherwise. To force command-line operation, use kcweb -t.
HP-UX reads kernel configuration parameters (such as modules and tunable values) from the /stand/system file. This file is maintained by kcweb and other tools, and administrators should not modify it directly.
Modules and configuration options can be static or dynamic. A static value or module is one that requires a kernel rebuild and a reboot to change or install.
Dynamic modules are loaded and unloaded as they are used, without requiring a reboot. Likewise, dynamically tunable values take effect immediately.
Table 13.5 lists a few of the more useful tunable properties of the HP-UX kernel.
Table 13.5 HP-UX kernel tunable configuration values (useful ones)
If you request changes to static modules or static tunable values, kcweb automatically runs the mk_kernel command to build a new kernel. The new kernel takes effect at the next system reboot.
The AIX kernel never requires a rebuild. New devices are configured dynamically through
IBM’s mysterious black box known as the Object Data Manager (ODM).
It’s an enigmatic setup. Many parameters that are commonly tunable on other kernels, such as shared memory settings, cannot be tuned at all on AIX. Instead, they are managed independently by the kernel. Other configurable options are managed through a series of six tuning commands.
Rather than keeping device configuration information in text files or scripts, AIX squirrels it away in the Object Data Manager (ODM) attribute/value database. Another layer of glue associates these property lists with specific devices (driver instances, really) and binds the drivers to the configuration information.
AIX’s intent is to support persistence for device configuration. Rather than having one way to configure devices on the fly (e.g., ifconfig or ndd) and a parallel system of configuration files and scripts that do configuration at boot time, AIX’s scheme attempts to unify these functions so that most device changes are automatically sticky across reboots.
However, if you take the red pill and look at what’s actually going on within the system, the underlying complexity can be daunting. The system has more entry points than traditional UNIX, and the interactions among the components aren’t always obvious. Here’s an outline of the various layers:
• The Object Data Manager is a configuration repository that’s analogous to the registry in Microsoft Windows. It’s actually a bit more sophisticated than the Windows registry in that it has the concept of object schemas and instances rather than just arbitrary property lists.
• Programs access ODM through library routines, but you can also work with the ODM database through the odmadd, odmcreate, odmdrop, odmshow, odmget, odmchange, and odmdelete commands.2
• The command family chdev, lsdev, lsattr, mkdev, rmdev, lsconn, and lsparent maps ODM configuration information to specific devices. AIX’s chdev is actually quite similar to the Solaris and HP-UX ndd command (see page 498), but by default chdev writes your changes both to the active driver and to the ODM configuration database. Even common parameters such as the system hostname and the details of static routes are stored as device attributes (the device in this case being an instance of the “inet” driver).
• Several administration utilities provide front ends to the chdev family. For example, mktcpip is sort of like a persistent ifconfig that converts its arguments into a series of chdev calls on network interfaces, affecting both the active and saved configurations. (Would you guess that its syntax mirrors that of ifconfig? You guessed wrong.)
• ODM is a user-level facility, so drivers don’t access it directly. Just as with traditional text-file configuration, some software must read the ODM configurations at boot time and poke the appropriate values into the running drivers.
Fortunately, most administrators need not touch the complexities of ODM thanks to SMIT and to higher-level tools such as mktcpip.
One indispensable utility for managing AIX devices is the cfgmgr command. Run it as root with no arguments after adding new hardware to the system; the new hardware will miraculously be recognized and become available for use. Well, usually. If the device drivers haven’t already been loaded into the ODM database, cfgmgr will helpfully suggest a package for you to install from the AIX installation media. See the cfgmgr man page for further details.
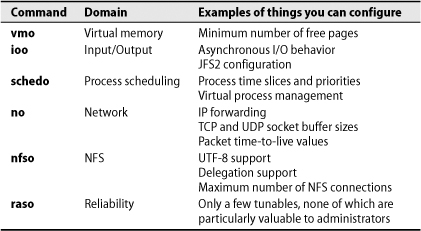
AIX has six categories of tunable values and supplies six corresponding commands for tweaking them. Most of the values relate to performance optimization. Table 13.6 captures each command and its purpose. Breaking from standard AIX convention, the commands share a common syntax. The parameters can also be managed through the SMIT interface with the incantation smit tuning. See the man page for each command for detailed information.
Table 13.6 Commands for setting tunable kernel parameters in AIX
The commands are simple to use. To enable IP forwarding, for example, run
aix$ sudo no -o ipforwarding=1
To list all available tunables for the I/O subsystem, type
aix$ sudo ioo -a
 You can add the -r flag to any of the commands to ensure that your changes persist after a reboot.
Loadable kernel modules (LKMs) are now common to nearly all flavors of UNIX. Each of our example systems implements some form of dynamic loading facility, although the exact implementations vary.
Loadable kernel module support allows a device driver—or any other kernel service—to be linked into and removed from the kernel while it is running. This facility makes the installation of drivers much easier since the kernel binary does not need to be changed. It also allows the kernel to be smaller because drivers are not loaded unless they are needed.
Although loadable drivers are convenient, they are not 100% safe. Any time you load or unload a module, you risk causing a kernel panic. So don’t try out an untested module when you are not willing to crash the machine.
Like other aspects of device and driver management, the implementation of loadable modules is OS dependent. The sections below outline the commands and caveats appropriate for Solaris and Linux, which support more devices and allow more administrator configuration than do our other example systems.
Linux is both more and less sophisticated than Solaris in its handling of loadable
kernel modules, at least from the system administrator’s point of view. Under Linux,
almost anything can be built as a loadable kernel module. The exceptions are the root
filesystem type, the device on which the root filesystem resides, and the PS/2 mouse
driver.
Loadable kernel modules are conventionally stored under /lib/modules/version, where version is the version of your Linux kernel as returned by uname -r. You can inspect the currently loaded modules with the lsmod command:
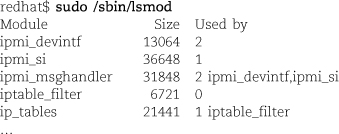
Loaded on this machine are the Intelligent Platform Management Interface modules and the iptables firewall.
As an example of manually loading a kernel module, here’s how we would insert the snarf module that we set up in the previous section:
redhat$ sudo insmod /path/to/snarf.ko
We can also pass parameters to loadable kernel modules; for example,
redhat$ sudo insmod /path/to/snarf.ko io=0xXXX irq=X
Once a loadable kernel module has been manually inserted into the kernel, it can only be removed if you explicitly request its removal or if the system is rebooted. We could use rmmod snarf to remove our snarf module.
You can use rmmod at any time, but it works only if the number of current references to the module (listed in the Used by column of lsmod’s output) is 0.
You can also load Linux LKMs semiautomatically with modprobe, a wrapper for insmod that understands dependencies, options, and installation and removal procedures. modprobe uses the /etc/modprobe.conf file to figure out how to handle each individual module.
You can dynamically generate an /etc/modprobe.conf file that corresponds to all your currently installed modules by running modprobe -c. This command generates a long file that looks like this:
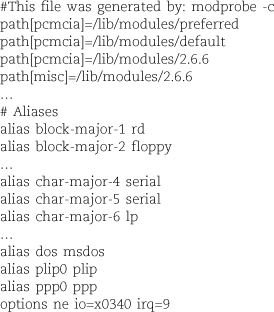
The path statements tell where a particular module can be found. You can modify or add entries of this type if you want to keep your modules in a nonstandard location.
The alias statement maps between block major device numbers, character major device numbers, filesystems, network devices, and network protocols and their corresponding module names.
The options lines are not dynamically generated but rather must be manually added by an administrator. They specify options that should be passed to a module when it is loaded. For example, we could use the following line to tell the snarf module its proper I/O address and interrupt vector:3
options snarf io=0xXXX irq=X
modprobe also understands the statements install and remove. These statements allow commands to be executed when a specific module is inserted into or removed from the running kernel.
In Solaris, virtually everything is a loadable module. The modinfo command lists the modules that are currently loaded.
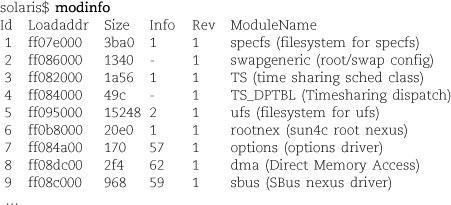
On our Solaris system, the list continued for 80-odd lines. Many elements that are hardwired into the kernel on other versions of UNIX (such as UFS, the local file-system) are loadable drivers in Solaris. This organization should make it much easier for third parties to write packages that integrate easily and seamlessly into the kernel, at least in theory.
As described in Linux kernel configuration earlier in this chapter, you can add a driver with the add_drv command. This command loads the driver into the kernel and makes the appropriate device links (all links are rebuilt each time the kernel boots). Once you add_drv a driver, it remains a part of the system until you actively remove it. You can unload drivers by hand with rem_drv.
Whenever you add a driver by running add_drv, it is a good idea to also run drvconfig. This command reconfigures the /devices directory and adds any files that are appropriate for the newly loaded driver.
Loadable modules that are not accessed through device files can be loaded and unloaded with modload and modunload.
Device files have been a tricky problem for many years. When systems supported only
a few types of devices, manual maintenance of device files was manageable. As the
number of available devices has grown, however, the /dev filesystem has become cluttered, often with files irrelevant to the current system.
Red Hat Enterprise Linux version 3 included more than 18,000 device files, one for
every possible device that could be attached to the system! The creation of static
device files quickly became a crushing problem and an evolutionary dead end.
USB, FireWire, PCMCIA, and other device interfaces introduce additional wrinkles. For example, if a user connects two external hard drives, it would be convenient for the system to recognize and automount each drive with a persistent device name. Ideally, a drive that is initially recognized as /dev/sda would remain available as /dev/sda despite intermittent disconnections and regardless of the activity of other devices and buses. The presence of dynamic devices such as cameras, printers, scanners, and other types of removable media clouds the water and makes the persistent identity problem even worse.
Udev is an elegant solution to these issues. It is a device management system implemented in user space (rather than inside the kernel) that informs end-user applications about devices as they are attached and removed. Udev relies on sysfs, described below, to learn what’s going on with the system’s devices, and it uses a series of udev-specific rules to understand appropriate naming conventions. Udev maintains device files in /dev automatically and with minimal disruption. Only devices that are currently available to the system have files in /dev.
Linux administrators should understand how udev’s rule system works and should know how to use the udevadm command. Before peering into those details, however, let’s first review the underlying technology of sysfs.
Sysfs was added to the Linux kernel at version 2.6. It is a virtual, in-memory file-system that provides detailed and well-organized information about the system’s available devices, their configurations, and their state. Sysfs device information is accessible both from within the kernel and from user space.
You can explore the /sys directory, where sysfs is typically mounted, to find out everything from what IRQ a device is using to how many blocks have been queued for writing on a disk controller. One of the guiding principles of sysfs is that each file in /sys should represent only one attribute of the underlying device. This convention imposes a certain amount of structure on an otherwise chaotic data set.
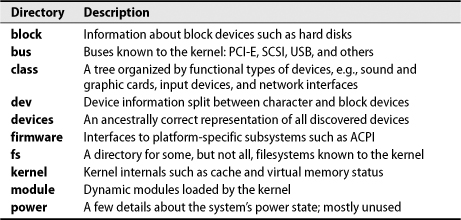
Table 13.7 shows the directories in the /sys root directory, each of which is a subsystem that is registered with sysfs. These directories vary slightly by distribution.
Table 13.7 Subdirectories of /sys
Originally, if information about device configuration was available at all, it was found in the /proc filesystem. Although /proc continues to hold run-time information about processes and the kernel, we anticipate that all device-specific information will move to /sys over time.
The udevadm command queries device information, triggers events, controls the udevd daemon, and monitors udev and kernel events. Its primary use for administrators is to build and test rules, which are covered in the next section.
udevadm expects one of six commands as its first argument: info, trigger, settle, control, monitor, or test. Of particular interest to system administrators are info, which prints device-specific information, and control, which starts and stops udev or forces it to reload its rules files. The monitor command displays events as they occur.
The following command shows all udev attributes for the device sdb. The output is truncated here, but in reality it goes on to list all parent devices—such as the USB bus—that are ancestors of sdb in the device tree.
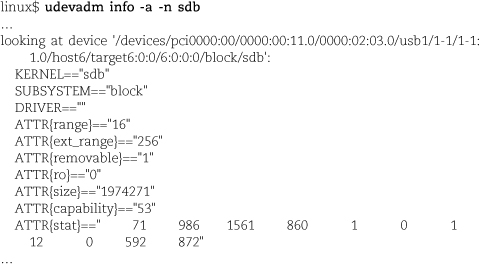
All paths in udevadm output, such as /devices/pci0000:00/…, are relative to /sys.
The output is formatted so that you can feed it back to udev when constructing rules. For example, if the ATTR{size}=="1974271" clause were unique to this device, you could copy that snippet into a rule as the identifying criteria.
Refer to the man page on udevadm for additional options and syntax.
Udev relies on a set of rules to guide its management and naming of devices. The default rules reside in the /lib/udev/rules.d directory, but local rules belong in /etc/udev/rules.d. There is no need to edit or delete the default rules—you can ignore or override a file of default rules by creating a new file with the same name in the custom rules directory.
The master configuration file for udev is /etc/udev/udev.conf; however, the default behaviors are reasonable. The udev.conf files on our example distributions contain only comments, with the exception of one line that enables error logging.
Sadly, because of political bickering among distributors and developers, there is little rule synergy among distributions. Many of the filenames in the default rules directory are the same from distribution to distribution, but the contents of the files differ significantly.
Rule files are named according to the pattern nn-description.rules, where nn is usually a two-digit number. Files are processed in lexical order, so lower numbers are processed first. Files from the two rules directories are combined before the udev daemon, udevd, parses them. The .rules suffix is mandatory; files without it are ignored.
Rules are of the form
match_clause, [match_clause, …] assignment_clause [,assignment_clause …]
The match_clauses define the situations in which the rule is to be applied. Each match clause consists of a key, an operator, and a value. For example, the clause ATTR{size}=="1974271" was referred to above as a potential component of a rule; it selects all devices whose size attribute is exactly 1,974,271.
Most match keys refer to device properties (which udevd obtains from the /sys filesystem), but some refer to other context-dependent attributes, such as the operation being handled (e.g., device addition or removal). All match clauses must match in order for a rule to be activated.
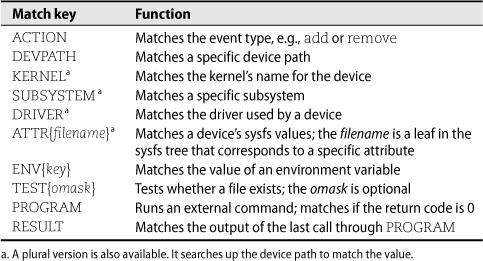
Table 13.8 shows the match keys understood by udev.
For matching rules, the assignment_clauses specify the actions udevd should take to handle the event. Their format is similar to that for match clauses.
The most important assignment key is NAME, which indicates what udev should name the device. The optional SYMLINK assignment key creates a symbolic link to the device through its desired path in /dev.
Let’s put these components together with an example: a USB flash drive. Suppose that we want to make the drive’s device name persist across insertions and that we want the drive to be mounted and unmounted automatically.
To start with, we insert the flash drive and check to see how the kernel identifies it. There are a couple of ways to do this. By running the lsusb command, we can inspect the USB bus directly:

Alternatively, we can check for log entries submitted to /var/log/messages. In our case, the attachment leaves an extensive audit trail:
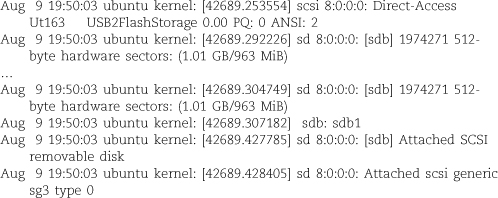
The log messages above indicate that the drive was recognized as sdb, which gives us an easy way to identify the device in /sys. We can now examine the /sys filesystem with udevadm in search of some rule snippets that are characteristic of the device and might be usable in udev rules.

The output from udevadm show several opportunities for matching. One possibility is the size field, which is likely to be unique to this device. However, if the size of the partition were to change, the device would not be recognized. Instead, we can use a combination of two values: the kernel’s naming convention of sd plus an additional letter, and the contents of the model attribute, USB2FlashStorage. For creating rules specific to this particular flash drive, another good choice would be the device’s serial number (not displayed here).
We’ll put our rules for this device in the file /etc/udev/rules.d/10-local.rules. Because we have multiple objectives in mind, we need a series of rules.
First, we take care of creating device symlinks in /dev. The following rule uses our knowledge of the ATTRS and KERNEL match keys, gleaned from udevadm, to identify the device:

When the rule triggers, udevd sets up /dev/ate-flashN as a symlink to the device. We don’t really expect more than one of these devices to appear on the system. If more copies do appear, they receive unique names in /dev, but the exact names depend on the insertion order of the devices.
Next, we use the ACTION key to run some commands whenever the device appears on the USB bus. The RUN assignment key lets us create an appropriate mount point directory and mount the device there.

The PROGRAM and RUN keys look similar, but PROGRAM is a match key that’s active during the rule selection phase, whereas RUN is an assignment key that’s part of the rule’s actions once triggered. The second rule above verifies that the flash drive contains a Windows filesystem before mounting it with the -t vfat option to the mount command.
Similar rules clean up when the device is removed:

Now that our rules are in place, we must notify udevd of our changes. udevadm’s control command is one of the few that require root privileges.
ubuntu$ sudo udevadm control --reload-rules
Typos are silently ignored after a reload, even with the --debug flag, so be sure to double-check the rules’ syntax.
That’s it! Now when the flash drive is plugged into a USB port, udevd creates a symbolic link called /dev/ate-flash1 and mounts the drive as /mnt/ate-flash1.

BOVET, DANIEL P., AND MARCO CESATI. Understanding the Linux Kernel (3rd Edition). Sebastopol, CA: O’Reilly Media, 2006.
CORBET, JONATHAN, ET AL. Linux Device Drivers (3rd Edition). Sebastopol, CA: O’Reilly Media, 2005. This book is also available on-line at lwn.net/Kernel/LDD3.
LOVE, ROBERT. Linux Kernel Development (2nd Edition). Indianapolis, IN: Novell Press, 2005.
MCDOUGALL, RICHARD, AND JIM MAURO. Solaris Internals: Solaris 10 and Open-Solaris Kernel Architecture (2nd Edition). Upper Saddle River, NJ: Prentice Hall PTR, 2006.
E13.1 Describe what the kernel does. Explain the difference between loading a driver as a module and linking it statically into the kernel.
E13.2 A process on an HP-UX system crashed and reported a cryptic error: “Too many open files: file permissions deny server access.” What might be the cause of this error? What change needs to occur to fix the underlying issue?
 E13.3 Do AIX systems offer loadable kernel modules? How would a developer add support
for a new filesystem or for new system calls to an AIX kernel? When might this functionality
be needed?
E13.3 Do AIX systems offer loadable kernel modules? How would a developer add support
for a new filesystem or for new system calls to an AIX kernel? When might this functionality
be needed?
E13.4 At a local flea market, you get a great deal on a laptop card that gives you
Ethernet connectivity through a parallel port. What steps would you need to perform
to make Linux recognize this new card? Should you compile support directly into the
kernel or add it as a module? Why? (Bonus question: if your hourly consulting fee
is $80, estimate the value of the labor needed to get this cheapie Ethernet interface
working.)
 E13.5 In the lab, configure a Linux kernel with xconfig or menuconfig and build a kernel binary. Install and run the new system. Turn in dmesg output from the old and new kernels and highlight the differences. (Requires root
access.)
E13.5 In the lab, configure a Linux kernel with xconfig or menuconfig and build a kernel binary. Install and run the new system. Turn in dmesg output from the old and new kernels and highlight the differences. (Requires root
access.)