Chances are high that your environment includes both Microsoft Windows and UNIX systems. If so, these operating systems can assist each other in many ways. Among other feats, Windows applications can run from a UNIX desktop or access a UNIX server’s printers and files. UNIX applications can display their user interfaces on a Windows desktop.
Both platforms have their strengths, and they can be made to work together. Windows is a popular and featureful desktop platform, capable of bridging the gap between the user and the network cable. UNIX, on the other hand, is a reliable and scalable infrastructure platform. So let’s not fight, OK?
Users may often find themselves wanting to head for the snow-covered slopes of a good bash session without abandoning the Windows box on their desk. The best remote access tool for UNIX and Linux systems is the secure shell protocol, SSH.
See page 926 for more information about SSH.
Several SSH client implementations are available for Windows. Our current favorite, the open source PuTTY, is simple and effective. It supports many of the features you have come to expect from a native terminal application such as xterm.
SSH also supports file transfer, and PuTTY includes two command-line clients for this purpose: psftp and pscp. Hard-core “never touch a command line” Windows users might prefer the graphical WinSCP client from winscp.net.
Another good option is to install the more general UNIX-on-Windows Cygwin package and to run its SSH utilities from rxvt. There’s more information about Cygwin starting on page 1140.
A nifty zero-footprint Java implementation of SSH called MindTerm is available from AppGate (appgate.com). It’s free for personal use. It runs on any system that supports Java and can be configured in a variety of ways.
Of the commercial SSH client implementations, our favorite is VanDyke Soft-ware’s SecureCRT, available for purchase from vandyke.com. SecureCRT supports all our favorite terminal features, and VanDyke offers excellent customer service and an open-minded attitude toward feature requests from customers. Like PuTTY, SecureCRT features built-in SFTP file transfer software.
An interesting feature of SSH is its ability to forward TCP ports between client and server. For example, this feature allows you to set up on the client a local port that forwards incoming connections to a different port on a machine that is only reachable from the server. Although this feature opens a world of new possibilities, it is also potentially dangerous and is something you must be aware of when granting SSH access to your server. Fortunately, the port-forwarding feature can be disabled on the server side to limit SSH to terminal access and file transfer.
Graphical desktops on UNIX are tied to the free X Window System, which is in no way related to Microsoft Windows. X was developed at MIT in the mid-1980s and has been adopted as a standard by all UNIX workstation manufacturers and Linux distributions. It has been through several major updates, but a stable base was finally reached with version 11, first published in the early 1990s. The version number of the protocol was appended to X to form X11, the name by which it is most commonly known. (The name “Windows” by itself always refers to Microsoft Windows, both in this chapter and in the real world.)
X11 is a client/server system. The X server is responsible for displaying data on the user’s screen and for acquiring input from the user’s mouse and keyboard. It communicates with client applications over the network. The server and clients need not be running on the same machine.
A more detailed discussion of the X Windows architecture can be found in Chapter 25, The X Window System, which starts on page 1011.
X11 is a rich protocol that has incorporated many extensions over the years. The implementation of an X server is, therefore, rather complex. Nevertheless, X server implementations now exist for almost every operating system. X itself is OS agnostic, so X11 clients running on a UNIX box can display on an X server running under Microsoft Windows and still be controlled as if the user were sitting at the system console.
Unfortunately, the original designers of the X protocols did not devote much thought to security. Every program that connects to your X server can read everything you type on the keyboard and see everything displayed on your screen. To make matters worse, remote programs need not even display a window when accessing your X server; they can simply lurk silently in the background.
Several methods of securing X11 have been proposed over time, but they have all tended to be somewhat complex. The bottom line is that you are best off preventing all remote connections to your X server unless you are absolutely sure of what you are doing. Most X servers are configured to refuse remote connections by default, so you should be safe as long as you do not run the xhost program (or its equivalent) to grant remote access.
Unfortunately, granting remote access is exactly what you need to do when you seek to run programs on UNIX and display their interfaces on Windows. So, how to run a remote application without granting remote access to the X server? The most common method is to use a feature of the SSH protocol that is specifically designed to support X11. This scheme creates a secure tunnel between X clients running on the remote host and the local X server. Programs started on the remote host display automatically on the local machine, but through the magic of SSH, the local X server perceives them as having originated locally.
See page 926 for more information about SSH.
Note that X forwarding only works if the X forwarding features have been enabled on both the SSH server and the SSH client. If you use the PuTTY SSH client on Windows, simply activate the X11 forwarding feature in its setup screen. On the SSH server side (that is, the X11 client side; the UNIX machine), make sure that the /etc/ssh/sshd_config file contains the line
X11Forwarding yes
If you modify the SSH server configuration, make sure you restart the sshd process to activate the new configuration. The X11Forwarding option is enabled by default on most UNIX systems that ship OpenSSH.
As our technical reviewer Dan Foster notes, forwarding X connections over SSH “can be excruciatingly slow, even on a LAN, and it is even worse if there is any network latency.” VNC, discussed below, is an alternative.
Although Apple provides a free X server for Mac OS X, Microsoft unfortunately offers no corresponding feature. A free X server for Windows is available from the Cygwin project (cygwin.com), and it works very well once you’ve configured it. The Xming server for Windows is an excellent alternative that’s much easier to configure. Commercial X servers for Windows include Exceed and X-Win32. These offer much simpler configuration at a rather steep price.
In the late 1990s, a few people at AT&T Labs in Cambridge, UK, developed a system for remote desktop access called VNC. Their idea was to marry the simplicity of a dumb terminal with the modern world of window systems. In contrast to X11, the VNC protocol does not deal with individual applications. Instead, it creates a complete virtual desktop (or provides remote access to an existing desktop) as a unit.
AT&T published the VNC software under a liberal source license. This openness allowed other folks to hop on the bandwagon and create additional server and viewer implementations, as well as protocol improvements that reduced the consumption of network bandwidth. Today, VNC viewers are available for most devices that provide some means for graphical display. VNC servers for UNIX, Linux, and Windows are widely available. VNC implementations exist even for most smartphones.
The UNIX VNC server implementation is essentially a graphics adapter emulator that plugs into the X.Org X Windows server. Running a vncserver from your UNIX account creates a new virtual desktop that runs in the self-contained world of the UNIX machine. You can then use a VNC viewer to access that desktop remotely. We recommend taking advantage of the vncpasswd command before starting the server for the first time to establish a connection password.
The VNC protocol is stateless and bitmap based. Therefore, viewers can freely connect and disconnect. Moreover, several viewers can access the same server at the same time. This last feature is especially useful for remote support and for training setups. It also facilitates shared console access for system administration.
VNC servers in the Windows world do not normally create an extra desktop; they simply export the standard Windows desktop as it is displayed on screen. The main application for this technology is remote support.
These days, the original authors of the VNC protocol are running their own company, RealVNC (realvnc.com). The UltraVNC project (uvnc.com) is concentrating on the Windows domain with a very fast and feature-rich Windows-based VNC server implementation, and TightVNC (tightvnc.com) is working on improved compression ratios. These groups do talk with each other, so features tend to cross-pollinate among the various implementations.
The VNC protocol has been designed with extensibility in mind. All combinations of viewers and servers can work together; they pick the best protocol variant that both sides understand. Implementation-specific features (such as file transfer) can only be accessed by a server and client running from the same project.
Ever since Windows 2000 Server, every Windows box has the technical ability to provide graphical remote access to several users at the same time. The remote access component is called Remote Desktop, and it uses a protocol called the Remote Desktop Protocol (RDP) to communicate between client and server. RDP clients for UNIX let administrators manage Windows systems from a UNIX desktop. They are an indispensable tool for UNIX administrators who have Windows systems in their environments.
To take advantage of RDP, you must enable it on the server (Windows) side and set up a client to access it. On Windows 7, go to the System control panel, click Remote settings, and select an option in the Remote Desktop box. Older versions of Windows might require you to manually enable the Terminal Server service.
On the UNIX side, install the open source rdesktop program (www.rdesktop.org) to display Windows desktops on your UNIX workstation. Clients exist for most other operating systems, too, including mobile devices.
RDP can also map the server’s printers and disks onto the client.
As discussed in Chapter 24, the free but proprietary product VMware Server from vmware.com lets you run multiple operating systems simultaneously on PC hardware. VMware emulates entire virtual “guest machines” on top of a host operating system, which must be either Linux or Windows. Regardless of the host OS, you can install most Intel-compatible operating systems into one of VMware’s virtual machines. From the guest machine’s perspective, the operating system runs exactly as it would on dedicated hardware, and applications install normally. Other virtualization offerings such as KVM and VirtualBox can also run Windows and should be candidates for running Windows applications.
A different approach is taken by the Wine system from winehq.org. Wine implements the Windows programming API in the UNIX environment, allowing you to run Windows applications directly on top of X. This free software translates native Windows API calls to their UNIX counterparts and can do so without using any Microsoft code. Wine supports TCP/IP networking, serial devices, and sound output. It runs on Linux, BSD, Mac OS, and Solaris systems.
A large number of Windows applications run in Wine without problems, and others can be made to work with a few tricks; see the web site for details. Unfortunately, getting an application to run under Wine is often not so simple. The talented folks at codeweavers.com have written a commercial installer system that can make some of the balkier Windows apps work correctly.
If your tool of choice is supported by CodeWeavers, great. But even if it is not, give the application a try—you might be pleasantly surprised. If an application does not work on its own and you cannot find any prewritten hints, be prepared to spend some serious spare time whipping it into shape if you are determined to do it on your own. If you have the budget, you can consider contracting CodeWeavers to help you.
Win4Lin is a commercial alternative to Wine from NeTraverse. Win4Lin claims to be more stable than Wine and to support a few more Microsoft applications. However, it requires kernel modifications, which Wine does not. Win4Lin is available from win4lin.com.
If you’ve ever installed Linux on a computer that had a former life as a Windows machine, you have doubtless been offered the option to set up a dual boot configuration. Such configurations function pretty much as promised. It is even possible to mount Windows partitions under Linux and to access Linux filesystems under Windows. Read all about setting up a dual boot configuration on page 85.
But wait! If you are doing real work and need access to both Windows and UNIX, be very skeptical of dual booting as a possible solution in the context of a production system. Dual boot setups represent Murphy’s Law at its worst: they always seem to be booted into the wrong OS, and the slightest chore usually requires multiple reboots. With the advent of widespread virtualization and cheap computing hardware, there’s usually no reason to put yourself through this torture.
A few years ago, Sun released an open source version of StarOffice, its Microsoft Office-like application suite, under the name OpenOffice.org. OpenOffice.org includes a spreadsheet, a word processor, a presentation package, a drawing application, and a database application similar to Microsoft Access. These tools can read and write files generated by their Microsoft analogs. You can download the suite from openoffice.org.
OpenOffice.org is available on all major platforms, including Windows, Linux, Solaris, Mac OS X, and most other versions of UNIX. If you’re looking for a package with a commercial support contract, you can also buy Sun’s StarOffice, which is essentially OpenOffice.org in a box with support and better spell-checking.
Google competes on the application front with its Google Apps offering. In addition to its powerful Gmail and Google Calendar offerings, Google also includes basic word processing and spreadsheets. These free products include collaboration features that let multiple users edit documents simultaneously from several locations. Since all of Google’s apps run in a web browser, they can be used on virtually any operating system. You can export and import content in various formats, including those of Microsoft Office.
What many UNIX people miss most when working on Windows systems is their beloved command-line terminal. Not just any old terminal application or the abomination known as the DOS box, but a proper xterm with support for window resizing, colors, mouse control, and all the fancy xterm escape sequences. Although Windows has no stand-alone (i.e., without X) native port of xterm, a neat little program called rxvt comes awfully close. It is part of the Cygwin system, downloadable from cygwin.com. If you install Cygwin’s X server, you can use the real xterm.
Cygwin is distributed under the GNU General Public License and contains an extensive complement of common UNIX commands as well as a porting library that implements the POSIX APIs under Windows. Cygwin’s reconciliation of the UNIX and Windows command-line and filesystem conventions is well thought out and manages to bring many of the creature comforts of a UNIX shell to native Windows commands. In addition to making UNIX users feel at home, Cygwin makes it easy to get UNIX software running under Windows. See cygwin.com for more details.
The MKS Toolkit is a commercial alternative to Cygwin. See MKS’s web site at mkssoftware.com for more information.
A growing list of UNIX software now also runs natively on Windows, including Apache, Perl, BIND, PHP, MySQL, Vim, Emacs, Gimp, Wireshark, and Python. Before attempting to force an application to work on Windows with something like Cygwin, find out if a native implementation is available.
In an ideal world, everybody would use open standards to communicate and happiness would abound. But this is not an ideal world, and many have accused Windows of being a mess of proprietary protocols and broken implementations of Internet standards. Partially true, perhaps, but Windows can play along nicely in some parts of the standards world. Two of these areas are email and web service.
In the wild history of the web, a number of corporations have tried to embrace and extend the web in ways that would allow them to lock out competition and give their own business a mighty boost. Microsoft is still engaged in this battle at the browser level with its numerous extensions peculiar to Internet Explorer. At the underlying level of the HTTP protocol, however, Windows and Windows browsers are relatively platform agnostic.
Microsoft provides its own web server, IIS, but the adoption of IIS has historically lagged that of Apache running on Linux by a significant margin. Unless you are locked in to a server-side technology such as ASP, or your vendor’s product requires IIS, there’s no compelling reason to use Windows machines as web servers.
For email, Microsoft touts its Exchange Server product as the preferred server-side technology. Truth be told, Exchange Server’s capabilities do outshine those of Internet-standard mail systems, particularly when the mail clients consist of Windows boxes running Microsoft Outlook. But fear not: Exchange Server can also speak SMTP for inbound and outbound mail, and it can serve up mail to UNIX clients through the standard IMAP and POP protocols.
On the client side, both Outlook and its free younger sibling Windows Mail can connect to UNIX IMAP and POP servers (as can most other third-party email user agents for Windows). Mix and match in any combination you like. More information about POP and IMAP can be found starting on page 756.
In the early 1980s, IBM designed an API that let computers on the same network subnet talk to one another using names instead of cryptic numeric addresses. The result was called the Network Basic/Input Output System, or NetBIOS. The combination of NetBIOS and its original underlying network transport protocol was called the NetBIOS Extended User Interface, or NetBEUI. The NetBIOS API became quite popular, and it was adapted for use on top of a variety of different network protocols such as IPX, DECNet, and TCP/IP.
Microsoft and Intel developed a file-sharing protocol on top of NetBIOS and called it “the core protocol.” Later, it was renamed the Server Message Block protocol, or SMB for short. A later evolution of the SMB protocol known as the Common Internet File System (CIFS) is essentially a version of SMB that has been cleaned up and tuned for operation over wide area networks. CIFS is the current lingua franca of Windows file sharing.
In the Windows world, a filesystem or directory made available over the network is known as a “share.” It sounds a bit strange to UNIX ears, but we follow this convention when referring to CIFS filesystems.
Samba is an enormously popular software package, available under the GNU Public License, that implements the server side of CIFS on UNIX and Linux hosts. It was originally created by Andrew Tridgell, who first reverse-engineered the SMB protocol and published the resulting code in 1992. Here, we focus on Samba version 3.
Today, Samba is well supported and under active development to expand its functionality. It provides a stable, industrial-strength mechanism for integrating Windows machines into a UNIX network. The real beauty of Samba is that you only need to install one package on the server; no special software is needed on the Windows side.
CIFS provides five basic services:
• File sharing
• Network printing
• Authentication and authorization
• Name resolution
• Service announcement (file server and printer “browsing”)
Samba not only serves files through CIFS, but it can also perform the basic functions of a Windows Active Directory controller. As a domain controller, Samba supports advanced features such as Windows domain logins, roaming Windows user profiles, and CIFS print spooling.
Most of Samba’s functionality is implemented by two daemons, smbd and nmbd. smbd implements file and print services, as well as authentication and authorization. nmbd provides the other major CIFS components: name resolution and service announcement.
Unlike NFS, which requires kernel-level support, Samba requires no drivers or kernel modifications and runs entirely as a user process. It binds to the sockets used for CIFS requests and waits for a client to request access to a resource. Once a request has been authenticated, smbd forks an instance of itself that runs as the user who is making the requests. As a result, all normal file-access permissions (including group permissions) are obeyed. The only special functionality that smbd adds on top of this is a file-locking service that gives client PCs the locking semantics to which they are accustomed.
Samba is known to work with all of our example systems.1 Linux distributions package it as a matter of course. Patches, documentation, and other goodies are available from samba.org. Make sure you are using the most current Samba packages available for your system since many updates fix security vulnerabilities.
On all systems, you’ll need to edit the smb.conf file (which is to be found in either /etc/samba/smb.conf or /etc/smb.conf) to tell Samba how it should behave. In this file, you specify the directories and printers that should be shared, their access rights, and Samba’s general operational parameters. The Samba package comes with a well-commented sample smb.conf file that is a good starting place for new configurations. Note that once Samba is running, it checks its configuration file every few seconds and loads any changes you make.
It’s important to be aware of the security implications of sharing files and other resources over a network. For a typical site, you need to do two things to ensure a basic level of security:
• Explicitly specify which clients can access the resources shared by Samba. This part of the configuration is controlled by the hosts allow clause in the smb.conf file. Make sure that it contains only the IP addresses (or address ranges) that it should.
• Block access to the server from outside your organization. Samba uses encryption only for password authentication. It does not use encryption for its data transport. In almost all cases, you should block access from
outside your organization to prevent your users from accidentally downloading files in the clear across the Internet. Blocking is typically implemented at the network firewall level; Samba uses UDP ports 137 through 139 and TCP ports 137, 139, and 445.
Since the release of Samba version 3, excellent documentation has been available on-line from samba.org.
Samba comes with sensible defaults for its configuration options, and most sites will need only a small configuration file. Use the command testparm -v to get a listing of all the Samba configuration options and the values to which they are currently set. This listing includes your settings from the smb.conf file as well as any default values you have not overridden.
Avoid setting options in the smb.conf file unless they are different from the default values and you have a clear idea of why you want to lock them down. The advantage of this approach is that your configuration automatically adapts to the settings recommended by the Samba authors when you upgrade to a newer version of Samba.
That having been said, do make sure that password encryption is turned on:
encrypt passwords = true
This option encrypts the password exchange between Windows clients and the Samba server. It’s currently the default, and there’s no conceivable situation in which you would want to turn it off.
The encryption feature requires the Samba server to store a special Windows password hash for every user. Windows passwords work in a fundamentally different way from UNIX passwords, and therefore it is not possible to use the passwords from /etc/shadow.2
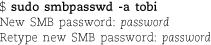
Samba provides a special tool, smbpasswd, for setting up these passwords. For example, let’s add the user tobi and set a password for him:
Users can change their own Samba passwords with smbpasswd as well:
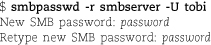
This example changes the Samba password of user tobi on the server smbserver.
Starting with version 3.0, Samba encodes all filenames in UTF-8. If your server runs with a UTF-8 locale, this a great match.3 If you are in Europe and you are still using one of the ISO 8859 locales on the server, you will find that filenames with special characters such as ä, ö, ü, é, or è look rather odd when you type ls in a directory in which such files have been created with Samba and UTF-8. The solution is to tell Samba to use the same character encoding as your server:

Make sure that the filename encoding is correct right from the start. Otherwise, files with oddly encoded names will accumulate. Fixing them can be quite a complex task later on.
In the Windows authentication systems, the client does not trust the server; the user’s password never travels across the net as plaintext. Instead, Windows uses a Kerberos-based challenge/response method for authentication. A Windows client can authenticate to a Samba server by using Kerberos as well.
Windows saves your login username and password and tries to use these credentials to authenticate you to network services whenever it is presented with an authentication request. So, if a user has the same username and password combination on your Windows box as on your Samba server, Samba grants seemingly passwordless access to the appropriate Samba shares. All the authentication happens transparently in the background.
The downside of the challenge/response approach is that the server has to store plaintext-equivalent passwords. In actual fact, the server’s copies of the passwords are locally encrypted, but this is primarily a precaution against casual browsing. An intruder who gains access to the encrypted passwords can use them to access the associated accounts without the need for further password cracking. Samba passwords must be protected even more vigorously than the /etc/shadow file.
In complex environments with multiple Samba servers, it makes sense to operate a centralized directory service that makes sure the same password is active on all servers. Samba supports LDAP and Windows authentication services. LDAP is discussed in Chapter 19, Sharing System Files.
To merge the authentication systems of Windows and UNIX, you have two basic options. First, you can configure a Samba server to act as a Windows Active Directory controller. (See Active Directory authentication starting on page 1154 for more information about how to implement this option.) Alternatively, you can install the pGina software (sourceforge.net/projects/pgina) on your Windows clients. This clever application replaces the standard Windows login system with a framework that supports all sorts of standard authentication services, including LDAP and NIS.
If each user has a home directory, the homes can be “bulk shared”:
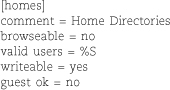
This configuration allows the user oetiker (for example) to access his home directory through the path \\sambaserver\oetiker from any Windows system.
At some sites, the default permissions on home directories allow people to browse one another’s files. Because Samba relies on UNIX file permissions to implement access restrictions, Windows users coming in through CIFS can read one another’s home directories as well. However, experience shows that this behavior tends to confuse Windows users and make them feel exposed. The valid users line in the configuration fragment above tells Samba to prevent connections to other people’s home directories. Leave it out if this is not what you want.
Samba uses its magic [homes] section as a last resort. If there is an explicitly defined share in the configuration for a particular user’s home directory, the parameters set there override the values set through [homes].
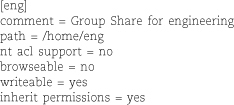
Samba can map Windows access control lists (ACLs) to either file permissions or ACLs (if the underlying filesystem supports them). In practice, we find that the concept of ACLs tends to be too complex for most users. Therefore, we normally just set up a special share for each group of users that requires one and configure Samba to take care of setting the appropriate permissions. Whenever a user tries to mount this share, Samba checks to make sure the applicant is in the appropriate UNIX group and then switches its effective UID to the designated owner of the group share (a pseudo-user created for this purpose). For example:
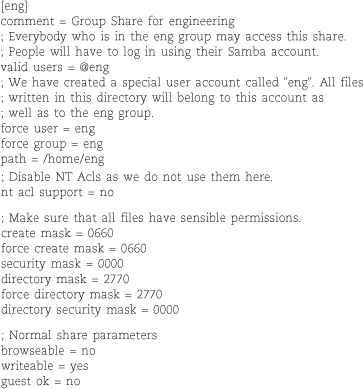
A similar effect can be achieved through Samba’s inherit permissions option. If that option is enabled on a share, all new files and directories inherit their settings from their parent directory:
Because Samba will now propagate settings from the parent directory, it’s important to set the permissions on the root of the share appropriately:

Note that this configuration still requires you to create an eng pseudo-user to act as the owner of the shared directory.
Microsoft’s Distributed File System (MS DFS) lets directories within a share trigger clients to transparently automount other shares as soon as they are accessed. For habitués of UNIX and Linux this does not sound like a big deal, but for Windows the whole concept is quite revolutionary and unexpected.
Here is an example:
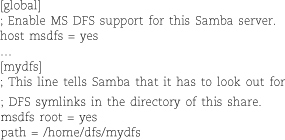
You create symbolic links in /home/dfs/mydfs to set up the actual automounts. For example, the following command makes the jump “directory” a link to one of two directories on other servers. (Note the single quotes. They are required for protection of the backslashes.)
$ sudo ln -s ’msdfs:serverX\shareX,serverY\shareY’ jump
If more than one source is provided (as here), Windows will fail over between them. Users who access \\server\mydfs\jump will now actually be reading files from shareX on serverX or shareY on serverY, depending on availability. If the filesystems are exported read/write, you must make sure you have some mechanism in place to synchronize the files. rsync can be helpful for this.
With Samba, you can also redirect all clients that access a particular share to a different server. This is something a Windows server cannot do.
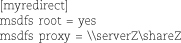
Note that DFS only works for users who have the same username and password on all the servers involved.
In addition to its many server-side features, the Samba package includes a simple command-line file transfer program called smbclient. You can use this program to access any Windows or Samba server. For example:

Once you have successfully logged in to the file server, you use standard ftp-style commands (such as get, put, cd, lcd, and dir) to navigate and transfer files. Type ? to see a full list of the available commands.
 Linux includes direct client-side support for the SMB/CIFS filesystem. You can mount
a CIFS share into your filesystem tree much as you can with any other filesystem that
is directly understood by the kernel. For example:
Linux includes direct client-side support for the SMB/CIFS filesystem. You can mount
a CIFS share into your filesystem tree much as you can with any other filesystem that
is directly understood by the kernel. For example:
$ sudo mount -t cifs -o username=joe //redmond/joes /home/joe/mnt
Although this feature is useful, keep in mind that Windows conceptualizes network mounts as being established by a particular user (hence the username=joe option above), whereas UNIX regards them as more typically belonging to the system as a whole. Windows servers generally cannot deal with the concept that several different people might be accessing a mounted Windows share.
From the perspective of the UNIX client, all files in the mounted directory appear to belong to the user who mounted it. If you mount the share as root, then all files belong to root, and garden-variety users might not be able to write files on the Windows server.
The mount options uid, gid, fmask, and dmask let you tweak these settings so that ownership and permission bits are more in tune with the intended access policy for that share. Check the mount.cifs manual page for more information about this behavior.
To allow users to mount a Windows share on their own, you can add a line in the following format to your /etc/fstab file:

Because of the user option specified here, users can now mount the filesystem just by running the command
$ mount /home/joe/mnt
mount prompts the user to supply a password before mounting the share.
Although NFS is the UNIX standard for network file service, in some situations it may make more sense to use Samba and CIFS to share files among UNIX and Linux computers. For example, in some versions of NFS, it is dangerous to allow users to perform mounts of corporate filesystems from their personal laptops.4 However, you can safely use CIFS to give these laptops access to their owner’s home directories.
See Chapter 18 for more information about NFS.
The simple approach to printer sharing is to add a [printers] section to the smb.conf file; this makes Samba share all local printers. Samba uses the system printing commands to do its work, but since UNIX printing is not very standardized, you may have to tell Samba which particular printing system is in use on your server. To do that, set the printing option to an appropriate value; check the smb.conf man page for the list of printing systems that are currently supported.
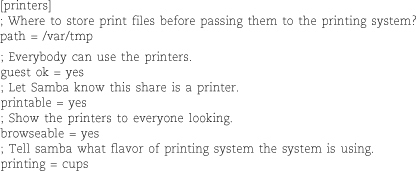
Windows clients can now use these printers as network printers, just as if they were hosted by a Windows server. There is one small problem, though. The Windows client will want know what kind of printer it is using, and it will ask the user to select an appropriate printer driver. This leads to quite a lot of support requests from users who do not know how to proceed in this situation. If the particular printer in question requires a driver that is not included with Windows, the situation becomes even more support-intensive.
See Chapter 26 for more information about printing.
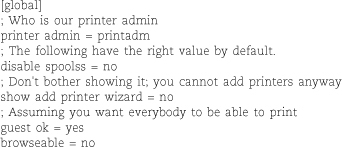
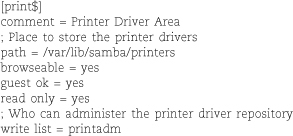
Fortunately, you can configure Samba to furnish the necessary Windows printer drivers to the Windows clients. But to make this work, you must do some preparation. First, to make sure that Samba behaves like a print server, add appropriate entries to the [global] section of the smb.conf file:
Now Samba knows that it is a print server, and it will accept the user printadm as its printer administrator.
If you are going to provide printer drivers for your Windows clients, there has to be a place to store the drivers. This is done through a special share called [print$].
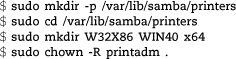
Before you can start to upload printer drivers to the new print server, you must take care of a few more details at the system level. Make sure the printadm account exists and has permission to access Samba.

Samba can store printer drivers only if the appropriate directory structure exists and is owned by printadm (as defined in the write list option):
At this point there are two options: you can either walk to a Windows box and upload the printer drivers from there, or you can use Samba tools to do it all from the command line. Unfortunately, there is no simple way of knowing what exactly has to be installed for a particular driver, so we recommend the first approach in most circumstances. Only if you are faced with repeatedly installing a driver on multiple servers is it worthwhile to examine the installation and learn to replicate it with command-line tools.
To install drivers from a Windows client, open a connection to the Samba server by typing \\sambaserver in the Start -> Run dialog box. Windows will ask you to log in to the Samba server. Log in as the user printadm. If all goes well, a window pops up with a list of shares provided by the server.
Within the Printers subfolder you should see all the printers you have shared from your server. Right-click in the blank space around the printer icons to activate the Server Properties dialog, then add your favorite printer drivers by making use of the Drivers tab.
The uploaded drivers end up in the directory specified for the [print$] share. At this point, you might want to take a quick peek at the properties of the driver you just uploaded. This list of files is what you will have to provide to the Samba command-line tool if ever you want to automate the uploading of the driver.
Once the proper drivers have been uploaded, you can now associate them with specific printers. Bring up the Properties panel of each printer in turn (by right-clicking and selecting Properties) and select the appropriate drivers in the Advanced tab. Then open the Printing Defaults dialog and modify the settings. Even if you are happy with the default settings, make at least one small change to force Windows to store the configuration data structures on the Samba server. Samba then provides that data to clients that access the printer. If you miss this last step, you may end up with clients crashing because no valid default configuration can be found when they try to use the printer.
As you may have guessed already, some of these steps are hard to replicate without Windows, especially the setting of printer defaults. But if you want to set up hundreds of printers on a Samba server, you may want to try to do it from the command line all the same. Command-line configuration works particularly well for PostScript printers because the Windows PostScript printer driver works correctly without default configuration information.
If you made a note of the files required by a particular driver, you can install the driver from the command line. First, copy the required files to the [print$] share:

Next, assign the driver to a particular printer. Let’s assume you have a simple PostScript printer with a custom PPD file:

The backslashes at the ends of lines allow the command to be split onto multiple lines for clarity; you can omit these and enter the command on one line if you prefer. The backslashes before double quotes distinguish the nested sets of quotes.
The long string in the example above contains the information listed in the property dialog of the printer driver that is seen when the printer driver is being installed from Windows:
• Long printer name
• Driver filename
• Data filename
• Configuration filename
• Help filename
• Language monitor name (set this to NULL if you have none)
• Default data type (set this to NULL if there is none)
• Comma-separated list of additional files
To configure a printer to use one of the uploaded drivers, run

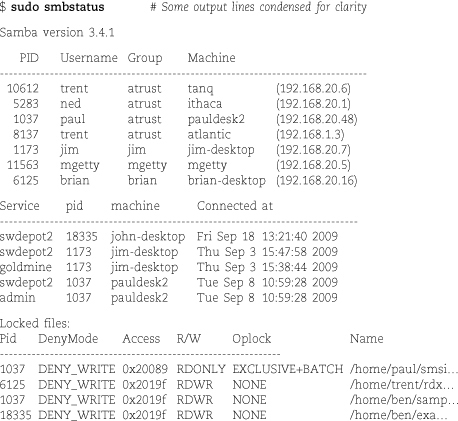
Samba usually runs without requiring much attention. However, if you do have a problem, you can consult two primary sources of debugging information: the log files for each client and the smbstatus command. Make sure you have appropriate log file settings in your configuration file.
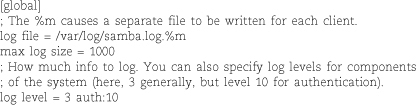
Higher log levels produce more information. Logging takes time, so don’t ask for too much detail unless you are debugging. Operation can be slowed considerably.
The following example shows the log entries generated by an unsuccessful connect attempt followed by a successful one.

The smbcontrol command is handy for altering the debug level on a running Samba server without altering the smb.conf file. For example,
$ sudo smbcontrol smbd debug "4 auth:10"
The example above would set the global debug level to 4 and set the debug level for authentication-related matters to 10. The smbd argument specifies that all smbd daemons on the system will have their debug levels set. To debug a specific established connection, you can use the smbstatus command to figure out which smbd daemon handles the connection and then pass its PID to smbcontrol to debug just this one connection. At log levels over 100 you will start to see (encrypted) passwords in the logs.
smbstatus shows currently active connections and locked files. This information is especially useful when you are tracking down locking problems (e.g., “Which user has file xyz open read/write exclusive?”). The first section of output lists the resources that a user has connected to. The last section lists any active file locks.
If you kill the smbd associated with a certain user, all its locks disappear. Some applications handle this gracefully and reacquire any locks they need. Others, such as MS Access, freeze and die a horrible death with much clicking required on the Windows side just to be able to close the unhappy application. As dramatic as this may sound, we have yet to see any file corruption resulting from such a procedure. In any event, be careful when Windows claims that files have been locked by another application. Often Windows is right and you should fix the problem on the client side by closing the offending application instead of brute-forcing the locks on the server.
The Windows desktops lurking on your network most likely use Microsoft’s Active Directory system for authentication, directory services, and other network services. Active Directory (AD) collects users, groups, computers, and operating system polices under a single umbrella, centralizing and simplifying system administration. It is also one of the primary reasons why Windows has gained a permanent foothold in many enterprises. UNIX has assembled some of the pieces of this puzzle, but none of the UNIX solutions are as polished or as widely implemented as Active Directory.
Ever devious, the Samba project folks have made great strides toward providing Active Directory support for UNIX and Linux environments. With the help of Samba, Linux systems can join an Active Directory domain and allow access to the system by accounts defined in AD that have no entries in the /etc/passwd file. Linux UIDs are derived from their analogous Windows user identifiers, known as security identifiers or SIDs. By leveraging PAM, a home directory can automatically be created for a user who doesn’t already have one. The integration system even allows the passwd command to change a user’s AD password. All of this Windows integration magic is handled by a component of Samba called winbind.
See page 908 for more information about PAM.
Active Directory embraces and extends several standard protocols, notably LDAP and Kerberos. In an attempt to achieve IT system management nirvana, Microsoft has unfortunately sacrificed compliance with the original protocols, creating an intoxicating web of proprietary RPC dependencies.
See page 739 for more information about the name service switch.
To emulate the behavior of an Active Directory client, winbind hooks into PAM, NSS, and Kerberos. It converts authentication and system information requests into the appropriate Microsoft-specific formats. From the standpoint of UNIX, Active Directory is just another source of LDAP directory information and Kerberos authentication data.
See Chapter 17 for more information about DNS.
You must complete the following configuration chores before your Linux system can enter Active Directory paradise:
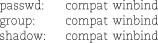
• Install Samba with support for Active Directory and identity conversion.
• Configure the name service switch, nsswitch.conf, to use winbind as a source of user, group, and password information.
• Configure PAM to service authentication requests through winbind.
• Configure Active Directory as a Kerberos realm.
UNIX and Linux AD clients should also use AD controllers to service their DNS requests and to set their clocks with NTP. Ensure as well that the system’s fully qualified domain name is listed in /etc/hosts. In some cases, it’s necessary to add the domain controller’s IP address to /etc/hosts, too. However, we discourage this if you’re using Active Directory for DNS service.
winbind is an excellent option for Linux systems, but UNIX has largely been left out in the cold. We have heard reports of UNIX sites successfully deploying the same general scheme described here, but each system has a few caveats, and the integration tends to be not as clean as on Linux. For UNIX systems, we suggest using one of the alternatives described on page 1160.
Samba is included by default on most Linux distributions, but some distributions do not include the identity mapping services needed for a full AD client implementation. Those components can be fiddly to set up correctly if you’re compiling from source code, so we recommend installing binary packages if they’re available for your distribution.
The Samba components, on the other hand, should be as fresh as possible. Active Directory integration is one of Samba’s newer features, so downloading the most recent source code from samba.org can eliminate frustrating bugs.
If you build Samba from source, configure it with the idmap_ad and idmap_rid shared modules. The appropriate argument to the ./configure script is
--with-shared-modules=idmap_ad,idmap_rid
Build and install Samba with the familiar make, sudo make install sequence. When installed correctly, the winbind library is deposited in /lib:

The winbind daemon is stopped and started through normal operating system procedures. It should be restarted after changes to nsswitch.conf, smb.conf, or the Kerberos configuration file, krb5.conf. There is no need to start it until these other services have been configured.
Kerberos is infamous for complex configuration, particularly on the server side. Fortunately, you only need to set up the client side of Kerberos, which is a much easier task. The configuration file is /etc/krb5.conf.
First, double-check that the system’s fully qualified domain name has been included in /etc/hosts and that NTP is using an Active Directory server as a time reference. Then, edit krb5.conf to add the realm as shown in the following example. Substitute your site’s AD domain for ULSAH.COM.
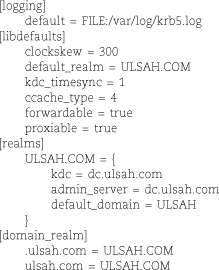
Several values are of interest in the above example. A 5-minute clock skew is allowed even though the time is set through NTP. This gives some slack in the event of an NTP problem. The default realm is set to the AD domain, and the key distribution center, or KDC, is configured as an AD domain controller. krb5.log might come in handy for debugging.
Request a ticket from the Active Directory controller by running the kinit command. Specify a valid domain user account. “administrator” is usually a good test, but any account will do. When prompted, type the domain password.

Use klist to show the Kerberos ticket:
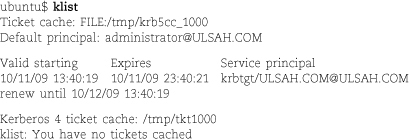
If a ticket is displayed, authentication was successful and you configured Kerberos correctly. In this case, the ticket is valid for 10 hours and can be renewed for 24 hours. (You can use the kdestroy command to invalidate the ticket.)
See the man page for krb5.conf for additional configuration options.
Like other Samba components, winbind is configured in the smb.conf file. Configure Samba as an AD domain member with the security = ads option.
A working configuration is reproduced below. We set our Kerberos realm and pointed Samba authentication at the domain controller. We also set up the user identity mapping with smb.conf ’s idmap options. Note that the configuration of individual shares in smb.conf is separate from the configuration of AD authentication services; only domain authentication is shown here.
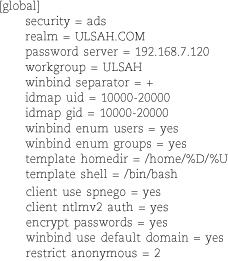
Most of the options here are straightforward, but see man smb.conf for details.
Of particular note is the winbind use default domain option. If you’re using multiple AD domains, this value should be no. If you’re using only one domain, however, setting this value to yes lets you omit the domain during authentication (you can use “ben” as opposed to “ULSAH\ben”, for example). Additionally, the winbind separator value specifies an alternative to the backslash when user-names are typed. The workgroup value should be the short name of the domain. A domain such as linux.ulsah.com would use LINUX as the workgroup value.
After configuring Samba, restart the Samba and winbind services to make these new settings take effect.
It’s finally time to join the system to the domain; use the Samba-provided net tool, which borrows its syntax from the Windows command of the same name. net accepts several protocols for communicating with Windows. We use the ads option to target Active Directory.
Ensure that a ticket exists by running klist (and request one with kinit if it does not), then use the following command to join the domain:

We specified an AD server, dc.ulsah.com, on the command line (not strictly necessary) and the administrator account. By default, AD adds the new system to the Computer organizational unit of the domain hierarchy. If the system appears in the Computers OU within Windows’ AD Users and Computers tool, the domain join operation was successful. You can also examine the system state with the net ads status command. See the net man page for additional options, including LDAP search operations.
Name service switch configuration is simple. The system’s passwd and group files should always be consulted first, but you can then punt to Active Directory by way of winbind. These entries in nsswitch.conf do the trick:
Once NSS has been configured, you can test AD user and group resolution with the wbinfo command. Use wbinfo -u to see a list of the domain’s users and wbinfo -g to see groups. The command getent passwd shows the user accounts defined in all sources, in /etc/passwd format:
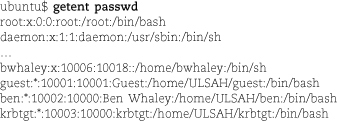
The only way to distinguish local users from domain accounts is by user ID and by the ULSAH path in the home directory, apparent in the last three entries above. If your site has multiple domains or if the winbind use default domain option is not set, the short domain name is prepended to domain accounts (for instance, ULSAH\ben).
At this point the system has been configured to communicate with Active Directory through Samba, but authentication has not been configured. Setting up PAM to do authentication through Active Directory is a bit tricky, mostly because the specifics differ widely among Linux distributions.
See page 908 for general information about PAM.
The general idea is to configure winbind as an authentication module for all the services that should have Active Directory support. Some distributions, such as Red Hat, conveniently set up all services in a single file. Others, such as Ubuntu, rely on several files. Table 30.1 lists the appropriate files for each of our example Linux distributions.
Table 30.1 PAM configuration files for winbind support

To enable winbind authentication, add
auth sufficient pam_winbind.so
at the beginning of each file. An exception is SUSE’s common-password file, in which you must replace the auth keyword with password:
password sufficient pam_winbind.so
PAM can create home directories automatically if they don’t exist when a new (to the system) user logs in. Since Active Directory users aren’t added by the standard useradd command, which is normally responsible for creating home directories, this feature is quite helpful. Add the following line to PAM’s session configuration file as indicated in Table 30.1:
session required pam_mkhomedir.so umask=0022 skel=/etc/skel
With this configuration, PAM creates home directories with octal permissions 755 and with account profiles copied from /etc/skel.
You may also want to restrict access to the local system to users who are in a particular Active Directory group. To do that, add the following line to PAM’s session configuration file:

Here, only users in the AD group unix_users can log in.
Although the “free as in beer” route to Active Directory clienthood outlined above works well enough, it is error prone and riddled with complexity. Alternatives exist for administrators who want a relatively painless installation and troubleshooting support from a knowledgeable third party.
Products from Likewise Software automate winbind, name service switch, PAM, and identity mapping configuration for more than 100 Linux distributions and UNIX variants, including all the example systems referenced in this book. Likewise also includes a group policy object agent, which permits some centralized configuration for AD-enabled UNIX systems. Several GUI plug-ins, including a management console and an Active Directory snap-in, simplify installation and configuration. A limited version is available for free, or you can pay for support and complete functionality. Find details at likewise.com.
Another option that skirts winbind entirely is a tool kit called Quest Authentication Services. It offers many of the same features as Likewise’s tools, but adds additional group policy management features. Be prepared to open your wallet, as Quest’s tools do not come cheap. See quest.com/authentication-services for the full scoop.
TERPSTRA, JOHN H. Samba-3 by Example: Practical Exercises to Successful Deployment (2nd Edition). Upper Saddle River, NJ: Prentice Hall PTR, 2006. (An on-line version of this book is available at samba.org.)
TERPSTRA, JOHN H., JELMER R. VERNOOIJ. The Official Samba-3 HOWTO and Reference Guide (2nd Edition). Upper Saddle River, NJ: Prentice Hall PTR, 2006. (An on-line version of this book is available at samba.org.)
E30.1 Why would you want to block Internet access to ports 137–139 and 445 on a Samba server?
E30.2 Install the Cygwin software on a Windows machine and use ssh in rxvt to connect to a UNIX machine. What differences from PuTTY do you find?
 E30.3 In the lab, compare the performance of a client that accesses files through
Samba with one that accesses files from a native CIFS server (i.e., a Windows machine).
If your two test servers have different hardware, devise a way to adjust for the hardware
variation so that the comparison is more indicative of the performance of the server
software. (May require root access.)
E30.3 In the lab, compare the performance of a client that accesses files through
Samba with one that accesses files from a native CIFS server (i.e., a Windows machine).
If your two test servers have different hardware, devise a way to adjust for the hardware
variation so that the comparison is more indicative of the performance of the server
software. (May require root access.)
 E30.4 In the lab, use a packet sniffer such as tcpdump or Wireshark to monitor a telnet session between Windows and a UNIX server. Obtain and install the PuTTY software
and repeat the monitoring. In each case, what can you see with the packet sniffer?
(Requires root access.)
E30.4 In the lab, use a packet sniffer such as tcpdump or Wireshark to monitor a telnet session between Windows and a UNIX server. Obtain and install the PuTTY software
and repeat the monitoring. In each case, what can you see with the packet sniffer?
(Requires root access.)
E30.5 Set up a Samba print server that provides Windows printer drivers for all the
printers it shares. Make sure the printers come with a sensible default configuration.
E30.6 Configure the system of your choice to authenticate to an Active Directory
environment. Make sure that password changes work and that home directories are automatically
created at login for new users.