Chapter 5. The Business Rules Engine
The Challenge
Your business is now doing really well. In fact, you’ve now scaled to an organization with thousands of employees. This mean you’ve hired many people for different business functions: marketing, sales, operations, admin, accounting, and so on. You realize that all the business functions have requirements for creating rules that trigger actions depending on some conditions; for example, “notify sales team if prospect’s job title is ‘CEO’.” You could be asking your tech team to implement each new requirement with bespoke software, but your developers are quite busy working on other products. In order to encourage collaboration between the business team and the tech team, you’ve decided that you will develop a Business Rules Engine that will enable developers and the business team to write code together. This will allow you to increase productivity and reduce the time it takes to implement new rules because your business team will be able to contribute directly.
The Goal
In this chapter you’ll first learn about how to approach a new design problem using test-driven development. You will get an overview about a technique called mocking, which will help specify unit tests. You will then learn about a couple of modern features in Java: local variable type inference and switch expressions. Finally, you’ll learn how to develop a friendly API using the Builder pattern and the Interface Segregation Principle.
Note
If at any point you want to look at the source code for this
chapter, you can look at the package com.iteratrlearning.shu_book.chapter_05
in the book’s code repository.
Business Rules Engine Requirements
Before you start, let’s think about what is it you want to achieve. You’d like to enable nonprogrammers to add or change business logic in their own workflow. For example, a marketing executive may wish to apply a special discount when a prospect is making an inquiry about one of your products and fits certain criteria. An accounting executive may wish to create an alert if expenses are unusually high. These are examples of what you can achieve with a Business Rules Engine. It’s essentially software that executes one or more business rules that are often declared using a simple bespoke language. A Business Rules Engine can support multiple different components:
- Facts
- Actions
- Conditions
-
These specify when an action should be triggered
- Rules
-
These specify the business logic you want to execute, essentially grouping facts, conditions, and actions together
The main productivity benefit of a Business Rules Engine is that it enables rules to be maintained, executed, and tested within one place without having to integrate with a main application.
Note
There are many production-ready Java Business Rules Engine such as Drools. Typically such an engine conforms to standards such as the Decision Model and Notation (DMN) and comes with a centralized rule repository, an editor using a Graphical User Interface (GUI), and visualization tools to help maintenance of complex rules. In this chapter, you will develop a minimal viable product for a Business Rules Engine and iterate over it to improve both its functionality and accessibility.
Test Driven Development
Where do you start? The requirements are not set in stone and are expected to evolve so you begin by simply listing the basic features you will need your users to undertake:
-
Add an action
-
Run the action
-
Basic reporting
This translates in the basic API shown in Example 5-1. Each method throws an UnsupportedOperationException indicating it is yet to be implemented.
Example 5-1. Basic API for Business Rules Engine
publicclassBusinessRuleEngine{publicvoidaddAction(finalActionaction){thrownewUnsupportedOperationException();}publicintcount(){thrownewUnsupportedOperationException();}publicvoidrun(){thrownewUnsupportedOperationException();}}
An action is simply a piece of code that will be executed. We could use the Runnable interface, but introducing a separate interface Action is more representative of the domain at hand. The Action interface will allow the Business Rules Engine to be decoupled from concrete actions. Since the Action interface only declares a single abstract method, we can annotate it as a functional interface, as shown in Example 5-2.
Example 5-2. The Action interface
@FunctionalInterfacepublicinterfaceAction{voidexecute();}
Where do we go from here? It’s now time to actually write some code—where is the implementation? You will use an approach called test-driven development (TDD). The TDD philosophy is to start writing some tests that are going to let you guide the implementation of the code. In other words, you write tests first before the actual implementation. It’s a bit like doing the opposite of what you’ve been doing so far: you wrote the full code for a requirement and then tested it. You will now focus more on the tests.
Why Use TDD?
Why should you take this approach? There are several benefits:
-
Writing a test at a time will help you focus and refine the requirements by correctly implementing one thing at a time.
-
It’s a way to ensure a relevant organization for your code. For example, by writing a test first, you need to think hard about the public interfaces for your code.
-
You are building a comprehensive test suite as you iterate through the requirements, which increases confidence that you are matching the requirements and also reduces the scope of bugs.
-
You don’t write code that you don’t need (over-engineer) because you’re just writing code that passes the tests.
The TDD Cycle
The TDD approach roughly consists of the following steps in a cycle, as depicted in Figure 5-1:
-
Write a test that fails
-
Run all tests
-
Make the implementation work
-
Run all tests
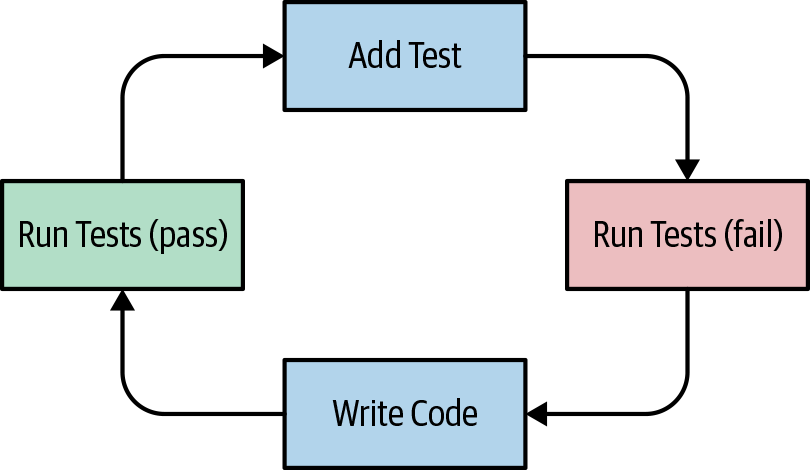
Figure 5-1. TDD cycle
In practice, as part of this process, you must continuously refactor your code or it will end up unmaintainable. At this moment you know you have a suite of tests that you can rely on when you introduce changes. Figure 5-2 illustrates this improved TDD process.
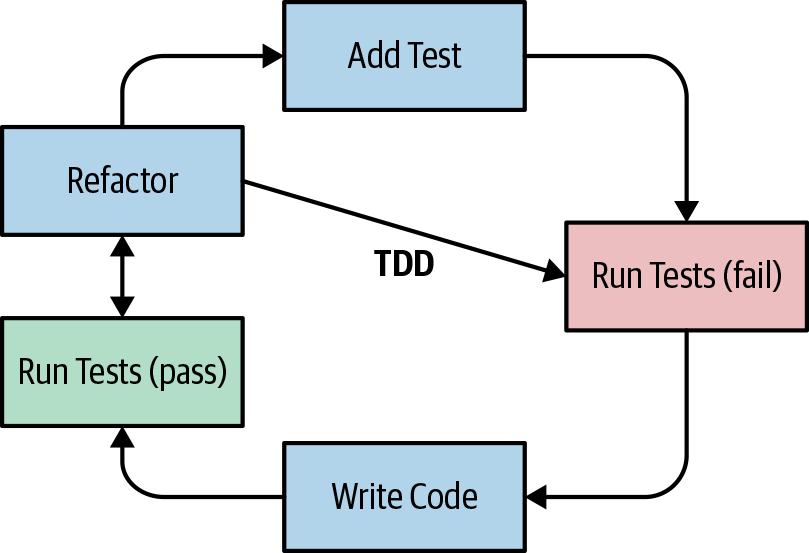
Figure 5-2. TDD with refactoring
In the spirit of TDD, let’s start by writing our first tests to verify that addActions and count behave correctly, as shown in Example 5-3.
Example 5-3. Basic tests for the Business Rules Engine
@TestvoidshouldHaveNoRulesInitially(){finalBusinessRuleEnginebusinessRuleEngine=newBusinessRuleEngine();assertEquals(0,businessRuleEngine.count());}@TestvoidshouldAddTwoActions(){finalBusinessRuleEnginebusinessRuleEngine=newBusinessRuleEngine();businessRuleEngine.addAction(()->{});businessRuleEngine.addAction(()->{});assertEquals(2,businessRuleEngine.count());}
When running the tests, you will see that they fail with an UnsupportedOperationException, as shown in Figure 5-3.

Figure 5-3. Failing tests
All tests are failing, but that’s fine. It gives us a reproducible test suite that will guide the implementation of the code. Now can add some implementation code, as shown in Example 5-4.
Example 5-4. Basic implementation for the Business Rules Engine
publicclassBusinessRuleEngine{privatefinalList<Action>actions;publicBusinessRuleEngine(){this.actions=newArrayList<>();}publicvoidaddAction(finalActionaction){this.actions.add(action);}publicintcount(){returnthis.actions.size();}publicvoidrun(){thrownewUnsupportedOperationException();}}
You can now rerun the tests and they are passing! However, there’s one crucial operation missing. How do we write a test for the method run? Unfortunately, run() does not return any result. We are going to need a new technique called mocking to verify that the method run() operates correctly.
Mocking
Mocking is a technique that will allow you to verify that when the method run() is executed, each action that was added to the Business Rules Engine is actually executed. At the moment it is difficult to do because both the methods run() in BusinessRuleEngine and perform() in Action are returning void. We have no way to write an assertion! Mocking is covered in detail in Chapter 6, but you will get a brief overview now so you are able to progress with writing a test. You’ll be using Mockito, which is a popular mocking library for Java. At its simplest you can do two things:
-
Create a mock.
-
Verify that a method is called.
So how do you get started? You will need to import the library first:
import static org.mockito.Mockito.*;
This import allows you to use the methods mock() and verify(). The static method mock() allows you to create a mock object which you can then verify that certain behaviors happen. The method verify() allows you to set up assertions that a particular method is invoked. Example 5-5 shows an example.
Example 5-5. Mocking and verifying interaction with an Action object
@TestvoidshouldExecuteOneAction(){finalBusinessRuleEnginebusinessRuleEngine=newBusinessRuleEngine();finalActionmockAction=mock(Action.class);businessRuleEngine.addAction(mockAction);businessRuleEngine.run();verify(mockAction).perform();}
The unit test creates a mock object for Action. This is done by passing the class as argument to the mock method. Next, you have the when part of your test where you invoke behaviors. Here we are adding the action and executing the method run(). Finally, you have the then part of the unit tests, which sets up assertions. In this case, we verify that the method perform() on the Action object was invoked.
If you run this test it will fail as expected with a UnsupportedOperationException. What if the body of run() is empty? You will receive a new exception trace:
Wanted but not invoked:
action.perform();
-> at BusinessRuleEngineTest.shouldExecuteOneAction(BusinessRuleEngineTest.java:35)
Actually, there were zero interactions with this mock.
This error is coming from Mockito and tells you that the method perform() was never invoked. It’s now time to write the correct implementation for the method run(), as shown in Example 5-6.
Example 5-6. The run() method implementation
publicvoidrun(){this.actions.forEach(Action::perform);}
Re-run the tests and you will now see the test passing. Mockito was able to verify that when the Business Rules Engine is running, the method perform() on the Action object should be invoked. Mockito allows you to specify sophisticated verification logic such as how many times a method should be invoked, with certain arguments, etc. You will learn more about this in Chapter 6.
Adding Conditions
You have to admit that so far the Business Rules Engine is pretty limiting. You can only declare simple actions. However, in practice, the users of the Business Rules Engine will need to execute actions based on certain conditions. These conditions will be dependent on some facts. For example, notify the sales team only if the prospect’s job title is CEO.
Modeling State
You may start by writing code that adds an action and refers to a local variable using an anonymous class as shown in Example 5-7, or using a lambda expression as shown in Example 5-8.
Example 5-7. Adding an action using an anonymous class
// this object could be created from a formfinalCustomercustomer=newCustomer("Mark","CEO");businessRuleEngine.addAction(newAction(){@Overridepublicvoidperform(){if("CEO".equals(customer.getJobTitle())){Mailer.sendEmail("sales@company.com","Relevant customer: "+customer);}}});
Example 5-8. Adding an action using a lambda expression
// this object could be created from a formfinalCustomercustomer=newCustomer("Mark","CEO");businessRuleEngine.addAction(()->{if("CEO".equals(customer.getJobTitle())){Mailer.sendEmail("sales@company.com","Relevant customer: "+customer);}});
However, this approach is inconvenient for several reasons:
-
How do you test the action? It’s not an independent piece of functionality; it has a hardcoded dependency on the customer object.
-
The customer object is not grouped with the action. It is a sort of external state that is shared around, leading to a confusing mix of responsibilities.
So what do we need? We need to encapsulate the state that is available to actions within the Business Rules Engine. Let’s model these requirements by introducing a new class called Facts, which will represent the state available as part of the Business Rules Engine, and an updated Action interface that can operate on facts. An updated unit test is shown in Example 5-9. The unit test checks that when the Business Rules Engine runs, the specified action is actually invoked with the Facts object passed as an argument.
Example 5-9. Testing an action with facts
@TestpublicvoidshouldPerformAnActionWithFacts(){finalActionmockAction=mock(Action.class);finalFactsmockFacts=mock(Facts.class);finalBusinessRuleEnginebusinessRuleEngine=newBusinessRuleEngine(mockedFacts);businessRuleEngine.addAction(mockAction);businessRuleEngine.run();verify(mockAction).perform(mockFacts);}
To follow the TDD philosophy, this test will initially fail. You always need to run the tests to begin with to ensure that they fail, otherwise you may write a test that accidentally passes. To make the test pass you will need to update the API and implementation code. First, you’ll introduce the Facts class, which allows you to store a fact represented as a key and a value. The benefit of introducing a separate Facts class for modeling state is that you can control the operations available to your users by providing a public API, and also unit test the behavior of the class. For the time being, the Facts class will only support String keys and String values. The code for the Facts class is shown in Example 5-10. We chose the names getFact and addFact because they better represent the domain at hand (working with facts) rather than getValue and setValue.
Example 5-10. The Facts class
publicclassFacts{privatefinalMap<String,String>facts=newHashMap<>();publicStringgetFact(finalStringname){returnthis.facts.get(name);}publicvoidaddFact(finalStringname,finalStringvalue){this.facts.put(name,value);}}
You’ll now need to refactor the Action interface so that the perform() method can use a Facts object passed as an argument. This way it’s clear the facts are available within the context of the single Action (Example 5-11).
Example 5-11. The Action interface that takes facts
@FunctionalInterfacepublicinterfaceAction{voidperform(Factsfacts);}
Finally, you can now update the BusinessRuleEngine class to utilize the facts and the updated Action’s perform() method as shown in Example 5-12.
Example 5-12. BusinessRuleEngine with facts
publicclassBusinessRuleEngine{privatefinalList<Action>actions;privatefinalFactsfacts;publicBusinessRuleEngine(finalFactsfacts){this.facts=facts;this.actions=newArrayList<>();}publicvoidaddAction(finalActionaction){this.actions.add(action);}publicintcount(){returnthis.actions.size();}publicvoidrun(){this.actions.forEach(action->action.perform(facts));}}
Now that the Facts object is available to actions, you can specify arbitrary logic in your code that looks up the Facts object as shown in Example 5-13.
Example 5-13. An action utilizing the facts
businessRuleEngine.addAction(facts->{finalStringjobTitle=facts.getFact("jobTitle");if("CEO".equals(jobTitle)){finalStringname=facts.getFact("name");Mailer.sendEmail("sales@company.com","Relevant customer: "+name);}});
Let’s look at some more examples. This is also a good opportunity to introduce two recent features in Java, which we explore in order:
-
Local variable type inference
-
Switch expressions
Local Variable Type Inference
Java 10 introduced variable local type inference. Type inference is the idea that the compiler can figure out the static types for you so you don’t have to type them. You saw an example of type inference earlier in Example 5-10 when you wrote
Map<String, String> facts = new HashMap<>();
instead of
Map<String, String> facts = new HashMap<String, String>();
This is a feature that was introduced in Java 7 called the diamond operator. Essentially, you can omit the type parameters of generics (in this case String, String) in an expression when its context determines them. In the preceding code, the lefthand side of the assignment indicates the keys and values of the Map should be Strings.
Since Java 10, type inference has been extended to work on local variables. For example, the code in Example 5-14 can be rewritten using the var keyword and local variable type inference shown in Example 5-15.
Example 5-14. Local variable declaration with explicit types
Factsenv=newFacts();BusinessRuleEnginebusinessRuleEngine=newBusinessRuleEngine(env);
Example 5-15. Local variable type inference
varenv=newFacts();varbusinessRuleEngine=newBusinessRuleEngine(env);
By using the var keyword in the code shown in Example 5-15, the variable env still has a static type Facts and the variable businessRuleEngine still has the static type BusinessRuleEngine.
Note
A variable declared using the var keyword is not made final. For example, this code:
final Facts env = new Facts();
is not strictly equivalent to:
var env = new Facts();
You can still assign another value to the variable env after declaring it using var. You’d have to explicitly add the final keyword as follows in front of the variable env for it to be final:
final var env = new Facts()
In the rest of the chapters, we simply use the var keyword without final for brevity as it is in the spirit of code conciseness. When we explicitly declare the type of a variable, we use the final keyword.
Type inference helps reduce the amount of time taken to write Java code. However, should you use this feature all the time? It’s worth remembering that developers spend more time reading code than writing it. In other words, you should think about optimizing for ease of reading over ease of writing. The extent to which var improves this will always be subjective. You should always be focusing on what helps your teammates read your code, so if they are happy reading code with var then you should use it, otherwise not.
For example, here we can refactor the code in Example 5-13 to use local variable type inference to tidy up the code as shown in Example 5-16.
Example 5-16. An action utilizing the facts and local variable type inference
businessRuleEngine.addAction(facts->{varjobTitle=facts.getFact("jobTitle");if("CEO".equals(jobTitle)){varname=facts.getFact("name");Mailer.sendEmail("sales@company.com","Relevant customer: "+name);}});
Switch Expressions
So far you’ve only set up actions with exactly one condition to handle. This is pretty limiting. For example,
say you work with your sales team. They may record on their Customer Relationship Management (CRM) system different deals with different amounts that have different stages.
A deal stage may be represented as an enum Stage with values including LEAD, INTERESTED, EVALUATING, CLOSED, as shown in Example 5-17.
Example 5-17. Enum representing different deal stages
publicenumStage{LEAD,INTERESTED,EVALUATING,CLOSED}
Depending on the stage of the deal you can assign a rule that gives you the probability of winning the deal. Consequently, you can help the sales team with generating a forecast.
Say for a particular team, LEAD has 20% probability to convert, then a deal at stage LEAD with amount of 1000USD will have a forecasted amount of 200USD. Let’s create an action to model these rules and return a forecasted amount for a particular deal as shown in Example 5-18.
Example 5-18. A rule to calculate a forecast amount for a specific deal
businessRuleEngine.addAction(facts->{varforecastedAmount=0.0;vardealStage=Stage.valueOf(facts.getFact("stage"));varamount=Double.parseDouble(facts.getFact("amount"));if(dealStage==Stage.LEAD){forecastedAmount=amount*0.2;}elseif(dealStage==Stage.EVALUATING){forecastedAmount=amount*0.5;}elseif(dealStage==Stage.INTERESTED){forecastedAmount=amount*0.8;}elseif(dealStage==Stage.CLOSED){forecastedAmount=amount;}facts.addFact("forecastedAmount",String.valueOf(forecastedAmount));});
The code shown in Example 5-18 is essentially providing a value for each enum value available. A preferred language construct is the switch statement as it’s more succinct. This is shown in Example 5-19.
Example 5-19. A rule to calculate a forecast amount for a specific deal using a switch statement
switch(dealStage){caseLEAD:forecastedAmount=amount*0.2;break;caseEVALUATING:forecastedAmount=amount*0.5;break;caseINTERESTED:forecastedAmount=amount*0.8;break;caseCLOSED:forecastedAmount=amount;break;}
Note all the break statements in the code in Example 5-19. The break statement ensures that the next block in the switch statement is not executed. If you forget the break by accident, then the code still compiles and you get what’s called a fall-through behavior. In other words, the next block is executed and this can lead to subtle bugs.
Since Java 12 (using the language feature preview mode) you can rewrite this to avoid the fall-through behavior and multiple breaks by using a different syntax for switch. switch can now be used as an expression, as illustrated in Example 5-20.
Example 5-20. Switch expression with no fall-through behavior
varforecastedAmount=amount*switch(dealStage){caseLEAD->0.2;caseEVALUATING->0.5;caseINTERESTED->0.8;caseCLOSED->1;}
Another benefit of this enhanced switch form, besides increased readability, is exhaustiveness. This means that when you use switch with an enum, the Java compiler checks that for all enum values there’s a corresponding switch label. For example, if you forget to handle the CLOSED case, the Java compiler would produce the following error:
error: the switch expression does not cover all possible input values.
You can rewrite the overall action using a switch expression as shown in Example 5-21.
Example 5-21. A rule to calculate a forecast amount for a specific deal
businessRuleEngine.addAction(facts->{vardealStage=Stage.valueOf(facts.getFact("stage"));varamount=Double.parseDouble(facts.getFact("amount"));varforecastedAmount=amount*switch(dealStage){caseLEAD->0.2;caseEVALUATING->0.5;caseINTERESTED->0.8;caseCLOSED->1;}facts.addFact("forecastedAmount",String.valueOf(forecastedAmount));});
Interface Segregation Principle
We would now like to develop an inspector tool that allows users of the Business Rules Engine to inspect the status of possible actions and conditions. For example, we would like to evaluate each action and associated condition in order to log them without actually performing the action. How do we go about this? The current Action interface is not sufficient because it doesn’t separate the code performed versus the condition that triggers that code. At the moment there’s no way to separate out the condition from the action code. To make up for this, we could introduce an enhanced Action interface that has a built-in functionality for evaluating the condition. For example, we could create an interface ConditionalAction that includes a new method evaluate() as shown in Example 5-22.
Example 5-22. ConditionalAction interface
publicinterfaceConditionalAction{booleanevaluate(Factsfacts);voidperform(Factsfacts);}
We can now implement a basic Inspector class that takes a list of ConditionalAction objects and evaluates them based on some facts, as shown in Example 5-23. The Inspector returns a list of reports that captures the facts, the conditional action, and the result. The implementation for the Report class is shown in Example 5-24.
Example 5-23. An Inspector of conditions
publicclassInspector{privatefinalList<ConditionalAction>conditionalActionList;publicInspector(finalConditionalAction...conditionalActions){this.conditionalActionList=Arrays.asList(conditionalActions);}publicList<Report>inspect(finalFactsfacts){finalList<Report>reportList=newArrayList<>();for(ConditionalActionconditionalAction:conditionalActionList){finalbooleanconditionResult=conditionalAction.evaluate(facts);reportList.add(newReport(facts,conditionalAction,conditionResult));}returnreportList;}}
Example 5-24. The Report class
publicclassReport{privatefinalConditionalActionconditionalAction;privatefinalFactsfacts;privatefinalbooleanisPositive;publicReport(finalFactsfacts,finalConditionalActionconditionalAction,finalbooleanisPositive){this.facts=facts;this.conditionalAction=conditionalAction;this.isPositive=isPositive;}publicConditionalActiongetConditionalAction(){returnconditionalAction;}publicFactsgetFacts(){returnfacts;}publicbooleanisPositive(){returnisPositive;}@OverridepublicStringtoString(){return"Report{"+"conditionalAction="+conditionalAction+", facts="+facts+", result="+isPositive+'}';}}
How would we go about testing the Inspector? You may start by writing a simple unit test as shown in Example 5-25. This test highlights a fundamental issue with our current design. In fact, the ConditionalAction interface breaks the Interface Segregation Principle (ISP).
Example 5-25. Highlighting ISP violation
publicclassInspectorTest{@TestpublicvoidinspectOneConditionEvaluatesTrue(){finalFactsfacts=newFacts();facts.setFact("jobTitle","CEO");finalConditionalActionconditionalAction=newJobTitleCondition();finalInspectorinspector=newInspector(conditionalAction);finalList<Report>reportList=inspector.inspect(facts);assertEquals(1,reportList.size());assertEquals(true,reportList.get(0).isPositive());}privatestaticclassJobTitleConditionimplementsConditionalAction{@Overridepublicvoidperform(Factsfacts){thrownewUnsupportedOperationException();}@Overridepublicbooleanevaluate(Factsfacts){return"CEO".equals(facts.getFact("jobTitle"));}}}
What is the Interface Segregation Principle? You may notice that the implementation of the perform method is empty. In fact, it throws an UnsupportedOperationException. This is a situation where you are coupled to an interface (ConditionalAction) that provides more than what you need. In this case, we just want a way to model a condition—something that evaluates to either true or false. Nonetheless, we are forced to depend on the perform() method because it is part of the interface.
This general idea is the foundation of the Interface Segregation Principle. It makes the case that no class should be forced to depend on methods it does not use because this introduces unnecessary coupling. In Chapter 2, you learned about another principle, the Single Responsibility Principle (SRP), which promotes high cohesion. The SRP is a general design guideline that a class has responsibility over a single functionality and there should be only one reason for it to change. Although the ISP may sound like the same idea, it takes a different view. The ISP focuses on the user of an interface rather than its design. In other words, if an interface ends up very large, it may be that the user of that interface sees some behaviors it doesn’t care for, which causes unnecessary coupling.
To provide a solution that meets the Interface Segregation Principle, we are encouraged to separate out concepts in smaller interface that can evolve separately. This idea essentially promotes higher cohesion. Separating out interfaces also provides an opportunity for introducing names that are closer to the domain at hand, such as Condition and Action, which we explore in the next section.
Designing a Fluent API
So far we’ve provided a way for our users to add actions with complex conditions. These conditions were created using the enhanced switch statement. However, for business users the syntax isn’t as friendly as it could be to specify simple conditions. We’d like to allow them to add rules (a condition and an action) in a way that matches their domain and is simpler to specify. In this section, you will learn about the Builder pattern and how to develop your own Fluent API to address this problem.
What Is a Fluent API?
A Fluent API is an API that is explicitly tailored for a specific domain so that you can solve a specific problem more intuitively. It also embraces the idea of chaining method calls to specify a more complex operation. There are several high-profile Fluent APIs you may be already familiar with:
-
The Java Streams API allows you to specify data processing queries in a way that reads more like the problem you need to solve.
-
Spring Integration offers a Java API to specify enterprise integration patterns using a vocabulary close to the domain of enterprise integration patterns.
-
jOOQ offers a library to interact with different databases using an intuitive API.
Modeling the Domain
So what is it that we want to simply for our business users? We’d like to help them specify a simple combination of “when some condition holds,” “then do something” as a rule. There are three concepts in this domain:
- Condition
-
A condition applied on certain facts that will evaluate to either true or false.
- Action
-
A specific set of operations or code to execute.
- Rule
-
This is a condition and an action together. The action only runs if the condition is true.
Now that we’ve defined the concepts in the domain, we translate it into Java! Let’s first define the Condition interface and reuse our existing Action interface as shown in Example 5-26. Note that we could have also used the java.util.function.Predicate interface available since Java 8, but the name Condition better represents our domain.
Note
Names are very important in programming because good names help you understand the problem that your code is solving. Names are in many cases more important than the “shape” of the interface (in terms of its parameters and return types), because the names convey contextual information to humans reading the code.
Example 5-26. The Condition interface
@FunctionalInterfacepublicinterfaceCondition{booleanevaluate(Factsfacts);}
Now the remaining question is how to model the concept of a rule? We can define a interface Rule with an operation perform(). This will allow you to provide different implementations of a Rule. A suitable default implementation of this interface is a class DefaultRule, which will hold a Condition and Action object together with the appropriate logic to perform a rule as shown in Example 5-27.
Example 5-27. Modeling the concept of a rule
@FunctionalInterfaceinterfaceRule{voidperform(Factsfacts);}publicclassDefaultRuleimplementsRule{privatefinalConditioncondition;privatefinalActionaction;publicRule(finalConditioncondition,finalActionaction){this.condition=condition;this.action=action;}publicvoidperform(finalFactsfacts){if(condition.evaluate(facts)){action.execute(facts);}}}
How do we create new rules using all these different elements? You can see an example in Example 5-28.
Example 5-28. Building a rule
finalConditioncondition=(Factsfacts)->"CEO".equals(facts.getFact("jobTitle"));finalActionaction=(Factsfacts)->{varname=facts.getFact("name");Mailer.sendEmail("sales@company.com","Relevant customer!!!: "+name);};finalRulerule=newDefaultRule(condition,action);
Builder Pattern
However, even though the code uses names that are close to our domain (Condition, Action, Rule), this code is fairly manual. The user has to instantiate separate objects and assemble things together. Let’s introduce what’s called the Builder pattern to improve the process of creating a Rule object with the appropriate condition and action. The purpose of this pattern is to allow the creation of an object in a simpler manner. The Builder pattern essentially deconstructs the parameters of a constructor and instead provides methods to supply each of the parameters. The benefit of this approach is that it allows you to declare methods with names that are suitable to the domain at hand. For example, in our case we’d like to use the vocabulary when and then. The code in Example 5-29 shows how to set up the Builder pattern to build a DefaultRule object. We’ve introduced a method when(), which supplies the condition. The method when() returns this (i.e., the current instance), which will allow us to chain up further methods. We’ve also introduced a method then(), which will supply the action. The method then() also returns this, which allows us to further chain a method. Finally, the method createRule() is responsible for the creation of the DefaultRule object.
Example 5-29. Builder pattern for a Rule
publicclassRuleBuilder{privateConditioncondition;privateActionaction;publicRuleBuilderwhen(finalConditioncondition){this.condition=condition;returnthis;}publicRuleBuilderthen(finalActionaction){this.action=action;returnthis;}publicRulecreateRule(){returnnewDefaultRule(condition,action);}}
Using this new class, you can create RuleBuilder and configure a Rule using the methods when(), then(), and createRule() as shown in Example 5-30. This idea of chaining methods is a key aspect of designing a Fluent API.
Example 5-30. Using the RuleBuilder
Rulerule=newRuleBuilder().when(facts->"CEO".equals(facts.getFact("jobTitle"))).then(facts->{varname=facts.getFact("name");Mailer.sendEmail("sales@company.com","Relevant customer: "+name);}).createRule();
This code looks more like a query and it leverages the domain at hand: the notion of a rule, when(), and then() as built-in constructs. But it’s not entirely satisfactory because there are still two awkward constructs the user of your API will have to encounter:
-
Instantiate an “empty”
RuleBuilder -
Call the method
createRule()
We can improve this by coming up with a slightly improved API. There are three possible improvements:
-
We’ll make the constructor private so that it can not be invoked explicitly by a user. This means that we will need to come up with a different entry point for our API.
-
We can make the method
when()static so it’s invoked directly and essentially short circuits the invocation to the old constructor. In addition, a static factor method improves discoverability of what’s the right method to use to set upRuleobjects. -
The method
then()will become responsible for the final creation of ourDefaultRuleobject.
Example 5-31 shows the improved RuleBuilder.
Example 5-31. Improved RuleBuilder
publicclassRuleBuilder{privatefinalConditioncondition;privateRuleBuilder(finalConditioncondition){this.condition=condition;}publicstaticRuleBuilderwhen(finalConditioncondition){returnnewRuleBuilder(condition);}publicRulethen(finalActionaction){returnnewDefaultRule(condition,action);}}
You can now simply create rules by starting with the RuleBuilder.when() method followed by the then() method as shown in Example 5-32.
Example 5-32. Using the improved RuleBuilder
finalRuleruleSendEmailToSalesWhenCEO=RuleBuilder.when(facts->"CEO".equals(facts.getFact("jobTitle"))).then(facts->{varname=facts.getFact("name");Mailer.sendEmail("sales@company.com","Relevant customer!!!: "+name);});
Now that we’ve refactored the RuleBuilder, we can refactor the Business Rules Engine to support rules instead of just actions, as shown in Example 5-33.
Example 5-33. Updated Business Rules Engine
publicclassBusinessRuleEngine{privatefinalList<Rule>rules;privatefinalFactsfacts;publicBusinessRuleEngine(finalFactsfacts){this.facts=facts;this.rules=newArrayList<>();}publicvoidaddRule(finalRulerule){this.rules.add(rule);}publicvoidrun(){this.rules.forEach(rule->rule.perform(facts));}}
Takeaways
-
The test-driven development philosophy starts with writing some tests that are going to let you guide the implementation of the code.
-
Mocking allows you to write unit tests that assert that certain behaviors are triggered.
-
Java supports local variable type inferences and switch expressions.
-
The Builder pattern helps design a user-friendly API for instantiating complex objects.
-
The Interface Segregation Principle helps promote high cohesion by reducing dependence on unnecessary methods. This is achieved by breaking up large interfaces into smaller cohesive interfaces so that users only see what they need.
Iterating on You
If you want to extend and solidify the knowledge from this chapter you could try one of these activities:
-
Enhance the
RuleandRuleBuilderto support a name and description. -
Enhance the
Factsclass so the facts can be loaded from a JSON file. -
Enhance the Business Rules Engine to support rules having multiple conditions.
-
Enhance the Business Rules Engine to support rules with different priorities.
Completing the Challenge
Your business is booming and your company has adopted the Business Rules Engine as part of its workflow! You are now looking for your next idea and want to put your software development skills to something new that will help the world rather than just your company. It’s time to jump to the next chapter—Twootr!