Chapter 3
Getting Going
Get ready to …
![]() Charge the Battery
Charge the Battery
![]() Download iTunes to Your Computer
Download iTunes to Your Computer
![]() Open an iTunes Account for Music, Movies, and More
Open an iTunes Account for Music, Movies, and More
![]() Make iPhone Settings Using iTunes
Make iPhone Settings Using iTunes
![]() Sync the iPhone to Your Computer Using iTunes
Sync the iPhone to Your Computer Using iTunes
![]() Sync Wirelessly
Sync Wirelessly
![]() Understand iCloud
Understand iCloud
![]() Get an iCloud Account
Get an iCloud Account
![]() Make iCloud Sync Settings
Make iCloud Sync Settings
Your first step in getting to work with the iPhone is to make sure that its battery is charged. Next, if you want to find free or paid content for your iPhone from Apple, from movies to music to e-books to audiobooks, you’ll need to have an iTunes account.
You can also use the wireless sync feature to exchange content between your computer and iPhone over a wireless network. After you have an iTunes account and the latest iTunes software on your computer, you can also connect your iPhone to your computer and sync them to exchange content between them (especially useful for syncing videos or music you’ve obtained from somebody other than Apple to the iPhone).
If you prefer, you can take advantage of the iCloud service from Apple to store and push all kinds of content and data to all your Apple devices — wirelessly. New with iOS 8 comes the capability to pick up where you left off from one device to another through a feature called Handoff. Also, edits that you make to documents in iCloud are reflected in all iOS devices and Macs running OS X Yosemite or later.
Charge the Battery
- My iPhone showed up in the box fully charged, and let’s hope yours did, too. Because all batteries run down eventually, one of your first priorities is to know how to recharge your iPhone battery. Gather your iPhone and its Lightning to USB Cable (iPhone 5 and later; if you have an earlier model, you have the Dock cable) and the Apple USB power adapter.
- Gently plug the Lightning connector end (the smaller of the two connectors) of the Lightning to USB Cable into the iPhone.
 Note that if you have a hard case for your iPhone, you should remove the phone from it if you’re charging it over several hours because these cases retain heat, which is bad for the phone and the case.
 - Plug the USB end of the Lightning to USB Cable into the Apple USB power adapter (see Figure 3-1).
- Plug the adapter into an electric outlet.
Connector cables from earlier versions of iPhone or other Apple devices such as iPad or iPod don’t work with your iPhone 5 or later. Adapters are available, however, from Apple.
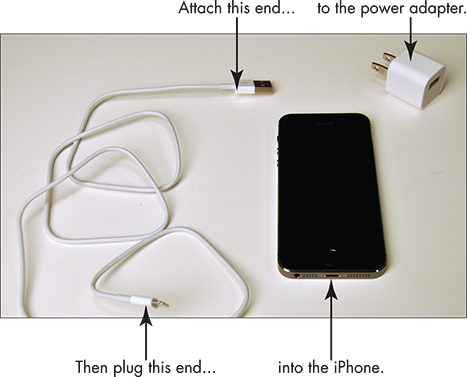
Figure 3-1:
Download iTunes to Your Computer
- If you’re using a Mac, you already have iTunes installed, but to be sure that you have the latest version (at the time of this writing, it’s version 11.4), open iTunes and choose Check for Updates. For Windows users, you should download the iTunes application to your computer so that you have the option of using it to sync (transfer) downloaded content to your iPhone. Go to www.apple.com/itunes using your computer’s browser. (In these steps, I use Internet Explorer as an example browser.)
- Click the Download iTunes link in the top-right corner of the iTunes Home page (see Figure 3-2). On the screen that opens, click the Download Now button.

Figure 3-2:
- In the dialog that appears, or using the Internet Explorer 10 download bar if you use that version (see Figure 3-3), click Run. The iTunes application downloads.

Figure 3-3:
- When the download is complete, another dialog appears, asking whether you want to run the software. Click Run, and the iTunes Installer appears (see Figure 3-4).
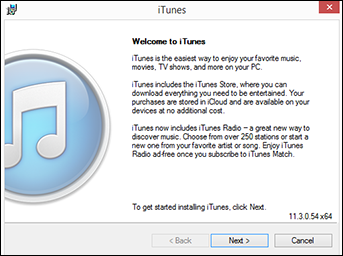
Figure 3-4:
- Click Next.
- Click the I Accept the Terms of the License Agreement check box in the following dialog and click Next.
- Review the installation options, click to deselect the ones you don’t want to use, and then click the Install button, as shown in Figure 3-5. A dialog appears, showing the installation progress.
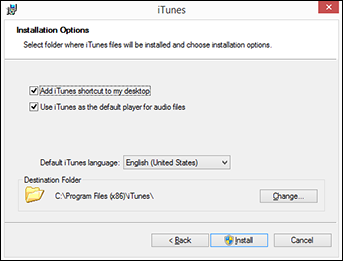
Figure 3-5:
- When a dialog appears and tells you that the installation is complete, click Finish. You have to restart your computer for the configuration settings that were made during the installation to take effect.
As of this writing, iTunes 11.3 is the latest version and includes a paid feature called iTunes Match that allows you to store all your music, even music that you’ve copied from DVDs, in the cloud and push it to all your Apple devices using iCloud. See Chapter 15 for more about music and iPhone.
Open an iTunes Account for Music, Movies, and More
- To be able to buy or download free items from iTunes or the App Store on your computer or iPhone, you must open an iTunes account. First, open the iTunes app (you had to download it to your computer in the preceding task if you’re running Windows). You can open iTunes by typing iTunes on your computer’s Start screen in Windows. If you’re on a Mac, click the iTunes item in the Mac Dock or Launchpad.
- Click the iTunes Store button to open the Store; then click the Sign In button on the screen that appears (see Figure 3-6).
- In the dialog that appears (see Figure 3-7), click the Create Apple ID button, and in the next screen that appears, click Continue.
- On the following screen, click to select the I Have Read and Agree to the These Terms and Conditions check box and then click the Agree button.

Figure 3-6:
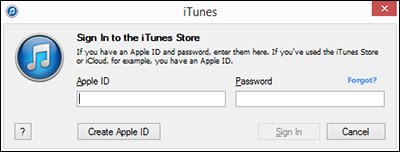
Figure 3-7:
- In the Provide Apple ID Details screen that follows (see Figure 3-8), fill in the information fields, click the last two check boxes to deselect them if you don’t want to receive email from Apple, and then click the Continue button.
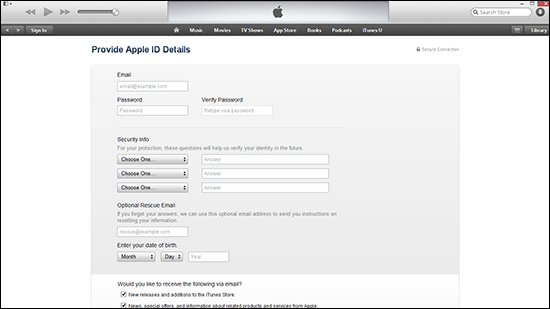
Figure 3-8:
- On the Provide a Payment Method screen that appears (see Figure 3-9), enter your payment information and click the Create Apple ID button.

Figure 3-9:
- A screen appears, confirming that your account has been created. Click the Done button to return to the iTunes Store.
If you prefer not to leave your credit card info with Apple, one option is to buy an iTunes gift card and provide that as your payment information. You can replenish the card periodically through the Apple Store.
Make iPhone Settings Using iTunes
- Open your iTunes software. (On a Windows 8 or 8.1 computer, begin to type iTunes on the Start screen and then click iTunes in the search results; on a Mac, click the iTunes icon in the Dock or Launchpad; if you still have iTunes open in the iTunes Store from the previous task, just click the Library button.)
- Connect your iPhone to your computer using the Lightning to USB Cable; your phone is listed near the upper-right corner in the Devices list, as shown in Figure 3-10. (If you display the Sidebar, you’ll find your iPhone listed there, instead.) At this point, you may need to tap Trust on your iPhone so that it will trust this computer.
- Click your iPhone, and a series of tabs displays. The tabs offer information about your iPhone and settings to determine how to download music, movies, or podcasts, for example. (You can see the choices on the Summary tab in Figure 3-11.) The settings relate to the kind of content you want to download and whether you want to download it automatically (when you sync) or manually. See Table 3-1 for an overview of the settings that are available on each tab.
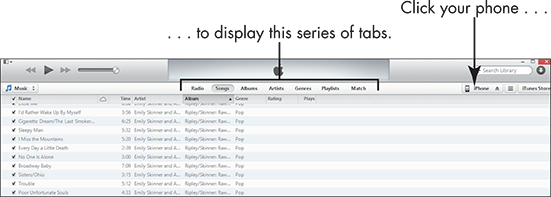
Figure 3-10:
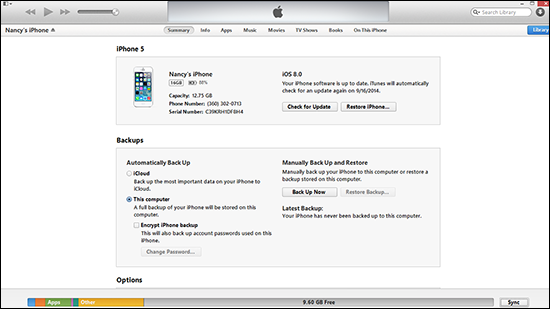
Figure 3-11:
- Make all settings for the types of content you plan to obtain on your computer. Table 3-1 provides information about settings on the different tabs. Note that if you’ve downloaded content through apps like iTunes and Podcast, you may see additional tabs.
Do go through these settings to choose what content you want to sync, because your iPhone has limited memory. It’s usually best not to sync memory-intensive items like videos automatically.
Table 3-1 iPhone Settings in iTunes
|
Tab Name |
What You Can Do with the Settings on the Tab |
|
Summary |
Perform updates to the iPhone software and set general backup and syncing options. |
|
Info |
Specify which information to sync: Contacts and Calendars for Windows users, Email accounts, Bookmarks, and/or Notes. Perform an advanced replacement of info on the phone with info from the computer. |
|
Apps |
Sync with iPhone the apps you’ve downloaded to your computer, and manage the location of those apps and folders, as well as associate data files with your various apps. Choose whether to automatically install new apps. |
|
Music |
Choose which music to download to your iPhone when you sync. |
|
Movies |
Specify whether to automatically download movies and which movies to sync. |
|
TV Shows |
Choose shows and episodes to sync automatically. |
|
Photos |
Choose the applications or folders from which you want to download photos or albums. |
|
Books |
Choose books and PDF files to sync to your iPhone. |
|
On This iPhone (Windows computers only) |
Select music on the iPhone to copy to iTunes. |
Sync the iPhone to Your Computer Using iTunes
- After you specify which content to download in iTunes (see the preceding task), you can use the Lightning to USB Cable to connect your iPhone and computer at any time and sync files, contacts, calendar settings, and more. After iTunes is downloaded to your computer and your iTunes account is set up, plug the data connection cord into your iPhone (using the smaller connector).
- Plug the other end of the cord into a USB port on your computer.
- iTunes opens and shows an item for your iPhone near the upper-right corner (refer to Figure 3-10). Click the Sync button in the lower-right corner and your iPhone screen shows the phrase Syncing [Your Phone’s Name] iPhone.
- When the syncing is complete, the Lock screen returns on the iPhone. Disconnect the cable. Any media you chose to transfer in your iTunes settings and any new photos in albums or folders on your computer that you’ve specified for syncing have been transferred to your iPhone.
Sync Wirelessly
You can also use the iTunes Wi-Fi Sync setting to allow cordless syncing if you’re within range of a Wi-Fi network that has a computer connected to it with iTunes installed and open. There are a few steps you have to take with your iPhone connected to your computer before you can perform a wireless sync with iTunes:
- Open iTunes and connect your iPhone to your computer using the Lightning to USB Cable.
- Click your phone name (refer to Figure 3-10), click the Summary tab, and then scroll down and click the check box labeled Sync with this iPhone over Wi-Fi.
- Disconnect your iPhone from your computer.
After you complete the preceding steps, you’ll be able to wirelessly sync your iPhone with your computer. To do so, follow these steps:
- To initiate a wireless sync, on the iPhone, tap Settings⇒ General⇒iTunes Wi-Fi Sync.
- In the settings that appear, tap Sync Now to sync with a computer connected to the same Wi-Fi network. (If you need to connect your iPhone to a network, tap Settings⇒Wi-Fi and then tap a network to join.)
If you have your iPhone set up to sync wirelessly to your Mac or PC and both are within range of the same Wi-Fi network, iPhone will appear in your iTunes Devices list. This setup allows you to sync and manage syncing from within iTunes. Also be aware that your iPhone will automatically sync with iTunes once a day if both are on the same Wi-Fi network, iTunes is running, and your iPhone is plugged in.
Understand iCloud
There’s an alternative to syncing content by using iTunes. iCloud is a service offered by Apple that allows you to back up most of your content to online storage. (Some content, however, such as videos, isn’t backed up, so consider doing an occasional backup of content to your computer, as well.) That content is then pushed automatically to all your Apple devices through a wireless connection. All you need to do is get an iCloud account, which is free, and make settings on your devices and in iTunes for which types of content you want pushed to each device. After you’ve done that, content that you create or purchase on one device — such as music, apps, and TV shows, as well as documents created in Apple’s iWork apps, photos, and so on — is synced among your devices automatically.
See Chapter 12 for more about using the new Family Sharing feature to share content that you buy online and more with family members through iCloud.
When you get an iCloud account, you get 5GB of free storage. Content that you purchase from Apple (such as apps, books, music, iTunes Match content, Photo Sharing contents, and TV shows) isn’t counted against your storage. If you want additional storage, you can buy an upgrade from one of your devices. Having 10GB costs $20 per year; 20GB is $40 per year; and 50GB is $100 per year. Most people will do just fine with the free 5GB of storage.
To upgrade your storage, go to iCloud in Settings, tap Storage & Backup, and then tap Buy More Storage. Tap the amount you need and then tap Buy.
You can make settings for backing up your content to iCloud in Settings, under the iCloud section of General settings. Here you can choose to have content backed up automatically or to back up content manually. See Chapter 24 for more about this topic.
If you pay $24.99 a year for the iTunes Match service, you can sync up to 25,000 songs in your iTunes library to your devices, which may be a less expensive way to go than paying for added iCloud storage. Tap Match in iTunes or visit www.apple.com/itunes/itunes-match for more information.
Get an iCloud Account
Before you can use iCloud, you need an iCloud account. By default, Apple assumes that you want to use the Apple ID you probably already have for an iTunes account; however, you can create a separate iCloud ID if you want. You can turn on iCloud when first setting up your iPhone, or use Settings to sign up using your Apple ID.
- When first setting up your phone after upgrading to iOS 8, in the sequence of screens that appear, you’ll see the one in Figure 3-12. Tap Use iCloud.
- In the next dialog, tap Backup to iCloud. Your account is now set up based on the Apple ID that you entered earlier in the setup sequence.
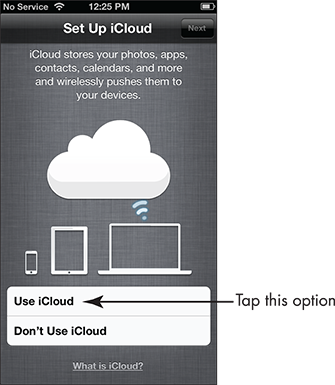
Figure 3-12:
Here are the steps to set up iCloud on your iPhone if you didn’t do so when first setting up iPhone:
- Tap Settings and then tap Mail, Contacts, Calendars; next, under Accounts, tap iCloud.
- Tap iCloud Drive and then tap the On/Off switch to turn on iCloud Drive (see Figure 3-13).
- A message appears, letting you know that your iPhone will no longer back up to your computer when you sync with a cable or over Wi-Fi; tap OK.
- An alert may appear, asking whether you want to allow iCloud to use the location of your iPhone. Tap OK to use iCloud and features such as Find My iPhone. Your account is now set up.
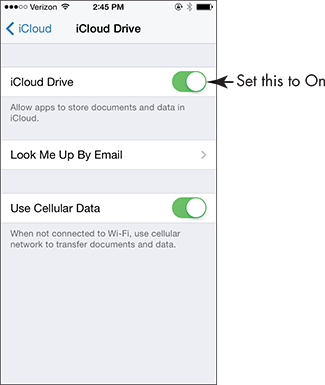
Figure 3-13:
Make iCloud Sync Settings
- When you have an iCloud account up and running (see the previous task), you have to specify which type of content should be synced with your iPhone via iCloud. To do so, tap Settings and then tap iCloud.
- In the iCloud settings shown in Figure 3-14, tap the On/Off switch for any item that’s turned off that you want to turn on (or vice versa). You can sync Photos, Mail, Contacts, Calendars, Reminders, Safari, Notes, Passbook, and Keychain (an app that stores all your passwords and even credit card numbers across all Apple devices).
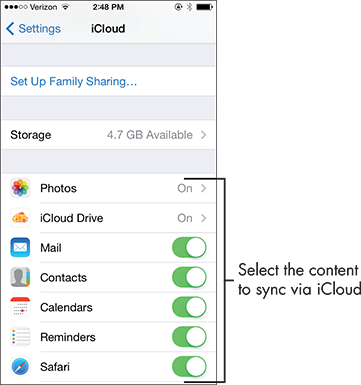
Figure 3-14:
If you want to allow iCloud to provide a service for locating a lost or stolen iPhone, tap the On/Off switch in the Find My iPhone field to activate it. This service helps you locate, send a message to, or delete content from your iPhone if it falls into other hands. - To enable automatic downloads of iTunes-purchased music, apps, and books, return to the main Settings screen by tapping the Settings button in the top-left corner of the screen (refer to Figure 3-14), and then tap iTunes & App Store.
- Scroll down and tap the On/Off switch for Music, Apps, Books, or Updates to set up automatic downloads of any of this content to your iPhone via iCloud.
You might want to turn off the Use Cellular Data option in Settings to avoid having these downloads occur over your cellular connection, which can use up your data allowance. Wait till you’re on a Wi-Fi connection to have iPhone perform the updates.
If you need help with any of these features, you can always go to http://manuals.info.apple.com/MANUALS/1000/MA1565/en_US/iphone_user_guide.pdf to view the Apple manual.