Chapter 17
Getting the Most Out of Video Features
Get ready to …
 Capture Your Own Videos with the Built-In Cameras
 Play Movies or TV Shows with Videos
 Turn On Closed-Captioning
 Delete a Video from the iPhone
 Let Others Know About Your Favorite Videos
Using the Videos app, you can watch downloaded movies or TV shows, as well as media that you’ve synced from iCloud or your Mac or PC.
In addition, iPhone 6 sports both a front and rear video camera that you can use to capture your own videos, and by downloading the iMovie app for iPhone (a more limited version of the longtime mainstay on Mac computers), you add the capability to edit those videos. The 4.7" Retina HD display on iPhone 6 and the 5.5" Retina HD display on iPhone 6 Plus offer even more pixels for better resolution than ever. An 8MP iSight camera can record high-definition video. These two phones are, quite simply, two of the best phones ever for viewing and capturing images, both still and moving.
In this chapter, I explain all about shooting and watching video content from a variety of sources. For practice, you might want to refer to Chapter 12 first to find out how to purchase or download one of many available TV shows or movies from the iTunes Store.
Capture Your Own Videos with the Built-In Cameras
The camera lens that comes on iPhone 6 and 6 Plus has perks for photographers, including a large aperture and highly accurate sensor, which make for better images all around. In addition, auto image stabilization makes up for any shakiness in the hands holding the phone, and autofocus has sped up thanks to the fast A8 processor chip. For videographers, you’ll appreciate a fast frames-per-second capability as well as a slow-motion feature.
- To capture a video, tap the Camera app on the Home screen. In iPhone, two video cameras are available for capturing video, one from the front and one from the back of the device. (See more about this topic in the next task.)
- The Camera app opens (see Figure 17-1). Tap and slide the camera-type options above the red Record button to the right until Video rests above the button; this is how you switch from the still camera to the video camera.
- If you want to switch between the front and back cameras, tap the Switch Camera button in the top-right corner of the screen (refer to Figure 17-1).
- Tap the red Record button to begin recording the video. (The red dot in the middle of this button turns into a red square when the camera is recording.) When you’re finished, tap the Record button again. Your new video is now listed in the bottom-left corner of the screen. Tap the video to play it, share it, or delete it. In the future, you can find and play the video in your Camera Roll when you open the Photos app.
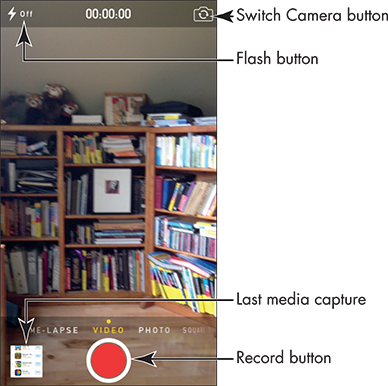
Figure 17-1:
Play Movies or TV Shows with Videos
- When you first open the Videos app, you may see relatively blank screens with a note that you don’t own any videos and a link to the iTunes Store. After you’ve purchased TV shows and movies or rented movies from the iTunes Store (see Chapter 12 to learn how) or other sources, you’ll see tabs of the different kinds of content you own. Tap the Videos app icon on the Home screen to open the application.
 If your iPhone is on the same Wi-Fi network as your computer and both are running iTunes, with the iPhone and iTunes set to use the same Home Sharing account, you see the Shared List. With this setup, you can stream videos from iTunes on your computer to your iPhone.
 - On a screen like the one shown in Figure 17-2, tap the appropriate category at the bottom of the screen (TV, Podcasts, or Movies, depending on the content you’ve downloaded) and then tap the video you want to watch. Information about the movie or TV show episodes appears, as shown in Figure 17-3. TV Shows include an Episodes, Details, and Related tab; Movies contain a Details, Chapters, and Related tab.
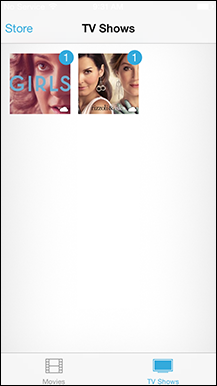
Figure 17-2:

Figure 17-3:
- For TV Shows, tap the Episodes tab to display episodes that you can tap to play; for Movies, the Play button appears no matter which tab is selected. Tap the Play button (see Figure 17-4) and the movie or TV show begins playing. (If you see a small, cloud-shaped icon instead of a Play button, tap it and the content is downloaded from iCloud.) Note that the progress of the playback is displayed on the Progress bar showing how many minutes you’ve viewed and how many remain. If you don’t see the bar, tap the screen once to display it briefly, along with a set of playback tools at the bottom of the screen.
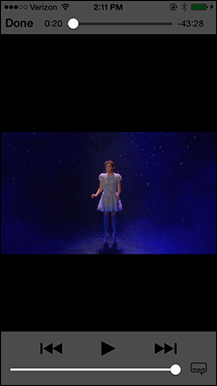
Figure 17-4:
- With the playback tools displayed, take any of these actions:
- Tap the Pause button to pause playback.
- Tap either Go to Previous Chapter or Go to Next Chapter to move to a different location in the video playback. Note that if a video has chapter support, another button appears here for displaying all chapters so that you can move more easily from one to another.
- Tap the circular button on the Volume slider and drag the button left or right to decrease or increase the volume, respectively.
- To stop the video and return to the information screen, tap the Done button to the left of the Progress bar.
Turn On Closed-Captioning
- iTunes and iPhone offer support for closed-captioning and subtitles. If a movie has either closed-captioning or subtitles, you can turn on the feature in iPhone. Look for the CC logo on media that you download to use this feature; be aware that video you record won’t have this capability. Begin by tapping the Settings icon on the Home screen.
- Tap General⇒Accessibility. On the screen that appears, scroll down and tap Subtitles & Captioning.
- On the menu that displays (see Figure 17-5), tap the Closed Captions + SDH switch to turn on the feature. Now when you play a movie with closed-captioning, you can tap the Audio and Subtitles button to the left of the playback controls to manage these features.
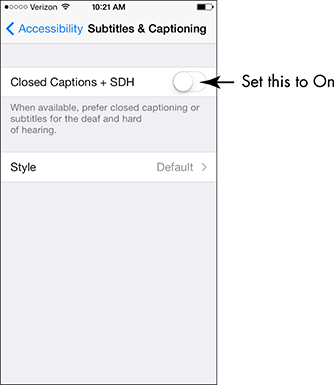
Figure 17-5:
Delete a Video from the iPhone
You can buy videos directly from your iPhone, or you can sync via iCloud or iTunes to place content you’ve bought or created on another device on your iPhone.
When you want to get rid of video content on your iPhone because it’s a memory hog, you can delete it by going to the Home screen and tapping Settings⇒General⇒Usage. Tap Manage Storage and then tap Videos to see a list of videos stored on your iPhone. Flick to the left over the video that you want to delete and then tap the Delete button that appears.
You can also delete it by using iTunes and then sync again, removing it from your iPhone. If you buy a video using iTunes and sync to download it to your iPhone and then delete it from your iPhone, it’s still saved in your iTunes library. You can sync your computer and iPhone again to download the video once more. Remember, however, that rented movies, once deleted, are gone with the wind and that video doesn’t sync to iCloud as photos and music do.
Let Others Know about Your Favorite Videos
- You can share your opinion about a video using AirDrop, Mail, Message, Twitter, or Facebook. Tap the Videos app to open it and then tap the Store button. Find a video you want to share and tap it.
- In the information screen shown in Figure 17-6, tap the Share button (a box with an arrow at the top of it at the top of the screen). Tap AirDrop, Mail, Message, Twitter, or Facebook to use one of these methods of sharing your enthusiasm for the item (see Figure 17-7).
- In the corresponding form, enter a recipient in the To field and add to the message, if you like. If you chose to post to your Facebook page, enter your message in the Facebook form.
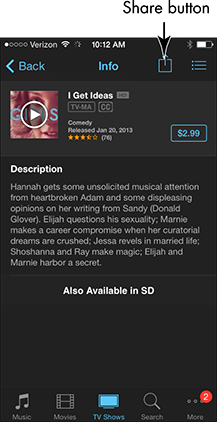
Figure 17-6:
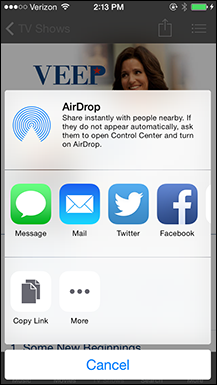
Figure 17-7:
- Tap the appropriate Send button to send your recommendation by your preferred method.
 A few other improvements to video in iPhone 6 and 6 Plus include image stabilization to avoid the shakes when recording, more frames shot per second for smoother video, and Cinematic Video Stabilization, which means that your iPhone continually autofocuses as you’re recording.