Chapter • 1
Basic Joinery
BY NICK ENGLER
There are three basic saw cuts: crosscuts, rips and miters. Crosscuts are made perpendicular to the wood grain, rips are cut parallel to the grain and miters are made at angles diagonally across the grain. None of these requires elaborate jigs or complex techniques, but they are the building blocks to basic joinery on the table saw.
Rips and crosscuts are used to form many joints, including the basic edge and butt joints, which can be used to glue up a tabletop or door frame. These two cuts are also used to cut rabbets, grooves and dados. And a variation of these cuts will create a miter joint.
Miters
Miters can be the most frustrating cuts to make. Angled cuts are harder to measure and lay out than crosscuts. To make a mitered frame perfect, both the inside and outside dimension of the piece must match on each component. You should start with accurate measuring tools and some basic math, and then you will need to test and retest your setup to ensure its precision.
When you make a miter cut on a table saw, you run into a problem associated with crosscuts – the factory-supplied miter gauge is too small to offer adequate support for guiding most boards. To properly support the work, you must fit the gauge with an extension fence or replace it with a sliding table.
Even when using an adequately sized miter gauge, boards are inclined to creep during a miter cut because of the rotation of the blade into the cut. One way to compensate for this is to add a stop to your miter gauge fence as shown above. Your stop will also help you make repeatable, accurate miter cuts every time.

PRO TIP:
Picture-perfect Miters
To make sure your miters are perfect, start with a new zero-clearance throat insert on your table saw. Bring the blade up through the insert until the blade height is about ¼ above the height of your frame material. Turn off the saw. After the blade has stopped, use a straightedge to make a mark, extending the line of the blade slot the full length of the insert. This will let you see exactly where the blade will cut. Add a sacrificial fence to your miter gauge that extends past the blade to eliminate tear-out. You can also extend the cut line to the sacrificial fence for extra alignment accuracy.
Accurate angles are another problem on table saws. The stock miter gauge and blade-tilt scale on most table saws – even the best ones – are notoriously imprecise. And you can’t use a drafting triangle to set every possible angle you might want to cut. You must use the scales to estimate the degree setting, then thoroughly test the setup until you have it right.
Once the miter gauge angle is properly set, make the miter cuts. If the boards are to be joined by miter joints (such as the members of a frame), you must make mirror-image miters. Note: A single miter joint is comprised of one left miter and one right miter. To do this, flip each board end-for-end, keeping the same edge against the gauge as you cut the ends. Only in rare instances when you can’t flip the board should you have to readjust the angle of the miter gauge to cut left and right miters.
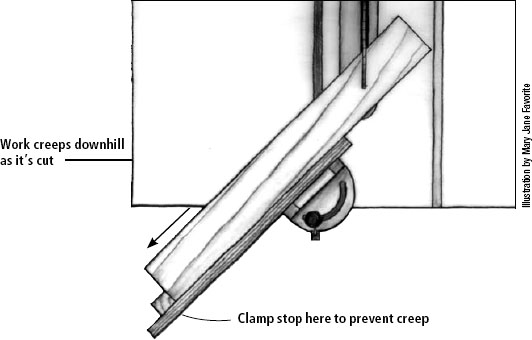
A simple stop clamped to your miter fence will keep your piece from slipping during the cut.

To create accurate, matching miters (or butt joints) for frame work, flip the work piece end-for-end keeping the same long edge against your miter gauge, as shown here.
You also can cut a miter by tilting the blade rather than angling the miter gauge. This procedure is similar, but there is an important difference when cutting left and right miters. As you rotate the board end for end, the same face must rest against the table. Note: You can switch faces if you first switch the miter gauge to the other slot.
Bevels
The procedure to make a bevel is similar to the way you make a miter, but you must set the blade at the proper angle, rather than the miter gauge. Measure the angle between the blade and the table with a triangle or a protractor.
If you rip a bevel or chamfer, make sure the blade tilts away from the rip fence. This gives you more room to safely maneuver the board and reduces the risk of kickback. On right-tilt saws, you will have to move the rip fence to the left side of the blade (as you face the infeed side of the table saw).
TIPS & TRICKS
GREAT TIP:
Setting Between the Lines
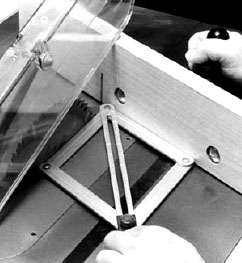
Use an angle divider to help set oddball miter angles that you can’t measure with a set of drafting triangles or a square. This device, which is available from most woodworking suppliers, looks like an adjustable metal parallelogram.
PRO TIP:
Right Height, Every Time
When using a dado set and sacrificial rip fence to make rabbets, setting the height of the dado set in the fence is tricky. Make it simple by attaching a new sacrificial fence, then measure and mark the height of the blade (for the perfect rabbet depth) right on the fence face, measuring from the table saw’s top. Lower the dado set, move the fence into place, then bring the running blade up into the fence, stopping when you reach your line.
Rabbets, Dados and Grooves
Although the final results and applications for dados, rabbets and grooves are different, the way to make each is very similar. And all are easily made on the table saw. But first let’s take a look at the joints themselves.
• A rabbet is an L-shaped cut of varying widths and depths, cut on the end (cross grain) or side (long grain) of a board. The width and depth of the rabbet can be adjusted to match the piece fitting in the rabbet, such as on a cabinet or drawer side. The joint created is better than a butt joint, but it is stronger when reinforced with more than glue.
• Grooves and dados have the same shape, but they’re called different names depending on the direction they’re cut on the board. Both a groove and a dado are U-shaped trenches. The depth and width are variable according to the use. This joint is referred to as a groove when it’s made parallel to the grain direction of the board. When made across the grain, it’s referred to as a dado. This is a stronger joint than a rabbet because the mating piece is captured on three sides, rather than two.

When ripping an angle other than 0° – cutting a bevel or a chamfer – be sure the blade tilts away from the rip fence. If the blade tilts toward the fence, there is a chance that the blade will pinch the board and fling it backward. Also, you may not have the space needed to feed the board safely. And on narrow cuts, there is the added danger that the blade may bite into the fence.
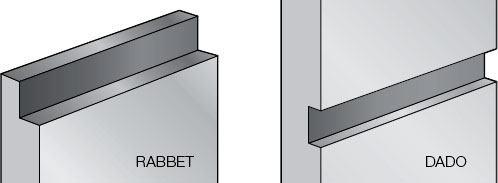
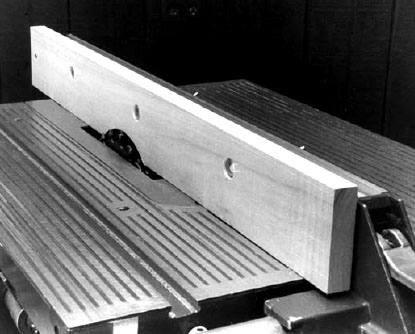
A rabbet (top) is an L-shaped cut on the end or side of a board. The depth and width can be varied to match a mating piece, or to create a particular type of joint. While the rabbet can be viewed as the female part of a joint, it can also be the male part, as it forms a tongue that can be used in tongue-and-groove joinery. A dado (bottom) is U-shaped and cut across the width of a piece. It can also be adjusted in depth and width. A groove is cut parallel to the board’s grain direction. It’s always the female part of a joint. Rabbets, grooves and dados can be “through” (run entirely across the board as shown), or stopped at either of both ends, depending on the requirement of the joint.

Because the dado stack makes a wider kerf than the saw blade, you must replace the normal throat insert with one that has a wider opening.
Using a Dado Set
Rabbets, dados and grooves can all be created by making multiple cuts with a single saw blade, or one cut with a dado set. The different types of dado sets were discussed in detail in Chapter One of this series, as were the different saw blades to best use for this application.
When changing from a single blade to a dado set, always remember to unplug the saw and carefully handle the sharp blades. Because a dado stack cuts a much wider kerf than the ordinary saw blade, you must replace the saw’s throat insert with a special dadoing insert. You can either make your own insert or purchase an aftermarket accessory to fit your saw. It’s wise to make or purchase more than one. After you cut the insert to accommodate your widest dado arrangement, it shouldn’t be used with a smaller-width setup that will leave gaps between the opening and the blades.
A sacrificial fence attached to your rip fence allows you to accurately use part of a dado set for rabbeting without harming your rip fence. The blade should be run up into the fence while it’s securely locked in place to the tabletop. Make sure the blade clears your rip fence.

Featherboards, to hold material snug against the fence (and to avoid kickback), can either be shop-made or purchased. The featherboards shown here have magnetic bases to hold them tightly against the tabletop. They should be positioned before and after the blade, but not at the blades’ location or the waste will bind against the blade.
When making rabbets on the table saw with a dado set, a sacrificial wooden face attached to your existing rip fence is a must. This face must have a semicircular cutout that’s the same radius as the dado cutter. The cutout face serves two purposes – it protects the rip fence during these operations, and it covers the unused portion of the dado stack when you don’t want to cut the full width.
Your next step is to detach the splitter (and guard, when appropriate) from the table saw and attach a featherboard to the table or wooden fence. Because you don’t use a dado cutter to cut all the way through a board, the splitter will just get in your way. Unfortunately, without the splitter and anti-kickback fingers, there is nothing to stop kickback, so be careful. Also, because the dado cutter removes more stock than a standard saw blade, kickback is more likely. To guard against this, use a featherboard.
When making the rabbet cut, the board is most safely run flat on the table saw’s top. By virtue of this position, the height of the dado stack should be set to the required depth of the rabbet. The distance from the sacrificial face to the left side of the dado stack (the amount of blade exposed) will be the width.
To make a groove (or dado, but only on wide boards for safety) the rip fence is adjusted to re-locate the groove where needed, and the dado stack height is set for the required depth of the groove.
PRO TIP:
Controlling Large Panels

When using a miter gauge extension to cut off large, wide panels, clamp a block of wood to the extension to serve as a hold-down. This will keep the panels from tipping over the back edge of the table saw as you finish the cut.
GREAT TIP:
Burn an Inch
When making a sacrificial fence for your rip fence (for cutting rabbets), make it 1 thick. This will make it easier to use the fence scale when setting the position of the fence – simply subtract 1 from the indicated measurement.
PRO TIP:
Clean in the Corners
After cutting a rabbet with a dado cutter or a saw blade, inspect the inside corner between the side and the bottom. These cutting tools sometimes leave a little waste, or “tang,” in the corner. You can quickly remove this with a scraper, chisel, bullnose plane or rabbeting plane.

A sacrificial fence attached to your rip fence allows you to accurately use part of a dado set for rabbeting without harming your rip fence. The blade should be run up into the fence while it’s securely locked in place to the tabletop. Make sure the blade clears your rip fence.

It’s possible to create a rabbet on a board with a single blade using only two cuts. The order of the cuts is important for safety, though. The first cut (left) must be made with the face of the board against the saw table. The second cut (right) must be made on edge, with the waste piece oriented away from the fence to allow the waste to fall harmlessly away from the blade.
Making Rabbet and Dado Joints with a Single Blade
As mentioned, rabbets and grooves can also be made with a single saw blade if you don’t have a dado stack.
Rabbets can most easily be made in a two-pass method. The blade height is set for the depth of the rabbet and the rip fence is set for the width of the rabbet (including the blade width in the setup). The board is then run flat on the table surface for the first cut.
To complete the rabbet, the blade height is reset to just shy of the width of the rabbet, while the fence is set to cut away the depth of the rabbet. It’s a good idea to have the rabbet size marked on the end of the board to double-check your setup. The board is then run on edge against the rip fence.
The order of these cuts is important. If the board were run on edge first, then on its face, the waste piece could be trapped between the blade and fence, and be kicked back at you at a very high speed. As shown above, the waste piece falls safely to the outside of the blade after the second cut.
To make a groove or dado with a single blade is more a nibbling away process until the groove is complete. It’s easiest to start with the two outside passes that will define the groove’s shoulder, then make overlapping cuts between those kerfs to remove the waste material. While this process works, it won’t take too many single-blade dados to convince you that the investment in a dado set is a smart one.
Expanded Techniques
In addition to cutting basic dados, grooves and rabbets, there are many other useful ways these joints can be used. Here are just a few of the most common variations:
Stopped Cuts
Sometimes you must halt a cut before it exits the end or edge of a board. To make a stopped rabbet, dado or groove, you must first know where the dado cutter starts to cut as the wood passes across the table saw.
To find out, first adjust the cutter to the desired height and position the rip fence. Affix a piece of tape to the fence beside the cutter. Select a scrap with at least one square corner and place it on the infeed side of the table with the square corner against the fence and facing the cutter. Slide the scrap toward the dado accessory as you spin the cutter by hand (with the saw unplugged). When the teeth brush the scrap, mark the position of the corner on the tape.
To find where the dado cutter stops cutting, simply place the scrap on the outfeed side of the table.
Now that you know where the blade stops its cut, you can clamp a stop to the end of the rip fence to halt the cut. Determine the length of the cut required and set the stop block that distance from your infeed blade mark on the fence.
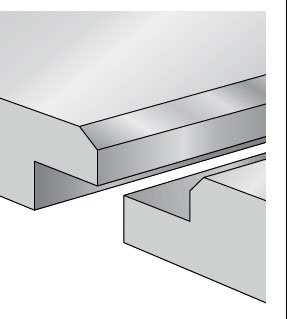
Shiplap Joint
A useful combination of two of our joints in this chapter is shiplapped boards, which are often used as decorative (and sturdy) backs in cabinetry.
The shiplap joint uses two interlocking rabbets (created on the long edges of the boards). The interlocking rabbets form a solid back that still has the ability to expand and contract with changes in humidity, without stressing the cabinet, or opening a gap between the boards. To add a decorative element, bevel the shiplapped boards at the mating edges.
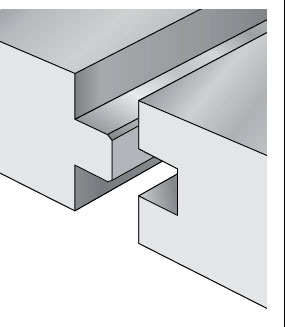
Tongue-and-groove Joint
A mating of a two-sided rabbet (forming a tongue) and a groove run in the long edge of a board forms the tongue-and-groove joint. Offering the same benefit against wood expansion and contraction as the shiplap joint, the tongue and groove also offers great strength as a mating joint. It allows long boards to stay parallel over long lengths. That’s why it’s most common application is in flooring to lock the board lengths tight against one another. This joint also plays an important role in frame-and-panel doors, but we’ll cover that in more detail in Chapter Six.
TIPS & TRICKS
PRO TIP:
Tested for Accuracy
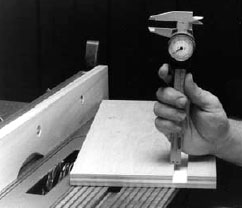
Whenever you’re setting up the saw for a rabbet or groove cut, it’s always a good idea to make a test cut in a scrap piece before cutting good stock. Measure the position of the cut on the board with a ruler or tape measure. For even more accuracy, a dial caliper can measure the width and depth very easily.
PRO TIP:
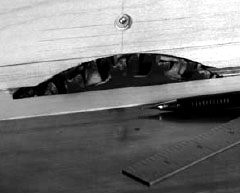
Dados with no Splintering

Whenever using a dado stack to make a dado (across the grain), there’s a very good chance of tearing out the fibers on the face of the wood, whether solid wood, or plywood (see above). To avoid this, score or precut both sides of the dado with a sharp utility knife before making the cut. This cleanly separates the fibers before the dado teeth get a chance to tear them.

Add Basic Joints to Make Complex Ones
A rabbet is a fairly simply (and not all that sturdy) joint. How it’s used can make it much stronger. If the tongue of the rabbet fits into a groove or dado, greater strength can be achieved.
In fact, one of the strongest joints in woodworking is the mortise-and-tenon joint. And a mortise is nothing more than a groove with closed ends, while a tenon is a double rabbet!
To turn a rabbet into a tenon, you’re simply cutting a shallow rabbet on both sides of a board with a dado stack that’s wider than the dado cutter itself. Do this by making two or more passes.
This seems simple enough if you have to make only one joint – make the first pass, move the rip fence or reposition the board on the miter gauge, make the next pass. But if you must make several precise copies of the same joint, use spacers to help position the boards, removing them one at a time as you make each pass.
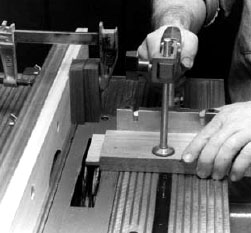

With the dado set to the desired height (and with the saw unplugged) the board is pushed forward until the leading edge touches the dado teeth. Mark the board location on the tape. This is the “start” position of the cut.

The tape mark on the fence also indicates where the dado cut ends in the piece. For a more accurate dado, a block attached to the fence (located using the tape mark) provides a positive stop.
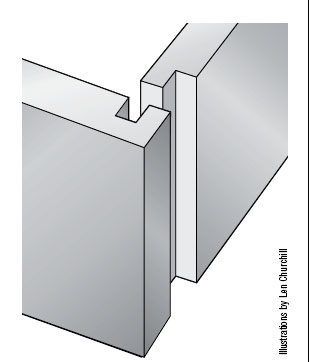
Rabbet-and-dado Joint
With a rabbet on one side and a dado on the other, this joint makes a strong, but simple drawer joint. While a simple rabbet joint can be used as a drawer joint, the addition of a dado allows the rabbet to be firmly captured on three sides. This adds strength and stability to the joint. And this joint isn’t only for drawer sides. Many drawer bottoms are slipped into grooves cut in the drawer sides to form an even simpler rabbet and dado. But wait – that makes it a tongue (the entire bottom is a tongue) and groove joint.
SHIPLAP JOINT
TONGUE-AND-GROOVE JOINT
RABBET-AND-DADO JOINT