Beneath the tree, below the shrub, underneath the herbaceous perennial’s crown, and sprouting from the base of a bulb are roots: the last stop from the top of plant propagation to the bottom.
Roots anchor a plant in the soil. They absorb moisture and nutrients and transport them to the outer reaches of the leaves. Every structure of a plant presents ways to grow new roots, and even a section of root itself can be prompted to become a new perennial, shrub, or even a tree for your garden.
Some propagators consider root cuttings the easiest of all ways to reproduce plants. In theory the results are guaranteed, but propagating from tiny root cuttings is not always as easy as the pros make it sound. An experienced propagator with a commercial greenhouse can have success with cuttings as small as ½ inch long. These cuttings are laid in flats horizontally —like little hash marks on paper. A single fibrous-rooted herbaceous perennial can yield thousands of them, each to become a new plant.
Beginners will have greater success if they try large roots at first. These and nearly all root cuttings have a better chance for success if set vertically in the medium. However, it is nearly impossible to keep cuttings of wiry roots upright, such as those from late-blooming anemone varieties. Cuttings from these easy-to-root plants can be laid horizontally just below the surface of perlite in a flat. But to be safe, the sections should be more than ½ inch long—2 to 4 inches long depending on the source.
There are many variables in root propagation: success depends on the type of plant, the condition of its roots, the time of year, temperature, the size of the cutting, and the propagator’s patience. Some plants are finicky about root propagation, while others require almost no effort. When an Oriental poppy (Papaver orientale) is accidentally run over with a rototiller and bits of roots are mixed through the soil, you could end up with a field full of these plants.
The overriding principle is that the cutting must have enough food resources to carry it through the process of making new roots and shoots. That’s one reason why tiny cuttings are more difficult. If an herbaceous plant is dug up in the spring for root pruning, roots that form through the summer and that are harvested in autumn will have the greatest chance for success, since they will be young and thick —full of stored nutrition to carry them through the months ahead.
Oriental poppies are about the easiest root cuttings to make—one can practically use a rototiller.
A few plants were kept and a few sent back to their original home. Some unusual plants make candidates for root cuttings; for example, the huge herbaceous native Aralia racemosa,
and woody trees and shrubs that are stoloni-ferous, such as the red buckeye, Aesculus pavia.

The nicotiana from root cuttings eventually bloomed—in the same rich color.

A wonderful nicotiana with violet flowers grew in Mary Anne Griffin’s Newport, Rhode Island, garden. Guaranteeing this plant’s return from seed is not possible, but in an experiment, root cuttings were taken. Setting them vertically in a pot worked: little plants sprouted.
Always select the thickest roots from a given plant. Phlox roots will never be pencil-thick, so just choose the largest ones. A preliminary step will make the process go more smoothly. In early spring, dig up the perennial when the ground has thoroughly thawed. Cut back new top growth, if any, and reduce the root system to stumps 1 to 2 inches long. Replant the perennial. Although root propagation can be done without this preparation, the rate of success will not be as high, and the plants will take longer to appear above the medium.
Late autumn to early winter, when the plants are dormant, is often the best time to go back to the perennial to harvest root cuttings. The herbaceous plants have disappeared above the soil, and, along with woody plants, they have sent provisions underground for safekeeping. There are exceptions, however; cuttings from species such as old-fashioned bleeding hearts (Dicentra spectabilis) and Oriental poppies are taken when the foliage of these plants has faded or died back in midsummer.
Roots from hardy plants in containers can be harvested in late winter if the pots are not frozen and growth is beginning. Slender roots of anemone and phlox could be handled then. The eager roots are set just below the surface of perlite in a flat and placed in a warm greenhouse or sweatbox in strong light but out of direct sunlight. New roots and shoots will develop at once, and bottom heat will hasten the development. Similarly, very thick roots, such as the horseradish-size ones of Anchusa, can also be encouraged to develop quickly if placed on perlite in mid- to late winter soon before growth begins. These large roots are laid horizontally on the medium, and they can even be sectioned to produce multiple plants (here).
Most pencil-thick roots are cut into sections and potted up vertically in containers. Several cuttings can fit into a single container. The size of the pot has to be in scale with the roots. For example, around eight 2-inch-long acanthus roots would be comfortable in a 1-gallon container. Once you have chosen a plant to propagate, prepare a suitable pot by filling it to the top with clean, moistened potting medium. Strike off the surface of the medium by scraping a ruler or homemade striker across the rim, and tamp the medium down to eliminate air spaces. Add more of the mix, if necessary, to bring the level up to ½ to ¼ inch below the pot rim, depending on the size of the root cutting. Thick roots will be set deep, and slender ones will be higher or shallower in the pot.
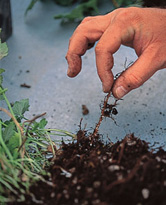
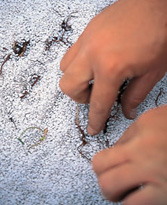
Dig up the plant and wash its roots clean of soil. Cut off a few roots for propagation, and replant the parent. (Mulch the plant with a loose covering of pine boughs or oak leaves after the soil freezes to keep the ground around it from heaving.) Lay the collected roots on a cutting board, and trim off tiny side feeder roots. Polarity must be retained under all circumstances. New shoots will form at the former top, or proximal end, of the roots sections.
To keep track of polarity (which is harder than one might imagine), start at the proximal end and make sections with a straight cut at the top and a diagonal cut to indicate the bottom; immediately retrim the angled top of the next section so that it is square again. The length of the cuttings also depends on their thickness —thick roots should be cut into longer sections than thin ones, but always err on the long side. Roots of Aralia racemosa, which are nearly as thick as a pencil, yield cuttings 2 to 3 inches long.
Make holes in the medium to receive the cuttings using a pencil, stick, or toothpick, corresponding to the diameter of the roots. Space the cuttings evenly and in proportion to their size. Insert the roots so the tops are flush with the surface of the medium. Pour grit over the top, and strike the surface even with the pot rim. Insert a label with the name of the plant and the date that the cuttings were stuck.
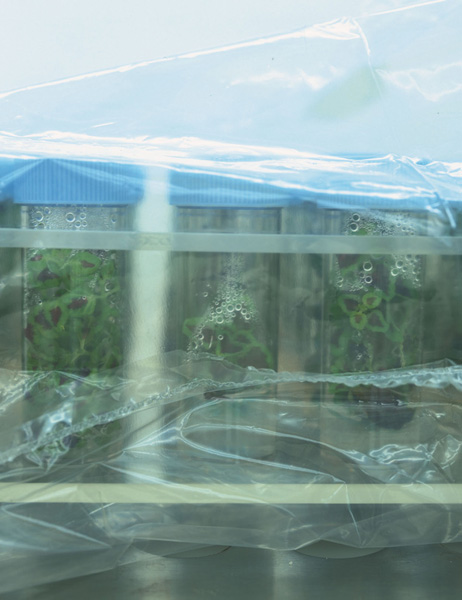
The roots of tender perennials can be placed in a cool location with a bit of bottom heat, but hardy root cuttings will not require extra warmth. A great spot for these pots is in the cold frame. There they will be protected from the rain; too much water is the main threat to root cuttings. Lift the pot to judge the weight and, thereby, the moisture content, but don’t be surprised if the pot only needs water once again until new growth appears above the grit —which will be your first sign that something is happening below. Do not attempt to uproot the cuttings, as the top growth appears well before the plants have produced enough tiny feeder roots to support a new independent specimen.
The time it takes for root cuttings to produce plants ready for the garden varies—several months or longer. The Aralia cuttings spent two winters in the cold frame before they were ready to be knocked out of their pot and planted in the garden. That was in their second spring, when they made lush top growth.
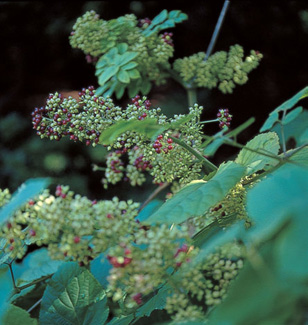
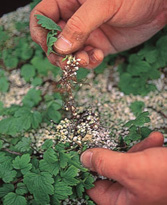
Broad, compound leaves, fuzzy flowers, and rich, ruby fruits are attractions for the North American native Aralia racemosa. The procedure for making root cuttings of the aralia starts by digging up a plant when it is dormant and cutting back the top growth (1). The roots are washed clean (2). Thick roots are selected for cuttings (3), and the rest of the plant is returned to the garden. Tiny fibrous side roots are removed (4). The cuttings are made about 3 inches long, and polarity must be retained, so angle cuts are made at the bottom (earth end) of the cuttings (5), straight cuts at the top (skyward) (6).

A gallon pot is filled with moist medium and tamped down to remove air pockets (1). A pencil drills holes to receive the root sections (2). The cuttings are set into the medium so that they are flush with its surface (3). Grit is poured to the top (4) and skimmed off (5). The pot can be set above bottom heat in a cool greenhouse, but any spot will do as long as the pot will not freeze. And since there is no top growth, direct sunlight is not necessary, nor is extra water usually required until the sprouts appear above the ground (6). Top growth is not a guarantee that new roots have formed, so leave the cuttings for a season.

The thin-root process begins in late winter by knocking a greenhouse-grown plant out of its pot or harvesting roots from garden plants below mulch. The wiry roots are pulled from the ball.
Dormant buds can be seen as white specks. The root sections are placed horizontally in rooting medium (perlite) again, bottom heat will speed the process.
In a month or two, green plants appear all over the medium and the little plants can be pulled free to be potted individually and watered.
Woody plants that are known to produce suckers and vertical shoots near the main plant, shrubs such as lilac, sumac, buckeye, daphne, and woody aralia, can also be propagated from root cuttings. (Remember that many variegated plants will not pass that characteristic along by this method.) A surprising number of trees can likewise be propagated from root cuttings, but, as you might imagine, harvesting the roots is a challenge. Suckering trees, such as black locust, acacia, catalpa, and Paulownia (or empress tree), often have shallow roots that can be uncovered for cuttings. Vines such as passionflower and cross vine can be propagated from their roots, as can trumpet vine (although I can’t imagine why one would want more of this athletic creeper).
Thick roots, such as those of perennial forget-me-not (Anchusa azurea), are like pieces of horseradish and can be prepared in autumn by slicing through a chunk horizontally.
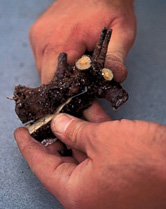
This produces two long halves and exposes the white flesh. The halves are set into rooting medium cut side up in a greenhouse or sweatbox (bottom heat is helpful). Roots grow, as do shoots.

In spring, pieces of the root cuttings with shoots can be cut apart. The sections are potted individually and will be hardened off—along with the seedlings started under lights in the indoor nursery.

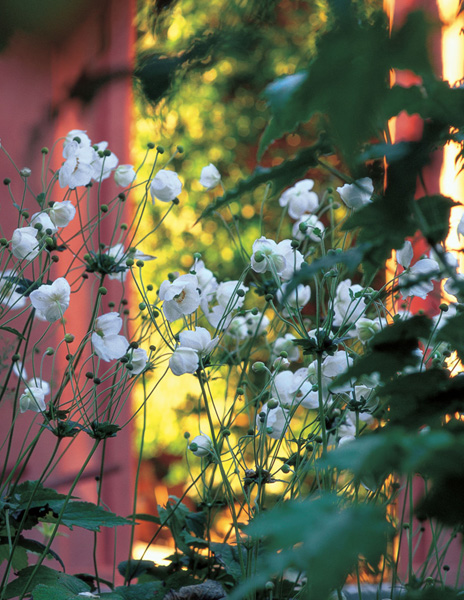
The late-summer-to-fall-blooming anemones will yield hundreds of slender roots for propagation.
One thing gardeners are sure of: the garden is never finished, and we wouldn’t have it any other way.
Micropropagation, meristem propagation, and tissue culture are synonyms for the latest method of vegetative propagation. This process entails growing an entire plant from as little as a single cell of the meristem, or growing point, of a plant. After many successes, and many failures, micropropagation has proved to represent the future for commercial propagation.
Although micropropagation holds a powerful allure, the financial and personal commitment necessary is daunting. One of the few books on the subject, Plants from Test Tubes: An Introduction to Micropropagation, by Lydiane Kyte and John Kleyn, suggests that tissue culture might be feasible for home gardeners, but then it goes on to list the requirements, including a sterile laboratory with an air-filtration system, body suits, masks, latex gloves, goggles, flasks, dishes, and a microscope.
In micropropagation, the guiding premise is totipotency, the notion that every cell of a plant has the genetic information encoded for every part of the plant. By manipulating hormones, a propagator “tells” a tiny cutting of callus or cells of new tissue to grow roots and shoots in vitro. The cuttings are made with surgical tools and placed on a growing medium, usually gelatinous agar, that has been enhanced with hormones and nutritional chemicals precisely concocted for the specific plant species.
Hundreds of cultivated varieties of expensive plants, such as hostas and orchids, are being reproduced through micropropagation. Tera Nova Labs in Oregon produces little plants of some of the Pulmonaria and Heuchera discoveries of one of its partners, Dan Heims. Dan’s hybrids, such as Pulmonaria ‘Spilled Milk’ and Heuchera ‘Pewter Veil’, are commonly found at garden centers. Tera Nova can make as many as 100,000 copies of one of these hybrids in only two years from its discovery.
Another advantage to tissue culture is that it is often a way to produce disease-free material from an infected plant, which otherwise would pass the pathogen to its progeny. The newest growth of plants either is not diseased or can be partially sterilized by a quick dip in a disinfecting solution of bleach and water.
The most exciting reason to venture into micropropagation is that plants that may be extremely or nearly impossible to reproduce through other methods can be propagated in vitro. Orchids are a prime example; this family is notoriously difficult and slow to propagate by sexual means because the seeds resemble spores with no nutritional support. Commercial growers have grown seeds in flasks of nutritional medium for decades, but sexual reproduction of an orchid hybrid by conventional means had been nearly unfeasible for mass marketing. Micropropagation presents a viable method that has revolutionized the orchid industry.
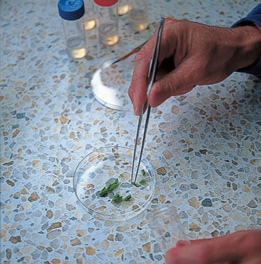
Students at Ryde College of Horticulture in Sydney, Australia, demonstrated simple operations for me on relatively easy-to-root cuttings such as coleus. Half-inch-long pieces of a plant were removed, dunked with tweezers in a 10 percent solution of bleach and water, and placed in a glass dish. Cuttings of the terminal growth, about 1/16 inch long, were sliced away from the sections with a sterilized scalpel. Next, the tiny bits were picked up with the tweezers and dropped onto prepared medium in labeled test tubes. The tubes were sealed and placed under fluorescent lights. Watching the process made micropropagation a little less intimidating to me, and perhaps worth a try in the future. I saw the results of earlier experiments as tiny plants in similar vials.
It is not unreasonable to imagine that someday home gardeners will be practicing tissue culture. As more gardeners want to learn about propagation, someone will undoubtedly find a way to translate this most precise and specialized aspect of making more plants into an accessible technique, and perhaps produce a kit for gardeners to try tissue culture at home.
Growing entire plants from tiny bits of tissue is where the journey ends, for now. That highly specialized propagation technique may seem mind-boggling, but remember that some plants you’ll want to grow will sprout from seeds in a week or two, and that coleus cuttings taken in spring will have roots in less than three weeks.
Vials under fluorescent lights hold tiny coleus plants grown from just a few cells of meristem tissue in sterile, nutrient-enriched agar. The process begins with a surgeon’s tools and vials of prepared medium.
After being dipped in a dilute solution of sterilizing bleach that kills surface contaminants but is not strong enough to harm the plant’s cells, the cutting is held with tweezers as the scalpel is readied. A tiny piece of the newest tissue is cut out. The cutting is picked up with tweezers to be lowered into the vial and placed onto the medium surface.


To become a great propagator, you must have patience, but to begin to propagate plants, all you need is curiosity. There will be triumphs, and there will surely be misses in your experience. Even great gardeners have experienced failure. Dan Hinkley of the Heronswood Nursery in Washington State writes of many of his adventures with plants, “Been there, killed that.” Bob and Briggita Stewart of Arrowhead Alpines in Michigan say that the measure of the best among elite growers is how many plants they have killed. In propagation, just as in all kinds of parenting, sometimes it is necessary to let go. But I can truly say that I have never lost a plant without learning something.
A beginner asked me recently about an African violet he had that had grown a long barren “neck” and had leaves only at the end of the trunk. The plant was leaning over the edge of the pot, threatening to topple off the windowsill. He wanted to propagate the plant by cutting off the top and rooting it in water. I explained how the top could be rooted in perlite, but I suggested that a better way to propagate it would be to take three or four leaf cuttings and throw the rest of the plant away. He protested, saying that he didn’t want to throw the plant away, he wanted to learn. But the best lesson is to know when to cut your losses. Fresh leaf cuttings will yield better plants than the scraggly African violet top.
Imagine the sense of accomplishment when flowers push up from a beautiful rosette of leaves grown from a single leaf. Picture what it will be like when the mail-order perennial you purchased can be divided in its second year into four, five, or six plants. Consider the thrill of watching a plant be “born” from a seed that you harvested. Dream about taking a little chunk of a plant that isn’t even on the market, a towering red-leaved canna for instance, and then in only two seasons, walking through a grove of 6-foot giants.
The bit of tissue in culture. The future has arrived. Many plants, such as hardy perennial pulmonaria and heuchera, are already produced this way and sold at nearly every garden center and nursery.