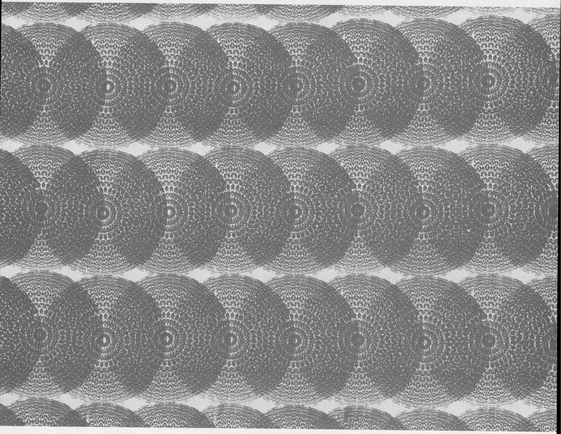
Fig. 6-1. A presensitized screen-process film was used to make the stencil for this textile print. (“Circles,” by Patricia K. Mansfield)
6. POSSIBILITIES WITH RESISTS
We are going to shift our approach somewhat in the hope that it will give you a broad understanding of the process as well as reinforce and further elaborate on what we have already said. The preceding chapters give an idea of the complete screen process. However, this process is very flexible and contains many variations, and we would like to discuss some of them in detail in the next several chapters. Unavoidably, there will be a little repetition, but it will help to jell the ideas already in your mind.
The major problem of a how-to-do-it book, as this professes to be, is that interest in the problems of technique and physical manipulation of the medium are given so much space and importance. One is apt to forget that technical craftsmanship and skill are completely subordinate to the idea presented, the artist’s conception. This is the only reason for making the print or producing the textile in the first place. The technique must never stand in the way of the idea’s clarity and potency or the result will be merely a brilliant show of technical virtuosity. Technique with no purpose is impressive but useless.
Yet craftsmanship and technical competence are important, particularly to the beginner. And, in a manner, this must come first. With experience, it is hoped that techniques will become intuitive. Then the major effort of the artist and designer can be directed at the idea that he is expressing in his textile design or serigraphic print.
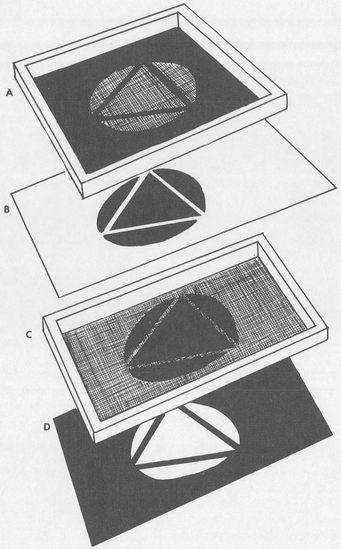
Fig. 6-2. In a positive stencil (A) the design motif is the open area that lets ink pass through to print the design on paper or fabric (B). In a negative stencil (C) only the background area is open for ink to pass through. On the print made with the negative stencil (D) the design motif is the only part not covered with ink.
The stencil is a resist that prevents the paint or ink from reaching parts of the printed image. Basically there are two types of stencils, positive and negative (Fig. 6-2). In the positive stencil, the resist material fills in the background, and the actual image is printed. This is the normal way of looking at objects, and therefore positive stencils are a little easier to work with. Paper stencils, cut films, washout-resist stencils, and most photographic stencils are positive images. In the negative stencil, the resist material is applied to the screen as an actual image. Most direct blockout stencils and some photographic stencils are negative-image processes.
It has been claimed that there are over forty-five different kinds of stencils prepared for the commercial screen-process industry alone, and individual serigraphic artists and textile designers have added considerably to that enormous proliferation of resist methods.
Unfortunately, the process itself is so intriguing that one becomes fascinated with new ways of making a resist. Actually, an artist should use no more stencils or different kinds of stencils than serve the clarity and strength of his final visual statement. Some printers use too many stencils. You can produce an excellent print or fabric design using only one stencil, and most prints and designs do not require more than three or four stencils to make complex and effective images. So discipline yourself and select your stencils sparingly and carefully. On the other hand, there is no reason to limit the number of stencils used if your statement would be more effective with additional ones. For example, certain rich, lustrous transparent colors may need a rather large build-up of different stencils before the desired effect is achieved.
For any multistencil design, four register marks should be drawn on each screen at the very beginning of the designing process, and they should then be included on every stencil no matter how produced. This assures accurate placement of each stencil resist on the printing frame (Figs. 6-3 and 6-4). In printing a serigraph it is also helpful to print the register marks on each print run in the margin of the print. This gives one more helpful check on the accuracy of the register of each color. The marks can be trimmed off the print or covered by the mat in mounting.
One other caution can be applied generally to all stencil production: the screen fabric stretched on the frame that will serve as the support for your stencil resist must be scrupulously clean. See Chapter 8 for procedures.
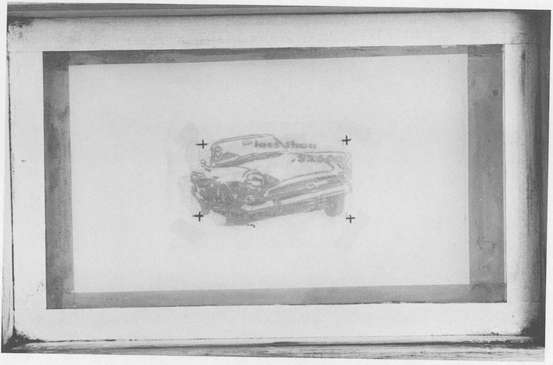
Fig. 6-3. The four black crosses on the stencil are register marks.
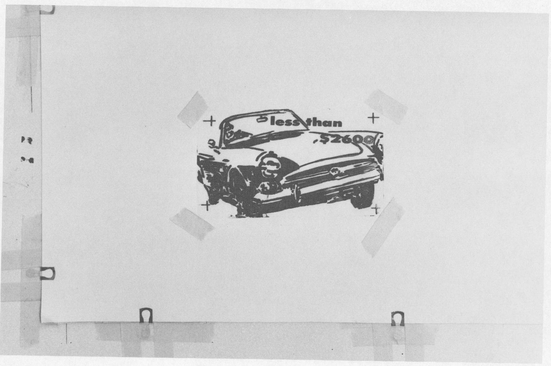
Fig. 6-4. The register marks should be printed on the first trial proofs prints of an edition to check accuracy and then be blocked out on the screen for the running of the actual edition. If the register marks are on the margin of a print, they can be left on during the run and later trimmed off or covered with a mat.
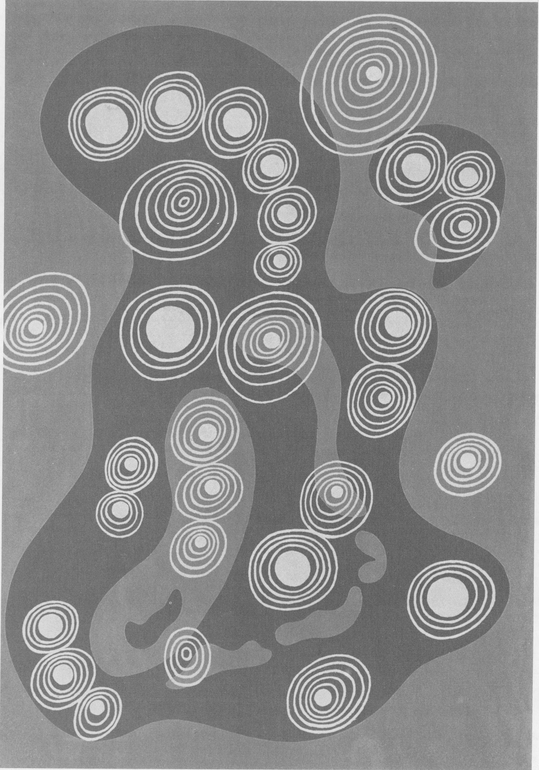
Fig. 6-5. The large free-form shapes in this serigraph were printed with paper stencils. (By Russell Peterson)
The Paper Stencil
The use of paper for the stencil resist is a simple, economical, and fast way to produce a screen print. The paper stencil is an excellent first experience for the beginner because it is an approach basic to the design process, and it is also easy, flexible and rewarding. Creating cut shapes frees him from some confining design clichés. The cut-paper shape is very different from a shape that is drawn. The shapes can be cut and used simply as a design exercise, without printing or adhering them to the screen fabric. The stencils can be cut and arranged in many trial ways. The positive forms (the parts cut out), because they are cut out of the paper, are visually sympathetic to it. They can be combined easily in a variety of ways. They can even be adhered as a stencil on the screen for a resist and printed. Many artists like to use paper stencils in the experimental first stages of a print. Or they can be used as a basis for a cut-film stencil if you place transparent film over the shapes and cut it. In the photo-stencil process, if the cutouts are opaque enough, they can serve to block out the light in exposure.
Almost any paper can be used for paper stencils, depending on what effect you have in mind. The paper used is usually transparent—or can be made transparent—and will not allow the paint to seep through it. It will stand up under a short run. Most paper stencils will give fifty to a hundred good clear impressions. Opaque paper can be used if you are designing the print directly with the paper stencil shapes and not working with a preliminary sketch. Ordinary blank newsprint makes an economical and satisfactory stencil, but it will wear out sooner than stronger papers.
Thin papers and very absorbent papers, like some tissue papers and rice paper, may allow the paint or ink to seep through during the printing process. Normally this is to be avoided, but for special effects and for short runs it can be controlled. A number of trial prints must be made first until the seepage is stabilized at the level you need. Then you must use a fairly light, consistent squeegee pressure. Check each print to see that the seepage does not become excessive. When it does, replace the paper stencil with a second paper stencil, cut simultaneously with the first one so that it is an exact duplicate. In this manner, normal print consistency is possible and special textural effects can be achieved.
Ordinary household freezer wrapping paper with a plastic coating can be used. The first pass of the printing ink with the squeegee will adhere the paper to the screen meshes if it is lightly fastened to the underside of the frame with masking tape before hard. This is reasonably durable even with water-soluable inks.
The common stencil paper used by house painters should not be used for most prints because it is thick and will deposit a heavy coating of paint on the print. On the other hand, if you want an impasto effect, you can get it by using just such a thick, or even thicker, paper stencil, for the layer of ink deposited will be just as thick as the stencil used. Paper stencils, even the thinner ones, deposit more ink than most other stencil-resist methods.
Waxy papers are generally not satisfactory for paper resists, because they tend to repel paints, especially water-based paints.
Papers that are not naturally transparent can be made transparent by rubbing them with a rag soaked in mineral spirits, cooking oil, or kerosene. They should then be pressed for a while between layers of paper towels to soak out the excess oil.
Weaker papers like newsprint and some of the tissue papers can be made stronger by coating them or, better still, spraying them with four coats of shellac or clear lacquer; this will also make them transparent. Papers that have been so treated will adhere more firmly to the stencil fabric. If you have used shellac, place the paper under the frame, shellacked side up against the mesh, with absorbent paper (several thicknesses of paper towels or a desk blotter will do) over the silk on the inside of the frame. Then apply heat with a warm iron on the absorbent paper inside the frame, checking frequently to see if the paper has adhered. All you need to do is heat the paper sufficiently to soften the shellac. Lacquered paper can be applied like a lacquer-film stencil (see page 89).
Clear thin acetate can also be used effectively in this manner. The acetate is given four coats of shellac, cut, and then ironed onto the screen the same way shellacked paper is. A minimum amount of heat should be used.
When you cut a stencil, it is important to use a very sharp knife and to keep it sharp by rubbing it on a finely ground oil stone as you work. The cutting surface must be hard and very smooth. Glass has many advantages. It has a hard, firm surface, although the knife must be sharpened more frequently. In addition, it can be placed right over the sketch and will protect the sketch during cutting. If the stencil paper is not transparent enough for you to follow the sketch easily, it then can be put on a light table or held up to a window. If you need several identical stencils, you can make them accurately by taping together several sheets and cutting them simultaneously. If you are cutting opaque paper or using the stencil as a means of designing, you can use scissors because you are not working over a preplanned sketch.
Many things can be done with paper; only your own imagination will limit you. Instead of cutting the paper, you can tear it into the shapes and holes desired and get softer edges. The edges can be burned with a wood-burning tool, or sandpapered, or the surface of the paper can be roughened with sandpaper to allow some ink to come through it. Holes can be punched with a rotary serrating, or pattern-tracing, wheel creating a dotted-line effect. This wheel can also be used in a step preliminary to tearing out the shape along the serrated line. Holes can be punched in the paper with a paper punch or a leather punch or in any other manner.
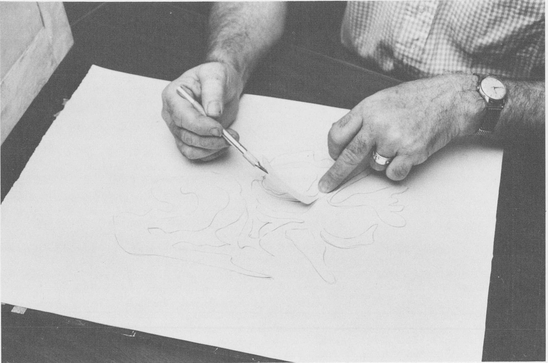
Fig. 6-6. If a paper stencil has floating parts it is a good idea to leave the cutout sections in the stencil until it has been adhered to the screen and then pick off the unwanted sections with tweezers. This makes for accurate, easy placement of the floating parts.
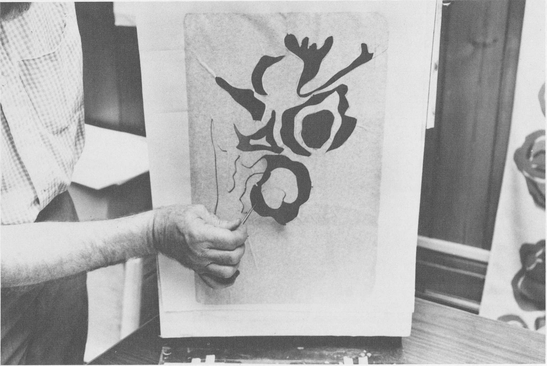
The main problems in adhering a paper stencil to the screen mesh are caused by floating parts, thin, delicate peninsulas of paper, and the fragility of most paper stencils. It is the tackiness of the printing ink that holds most paper stencils to the screen mesh. The cut-paper stencil is laid down in position over the sketch on the printing board for a serigraph. In fabric design, where the use of the paper stencil is more informal, positioning needs to be worked out during the printing process. The floating pieces that are part of the design and fragile parts of the stencil are then lightly glued to the screen mesh. A little drop of water-soluble glue is pressed on the screen mesh with a cotton swab until it contacts the paper stencil underneath. Larger pieces may need several such glue drops. The outside edges of the paper stencil are lightly taped to the outside of the printing frame with short pieces of masking tape.
Many artists leave the cutout pieces in the stencil at this point. After the glue has dried, some ink can be placed in the printing frame and squeegeed across to adhere the stencil to the silk. The cutout parts left in the stencil protect the sketch underneath (Fig. 6-6). They are then picked off with tweezers. However, if it is too difficult or time-consuming to leave those pieces in the stencil, the stencil frame will have to be carefully raised after the glue has dried. The sketch is then removed, and a piece of waste printing paper is put in its place. The stencil is printed to attach it securely to the screen. The paper stencil is then taped around the outside edges to prevent the ink from seeping out, and it is ready for printing (see Chapter 3, Step 23).
Generally speaking, paper stencils (unless they have been protected with shellac or lacquer) are not satisfactory for use with water-based inks. They will buckle on the frame and then leak. In textile design, however, they are helpful when a simple direct shape is needed or when you experiment with trial prints.
Since most paper stencils are adhered with the printing ink, they will peel off from the screen when the frame is cleaned. Those parts attached with glue must be washed off with warm water. Stencils coated with shellac and adhered with a warm iron must be removed with alcohol. Stencils coated and adhered with lacquer are removed with lacquer thinner.
The Blockout Resist Stencil
The blockout resist stencil is also a very easy, fast, and economical way to produce a screen resist. It, along with the paper stencil, is an excellent first method for the beginning screen artist (see Chapter 3, Step 25) and easy enough for a child to manipulate. It is also extremely flexible, and, as you will see, your own ingenuity is the only limiting factor.
The blockout resist is generally used as a negative stencil. It is the image or design shape that is easier to apply by painting or adhering. This means that the background—the space around the design shapes—or negative area, is left open and free for the passage of the paint. Some artists and designers, however, paint or apply the resist to the background areas, creating a positive stencil, even though this is more difficult.
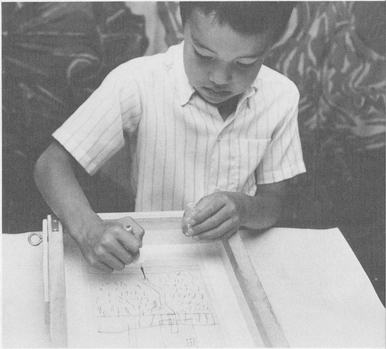
Fig. 6-7. The youngster is tracing his design on the screen with fingernail lacquer to make a resist.
As with the paper stencil, there are many materials that can be used for a blockout and many ways of applying them. Glue is the most common, and it is mixed as follows: 5 ounces of hide glue (like LePage’s—the glue must be soluble in water after it has dried), 4 ounces of water, 1 scant ounce of vinegar, and 10 drops of glycerin. Since it has almost no color and is difficult to see when applied, about ½ teaspoon of showcard or tempera color will give it an adequate tint. The glue mixture can also be thinned considerably with water to develop pinholes, if a textured effect is desired, although this is not normally done. The actual amount of thinning is up to the artist.
Other materials that can be painted on the screen are lacquer (tinted with fingernail polish), shellac (tinted with oil colors), liquid wax emulsions (tinted with wax crayons), stove enamel, asphaltum, and any of the several blockout liquids sold by the commercial screen-process supply houses. Ordinary wax crayon can be rubbed on the screen mesh as a blockout, but this works only for water-based paints and even then only for short runs. Oil-based paints tend to dissolve the wax crayon. Cooking paraffin can also be rubbed on the screen mesh in the hard cake form, but it works better melted. Melting paraffin in an electric stew pan with an automatic temperature control reduces the danger of fire. It is applied hot to the screen mesh by any means you want to use. Lumps of hot wax, if they occur, must be scraped off the screen mesh with a dull knife.
But besides liquids that can be painted and solids that can be rubbed on the stencil, there are various adhesive materials that can make blockout resists. Masking tape can be cut in various ways and adhered to the silk. Press-type letters can be stuck to the screen fabric and printed as is, or sprayed with shellac or lacquer around them and then peeled off when the lacquer dries. Use a pressurized can of lacquer for this. When you take the letters off, you will have a positive image that can be printed. Self-adhesive decal paper will also work. It is available in sheet form and in many standard shapes. The paper can be cut or the shapes selected. The protective backing is removed, and the decal adhered in the proper place to the screen.
There are many different ways of applying liquid blockout materials. Any of them can be applied with an ink roller or brayer, with cut and notched pieces of cardboard, crumpled paper, sponges, fingers, sticks, or cotton swabs. They can in many cases be thinned with the appropriate solvent and put on with bamboo pens, ballpoint pens, and even ruling pens. But be very careful not to cut the silk with ruling pens. They may have to be dulled slightly with emery cloth before they will be safe.
If the glue solution is applied to a damp screen fabric, it will produce softer edges. While glue is being applied to a screen, either damp paper or wax paper can be placed underneath. The damp paper can be lifted away after the glue has been applied to the screen mesh. The wax paper can be removed when the glue is partially dried. Each will produce a different effect. If the screen has been given a light coating of machine oil, it will cause the glue to creep and crawl.
Glue and other liquids can be transferred from another surface and printed on the screen mesh. They can be painted on wax paper, for example. The screen is then carefully lowered onto the wax paper so that it is stuck to the silk. Next, the screen is slowly lifted up, and the wax paper carefully peeled off. With wax paper, the glue may be allowed to dry partially before it is removed. All sorts of objects—pieces of wood, various textures of cloth and cardboard, bolts, screws, cross sections of vegetables, and keys, for example—can be given a light coating of liquid glue and then pressed on the screen mesh.
The liquids can be dribbled, poured, and applied by brush or from spouts of plastic mustard containers. A very soft, almost halftone effect can be achieved by placing various shapes or objects on the surface of the screen mesh. Liquid blockout is then sprayed on the screen mesh around those objects with an artist’s airbrush. Pressure spray cans of lacquer will also work. Before you use any particular pressure spray paint, be sure that a suitable solvent is available to take it off the screen when the print is finished.
While the liquid blockout is still wet on the screen mesh, objects of various kinds including your own fingers, cotton swabs, and various absorbent papers can be pressed on the wet blockout to blot up some of the liquid. This will also affect the nature of the pattern.
After the liquids have dried, they can be touched with a drop of the proper solvent, which is then allowed to rest on the surface for a short time. Then the surface is wiped quickly with one brush of a dry cloth. Stroking more than once will remove too much. Proper stroking will produce small holes in the resist. Edges of the blocked-out areas can be softened by scrubbing them lightly with a brush and the proper solvent.
The blockout resist is particularly adaptable to reduction printing (Fig. 6-8). In brief, this means that a blockout is applied to portions of the screen, and then it is printed. When the print has dried, more of the same blockout is applied and a second color is printed. Up to five or six reduction color runs can be made for one print, with a little more blockout area being added each time. The thickness of the layers of blockout on the screen will call a halt. To make the process less confusing to the artist, the first blockout solution can be tinted a very light color, say white. Then each successive blockout is tinted a slightly different or darker color. This will facilitate design planning during the production process.
Since the last color is printed on all of the previous colors, very rich effects can be achieved, especially when a number of transparent colors are used. A beginner is likely to get a more unified print in this manner, particularly in color and shape. The use of one stencil to which shapes are continually added, reducing the area printed, tends to unify the print. There are a few precautions to be taken with this method. After each new application of the blockout, double-check for the appearance of pinholes. The wear and tear from printing and cleaning frequently produces new pinholes in the old coating. Great care must be taken in the removal of ink after each printing. It tends to stick to the blockout in tiny crevices and, when covered with a new coating, to make final cleaning much more difficult. Because of the number of successive blockout coatings and color printings involved, a blockout resist should never be left on a screen for too long a period, or the screen may turn out to be too difficult to clean. (See Chapter 8 for instructions for removing blockout resists.)
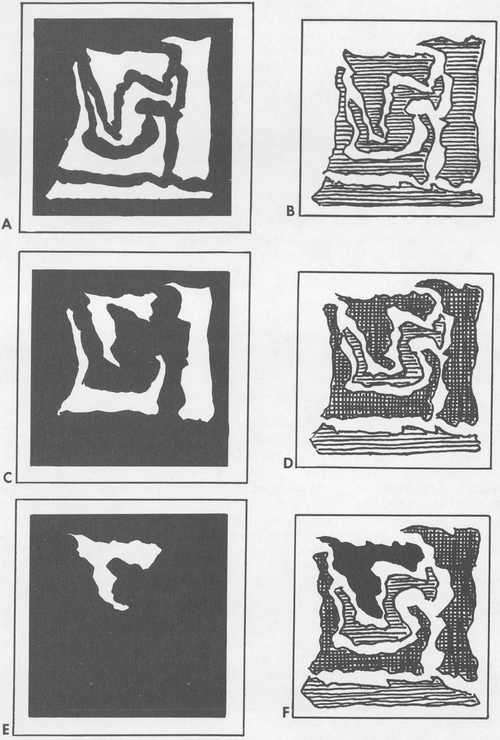
Fig. 6-8. In this drawing, the three stages in making a three-color reduction print are demonstrated. The background area (shown in black) is painted on the screen with lacquer as the resist (A), and the first color is printed (B). Next, the center and lower parts of the design are blocked out on the screen with lacquer (C), and the second color (the cross hatches) is printed over part of the first color (D). Now all of the original design except the top left part is blocked out on the screen with lacquer (E), and the third color is printed (F) over that part of the original design (the black area).
The Washout Resist
The washout resist is the most popular stencil among serigraphers, probably because it is the most autographic stencil and it most resembles the painting process. Its most common form is the well-known tusche-and-glue stencil. In essence, the washout-resist stencil is a double resist method: first, a temporary resist is made, which will be removed from the screen before printing and replaced by a permanent one that will be the printing screen resist.
You will remember that in Chapter 4 we used the common tusche-and-glue resist for one of the color runs. We would like to go over that process again, but in considerably more detail. The repetition may help to make the process clearer. Lithographic tusche in both crayon and liquid form is first applied to those sections of the screen to be printed. To get a cleaner line and more detail, you can first wipe the screen with a cornstarch solution. Mix 2 teaspoons of ordinary cornstarch in a cup of hot water and coat the underside (printing side) of the screen mesh with it. Let it dry before painting the tusche on the screen (Fig. 6-9). It is usually necessary to put two coats of tusche on the screen fabric to get the solid opaque black coating needed. Hold the frame up against a light to check its opacity. In applying the lithographic crayon, press it very hard into the silk in order to fill the meshes. For a textured effect, you can place various materials like corrugated cardboard, pebbled book covers, wall plaster, or wood grain under the screen and then rub the mesh with a lithographic crayon. Again, be sure to get a good deposit of the black crayon on the screen mesh. Liquid tusche can be used to accent these crayon rubbings. When the tusche is dry to the touch or does not rub when touched lightly, it is ready for the glue. It will look shiny and wet: it never gets a completely dry look.
The glue mixture is now scraped with a scraper over the tusche on the inside of the screen (see Chapter 4). An improvement on the cardboard scraper would be one made of tin or aluminum. The scraper should be as wide as the screen area and perfectly straight on the scraping edge. While a metal scraper should have a definite edge, it should not have any nicks or burrs that might damage the screen. The scraping edge should be rubbed down with emery cloth and the ends slightly rounded so that there will be no sharp corners to damage the screen. If you wish, you can place the scraper between two thin slats of wood to form a handle. Metal will scrape cleaner than cardboard, leaving less glue deposited on the tusche. After the first scraping of glue has dried, a second one is applied in exactly the same way. Any flakes of glue left on the tusche can be scraped off with your fingernail or a dull knife. When it is dry, the tusche is removed from the screen with mineral spirits or turpentine (again see Chapter 4), and any unwanted pinholes are filled with the glue solution. The screen can now be printed.
Lacquer can be used with the tusche in the same manner as glue to make a stencil that can be used with either water- or oil-based paints. There are also other combinations of two resist materials that serve the same purpose. Hot wax or liquid wax emulsion can be dripped or painted on the screen as the temporary resist, with glue or lacquer used as the second or permanent resist. The glue formula for a glue blockout stencil mentioned earlier in this chapter can be used for the temporary resist—it is a little more concentrated than the glue applied over tusche—with lacquer for the permanent resist. Stove enamel, asphaltum varnish, pressure-sensitive decals, press-type letters, and masking tape can serve as temporary resists with either glue or lacquer as the permanent resists.
Rubber cement or, better still, Maskoid has great possibilities as the temporary resist with lacquer as the permanent resist. Maskoid is a rubber-based product used by commercial illustrators and can be purchased at most art stores. It can be thinned with distilled water and has the advantage of drying quickly. It can be peeled off the screen if a mistake is made. Maskoid can be handled very freely and spontaneously because, unlike most other first resists, it does not need a second coat. It will give a very fine line and can be applied with a brush, bamboo pen, strip of cut cardboard, crumpled paper, or sponge. Maskoid tends to coagulate in a brush, but this can be prevented by lathering a little soap in the brush before it is used. After the stencil design has been finished, the brush and pen can be cleaned in soapy water. The screen is coated with lacquer for a second permanent resist, and the Maskoid is rubbed off with the fingers to create the stencil.
Another interesting method of producing a washout resist is to combine a temporary blockout with a permanent photographic emulsion. Clean the screen thoroughly, then apply the gelatin emulsion to the screen mesh in the manner suggested in Chapter 5; however, do not add the liquid sensitizer to the emulsion at this point. Because the emulsion is not sensitized, this process does not require a darkened room. After giving the screen two coats of the emulsion and allowing each coat to dry, paint your design on the underside of the screen mesh with black lacquer. After the lacquer is dry, carefully and quickly brush the sensitized emulsion on the under surface of the screen only. Be careful not to get it on the gelatin emulsion on the inside of the frame. Lay the frame flat (underside up) on the table and allow it to dry in that position. Then stand it in the light to expose it. In bright summer sunlight, only about five or six minutes will be needed. On dull winter days, several hours should elapse. You will need to experiment here. Some fluorescent lights will not affect the emulsion; photoflood lamps will, but are slower than bright sunlight. When the screen is fully exposed, take it to a sink and gently wash the inside of the screen fabric with water between 90 and 120 degrees. The unexposed emulsion under the lacquer design will float away taking most of the lacquer with it. Stubborn bits of lacquer and gelatin can be removed with lacquer thinner and warm water. If you are interested in the photographic process described later in this chapter, you will learn something by trying this simple version first. (See Chapter 8 for removal of the resist.)
After you acquire some confidence and skill with this form of stencil resist, you might try printing a single washout stencil that uses three different resists for each of three colors. With some skill in overprinting, many more colors than the original three can result. Carefully work out your design in detail in a sketch. Cover all of the areas to be printed with color number one on the inside of the screen mesh with Maskoid. Paint the areas to be printed with color number two on the screen mesh with two coats of tusche (Fig. 6-10). Paint all of the areas that are to print color three with two coats of glue. Then scrape the permanent resist, a lightly tinted lacquer, over all of the inside of the screen (again on the inside of the screen). Do not make it any heavier than necessary to cover the meshes still left open.
Now rub Maskoid off the screen mesh, and print the first color. After this color is printed, protect those parts of the screen that are to remain this color with the lightly tinted lacquer. If you do not cover all of color number one, you will increase the richness of your colors.
Next, from the underside of the frame (the printing side) remove the tusche resist with turpentine. You may have to do some rubbing from both sides to accomplish this. When it has been removed, print color number two. When finished, protect those areas you wish to leave as printed with the tinted lacquer. Part will be color number two only, and the rest will be color two printed over color one.
Finally, complete the design by removing the glue with hot water from the underside of the printing frame and printing the third color. The final resist is then removed from the screen with lacquer thinner. This is not a process for the beginner to attempt, but after you have gained a little experience and skill, it could be a challenge for you and it can produce some very interesting results.
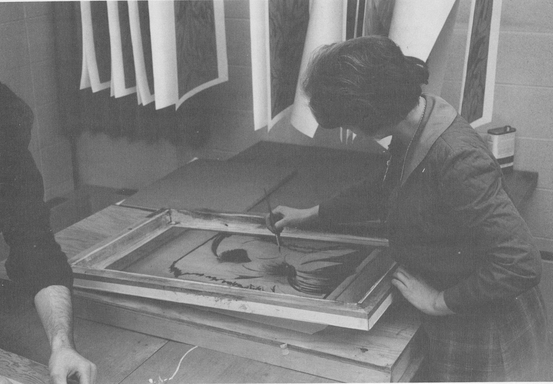
Fig. 6-9. Liquid lithographic tusche is applied to the surface of the screen fabric with a brush.
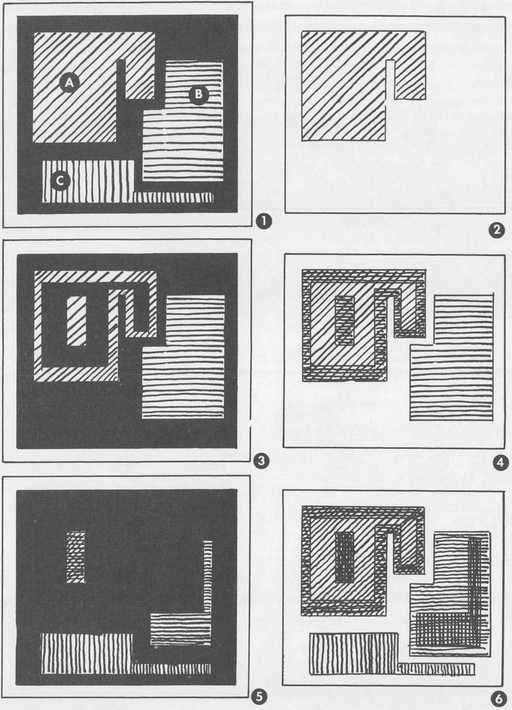
Fig. 6-10. This drawing shows how to create a six-color design using only one stencil with three different blockout resists and three colors of transparent ink. (1) First a Maskoid resist (A), a water-soluble glue resist (B), and a lacquer-soluble resist (C) are applied to the screen fabric; then a permanent blockout that will resist rubbing, water, and lacquer is applied over all. (2) The Maskoid is rubbed off and color number one (diagonal lines) is printed. (3) All but the outside edge and the central rectangle in the first-color area of the screen are now blocked out with the permanent resist and the water-soluble resist is washed off area B. (4) Color number two (horizontal lines) is now printed. (5) Additional areas of the screen that printed the first and second colors are blocked with the permanent resist and the lacquer-soluble resist is removed. (6) Color number three (vertical lines) is now printed. Where color two overprints color one, a fourth color is created; where color three overprints color two, there is a fifth color; and where color three overprints the first and second colors combined, there is a sixth color.
The Cut-Film Stencil
When, in 1929, Louis F. D’Autremont and A. S. Danemon brought out the first hand-cut film stencil, called Profilm, it revolutionized the commercial screen-process printing industry. Because the early Profilm was easy to use, it brought the screen-process print to the attention of artists and teachers throughout the country. For most, however, it was still a process for making school posters without involving an entire art class in every poster project. Even today, when there are many different types and brands of hand-cut film stencils, many screen printers still refer to any cut-film stencil as “Profilm.” Because of the sharp, clean-cut image that it produces, the cut-film stencil is widely used by commercial printers, artists, and designers.
We are not going to repeat the rudiments of the process given in Chapter 4. Instead, some suggestions that might make each step a little easier will be given. Basically a cut-film resist is a stencil that is a laminate of at least two materials. First there is a backing, frequently a heavy grade of good wax paper. Since wax paper is affected by heat and humidity, some of the newer stencils are bonded to clear acetate. The film layer, which is what actually becomes the permanent resist on the screen fabric, is made from at least three different materials. The film of lacquer is still most common, but recently lacquer-proof films adhered with a special adhesive and water-soluble films adhered with water have become available. The earliest Profilm was made of shellac on a wax-paper base and was adhered with a warm iron. This was more difficult to use than contemporary film but had one advantage over it. A single knife cut would not reseal itself when the film was adhered, and very fine lines could be cut and printed. Such film is very difficult to obtain today. Films come in a variety of colors, and different film cutters prefer different colors. Eye strain and the ability to distinguish the colors of the original sketch through the film are reasons to choose a particular color.
A simple design is fairly easy to cut, and most beginners who observe a few precautions can do it satisfactorily. But professional film cutting is a highly skilled part of the commercial screen industry, and good film cutters are in great demand. The shortage of highly trained film cutters has accelerated the use of the more complicated photographic screen resists.
The film is placed over the sketch to guide the cutting. Since the knife should not cut through the backing, the sketch will be protected. Some designers like to arrange cut paper under the film, then cut the stencil following ideas suggested by the shapes.
There are a few precautions to observe in cutting. Cleanliness is paramount. Any grease or foreign material on the surface of the film will make the adhering step much more difficult, especially with water-adhering films, which are more susceptible to grease. Hands should be kept clean and should not touch the working surface of the film except when it is unavoidable. Keeping a clean sheet of paper between your hand and the film is a good practice.
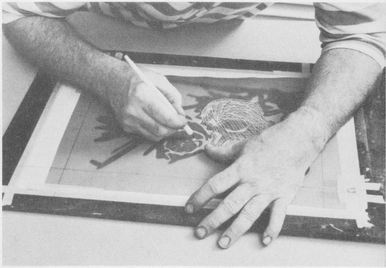
Fig. 6-11. A scooper cutter is used in cutting lacquer-film stencils to remove thin lines from the film.
There are many different types of stencil knives. The ordinary single-blade stencil knife with the blade inserted into an aluminum handle is most frequently used. There are also double-bladed knives to cut both sides of a line at once, and circle or compass cutters. One of the most useful of the special knives is a scooper cutter, which comes in three sizes for three different widths of cuts. The blade is a small circle of cutting steel, and the cutting edge is at the inside of the bottom of the metal loop. The round blade literally scoops the film off its backing. It can be used very rapidly and gives a loose, sketchy line (Fig. 6-11). Also available and quite popular is a knife with a swivel blade that revolves as you cut curves. All knives must be kept sharp as a surgeon’s scalpel. An excellent investment would be two sharpening stones, one a reddish India stone for sharpening the knife edge, and the other a white Arkansas stone for final honing of the blade. Both stone surfaces are lubricated for sharpening with a few drops of light machine oil. When the knife edge becomes dull, too much pressure is necessary to cut cleanly through the film, which distorts the backing sheet. This does not permit good contact between the film and the screen mesh during the adhering process. Adhering becomes almost impossible if distortion is severe. Too much pressure will make a sharp knife cut through the film backing, which also presents adhering problems. Actually, a very light pressure should be sufficient. In many cases, the pressure exerted only by the natural weight of the blade and handle will do the job. One way to test the pressure is to rub your fingers lightly over the film backing. If you can feel ridges where the knife has cut, you are likely to have trouble adhering the film.
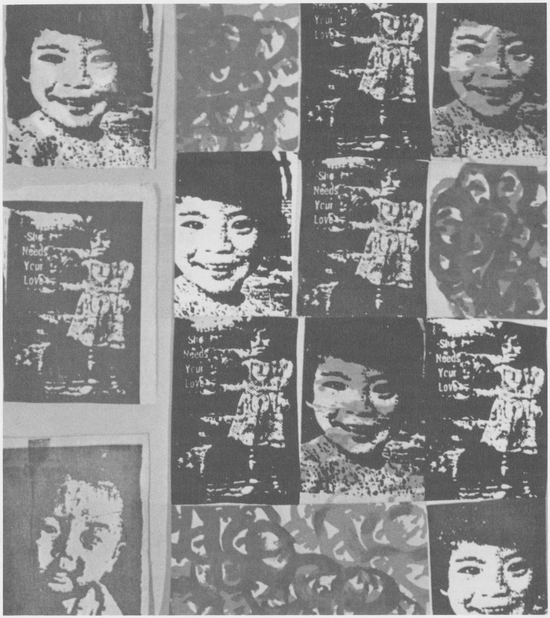
Fig. 6-12. (Reproduced in full color between pages 16 and 17.) Textile pattern composed of images in a light-sensitive film stencil made with a dry-copier transparency from current press cuttings produces a social commentary banner. (By Bobette Heller)
Cutting must be done on a smooth, hard surface. A sheet of glass or Formica works best, although the cutting blade will get dull and require more frequent sharpening. Scarred and marred surfaces and those with wood grain are to be avoided. Overcutting the line slightly is a good practice. This will ensure good clean corners and allow you to peel off the unused film more easily. The slight cut that extends into the film area will seal when the film is adhered. Often, if a section of the film is inadvertently removed, it can be replaced with the heat and pressure of your finger or the judicious application of a small amount of rubber cement thinned with 50 per cent rubber-cement thinner. Use a dull knife, an old ballpoint pen or a pair of tweezers for peeling off the film parts to be discarded. Instead, some designers place small lacquer-film pieces in a bottle with a little lacquer thinner to dissolve into a syrupy liquid that can be used to repair the printing screen. A wood-burning tool can be used to remove portions of the lacquer film. Small holes can be made with the tip, and broad areas can be removed with the side. Great care must be exercised to avoid burning the backing. Large areas where the film is removed will adhere more easily if a small hole is cut through the backing to allow air to escape. Film that has been stored too long gets dark and is more difficult to cut and to adhere, especially films with wax-paper backing. After the cutting is finished, roll up a small ball of masking tape with the adhesive to the outside of the ball. This is an excellent device for picking up any bits of cut film that have not been removed from the surface. If you are not going to adhere the cut film immediately, put it in a large envelope or file folder to keep it from gathering dust.
The screen fabric must be absolutely clean and free from grease before the film is adhered. Clean it with trisodium phosphate followed by a 5 per cent acetic acid solution (vinegar will work) and then rinse off the acid with cold water. Just before adhering the lacquer-film stencil, wipe the frame and screen mesh with a rag dampened slightly with lacquer thinner to remove all dust particles and prepare the mesh for the adhering process. Place a heavy piece of cardboard on a table. The cardboard should be a little larger than the cut film and smaller than the printing area inside the frame. Now put the cut-film stencil film side up on the cardboard to force the film and mesh to contact firmly. Position the frame with the mesh contacting the film and adhere them as suggested in Chapter 4. If the film does not adhere properly, it could be because the cutting pressure was too heavy, because there is too much humidity, or because the film is too old. If the problem is in the cutting, it is too late. Excessive humidity can be corrected by drying the film carefully in front of an electric room-heater. Adhering old film can be facilitated by rubbing a solution of xylene (a solvent for rubber cement) on both sides of the cut film. It will not damage the film, and it will loosen the rubber cement that adheres the film to the backing. Xylene is a hazardous chemical; check label precautions before use. After the adhered film has dried for twenty to thirty minutes (depending on conditions of humidity), carefully peel off the backing (see Chapter 4). The film is now ready for printing.
Lacquerproof films and those adhered with water are handled in exactly the same manner. Follow the manufacturer’s directions.
See Chapter 8 for removal procedures.
The Photo-Emulsion Resist
In recent years, the use of photogelatin emulsions in the screen printing process has added to the already great versatility of the medium. There are basically two methods of using a photogelatin emulsion. In the direct method, the emulsion is scraped in liquid form on the screen fabric and dried. The entire process takes place right on the screen mesh. In the transfer method, the emulsion is placed on some other support and not transferred to the screen mesh until the image is completed. Actually, there are two different transfer methods. In the single transfer, sensitizing the emulsion, exposing it, and washing out are done on a film backing, usually of acetate. The image is then transferred to the screen mesh for printing. In the double transfer, the emulsion is sensitized on the support it comes on. It is then transferred to a temporary support such as a sheet of Mylar. The emulsion is then exposed (often while wet), washed out, and the image transferred to the screen mesh.
The photo-emulsion resist is based on the principle that ordinary photogelatin to which a sensitizer like ammonium bichromate has been added becomes water insoluble when exposed to light. Those parts of the gelatin emulsion that have not been affected by the light remain water soluble and wash off to create the image.
The emulsion can be exposed to the light and the image produced by a number of methods. The simplest is to place opaque objects directly on the emulsion to prevent light from reaching it. Pieces of opaque paper or cardboard, semiopaque woven materials, threads and yarn, leaves, sticks, plant stems, paper clips, bolts, and many other things can be used here. This is probably the most direct way of creating an image. Even the dry-copy machines found in most offices can be used. These employ various heat-transfer processes to produce transparencies that can be used with the photogelatin emulsion resist. Halftone images from the printed page can be converted into two-dimensional motifs. Follow manufacturers’ directions for making these transparencies. This process suggests great design possibilities. Designs can be painted on clear acetate sheets with heavy opaque black paint. For larger designs, photo masking films with adhesive backing can be applied with ease to the acetate. In addition, a film acetate can be made with orthochromatic photomechanical film such as Kodalith. This is a very high-contrast medium-speed film that can be exposed directly in the camera to produce a high-contrast negative. It can also be used to create a large high-contrast positive when a suitable negative is used in an enlarger (Fig. 6-13 and 6-14). If an image with halftones is to be produced, a negative must be made with an 85-line halftone screen (this means that there are 85 dots and white spaces per linear inch). Anything finer than that in the enlarger will cause problems in the printing process. The halftone screen negative then can be put in the enlarger to produce a positive on Kodalith film. Both the painted acetates and the photographic positive are placed in contact with the emulsion to produce the resist screen.
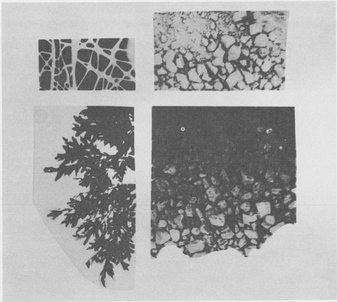
Fig. 6-13. A photographic negative exposed in a camera can be projected or enlarged on Kodalith film to produce a positive transparency with high contrast.
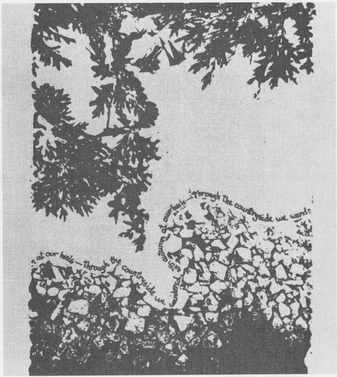
Fig. 6-14. Kodalith positive transparencies to which the hand script was added were exposed on presensitized screen-process film for this print. (“Through the Countryside,” by Caroline Hunkel Kitelinger)
There are a number of light-sensitive photo-emulsion screen films produced by commercial companies that are fast enough to be used directly in a copy camera or an enlarger. For the serigrapher and the fabric designer, using these speedier films with an enlarger presents many opportunities. Being able to change the scale, size, and focus of the image makes for great design flexibility. In addition, objects can be distorted by varying the distance of the printing surface from the enlarging lens. The possibility of using only a very small section of a much larger image also opens new doors. Photographic positives can be used in the enlarger, as can small bits of actual objects like the wings of insects, leaves, tissue paper, and textured cloth. Slides, negatives, and objects can be enlarged and projected on to either Kodalith film or the high-speed photo-emulsion sensitized screen film.
As a graduate student in related art at the University of Wisconsin, Patricia K. Mansfield produced interesting textile patterns using photo-emulsion film resists and an enlarger. She found that exposure factors, developing procedures, and manipulative inventiveness are part of the necessary experimentation before satisfactory results can be achieved. The process offers endless challenges to the serious designer. Mrs. Mansfield advocates the use of the enlarger as a tool for designing. Familiarity with its mechanical advantages and limitations is necessary. However, such familiarity can be gained by using and manipulating it in the search for design statements. It is one of the tools of our century, and contemporary designers need to become sensitive to and selective of the potentials lying within this photographic experience.
The range of decorative detail possible with the photo-emulsion resist can be easily seen in(Fig. 6-15). On the left side of the picture is a detail from a photograph of a found texture that was exposed on presensitized film with the enlarger. In the center is a bamboo fly swatter that was laid down directly on the gelatin film resist with the enlarger as the light source. At the right, a piece of metal lathe for wall construction was placed on the screen photo film and exposed, then printed over a background texture.
Probably the simplest, most direct way to produce a photo-emulsion screen resist is with transfer films. These can be used either for single transfer or double transfer. They vary in speed and in the amount of detail they give. There are many more available from screen-process supply houses than we could cover adequately, and each comes with descriptions and directions for use. You will need to choose and to experiment. While most large suppliers are geared to the needs of the screen-process industry, many will send sample kits if you want to try out a material. Some of the film companies also package small trial kits. But while transfer films are easiest and most direct to use, they are also the most expensive, and you may want to try the direct emulsion method instead.
In the direct method, you apply a liquid gelatin emulsion to your screen fabric. The emulsion can be sensitized in advance in the liquid form. This is the normal procedure, but it causes some difficulties. The sensitized screens must be dried in a darkened room and can be stored for only a few hours before they begin to deteriorate. However, the unsensitized emulsion can also be applied to the screen even in a light room, then dried and stored for a reasonable period of time. When you wish to use it, it can be brushed with the sensitized emulsion and dried in a dark room just before exposure. This is a little more convenient.
Again, many varieties of photogelatin liquid emulsions are available from commercial supply houses. If expense is no factor and you are not doing too many screen prints, these may be your best bet. They are very uniform and dependable, and they are less expensive than transfer films. However, the photogelatin emulsion formula given in Chapter 5 is not too difficult to make or use, and its cost is practically negligible.
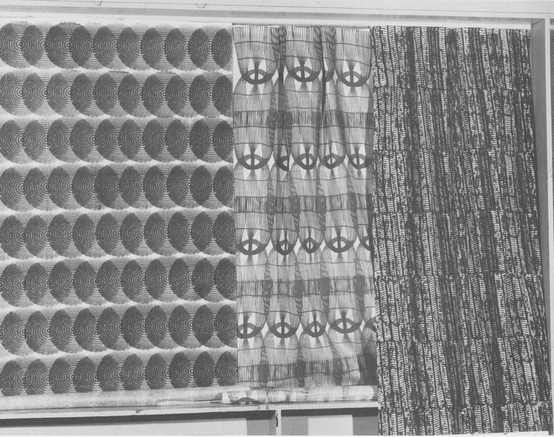
Fig. 6-15. Textile prints made with presensitized screen-process film are displayed on a wall. (By Patricia K. Mansfield)
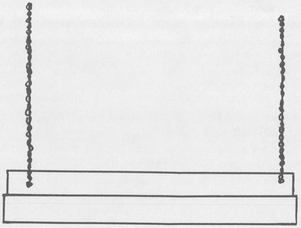
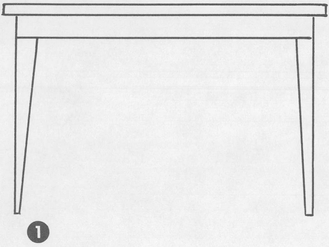
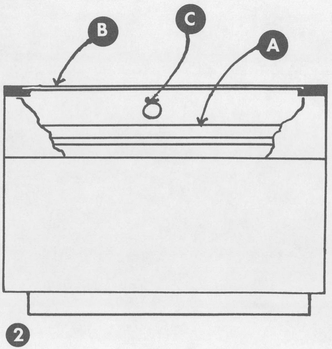
Fig. 6-16. In exposing a light-sensitive emulsion resist on a table with the light source suspended above the screen (1), the light source must be large enough and high enough to cover the entire screen with even illumination. Fluorescent tubes are best, but photoflood bulbs (which require longer exposure) can be used. A light box especially made for exposing light-sensitive emulsion resists (2) contains eight 4-foot fluorescent light tubes (A) spaced 6 inches below a sheet of heavy plate glass (B) that supports the emulsion. A 40-watt yellow insect bulb (C) can be placed in the box for illumination when materials are adjusted before exposure.
Here are a few miscellaneous suggestions about photo-emulsion resists that might reduce some problems. Get in the habit of using rubber or disposable plastic gloves during most of the process. Many of the chemicals used are very strong and can burn or cause skin eruptions. When mixing solutions, use distilled water whenever possible; this is not always necessary, but occasionally a failure can be traced to something foreign in the water supply.
Sensitizing solutions should always be kept cool—no warmer than 60 degrees. Warmer temperatures will tend to oxidize some of the chemical and destroy part of its potential even during mixing. Too-warm sensitizer applied to dry gelatin may damage the gelatin. When you are adding a dye color to the gelatin to increase its visibility on the screen, purple, green, or blue are best; other colors might alter exposure times. When washing out the exposed gelatin, use a gentle spray. The water should be no cooler than 90 degrees and no hotter than 115 degrees. When mixing the gelatin emulsion, do not heat the water over 167 degrees.
Exposure times will probably have to be determined to suit your own needs. Generally speaking, the direct gelatin photo emulsion needs a longer exposure than most of the transfer films. But the exposure time depends on the kind of light source, the distance between the light source and the emulsion, and the capacity of the objects, films, or acetates that you are using for your image. Most commercial products give definite exposure suggestions. There are two ways to set up the light source. The preferred way is a light box, but a light suspended above the emulsion will also work (Fig. 6-16). In a glass-covered light box containing a bank of eight 4-foot-long 40-watt white fluorescent tubes about 6 inches from the emulsion, the average exposure will range between four and eight minutes for most emulsions except high-speed ones. If a No. 2 photoflood bulb (equivalent to about 700 watts of light) is suspended about 2 feet above the emulsion, exposures of twenty to forty minutes will be called for. But you will have to make exposure adjustments to suit your own situation. If you get a good clean image, the exposure time is correct. If the image cannot be seen at all or washes away in the warm water bath, then the exposure time is too short. If the image cannot be washed out or the fine line details are filled in, the exposure is too long. These results assume that the wash water has correct temperature and force. Too-cold water will not wash out the image; it will only harden it. Too-warm water will dissolve all of the gelatin. Excessive water pressure will also destroy the image. This process takes skill, but it is not as difficult as it sounds.
It is also important to protect the emulsion from light halation during exposure. This can be done by placing a matte black cloth or cardboard with the emulsion-and-image sandwich. There must also be pressure on the image so that it is held firmly against the emulsion. For stencil resists that are exposed from above, a heavy piece of good-quality plate glass will do the job. Stencil resists exposed on a light box can be weighted down with bricks on a piece of plywood with foam-rubber padding underneath Fig. 6-17).
One of the major handicaps of photo-emulsion resists is that most are susceptible to water damage from water-based inks and particularly from water-based dyes, especially in the direct emulsion method. You can purchase a direct-method liquid emulsion produced for use with water-based inks; but some cannot be removed from the screen mesh, so check. The transfer films seem to hold up a little better, but they too are subject to water deterioration.
Several companies sell preparations that can be applied to harden emulsions and make them more water resistant. Use them with care, because with some the stencil will not come off the screen fabric after use. A new fabric has to be stretched before a new design can be made. If the destruction of the screen fabric is no problem, then the resist can be made impervious to water by brushing the inside of the stencil with a synthetic enamel. Before the enamel has dried, the underside of the screen fabric is rubbed with a cloth dampened in mineral spirits. This will quickly clean all of the wet enamel out of the screen meshes. When the first enamel coat is dry on the inside of the frame, the process is reversed. The enamel is brushed on the underside of the screen fabric, and the printing meshes are cleaned from the inside with a cloth dampened in mineral spirits. This will protect the screen very well, but the screen fabric will have to be replaced for a different pattern. A somewhat less predictable method is to use lacquer on the inside of the screen mesh, cleaning it with lacquer thinner, and shellac on the underside, cleaning it with alcohol. This gives a fair degree of protection, and the substances can be removed from the screen, saving the screen fabric for future use.
See Chapter 8 for removing photo-emulsion resists.
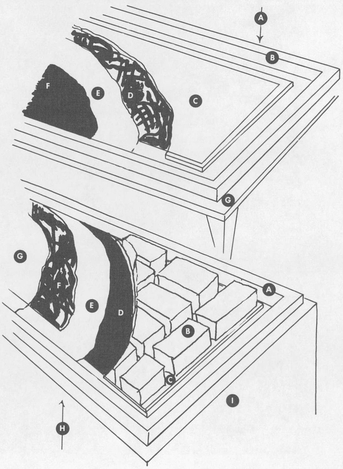
Fig. 6-17. The top part of this drawing shows the top-to-bottom sequence for placing various materials for safe exposure of a light-sensitive emulsion when the light source is suspended above: light source (A); screen frame if emulsion is in the screen fabric (B); heavy piece of clear plate glass (C); acetate containing opaque materials for the design (D); light-sensitive emulsion (E); black paper to prevent light halation during exposure (F); table support (G). The lower section of the drawing shows the proper sequence when the light source is in a light box below the emulsion: screen frame if the emulsion is in the screen fabric (A); bricks or other heavy objects to weight down the various layers to guarantee good contact (B); thin sheet of plywood (C); black paper or thin sheet of black foam rubber to prevent halation during exposure (D); light-sensitive emulsion (E); acetate containing opaque materials for the design (F); heavy plate glass top of the light box (G); light source (H); light box (I).