PIZZA AND FOCACCIA
SAUCES AND TOPPINGS
PIZZA STONE PIZZAS
IRON-SKILLET PIZZAS
FOCACCIA
This is a smooth tomato sauce flavored with dried oregano, along with optional garlic and chile flakes. Use the best-quality dried oregano you can get; if you can find Calabrian oregano, all the better. Although including chile flakes isn’t traditional for Neapolitan pizza sauce, I like the zip. If you can’t find San Marzano tomatoes, use the best-quality canned plum tomatoes available.
MAKES ENOUGH SAUCE FOR FIVE 12-INCH ROUND PIZZAS
1 (28-ounce) can whole San Marzano tomatoes
1½ tablespoons extra-virgin olive oil
1 clove garlic (optional)
½ teaspoon fine sea salt
¼ teaspoon dried oregano
¼ teaspoon chile flakes (optional)
1. Place a colander over a large bowl. Drain the tomatoes for 10 to 15 minutes. (Reserve the juice for another use.)
Sometimes I want a chunkier sauce, and sometimes I like a sauce with a more pure tomato flavor. This recipes satisfies both desires. Again, San Marzano tomatoes are ideal, but if you can’t find them, you can substitute the best-quality canned plum tomatoes available.
MAKES ENOUGH SAUCE FOR TWO TO THREE 12-INCH ROUND PIZZAS
1 (28-ounce) can whole San Marzano tomatoes
1½ tablespoons extra-virgin olive oil
Sea salt
1. Place a colander over a large bowl. Drain the tomatoes for 10 to 15 minutes.
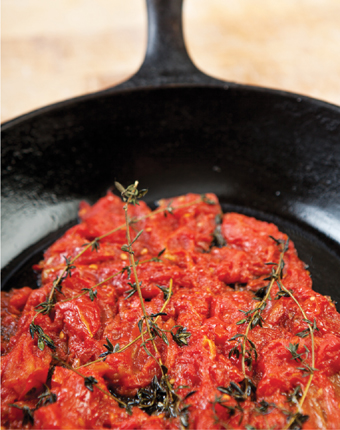
Sometimes, it’s just the tomatoes you want. Roasting the tomatoes in advance is optional. Uncooked, they’ll have a bright flavor. For deeper, more concentrated and complex flavor, roast them slowly with simple seasonings as described here.
MAKES ENOUGH SAUCE FOR THREE 12-INCH ROUND PIZZAS OR THREE TO FOUR IRON-SKILLET PIZZAS
1 (28-ounce) can whole San Marzano tomatoes
Extra-virgin olive oil (optional)
Sea salt (optional)
Thyme sprigs (optional)
1. If roasting the tomatoes, preheat the oven to 325°F (165°C).
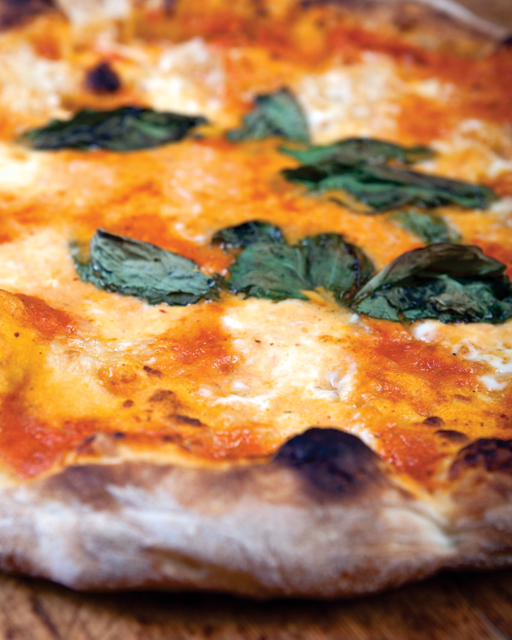
Pizza Margherita
This is the classic, basic pie that is the standard for Neapolitan-style pizza. It should have a thin crust with some poofiness in the rim, sauce made with San Marzano tomatoes, and fresh mozzarella and basil. The red, white, and green toppings mirror the colors of the Italian flag.
I prefer fior di latte mozzarella (literally, “the flower of the milk,” and referring to mozzarella made with cow’s milk rather than buffalo milk). Grande brand is very good quality, and their Ovoline variety is shaped into 4-ounce balls that are the perfect size for this pizza. Whatever brand you choose, look for fresh mozzarella packaged in liquid brine.
As simple as the Margherita pizza is, defining its ideal incarnation could provoke an hours-long, Chianti-filled evening of lively conversation and not a little arm waving. Should the cheese be just melted, or browned on top? Should the basil leaves be whole or torn? Flat rims or poofy? Should the bottom be spotted with dots of char? Should the rim be lightly browned or have a few charred areas? Should it be finished with olive oil? You get the idea. I’ll supply you with the basic formula. You take it from there and bake it the way you like it.
1 350-gram dough ball from any recipe in
chapter 13White flour for dusting
4 ounces fresh whole-milk mozzarella cheese, cut into pieces ½ inch thick at most
6 to 8 whole basil leaves
Extra-virgin olive oil for drizzling (optional)
Fine-flake sea salt, such as fiore di sale (optional)
Chile flakes (optional)
1. Preheat the pizza stone Put your pizza stone on a rack in the upper portion of your oven so the surface is about 8 inches below the broiler. Preheat the oven to 600°F (316°C) if you’re lucky enough to have an oven that goes that high; otherwise, simply preheat to the highest possible setting. Once the oven is preheated, continue heating the pizza stone for another 30 minutes, for a total of about 45 minutes.
Using both hands, grab the rim and lift so the dough hangs down vertically. Let gravity pull the rest of the dough down and stretch it. Run the rim between your hands, working all the way around the circumference of the dough several times.
Next, make two fists and position them just inside the rim, with the dough still hanging vertically. Gently stretch and turn the dough repeatedly, still letting the bottom of the dough pull down, expanding the surface. Keep a close eye on the thickness of the dough. You want it thin, but you don’t want it to tear or develop holes. If you end up with a small tear, don’t panic—it’s okay to patch it.
Spread the dough on the floured peel and run your hands around the perimeter to shape it into a round and work out the kinks.
Bake for 5 minutes, then switch to the broil setting and broil for 2 minutes, keeping a close eye on the pizza. Bake until the cheese is completely melted and the crust is golden with spots of brown and a few small spots of char. If the oil separates out of the cheese, it’s overbaked. Use tongs or a fork to slide the pizza from the pizza stone onto a large plate.


The New Yorker
This pizza represents my ideal of a classic New York pizza, with a blend of grated cheeses covering a red sauce spiked with dried oregano, optionally topped with pepperoni. Not all of the great New York pizzas are made with shredded cheese, but that’s what I prefer for this style of pizza, which is cheesier than the Margherita.
If I were to do this kind of pie in a coal-fired oven like at Lombardi’s or Totonno’s, it would be bigger than the 12- to 14-inch pizzas we are going to bake on the home kitchen pizza stone. Compensate by cutting the finished pizza into no more than four pieces.
1 350-gram dough ball from any recipe in
chapter 13White flour for dusting
3 ounces fresh whole-milk mozzarella cheese, grated
2 ounces provolone cheese, grated
4 to 6 whole basil leaves (optional)
12 to 15 slices of pepperoni (optional)
Chile flakes (optional)
1. Preheat the pizza stone Put your pizza stone on a rack in the upper portion of your oven so the surface is about 8 inches below the broiler. Preheat the oven to 600°F (316°C) if you’re lucky enough to have an oven that goes that high; otherwise, simply preheat to the highest possible setting. Once the oven is preheated, continue heating the pizza stone for another 30 minutes, for a total of about 45 minutes.
Using both hands, grab the rim and lift so the dough hangs down vertically. Let gravity pull the rest of the dough down and stretch it. Run the rim between your hands, working all the way around the circumference of the dough several times.
Next, make two fists and position them just inside the rim, with the dough still hanging vertically. Gently stretch and turn the dough repeatedly, still letting the bottom of the dough pull down, expanding the surface. Keep a close eye on the thickness of the dough. You want it thin, but you don’t want it to tear or develop holes. If you end up with a small tear, don’t panic—it’s okay to patch it.
Spread the dough on the floured peel and run your hands around the perimeter to shape it into a round and work out the kinks.
Bake for 5 minutes, then switch to the broil setting and broil for 2 minutes, keeping a close eye on the pizza. Bake until the cheese is completely melted and bubbling, with a few small charred spots, and the crust is golden with spots of brown and a few small charred spots. Use tongs or a fork to slide the pizza from the pizza stone onto a large plate.


Salami Pizza
This is the cured meat lover’s pizza, essentially a Margherita pizza with the addition of the salami of your choice. At
Ken’s Artisan Pizza, we have two of these pizzas on our menu: one with a spicy
soppressata and another with
finocchiona, made by Olympic Provisions, a local
salumeria making admirable dry-cured sausages. In each case we peel the salami, then slice it into thin disks—about
1/
16 inch thick for the
soppressata and about ⅛ inch thick for the
finocchiona. I love the way the meat crisps as it bakes on top of the pizza. The more salami you pile on the pizza, the thinner it should be sliced. My preference is to not overwhelm the other ingredients on the pizza with too much meat; rather, use it as an accent.
Salumi or salami? Salumi refers to the entire range of cured meat products, typically made from pork (but sometimes from beef), from ham and other salt-cured whole muscles of meat to sausages, including cooked meat emulsions in casings, like mortadella. Salami refers to a specific type of salumi: dry-cured sausage, usually made from pork, which may be either fresh or aged. Use whatever type of salami you prefer, from pepperoni (an American invention usually made with beef, or with beef and pork) to chorizo, saucisson sec to Genovese. When using any variety of salami, I like to cook it on the pizza. Sometimes I make a similar pizza topped with cured meat, such as prosciutto or coppa, in which case I like it sliced paper-thin and draped on the pizza immediately after it comes out of the oven.
1 350-gram dough ball from any recipe in
chapter 13White flour for dusting
4 ounces fresh whole-milk mozzarella cheese, cut into pieces ½ inch thick at most
12 to 18 slices of salami, depending on the size of the salami
4 to 6 whole basil leaves
Fine-flake sea salt, such as fiore di sale (optional)
Chile flakes (optional)
Using both hands, grab the rim and lift so the dough hangs down vertically. Let gravity pull the rest of the dough down and stretch it. Run the rim between your hands, working all the way around the circumference of the dough several times.
Next, make two fists and position them just inside the rim, with the dough still hanging vertically. Gently stretch and turn the dough repeatedly, still letting the bottom of the dough pull down, expanding the surface. Keep a close eye on the thickness of the dough. You want it thin, but you don’t want it to tear or develop holes. If you end up with a small tear, don’t panic—it’s okay to patch it.
Spread the dough on the floured peel and run your hands around the perimeter to shape it into a round and work out the kinks.
Bake for 5 minutes, then switch to the broil setting and broil for 2 minutes, keeping a close eye on the pizza. Bake until the cheese is completely melted, the salami is crisp around the edges, and the crust is golden with spots of brown and a few small charred spots. Use tongs or a fork to slide the pizza from the pizza stone onto a large plate.

Pizza And Focaccia — Golden Beet and Duck Breast “Prosciutto” Pizza
GOLDEN BEET AND DUCK BREAST “PROSCIUTTO” PIZZA
My friends at Chop, a Portland meat counter and charcuterie shop, cure Magret duck breast in the style of prosciutto hams. Feel free to substitute paper-thin slices of Prosciutto di Parma, Serrano ham, or good salt-cured Virginia or Tennessee country ham if duck breast “prosciutto” isn’t available. This pizza blends the milky ooze of good mozzarella cheese with the sweetness of golden beets and the salty umami flavors of good cured meat and a little provolone cheese. Be generous with the black pepper and go easy on the chopped rosemary.
1 350-gram dough ball from any recipe in
chapter 13White flour for dusting
One baseball-sized golden beet
3 to 4 ounces fresh whole-milk mozzarella cheese, cut into pieces ½ inch thick
1 ounce grated provolone cheese
1 teaspoon finely chopped fresh rosemary
Ground black pepper to taste
1 to 2 ounces very thinly sliced salt-cured duck breast or prosciutto-style ham
Drain the beet and let rest for 5 to 10 minutes, until cool enough to handle. Slice off the stem and root, then with a lint-free kitchen towel, rub off the skin. Slice the beet into 3 disks of equal thickness, then quarter the disks to make 12 roughly equal pieces.
Using both hands, grab the rim and lift so the dough hangs down vertically. Let gravity pull the rest of the dough down and stretch it. Run the rim between your hands, working all the way around the circumference of the dough several times.
Next, make two fists and position them just inside the rim, with the dough still hanging vertically. Gently stretch and turn the dough repeatedly, still letting the bottom of the dough pull down, expanding the surface. Keep a close eye on the thickness of the dough. You want it thin, but you don’t want it to tear or develop holes. If you end up with a small tear, don’t panic—it’s okay to patch it.
Spread the dough on the floured peel and run your hands around the perimeter to shape it into a round and work out the kinks.
Bake for 5 minutes, then switch to the broil setting and broil for 2 minutes, keeping a close eye on the pizza. Bake until the cheese is completely melted and the crust is golden with spots of brown and a few small spots of char. Use tongs or a fork to slide the pizza from the pizza stone onto a large plate.

Sweet Potato and Pear Pizza
SWEET POTATO AND PEAR PIZZA
Despite the fruit, this is a savory pizza that would go great with a bottle of rosé or bubbles. It’s also not bad as an afternoon snack, or for dinner with a roasted bird.
1 350-gram dough ball from any recipe in
chapter 13White flour for dusting
1 medium sweet potato, cut into ⅙-inch slices
2 tablespoons extra-virgin olive oil
Fine-flake sea salt, such as fiore di sale
1 medium pear, such as Comice or Bosc, cored and cut into ¼-inch slices
1 ounce shaved Pecorino Romano cheese
2 tablespoons chopped cilantro
1 ounce grated fresh ginger
1 ounce oil-packed red chile peppers, chopped (optional)
Ground black pepper to taste
Using both hands, grab the rim and lift so the dough hangs down vertically. Let gravity pull the rest of the dough down and stretch it. Run the rim between your hands, working all the way around the circumference of the dough several times.
Next, make two fists and position them just inside the rim, with the dough still hanging vertically. Gently stretch and turn the dough repeatedly, still letting the bottom of the dough pull down, expanding the surface. Keep a close eye on the thickness of the dough. You want it thin, but you don’t want it to tear or develop holes. If you end up with a small tear, don’t panic—it’s okay to patch it.
Spread the dough on the floured peel and run your hands around the perimeter to shape it into a round and work out the kinks.
Bake for 5 minutes, then switch to the broil setting and broil for 2 minutes, keeping a close eye on the pizza. Bake until the cheese is completely melted and the crust is golden with spots of brown and a few small spots of char. Use tongs or a fork to slide the pizza from the pizza stone onto a large plate.


Iron-Skillet Meat Pie
Here’s a great way to make pizza in your home oven in a cast-iron skillet, without a pizza stone, and without the fuss that goes with tossing the dough, setting it up on a peel, and successfully transferring it to the preheated pizza stone. As far as the meat is concerned, I’m a traditionalist and very happy with a good salami or sausage that can stand up to the fifteen to twenty minutes of baking time this pizza requires.
You have more flexibility with the skillet pizza to top as heavily as you want. If you’d like to load up Chicago-style with sauce, cheese and toppings, just keep in mind that the more toppings, the longer the bake time.
MAKES ONE 9-INCH IRON-SKILLET PIZZA
1 dough ball from any recipe in
chapter 13, 350 grams for a thick crust or 200 grams for a thin crust
3 to 4 ounces fresh whole-milk mozzarella cheese, sliced thin, or a blend of mozzarella and provolone
8 to 10 slices pepperoni or other salami or fresh sausage
1. Preheat the oven Preheat the oven to 525°F (274°C), or as high as it will go if it doesn’t reach 525°F (274°C).
Remove the dough ball from the refrigerator, put it on the floured work surface, and gently pat it down a bit to coat the bottom with flour. Turn it over and repeat on the other side. You can compress the perimeter of this dough. Holding the rim, stretch the dough to the width of your skillet, then put it in a dry 9-inch cast-iron skillet.
SKILLET PIZZA WITH TOMATO FILLETS, GARLIC, AND CHILE
This pizza is one of my favorites for serving as a predinner snack, alongside a salad course, or to accompany a meal. If you want to jazz it up, you could bake it with black olives and add a few strips of anchovy fillet over the pizza after it comes out of the oven. Then you could call it The Sicilian. Since this skillet pizza has no cheese and you don’t want to burn the garlic, the baking time is shorter than that of the
Iron-Skillet Meat Pie—just 12 to 15 minutes. In contrast to my usual preferences, I like this pie baked just until golden brown.
MAKES ONE 9-INCH IRON-SKILLET PIZZA
1 dough ball from any recipe in
chapter 13, 350 grams for a thick crust, or 200 grams for a thin crust
1 clove garlic, chopped
½ teaspoon dried oregano
¼ teaspoon chile flakes
1 tablespoon extra-virgin olive oil
Fine-flake sea salt, such as fiore di sale (optional)
Remove the dough ball from the refrigerator, put it on the floured work surface, and gently pat it down a bit to coat the bottom with flour. Turn it over and repeat on the other side. You can compress the perimeter of this dough. Holding the rim, stretch the dough to the width of your skillet, then put it in a dry 9-inch cast-iron skillet.
The soulful home of focaccia is along the Ligurian coast of Italy. Genoa is the capital of Liguria, and focaccia Genovese is a staple of the local cuisine. Traditionally, it’s made from a very soft dough, spread out in rectangular or round pans and dimpled by the baker’s fingers in the process of working olive oil into the dough. After being baked to a golden hue, it’s sometimes topped with more olive oil and a sprinkling of salt.
For the basic Focaccia Genovese, use this book’s
Overnight Pizza Dough with Poolish, made with either 00 flour or all-purpose white flour. This soft dough can easily be worked to conform to the shape of the baking pan, then you work in the olive oil with your hands, sprinkle on some sea salt, and bake it to a golden color. In this recipe I call for using 800 grams of dough, baked on a 12 by 17-inch baking sheet. However, you could also use two pieces of dough, each between 250 and 350 grams, and bake them in 9-inch cast-iron skillets.
MAKES ONE ROUGHLY 12 BY 5-INCH FOCACCIA
White flour for dusting
½ cup extra-virgin olive oil
Sea salt to taste, fine or small-flake like fiore di sale
Using both hands, grab the rim and lift, letting gravity pull the rest of the dough down. Run the rim between your hands, working all around the circumference of the dough for one or two turns. Transfer the dough to the baking sheet. Pour the olive oil over the dough and spread it evenly over the dough with both hands, simultaneously spreading the dough out evenly in the shape of the pan. Enjoy working the oil into the dough with
your fingers, pressing down to make dimples, and using the viscosity of the oil to spread the dough out in the pan. If the dough resists, let it rest for 10 minutes, then return to it. You want the dough flattened and dimpled evenly all around. It feels great.

Focaccia “Pissalidiere”
Pissalidière is a savory pastry from Southern France, usually made with caramelized onions, black olives, and anchovies on puff pastry dough. I like to top focaccia the same way, and add red chiles for both color and kick. We use oil-packed Calabrian chiles for our Arrabiata Pizza at
Ken’s Artisan Pizza, and I copped some of those for this recipe. The heat naturally compliments the olives and anchovies, and this focaccia tastes to me like summer vacation on the Mediterranean coast. Serve it with chilled rosé and a simple green salad. You can caramelize the onions a day or two in advance.
MAKES ONE ROUGHLY 12 BY 5-INCH FOCACCIA
White flour for dusting
1 medium yellow onion, sliced thin
½ tablespoon butter
12 to 14 salt-cured black olives
6 anchovy fillets, dredged in their packing oil
1 ounce oil-packed red chile peppers, drained and chopped
2 teaspoons olive oil
Sea salt to taste, fine or small-flake like fiore di sale
1. Bring the dough to room temperature About 2 hours before you plan to bake, remove the dough from the refrigerator and let it warm to room temperature. This step is optional but recommended, as it will make the dough easier to stretch and help it hold the finger dents. In essence, you’re slightly overproofing the dough. It will get gassy before you flatten it out, and that’s fine.
When the dough is stretched out and before placing it on your baking sheet, spread a very light film of olive oil over one side of the dough, then place the dough oiled-side down on the baking seet. Dimple the dough with your fingers.

Zucchini Focaccia
This recipe is one of my favorites in the summertime and early autumn, when garden-fresh zucchini is abundant. Thinly sliced disks of zucchini are spread out across the dough and resemble fish scales if you stand back and squint. Don’t use the softball bat–sized zucchinis from your Aunt Zelda’s garden for this; use zucchini that’s just a couple of inches in diameter. This focaccia looks cool if the dough is shaped into a freeform oblong on a sheet pan.
MAKES ONE ROUGHLY 12 BY 5-INCH FOCACCIA
2 zucchini, about 2 inches in diameter, thinly sliced
2 tablespoons extra-virgin olive oil
Sea salt to taste, fine or small-flake like fiore di sale
Ground black pepper
Chile flakes (optional)
1. Bring the dough to room temperature About 2 hours before you plan to bake, remove the dough from the refrigerator and let it warm to room temperature. This step is optional but recommended, as it will make the dough easier to stretch and help it hold the finger dents. In essence, you’re slightly overproofing the dough. It will get gassy before you flatten it out, and that’s fine.
