Now, it is time to start on the product part of the squash application. In this part, we will no longer reverse engineer in detail. We will learn how to search in the standard functionality and reuse parts in our own software.
For this part, we will look at resources in Microsoft Dynamics NAV. Resources are similar to using as products as items but far less complex making it easier to look and learn.
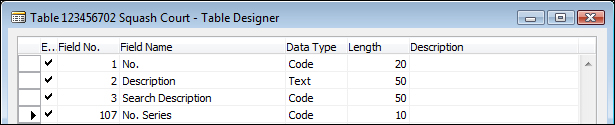
Our company has 12 courts that we want to register in Microsoft Dynamics NAV. This master data is comparable to resources so we'll go ahead and copy this functionality. Resources are not attached to the contact table like the vendor/squash player tables. We need the number series again so we'll add a new number series to our Squash Setup table.
The Squash Court table should look like this after creation:
With this chapter some objects are required. A description of how to import these objects can be found in the Appendix, Installation Guide.
After the import process is completed, make sure that your current database is the default database for the Role Tailored Client and run page 123456701, Squash Setup.
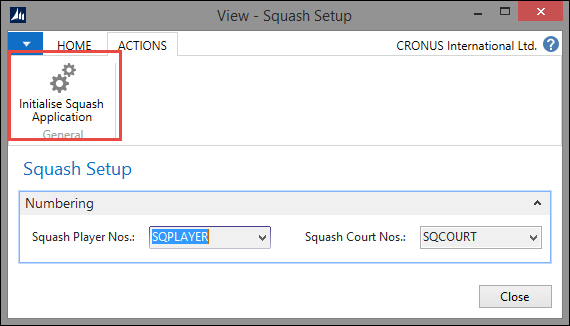
From this page, select the action Initialize Squash Application. This will execute the C/AL code in the InitSquashApp function of this page, which will prepare the demo data for us to play with. The objects are prepared and tested in a Microsoft Dynamics NAV 2013 R2 W1 database.
When running a squash court, we want to be able to keep track of reservations. Looking at standard Dynamics NAV functionality, it might be a good idea to create a squash player journal. The journal can create entries for reservations that can be invoiced.
A journal needs the object structure. The journal is prepared in the objects delivered with this chapter. Creating a new journal from scratch is a lot of work and can easily lead to making mistakes. It is easier and safer to copy an existing journal structure from the standard application that is similar to the journal we need for our design.
In our example, we have copied the Resource Journals:
As explained in Chapter 1, Introduction to Microsoft Dynamics NAV, all journals have the same structure. The template, batch, and register tables are almost always the same whereas the journal line and ledger entry table contain function-specific fields. Let's have a look at all of them one by one.
The Journal Template has several fields, as shown in the following screenshot:
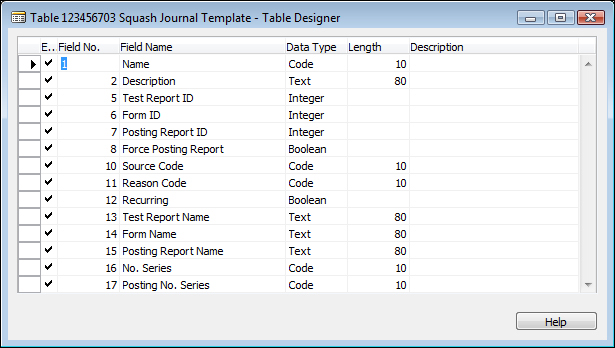
Let's discuss these fields in more detail:
- Name: This is the unique name. It is possible to define as many templates as required but usually one template per form ID and one for recurring will do. If you want journals with different source codes, you need to have more templates.
- Description: A readable and understandable description for its purpose.
- Test Report ID: All templates have a test report that allows the user to check for posting errors.
- Form ID: For some journals, more UI objects are required. For example, the General Journals have a special form for bank and cash.
- Posting Report ID: This report is printed when a user selects Post and Print.
- Force Posting Report: Use this option when a posting report is mandatory.
- Source Code: Here you can enter a trail code for all the postings done via this journal.
- Reason Code: This functionality is similar to Source Code.
- Recurring: Whenever you post lines from a recurring journal, new lines are automatically created with a posting date defined in the recurring date formula.
- No. Series: When you use this feature the Document No. in the journal line is automatically populated with a new number from this Number Series.
- Posting No. Series: Use this feature for recurring journals.
The Journal Batch has various fields, as shown in the following screenshot:
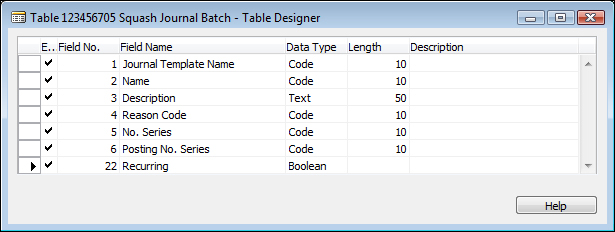
Let's discuss these fields in more detail:
- Journal Template Name: The name of the journal template this batch refers to
- Name: Each batch should have a unique code
- Description: A readable and explaining description for this batch
- Reason Code: When populated this Reason Code will overrule the Reason Code from the Journal Template
- No. Series: When populated this No. Series will overrule the No. Series from the Journal Template
- Posting No. Series: When populated this Posting No. Series will overrule the Posting No. Series from the Journal Template
The Register table has various fields, as shown in the following screenshot:
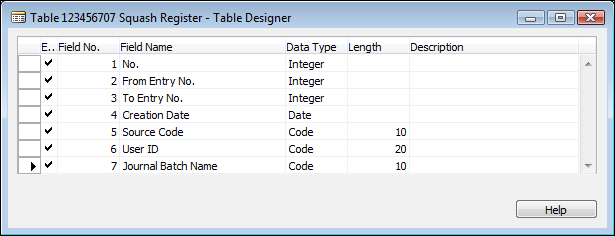
Terms from the Journal Register tab that you need to know would be:
- No.: This field is automatically and incrementally populated for each transaction with this journal and there are no gaps between the numbers
- From Entry No.: A reference to the first ledger entry created is with this transaction
- To Entry No.: A reference to the last ledger entry is created with this transaction
- Creation Date: Always populated with the real date when the transaction was posted
- User ID: The ID of the end user who has posted the transaction
The journal line has a number of mandatory fields that are required for all journals and some fields that are required for their designed functionality.
In our case, the journal should create a reservation which then can be invoiced. This requires some information to be populated in the lines.
The reservation process is a logistical process that requires us to know the number of the squash court, the date, and the time of the reservation. We also need to know how long the players want to play. To check the reservation, it might also be useful to store the number of the squash player.
For the invoicing part, we need to know the price we need to invoice. It might also be useful to store the cost to see our profit. For the system to figure out the proper G/L Account for the turnover, we also need to define a General Product Posting Group. We will see more of how that works later in Chapter 3, Financial Management.
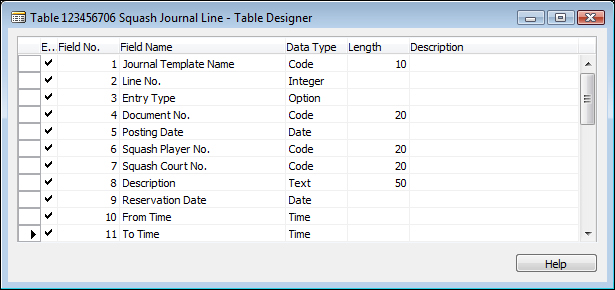
Let's discuss these fields in more detail:
- Journal Template Name: This is a reference to the current Journal Template.
- Line No.: Each journal has a virtually unlimited number of lines; this number is automatically incremented by 10000 allowing lines to be created in between.
- Entry Type: This is the reservation or invoice.
- Document No.: This number can be used to give to the squash player as a reservation number. When the Entry Type is Invoice, it is the invoice number.
- Posting Date: This is usually the reservation date but when the Entry Type is Invoice, it might be the date of the invoice, which might differ from the posting date in the general ledger.
- Squash Player No.: This is a reference to the squash player who has made the reservation.
- Squash Court No.: This is a reference to the squash court.
- Description: This is automatically updated with the number of the squash court, reservation date, and times, but can be changed by the user.
- Reservation Date: This is the actual date of the reservation.
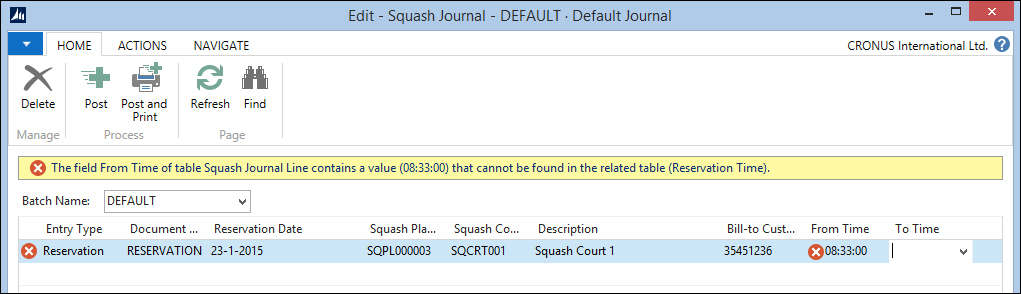
- From Time: This is the starting time of the reservation. We only allow whole and half hours.
- To Time: This is the ending time of the reservation. We only allow whole and half hours. This is automatically populated when people enter a quantity.
- Quantity: This is the number of hours' playing time. We only allow units of 0.5 to be entered here. This is automatically calculated when the times are populated.
- Unit Cost: This is the cost to run a squash court for one hour.
- Total Cost: This is the cost for this reservation.
- Unit Price: This is the invoice price for this reservation per hour. This depends on whether or not the squash player is a member or not.
- Total Price: This is the total invoice price for this reservation.
- Shortcut Dimension Code 1 & 2: This is a reference to the dimensions used for this transaction.
- Applies-to Entry No.: When a reservation is invoiced, this is the reference to the Squash Entry No. of the reservation.
- Source Code: This is inherited from the journal batch or template and used when posting the transaction.
- Chargeable: When this option is used, there will not be an invoice for the reservation.
- Journal Batch Name: This is a reference to the journal batch that is used for this transaction.
- Reason Code: This is inherited from the journal batch or template and used when posting the transaction.
- Recurring Method: When the journal is a recurring journal, you can use this field to determine if the Amount field is blanked after posting the lines.
- Recurring Frequency: This field determines the new posting date after the recurring lines are posted.
- Gen. Bus. Posting Group: The combination of general business and product posting group determines the G/L Account for turnover when we invoice the reservation. The Gen. Bus. Posting Group is inherited from the bill-to customer.
- Gen. Prod. Posting Group: This will be inherited from the squash player.
- External Document No.: When a squash player wants us to note a reference number, we can store it here.
- Posting No. Series: When the Journal Template has a Posting No. Series, it is populated here to be used when posting.
- Bill-to Customer No.: This determines who is paying for the reservation. We will inherit this from the squash player.
So now we have a place to enter reservations but we have something to do before we can start doing this. Some fields were determined to be inherited and calculated:
- The time field needs calculation to avoid people entering wrong values
- The Unit Price should be calculated
- The Unit Cost, Posting groups, and Bill-to Customer No. need to be inherited
- As the final cherry on top, we will look at implementing dimensions
When it comes to the time, we want only to allow specific start and end times. Our squash court can be used in blocks of half an hour. The Quantity field should be calculated based on the entered times and vice versa.
To have the most flexible solution possible, we will create a new table with allowed starting and ending times. This table will have two fields: Reservation Time and Duration.
The Duration field will be a decimal field that we will promote to a SumIndexField. This will enable us to use SIFT to calculate the quantity.

When populated the table will look like this:

The time fields in the squash journal table will now get a table relation with this table. This prevents a user entering values that are not in the table, thus entering only valid starting and ending times. This is all done without any C/AL code and is flexible when times change later.
Now, we need some code that calculates the quantity based on the input:
From Time - OnValidate()
CalcQty;

To Time - OnValidate()
CalcQty;

CalcQty()
IF ("From Time" <> 0T) AND ("To Time" <> 0T) THEN BEGIN
  IF "To Time" <= "From Time" THEN
    FIELDERROR("To Time");
  ResTime.SETRANGE("Reservation Time", "From Time",
    "To Time");
  ResTime.FIND('+');
  ResTime.NEXT(-1);
  ResTime.SETRANGE("Reservation Time", "From Time",
    ResTime."Reservation Time");
  ResTime.CALCSUMS(Duration);
  VALIDATE(Quantity, ResTime.Duration);
END;
When a user enters a value in the From Time or To Time fields, the CalcQty function is executed. This checks if both fields have a value and then checks whether To Time is larger than From Time.
Then we place a filter on the Reservation Time table. Now, when a user makes a reservation from 8:00 to 9:00, there are three records in the filter making the result of the Calcsums (total of all records) of duration 1,5. Therefore, we find the previous reservation time and use that.
This example shows how easy it is to use the built-in Microsoft Dynamics NAV functionality such as table relations and Calcsums instead of complex time calculations, which we could have also used.
As discussed in Chapter 1, Introduction to Microsoft Dynamics NAV, there is a special technique to determine prices. Prices are stored in a table with all possible parameters as fields and by filtering down on these fields, the best price is determined. If required, extra logic is need to find the lowest (or highest) price, if more prices are found.
To look, learn, and love this part of the standard application, we have used table Sales Price (7002) and codeunit Sales Price Calc. Mgt. (7000), even though we only need a small part of this functionality. This mechanism of price calculation is used throughout the application and offers a normalized way of calculating sales prices. A similar construction is used for purchase prices with the table Purchase Price (7012) and codeunit Purch. Price Calc. Mgt. (7010).
In our case, we have already determined that we have a special rate for members, but let's say we have also a special rate for daytime and evening in winter and summer.
This could make our table look as follows:
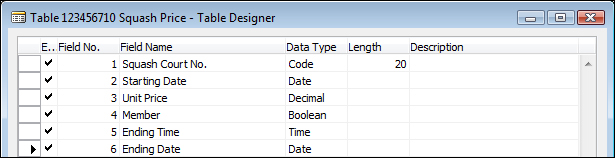
We can make special prices for members on dates for winter and summer and make a price valid only until a certain time. We can also make a special price for a court.
This table could be creatively expanded with all kinds of codes until we end up with table Sales Price (7002) in the standard product, which was the template for our example.
To calculate the price, we need a codeunit similar to the standard product. This codeunit is called with a squash journal line record and stores all valid prices in a buffer table and then finds the lowest price if there is any overlap:
FindSquashPrice()
WITH FromSquashPrice DO BEGIN
  SETFILTER("Ending Date",'%1|>=%2',0D,StartingDate);
  SETRANGE("Starting Date",0D,StartingDate);

  ToSquashPrice.RESET;
  ToSquashPrice.DELETEALL;

  SETRANGE(Member, IsMember);

  SETRANGE("Ending Time", 0T);
  SETRANGE("Squash Court No.", '');
  CopySquashPriceToSquashPrice(FromSquashPrice,ToSquashPrice);

  SETRANGE("Ending Time", 0T);
  SETRANGE("Squash Court No.", CourtNo);
  CopySquashPriceToSquashPrice(FromSquashPrice,ToSquashPrice);

  SETRANGE("Squash Court No.", '');
  IF StartingTime <> 0T THEN BEGIN
    SETFILTER("Ending Time",'%1|>=%2',000001T,StartingTime);
    CopySquashPriceToSquashPrice(FromSquashPrice,
      ToSquashPrice);
  END;

  SETRANGE("Squash Court No.", CourtNo);
  IF StartingTime <> 0T THEN BEGIN
    SETFILTER("Ending Time",'%1|>=%2',000001T,StartingTime);
    CopySquashPriceToSquashPrice(FromSquashPrice,
      ToSquashPrice);
  END;
END;
If there is no price in the filter, it uses the unit price from the squash court, as shown here:
CalcBestUnitPrice()
WITH SquashPrice DO BEGIN
  FoundSquashPrice := FINDSET;
  IF FoundSquashPrice THEN BEGIN
    BestSquashPrice := SquashPrice;
    REPEAT
      IF SquashPrice."Unit Price" <
        BestSquashPrice."Unit Price"
      THEN
        BestSquashPrice := SquashPrice;
    UNTIL NEXT = 0;
  END;
END;

// No price found in agreement
IF BestSquashPrice."Unit Price" = 0 THEN
  BestSquashPrice."Unit Price" := SquashCourt."Unit Price";

SquashPrice := BestSquashPrice;To use the journal for the product part of the application, we want to inherit some of the fields from the master data tables. In order to make that possible, we need to copy and paste these fields from other tables to our master data table and populate it.
In our example, we can copy and paste the fields from the Resource table (156). We also need to add code to the OnValidate triggers in the journal line table.
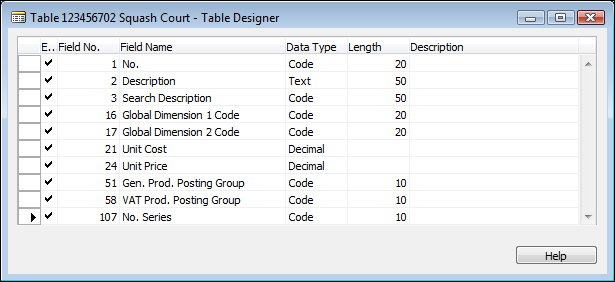
The squash court table, for example, is expanded with the fields Unit Code, Unit Price, Gen. Prod. Posting Group, and VAT Prod. Posting Group, as shown in the preceding screenshot.
We can now add code to the OnValidate of the Squash Court No. field in the Journal Line table.
Squash Court No. - OnValidate()
IF SquashCourt.GET("Squash Court No.") THEN BEGIN
  Description := SquashCourt.Description;
  "Unit Cost" := SquashCourt."Unit Cost";
  "Gen. Prod. Posting Group" := SquashCourt."Gen. Prod. Posting Group";
  FindSquashPlayerPrice;
END;
Please note that unit price is used in the Squash Price Calc. Mgt. codeunit that is executed from the FindSquashPlayerPrice function.
In Microsoft Dynamics NAV, dimensions are defined in master data and posted to the ledger entries to be used in analysis view entries. In Chapter 3, Financial Management, we will discuss how to analyze the data generated by dimensions. In between that journey they move around a lot in different tables as follows:
- Table 348 | Dimension: This is where the main dimension codes are defined.
- Table 349 | Dimension Value: This is where each dimension can have an unlimited number of values.
- Table 350 | Dimension Combination: In this table, we can block certain combinations of dimension codes.
- Table 351 | Dimension Value Combination: In this table, we can block certain combinations of dimension values. If this table is populated, the value
Limitedis populated in the dimension combination table for these dimensions. - Table 352 | Default Dimension: This table is populated for all master data that has dimensions defined.
- Table 354 | Default Dimension Priority: When more than one master data record in one transaction have the same dimensions, it is possible here to set priorities.
- Table 480 | Dimension Set Entry: This table contains a matrix of all used dimension combinations.
- Codeunit 408 | Dimension Management: This codeunit is the single point in the application where all dimension movement is done.
In our application, dimensions are moved from the squash player, squash court, and customer table via the squash journal line to the squash ledger entries. When we create an invoice, we move the dimensions from the ledger entries to the sales line table.
To connect dimensions to master data, we first need to allow this changing codeunit 408 dimension management.
SetupObjectNoList()
TableIDArray[1] := DATABASE::"Salesperson/Purchaser";
TableIDArray[2] := DATABASE::"G/L Account";
TableIDArray[3] := DATABASE::Customer;
...
TableIDArray[22] := DATABASE::"Service Item Group";
TableIDArray[23] := DATABASE::"Service Item";

//* Squash Application
TableIDArray[49] := DATABASE::"Squash Player";
TableIDArray[50] := DATABASE::"Squash Court";
//* Squash Application

Object.SETRANGE(Type,Object.Type::Table);

FOR Index := 1 TO ARRAYLEN(TableIDArray) DO BEGIN
  ...
The TableIDArray variable has a default number of 23 dimensions. This we have changed to 50.
Without this change, the system would return the following error message when we try to use dimensions:

Next change is to add the Global Dimension fields to the master data tables. They can be copied and pasted from other master data tables.

When these fields are validated, the ValidateShortcutDimCode function is executed as follows:
ValidateShortcutDimCode()
DimMgt.ValidateDimValueCode(FieldNumber,ShortcutDimCode);
DimMgt.SaveDefaultDim(DATABASE::"Squash Player","No.",
  FieldNumber,ShortcutDimCode);
MODIFY;When we use the master data records in the journal table, the dimensions are copied from the default dimension table to the dimension set entry table. This is done using the folowing piece of code that is called from OnValidate of each master data reference field:
CreateDim()
TableID[1] := Type1;
No[1] := No1;
TableID[2] := Type2;
No[2] := No2;
TableID[3] := Type3;
No[3] := No3;

"Shortcut Dimension 1 Code" := '';
"Shortcut Dimension 2 Code" := '';

"Dimension Set ID" :=
  DimMgt.GetDefaultDimID(TableID,No,"Source Code",
    "Shortcut Dimension 1 Code",
      "Shortcut Dimension 2 Code",0,0);
To decide which dimensions to inherit, we should first analyze which master data is used in our Journal that is using default dimensions.
Squash Court No. - OnValidate()
CreateDim(
  DATABASE::"Squash Court","Squash Court No.",
  DATABASE::"Squash Player","Squash Player No.",
  DATABASE::Customer,"Bill-to Customer No.");
In our case, Table[1] is Squash Player, Table[2] is Squash Court, and Table[3] is Customer. The dimension management codeunit makes sure everything is copied. We can use standard Microsoft Dynamics NAV functions.
When we post a journal using Codeunit Squash Jnl.-Post Line (123456703), the dimensions are copied using the dimension set ID as follows:
Code()

...
SquashLedgEntry."Dimension Set ID" := "Dimension Set ID";
...

SquashLedgEntry.INSERT;

NextEntryNo := NextEntryNo + 1;
This field is also used from our combine invoicing report, which we will create later in this chapter in the Invoicing section.
CreateLn()
...
SalesLn.INIT;

SalesLn."Dimension Set ID" := "Dimension Set ID";

SalesLn.INSERT(TRUE);