Chapter 7. Web application templating
- Organizing applications with templating
- Creating templates by using Embedded JavaScript
- Learning minimalist templating with Hogan
- Using Pug to create templates
In chapters 3 and 6, you learned some basics about templates in Express applications in order to create views. In this chapter, you’ll focus exclusively on templating, learning how to use three popular template engines, and how to use templating to keep any web application’s code clean by separating logic from presentation markup.
If you’re familiar with templating and the Model-View-Controller (MVC) pattern, you can skim through to section 7.2, where you’ll start learning about the template engines detailed in this chapter, which include Embedded JavaScript, Hogan, and Pug. If you’re not familiar with templating, keep reading—you’ll explore it conceptually in the next few sections.
7.1. Using templating to keep code clean
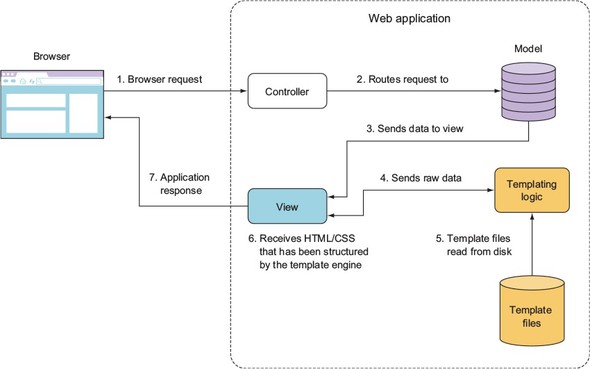
You can use the MVC pattern to develop conventional web applications in Node as well as in nearly every other web technology. One of the key concepts in MVC is the separation of logic, data, and presentation. In MVC web applications, the user typically requests a resource from the server, which causes the controller to request application data from the model and then pass the data to the view, which finally formats the data for the end user. This view portion of the MVC pattern is often implemented by using one of various templating languages. When an application uses templating, the view relays selected values, returned by the model, to a template engine, and specifies the template file that defines how to display the provided values.
Figure 7.1 shows how templating logic fits into the overall architecture of an MVC application. Template files typically contain placeholders for application values as well as HTML, CSS, and sometimes small bits of client-side JavaScript to implement dynamic behavior, including displaying third-party widgets such as Facebook’s Like button, or to trigger interface behavior, such as hiding or revealing parts of the page. Because template files focus on presentation rather than logic, front-end developers and server-side developers can work on them, which can help with a project’s division of labor.
Figure 7.1. The flow of an MVC application and its interaction with the template layer
In this section, we’ll render HTML with, and without, a template to show you the difference. But first, let’s start with an example of templating in action.
7.1.1. Templating in action
As a quick illustration of applying templating, let’s look at the problem of elegantly outputting HTML from a simple blogging application. Each blog entry has a title, date of entry, and body text. The blog looks similar to figure 7.2 in a web browser.
Figure 7.2. Example blog application browser output
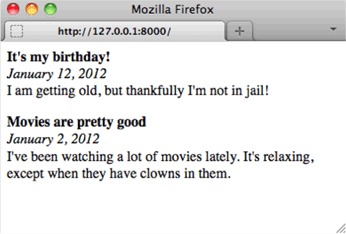
Blog entries are read from a text file formatted like the following snippet from entries.txt. The --- in the following listing indicates where one entry stops and another begins.
Listing 7.1. Blog entries text file
title: It's my birthday!
date: January 12, 2016
I am getting old, but thankfully I'm not in jail!
---
title: Movies are pretty good
date: January 2, 2016
I've been watching a lot of movies lately. It's relaxing,
except when they have clowns in them.
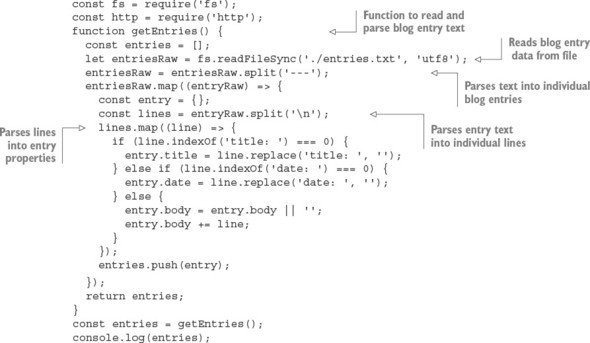
The blog application code in blog.js starts by requiring necessary modules and reading in the blog entries, as shown in the following listing.
Listing 7.2. Blog entry file-parsing logic for a simple blogging application
The following code, when added to the blog application, defines an HTTP server. When the server receives an HTTP request, it returns a page containing all blog entries. This page is rendered using a function called blogPage, which you’ll define next:
const server = http.createServer((req, res) => {
  const output = blogPage(entries);
  res.writeHead(200, {'Content-Type': 'text/html'});
  res.end(output);
});
server.listen(8000);
Now you need to define the blogPage function, which renders the blog entries into a page of HTML that can be sent to the user’s browser. You’ll implement this by trying two approaches:
- Rendering HTML without a template
- Rendering HTML using a template
Let’s look at rendering without a template first.
7.1.2. Rendering HTML without a template
The blog application could output the HTML directly, but including the HTML with the application logic would result in clutter. In the following listing, the blogPage function illustrates a nontemplated approach to displaying blog entries.
Listing 7.3. Template engines separate presentation details from application logic
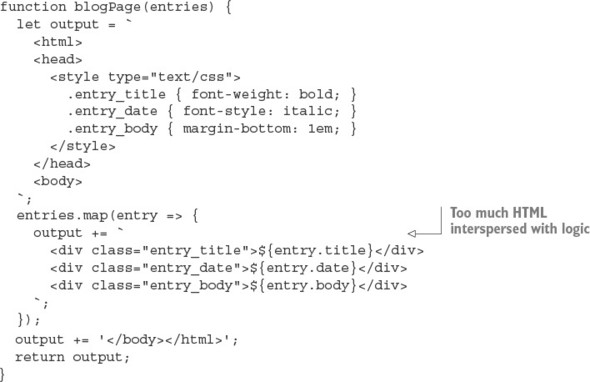
Note that all of this presentation-related content, CSS definitions, and HTML adds many lines to the application.
Rendering HTML by using a template
Rendering HTML by using templating allows you to remove the HTML from the application logic, cleaning up the code considerably.
To try the demos in this section, you need to install the Embedded JavaScript (EJS) module into your application directory. You can do this by entering the following on the command line:
npm install ejs
The following snippet loads a template from a file and then defines a new version of the blogPage function, this time using the EJS template engine, which we’ll show you how to use in section 7.2:
const fs = require('fs');
const ejs = require('ejs');
const template = fs.readFileSync('./templatess/blog_page.ejs', 'utf8');
function blogPage(entries) {
  const values = { entries };
  return ejs.render(template, values);
}
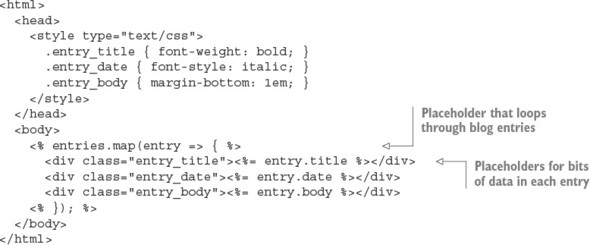
The full listing can be found in this book’s listings under ch07-templates/listing7_4/. The EJS template file contains HTML markup (keeping it out of the application logic) and placeholders that indicate where data passed to the template engine should be put. The EJS template file that shows the blog entries contains the HTML and placeholders shown in the following listing.
Listing 7.4. An EJS template for displaying blog entries
Community-contributed Node modules also provide template engines, and a wide variety of them exist. If you consider HTML and/or CSS inelegant, because HTML requires closing tags and CSS requires opening and closing braces, take a closer look at template engines. They allow template files to use special languages (such as the Pug language, which we cover later in this chapter) that provide a shorthand way of specifying HTML, CSS, or both.
These template engines can make your templates cleaner, but you may not want to take the time to learn an alternative way of specifying HTML and CSS. Ultimately, what you decide to use comes down to a matter of personal preference.
In the rest of this chapter, you’ll learn how to incorporate templating in your Node applications through the lens of three popular template engines:
- The Embedded JavaScript (EJS) engine
- The minimalist Hogan engine
- The Pug template engine
Each engine allows you to write HTML in an alternative way. Let’s start with EJS.
7.2. Templating with Embedded JavaScript
Embedded JavaScript (https://github.com/visionmedia/ejs) takes a fairly straightforward approach to templating, and it will be familiar territory for folks who’ve used template engines in other languages, such as Java Server Pages (JSP), Smarty (PHP), Embedded Ruby (ERB), and so on. EJS allows you to embed EJS tags as placeholders for data within HTML. EJS also lets you execute raw JavaScript logic in your templates for tasks such as conditional branching and iteration, much as PHP does.
In this section, you’ll learn how to do the following:
- Create EJS templates
- Use EJS filters to provide commonly needed, presentation-related functionality, such as text manipulation, sorting, and iteration
- Integrate EJS with your Node applications
- Use EJS for client-side applications
Let’s dive deeper into the world of EJS templating.
7.2.1. Creating a template
In the world of templating, the data sent to the template engine for rendering is sometimes called the context. The following is a bare-bones example of Node using EJS to render a simple template in a context:
const ejs = require('ejs');
const template = '<%= message %>';
const context = { message: 'Hello template!' };
console.log(ejs.render(template, context));
Note the use of locals in the second argument sent to render. The second argument can include rendering options as well as context data, which means the use of locals ensures that individual bits of context data aren’t interpreted as EJS options. But it’s possible in most cases to pass the context itself as the second option, as the following render call illustrates:
console.log(ejs.render(template, context));
If you pass a context to EJS directly as the second argument to render, make sure you don’t name context values by using any of the following terms: cache, client, close, compileDebug, debug, filename, open, or scope. These values are reserved to allow the changing of template engine settings.
Character escaping
When rendering, EJS escapes any special characters in context values, replacing them with HTML entity codes. This is intended to prevent cross-site scripting (XSS) attacks, in which malicious web application users attempt to submit JavaScript as data in the hopes that when displayed, it’ll execute in some other user’s browser. The following code shows EJS’s escaping at work:
const ejs = require('ejs');
const template = '<%= message %>';
const context = {message: "<script>alert('XSS attack!');</script>"};
console.log(ejs.render(template, context));
The previous code displays the following output:
<script>alert('XSS attack!');</script>
If you trust the data being used in your template and don’t want to escape a context value in an EJS template, you can use <%- instead of <%= in your template tag, as the following code demonstrates:
const ejs = require('ejs');
const template = '<%- message %>';
const context = {
  message: "<script>alert('Trusted JavaScript!');</script>"
};
console.log(ejs.render(template, context));
Note that if you don’t like the characters used by EJS to specify tags, you can customize them, like so:
const ejs = require('ejs');
ejs.delimiter = '$'
const template = '<$= message $>';
const context = { message: 'Hello template!' };
console.log(ejs.render(template, context));
Now that you know the basics of EJS, let’s look at some more detailed examples.
7.2.2. Integrating EJS into your application
Because it’s awkward to store templates in files along with application code, and doing so clutters up your code, we’ll show you how to use Node’s filesystem API to read them from separate files.
Move to a working directory and create a file named app.js containing the code in the following listing.
Listing 7.5. Storing template code in files
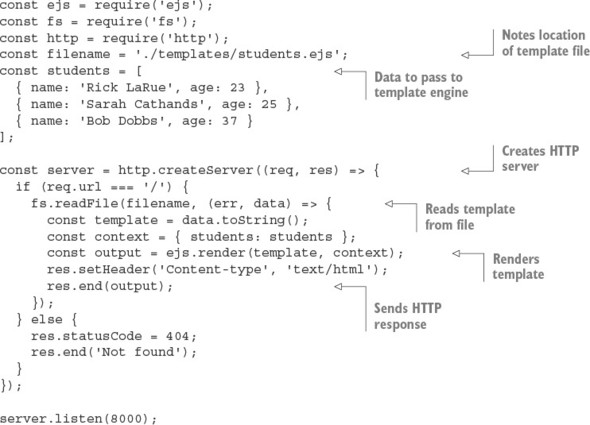
Next, create a child directory called templates. You’ll keep your templates in this directory. Create a file named students.ejs in the templates directory. Enter the code in the following listing into templates/students.ejs.
Listing 7.6. EJS template that renders an array of students
<% if (students.length) { %>
  <ul>
    <% students.forEach((student) => { %>
      <li><%= student.name %> (<%= student.age %>)</li>
    <% }) %>
  </ul>
<% } %>
Caching EJS templates
EJS supports optional, in-memory caching of template functions: after parsing your template file once, EJS will store the function that’s created by the parsing. Rendering a cached template will be faster because the parsing step can be skipped.
If you’re doing initial development of a Node web application, and you want to see any changes you make to your template files reflected immediately, don’t enable caching. But if you’re deploying an application to production, enabling caching is a quick, easy win. Caching is conditionally enabled via the NODE_ENV environment variable.
To try out caching, change the call to EJS’s render function in the previous example to the following:
const cache = process.env.NODE_ENV === 'production';
const output = ejs.render(
  template,
  { students, cache, filename }
);
Note that the filename option doesn’t necessarily have to be a file; you can use a unique value that identifies whichever template you’re rendering.
Now that you’ve learned how to integrate EJS with your Node applications, let’s look at how EJS can be used in a different way: in web browsers.
7.2.3. Using EJS for client-side applications
To use EJS on the client side, you first need to download the EJS engine to your working directory, as shown by the following commands:
cd /your/working/directory
curl -O https://raw.githubusercontent.com/tj/ejs/master/lib/ejs.js
After you download the ejs.js file, you can use EJS in your client-side code. The following listing shows a simple client-side application of EJS. If you save this file as index.html, you should be able to open it in a browser to see the results.
Listing 7.7. Using EJS to add templating capabilities to the client side

You’ve now learned how to use a fully featured Node template engine, so it’s time to look at the Hogan template engine, which deliberately limits the functionality available to templating code.
7.3. Using the Mustache templating language with Hogan
Hogan.js (https://github.com/twitter/hogan.js) is a template engine that was created by Twitter for its templating needs. Hogan is an implementation of the popular Mustache (http://mustache.github.com/) template language standard, which was created by GitHub’s Chris Wanstrath.
Mustache takes a minimalist approach to templating. Unlike EJS, the Mustache standard deliberately doesn’t include conditional logic, or any built-in content-filtering capabilities other than escaping content to prevent XSS attacks. Mustache advocates that template code should be kept as simple as possible.
In this section you’ll learn
- How to create and implement Mustache templates in your application
- How to use the various template tags in the Mustache standard
- How to organize your templates by using partials
- How to fine-tune Hogan with your own delimiters and other options
Let’s look at the alternative approach Hogan provides for templating.
7.3.1. Creating a template
To use Hogan in an application, or to try the demos in this section, you need to install Hogan in your application directory (ch07-templates/hogan-snippet). You can do this by entering the following command on the command line:
npm i --save hogan.js
The following is a bare-bones example of Node using Hogan to render a simple template in a context. Running it outputs the text Hello template!
const hogan = require('hogan.js');
const templateSource = '{{message}}';
const context = { message: 'Hello template!' };
const template = hogan.compile(templateSource);
console.log(template.render(context));
Now that you know how to process Mustache templates with Hogan, let’s look at what tags Mustache supports.
7.3.2. Using Mustache tags
Mustache tags are conceptually similar to EJS’s tags. Mustache tags serve as placeholders for variable values, indicate where iteration is needed, and allow you to augment Mustache’s functionality and add comments to your templates.
Displaying simple values
To display a context value in a Mustache template, include the name of the value in double braces. Braces, in the Mustache community, are known as mustaches. If you want to display the value for context item name, for example, you use the Hogan tag {{name}}.
Like most template engines, Hogan escapes content by default to prevent XSS attacks. But to display an unescaped value in Hogan, you can either add a third mustache or prepend the name of the context item with an ampersand. Using the previous name example, you could display the context value unescaped by either using the {{{name}}} or {{&name}} tag formats.
If you want to add a comment in a Mustache template, you can use this format: {{! This is a comment }}.
Sections: iterating through multiple values
Although Hogan doesn’t allow the inclusion of logic in templates, it does include an elegant way to iterate through multiple values in a context item by using Mustache sections. The following context, for example, contains an item with an array of values:
const context = {
  students: [
    { name: 'Jane Narwhal', age: 21 },
    { name: 'Rick LaRue', age: 26 }
  ]
};
If you want to create a template that displays each student in a separate HTML paragraph, with output similar to the following, it’s a straightforward task using a Hogan template:
<p>Name: Jane Narwhal, Age: 21 years old</p>
<p>Name: Rick LaRue, Age: 26 years old</p>
The following template produces the desired HTML:
{{#students}}
  <p>Name: {{name}}, Age: {{age}} years old</p>
{{/students}}
Inverted sections: default HTML when values don’t exist
What if the value of the students item in the context data isn’t an array? If the value is a single object, for example, the template will display it. But sections won’t display if the corresponding item’s value is undefined or false, or is an empty array.
If you want your template to output a message indicating that values don’t exist for a section, Hogan supports what Mustache calls inverted sections. The following template code, if added to the previous student display template, would display a message when no student data exists in the context:
{{^students}}
  <p>No students found.</p>
{{/students}}
Section lambdas: custom functionality in section blocks
In order to allow developers to augment Mustache’s functionality, the Mustache standard lets you define section tags that process template content through a function call, rather than iterating through arrays. This is called a section lambda.
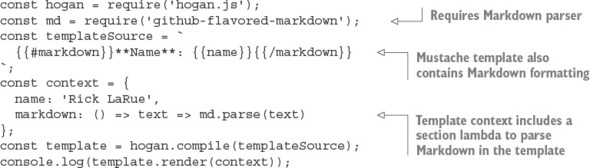
Listing 7.8 shows an example of using a section lambda to add Markdown support when rendering a template. Note that the example uses the github-flavored-markdown module, which you install by entering npm install github-flavored-markdown --dev on your command line. If you’re using the book’s source code, run npm install from ch07-templates/listing7_8 to run the example.
In the following listing, the **Name** in the template gets rendered to <strong>Name</strong> when passing through the Markdown parser called by the section lambda logic.
Listing 7.8. Using a lambda in Hogan
Section lambdas allow you to easily implement features such as caching and translation mechanisms in your templates.
Partials: reusing templates within other templates
When writing templates, you want to avoid unnecessarily repeating the same code in multiple templates. One way to avoid this is to create partials. Partials are templates used as building blocks that are included in other templates. Another use of partials is to break up complicated templates into simpler templates.
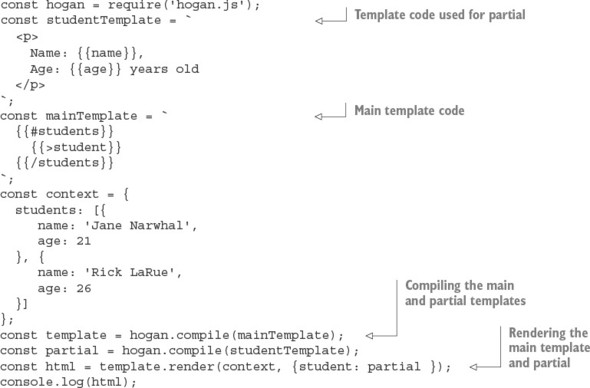
The following listing, for example, uses a partial to separate the template code used to display student data from the main template.
Listing 7.9. Using partials in Hogan
7.3.3. Fine-tuning Hogan
Hogan is fairly simple to use—after you’ve learned its vocabulary of tags, you should be off and running. You may need to tweak only a couple of options as you use it.
If you don’t like Mustache-style braces, you can change the delimiters Hogan uses by passing the compile method an option to override them. The following example shows compiling in Hogan using EJS-style delimiters:
hogan.compile(text, { delimiters: '<% %>' });
In addition to Mustache, other template languages are available. One that attempts to eliminate as much of HTML’s noise as possible is Pug.
7.4. Templating with Pug
Pug (http://pugjs.org), formerly known as Jade, offers an alternative way to specify HTML. It’s the default template engine in Express. The key difference between Pug and the majority of other templating systems is the use of meaningful whitespace. When creating a template in Pug, you use indentation to indicate HTML tag nesting. HTML tags also don’t have to be explicitly closed, which eliminates the problem of accidentally closing tags prematurely or not at all. Using indentation also results in templates that are less visually dense and easier to maintain.
For a quick example of this at work, let’s look at how you’d represent this snippet of HTML:
<html>
  <head>
    <title>Welcome</title>
  </head>
  <body>
    <div id="main" class="content">
      <strong>"Hello world!"</strong>
    </div>
  </body>
</html>
This HTML could be represented using the following Pug template:
html
  head
    title Welcome
  body
    div.content#main
      strong "Hello world!"
Pug, like EJS, allows you to embed JavaScript, and you can use it on the server or client side. But Pug offers additional features, such as support for template inheritance and mixins. Mixins allow you to define easily reusable mini-templates to represent the HTML used for commonly occurring visual elements, such as item lists and boxes. Mixins are similar in concept to the Hogan.js partials, which you learned about in the previous section. Template inheritance makes it easy to organize the Pug templates needed to render a single HTML page into multiple files. You’ll learn about these features in detail later in this section.
To install Pug in a Node application directory, enter the following on the command line:
npm install pug --save
In this section, you’ll learn
- Pug basics, such as specifying class names, attributes, and block expansion
- How to add logic to your Pug templates by using built-in keywords
- How to organize your templates by using inheritance, blocks, and mixins
To get started, let’s look at the basics of Pug usage and syntax.
7.4.1. Pug basics
Pug uses the same tag names as HTML, but it lets you lose the opening and closing < and > characters and instead uses indentation to express tag nesting. A tag can have one or more CSS classes associated with it by adding .<classname>. A div element with the content and sidebar classes applied to it would be represented like this:
div.content.sidebar
CSS IDs are assigned by adding #<ID> to the tag. You add a CSS ID of featured_content to the previous example by using the following Pug representation:
div.content.sidebar#featured_content
Using div tag shorthand
Because the div tag is commonly used in HTML, Pug offers a shorthand way of specifying it. The following example renders to the same HTML as the previous example:
.content.sidebar#featured_content
Now that you know how to specify HTML tags and their CSS classes and IDs, let’s look at how to specify HTML tag attributes.
Specifying tag attributes
You can specify tag attributes by enclosing the attributes in parentheses, separating the specification of each attribute from the next with a comma. You can specify a hyperlink that’ll open in a different tab by using the following Pug representation:
a(href='http://nodejs.org',
  target='_blank')
Because the specification of tag attributes can lead to long lines of Pug, the template engine provides you with some flexibility. The following Pug is valid and equivalent to the previous example:
a(href='http://nodejs.org', target='_blank')
You can also specify attributes that don’t require a value. The next Pug example shows the specification of an HTML form that includes a select element with an option preselected:
strong Select your favorite food:
form
  select
    option(value='Cheese') Cheese
    option(value='Tofu', selected) Tofu
Specifying tag content
In the previous code snippet, you can also see examples of tag content: Select your favorite food: after the strong tag; Cheese after the first option tag; and Tofu after the second option tag.
This is the normal way to specify tag content in Pug, but it’s not the only way. Although this style is great for short bits of content, it can result in Pug templates with overly long lines if a tag’s content is lengthy. Luckily, as the following example shows, Pug allows you to specify tag content by using the | character:
textarea
  | This is some default text
  | that the user should be
  | provided with.
If the HTML tag, such as the style and script tags, accepts only text (meaning it doesn’t allow nested HTML elements), then the | characters can be left out entirely, as the following example shows:
style
  h1 {
    font-size: 6em;
    color: #9DFF0C;
  }
Having two separate ways to express long tag content and short tag content helps you keep your Pug templates looking elegant. Pug also supports an alternative way to express nesting, called block expansion.
Keeping it organized with block expansion
Pug normally expresses nesting through indentation, but sometimes indentation can lead to excess whitespace. For example, here’s a Pug template that uses indentation to define a simple list of links:
ul
  li
    a(href='http://nodejs.org/') Node.js homepage
  li
    a(href='http://npmjs.org/') NPM homepage
  li
    a(href='http://nodebits.org/') Nodebits blog
A more compact way to express the previous example is by using Pug block expansion. With block expansion, you add a colon after your tag to indicate nesting. The following code generates the same output as the previous listing, but in four lines instead of seven:
ul
  li: a(href='http://nodejs.org/') Node.js homepage
  li: a(href='http://npmjs.org/') NPM homepage
  li: a(href='http://nodebits.org/') Nodebits blog
Now that you’ve had a good look at how to represent markup using Pug, let’s look at how to integrate Pug with your web application.
Incorporating data in Pug templates
Data is relayed to the Pug engine in the same basic way as in EJS. The template is first compiled into a function that’s then called with a context in order to render the HTML output. The following is an example of this:
const pug = require('pug');
const template = 'strong #{message}';
const context = { message: 'Hello template!' };
const fn = pug.compile(template);
console.log(fn(context));
Here, the #{message} in the template specifies a placeholder to be replaced by a context value.
Context values can also be used to supply values for attributes. The next example renders <a href="http://google.com"></a>:
const pug = require('pug');
const template = 'a(href = url)';
const context = { url: 'http://google.com' };
const fn = pug.compile(template);
console.log(fn(context));
Now that you’ve learned how HTML is represented using Pug, and how to provide Pug templates with application data, let’s look at how to incorporate logic in Pug.
7.4.2. Logic in Pug templates
After you supply Pug templates with application data, you need logic to deal with that data. Pug allows you to directly embed lines of JavaScript code into your templates, which is how you define logic in your templates. Code such as if statements, for loops, and var declarations are common. Before we dive into the details, here’s an example for template rendering a contact list, to give you a practical feel for how you might use Pug logic in an application:
h3.contacts-header My Contacts
if contacts.length
  each contact in contacts
    - var fullName = contact.firstName + ' ' + contact.lastName
    .contact-box
      p fullName
      if contact.isEditable
        p: a(href='/edit/+contact.id) Edit Record
      p
        case contact.status
          when 'Active'
            strong User is active in the system
          when 'Inactive'
            em User is inactive
          when 'Pending'
            | User has a pending invitation
else
  p You currently do not have any contacts
Let’s first look at the various ways Pug handles output when embedding JavaScript code.
Using JavaScript in Pug templates
Prefixing a line of JavaScript logic with - will execute the JavaScript without including any value returned from the code in the template’s output. Prefixing JavaScript logic with = will include a value returned from the code, escaped to prevent XSS attacks. But if your JavaScript generates code that shouldn’t be escaped, you can prefix it with !=. Table 7.1 summarizes the output resulting from these prefixes.
Table 7.1. Prefixes used to embed JavaScript in Pug
|
Prefix |
Output |
|---|---|
| = | Escaped output (for untrusted or unpredictable values, XSS safe) |
| != | Output without escaping (for trusted or predictable values) |
| - | No output |
Pug includes commonly used conditional and iterative statements that can be written without prefixes: if, else, case, when, default, until, while, each, and unless.
Pug also allows you to define variables. The following shows two ways to assign values that are equivalent in Pug:
- count = 0
count = 0
The unprefixed statements have no output, just like the - prefix discussed previously.
Iterating through objects and arrays
Values passed in a context are accessible to JavaScript in Pug. In the next example, you’ll read a Pug template from a file and pass the Pug template a context containing a couple of messages that you intend to display in an array:
const pug = require('pug');
const fs = require('fs');
const template = fs.readFileSync('./template.pug');
const context = { messages: [
  'You have logged in successfully.',
  'Welcome back!'
]};
const fn = pug.compile(template);
console.log(fn(context));
The Pug template contains the following:
- messages.forEach(message => {
  p= message
- })
The final HTML output looks like this:
<p>You have logged in successfully.</p><p>Welcome back!</p>
Pug also supports a non-JavaScript form of iteration: the each statement, which allows you to cycle through arrays and object properties with ease.
The following is equivalent to the previous example, but using each instead:
each message in messages
  p= message
You can cycle through object properties by using a slight variation, like this:
each value, key in post
  div
    strong #{key}
    p value
Conditionally rendering template code
Sometimes templates need to make decisions about how data is displayed, depending on the value of the data. The next example illustrates a conditional in which, roughly half the time, the script tag is outputted as HTML:
- n = Math.round(Math.random() * 1) + 1
- if (n == 1) {
  script
    alert('You win!');
- }
Conditionals can also be written in Pug by using a cleaner, alternative form:
- n = Math.round(Math.random() * 1) + 1
  if n == 1
    script
      alert('You win!');
If you’re writing a negated conditional, such as if (n != 1), you can use Pug’s unless keyword:
- n = Math.round(Math.random() * 1) + 1
  unless n == 1
    script
      alert('You win!');
Using case statements in Pug
Pug also supports a non-JavaScript form of conditional similar to a switch: the case statement, which allows you to specify an outcome based on various template scenarios.
The following example template shows how the case statement can be used to display results from the search of a blog in three ways. If the search finds nothing, a message is shown indicating that. If a single blog post is found, it’s displayed in detail. If multiple blog posts are found, an each statement is used to iterate through the posts, displaying their titles:
case results.length
  when 0
    p No results found.
  when 1
    p= results[0].content
  default
    each result in results
      p= result.title
7.4.3. Organizing Pug templates
With your templates defined, you next need to know how to organize them. As with application logic, you don’t want to make your template files overly large. A single template file should correspond to a conceptual building block: a page, a sidebar, or blog post content, for example.
In this section, you’ll learn a few mechanisms that allow template files to work together to render content:
- Structuring multiple templates with template inheritance
- Implementing layouts by using block prepending/appending
- Template including
- Reusing template logic with mixins
Let’s begin by looking at template inheritance in Pug.
Structuring multiple templates with template inheritance
Template inheritance is one means of structuring multiple templates. The concept treats templates, conceptually, like classes in the object-oriented programming paradigm. One template can extend another, which can in turn extend another. You can use as many levels of inheritance as makes sense.
As a simple example, let’s look at using template inheritance to provide a basic HTML wrapper that you can use to wrap page content. In a working directory, create a folder called templates in which you’ll put the example’s Pug file. For a page template, you’ll create a file called layout.pug containing the following Pug:
html
  head
    block title
  body
    block content
The layout.pug template contains the bare-bones definition of an HTML page as well as two blocks. Blocks are used in template inheritance to define where a descendant template can provide content. In layout.pug, there’s a title block, allowing a descendent template to set the title, and a content block, allowing a descendant template to set what's to be displayed on the page.
Next, in your working directory’s templates directory, create a file named page.pug. This template file will populate the title and content blocks:
extends layout
block title
  title Messages
block content
  each message in messages
    p= message
Finally, add the logic in the following listing (a modification of an earlier example in this section), which will display the template results, showing inheritance in action.
Listing 7.10. Template inheritance in action
const pug = require('pug');
const fs = require('fs');
const templateFile = './templates/page.pug';
const iterTemplate = fs.readFileSync(templateFile);
const context = { messages: [
  'You have logged in successfully.',
  'Welcome back!'
]};
const iterFn = pug.compile(
  iterTemplate,
  { filename: templateFile }
);
console.log(iterFn(context));
Now let’s look at another template inheritance feature: block prepending and appending.
Implementing layouts by using block prepending/appending
In the previous example, the blocks in layout.pug contain no content, which makes setting the content in the page.pug template straightforward. But if a block in an inherited template does contain content, this content can be built upon, rather than replaced, by descendant templates using block prepending and appending. This allows you to define common content and add to it, rather than replace it.
The following layout.pug template contains an additional block, scripts, which contains content—a script tag that loads the jQuery JavaScript library:
html
  head
    - const baseUrl = "http://ajax.googleapis.com/ajax/libs/jqueryui/1.8/"
    block title
    block style
    block scripts
  body
    block content
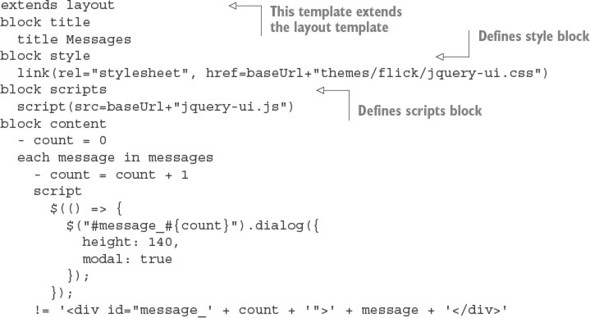
If you want the page.pug template to additionally load the jQuery UI library, you can do this by using the template in the following listing.
Listing 7.11. Using block appending to load an additional JavaScript file
Template inheritance isn’t the only way to integrate multiple templates. You also can use the include Pug command.
Template including
Another tool for organizing templates is Pug’s include command. This command incorporates the contents of another template. If you add the line include footer to the layout.pug template from the earlier example, you end up with the following template:
html
  head
    block title
    block style
    block scripts
      script(src='//ajax.googleapis.com/ajax/libs/jquery/1.8/jquery.js')
  body
    block content
    include footer
This template includes the contents of a template named footer.pug in the rendered output of layout.pug, as illustrated in figure 7.3.
Figure 7.3. Pug’s include mechanism provides a simple way to include the contents of one template in another template during rendering.
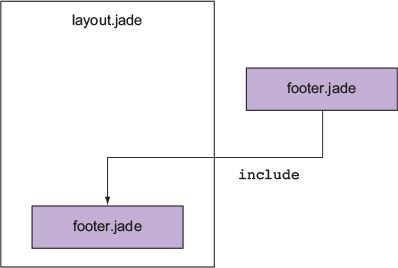
This can be used, for example, to add information about the site or design elements to layout.pug. You can also include non-Pug files by specifying the file extension (for example, include twitter_widget.html).
Reusing template logic with mixins
Although Pug’s include command is useful for bringing in previously created chunks of code, it’s not ideal for creating a library of reusable functionality that you can share between pages and applications. For this, Pug provides the mixin command, which lets you define reusable Pug snippets.
A Pug mixin is analogous to a JavaScript function. A mixin can, like a function, take arguments, and these arguments can be used to generate Pug code.
Let’s say, for example, your application handles a data structure similar to the following:
const students = [
  { name: 'Rick LaRue', age: 23 },
  { name: 'Sarah Cathands', age: 25 },
  { name: 'Bob Dobbs', age: 37 }
];
If you want to define a way to output an HTML list derived from a given property of each object, you could define a mixin like the following one to accomplish this:
mixin list_object_property(objects, property)
  ul
    each object in objects
      li= object[property]
You could then use the mixin to display the data using this line of Pug:
mixin list_object_property(students, 'name')
By using template inheritance, include statements, and mixins, you can easily reuse presentation markup and can prevent your template files from becoming larger than they need to be.
7.5. Summary
- Templating engines help keep application logic and presentation organized.
- Node has several popular template engines, including EJS, Hogan.js, and Pug.
- EJS supports simple control flow and escape or unescaped interpolation.
- Hogan.js is a simple template engine that doesn't support control flow, but does support the Mustache standard.
- Pug is a more complex template language that can output HTML, but doesn’t use angled brackets.
- Pug relies on whitespace for embedding tags.