Chapter 9. Testing Node applications
- Testing logic with Node’s assert module
- Using other assertion libraries
- Using Node unit-testing frameworks
- Simulating and controlling web browsers using Node
- Getting more details when tests fail
As features are added to your application, the risk of introducing bugs is increased. An application isn’t complete if it’s not tested, and because manual testing is tedious and prone to human error, automated testing has become increasingly popular with developers. Automated testing involves writing logic to test your code, rather than running through application functionality by hand.
If the idea of automated testing is new to you, think of it as a robot doing all of the boring stuff while you focus on the interesting work. Every time you make a change to the code, the robot ensures that bugs haven’t crept in. Although you may not have completed or started your first Node application yet, it’s good to get a handle on how to implement automated testing because you’ll be able to write tests as you develop.
In this chapter, you’ll look at two types of automated testing: unit testing and acceptance testing. Unit testing is used to verify logic, typically at a function or method level, and it’s applicable to all types of applications. Unit-testing methodologies can be divided into two major forms: test-driven development (TDD) and behavior-driven development (BDD). Practically speaking, TDD and BDD are largely the same thing, but they differ stylistically. This can be important, depending on who needs to read your tests. Other differences between TDD and BDD exist, but they’re beyond the scope of this book. Acceptance testing is an additional layer of testing most commonly used for web applications. Acceptance testing involves scripting control of a browser and attempting to trigger web application functionality with it.
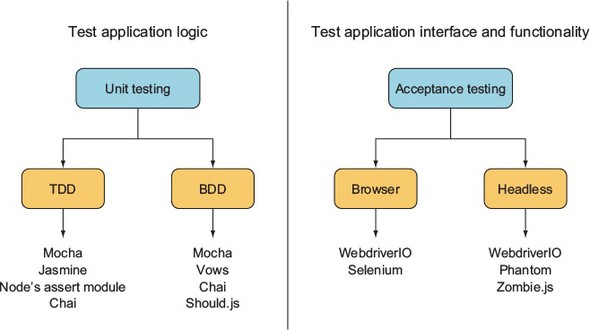
This chapter covers established solutions for both unit and acceptance testing. For unit testing, we cover Node’s assert module; the Mocha, Vows, and Should.js frameworks; and Chai. For acceptance testing, we look at using Selenium with Node. Figure 9.1 places the tools alongside their respective testing methodologies and flavors.
Figure 9.1. Test framework overview
Let’s start with unit testing.
9.1. Unit testing
Unit testing is a type of automated testing in which you write logic to test discrete parts of your application. Writing tests helps you think more critically about your application design choices and helps you avoid pitfalls early on. The tests also give you confidence that your recent changes haven’t introduced errors. Although unit tests take a bit of work up front to write, they can save you time by lessening the need to manually retest every time you make a change to an application.
Unit testing can be tricky, and testing asynchronous logic can present its own challenges. Asynchronous unit tests can run in parallel, so you have to be careful to ensure that tests don’t interfere with each other. For example, if your tests create temporary files on disk, you have to be careful that when you delete the files after a test, you don’t delete the working files of another test that hasn’t yet finished. For this reason, many unit-testing frameworks include flow control to sequence the running of tests.
In this section, we show you how to use the following:
- Node’s built-in assert module— A good building block for TDD-style automated testing
- Mocha— A relatively new testing framework that can be used for TDD- or BDD-style testing
- Vows— A widely used BDD-style testing framework
- Should.js— A module that builds on Node’s assert module to provide BDD-style assertions
The next section demonstrates how to test business logic with the assert module, which is included with Node.
9.1.1. The assert module
The basis for most Node unit testing is the built-in assert module, which tests a condition and, if the condition isn’t met, throws an error. Node’s assert module is used by many third-party testing frameworks. Even without a testing framework, you can do useful testing with it. If you’re trying out a quick idea, you can use the assert module by itself to write a quick test.
A simple example
Suppose you have a simple to-do application that stores items in memory, and you want to assert that it’s doing what you think it’s doing.
The following listing defines a module containing the core application functionality. Module logic supports creating, retrieving, and deleting to-do items. It also includes a simple doAsync method, so you can look at testing asynchronous methods too. Save this file as todo.js.
Listing 9.1. A model for a to-do list

Now you can use Node’s assert module to test the code. In a file called test.js, enter the following code to load the necessary modules, set up a new to-do list, and set a variable that tracks the number of completed tests.
Listing 9.2. Set up necessary modules
const assert = require('assert');
const Todo = require('./todo');
const todo = new Todo();
let testsCompleted = 0;
Using equal to test the contents of a variable
Next, you can add a test of the to-do application’s delete functionality. Add the function in the following listing to the end of test.js.
Listing 9.3. Test to make sure that no to-do items remain after deletion

This test adds a todo item and then deletes it. Because there should be no to-dos at the end of this test, the value of todo.length should be 0 if the application logic is working properly. If a problem occurs, an exception is thrown. If the value returned by todo.length isn’t set to 0, the assertion will result in a stack trace showing an error message, “No items should exist,” outputted to the console. After the assertion, testsCompleted is incremented to note that a test has completed.
Using notEqual to find problems in logic
Next, add the code in the following listing to test.js. This code is a test of the to-do application’s add functionality.
Listing 9.4. Test to make sure adding a to-do works

The assert module also allows notEqual assertions. This type of assertion is useful when the generation of a certain value by application code indicates a problem in logic. Listing 9.4 shows the use of a notEqual assertion. All to-do items are deleted, an item is added, and the application logic then gets all items. If the number of items is 0, the assertion will fail and an exception will be thrown.
Using additional functionality: strictEqual, notStrictEqual, deep- pEqual, notDeepEqual
In addition to equal and notEqual functionality, the assert module offers strict versions of assertions called strictEqual and notStrictEqual. These use the strict equality operator (===) rather than the more permissive version (==).
To compare objects, the assert module offers deepEqual and notDeepEqual. The deep in the names of these assertions indicates that they recursively compare two objects, comparing two object’s properties, and if the properties are themselves objects, comparing these as well.
Using ok to test for an asynchronous value being true
Now it’s time to add a test of the to-do application’s doAsync method, as shown in listing 9.5. Because this is an asynchronous test, you’re providing a callback function (cb) to signal to the test runner when the test has completed; you can’t rely on the function returning to tell you, as you can with synchronous tests. To see whether the result of doAsync is the value true, use the ok assertion. The ok assertion provides an easy way to test a value for being true.
Listing 9.5. Test whether the doAsync callback is passed true

Testing that thrown errors are correct
You can also use the assert module to check that thrown error messages are correct, as the following listing shows. The second argument in the throws call is a regular expression that looks for the text requires in the error message.
Listing 9.6. Test whether add throws when missing a parameter

Adding logic to run your tests
Now that you’ve defined the tests, you can add logic to the file to run each of the tests. The logic in the following listing runs each test, and then prints the number of tests that were run and completed.
Listing 9.7. Running the tests and reporting test completion

You can run the tests with the following command:
$ node chapter09-testing/listing_09_1-7/test.js
If the tests don’t fail, the script informs you of the number of tests completed. It also can be smart to keep track of when tests start execution as well as when they complete, to protect against flaws in individual tests. For example, a test may execute without reaching the assertion.
In order to use Node’s built-in functionality, each test case has to include a lot of boilerplate to set up the test (such as deleting all items) and to keep track of progress (the completed counter). All this boilerplate shifts the focus away from the primary concern of writing test cases, and it’s better left to a dedicated framework that can do the heavy lifting while you focus on testing business logic. Let’s look at making things easier by using Mocha, a third-party unit-testing framework.
9.1.2. Mocha
Mocha, a popular testing framework, is easy to grasp. Although it defaults to a BDD style, you can also use it in a TDD style. Mocha has a wide variety of features, including global variable leak detection and client-side testing.
You should have little need for global variables that are readable application-wide, and it’s considered a programming best practice to minimize your use of them. But in ES5, it’s easy to inadvertently create global variables by forgetting to include the var keyword when declaring a variable. Mocha helps detect accidental global variable leaks by throwing an error when you create a global variable during testing.
If you want to disable global leak detection, run mocha with the --ignored-leaks command-line option. Alternatively, if you want to allow a select number of globals to be used, you can specify them by using the --globals command-line option followed by a comma-delimited list of allowable global variables.
By default, Mocha tests are defined and their logic is set up by using BDD-flavored functions called describe, it, before, after, beforeEach, and afterEach. Alternatively, you can use Mocha’s TDD interface, which replaces the use of describe with suite, it with test, before with setup, and after with teardown. For our example, you’ll stick with the default BDD interface.
Testing Node applications with Mocha
Let’s dive right in and see how to create a small project called memdb—a small in-memory database—and use Mocha to test it. First, you need to create the directories and files for the project:
$ mkdir -p memdb/test
$ cd memdb
$ touch index.js
$ touch test/memdb.js
$ npm init -y
$ npm install --save-dev mocha
Open package.json and add a scripts property that defines how the tests are run:
"scripts": {
  "test": "mocha"
},
The test directory is where the tests will live. By default, Mocha uses the BDD interface. The following listing shows what it looks like (chapter09-testing/memdb in the book’s sample code).
Listing 9.8. Basic structure for a Mocha test
const memdb = require('..');
describe('memdb', () => {
  describe('.saveSync(doc)', () => {
    it('should save the document', () => {
    });
  });
});
Mocha also supports TDD and qunit, and exports style interfaces, which are detailed on the project’s site (https://mochajs.org/). To illustrate the concept of interfaces, here’s the exports interface:
module.exports = {
  'memdb': {
    '.saveSync(doc)': {
      'should save the document': () => {
      }
    }
  }
}
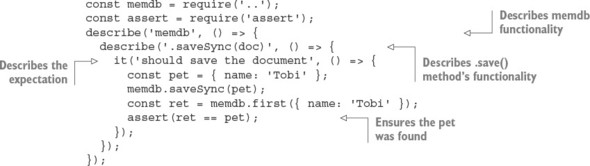
All of these interfaces provide the same functionality, but for now you’ll stick to the BDD interface and write the first test, shown in the following listing, in test/memdb.js. This test uses Node’s assert module to perform the assertions.
Listing 9.9. Describing the memdb .save functionality
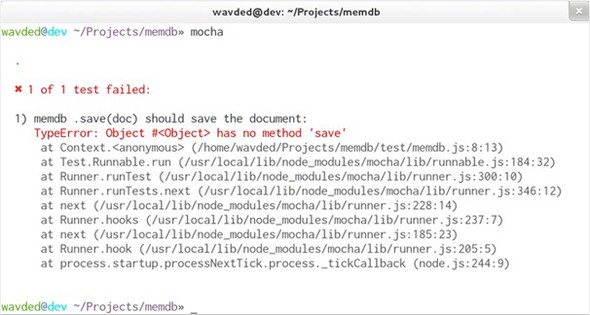
To run the tests, all you need to do is execute npm test. Mocha looks in the ./test directory by default for JavaScript files to execute. Because you haven’t implemented the .saveSync() method yet, you’ll see that the single defined test fails, as shown in figure 9.2.
Figure 9.2. Failing test in Mocha
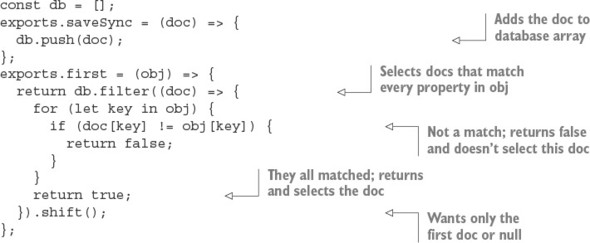
Let’s make it pass! Add the code in the following listing to index.js.
Listing 9.10. Added save functionality
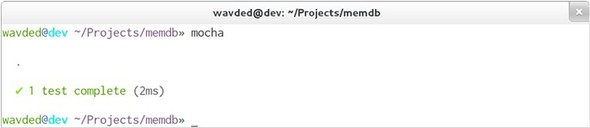
Run the tests again with npm, and the results should be similar to figure 9.3.
Figure 9.3. Successful test in Mocha
Defining setup and cleanup logic by using Mocha hooks
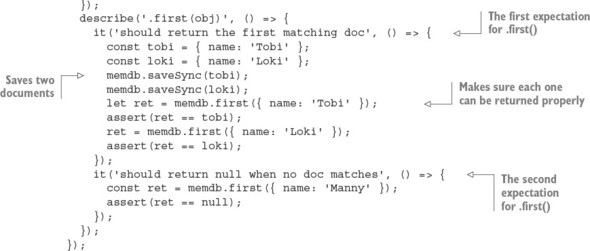
The test case in listing 9.10 makes the assumption that memdb.first() works correctly, so you’ll want to add a few test cases for that as well. The revised test file, listing 9.11, includes a new concept—the concept of Mocha hooks. The BDD interface exposes beforeEach(), afterEach(), before(), and after(), which take callbacks for defining setup and cleanup logic.
Listing 9.11. Adding a beforeEach hook

Ideally, test cases share no state whatsoever. To achieve this with memdb, you need to remove all the documents by implementing the .clear() method in index.js:
exports.clear = () => {
  db.length = 0;
};
Running Mocha again should show you that three tests have passed.
Testing asynchronous logic
One thing we haven’t yet looked at in Mocha is testing asynchronous logic. To see how this is done, you’ll make a small change to one of the functions defined earlier in index.js. By changing the save function to the following, a callback can be optionally provided that will execute after a small delay (meant to simulate some sort of asynchronous operation):
exports.save = (doc, cb) => {
  db.push(doc);
  if (cb) {
    setTimeout(() => {
      cb();
    }, 1000);
  }
};
Mocha test cases can be defined as asynchronous by adding an argument to a function defining testing logic. The argument is commonly named done. The following listing shows how to write a test for the asynchronous save method.
Listing 9.12. Testing asynchronous logic
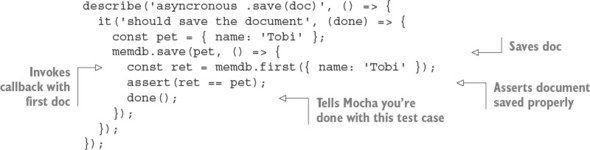
This same rule applies to all of the hooks. For example, the beforeEach() hook to clear the database could add a callback, and Mocha could wait until it’s called in order to move on. If done() is invoked with an error as the first argument, Mocha will report the error and mark the hook or test case as a failure:
beforeEach((done) => {
  memdb.clear(done);
});
For more about Mocha, check out its full online documentation: http://mochajs.org. Mocha also works for client-side JavaScript.
Mocha executes tests one after another rather than in parallel, which makes test suites execute more slowly but makes writing tests easier. But Mocha won’t let any test run for an inordinately long time. Mocha, by default, allows any given test to run for only 2,000 milliseconds before failing it. If you have tests that take longer, you can run Mocha with the --timeout command-line option and then specify a larger number.
For most testing, running tests serially is fine. If you find this problematic, other frameworks, such as Vows, execute in parallel, and are covered in the next section.
9.1.3. Vows
The tests you can write using the Vows unit-testing framework are more structured than those of many other frameworks, with the structure intended to make the tests easy to read and maintain.
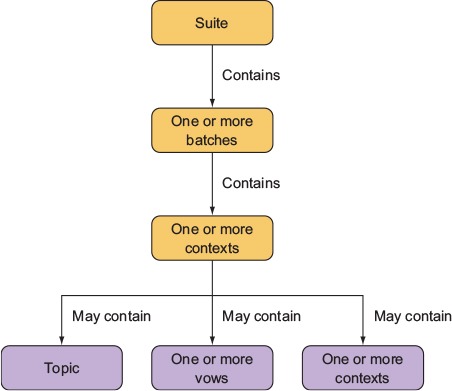
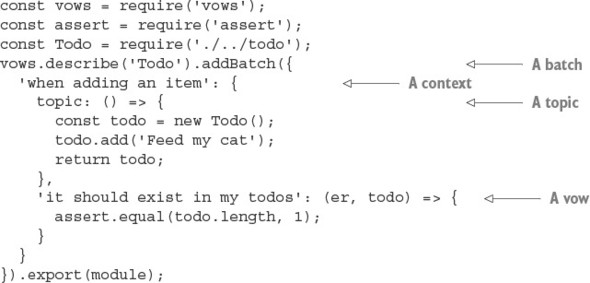
Vows uses its own BDD-flavored terminology to define test structure. In the realm of Vows, a test suite contains one or more batches. A batch can be thought of as a group of related contexts, or conceptual areas of concern that you want to test. The batches and contexts run in parallel. A context may contain a topic, one or more vows, and/or one or more related contexts (inner contexts also run in parallel). A topic is testing logic that’s related to a context. A vow is a test of the result of a topic. Figure 9.4 shows how Vows structures tests.
Figure 9.4. Vows can structure tests in a suite using batches, contexts, topics, and vows.
Vows, like Mocha, is geared toward automated application testing. The difference is primarily in flavor and parallelism, with Vows tests requiring a specific structure and terminology. In this section, we run through an example application test and explain how to use a Vows test to run multiple tests at the same time.
Add Vows to the to-do project by installing it using npm:
mkdir -p vows-todo/test
cd vows-todo
touch todo.js
touch test/todo-test.js
npm init -y
npm install --save-dev –g vows
You need to add Vows to the test property in package.json so you can run the tests by typing npm test:
"scripts": {
  "test": "vows test/*.js"
},
Testing application logic with Vows
You can trigger testing in Vows either by running a script containing test logic or by using the vows command-line test runner. The following example of a standalone test script (which can be run like any other Node script) uses one of the tests of the to-do application’s core logic.
Listing 9.13 creates a batch. Within the batch, you define a context. Within the context, you define a topic and a vow. Note how the code uses the callback to deal with asynchronous logic in the topic. If a topic isn’t asynchronous, a value can be returned rather than being sent via a callback. Save the file as test/todo-test.js.
Listing 9.13. Using Vows to test the to-do application
You should be able to run this test by typing npm test. If you install Vows globally with npm i -g vows, you can also run all tests in a folder named test by entering the following command:
$ vows test/*
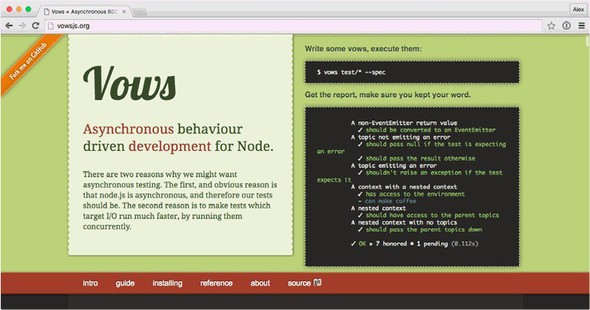
For more about Vows, check out the project’s online documentation (http://vowsjs.org/), as shown in figure 9.5.
Figure 9.5. Vows combines full-featured BDD testing with macros and flow control.
Vows offers a comprehensive testing solution, but you can mix and match test library features by using a different assertion library. Perhaps you like Mocha but don’t like Node’s assertion library. The next section introduces Chai, an assertion library that you can use in place of Node’s assert module.
9.1.4. Chai
Chai (http://chaijs.com/) is a popular assertion library that comes with three interfaces: should, expect, and assert. The assert interface, shown in the following listing, looks like Node’s built-in assertion module, but it comes with useful tools for comparing objects, arrays, and their properties. For example, typeOf can be used to compare types, and property checks that an object has the desired property.
Listing 9.14. Chai’s assert interface

The main reason you might want to try Chai is the should and expect interfaces. They provide fluent APIs that are more like BDD-style libraries. Here’s the expect interface:
const chai = require('chai');
const expect = chai.expect;
const foo = 'bar';
expect(foo).to.be.a('string');
expect(foo).to.equal('bar');
This API reads more like an English sentence—the declarative style is more verbose but easier to read aloud. The should interface switches this around: objects are decorated to have extra properties, so you don’t need to wrap assertions in a call as with expect:
const chai = require('chai');
chai.should();
const foo = 'bar';
foo.should.be.a('string');
foo.should.equal('bar');
Deciding which interface to use depends on the project. If you’re writing tests first and using them to document the project, the verbose expect and should interfaces will work well. JavaScript purists prefer expect because it doesn’t change prototypes, but those with Ruby experience may be familiar with APIs such as should.
The main advantage of using Chai is the range of plugins. This includes handy things such as chai-as-promised (http://chaijs.com/plugins/chai-as-promised/), which helps test code that uses promises, and chai-stats (http://chaijs.com/plugins/chai-stats/), a library for comparing numbers according to statistical methods. Note that Chai is an assertion library, so you should use it alongside a test runner like Mocha.
Another BDD assertion library like Chai is Should.js. The next section introduces Should.js and demonstrates how to write tests with it.
9.1.5. Should.js
Should.js is an assertion library that can help make your tests easier to read by allowing you to express assertions in a BDD-like style. It’s designed to be used in conjunction with other testing frameworks, which lets you continue to use your own preferred framework. In this section, you’ll learn how to write assertions with Should.js and, as an example, you’ll write a test for a custom module.
Should.js is easy to use with other frameworks because it augments Object. --proto-type with a single property: should. This allows you to write expressive assertions such as user.role.should.equal('admin'), or users.should.include ('rick').
Let’s say you’re writing a Node command-line tip calculator that you want to use to figure out who should pay what amount when you split a bill with friends. You’d like to write tests for your calculation logic in a way that’s easily understood by your nonprogrammer friends, because then they won’t think you’re cheating them.
To set up your tip calculator application, enter the following commands, which set up a folder for the application, and then install Should.js for testing:
mkdir -p tips/test
cd tips
touch index.js
touch test/tips.js
Now you can install Should.js by running the following commands:
npm init -y
npm install --save-dev should
Next, edit the index.js file, which will contain the logic defining the application’s core functionality. Specifically, the tip calculator logic includes four helper functions:
- addPercentageToEach—Increases each number in an array by a given percentage
- sum—Calculates the sum of each element in an array
- percentFormat—Formats a percentage for display
- dollarFormat—Formats a dollar value for display
Add this logic by populating index.js with the contents of the following listing.
Listing 9.15. Logic for calculating tips when splitting a bill

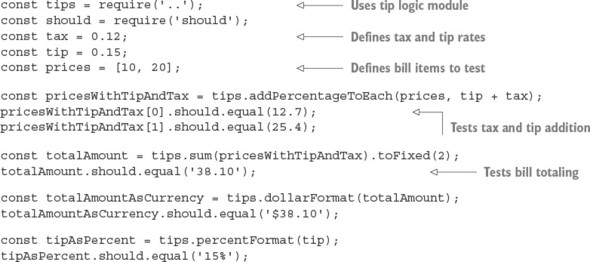
Now edit the test script in test/tips.js, as shown in the following listing. The script loads the tip logic module; defines a tax, tip percentage, and the bill items to test; tests the addition of a percentage to each array element; and tests the bill total.
Listing 9.16. Logic that calculates tips when splitting a bill
Run the script by using the following command. If all is well, the script should generate no output, because no assertions have been thrown, and your friends will be reassured of your honesty:
$ node test/tips.js
To make this easier to run, add it as the test property under scripts in package.json:
"scripts": {
  "test": "node test/tips.js"
}
Should.js supports many types of assertions—everything from assertions that use regular expressions to assertions that check object properties—allowing comprehensive testing of data and objects generated by your application. The project’s GitHub page (https://github.com/shouldjs/should.js) provides comprehensive documentation of Should.js’s functionality.
Spies, stubs, and mocks are often used in addition to assertion libraries to control the way that code under tests is executed. The next section demonstrates how to do these with Sinon.JS.
9.1.6. Spies and stubs with Sinon.JS
The final tool for your testing toolbox is a mock and stub library. The reason we write unit tests is to isolate parts of a system to test, but sometimes this is difficult. For example, imagine you’re testing code that resizes images. You don’t want to write to real image files, so how do you write tests? The code shouldn’t have special test branches that avoid touching the filesystem, because then you wouldn’t be truly testing the code. In cases like this, you need to stub the filesystem functionality. The practice of writing stubs also helps you do true TDD, because you can stub dependencies that aren’t ready yet.
In this section, you’ll learn how to use Sinon.JS (http://sinonjs.org/) to write test spies, stubs, and mocks. Before you get started, create a new project and install Sinon:
mkdir sinon-js-examples
cd sinon-js-examples
npm init -y
mkdir test
npm i --save-dev sinon
Next create a sample file to test. The example we use is a simple JSON key/value database. Our goal is to be able to stub the filesystem API so it doesn’t create real files on the filesystem. This will allow us to test only our database code rather than the file-handling code, as shown in the next listing.
Listing 9.17. Database class
const fs = require('fs');

class Database {
  constructor(filename) {
    this.filename = filename;
    this.data = {};
  }

  save(cb) {
    fs.writeFile(this.filename, JSON.stringify(this.data), cb);
  }

  insert(key, value) {
    this.data[key] = value;
  }
}

module.exports = Database;
Save the listing as db.js. Now you’ll try testing it with Sinon’s spies.
Spies
Sometimes you just want to see whether a method has been called. Spies are perfect for this. The API lets you replace a method with something you can use to make assertions on. To mock the fs.writeFile call in db.js, use Sinon’s method replacement, spy:
sinon.spy(fs, 'writeFile');
When the test is finished, you can get the original method back with restore:
fs.writeFile.restore();
In a test library like Mocha, you’d place these calls in the beforeEach and afterEach blocks. The following listing shows a full example of using spies. Save this file as spies.js.
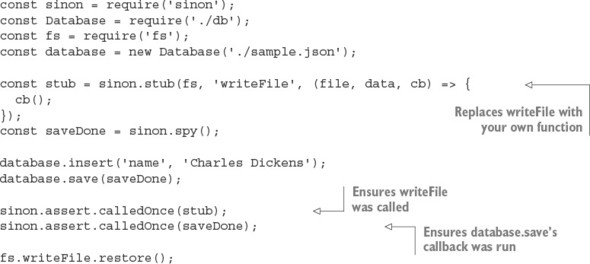
Listing 9.18. Using spies
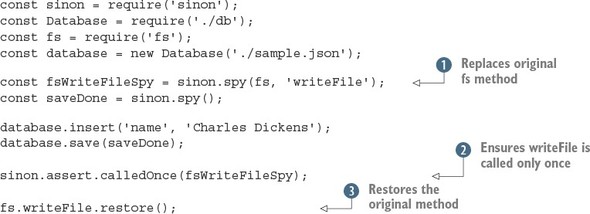
After setting up the spy ![]() , the code under test is run. Then you ensure that the expected method was called with sinon.assert
, the code under test is run. Then you ensure that the expected method was called with sinon.assert ![]() . The original method is then restored
. The original method is then restored ![]() . In this test, restoring it isn’t strictly necessary, but it’s best practice to always restore methods that you’ve changed.
. In this test, restoring it isn’t strictly necessary, but it’s best practice to always restore methods that you’ve changed.
Stubs
Sometimes you need to control code flow. For example, you might want to force an error branch to be executed so you can test error handling in your code. The preceding example could be rewritten to use a stub instead of a spy to cause writeFile to execute its callback. Note that you still want to avoid calling the original method, but instead force the code under test to run the supplied callback. The next listing shows how to use stubs to replace functions. Save it as stub.js.
Listing 9.19. Using stubs
Using a combination of stubs and spies is ideal for testing Node code that makes heavy use of user-supplied functions, callbacks, and promises. Now that you’ve looked at tools designed for unit testing, let’s move on to an altogether different style of testing: functional testing.
9.2. Functional testing
In most web development projects, functional tests work by driving the browser and then checking for various DOM transformations against a list of user-specific requirements. Imagine you’re building a content management system. A functional test for the image library upload feature would upload an image, check that it gets added, and then check that it’s added to a corresponding list of images.
The choice of tools to implement functional testing in Node is bewildering. From a high level, however, they fall into two broad groups: headless and browser-based tests. Headless tests typically use something like PhantomJS to provide a terminal-friendly browser environment, but lighter solutions use libraries such as Cheerio and JSDOM. Browser-based tests use a browser automation tool such as Selenium (www.seleniumhq.org) so you can write scripts that drive a real browser. Both approaches can use the same underlying Node test tools, so you could use Mocha, Jasmine, or even Cucumber to drive Selenium against your application. Figure 9.6 shows an example test environment.
Figure 9.6. Testing with browser automation

In this section, you’ll learn about functional testing solutions for Node, so you can set up test environments based on your own requirements.
9.2.1. Selenium
Selenium is a popular Java-based browser automation library. With the aid of a language-specific driver, you can connect to a Selenium server and run tests against a real browser. In this section, you’ll learn how to use WebdriverIO (http://webdriver.io/), a Node Selenium driver.
Getting Selenium running is trickier than pure Node test libraries, because you need to install Java and download the Selenium JAR file. Download Java for your operating system, and then go to the Selenium download site (http://docs.seleniumhq.org/download/) to download the JAR file. You can then run a Selenium server like this:
java -jar selenium-server-standalone-2.53.0.jar
Note that your exact Selenium version may be different. You may also have to supply a path to the browser binary. For example, in Windows 10 with Firefox set as the browserName, you can specify Firefox’s full path like this:
java -jar -Dwebdriver.firefox.driver="C:\path\to\firefox.exe" selenium-server-standalone-3.0.1.jar
The exact path will depend on how Firefox is installed on your machine. For more about the Firefox driver, read the SeleniumHQ documentation (https://github.com/SeleniumHQ/selenium/wiki/FirefoxDriver). Drivers for Chrome and Microsoft Edge are configured in similar ways.
Now create a new Node project and install WebdriverIO:
mkdir -p selenium/test/specs
cd selenium
npm init -y
npm install --save-dev webdriverio
npm install --save express
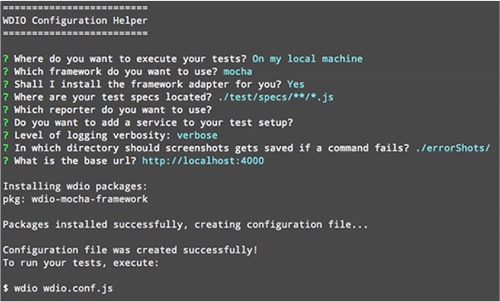
WebdriverIO comes with a friendly config file generator. To run it, run wdio config:
./node_modules/.bin/wdio config
Follow the questions and accept the defaults. Figure 9.7 shows my session.
Figure 9.7. Using wdio to configure Selenium tests
Update the package.json file with the wdio command so tests can be run with npm test:
"scripts": {
  "test": "wdio wdio.conf.js"
},
Now add something to the test. A basic Express server will suffice. The example in the following listing will be used in the subsequent listing for testing. Save this listing as index.js (it’s c09-testing/selenium/index.js in the book’s sample code).
Listing 9.20. Sample Express project
const express = require('express');
const app = express();
const port = process.env.PORT || 4000;

app.get('/', (req, res) => {
  res.send(`
<html>
  <head>
    <title>My to-do list</title>
  </head>
  <body>
    <h1>Welcome to my awesome to-do list</h1>
  </body>
</html>
  `);
});

app.listen(port, () => {
  console.log('Running on port', port);
});
The good thing about WebdriverIO is it provides a simple, fluent API for writing Selenium tests. The syntax is clear and easy to learn—you can even write tests with CSS selectors. The next listing (found in test/specs/todo-test.js in the book’s sample code) shows a simple test that sets up a WebdriverIO client and then checks the title on the page.
Listing 9.21. A WebdriverIO test

After WebdriverIO is connected ![]() , you can use an instance of the client to fetch pages from your app
, you can use an instance of the client to fetch pages from your app ![]() . Then you can query the current state of the document in the browser—this example uses getTitle to get the title element from the document’s head. If you want to query the document for CSS elements, you can use .elements instead (http://webdriver.io/api/protocol/elements.html). There are all kinds of methods for manipulating the document, forms, and even cookies.
. Then you can query the current state of the document in the browser—this example uses getTitle to get the title element from the document’s head. If you want to query the document for CSS elements, you can use .elements instead (http://webdriver.io/api/protocol/elements.html). There are all kinds of methods for manipulating the document, forms, and even cookies.
This test, which looks like the other Mocha tests in this chapter, is capable of running a real browser against a Node web app. To run it, start the server on port 4000:
PORT=4000 node index.js
Then type npm test. You should see Firefox open and the tests run in the command line. If you want to use Chrome, open wdio.conf.js and change the browserName property.
If you use WebdriverIO and Selenium to test a more complex web app that uses something like React or Angular, you’ll want to check out the utility methods. Some of the methods will pause the test until certain elements are available, which is great for React apps that may asynchronously render the document, updating it several times based on when remote data is available.
Take a look at the waitFor* methods, such as waitForVisible (http://webdriver.io/api/utility/waitForVisible.html) to learn more.
9.3. Dealing with failing tests
When you’re working on an established project, there will come a point when tests begin to fail. Node provides several tools for getting more detail on failed tests, and in this section you’ll learn about how to enrich the output generated when debugging failing tests.
The first thing to do when tests fail is to generate more-verbose logging output. The next section demonstrates how to do that with NODE_DEBUG.
9.3.1. Getting more-detailed logs
When tests fail, it’s useful to get information on what the program is doing. Node has two ways to do this: one for Node’s internals, and another for npm modules. To debug Node’s core modules, use NODE_DEBUG.
Using NODE_DEBUG
To see how NODE_DEBUG works, imagine you have a deeply nested filesystem call where you’ve forgotten to use a callback. For example, the following example will throw an exception:
const fs = require('fs');

function deeplyNested() {
fs.readFile('/');
}

deeplyNested();
The stack trace shows only a limited amount of detail about the exception, and in particular doesn’t include full information on the call site where the exception originated:
fs.js:60
      throw err;  // Forgot a callback but don't know where? Use NODE_DEBUG=fs
      ^

Error: EISDIR: illegal operation on a directory, read
    at Error (native)
Without the helpful comment, many programmers see a trace like this and blame Node for the unhelpful error. But, as the comment points out, NODE_DEBUG=fs can be used to get more information on the fs module. Run the script like this instead:
NODE_DEBUG=fs node node-debug-example.js
Now you’ll see a more detailed trace that helps debug the issue:
fs.js:53
        throw backtrace;
        ^

Error: EISDIR: illegal operation on a directory, read
    at rethrow (fs.js:48:21)
    at maybeCallback (fs.js:66:42)
    at Object.fs.readFile (fs.js:227:18)
    at deeplyNested (node-debug-example.js:4:6)
    at Object.<anonymous> (node-debug-example.js:7:1)
    at Module._compile (module.js:435:26)
    at Object.Module._extensions..js (module.js:442:10)
    at Module.load (module.js:356:32)
    at Function.Module._load (module.js:311:12)
    at Function.Module.runMain (module.js:467:10)
It’s clear from this trace that the problem lies in our file, inside a function on line 4 that was originally called from line 7. This makes debugging any code that uses core modules much easier, and that includes not only the filesystem, but also network libraries such as Node’s HTTP client and server modules.
Using DEBUG
The public alternative to NODE_DEBUG is DEBUG. Many packages on npm look for the DEBUG environment variable. It mimics the parameter style used by NODE_DEBUG, so you can specify a list of modules to debug or see all of them with DEBUG='*'. Figure 9.8 shows the project from chapter 4 running with DEBUG='*'.
Figure 9.8. Running an Express application with DEBUG='*'

If you want to incorporate the NODE_DEBUG functionality into your own projects, use the built-in util.debuglog method:
const debuglog = require('util').debuglog('example');
debuglog('You can only see these messages by setting NODE_DEBUG=example!');
To make custom debug loggers that are configured with DEBUG, you need to use the debug package from npm (www.npmjs.com/package/debug). You can create as many loggers as you want. Imagine you’re building an MVC web application. You could create separate loggers for models, views, and controllers. Then, when tests fail, you’ll be able to specify the debug logs that are necessary to debug the specific part of the application. The following listing (found in ch09-testing/debug-example/index.js) demonstrates how to use the debug module.
Listing 9.22. Using the debug package
const debugViews = require('debug')('debug-example:views');
const debugModels = require('debug')('debug-example:models');

debugViews('Example view message');
debugModels('Example model message');
To run this example and see the view logs, set DEBUG to debug-example:views:
DEBUG=debug-example:views node index.js
One final feature of debug logging is that you can prefix a debug section with a hyphen to remove it from logs:
DEBUG='* -debug-example:views' node index.js
Hiding certain modules means you can still use the wildcard, but omit unneeded or noisy sections from the output.
9.3.2. Getting better stack traces
If you’re using asynchronous operations, and that includes anything you’ve written using asynchronous callbacks or promises, then you may run into problems when stack traces aren’t detailed enough. Packages on npm can help you in such cases. For example, when callbacks run asynchronously, Node won’t keep the call stack from when the operation was queued. To test this, create two files, one called async.js that defines an asynchronous function, and another called index.js that requires async.js. This snippet is aync.js (found in ch09-testing/debug-stacktraces/async.js in the book’s sample code):
module.exports = () => {
  setTimeout(() => {
    throw new Error();
  })
};
And index.js just needs to require async.js:
require('./async.js')();
Now if you run index.js with node index.js, you’ll get a short stack trace that doesn’t show the caller of the failed function, only the location of the thrown exception:
    throw new Error();
    ^

Error
    at null._onTimeout (async.js:3:11)
    at Timer.listOnTimeout (timers.js:92:15)
To improve this reporting, install the trace package (www.npmjs.com/package/trace) and run it with node -r trace index.js. The -r flag tells Node to require the trace module before loading anything else.
Another problem with stack traces is they can be too detailed. This happens when the trace includes too much detail about Node’s internals. To clear up your stack traces, use clarify (www.npmjs.com/package/clarify). Again, you can run it with the -r flag:
$ node -r clarify index.js
    throw new Error();
    ^


Error
    at null._onTimeout (async.js:3:11)
clarify is particularly useful if you want to include stack traces in error alert emails for a web application.
If you’re running code intended for browsers in Node, perhaps as part of an isomorphic web application, then you can get better stack traces by using source-map-support (www.npmjs.com/package/source-map-support). This can be run with -r, but it also works with some test frameworks:
$ node -r source-map-support/register index.js
$ mocha --require source-map-support/register index.js
The next time you’re struggling with a stack trace generated by asynchronous code, look for tools such as trace and clarify to make sure you’re getting the best out of what V8 and Node can offer.
9.4. Summary
- Writing unit tests requires a test runner such as Mocha.
- Node has a built-in assertion library called assert.
- There are other assertion libraries, including Chai and Should.js.
- If you don’t want to run certain code, such as network requests, you can use Sinon.JS.
- Sinon.JS also allows you to spy on code and verify that certain functions or methods were run.
- Selenium can be used to write browser tests by scripting real browsers.