Appendix C. Connect’s officially supported middleware
Connect is a minimal wrapper around Node’s built-in HTTP client and server modules. The Connect authors and contributors have also produced officially supported middleware components that implement low-level features used by most web frameworks, including things like cookie handling, body parsing, sessions, basic auth, and cross-site request forgery (CSRF). This appendix demonstrates all of the officially supported modules so you can use them to build lightweight web applications without a larger framework.
C.1. Parsing cookies, request bodies, and query strings
Node’s core doesn’t provide modules for higher-level web application concepts such as parsing cookies, buffering request bodies, or parsing complex query strings, so Connect modules implement these features. This section covers four modules that parse request data:
- cookie-parser— Parses cookies from web browsers into req.cookies
- qs— Parses the request URL query string into req.query
- body-parser— Consumes and parses the request body into req.body
The first module we’ll look at is cookie-parser. This makes it easy to retrieve data stored by a website visitor’s browser so you can read things such as authorization status, website settings, and so on.
C.1.1. cookie-parser: parse HTTP cookies
The cookie-parser module supports regular cookies, signed cookies, and special JSON cookies (www.npmjs.com/package/cookie-parser). By default, regular unsigned cookies are used, populating the req.cookies object. If you want signed cookie support, which helps prevent cookies from being tampered with, you’ll want to pass a secret string when creating the cookie-parser instance.
Setting cookies on the server side
The cookie-parser module doesn’t provide any helpers for setting outgoing cookies. For this, you should use the res.setHeader() function with Set-Cookie as the header name. Connect patches Node’s default res.setHeader() function to special-case the Set-Cookie headers so that it just works, as you’d expect it to.
Regular cookies
To read cookies, you need to load the module, add it to the middleware stack, and then read the cookies in a request. The following listing illustrates each of these steps.
Listing C.1. Reading cookies sent in a request
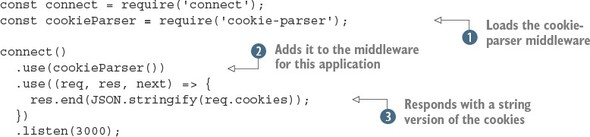
This example loads the middleware component ![]() . Remember that you need to install the middleware with npm install cookie-parser for this to work. Next it adds an instance of the cookie parser to the middleware stack for this application
. Remember that you need to install the middleware with npm install cookie-parser for this to work. Next it adds an instance of the cookie parser to the middleware stack for this application ![]() . The final step is to send back the cookies to the browser as a string
. The final step is to send back the cookies to the browser as a string ![]() , so you can see it working.
, so you can see it working.
If you run this example, you’ll need to set cookies with the request. If you go to http://localhost:3000 in a browser, you probably won’t see much; it should return an empty object ({}). You can use cURL to set a cookie like this:
curl http://localhost:3000/ -H "Cookie: foo=bar, bar=baz"
Signed cookies
Signed cookies are better suited for sensitive data, as the integrity of the cookie data can be verified, helping to prevent man-in-the-middle attacks. Signed cookies are placed in the req.signedCookies object when valid. The reasoning behind having two separate objects is that it shows the developer’s intention. If you were to place both signed and unsigned cookies in the same object, a regular cookie could be crafted to contain data to mimic a signed cookie.
A signed cookie looks something like s:tobi.DDm3AcVxE9oneYnbmpqxoy[...],[1] where the content to the left of the period (.) is the cookie’s value, and the content to the right is the secret hash generated on the server with SHA-256 HMAC (hash-based message authentication code). When Connect attempts to unsign the cookie, it will fail if either the value or HMAC has been altered.
The signed values have been shortened.
Suppose, for example, you set a signed cookie with a key of name and a value of luna. cookieParser would encode the cookie to s:luna.PQLM0wNvqOQEObZX[...]. The hash portion is checked on each request, and when the cookie is sent intact, it will be available as req.signedCookies.name:
$ curl http://localhost:3000/ -H "Cookie:name=s:luna.PQLM0wNvqOQEObZXU[...]" {} { name: 'luna' } GET / 200 4ms
If the cookie’s value were to change, as shown in the next curl command, the name cookie would be available as req.cookies.name because it wasn’t valid. It might still be of use for debugging or application-specific purposes:
$ curl http://localhost:3000/ -H "Cookie:
The first argument to cookieParser is the secret to be used for signing cookies. In the following listing, the secret is tobi is a cool ferret.
Listing C.2. Parsing signed cookies

In this example, the signed cookies are parsed automatically because the secret argument was passed to the cookieParser middleware component ![]() . The values can be accessed on the request object
. The values can be accessed on the request object ![]() . The cookie-parser module also makes the cookie parsing functionality available through the signedCookie and signedCookies methods.
. The cookie-parser module also makes the cookie parsing functionality available through the signedCookie and signedCookies methods.
Before moving on, let’s look at how to use this example. As with listing C.1, you can use curl with the -H option to send a cookie. But for it to be considered a signed cookie, it needs to be encoded in a certain way.
Node’s crypto module is used to unsign cookies in the signedCookie method. If you want to sign a cookie to test listing C.2, you need to install cookie-signature and then sign a string with the same secret:
const signature = require('cookie-signature');
const message = 'luna';
const secret = 'tobi is a cool ferret';
console.log(signature.sign(message, secret);
Now if the signature or message were modified, the server would be able to tell. In addition to signed cookies, this module supports JSON-encoded cookies. The next section shows how these work.
JSON cookies
The special JSON cookie is prefixed with j:, which informs Connect that it’s intended to be serialized JSON. JSON cookies can be either signed or unsigned.
Frameworks such as Express can use this functionality to provide developers with a more intuitive cookie interface, instead of requiring them to manually serialize and parse JSON cookie values. Here’s an example of how Connect parses JSON cookies:
$ curl http://localhost:3000/ -H 'Cookie: foo=bar,
bar=j:{"foo":"bar"}'
{ foo: 'bar', bar: { foo: 'bar' } }
{}
GET / 200 1ms
As mentioned, JSON cookies can also be signed, as illustrated in the following request:
$ curl http://localhost:3000/ -H "Cookie:
Setting outgoing cookies
As noted earlier, the cookie-parser module doesn’t provide any functionality for writing outgoing headers to the HTTP client via the Set-Cookie header. Connect, however, provides explicit support for multiple Set-Cookie headers via the res.setHeader() function.
Say you want to set a cookie named foo with the string value bar. Connect enables you to do this in one line of code by calling res.setHeader(). You can also set the various options of a cookie, such as its expiration date, as shown in the second setHeader() call here:
var connect = require('connect');

connect()
  .use((req, res) => {
    res.setHeader('Set-Cookie', 'foo=bar');
    res.setHeader('Set-Cookie',
      'tobi=ferret; Expires=Tue, 08 Jun 2021 10:18:14 GMT'
    );
  res.end();
})
.listen(3000);
If you check out the headers that this server sends back to the HTTP request by using the --head flag of curl, you can see the Set-Cookie headers set as you would expect:
$ curl http://localhost:3000/ --head
HTTP/1.1 200 OK
Set-Cookie: foo=bar
Set-Cookie: tobi=ferret; Expires=Tue, 08 Jun 2021 10:18:14 GMT
Connection: keep-alive
That’s all there is to sending cookies with your HTTP response. You can store any kind of text data in cookies, but it has become usual to store a single session cookie on the client side so that you can have full user state on the server. This session technique is encapsulated in the express-session module, which you’ll learn about later in this appendix.
Now that you can handle cookies, you’re probably eager to handle the other usual methods for accepting user input. The next two sections cover parsing query strings and request bodies, and you’ll discover that even though Connect is relatively low-level, you can still get the same features as more complicated web frameworks without writing lots of code.
C.1.2. Parsing query strings
One method for accepting input is to use GET parameters. You place a question mark after a URL, with a list of arguments separated by ampersands:
http://localhost:3000/page?name=tobi&species=ferret
This type of URL can be presented to your application by a form that’s set to use the GET method, or by anchor elements within your application’s templates. You’ve probably seen this used for pagination.
The request object that’s passed to each middleware component in Connect applications includes a url property, but what you want is the last part of the URL: just the portion after the question mark. Node comes with a URL-parsing module, so you could technically use url.parse to get the query string. But Connect also has to parse the URL, so it sets an internal property with a parsed version.
The recommended module for parsing query strings is qs (www.npmjs.com/package/qs). This module isn’t officially supported by Connect, and alternatives are available through npm. To use qs and similar modules, you need to call its .parse() method from your own middleware component.
Basic usage
The following listing uses the qs.parse method to create an object that’s stored on the req.query property for subsequent middleware components to use.
Listing C.3. Parsing query strings
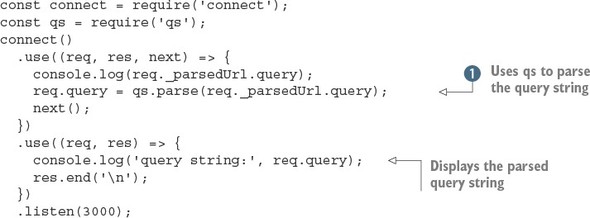
This example uses a custom middleware component to obtain the parsed URL, parse it using qs.parse ![]() , and then display it in a subsequent component.
, and then display it in a subsequent component.
Suppose you’re designing a music library app. You could offer a search engine and use the query string to build up the search parameters, like this:
/songSearch?artist=Bob%20Marley&track=Jammin.
This example query produces a res.query object like this:
{ artist: 'Bob Marley', track: 'Jammin' }
The qs.parse method supports nested arrays, so complex query strings such as ?images[]=foo.png&images[]=bar.png produce objects like this one:
{ images: [ 'foo.png', 'bar.png' ] }
When no query-string parameters are given in the HTTP request, such as /songSearch, req.query will default to an empty object:
{}
Higher-level frameworks such as Express tend to have query-string parsing built in, because it’s such a common requirement for web development. Another common feature of web frameworks is parsing request bodies, so you can accept data posted in forms. The next section explains how to parse request bodies, handle forms and file uploads, and validate these requests to ensure they’re safe.
C.1.3. body-parser: parse request bodies
Most web applications have to accept and process user input. This can be from forms or even other programs in the case of RESTful APIs. HTTP requests and responses are collectively known as HTTP messages. The format of a message consists of a list of headers and then a message body. In Node web applications, the body is usually a stream, and it can be encoded in various ways: a POST from a form will usually be application/x-www-form-urlencoded, and a RESTful JSON request could be application/json.
That means your Connect applications need middleware that’s capable of decoding streams of form-encoded data, JSON, or even compressed data using gzip or deflate. In this section, we’ll show how to do the following:
- Handle input from forms
- Parse JSON requests
- Validate bodies based on content and size
- Accept file uploads
Forms
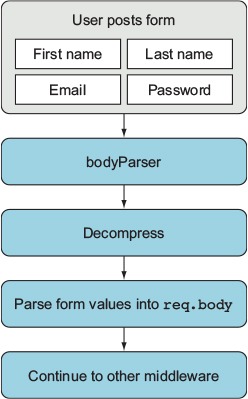
Suppose you want to accept registration information for your application though a form. All you have to do is add the body-parser component (www.npmjs.com/package/body-parser) before any other middleware that will access the req.body object. Figure C.1 shows how this works.
Figure C.1. How a form is processed by body-parser
The following listing shows how to use the body-parser module with HTTP POSTs from forms.
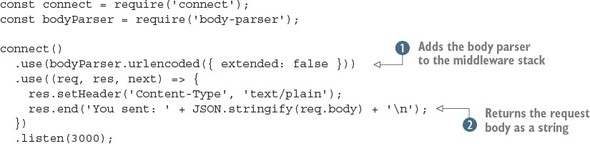
Listing C.4. Parsing form requests
To use this example, you need to install the body-parser module,[2] and then you need a way to make a simple HTTP request with a URL-encoded body. The easiest way is to use curl with the -d option:
We used version 1.11.0.
curl -d name=tobi http://localhost:3000
This should cause the server to display You sent: {"name":"tobi"}. To make this work, the body parser is added to the middleware stack ![]() , and then the parsed body in req.body is converted to a string
, and then the parsed body in req.body is converted to a string ![]() so it can be displayed more easily. The urlencoded body parser accepts a UTF-8 encoded string, and it’ll automatically decompress request bodies encoded with gzip or deflate.
so it can be displayed more easily. The urlencoded body parser accepts a UTF-8 encoded string, and it’ll automatically decompress request bodies encoded with gzip or deflate.
In this example, the options passed to the body parser are extended: false. When set to true, this option causes the body parser to use another library to parse the query-string format. This allows you to use more complex, nested, JSON-like objects in forms. The other options are presented in the next section, where you’ll look at validating requests.
Validating requests
Each parser that comes with the body-parser module supports two options for validating requests: limit and verify. The limit option allows you to block requests over a certain size: the default is 100 KB, so you can increase it if you want to accept larger forms. If you’re making something like a content management system or blog, where people can potentially enter valid but lengthy fields, this would be useful.
The verify option allows you to use a function to validate requests. It’s useful if you want to get the raw request body and check that it’s in the correct format. For example, you could use this to ensure that API methods that accept XML always start with the correct XML header. The following listing shows how to use both of these options.
Listing C.5. Validating form requests
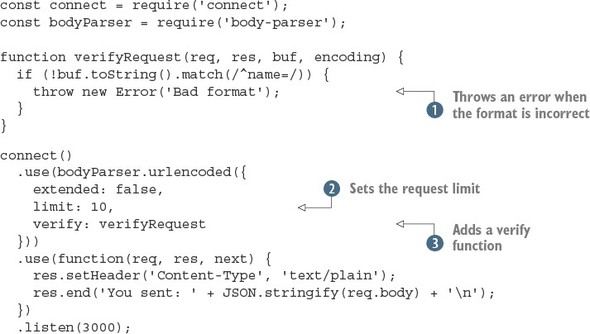
Notice that an Error object should be thrown by using the throw keyword ![]() . The body-parser module is set up to catch these before parsing the request, so it’ll pass the error back to Connect. After
a request validation function has been created, you need to pass it to the body-parser middleware component by using the verify option
. The body-parser module is set up to catch these before parsing the request, so it’ll pass the error back to Connect. After
a request validation function has been created, you need to pass it to the body-parser middleware component by using the verify option ![]() .
.
The body size limit is in bytes; here it’s quite small, at 10 bytes ![]() . You can easily see what happens when the request is too large by using the previous curl command with a larger name value. Also, if you want to see what happens when the validation error is thrown, use curl to send another value instead of name.
. You can easily see what happens when the request is too large by using the previous curl command with a larger name value. Also, if you want to see what happens when the validation error is thrown, use curl to send another value instead of name.
Why is limit needed?
Let’s take a look at how a malicious user can render a vulnerable server useless. First, create the following small Connect application named server.js, which does nothing other than parse request bodies by using the bodyParser() middleware component:
const connect = require('connect');
const bodyParser = require('body-parser');

connect()
  .use(bodyParser.json({ limit: 99999999, extended: false }))
  .use((req, res, next) => {
    res.end('OK\n');
  })
  .listen(3000);
Now create a file named dos.js, as shown in the following listing. You can see how a malicious user could use Node’s HTTP client to attack the preceding Connect application, simply by writing several megabytes of JSON data:
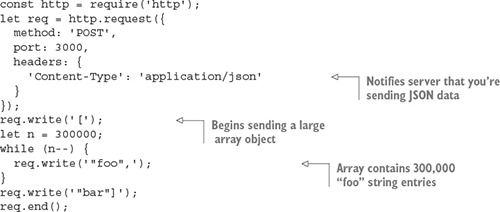
Fire up the server and run the attack script:
$ node server.js &
$ node dos.js
If you watch the node process in top(1), you should see that it starts to use more CPU and RAM as dos.js runs. This is bad, but thankfully it’s exactly why all the body parsing middleware components accept a limit option.
Parsing JSON data
If you’re making web applications with Node, you’re going to be dealing with a lot of JSON. The body-parser module’s JSON parser has a few handy options that you’ve seen in the previous examples. The following listing shows how parsing JSON and using the resulting values works.
Listing C.6. Validating form requests
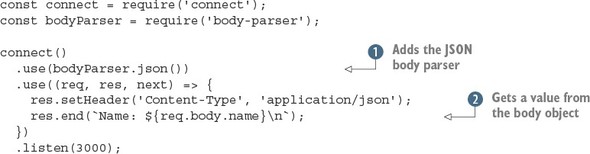
After the JSON parser has been loaded ![]() , your request handlers can treat the req.body value as a JavaScript object rather than a string. This example assumes that a JSON object with a name property has been sent, and it’ll send the value back in the response
, your request handlers can treat the req.body value as a JavaScript object rather than a string. This example assumes that a JSON object with a name property has been sent, and it’ll send the value back in the response ![]() . That means your request has to have a Content-Type of application/json, and you need to send valid JSON. By default, the json middleware component uses strict parsing, but you can relax encoding requirements by setting this to false.
. That means your request has to have a Content-Type of application/json, and you need to send valid JSON. By default, the json middleware component uses strict parsing, but you can relax encoding requirements by setting this to false.
One option that you need to be aware of is type. This allows you to change the Content-Type that’ll be parsed as JSON. In the following example, we use the default, which is application/json. But in some cases your application might have to interact with HTTP clients that don’t send this header, so be warned.
The following curl request could be used to submit data to your application, and will send a JSON object with the username property set to tobi:
curl -d '{"name":"tobi"}' -H "Content-Type: application/json"
http://localhost:3000
Name: tobi
Parsing multipart <form> data
The body-parser module doesn’t handle multipart request bodies. You need to handle multipart messages to support file uploads, so anything such as uploading a user’s avatar needs multipart support.
There’s no officially supported multipart parser for Connect, but some popular ones are well maintained. Two examples are busboy (www.npmjs.com/package/busboy) and multiparty (www.npmjs.com/package/multiparty). Both of these modules have associated connect modules: connect-busboy and connect-multiparty. The reason for this is that the multipart parsers themselves are dependent on Node’s lower-level HTTP modules, so a wide range of frameworks can use them. They’re not specifically tied into Connect.
The following listing is based on multiparty, and will print out the details of an uploaded file in the console.
Listing C.7. Handling uploaded files

This short example adds the multiparty middleware component ![]() and then logs the received files
and then logs the received files ![]() . The files will be uploaded to a temporary location, so you have to use the fs module to delete the files when your application
is finished with them.
. The files will be uploaded to a temporary location, so you have to use the fs module to delete the files when your application
is finished with them.
To use this example, make sure you’ve installed connect-multiparty.[3] Then start the server and send it a file with curl’s -F option:
We used version 1.2.5 to test this example.
curl -F file=@index.js http://localhost:3000
The filename is placed after the @ symbol, and it’s prefixed with a field name. The field name will be available in the req.files object, so you can distinguish between separate uploaded files.
If you take a look at the output of the application, you’ll see something similar to the following example output. As you can see, req.files.file.path would be available to your application, and you could rename the file on disk, transfer the data to a worker for processing, upload to a content delivery network, or do anything else your app requires:
{ fieldName: 'file',
  originalFilename: 'index.js',
  path: '/var/folders/d0/_jqj3lf96g37s5wrf79v_g4c0000gn/T/60201-p4pohc.js',
  headers:
   { 'content-disposition': 'form-data; name="file"; filename="index.js"',
     'content-type': 'application/octet-stream' },
Although body-parser copes with compression, you may be wondering about compressing outgoing responses. Read on to learn about the compression middleware component that can reduce your bandwidth bills and make your web applications feel faster.
C.1.4. compression: compressing outgoing responses
In the preceding section, you may have noticed that the body parsers are capable of decompressing requests that used gzip or deflate. Node comes with a core module for handling compression called zlib, and this is used to implement both compression and decompression methods. The compression middleware component (www.npmjs.com/package/compression) can be used to compress outgoing responses, which means the data your server sends can be compressed.
Google’s PageSpeed Insights tool recommends enabling gzip compression,[4] and if you look at requests made by your browser in the developer tools, you should see that many sites send gzipped responses. Compression adds CPU overhead, but because formats such as plain text and HTML compress well, it can improve your site’s performance and reduce bandwidth usage.
See https://developers.google.com/speed/docs/insights/EnableCompression for more information.
Having two compression options can be confusing. You’re probably wondering which is best, and why two exist at all. Well, according to the standards (RFC 1950 and RFC 2616), both use the same compression algorithm, but they differ in the way the header and checksum are handled.
Unfortunately, some browsers don’t correctly handle deflate, so the general advice is to use gzip. In the case of body parsing, it’s best to be able to support both, but if you’re compressing your server’s output, use gzip to be on the safe side.
The compression module detects the accepted encodings from the Accept-Encoding header field. If this field isn’t present, the identity encoding is used, meaning the response is untouched. Otherwise, if the field contains gzip, deflate, or both, the response will be compressed.
Basic usage
You should generally add compression high in the Connect stack, because it wraps the res.write() and res.end() methods.
In the following example, the content will be compressed:
const connect = require('connect');
const compression = require('compression');
connect()
  .use(compression({ threshold: 0 }))
  .use((req, res) => {
    res.setHeader('Content-Type', 'text/plain');
    res.end('This response is compressed!\n');
  })
  .listen(3000);
To run this example, you need to install the compression module from npm. Then, start the server and try making a request with curl that sets Accept-Encoding to gzip:
$ curl http://localhost:3000 -i -H "Accept-Encoding: gzip"
The -i argument makes cURL show you the headers, so you should see the Content-Encoding set to gzip. The output should be garbled, because the compressed data won’t be standard characters. Try piping it through gunzip without the -i option to see the output:
$ curl http://localhost:3000 -H "Accept-Encoding: gzip" | gunzip
This is powerful and relatively simple to set up, but you won’t always want to compress everything your server sends. To skip compression, you can use custom filter functions.
Using a custom filter function
By default, compression includes the MIME types text/*, */json, and */java-script in the default filter function to avoid compressing these data types:
exports.filter = function(req, res){
  const type = res.getHeader('Content-Type') || '';
  return type.match(/json|text|javascript/);
};
To alter this behavior, you can pass a filter in the options object, as shown in the following snippet, which will compress only plain text:
function filter(req) {
  const type = req.getHeader('Content-Type') || '';
  return 0 === type.indexOf('text/plain');
}
connect()
  .use(compression({ filter: filter }));
Specifying compression and memory levels
Node’s zlib bindings provide options for tweaking performance and compression characteristics, and they can also be passed to the compression function.
In the following example, the compression level is set to 3 for less but faster compression, and memLevel is set to 8 for faster compression by using more memory. These values depend entirely on your application and the resources available to it. Consult Node’s zlib documentation for details:
connect()
  .use(compression({ level: 3, memLevel: 8 }));
That’s all there is to it. Next we’ll look at middleware that covers core web application needs, such as logging and sessions.
C.2. Implementing core web application functions
Connect aims to implement and provide built-in middleware for the most common web application needs so that they don’t need to be reimplemented over and over by every developer. Core web application functions such as logging, sessions, and virtual hosting are all provided by Connect out of the box.
In this section, you’ll learn about five useful middleware components that you’ll likely use in your applications:
- morgan— Provides flexible request logging
- serve-favicon— Takes care of the /favicon.ico request without you having to think about it
- method-override— Enables incapable clients to transparently overwrite req.method
- vhost— Sets up multiple websites on a single server (virtual hosting)
- express-session— Manages session data
Up until now, you’ve created your own custom logging middleware, but the Connect maintainers provide a flexible solution named morgan, so let’s explore that first.
C.2.1. morgan: log requests
The morgan module (www.npmjs.com/package/morgan) is a flexible request-logging middleware component with customizable log formats. It also has options for buffering log output to decrease disk writes, and for specifying a log stream if you want to log to something other than the console, such as a file or socket.
Basic usage
To use morgan in your own application, invoke it as a function to return a middleware function, as shown in the following listing.
Listing C.8. Using the morgan module for logging

To use this example, you need to install the morgan module from npm.[5] It adds the module at the top of the middleware stack ![]() and then outputs a simple text response
and then outputs a simple text response ![]() . By using the combined logging format argument
. By using the combined logging format argument ![]() , this Connect application will output the Apache log format. This is a flexible format that many command-line utilities can
parse, so you can run your logs through log-processing applications that can generate useful statistics. If you try making
requests from different clients, such as curl, wget, and a browser, you should see the user agent string in the logs.
, this Connect application will output the Apache log format. This is a flexible format that many command-line utilities can
parse, so you can run your logs through log-processing applications that can generate useful statistics. If you try making
requests from different clients, such as curl, wget, and a browser, you should see the user agent string in the logs.
We used version 1.5.1.
The combined logging format is defined like this:
:remote-addr - :remote-user [:date[clf]] ":method :url
Each of the :something pieces are tokens, and in a log entry they’d contain real values from the HTTP request that’s being logged. For example, a simple curl(1) request would generate a log line similar to the following:
127.0.0.1 - - [Thu, 05 Feb 2015 04:27:07 GMT]
                    "GET / HTTP/1.1" 200 - "-"
                    "curl/7.37.1"
Customizing log formats
You can also create your own log formats. To do this, pass a custom string of tokens. For example, the following format would output something like GET /users 15 ms:
connect()
  .use(morgan(':method :url :response-time ms'))
  .use(hello)
  .listen(3000);
By default, the following tokens are available for use (note that the header names aren’t case-sensitive):
- :req[header] example: :req[Accept]
- :res[header] example: :res[Content-Length]
- :http-version
- :response-time
- :remote-addr
- :date
- :method
- :url
- :referrer
- :user-agent
- :status
You can even define custom tokens. All you have to do is provide a token name and callback function to the connect.logger.token function. For example, say you want to log each request’s query string. You might define it like this:
var url = require('url');
morgan.token('query-string', function(req, res){
  return url.parse(req.url).query;
});
The morgan module comes with predefined formats other than the default one, such as short and tiny. Another predefined format is dev, which produces concise output for development, for situations when you’re usually the only user on the site and you don’t care about the details of the HTTP requests. This format also color-codes the response status codes by type: responses with a status code in the 200s are green, 300s are blue, 400s are yellow, and 500s are red. This color scheme makes it great for development.
To use a predefined format, you provide the name to logger():
connect()
  .use(morgan('dev'))
  .use(hello);
  .listen(3000);
Now that you know how to format the logger’s output, let’s look at the options you can provide to it.
Logger options: stream, immediate, and buffer
As mentioned previously, you can use options to tweak how morgan behaves.
One such option is stream, which allows you to pass a Node Stream instance that the logger will write to instead of stdout. This allows you to direct the logger output to its own log file, independent of your server’s own output, by using a Stream instance created from fs.createWriteStream.
When you use these options, it's generally recommended to also include the format property. The following example uses a custom format and logs to /var/log/myapp.log with the append flag, so that the file isn’t truncated when the application boots:
const fs = require('fs');
const morgan = require('morgan');
const log = fs.createWriteStream('/var/log/myapp.log', { flags: 'a' })
connect()
  .use(morgan({ format: ':method :url', stream: log }))
  .use('/error', error)
  .use(hello)
  .listen(3000);
Another useful option is immediate, which writes the log line when the request is first received, rather than waiting for the response. You might use this option if you’re writing a server that keeps its requests open for a long time, and you want to know when the connection begins. Or you might use it for debugging a critical section of your app. Tokens such as :status and :response-time can’t be used, because they’re related to the response. To enable immediate mode, pass true for the immediate value, as shown here:
const app = connect()
  .use(connect.logger({ immediate: true }))
  .use('/error', error)
  .use(hello);
That’s it for logging! Next we’ll look at the favicon-serving middleware component.
C.2.2. serve-favicon: address bar and bookmark icons
A favicon is that tiny website icon your browser displays in the address bar and bookmarks. To get this icon, the browser makes a request for a file at /favicon.ico. It’s usually best to serve favicon files as soon as possible, so the rest of your application can simply ignore them. The serve-favicon module (www.npmjs.com/package/serve-favicon) causes Connect’s icon to be displayed by default. This can be configured by passing arguments for other icons. This favicon is shown in figure C.2.
Figure C.2. A favicon
Basic usage
The serve-favicon middleware component can be placed at the top of the stack, which causes favicon requests to be ignored by any subsequent logging components. The icon is cached in memory for fast responses.
The following example shows serve-favicon sending an .ico file by passing the file path as the only argument:
const connect = require('connect');
const favicon = require('serve-favicon');
connect()
  .use(favicon(__dirname + '/favicon.ico'))
  .use((req, res) => {
    res.end('Hello World!\n');
  });
Note that you need a file called favicon.ico to test this out. Optionally, you can pass in a maxAge argument to specify how long browsers should cache the favicon in memory.
Next we have another small but helpful middleware component: method-override. It provides the means to fake the HTTP request method when client capabilities are limited.
C.2.3. method-override: fake HTTP methods
Sometimes it’s useful to use HTTP verbs beyond the common GET and POST methods. Imagine that you’re building a blog, and you want to allow people to create, update, and delete articles. It feels more natural to say DELETE /article rather than GET or POST. Unfortunately, not every browser understands the DELETE method.
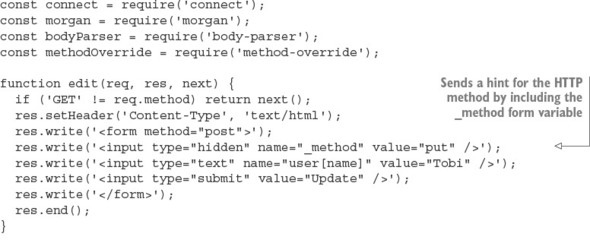
A common workaround is to allow the server to get a hint about which HTTP method to use from the query parameters, form values, and sometimes even the HTTP headers. One way this is done is by adding <input type=hidden> with the value set to the method name you want to use. The server can then check the value and pretend it’s the request method.
Most web frameworks support this technique, and the method-override module (www.npmjs.com/package/method-override) is the recommended way to do it with Connect.
Basic usage
By default, the HTML input name is _method, but you can pass a custom value to methodOverride, as shown in the following snippet:
connect()
const connect = require('connect');
const methodOverride = require('method-override');
connect()
  .use(methodOverride('__method__'))
  .listen(3000)
To demonstrate how methodOverride() is implemented, let’s see how to create a tiny application to update user information. The application consists of a single form that will respond with a simple success message when the form is submitted by the browser and processed by the server, as illustrated in figure C.3.
Figure C.3. Using methodoverride to simulate a PUT request to update a form in the browser
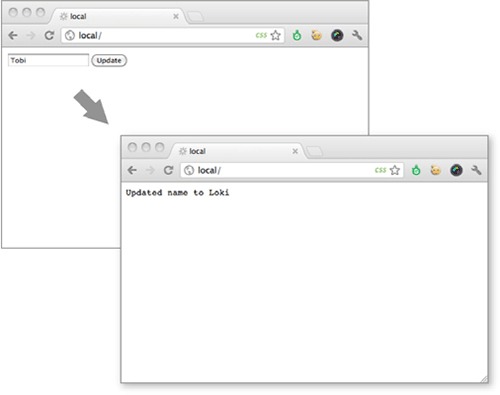
The application updates the user data through the use of two separate middleware components. In the update function, next() is called when the request method isn’t PUT. As mentioned previously, most browsers don’t respect the form attribute method="put", so the application in the following listing won’t function properly.
Listing C.9. A broken user-update application

In this example, a form has been set up that sends a PUT to the server ![]() . The form should send data to the update function, but only if it’s sent with a PUT
. The form should send data to the update function, but only if it’s sent with a PUT ![]() . You can try this with different browsers and HTTP clients; you can send a PUT with curl by using the -X option.
. You can try this with different browsers and HTTP clients; you can send a PUT with curl by using the -X option.
To improve browser support, you’ll add the method-override module. Here an additional input with the name _method has been added to the form, and methodOverride() has been added below the bodyParser() method because it references req.body to access the form data.
Listing C.10. Using method-override to support HTTP PUT

If you run this example, you should see that you can now send PUT requests from almost any browser.
Accessing the original req.method
methodOverride() alters the original req.method property, but Connect copies over the original method, which you can always access with req.originalMethod. The previous form would output values like these:
console.log(req.method);
  // "PUT"
console.log(req.originalMethod);
  // "POST"
To avoid including extra form variables, HTTP headers are supported as well. Different vendors use different headers, so you can create servers that support several header field names. This will help if you want to support client tools and libraries that assume a specific header. In the following example, the three header field names are supported:
![]()
Routing based on headers is a common task. One good example of this is supporting virtual hosts. You may have seen Apache servers that do this when you want to host multiple websites on a smaller number of IP addresses. Apache and Nginx can determine which website should be served based on the Host header.
Connect can do this too, and it’s easier than you might think. Read on to learn about virtual hosts and the vhost module.
C.2.4. vhost: virtual hosting
The vhost (virtual host) module (www.npmjs.com/package/vhost) is a simple, lightweight middleware component that routes requests via the Host request header. This task is commonly performed by a reverse proxy, which then forwards the request to a web server running locally on a different port. The vhost component does this in the same Node process by passing control to a Node HTTP server associated with the vhost instance.
Basic usage
Like most middleware, a single line is all it takes to get up and running with the vhost component. It takes two arguments: The first is the hostname string that this vhost instance will match against. The second is the http.Server instance that’ll be used when an HTTP request with a matching hostname is made (all Connect apps are subclasses of http.Server, so an application instance will work as well):
const connect = require('connect');
const server = connect();
const vhost = require('vhost');
const app = require('./sites/expressjs.dev');
server.use(vhost('expressjs.dev', app));
server.listen(3000);
In order to use the preceding ./sites/expressjs.dev module, it should assign the HTTP server to module.exports, as in the following example:
const http = require('http')
module.exports = http.createServer((req, res) => {
  res.end('hello from expressjs.com\n');
});
Using multiple vhost instances
As with any other middleware, you can use vhost more than once in an application to map several hosts to their associated applications:
const app = require('./sites/expressjs.dev');
server.use(vhost('expressjs.dev', app));
const app = require('./sites/learnboost.dev');
server.use(vhost('learnboost.dev', app));
Rather than setting up the vhost middleware manually like this, you could generate a list of hosts from the filesystem. That’s shown in the following example, with the fs.readdirSync() method returning an array of directory entries:
const connect = require('connect')
const fs = require('fs');
cons app = connect()
const sites = fs.readdirSync('source/sites');
sites.forEach((site) => {
  console.log('  ... %s', site);
  app.use(vhost(site, require('./sites/' + site)));
});
app.listen(3000);
The benefit of using vhost instead of a reverse proxy is simplicity. It allows you to manage all your applications as a single unit. This is ideal for serving several smaller sites, or for serving sites that are largely composed of static content, but it also has the downside that if one site causes a crash, all your sites will be taken down (because they all run in the same process).
Next we’ll take a look at one of the most fundamental middleware components that Connect provides: the session management component, appropriately named express-session.
C.2.5. express-session: session management
The way web applications handle sessions is dependent on varying requirements. For example, one important choice is the storage back end: some applications benefit from high-performance databases such as Redis; others require simplicity and use the same database as the main application. The express-session module (www.npmjs.com/package/express-session) provides an API that can be extended to suit different databases. It’s robust and easy to extend, so it has many community-supported extensions. In this section, you’ll learn how to use the memory-backed version and Redis.
First, let’s see how to set up the middleware and explore the options available.
Basic usage
Listing C.11 implements a small application that counts the number of times a given user has accessed the page. The data is stored in the user’s session. By default, the cookie name is connect.sid, and it’s set to be httpOnly, meaning client-side scripts can’t access its value. The data in the session itself is stored in-memory on the server. The listing shows the basic usage for express-session in Connect.[6]
This was tested with express-session 1.10.2.
Listing C.11. Using sessions in Connect
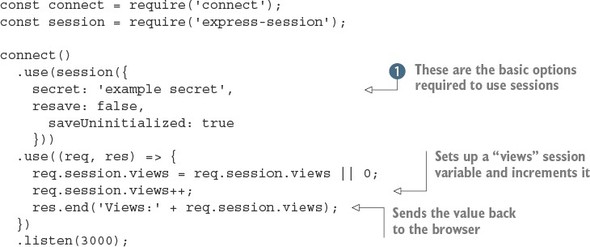
This short example sets up sessions and then manipulates a single session variable called views. First, the session middleware component is initialized with the required options: secret, resave, and saveUninitialized ![]() . The secret option is required and determines whether the cookie used to identify the session is signed. The resave option is used to force the session to be saved on each request, even if it hasn’t changed. Some session storage back ends require this, so you need to check before enabling it. The last option, saveUninitialized, causes a session to be created even if no values were saved. You can turn this off if you want to comply with laws that
require consent before saving cookies.
. The secret option is required and determines whether the cookie used to identify the session is signed. The resave option is used to force the session to be saved on each request, even if it hasn’t changed. Some session storage back ends require this, so you need to check before enabling it. The last option, saveUninitialized, causes a session to be created even if no values were saved. You can turn this off if you want to comply with laws that
require consent before saving cookies.
Setting the session expiration date
Suppose you want sessions to expire in 24 hours, to send the session cookie only when HTTPS is used, and to configure the cookie name. You can control how long the session lasts by setting the expires or maxAge properties on the expression object:
const hour = 3600000
req.session.cookie.expires = new Date(Date.now() + hour * 24);
req.session.cookie.maxAge = hour * 24;
When using Connect, you’ll often set maxAge, specifying a number of milliseconds from that point in time. This method of expressing future dates is often written more intuitively, expanding to new Date(Date.now() + maxAge).
Now that sessions are set up, let’s look at the methods and properties available when working with session data.
Working with session data
The express-session data management API is simple. The basic principle is that any properties assigned to the req.session object are saved when the request is complete; then they’re loaded on subsequent requests from the same user (browser). For example, saving shopping cart information is as simple as assigning an object to the cart property, as shown here:
req.session.cart = { items: [1,2,3] };
When you access req.session.cart on subsequent requests, the .items array will be available. Because this is a regular JavaScript object, you can call methods on the nested objects in subsequent requests, as in the following example, and they’ll be saved as you expect:
req.session.cart.items.push(4);
One important thing to keep in mind is that this session object gets serialized as JSON between requests, so the req.session object has the same restrictions as JSON: cyclic properties aren’t allowed, function objects can’t be used, Date objects can’t be serialized correctly, and so on. Keep those restrictions in mind when using the session object.
Connect will save session data for you automatically, but internally it’s calling the Session#save([callback]) method, which is also available as a public API. Two additional helpful methods are Session#destroy() and Session#regenerate(), which are often used when authenticating a user to prevent session fixation attacks. When you build applications with Express, you’ll use these methods for authentication.
Now let’s move on to manipulating session cookies.
Manipulating session cookies
Connect allows you to provide global cookie settings for sessions, but it’s also possible to manipulate a specific cookie via the Session#cookie object, which defaults to the global settings.
Before you start tweaking properties, let’s see how to extend the previous session application to inspect the session cookie properties by writing each property into individual <p> tags in the response HTML, as shown here:
...
res.write('<p>views: ' + sess.views + '</p>');
res.write('<p>expires in: ' + (sess.cookie.maxAge / 1000) + 's</p>');
res.write('<p>httpOnly: ' + sess.cookie.httpOnly + '</p>');
res.write('<p>path: ' + sess.cookie.path + '</p>');
res.write('<p>domain: ' + sess.cookie.domain + '</p>');
res.write('<p>secure: ' + sess.cookie.secure + '</p>');
...
Express-session allows all the cookie properties (such as expires, httpOnly, secure, path, and domain) to be altered programmatically on a per-session basis. For example, you could expire an active session in 5 seconds like this:
req.session.cookie.expires = new Date(Date.now() + 5000);
An alternative, more intuitive API for expiry is the .maxAge accessor, which allows you to get and set the value in milliseconds relative to the current time. The following also expires the session in 5 seconds:
req.session.cookie.maxAge = 5000;
The remaining properties, domain, path, and secure, limit the cookie scope, restricting it by domain, path, or to secure connections, whereas httpOnly prevents client-side scripts from accessing the cookie data. These properties can be manipulated in the same manner:
req.session.cookie.path = '/admin';
req.session.cookie.httpOnly = false;
So far you’ve been using the default memory store to store session data, so let’s take a look at how to plug in alternative data stores.
Session stores
In the previous examples, we’ve been using the built-in MemoryStore session storage. It’s a simple, in-memory data store, which is ideal for running application tests because no other dependencies are necessary. But during development and in production, it’s best to have a persistent, scalable database backing your session data; otherwise, you’ll keep losing your session when you restart the server.
Just about any database can act as a session store, but low-latency key/value stores work best for such volatile data. The Connect community has created several session stores for databases, including CouchDB, MongoDB, Redis, Memcached, PostgreSQL, and others.
Here you’ll use Redis with the connect-redis module (https://www.npmjs.com/package/connect-redis). Redis is a good backing store because it supports key expiration, provides great performance, and is easy to install.
Invoke redis-server to make sure you’ve got Redis installed:
$ redis-server [11790] 16 Oct 16:11:54 * Server started, Redis version 2.0.4 [11790] 16 Oct 16:11:54 * DB loaded from disk: 0 seconds [11790] 16 Oct 16:11:54 * The server is now ready to accept
Next, you need to install connect-redis by adding it to your package.json file and running npm install, or by executing npm install --save connect-redis directly.[7] The connect-redis module exports a function that should be passed connect, as shown in the following listing.
We used version 2.2.0 when writing this book.
Listing C.12. Using Redis as a session store

This example sets up a session store that uses Redis. Passing the connect reference to connect-redis allows it to inherit from connect.session.Store.prototype. This is important because in Node a single process may use multiple versions of a module simultaneously; by passing your specific version of Connect, you can be sure that connect-redis uses the proper copy.
The instance of RedisStore is passed to session() as the store value, and any options you want to use, such as a key prefix for your sessions, can be passed to the RedisStore constructor. After both of these steps are done, you can access session variables the same way as with MemoryStore. One small detail about this example is that we included the favicon middleware component to prevent the session variable from being incremented twice; otherwise, the views value will appear to be increased by 2 on each request as the browser fetches the page and /favicon.ico.
Whew! session was a lot to cover, but that finishes up all the core concept middleware. Next we’ll go over the built-in middleware that handles web application security. This is an important subject for applications that need to secure their data.
C.3. Handling web application security
As we’ve stated many times, Node’s core API is intentionally low-level. This means it provides no built-in security or best practices when it comes to building web applications. Fortunately, Connect middleware components implement these security practices.
This section will teach you about three security-related modules that you can install from npm:
- basic-auth— Provides HTTP Basic authentication for protecting data
- csurf— Implements protection against cross-site request forgery (CSRF) attacks
- errorhandler— Helps you debug during development
First, let’s see how to set up an application that uses basic-auth to provide HTTP Basic authentication.
C.3.1. basic-auth: HTTP Basic authentication
In chapter 4, you created a crude Basic authentication middleware component. Well, it turns out that several Connect modules can do this for you. As previously mentioned, Basic authentication is a simple HTTP authentication mechanism, and it should be used with caution because user credentials can be trivial for an attacker to intercept unless Basic authentication is served over HTTPS. That being said, it can be useful for adding quick and dirty authentication to a small or personal application.
When your application has the basic-auth module in use, web browsers will prompt for credentials the first time the user attempts to connect to your application, as shown in figure C.4.
Figure C.4. Basic authentication prompt

Basic usage
The basic-auth module (www.npmjs.com/package/basic-auth) allows you to get the credentials from the HTTP Authorization header field. The following listing shows how to use it with your own password verification function.
Listing C.13. Using the basic-auth module
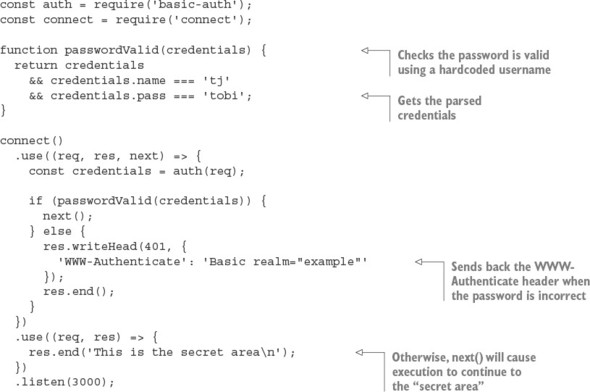
The basic-auth module provides only the Authorization header field parsing part of the authentication process. You have to check the password yourself by calling it in a middleware component and then the basic-auth module sends back the right headers when authentication fails. This example calls next() when authentication has succeeded so execution will continue to the protected parts of the application.
An example with curl
Now try issuing an HTTP request to the server with curl, and you’ll see that you’re unauthorized:
$ curl http://localhost:3000 -i
HTTP/1.1 401 Unauthorized
WWW-Authenticate: Basic realm="Authorization Required"
Connection: keep-alive
Transfer-Encoding: chunked
Unauthorized
Issuing the same request with HTTP Basic authorization credentials (notice the beginning of the URL) will provide access:
$ curl --user tj:tobi http://localhost:3000 -i
HTTP/1.1 200 OK
Date: Sun, 16 Oct 2011 22:42:06 GMT
Cache-Control: public, max-age=0
Last-Modified: Sun, 16 Oct 2011 22:41:02 GMT
ETag: "13-1318804862000"
Content-Type: text/plain; charset=UTF-8
Accept-Ranges: bytes
Content-Length: 13
Connection: keep-alive
I'm a secret
Continuing on with the security theme of this section, let’s look at the csurf module, which is designed to help protect against cross-site request forgery attacks.
C.3.2. csurf: cross-site request forgery protection
Cross-site request forgery (CSRF) is a form of attack that exploits the trust that a web browser has in a site. The attack works by having an authenticated user on your application visit a different site that an attacker has either created or compromised, and then making requests on the user’s behalf without them knowing about it.
It’s easier to understand this process with an example. Suppose that in your application the request DELETE /account will trigger a user’s account to be destroyed (though only while the user is logged in). Now suppose that user visits a forum that happens to be vulnerable to CSRF. An attacker could post a script that issues the DELETE /account request, thus destroying the user’s account. This is a bad situation for your application to be in, and the csurf module can help protect against such an attack.
The csurf module (https://www.npmjs.com/package/csurf) works by generating a 24-character unique ID, the authenticity token, and assigning it to the user’s session as req.session._csrf. This token can then be included as a hidden form input named _csrf, and the CSRF component can validate the token on submission. This process is repeated for each interaction.
Basic usage
To ensure that csurf can access req.body._csrf (the hidden input value) and req.session._csrf, you need to make sure that you add the module’s middleware function below body-parser and express-session, as shown in the following listing.[8]
We tested this example with csurf 1.6.6.
Listing C.14. CSRF protection
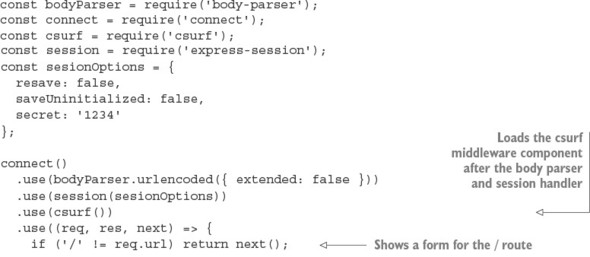
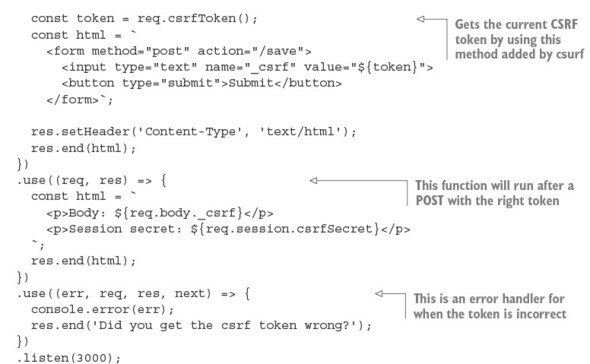
To use csurf, you have to first load the body-parser and session middleware components. This example then shows a form, which includes a text field with the current CSRF token. This token will cause all requests of certain method types to be checked based on the secret in the session. You can get the current token with req.csrf-Token, which is a method added by csurf. Posts with invalid tokens will automatically be flagged by csurf, so we’ve included a “token successful” handler and an error handler. This example uses a text field so you can see what happens if you change it.
This example shows that csurf automatically kicks in for certain kinds of requests. This is defined by the ignoreMethods option that you can pass to csurf. By default, HTTP GET, HEAD, and OPTIONS are ignored, but you could add others if required.
Another aspect of web development is ensuring that verbose logs and detailed error reporting are available both in production and development environments. Let’s look at the errorhandler module, which is designed to do exactly that.
C.3.3. errorhandler: displaying errors during development
The errorhandler module (www.npmjs.com/package/errorhandler) is ideal for development, providing verbose HTML, JSON, and plain-text error responses based on the Accept header field. It’s meant for use during development and shouldn’t be part of the production configuration.
Basic usage
Typically, this component should be the last used so it can catch all errors:
connect()
  .use((req, res, next) => {
    setTimeout(function () {
       next(new Error('something broke!'));
     }, 500);
  })
  .use(errorhandler());
Receiving an HTML error response
If you view any page in your browser with the setup shown here, you’ll see a Connect error page like the one shown in figure C.5, displaying the error message, the response status, and the entire stack trace.
Figure C.5. The default errorhandler HTML as displayed in a web browser

Receiving a plain-text error response
Now suppose you’re testing an API built with Connect. It’s far from ideal to respond with a large chunk of HTML, so by default errorHandler() will respond with text/plain, which is ideal for command-line HTTP clients such as curl(1). This is illustrated in the following stdout:
$ curl localhost:3000 -H "Accept: text/plain"
Error: something broke!
    at Object.handle (/Users/tj/Projects/node-in-action/source
    /connect-middleware-errorHandler.js:12:10)
    at next (/Users/tj/Projects/connect/lib/proto.js:179:15)
    at Object.logger [as handle] (/Users/tj/Projects/connect
    /lib/middleware/logger.js:155:5)
    at next (/Users/tj/Projects/connect/lib/proto.js:179:15)
    at Function.handle (/Users/tj/Projects/connect/lib/proto.js:192:3)
    at Server.app (/Users/tj/Projects/connect/lib/connect.js:53:31)
    at Server.emit (events.js:67:17)
    at HTTPParser.onIncoming (http.js:1134:12)
    at HTTPParser.onHeadersComplete (http.js:108:31)
    at Socket.ondata (http.js:1029:22)
Receiving a JSON error response
If you send an HTTP request that has the Accept: application/json HTTP header, you’ll get the following JSON response:
$ curl http://localhost:3000 -H "Accept: application/json"
{"error":{"stack":"Error: something broke!\n
            at Object.handle (/Users/tj/Projects/node-in-action
            /source/connect-middleware-errorHandler.js:12:10)\n
            at next (/Users/tj/Projects/connect/lib/proto.js:179:15)\n
            at Object.logger [as handle] (/Users/tj/Projects
            /connect/lib/middleware/logger.js:155:5)\n
            at next (/Users/tj/Projects/connect/lib/proto.js:179:15)\n
            at Function.handle (/Users/tj/Projects/connect/lib/proto.js:192:3)\n
            at Server.app (/Users/tj/Projects/connect/lib/connect.js:53:31)\n
            at Server.emit (events.js:67:17)\n
            at HTTPParser.onIncoming (http.js:1134:12)\n
            at HTTPParser.onHeadersComplete (http.js:108:31)\n
            at Socket.ondata (http.js:1029:22)","message":"something broke!"}}
We’ve added additional formatting to the JSON response, so it’s easier to read on the page, but when Connect sends the JSON response, it gets compacted nicely by JSON.stringify().
Are you feeling like a Connect security guru now? Maybe not yet, but you should have enough of the basics down to make your applications secure. Now let’s move on to a common web application function: serving static files.
C.4. Serving static files
Serving static files is another requirement common to many web applications that’s not provided by Node’s core. Fortunately, with some simple modules, Connect has you covered here as well.
In this section, you’ll learn about two more of Connect’s officially supported modules—this time focusing on serving files from the filesystem. These types of features are provided by HTTP servers such as Apache and Nginx, but with a little bit of configuration you can add them to your Connect projects:
- serve-static— Serves files from the filesystem from a given root directory
- serve-index— Serves pretty directory listings when a directory is requested
First we’ll show you how to serve static files with a single line of code by using the server-static module.
C.4.1. serve-static: automatically serving files to the browser
The serve-static module (www.npmjs.com/package/serve-static) implements a high-performance, flexible, feature-rich static file server supporting HTTP cache mechanisms, Range requests, and more. It also includes security checks for malicious paths, disallows access to hidden files (beginning with a period) by default, and rejects poison null bytes. In essence, serve-static is a secure and compliant static file-serving middleware component, ensuring compatibility with the various HTTP clients out there.
Basic usage
Suppose your application follows the typical scenario of serving static assets from a directory named ./public. This can be achieved with a single line of code:
app.use(serveStatic('public'));
With this configuration, serve-static will check for regular files that exist in ./public/ based on the request URL. If a file exists, the response’s Content-Type field value will be defaulted based on the file’s extension, and the data will be transferred. If the requested path doesn’t represent a file, the next() callback will be invoked, allowing subsequent middleware (if any) to handle the request.
To test it out, create a file named ./public/foo.js with console.log('tobi'), and issue a request to the server by using curl(1) with the -i flag, telling it to print the HTTP headers. You’ll see that the HTTP cache-related header fields are set appropriately, the Content-Type reflects the .js extension, and the content is transferred:
$ curl http://localhost/foo.js -i
HTTP/1.1 200 OK
Date: Thu, 06 Oct 2011 03:06:33 GMT
Cache-Control: public, max-age=0
Last-Modified: Thu, 06 Oct 2011 03:05:51 GMT
ETag: "21-1317870351000"
Content-Type: application/javascript
Accept-Ranges: bytes
Content-Length: 21
Connection: keep-alive
console.log('tobi');
Because the request path is used as is, files nested within directories are served as you’d expect. For example, you might have a GET /javascripts/jquery.js request and a GET /stylesheets/app.css request on your server, which would serve the files ./public/javascripts/jquery.js and ./public/stylesheets/app.css, respectively.
Using serve-static with mounting
Sometimes applications prefix pathnames with /public, /assets, /static, and so on. With the mounting concept that Connect implements, serving static files from multiple directories is simple. Just mount the app at the location you want. As mentioned in chapter 5, the middleware itself has no knowledge that it’s mounted, because the prefix is removed.
For example, a request to GET /app/files/js/jquery.js with serve-static mounted at /app/files will appear to the middleware as GET /js/jquery. This works out well for the prefixing functionality because /app/files won’t be part of the file resolution:
app.use('/app/files', connect.static('public'));
The original request of GET /foo.js won’t work anymore, because the middleware isn’t invoked unless the mount point is present, but the prefixed version GET /app/files/foo.js will transfer the file:
$ curl http://localhost/foo.js
Cannot get /foo.js
$ curl http://localhost/app/files/foo.js
console.log('tobi');
Absolute vs. relative directory paths
Keep in mind that the path passed to serve-static is relative to the current working directory. Passing in "public" as your path will essentially resolve to process.cwd() + "public".
Sometimes, though, you may want to use absolute paths when specifying the base directory, and the __dirname variable helps with that:
app.use('/app/files', connect.static(__dirname + '/public'));
Serving index.html when a directory is requested
Another useful feature of serve-static is its ability to serve index.html files. When a request for a directory is made and an index.html file lives in that directory, it will be served.
Serving static files is useful for web application assets, such as CSS, JavaScript, and images. But what if you want to allow people to download a list of arbitrary files from a list of directories? That’s where serve-index comes in.
C.4.2. serve-index: generating directory listings
The serve-index module (www.npmjs.com/package/serve-index) is a small directory-listing component that provides a way for users to browse remote files. Figure C.6 illustrates the interface provided by this component, complete with a search input field, file icons, and clickable breadcrumbs.
Figure C.6. Serving directory listings with Connect’s directory() middleware component

Basic usage
This component is designed to work with serve-static, which will perform the file serving; serve-index simply serves the listings. The setup can be as simple as the following snippet, where the request GET / serves the ./public directory:
const connect = require('connect');
const serveStatic = require('serve-static');
const serveIndex = require('serve-index');

connect()
  .use(serveIndex('public'))
  .use(serveStatic('public'))
  .listen(3000);
Using directory() with mounting
Through the use of middleware mounting, you can prefix both the server-static and serve-index modules to any path you like, such as GET /files in the following example. Here the icons option is used to enable icons, and hidden is enabled for both components to allow the viewing and serving of hidden files:
connect()
  .use('/files', serveIndex('public', { icons: true, hidden: true }))
  .use('/files', serveStatic('public', { hidden: true }))
  .listen(3000);
It’s now possible to navigate through files and directories with ease.