7
Upgrading Shank Angle
It takes just a few seconds to make the change from heel- to midfoot-striking during drills. The transformation from a large shank angle at touchdown (SAT) to the optimal six- to seven-degree angle is similarly brief. However, the total change—to where all running is completed with an SAT of six to seven degrees—can take several months, similar to the time frame sometimes associated with the change from heel- to midfoot-striking (figure 7.1).
As mentioned in chapter 6, the reason for the long conversion period is not because it takes a long time to learn how to react with the ground in a different way. Most runners with a large SAT can reduce those lofty angles nearly instantly during drills. However, they often will not preserve the more minimal SAT when they change from carrying out the initial shank-angle-minimizing drills to regular running. Many will broaden SAT again as they move from drills to running, because a broad SAT is what their neuromuscular systems are accustomed to producing. The human neuromuscular system is not usually agreeable to sudden, complete changes in running kinematics, even when the capacity to make such alterations is present.
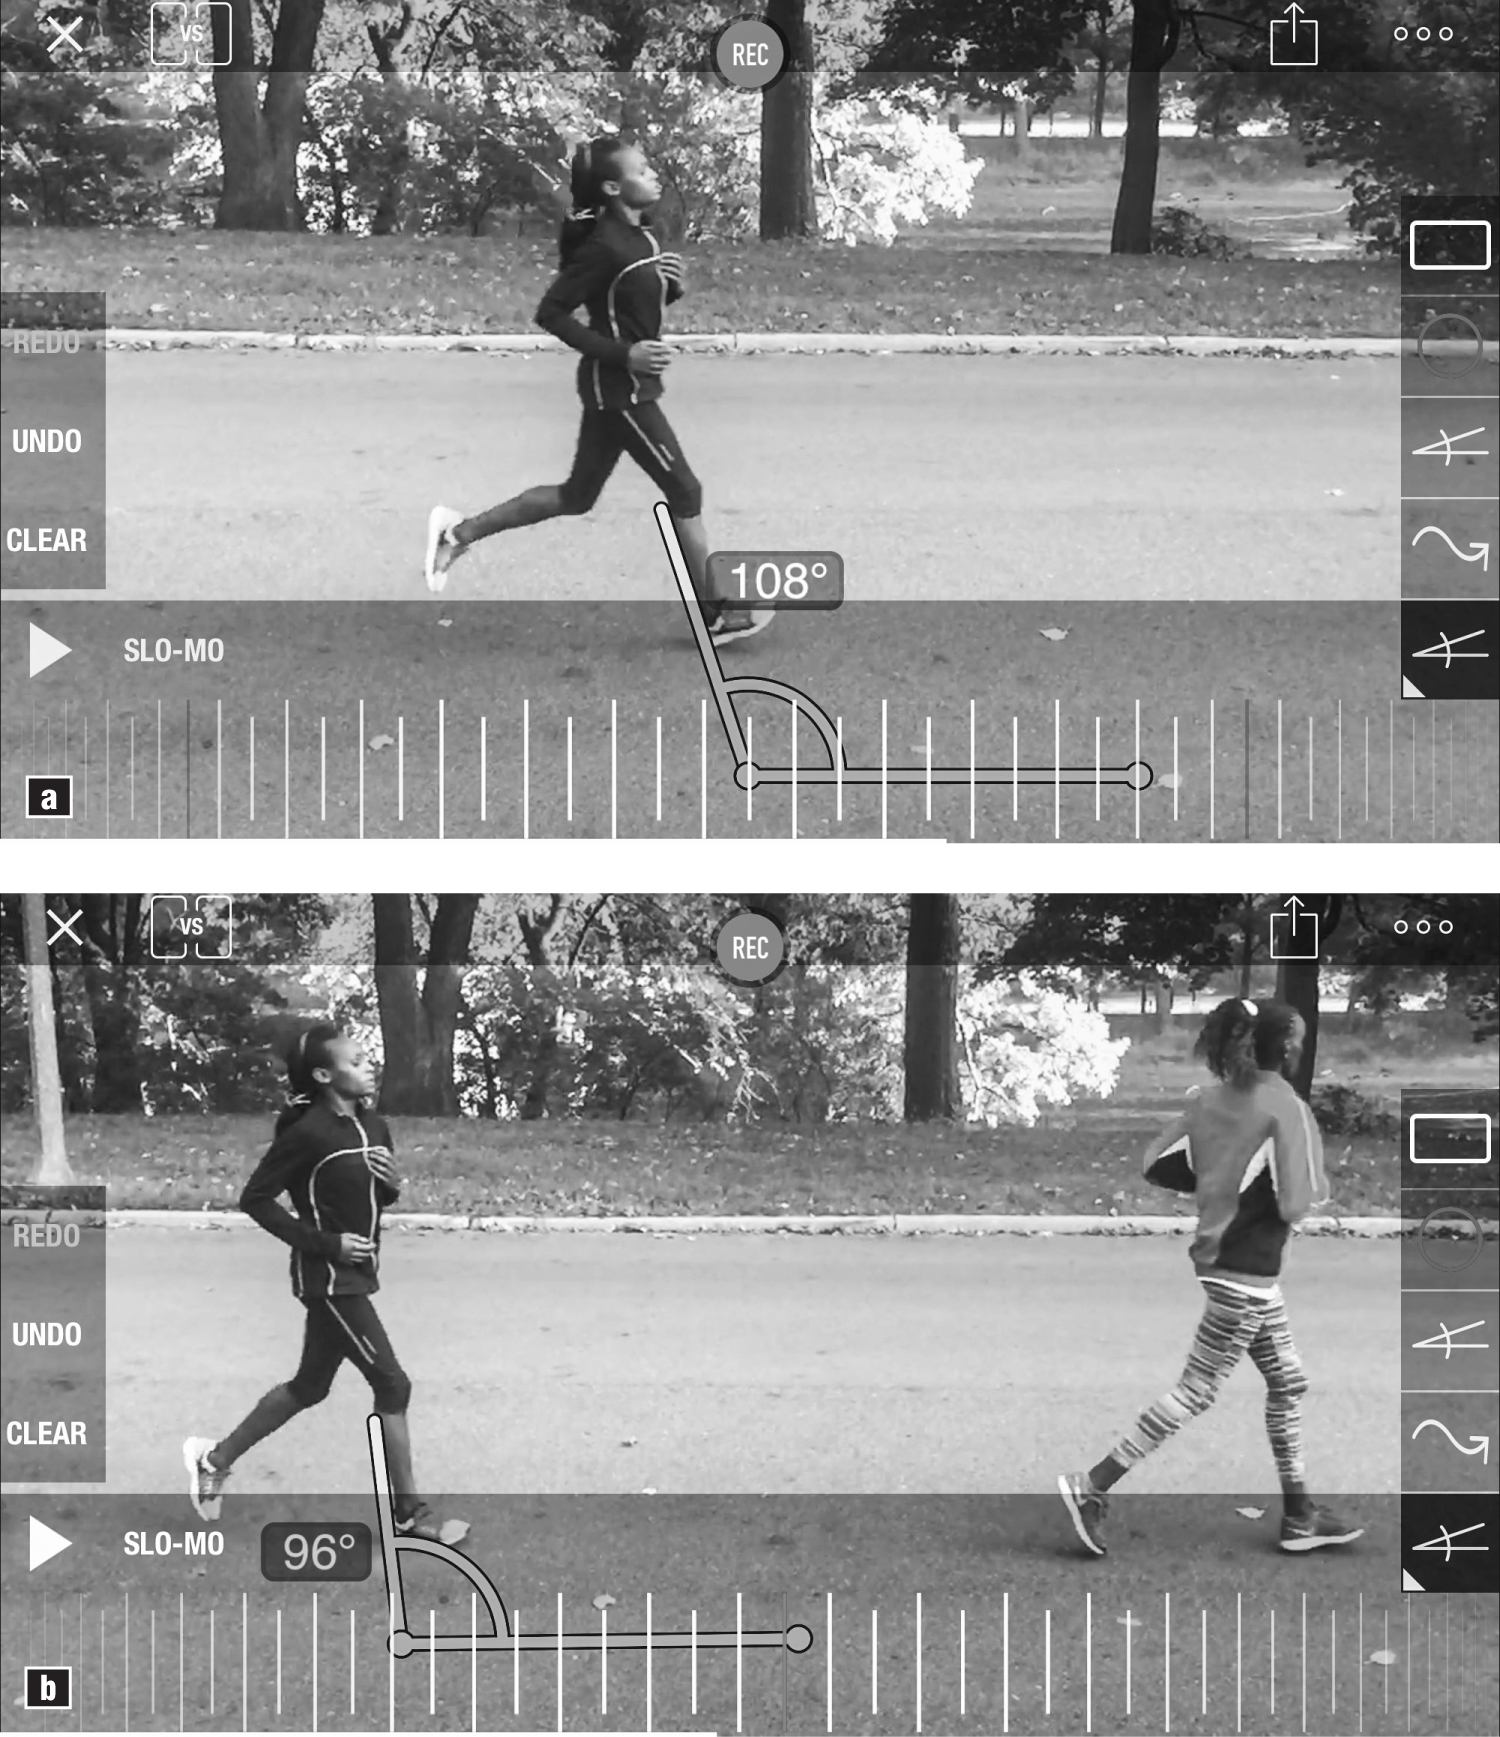
Figure 7.1 It can take months for a runner to transform completely from (a) a high SAT to (b) a six- or seven-degree SAT.
We shouldn’t be angry at our neuromuscular systems for this. After all, just as was the case with the change from heel- to midfoot-striking, a severe reduction in SAT changes everything. When shank angle changes, the leg muscles and connective tissues begin working in completely different ways, and muscles that had been relatively inactive during big-shank-angle running (especially the calf muscles) suddenly begin carrying out a heavy load of work with each step. While it is highly beneficial to make the change from big SAT to six- or seven-degree landings, an acute change can actually hurt running economy and increase the risk of injury in the short term. Going for an 8-mile run with a small SAT after years of running with a big SAT is a recipe for serious calf discomfort.
The Danger of Sudden Changes in SAT
Why is a sudden change in SAT such a bad idea, even though long-term reduction in shank angle is a fantastic concept? Hitting the ground with a more flexed knee, and moving the foot back so that it strikes closer to a point under a runner’s center of mass, tends to change not just the shank angle, but also the way in which the foot hits the ground. Specifically, moving the foot closer to the body so that shank angle is smaller tends to push a runner toward midfoot- striking rather than heel-striking (figures 7.2 and 7.3).
If you doubt that this is the case, try a simple drill: Stand with fairly erect posture, with your feet directly under your shoulders and your knees “soft” (relaxed) and a little flexed, and then begin running in place. Do you notice how the mid-regions of your feet (or even the balls of your feet) are hitting the ground? Now try running in place with the same posture using a heel-striking pattern. Do you notice how uncomfortable this is? Moving the feet back so that each impact with the ground occurs closer to a point under the center of the body tends to naturally produce a midfoot-landing pattern (figure 7.4a and b).

Figure 7.2 When a runner lands on her heel with a relatively straight leg, her SAT is usually quite fat.

Figure 7.3 Making initial contact with the ground with a less-straight leg (more flexion at the knee) and smaller SAT automatically pushes a runner away from heel-striking and toward midfoot landings.
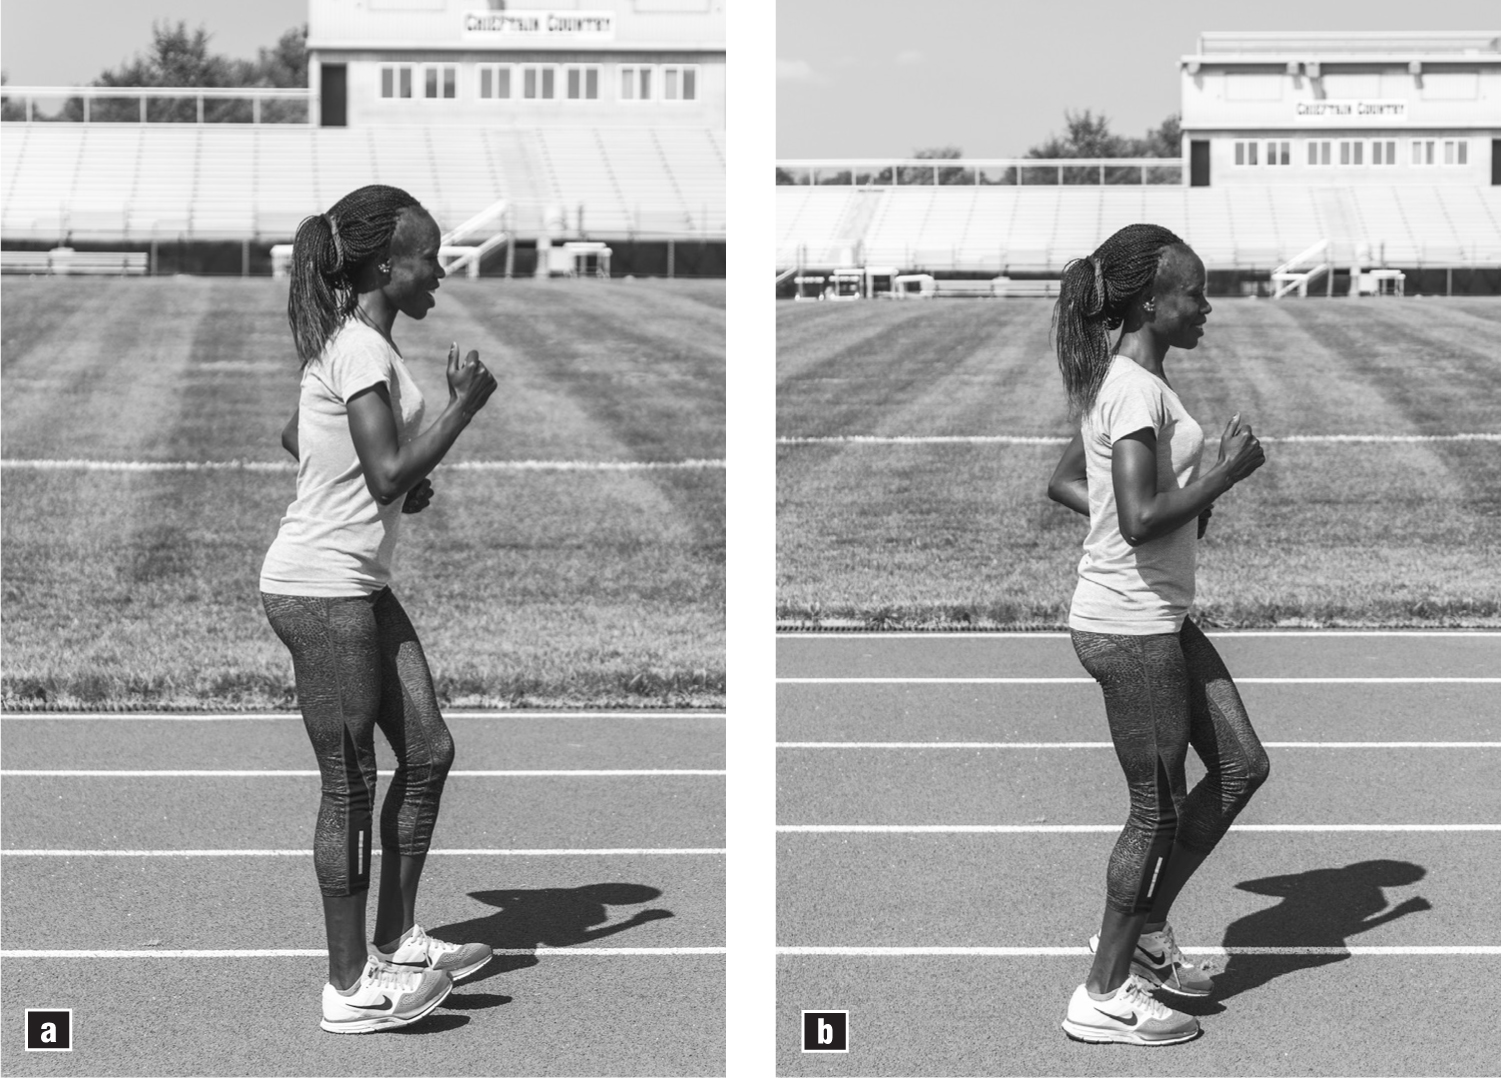
Figure 7.4 Reducing shank angle at initial impact tends to naturally enforce a shift from (a) heel-striking to (b) midfoot-striking. Heel-striking becomes too uncomfortable for the pattern to persist.
All of this being true, we are left with a scenario similar to the one observed during the change from heel-striking to midfoot-striking. The greater reliance on smaller shank angles (and the associated move toward midfoot-striking) reduces the vertical loading rate of force through the shank and entire rest of the leg. Use of more abbreviated shank angles is gentle on the knees and hips. This prevents the unmitigated effects of Isaac Newton’s equal-and-opposite reactions from blasting the knees and hips with tremendous forces directly up the legs from the heels on each step. Smaller shank angles are comforting to the muscles and connective tissues of the shins, too, because they reduce the eccentric control of slap-down work that the muscles, tendons, and ligaments must carry out when SAT is large and heel-striking is dominant (figure 7.5).

Figure 7.5 After a heel strike, when the foot hits the ground, the shin muscles are working hard to control the foot while simultaneously being stretched. This eccentric action increases the risk of stress reactions in the tibia and fibula as well as damage to the muscles and tendons of the shin.
Drawbacks of Landing With Lower SATs
It is important to note that moving the foot back toward the body and reducing the SAT converts the calf muscles and Achilles tendon from lazy passengers during gait to the hardest-working members of the below-the-knee team. This has to be true because the ankle making a small shank angle begins to undergo dorsiflexion immediately after impact, with the top of the foot moving closer to the shin instead of away from it (as it does during the slap-down of the foot associated with a big SAT). As mentioned in chapter 6, this dorsiflexion after touchdown places extra strain on the Achilles tendon and calf-muscle complex (gastrocnemius and soleus), which must work together to control the strong dorsiflexion approximately 90 times per minute per ankle (assuming a decent cadence of 180 steps per minute) (figures 7.6 and 7.7).
Over the long term, of course, it’s good to ask the Achilles tendon and calf muscles to carry out more work per step because this additional work can gradually strengthen those key areas of the lower limbs. However, sudden jumps in work output, especially when performed 90 times per minute per foot, can have a crippling effect on the Achilles tendon and calf muscles, producing soreness and tightness that can persist for days (or a significant calf injury which can last even longer).

Figure 7.6 With heel-striking and a large SAT, the initial ankle action after contact with the ground will be plantar flexion, with large forces placed on the shin muscles and tendons to control this plantar flexion.

Figure 7.7 With a small shank angle (and a foot strike that is usually closer to midfoot), the initial ankle action tends to be dorsiflexion, with large forces placed on the controlling Achilles tendon and calf muscles.
The problem associated with such an injury is not with low SAT (or even with the increased reliance on midfoot-striking), but rather with an overly dramatic and sudden transition from big to little SATs. As outlined in chapter 6, transformations of form and training always require a slow and careful approach in order to minimize the risk of injury. Runners working toward smaller SATs should make a very gradual entry into this new form pattern, instead of an all-or-nothing approach over a short period of time.
A gradual transition from large to six- to seven-degree SAT is especially important for the high-volume runner. Runners who have a big SAT and are averaging five miles of running per week can probably immediately begin hitting 20 percent of their miles (about one mile per week) with low shank angles and no negative consequences. The runner who averages 70 miles per week, on the other hand, would be in trouble at 20 percent (14 miles per week) at low shank angle, especially if most of the miles were covered in a single run. The calves, Achilles tendons, and metatarsal bones of the feet would be at heightened risk of injury.
The change from expanded to diminutive shank angles will produce significant benefits (table 7.1). As previously described, impact-force-loading rate in the leg (VALR) will decrease. The knees and hips will get a much-needed break, and braking forces during stance will be reduced. The time spent producing braking forces (as opposed to propulsive forces) during stance will shorten, and thus a greater fraction of stance will be devoted to pushing the runner forward. Economy will improve, in part because of the reduced braking forces, as less energy and oxygen will be needed to overcome braking. Economy will also improve because of the shorter duration of the braking phase. This will reduce stance time and thus the amount of oxygen utilized with each step to support the body. Propulsive forces will increase because the legs will become springier. Increased propulsive forces will lead to a higher performance potential. Risk of injury will be lower because of the lower force-loading rate.
|
TABLE 7.1 |
||
|
FACTORS ASSOCIATED WITH HIGH VS LOW SAT |
||
|
High SAT |
6–7 degree SAT |
|
|
Force loading rate |
High |
Reduced |
|
Breaking forces during stance |
High |
Reduced |
|
Time spent producing breaking forces |
Long |
Short |
|
Running economy |
Poor |
Improved |
|
Oxygen Required to overcome breaking |
High |
Reduced |
|
Stance time |
Longer |
Shorter |
|
Stride rate |
Slower |
Faster |
|
Risk of injury |
Higher |
Lower |
Running With Battering Rams or Springs
A key point to remember is that the runner with a big shank angle usually hits the ground with a relatively straight leg, with the landing foot well in front of the body. In contrast, the runner with a small shank angle hits the ground with the foot closer to the body (and the body’s center of mass), and with a “softer” and more flexed knee compared with heel-striking. Small SATs provide milder landings, with impact force travelling up the leg at a lower speed. Running fast with high shank angles forces the runner to ram a leg into the ground at high speed with each step, while running quickly with low shank angles brings your feet back and allows your legs to work like the springier structures they were intended to be (figure 7.8).

Figure 7.8 A small SAT allows the leg to function like a shock-absorbing spring, rather than a high-impact battering ram.
If there remains any doubt that big shin angles put runners more at risk for injury than small shin angles, consider this scenario: You are running along a sidewalk at high speed and come to the end of the block. There, you must spring forward off of the curb and land on a cement roadway that is 2 feet, or .6 meters, below the top level of the curb. You are going to jump down onto the road at high velocity, and you must land on just one foot. Would you rather land on your heel, with your foot well out in front of you and with a straight, rigid leg? Or would you rather land midfoot, with your foot closer to being under your body and your knee flexed to absorb the impact shock? Which plan carries the greater risk of injury?
Drills for Shank Angle Transitioning
On the pages that follow, you will find drills to facilitate the transition from large to small SATs. They should be carried out barefoot at first in order to provide superior proprioception and therefore a better feeling for midfoot-striking and smaller shank angles (figure 7.9). Developing this feeling will help sustain midfoot-landings and small SATs during training and races. All drill durations are measured in minutes.

Figure 7.9 Jogging barefoot helps runners learn to land midfoot with low SATs.
|
PHASE ONE: BAREFOOT |
||
|
Activity |
Duration (minutes) |
Stance |
|
Walk in place with midfoot landing and small shank angle at initial impact |
1:00 |
Soft, flexed knees |
|
Jog in place with midfoot-landing and small SAT |
3:00 |
Soft, flexed knees |
|
Jog forward with midfoot-landing and small SAT |
3:00 |
Soft, flexed knees and small steps |
Conduct the drills before the main portion of your overall workout. Repeat the drills about five times per week for two weeks, or until you are completely certain that you can carry out all three activities with midfoot-landings and small SATs. Verify this by video analysis using a smart phone or camera capable of recording at 240 fps or greater along with an analysis app. You are then ready to move on to Phase Two.
|
PHASE TWO: IN RUNNING SHOES |
||
|
Activity |
Duration (minutes) |
Stance |
|
Walking in place with midfoot-landing and small SAT |
1:00 |
Soft, flexed knees |
|
Jog in place with midfoot-landing and small SAT |
3:00 |
Soft, flexed knees |
|
Jog forward with midfoot-landing and small SAT |
3:00 |
Soft, flexed knees and small steps |
Complete the drills about five times per week for two weeks, or until you are completely certain that you can carry out all three activities with midfoot-landings and low shank angles while shod. Verify this by video analysis using a smart phone or camera capable of recording at 240 fps or greater, along with an analysis app. You are then ready to move on to Phase Three.
|
PHASE THREE: BAREFOOT |
||
|
Activity |
Duration (minutes) |
Stance |
|
Jog in place with midfoot-landing and small SAT |
1:00 |
Soft, flexed knees |
|
Jog forward with midfoot-landing and small SAT |
3:00 |
Soft, flexed knees and small steps |
|
Run forward with midfoot-landing and small SAT |
3:00 |
Soft, flexed knees and longer steps |
When running forward, move at medium to medium-hard intensity, somewhat like a half-marathon to 10K race pace. Warm up properly before you carry out Phase Three. Complete the drills about five times per week for two weeks, or until you are completely certain that you can carry out all three activities with midfoot-landings and small shank angles while barefoot. Verify by video analysis using a smart phone or camera capable of recording at 240 fps or greater, along with an analysis app. You are then ready to move on to Phase Four.
|
PHASE FOUR: IN RUNNING SHOES |
||
|
Activity |
Duration (minutes) |
Stance |
|
Jog in place with midfoot-landing and small SAT |
1:00 |
Soft, flexed knees |
|
Jog forward with midfoot-landing and small SAT |
3:00 |
Soft, flexed knees and small steps |
|
Run forward with midfoot-landing and small SAT |
3:00 |
Soft, flexed knees and longer steps |
When running forward, move at medium to medium-hard intensity (somewhat like half-marathon to 10K race pace, or a little faster). Warm up properly before you carry out Phase Four. Complete the drills about five times per week for two weeks, or until you are completely certain that you can carry out all three activities with midfoot-landings and small SATs while shod in your regular training or racing shoes. Verify by video analysis using a smart phone or camera capable of recording at 240 fps or greater, along with an analysis app. You are then ready to move on to more complicated drills described in subsequent chapters.
These drills take seven minutes per workout to complete. For the rest of your training session (including during the warm-up), gradually introduce more and more running with midfoot-landings and low SATs. For example, during the first week of drills, you may want to focus on running with midfoot-striking and low SATs for about 10 percent of your normal training time; the rest of the time, simply run normally. During the second week of drills, transition to running with midfoot-striking and small SATs for around 20 percent of your training time, and so on.
Contrast Runs
A couple of times per week, after an adequate warm-up, supplement the above drills with contrast runs, proceeding as follows:
- Run at moderate speed for approximately 50 meters with straight, stiff legs, with little knee flexion and the landing point well ahead of the body (large SAT).
- Rest for a few moments, and then run 50 meters at moderate speed with soft, slightly flexed knees.
- Rest for a few moments, and then run 50 meters with straight, hard legs, landing on a heel with each step and with large SAT.
- Rest briefly, and then run 50 meters at moderate speed with soft, slightly flexed knees, making sure that each landing occurs at the midfoot with small SAT.
- Repeat Steps 1 through 4 two more times.
At first, make sure that the contrast running is carried out on a soft, forgiving surface such as grass, sand, a gym floor, or a rubberized track. During each 50-meter segment, be aware of how different each running style feels—and how midfoot-striking with small shank angles leads to springier running with less discomfort and lower perceived effort.
Summary
The transition from large SAT to a six- or seven-degree SAT will occur at different rates for individual runners; some runners may make the transformation nearly instantly while others might require several months. Regular performance of the drills described in this chapter will facilitate the transition. But remember that runners should not try to transition all running from large SAT to small SAT in a short period of time. The change should be made progressively to prevent injury to the Achilles tendon, calf muscles, and feet. As drills are completed week by week, an individual’s running will gradually and progressively become more like the drills. Then, the transformation from large to small SATs will be complete.