There are many individual benefits to all the exercises that follow in this chapter, described as each exercise is presented. Two Chinese proverbs apply to all of them, though, which you may want to consider even if you have no apparent foot problems. The first is, “Death begins in the feet.” While there are a few ways to interpret that proverb, the simplest is that the feet are the foundations for our entire body. We stand on them for most of our waking day, they support us, transport us from place to place, allowing us to work, play, and accomplish most of the necessary activities of daily life. Yet most of us take them entirely for granted. Just as the foundation of a house must be stable and secure in order for it to support everything else that is built upon it, so must our feet be stable and healthy to ensure the stability and healthy functionality of our legs, knees, back, neck, and literally every other part of our body. If your feet are troubled, it’s only a matter of time before you will develop aches and pains in other parts of your body. If you doubt that, just ask anyone whose work requires them to stand on their feet all day, or anyone with gout or arthritis. Even the pain of a stubbed toe or an ingrown toenail can make a person feel less functional and devitalized. It is that decreased functionality and reduced vitality that sets the stage for declining health overall.
The second proverb is, “A wise person breathes through their feet.” This one may be a little more difficult for a Westerner, or for anyone without sufficient training in Asian health practices such as qigong or taiji, to fully understand and appreciate. Keeping things as simple and relatable as possible, we can define breathing in this case to be taking in qi, or vital life energy, from the ground, the earth, drawing it up through our feet. Whether you are already adept at qigong, or follow the simplified Western practice called “earthing” (standing barefoot on the ground to absorb some of the earth’s ionic energy—similar to “grounding,” making energetic contact with and being stabilized by the earth) as is taught in chapter Eleven, your feet and legs must be open in order to absorb whatever amount of qi you are able to gather. Each of the following exercises assists in removing any physical restriction that may be present in your feet and ankles, opens them energetically to permit an unimpeded flow of qi, and stimulates qi to move freely through those body parts.
1. Toe Pinch, Stretch, and Twist
Purpose
Physical: This is a preparatory practice, to gently open the toes before proceeding to the next series of exercises for the toes and feet.
Energetic: It stimulates the Jing Well points of the acupuncture meridians that end at the toes, including the Liver, Gall Bladder, Spleen, Stomach, and Urinary Bladder. The Jing Well points have an invigorating effect on the mind, and so this practice may help to improve your focus throughout the course of your practice session, into the rest of the day.
Techniques Used
Acupressure (to the Jing Well points); mobilization of the toe joints; gentle stretch of the ligaments.
Method
Sitting comfortably in a chair or on the floor, cross your right leg over your left. Grab the tip of your right big toe with your left thumb and index finger, close to the bottom of the toenail. Apply firm pressure with your fingers. Gently pull your toe straight out from your foot, so that the joints of the toe are straightened without strain, and feel comfortably open. Keeping that traction on your toe, twist it one way to the point at which you feel some resistance (Fig 1.1), and then twist it in the other direction to the point of resistance. Twist your toe back and forth in this way at least ten times. Then repeat this procedure on each of your four other toes. Then do the same thing on your left foot. Alternatively, you can do all of the seated foot exercises on one foot, and then do the same on the other foot.
Additional Considerations
You may feel slight pain or discomfort from your finger pressure on some of your toes, which indicates an obstruction of Qi, Blood, or both. Gout (uric acid crystal deposits) indicates another type of obstruction, and may produce a more sharp pain. Some toes may not feel any such sensation. The sensation of discomfort is nothing to be alarmed by, although the underlying cause is something you want to address. In this exercise, simply work the uncomfortable toes just a little longer than the ones that are fine.
If you have arthritis in your toes, you may feel an ache from this practice. Do not overdo something even as simple and gentle as this exercise, but neither should you avoid it altogether because of that ache. The traction on the toes opens the joint space, so you will be doing no harm to yourself by twisting your toes with the joints opened in that way, and in fact your toes will feel much better at the end of your practice session. Additionally, the Ying Spring acupuncture points that are present near where the toes join the foot, some of those being at the web between the toes, are useful in clearing heat. One of the Western correlations to clearing heat means reducing inflammation, so your toes will benefit from that energetic effect. The Ying Spring points are addressed more strongly in some of the exercises that follow, but this is a good place to start that process.
These considerations are applicable to the rest of the toe exercises that follow.
2. Toe Stretch, Forward and Backward
Purpose
Physical: Stretch the muscles, tendons, and ligaments in each toe; open the joint spaces between the small bones of the toes. Most people have their feet in shoes all day, which tend to compress the toes, allowing the muscles, tendons, and ligaments to tighten and shorten. Our feet are the foundations for our entire body, so keeping them open and supple will provide better support for and comfort throughout our body.
Energetic: Every practice that stretches a muscle benefits the Spleen, since the Spleen dominates (has a special affinity for) the muscles. Every practice that mobilizes tendons and ligaments benefits the Liver, which dominates the sinews (tendons and ligaments). The Liver and Spleen acupuncture meridians begin at the big toe, so there is an additional benefit provided when engaging that toe. The Jing Well and Ying Spring points introduced in Exercise 1 are further stimulated in this exercise.
Techniques Used
Mobilization of the toe joints; gentle stretch of the tendons, ligaments, and muscles.
Method
Sitting comfortably in a chair or on the floor, cross your right leg over your left. If your legs and hips are flexible enough, place your right outer ankle on your left thigh anywhere that’s comfortable between your knee and hip, with the sole of your foot facing left and slightly upward. This allows the easiest access to your toes. Grasp your big toe firmly with your left hand, and the next toe with your right. With a slightly stronger traction than in the first exercise, pull your toes straight out from your foot so that the joint spaces feel open and the toes are lengthened. This also opens the metatarsal bones, the small bones in your feet closest to your toes, and stretches their associated tendons and ligaments. Maintaining that traction, move your big toe backward, toward the top of your foot, and the next toe forward, toward the sole of your foot, until you meet resistance in both directions (Fig 1.2). Then reverse directions and repeat, moving your toes forward and back at least ten times. Then grasp the toe next to your big toe with your left hand, and the middle toe with your right. Repeat the entire procedure with those toes. Continue through the rest of the toes in the same way. The middle three toes will get twice the workout as the big and little toes, so you can end this practice by grasping the big toe with the left hand and the little toe with the right, apply the traction to each and move them forward and backward another ten times.
Purpose and Techniques
These are the same as for Exercise 2.
Method
Sitting comfortably in a chair or on the floor, cross your right leg over your left as in Exercise 2. Grasp your big toe firmly with your left hand, and the next toe with your right. With a slightly stronger traction than in the first exercise, pull your toes straight out from your foot so that the joint spaces feel open and the toes are lengthened. Maintaining that traction, spread your toes sideways as far apart as is comfortable, until you meet resistance (Fig 1.3). Then bring them back together, touching briefly. Spread and return to touching at least ten times. Then grasp your second toe with your left hand and your middle toe with your right. Repeat the entire procedure with those toes. Continue through the rest of the toes in the same way.
Purpose
Physical: More strongly stretches the muscles, tendons, and ligaments in each toe where they join the foot; open the joint spaces between the toes and the metatarsal bones at the end of the foot. Mobilizes the metatarsal bones and opens the associated joint spaces.
Energetic: Strongly stimulates most of the Ying Spring points of the foot, and moderately stimulates the Shu Stream points. Benefits the Liver and Spleen through their association with tendons, ligaments, and muscles. The Kidneys are also benefited both from the more vigorous joint mobilization, as the Kidneys dominate the bones, and from the Laogong acupuncture point at the center of the palm gently stimulating the Bubbling Well (Yongquan) point, the first point on the Kidney meridian near the ball of the foot. This is a partial Daoyin technique. Daoyin means “guide and induce,” referring to qi flow. Without some training of the mind, the “guiding” aspect may not be accomplished here, but the “induction” occurs almost automatically, from the contact between Laogong and Yongquan with the associated physical tissue manipulation.
Techniques Used
Mobilization of the toe-to-foot joints; gentle stretch of the tendons, ligaments, and muscles; daoyin.
Method
Sitting comfortably in a chair or on the floor, cross your right leg over your left as in Exercises 2 and 3. With your right hand, grasp your foot so that your thumb is perpendicular to the sole of your foot, about two inches below the ball of your foot. Your index finger should cross perpendicular to the top of your foot, with your little finger near where your foot joins the front of your leg. Bring the palm of your left hand to the sole of your right foot, and interlock your left fingers between your right toes (Fig 1.4). Ideally, the web of your fingers should touch the web of your toes.
Your right hand holds your foot immobile, so that from your mid foot up to your ankle and lower leg, nothing moves. The palm of your left hand maintains contact with the sole of your foot as much as possible, to stimulate the Bubbling Well point. With your left hand, gently pull all of your toes straight out from your foot to create the traction used in Exercises 2 and 3. The traction is useful and beneficial, but secondary to what comes next, so if you lose it, don’t be too concerned. Do your best to maintain that traction, and rotate your toes in clockwise circles at least ten times. Then reverse direction, rotating your toes in counterclockwise circles.
Do not remove your fingers at the end of this exercise. The next exercise begins in the same position.
Additional Considerations: Modifying This Exercise
Exercises 2 and 3 served to open your toes to facilitate interlocking your fingers between them. You may find that your toes are still too tight to allow such a full interlocking, and if so, you can modify the exercise in this way. You may only be able to get the tips of your fingers between your toes (Fig 1.5), or you may be able to get the first or even the second finger joint part way between your toes. However far you can get your fingers, that’s okay for now. With practice and time, your feet will open more. Make whatever accommodations you may need to approximate the rest of the instructions until you can fully interlock your fingers and toes.
5. Rotational Foot and Ankle Stretch
Purposes and Techniques
These are the same as for Exercise 4, with these additions. Physically, it strongly stretches the muscles, tendons, and ligaments of the ankle; opens the ankle joint space. Mobilizes the metatarsal bones and opens the associated joint spaces. Energetically, it strongly stimulates most of the Shu Stream points of the foot, mostly found at various places along the general circumference of the foot up from the web of the toes, toward the ankle. Stream points are most commonly used to treat Bi (pronounced “be”) Syndromes, more colloquially called Painful Obstruction Syndromes, and which are often the same as or associated with various types of arthritis pain. This is especially true if Damp is part of the pathogenic picture, which is almost always the case in Bi Syndromes. That Damp may or may not visibly manifest as swelling or edema. (Damp, along with Dryness, Wind, Cold, and Heat, are both external, environmental, pathogenic influences and internally generated ones when organ systems are not functioning properly.) The reader who may be unfamiliar yet interested in this and other Chinese medical terms used in this book is directed to The Web That Has No Weaver by Ted Kaptchuk, for further insight. While such insight is useful and encouraged, it is not necessary in order for you to get the most from the exercises taught here.) The Kidney Shu Stream point, Kidney 3, is located just behind the inner ankle. Because of its association with bones and hence joints, that’s a particularly important point used to treat most Bi Syndromes. This exercise also provides moderate to strong stimulation to the foot Jing River points, which are located at various points around and above the ankle.
Method
Beginning where you left off in Exercises 4, grasp your lower left leg with your right hand, just above your ankle. Your right hand holds your leg immobile, so that above your ankle, nothing moves.
Keep the palm of your left hand at the sole of your right foot with your left fingers interlocked between your right toes. Ideally, the web of your fingers should touch the web of your toes.
The palm of your left hand maintains contact with the sole of your foot as much as possible, to stimulate the Bubbling Well point. With your left hand, gently pull all of your toes straight out from your foot to create the traction used in Exercises 2, 3, and 4. As in Exercise 4, the traction is useful and beneficial, but secondary to what comes next, so if you lose it, don’t be too concerned. Do your best to maintain that traction, and rotate your entire foot from your ankle in clockwise circles at least ten times (Fig 1.6A and Fig 1.6B on next page). Then reverse direction, rotating your foot and ankle in counterclockwise circles an equal number of times. When you finish, hold your foot still, slightly grip your toes with your interlocked fingers, and pull your fingers straight out beyond the tips of your toes. This gives your toes one last stretch, and may spread them just slightly farther than previously. If you have dislodged any stagnant qi, this pull will help remove it from your foot and toes.
Although your entire foot will move, you’ll feel the rotation most strongly in your ankle. You may feel or even hear clicks and pops. As long as there is no pain, that’s fine, and even expected if you haven’t moved your ankle like this before. If your ankles are typically somewhat painful, feeling that much pain is also okay, you just want to be careful to not make the pain increase beyond that. Over time (many days or weeks of practice), both the pain and the pops and clicks will improve.
Purpose
Physical: Opens the joint spaces between all the bones of the foot; further opens the ankle; provides a spiraling or shearing stretch though the muscles, tendons, and ligaments of the foot.
Energetic: By opening the physical spaces in the foot, all of the energetic pathways are freed, allowing for unrestricted qi flow. In addition to deepening the benefits already stated for all the foot exercises, this begins the process of grounding, providing greater stability and a sense of connection with and support from the earth.
Techniques Used
Stretching; joint mobilization. Some acupressure to Kidney 1, the Bubbling Well Point, may occur, but that is not a main focus of this exercise.
Method
Sitting either on the floor or in a chair as in the previous exercises, cross your right leg over your left knee. Interlock your fingers, and place them palm side down across the top of your right foot. Your right thumb will then be in a position to cross just under the ball of your foot, so that the tip of your thumb rests on or near Kidney 1, Yongquan (the Bubbling Well Point). Your left thumb should cross over your right, so you are securely grasping your foot. Firmly twist your foot, so that the sole surface faces upward, toward the sky (Fig 1.7 on next page). Your heel will not move very much, as the bones are denser there and don’t allow much movement. That’s normal. While maintaining the twist, your right thumb pushes the ball of your foot outward, toward the tip of your big toe. Simultaneously, your left hand pulls the little toe side of your foot toward your heel. This creates the shearing, spiraling aspect of the stretch, and opens your foot and ankle more fully than just a circular stretch would. Here, your outer ankle is stretched more.
Hold this stretch for 20–30 seconds. Repeat once more, or twice if your foot and ankle feel the need. With some practice, you can safely maintain this stretch for two minutes. When performing a two-minute stretch, just do one so that you don’t overstretch your ligaments.
Purposes and Techniques
These are the same as for Exercise 1.
Method
Seated, with your right leg crossed over your left, keep your fingers interlocked but place them with the palm surface to the sole of your foot. Your left thumb tip will be placed at or near the margin of the web between your big toe and the one next to it. Your hand position will be slightly closer to your toes than in the previous exercise. Firmly twist your foot, so that the sole surface faces downward, toward the ground (Fig 1.8). Your heel will not move very much, as previously, and your entire foot will normally have less range of motion in this downward direction than in the upward one. While maintaining the twist, your left thumb pushes your big toe outward, toward its tip. Simultaneously, your right hand pulls the little toe side of your foot toward your heel. Here, your inner ankle is stretched more.
Hold this stretch for twenty to thirty seconds. Repeat once more, or twice if your foot and ankle feel the need. In this direction, there is no need to extend the length of the stretch longer, since there is a natural bony limit that prevents further benefit with a longer stretch.
Purpose
Physical: Relaxes and releases the plantar fascia (the tough membrane covering the bottom surface of the foot, below the skin), and the related muscles. Helps to relieve plantar fasciitis.
Energetic: Awakens the Central Channel, one of the core energy channels that runs directly through the center of the body. Since the Central Channel is formed almost at the moment of conception, advanced Central Channel work addresses constitutional, genetic, and karmic considerations. “Awakening” is a gentle approach, a very mild stimulation that helps a person become more sensitive to the qi in any targeted body location.
Techniques Used
Acupressure; reflexology. There are many models used in reflexology, most being accessed on the hands and ears as well as the feet. In one common model of foot reflexology, many of the internal organs are accessed along the centerline of the foot. While those organs will benefit from this massage, here we are using the model of the centerline of the foot as a hologram for the centerline of the body.
Method
Seated as before with right leg crossed over left knee, grasp the foot with both hands so that the fingers are on the top surface of the foot, and the thumbs touch on the Bubbling Well point, on the centerline of the sole just below the ball of the foot. With moderate pressure, make very small circles with both thumbs working together in the same direction. The nail surface of the thumbs should be touching, or nearly so. There is no set number of circles, but stay in one location long enough for you to feel the sole relaxing at that point. Then move both thumbs together toward the heel, about the distance of a thumb’s width, to the next lowest point on the centerline of the sole. Repeat the circular motion in that location. Continue in this way until just before reaching the center of the heel (Fig 1.9).
You will probably find spots that are sore or achy as you massage your foot. This is nothing to be alarmed by, but it does mean there is some restriction, a physical or energetic obstruction, tension, or irritation in the plantar fascia or muscles, or some toxic accumulation. You may want to spend a little more time applying circular pressure in those locations; many teachers claim that counterclockwise circles are best for dispersing such things, but I encourage you to experiment and see what feels best to you. Don’t expect or try to clear that out in just one or two sessions, but after a few days or a few weeks of self-treatment, you will find that those points are no longer uncomfortable.
Purpose
Physical: Flexes and stretches the sole of your foot to further relax and release the plantar fascia and related muscles; mobilizes the bones of the foot, helping to open the small joint spaces there.
Energetic: Further opens the Central Channel and prepares the foot for the deeper energetic stimulation of the next exercise.
Techniques Used
Stretching; joint mobilization.
Method
Seated as before with right leg crossed over left knee, grasp your right foot with both hands, fingers interlocked over the top of the foot. With the heel of both hands (near where the base of the thumb, the thenar eminence, joins the wrist) squeeze the sides of the foot, from closer to the toe end of the foot, toward the centerline of the sole (Fig 1.10). This spreads the top of the foot, and gathers both physical tissue and qi along the centerline of the sole. Hold this compression for just a few seconds, and then slide your hands toward your ankle so that they are positioned closer to the middle of your foot, and repeat. Finally, move your hands even closer to your ankle, and repeat once more. In this position, you will not get much stretch at the top of your foot, but you will still get an effective gathering at the sole.
Next, move your hands toward your toes once more. Unlock your fingers, and place the tips of your fingers on the top surface of your foot at the midline, with the nail surface of your fingers touching each other, or nearly so. The whole length of your thumbs should be touching the sole of your foot, thumbs touching each other, with thumb tips near the middle of your toes. Using your fingertips mainly to anchor your hands in place and to provide some resistance for your thumbs, apply moderate pressure with your thumbs and spread them out toward the sides of your foot (Fig 1.11 on next page). This stretches the sole of your foot and slightly compresses the top of your foot. Do your best to keep the spreads slow, smooth, and even. The top of your foot will not visibly compress as much as the sole did because of natural bony restrictions. Return your thumbs to the midline of the sole, and repeat the spreads two more times, for a total of three. Then move your hands toward your ankle, to the middle of your foot, and repeat the three spreads in that location. Finally, move your hands closest to your ankles, and do three final spreads.
5. Palm Rub, Laogong to Yongquan (Bubbling Well)
Purpose
Physical: Warms and brings blood to the bottom of the foot, softens and opens the tissues.
Energetic: Stimulates qi flow, brings qi to K1, the Bubbling Well point. Physically and energetically prepares the foot for the next exercise.
Techniques Used
Friction massage, qi stimulation, induction, and sensitization.
Method
Seated as before with right leg crossed over left knee, with the right palm on the top surface of the right toes, grasp the right toes, wrapping your thumb around your big toe. Gently bend the toes back to stretch the sole of the foot. Place the palm of your left hand on the sole of your foot, so that the Laogong point at the center of the palm is roughly over the Bubbling Well point (Fig 1.12). Quickly and vigorously rub your palm back and forth over the sole of your foot. The movement does not need to be a large one. Try to make your Laogong point cross the Bubbling Well point with each back and forth motion. Do this one hundred times unless your hand tires before then. It will only take about a half a minute if you move your hand fast enough.
A variation, especially useful if you suffer from cold hands and feet, is to rub the palms of your hands together first, to warm them and bring more qi to them before rubbing the sole of your foot. Rubbing your hands together in this way is a common method to bring qi to your hands and sensitize Laogong, often done before beginning a variety of energy practices.
6. Pumping the Bubbling Well Point
Purpose
Physical: Locally, of minimal importance. If there is a physical restriction at the ball of your foot, common in many people, this will reduce it. If you feel some tenderness at the point where you are applying pressure, that’s an indicator that you’re on the right spot.
Energetic: This point has a variety of functions, so its energetic purposes are fairly extensive. It is the main point to stimulate the rising of qi, and as such it is called a “revival point,” used to awaken the mind from fainting or unconsciousness, or to focus and ease when a person has had a shocking, destabilizing experience. Even in less serious circumstances, it will stimulate the mind and provide a natural energizing effect. This is one aspect of its being the first point of the Kidney meridian, which ends within the brain. In what might seem paradoxical, it also exerts a strong calming effect on the mind, useful for reducing anxiety.
For people who practice qigong, martial arts, or other physical disciplines that have an inherent energetic nature, the more open this point becomes, the easier it is to connect with the earth to ground and draw the earth’s energy upward. If you practice any of those arts and have some difficulty in grounding or perceiving qi flows up your legs, practice this for a few weeks and you’ll feel the improvement. While all the foot exercises may be of some help, this one provides a particularly strong benefit in that regard. The traditional functions of this point are mainly focused on its mental and emotional benefits, but it will strengthen all the functions associated with the kidneys, and by extension the urinary bladder, which is the Yang organ paired with the kidneys. Some of these include normalizing urination, improving sexual vitality and/or desire, reducing back pain, and strengthening the bones. Those will become more pronounced when adding other exercises and practices that benefit the kidneys.
Technique Used
Acupressure

Method
Seated as before with right leg crossed over left knee, place the tip of your right thumb directly on the Bubbling Well point. Maintaining contact with the Bubbling Well point, position your thumb so the thumb tip is perpendicular to the Bubbling Well point (Fig 1.13A), and the first joint is bent at about 90 degrees. Gently grasp your right foot, the palm and fingers of your right hand on the top surface of your foot, down from your toes and as close to your ankle as is comfortable.
Place your left hand so that the Laogong point contacts the bent joint of your right thumb. Your left thumb points upward and contacts your toes while the fingers of your left hand curl around your upper foot by the margin of your toes, above the fingers of your right hand (Fig 1.13B). By squeezing your left hand, your left palm will push the tip of your right thumb directly into the Bubbling Well point with more force than you could easily manage with your right thumb alone. Using a pressure that is strong yet comfortable, squeeze your left hand and then release the squeeze rapidly, so that there is a pumping sensation at the Bubbling Well point. Repeat this up to a hundred times, rapidly enough that it would take you no more than a minute.
Ankle Exercises, Seated, Active
The previous exercises have all been passive; that is, you’ve used your hands to exert an effect on your feet, which have been the passive recipients of the work your hands have done. The next three exercises involve actively using the muscles in your feet and lower legs to mobilize your ankle joints. Regardless of the particular benefits of each exercise, these have the added advantage of drawing more blood into your feet, ankles, and lower legs. Blood always brings nutrition, oxygen, and qi in, and helps remove local toxic accumulations should any be present. It also helps lubricate the joints and muscles. That can help to relax those joints and muscles which may be stiff and achy from relative inactivity, effectively “dried out” from reduced blood flow. Conversely, in other people inactivity will make the blood and other body fluids pool, creating a swelling. The activity of these exercises will help pump out the pooled fluids, and over time will strengthen the muscles so whatever your foot and ankle concerns may be, they will improve and have a reduced likelihood of returning. While the passive exercises may bring some awareness into the body part being worked, the active exercises will deepen your relationship with that part of your body and give you more control over its functions. As a final benefit, many people find these helpful in promoting sleep when practiced just before bed. That’s because many types of poor sleep, restlessness, or insomnia are due to too much activity in the mind. Whenever there is activity, there is qi, and too much of that in the brain creates too much thought and mental agitation. The active aspect of these exercises brings the blood down to the feet, and it is the qi that moves and directs the blood, so qi is brought down out of the head. In cases where that is the cause of sleep disturbances, these exercises will remedy the problem.
In each of these ankle exercises, a technique used is a simple daoyin, “guiding and inducing.” They induce the blood to move, and guide it downward toward the feet. Since qi is “the commander of the Blood,” qi is also induced and guided downward, as described in the preceding paragraph.
These exercises are best practiced sitting on the floor, legs extended in front of you, and I will describe them that way. If your legs or back are too inflexible or painful to allow this, you can easily modify these by performing them while sitting in a chair, legs extended as far as is comfortable. Follow all the other instructions as closely as possible.
1. Ankle Flexion and Extension
Purpose
Physical: Provides linear flexibility in the ankles, improving flexion and extension in the ankles and toes; strengthens and opens the ankle joint and toes; stretches and releases the plantar fascia, the tough membrane covering the sole of the foot.
Energetic: Stimulates the foot Ying Spring points, found where the toes connect to the foot, and the foot Shu Stream points, found at various places along the circumference of the foot and ankle. Ying Spring points are useful in clearing heat. One of the Western correlations to clearing heat means reducing inflammation, so your toes, as well as other parts of your body along the selected meridian pathways, will benefit from that energetic effect. As discussed earlier, Stream points are most commonly used to treat Bi (pronounced “be”) syndromes, more colloquially called Painful Obstruction syndromes, which are often the same as or associated with various types of arthritis pain. This is especially true if Damp is part of the pathogenic picture, which is almost always the case with Bi syndromes. If Damp is present as swelling or edema, the active motion of the ankle in this exercise is very useful in reducing that swelling, from both physical and energetic standpoints.
Techniques Used
Active stretching, flexion, and extension.
Method
Sitting on the floor with legs extended in front of you, feet six to twelve inches apart, slightly bend your knees, and then “anchor” your heels to that spot on the floor. That is, don’t let your heels slide on the floor at all as you move the rest of your foot as directed in each of these exercises. If you keep your heels contacting the floor in one spot only, you’ll ensure the fullest possible range of motion when you begin to move your feet. This becomes very easy with a little practice.
Begin with both ankles flexed (dorsiflexed) and toes fully extended, pointing toward your head (Fig 1.14A). Keeping your toes extended, push the soles of your feet downward (forward), pivoting on your heels, which remain anchored in place (Fig 1.14B). Near the end of your downward push, flex your toes tightly as though you are grabbing something with them (Fig 1.14C). With your ankles fully extended (plantar flexed) and toes flexed, the sole of your foot should feel “scrunched,” slightly compressed as though it too is attempting to grab something. Keep your toes tightly flexed and pull your foot back by flexing your ankle, still keeping your heel anchored to one spot (Fig 1.14D). The sole of your foot may feel even more compressed as you do this. As you reach the end of the ankle flexion, open your toes and extend them, once again pointing them toward your head. This brings you to your starting position (Fig 1.14A). Repeat this ankle flexion and extension 25 times, more if your ankles and feet are healthy.
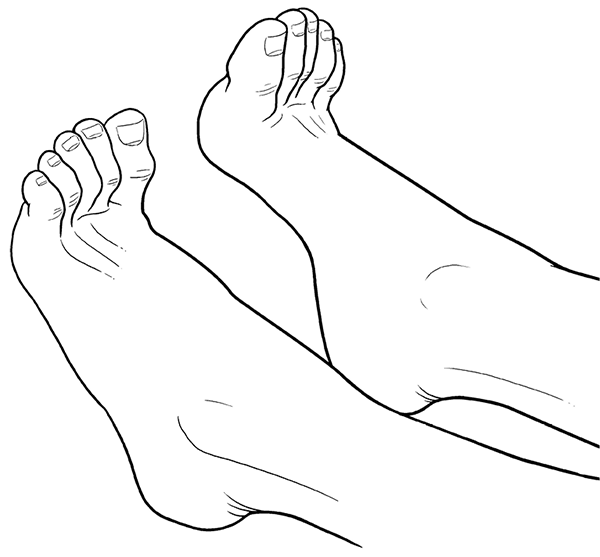
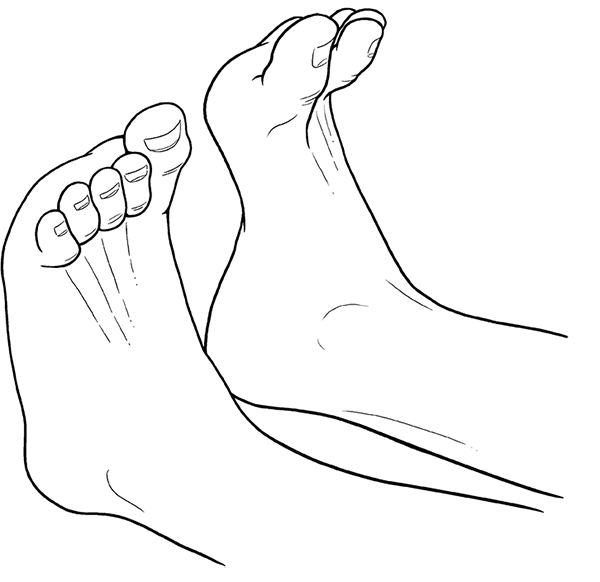
Figures 1.14A and 1.14B (Ankle Flexion and Extension)
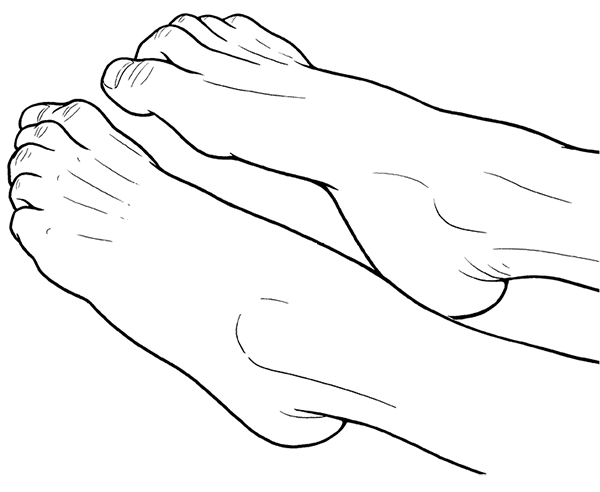

Figures 1.14C and 1.14D (Ankle Flexion and Extension)
Variation
Instead of moving your feet forward/backward and downward/upward together, you can alternate them in a sort of bicycling motion, so that one foot moves downward and grabs with the toes while the other is moving upward and extending the toes (Fig 1.15 on previous page). Note, this image shows the toes immediately before they reach their final position as described, at which time the feet bicycle in the opposite directions. The basic physical and energetic benefits are the same, but this variation requires more coordination, benefits the nervous system, and helps to improve mental presence and focus. The alternating up and down foot movement is a simple version of what is called “cross crawl” technique, used in learning disabilities, dyslexia, poor coordination and body awareness, and in compromised cognitive processes primarily involving left and right brain hemisphere communication.
2. Ankle Pronation and Supination (Inward and Outward Foot Roll)
Purpose
Physical: Strengthens and opens the ankle on another plane of motion. While pronation and supination may be considered problematic and even pathological if occurring randomly or uncontrollably when walking or running, the ability to pronate and supinate freely while having the stability to keep your foot properly aligned will promote a supple support to your entire upper body whenever you are on your feet, during any activity.
Energetic: Stimulates the foot Jing River points, found at various places along and above the circumference of the ankle. Because this exercise involves pivoting around the centerline of the sole of your foot, it has the ability to stimulate qi flow through your Central Channel, a core constitutional pathway running through the center of your entire body. While of some benefit, that effect will not be particularly strong from this exercise alone. If you are following the exercises in order and have already done the Centerline of Sole Massage and Centerline Fold and Spread, you will have awakened your Central Channel, allowing more qi to flow there with the addition of the mental focus used in this practice.
Techniques Used
Active stretching, pronation, and supination.
Method
Sitting on the floor with legs extended in front of you as before, feet 6 to 12 inches apart, slightly bend your knees, and then anchor your heels to that spot on the floor, as in the previous exercise. Keep your feet as close to perpendicular to the floor as possible. With your mind only, feel the centerline of the sole of your foot. If it helps, you can imagine a pole running through the center of your foot, from your middle toe straight through to where your heel contacts the floor. Simultaneously rotate both feet around that centerline, moving your soles to face each other (Fig 1.16A). You will not be able to get your soles to actually fully face each other if you keep your legs straight and your feet perpendicular to the floor. That’s normal. You only need to move your feet in that direction. In the language of Western anatomy, this is called supination. While you are moving in that direction, flex your toes, which will slightly increase the arch in your foot, creating a feeling of compression there.
Then simultaneously move your feet in the opposite direction, so that the soles of your feet face away from each other. This is pronation. While moving your feet in that direction, extend your toes, which will slightly flatten the arch in your foot, and create a feeling of stretch there (Fig 1.16B).
As in the other exercises in this set, while primarily targeting your ankles, actively using your toes will help to engage the entire foot. You may find your feet getting tired after just a few repetitions. Ten or fifteen turns of your foot in each direction is a good place to start, but you should try to get comfortable with twenty-five to thirty. It’s fine to do more than that if your feet and ankles don’t get fatigued, but there’s no need to do more than fifty, as the amount of additional benefit you’ll get beyond that is minimal.
Purpose
Physical: Provides rotational flexibility in the ankles; strengthens and opens the ankle joint.
Energetic: Moderately stimulates most of the Shu Stream points of the foot, mostly found at various places along the general circumference of the foot up from the web of the toes toward the ankle. Stream points are most commonly used to treat Bi (Painful Obstruction) Syndromes, which are often the same as or associated with various types of arthritis pain. This is especially true if Damp is part of the pathogenic picture. That Damp may or may not visibly manifest as swelling or edema. The Kidney Shu Stream point, Kidney 3, is located just behind the inner ankle, and is strongly stimulated in this series of ankle exercises. Because of its association with bones and hence joints, that’s a particularly important point used to treat most Bi Syndromes. All these ankle exercises provide strong stimulation to the foot Jing River points which are located at various points around and above the ankle. As a class of points, Jing River points are typically used to treat all types of respiratory problems. Among the Foot Jing River points, those on the stomach and spleen meridians are most beneficial for those types of conditions, although all tend to clear Wind and Heat, external pathogens which commonly invade the lungs.
Technique Used
Active stretching.
Method
Sitting on the floor with legs extended in front of you, feet six to twelve inches apart, slightly bend your knees, and then “anchor” your heels to that spot on the floor, as in the previous exercise. In other words, don’t let your heels slide on the floor at all as you move the rest of your foot as directed in each of these exercises. If you keep your heels contacting the floor in one spot only, you’ll ensure the fullest possible range of motion when you begin to move your feet. This can be a little challenging at first, but becomes very easy with a little practice.
Point the toes of both feet directly downward, away from your head, primarily by extending your ankles (also called plantar flexion) (Fig 1.17A on next page). Your toes may flex some in this position too, but not too tightly. While primarily targeting your ankles, actively using your toes in these exercises, to point to each of the clock directions, will help to engage the entire foot. The line from the tips of your toes, across the top of your foot, through to your lower leg should be as straight as possible in this starting position, at the 12 o’clock position. Then rotate both feet clockwise from your ankles, remembering to keep your heels anchored in one spot on the floor. As your feet move to 3 o’clock, begin to pull your toes back from their flexed state (Fig 1.17B). As your feet move to 6 o’clock, your ankles are fully flexed (also called dorsiflexion) and your toes are fully extended upward, toward your head (Fig 1.17C). Continuing to circle to 9 o’clock, begin to flex your toes (Fig 1.17D). As you complete one ankle rotation, you return to your starting position, ankle fully extended and toes pointing downward.
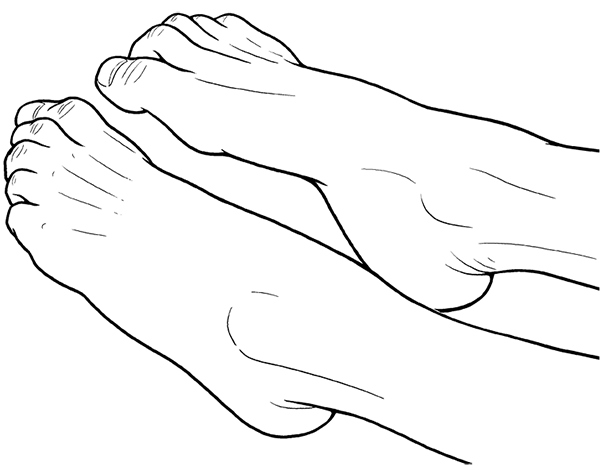

Figures 1.17A and 1.17B (Ankle Rotations)

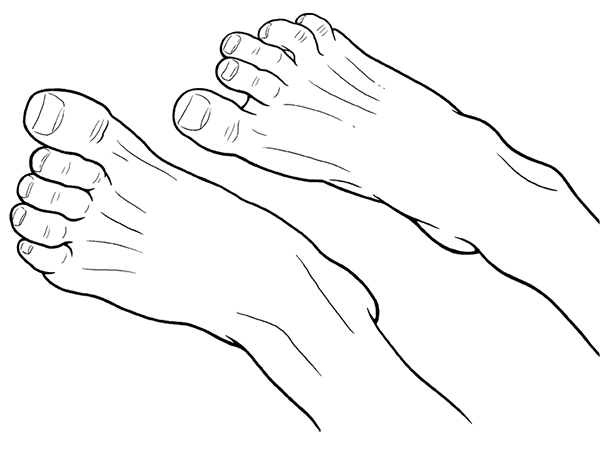
Figures 1.17C and 1.17D (Ankle Rotations)
If your ankles are healthy, do twenty-five or more ankle rotations clockwise, and then an equal number counterclockwise. If your ankles are stiff, injured, or weak, this can be a surprisingly demanding exercise, and you may find you will need to start with fewer rotations, perhaps only five to ten in each direction. As your ankles open with practice, build up the number of rotations at a comfortable pace, until you can do twenty-five in each direction with no sense of strain.
This is a relatively strong toe stretch, and should only be attempted after your feet are open and soft from the previous exercises, to reduce any potential discomfort. Once this is learned, it may be combined with the Seated Forearm Stretch described in chapter 5, on shoulder and arm exercises.
Purpose
Physical: Strongly stretches the muscles and ligaments of the toes; stretches the plantar fascia (at the sole of the foot).
Energetic: Opens the Bubbling Well point, Kidney 1, and so benefits the Kidneys, strengthening bones, sexual/reproductive/urogenital functioning, and general vitality. The release of tension in the ligaments and fascia benefits the Liver, increasing calmness and physical and emotional balance. Improves grounding, being present. Helps to reverse some aging processes.
Techniques used
Stretching, Daoist yoga, focused breathing. If you are already experienced in daoyin, you can additionally benefit by using your mind to direct qi through your Kidney meridian.
Method
Kneeling with your knees close together, on a mat or other soft surface to protect your knees, position your feet so they are more or less perpendicular to the ground, toes pointed forward with the pads of the toes in contact with the ground. You may find your little toe curling, wanting to point rearward. If that’s the case, use your hands to position your little toe (or any other that may need it) properly. Next, sit on your heels, putting more of a stretch on your toes (Fig 1.18). Keep your body as close to perpendicular as possible, hands placed palm down on your knees or thighs. The more you sit back on your heels, the greater the stretch becomes (Fig 1.19). Once you’ve reached the current limit of your stretch, where it just begins to be uncomfortable, use focused breathing to relax in that posture, releasing the discomfort along with any tension on each exhale.
Do not overdo this stretch, especially if you are new to it, or if it is particularly difficult for you. Ten or fifteen seconds may be a good place to start. Even when this stretch becomes completely comfortable, there is no need to do it for more than two minutes.

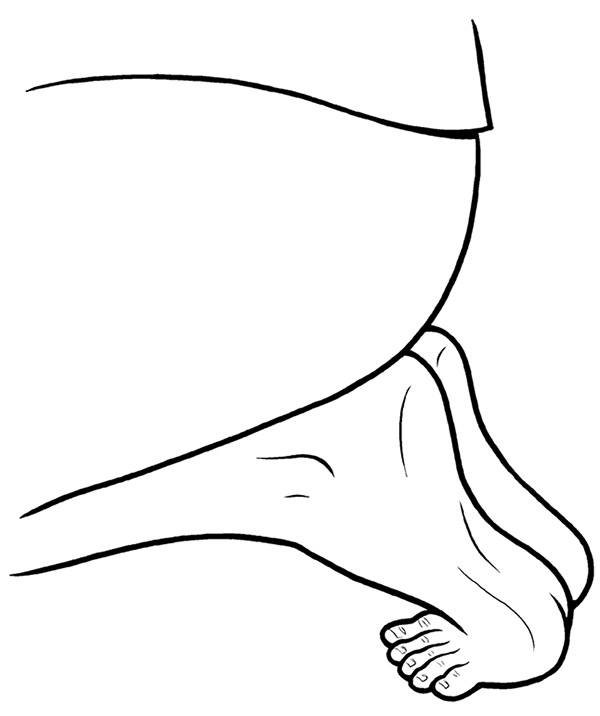
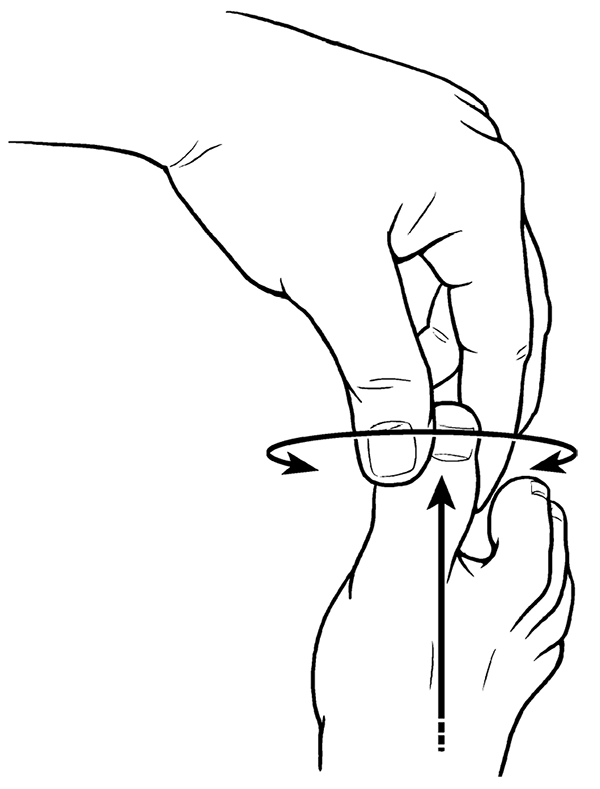
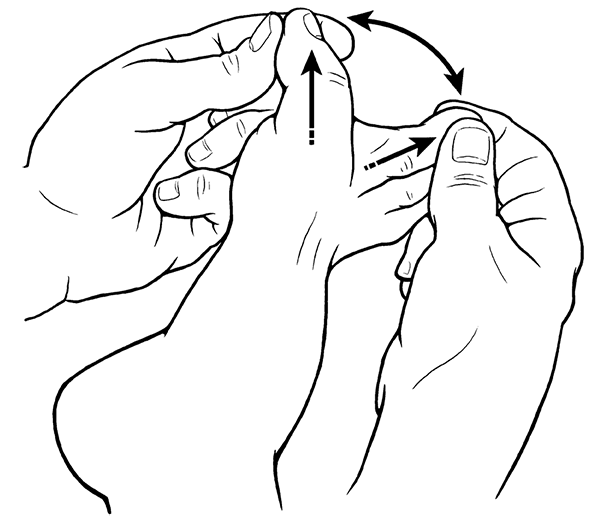 Figure 1.2 (Toe Stretch, Forward and Backward)
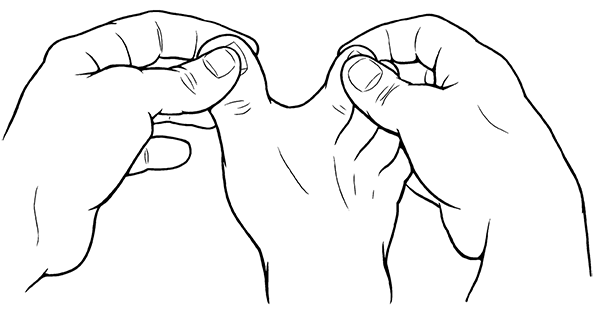 Figure 1.3 (Toe Stretch, Side to Side)
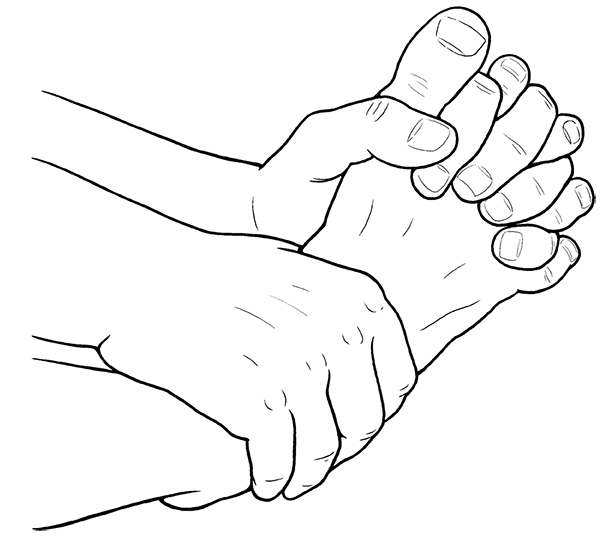 Figure 1.4 (Rotational Toe Stretch)
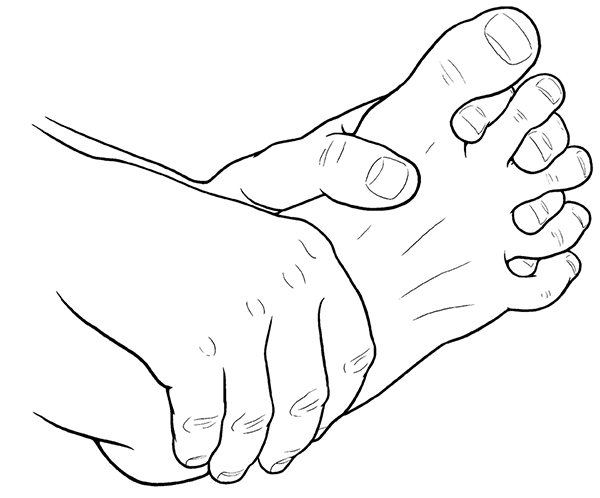 Figure 1.5 (Rotational Toe Stretch)
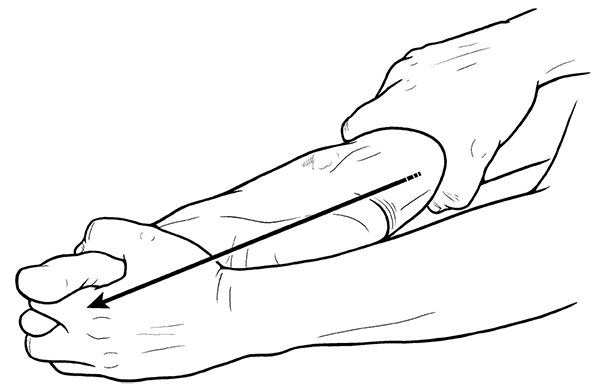 Figure 1.6A (Rotational Foot and Ankle Stretch)
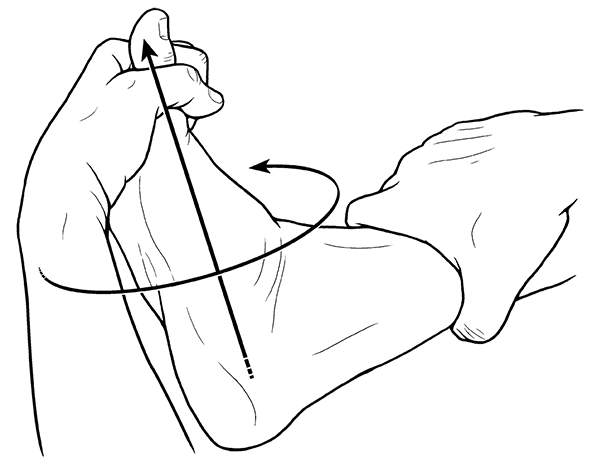 Figure 1.6B (Rotational Foot and Ankle Stretch)
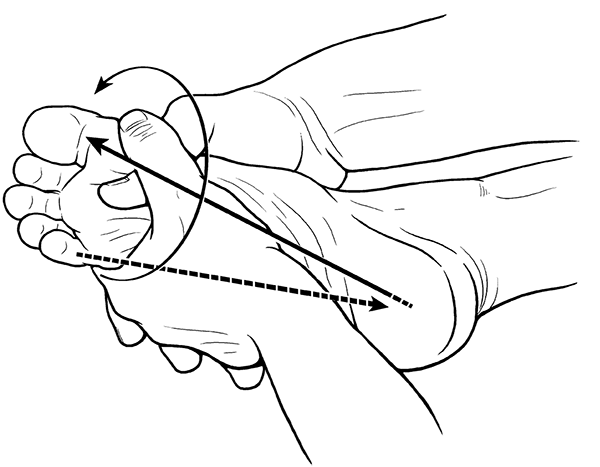 Figure 1.7 (Foot Wringing, Upward)
 Figure 1.8 (Foot Wringing, Downward)
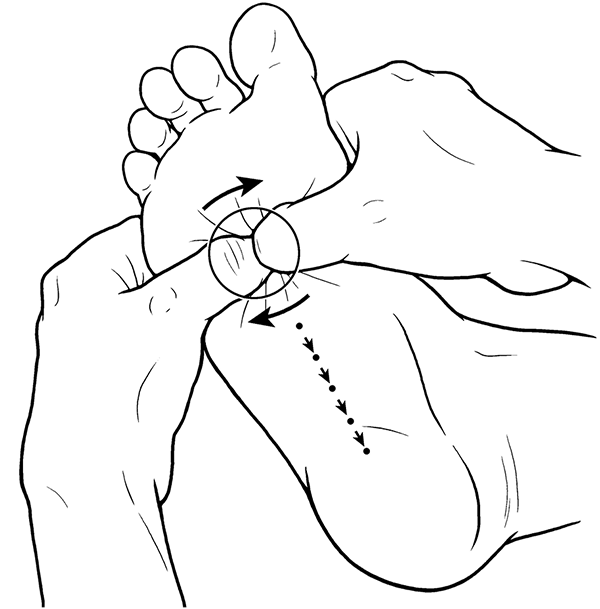 Figure 1.9 (Centerline of Sole Massage)
 Figure 1.10 (Centerline Fold and Spread)
 Figure 1.11 (Centerline Fold and Spread)
 Figure 1.12 (Palm Rub, Laogong to Yongquan—Bubbling Well)
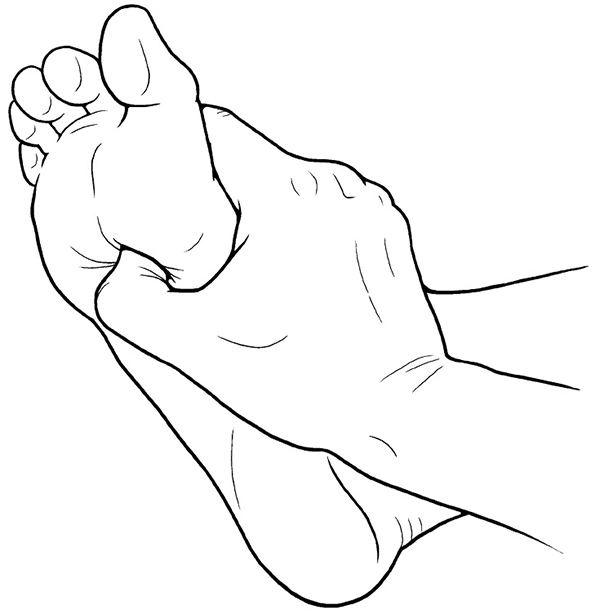 Figure 1.13A and 1.13B (Pumping the Bubbling Well Point)
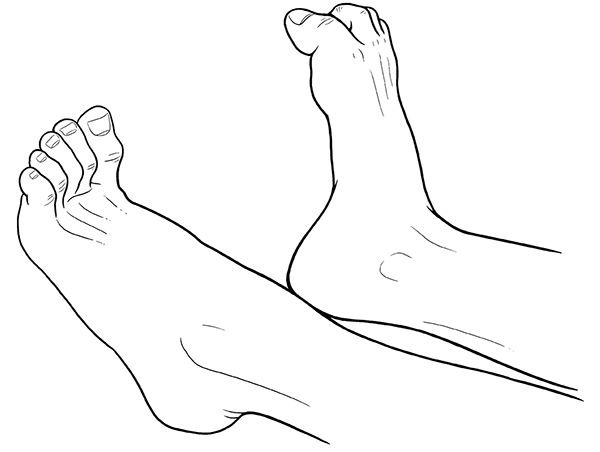 Figure 1.15 (Ankle Flexion and Extension)
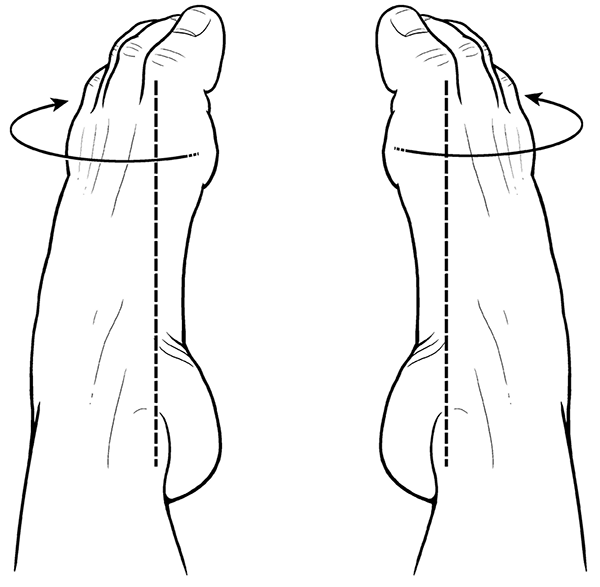 Figure 1.16A (Ankle Pronation and Supination—Inward and Outward Foot Roll)
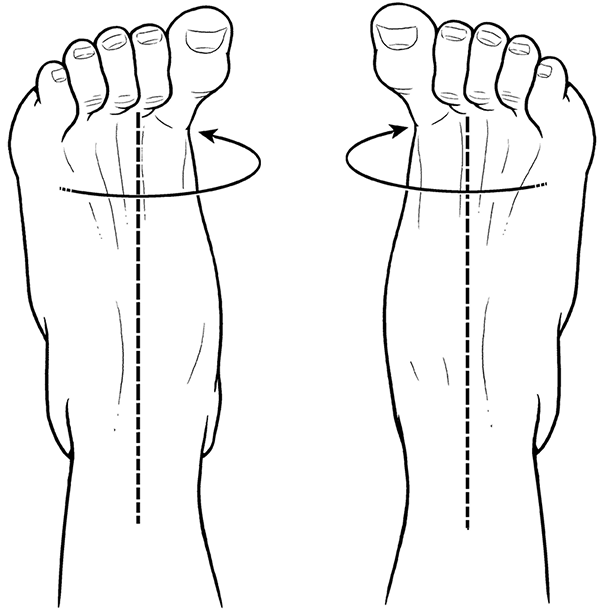 Figure 1.16B (Ankle Pronation and Supination—Inward and Outward Foot Roll)