These exercises can be practiced on their own, or immediately following the foot exercises. They can readily begin where the foot exercises left off, and are practiced while seated on the floor.
The first two exercises in this series make use of paidagong, tapping and patting practices. In Chinese medical theory, one of the main causes of discomfort and pain, and one of the main factors considered to be at the root of many diseases when left untreated, is stagnation. In its milder phase, it is qi stagnation—energy that should be flowing freely but is unable to do so, stuck in a location or many locations within the body. This could be due to physical or emotional trauma, inactivity, exposure to environmental conditions when prolonged or in a person sensitive to an environmental factor, inappropriate diet, or it could be a side effect of various drugs (prescription or otherwise), among many other possibilities. Over time, qi stagnation may worsen, weaken surrounding body tissues, and cause a stagnation of blood or other body fluids that should normally be in motion. These are more significant pathological changes engendering various diseases.
Paidagong can assist in reversing such stagnation. The gentle impact caused by tapping and patting induces a penetrating wave of energy through the body. When that wave encounters a pocket of stagnation, it can gradually break it up when applied over time, like a constant drip of water can wear down a boulder. As the stagnation breaks apart, any associated health problem will resolve.
These exercises are a good starting point for all that will come next. Even without a known health problem to remedy, the waves generated by tapping and patting gently relax and open the body, remove restrictions and make it easier to do the more challenging exercises.
1. Tapping and Patting the Outter Legs (Yang surfaces)
Purpose
Physical: Relaxes and softens body tissues, promotes blood circulation in the legs, prepares the legs for later exercises.
Energetic: Breaks up local qi stagnation, promotes qi flow through the Gall Bladder, Stomach, and Spleen meridians of the leg. The Spleen is one organ which engenders blood and thus assists in the physical purpose of this exercise. The Spleen and Stomach dominate the muscles, and the Gall Bladder (along with the Liver) dominates the tendons and ligaments, so this will energetically condition those body tissues.
Technique Used
Paidagong.
Method
Sit on the floor, legs extended in front of you. Curl the fingers of both hands into soft fists, not tightly clenched, with a little sense of space at the center of each palm. With any part of your fist that is easiest for you (back, sides, or front), use both to tap down one leg, starting at the thigh and slowly working your way down to your lower shin (Fig 2.1 ). Tap and pat down and up your leg a number of times. Vary the rate, rhythm, and force of the impacts, so your body won’t be able to adapt to a repetitive pattern. While this is not crucial, it will enhance the benefit you get. Do not pat or tap strongly enough to hurt yourself. If you find any area of tenderness, stay on that area just a little longer than the others, since it indicates an area of stagnation that needs dispersing.
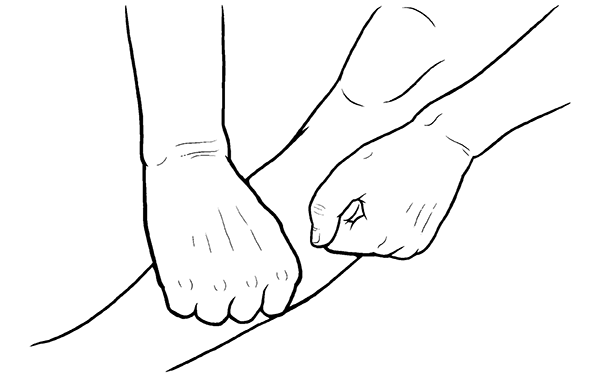 Figure 2.1 (Tapping and Patting the Outter Legs—Yang surfaces)
Focus primarily on the top and outside of your leg here. We’ll address the inner leg in the next exercise. While it’s okay to tap on bony surfaces, it’s more difficult to create that wave through bone, and you run a small risk of hurting yourself, so stick to the soft tissue for now. Do this for a few minutes on one leg, and then repeat on the other leg.
Variation
If you’re unable to sit on the floor with your legs extended, or are unable to reach down to your lower leg, do this exercise seated in a chair, possibly with your foot resting on a footstool if necessary to reach your lower leg.
2. Tapping and Patting the Inner Legs (Yin surfaces)
Purpose
Physical: Relaxes and softens body tissues, promotes blood circulation in the legs, prepares the legs for later exercises.
Energetic: Breaks up local qi stagnation, promotes qi flow through the Spleen, Liver, and Kidney meridians of the leg. While equally important for men and women, these leg meridians treat a variety of women’s issues, including various menstrual disorders and menopausal discomforts. Commonly, women will feel some tenderness at various places along these pathways. That’s no cause for alarm, but does indicate a need for attention in those areas. In both sexes, they tone the urogenital system and can improve both sexual and general vitality. In men, the prostate is benefited.
Techniques Used
Paidagong, stretching.
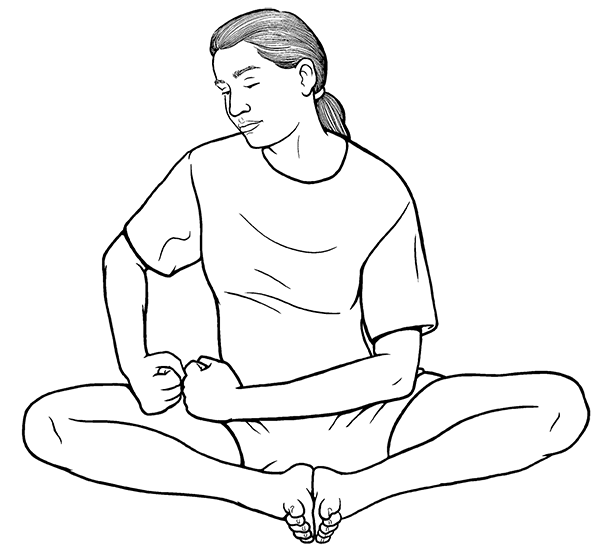 Figure 2.2 (Tapping and Patting the Inner Legs—Yin surfaces)
Method
Sit on the floor, with your legs positioned in one of three ways.
1. Place the soles of your feet together, and draw your heels to or to-ward your perineum. Your knees should be on or near the floor, with little or no discomfort to them or to your inner thighs. (Fig 2.2) This is the most advantageous position, since it stretches and opens the tendons, ligaments, and muscles in your legs, helps open your perineum, and gives you the best, easiest access to your inner legs. However, your legs should be comfortably relaxed. If they are not, choose one of the other seated modifications.
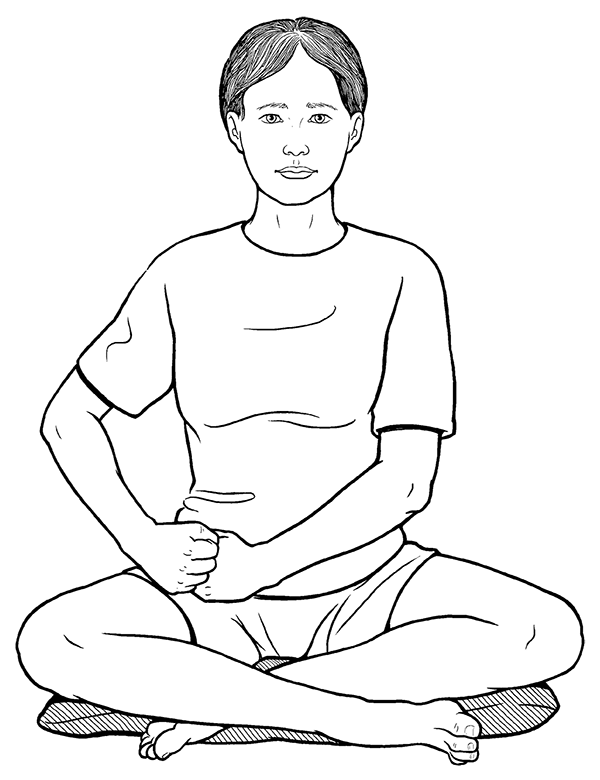 Figure 2.3 (Tapping and Patting the Inner Legs—Yin surfaces)
2. Sit on a zafu or other firm cushion, and either place the soles of your feet together and drawn them toward your perineum as above, or cross your legs at or just slightly above your ankles (Fig 2.3).
3. Sit on any comfortable cushion on the floor. If necessary, you can even sit on your bed. Use enough cushions or pillows under each knee to prop them up at a comfortable height, so your legs do not feel overstretched. Place your soles together at whatever distance is comfortable for you, or cross your legs at or slightly above your ankles (Fig 2.4 ).
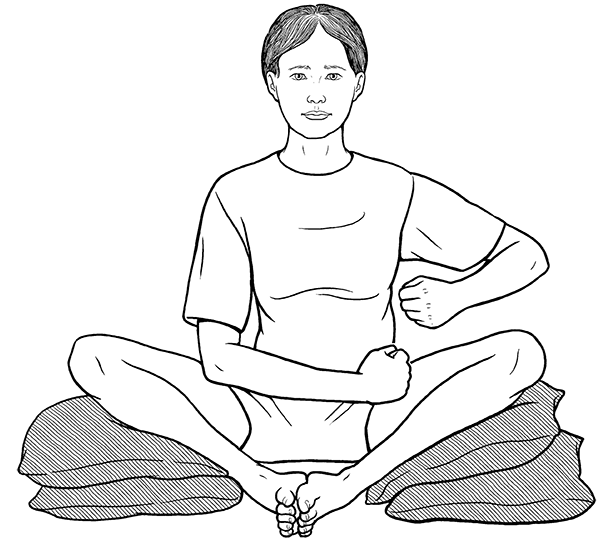 Figure 2.4 (Tapping and Patting the Inner Legs—Yin surfaces)
Curl the fingers of both hands into soft fists as before. With any part of your fist that is easiest for you (back, sides, or front), use both fists to tap down the inner surface of one leg, starting at the thigh and slowly working your way down to your lower calf, just above your heel and behind your ankle (Fig 2.2–Fig 2.4 on previous pages). It’s also okay to start from this region and pat your way up to the top of your inner thigh, and you will want to tap and pat up and down your leg a number of times. Vary the rate, rhythm, and force of the impacts so that your body won’t be able to adapt to a repetitive pattern. Do not pat or tap strongly enough to hurt yourself. If you find any area of tenderness, you should stay on that area just a little longer than the others, since it indicates an area of stagnation that needs dispersing.
Do this for a few minutes on one leg, and repeat on the other leg.
Purpose
Physical: Stretches all the muscles at the back of the leg. While mainly targeting the hamstrings, it also stretches the calf muscles (which includes the Achilles tendon, just above the back of the heel) and the low back. If more of your tension resides in those places, you may feel the stretch more strongly there.
Energetic: Stimulates qi flow through the Urinary Bladder meridian, which runs up the back of the legs, and helps resolve qi stagnation in that portion of that meridian. This benefits the functions of the bladder, and can help to improve most urinary tract problems. With the inclusion of the Urinary Bladder here added to the paidagong exercises above, all regular acupuncture leg meridians are addressed.
Techniques used
Stretching, Daoist yoga, focused breathing.
Method
Sit on the floor with your left leg extended, the back of the knee very close to the ground without locking your knee, and the sole of your left foot placed as high up against your inner right thigh as is comfortable. If necessary, place a cushion under your right knee. Align your torso to face in the direction of your right leg, so that it is not twisted to the right or left. Keep your back straight, not bent or bowed, although it will incline forward when you follow the next instructions. With both hands, grab your right foot, and keep it held perpendicular to the ground, not tilted forward, left or right. Take a comfortable deep breath in, and while slowly letting it out, gently pull on your foot and incline your upper body toward your right leg (Fig 2.5 ). Do your best to keep your upper body directly aligned with your leg, not turned to the right (the most common mistake) or to the left, nor bent (curved or arched) forward. Repeat the breath and gently increase the stretch on the exhale. When you reach the place beyond which you can stretch no further, hold that stretch for five to ten slow, deep breaths, allowing yourself to relax into that stretch more fully with each exhalation. Then release your foot, place both hands at the sides of your left knee or slightly higher, and use them to push yourself back to an upright seated position, so you don’t strain your back. Repeat the stretch on your right leg.
For extra benefit: Put some attention on the back of your knee during this stretch, and see if you can specifically allow it to soften, release, and lengthen. The hamstrings cross the back of the knee and attach to the lower leg, so releasing the back of the knee will increase your hamstring stretch. For anyone already doing the neigong practice of pulsing body cavities and joint spaces, or for anyone already practicing the inner aspects of taiji and qigong and aware of the importance of keeping the backs of the knees open, this stretch and the next two that follow will aid in releasing any restrictions in the physical tissues, so those neigong aspects will become easier to attain. Additionally, opening the region around the entire knee benefits the He Sea points. He Sea points normalize the directionality of qi flow, especially as related to the Stomach and Intestines, and promote general vitality.
Variations
Variation One: If you’re unable to reach your foot, you may use a belt or towel to wrap around the sole of your foot. Hold the belt or towel with both hands, as close to your foot as possible for you (Fig 2.6 ), and continue as directed above.
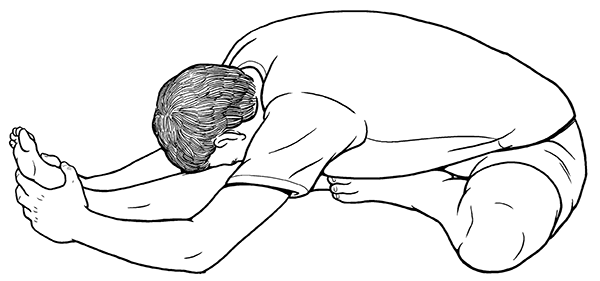 Figure 2.5 (One-Leg Hamstring Stretch)
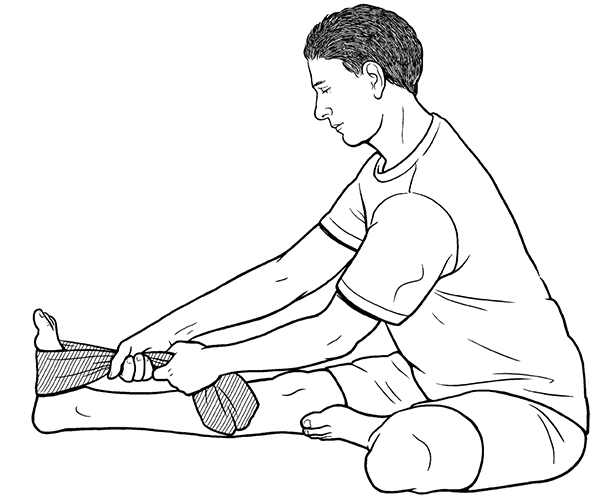 Figure 2.6 (One-Leg Hamstring Stretch)
Your ultimate goal is to be able to lay your chest fully onto your leg, but this must be accomplished by relaxation and release, and never with any feeling of strain. It may take many weeks, months, or longer for you to be able to do that, and if you have been very tight for a very long time, that deep a stretch may not ever be possible for you. The important thing is to improve over time, and enjoy the benefits that occur along the way. When you reach your natural limit, whether laying your chest on your leg or not, stay in that stretch for approximately two minutes, but no longer than that, as then you can begin to overstretch your ligaments. The easiest and most beneficial way to time a two-minute stretch is to time the length of your comfortable inhale and exhale, and then simply count your breaths to the appropriate number. For example, if you can comfortably inhale and exhale in a fifteen-second cycle, four breaths per minute, then you’d hold your stretch for eight breaths. This method allows you to use your breath to deepen your relaxation the longer you hold the stretch.
Variation Two: In some forms of Daoist Yoga, any increase in a stretch only occurs through release of tight or held muscles, not through actively using even the slightest force, such as carefully pulling on your foot as is otherwise done in this exercise. That release is accomplished by combining at least three factors. The first is your breath, which is directed to a tight muscle or region on an inhale, and the tension is released to whatever degree is possible on the exhale, leaving your body along with the breath. Numerous directed breaths can be done to facilitate this process. The second factor is the force of gravity. As you engage in any stretch, gravity will usually play a role in increasing the stretch. In this exercise, gravity will push on your torso as it lowers toward your leg. Feel its influence and allow it to open your body into a deeper stretch. The third factor is your mind. Some part of your mind must contact the tense, tight, or held muscle, and be used to soften and release that held tension. There is no physical effort involved in this aspect, and this is different than using your breath and gravity, though it may seem similar. Personal guidance by a teacher may be necessary for you to fully incorporate this release, but you won’t harm yourself in any way by trying it if it appeals to you. In this variation, you may place your hands on the floor, on your lower leg, or grasp your foot, but you do not pull on your foot or leg at all. You can use this approach in the following exercise, and in any other stretch, often involving a forward bend, where gravity and breath may be used together along with mind.
This exercise should only be attempted once the One-Leg Hamstring Stretch can be done comfortably, regardless of how far you can lower your torso to your leg.
Purpose
Physical: Stretches all the muscles at the back of the leg. While mainly targeting the hamstrings, it also stretches the calf muscles. Here the lower back is opened considerably more than it is in the one-leg stretch, and in a necessarily more balanced way. If your low back is particularly tight, as it is for many people, be prepared to feel more restriction there, which must be opened too in order to get the deepest hamstring stretch possible.
Energetic: Stimulates qi flow through the Urinary Bladder meridian, which runs up the back of the legs, and helps resolve qi stagnation in that portion of that meridian. This benefits the functions of the bladder, and can help to improve most urinary tract problems. Because the low back is opened more, the Kidneys are both massaged and relaxed. The Kidneys and Urinary Bladder are a Yin-Yang organ pair; addressing them simultaneously in this exercise will mutually increase the benefit to both.
Techniques used
Stretching, Daoist Yoga, focused breathing.
Method
Sit on the floor with both legs extended in front of you, lightly touching, or spread up to a foot apart if necessary. Keep your back straight, not bent or bowed, although it will incline forward when you follow the next instructions. With both hands, grab your feet, and keep them held perpendicular to the ground, not tilted forward or splayed out to the sides. Take a comfortable deep breath in, and while slowly letting it out, gently pull on your feet and incline your upper body toward your legs. Do your best to keep your upper body directly aligned with your legs and not bent (curved or arched) forward. Repeat the breath and increase the stretch on the exhale, further lowering your chest toward your legs (Fig 2.7). When you reach the place beyond which you can stretch no further, hold that stretch for five to ten slow, deep breaths, allowing yourself to relax into the stretch more with each exhalation. Then release your feet, place both hands at the sides of your knees or slightly higher, and use them to push yourself back to an upright seated position, so you won’t strain your back. Repeat the stretch once or twice more.
Variation
Some very flexible people may have large bellies that interfere with being able to lay their chest on their legs. In that case, it’s fine to spread your legs wider to allow more space for your belly (Fig 2.8).
As in the One-Leg Hamstring Stretch, your ultimate goal is to be able to lay your chest fully onto your legs, but this must be accomplished by relaxation and release, never with any feeling of strain. It may take many weeks, months, or longer for you to be able to do that. When you reach your natural limit, whether you’re able to lay your chest on your legs or not, stay in that stretch for approximately two minutes, but no longer than that, as then you can begin to overstretch your ligaments. When you’re able to stretch, for two minutes, do only one of these stretches in any practice session.
 Figure 2.7 (Two-Leg Hamstring Stretch)
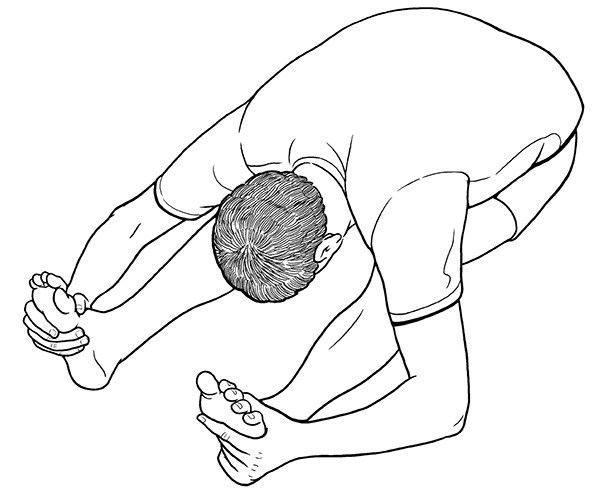 Figure 2.8 (Two-Leg Hamstring Stretch)
Purpose
Physical: Stretches the leg adductors (the inner leg). There is also a stretch at the back of the legs (hamstrings and calves) and the low back, but since you’ve already opened those regions in the previous exercises, you may not notice much of a stretch there. This will also stretch the muscles at the inner knee, and spread the perineum.
Energetic: Engages and activates the Leg Yin meridians, continuing and deepening the benefits of the second paidagong exercise in this section. Those include the Liver, Spleen, and Kidney meridians. The more qi stagnation and obstruction you were able to release in that practice, the easier it will be to get deeper in this stretch, and the sooner you will be able to release any associated muscle tension.
Techniques used
Stretching, Daoist Yoga, focused breathing.
Method
Sit on the floor with both legs extended, spread as far apart as is comfortable, with the back of the knees very close to the ground without locking them, and feet perpendicular to the ground. Keep your back straight, not bent or bowed, although it will incline forward when you begin the stretch. If you are completely new to this type of stretch, begin by placing the palms of your hands on the floor in front of you, spread slightly wider than shoulder width apart. This is to give support both to your low back and your inner legs, both of which may feel strongly stretched in this exercise. Take a comfortable deep breath in, and while slowly exhaling, lower your torso straight forward, evenly between your legs, using your hands to help support the weight of your upper body. Do your best to keep your back straight and not bent (curved or arched) forward. Repeat the breath and increase the stretch on the exhale (Fig 2.9). When you reach the place beyond which you can stretch no further, hold that stretch for five to ten slow, deep breaths, allowing yourself to relax into the stretch more fully with each exhalation. Then use your hands to push yourself back to an upright seated position, so that you don’t strain your back. Repeat the stretch once or twice more.
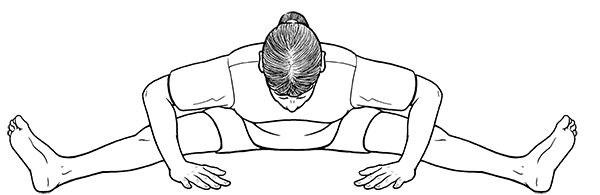 Figure 2.9 (Seated Split)
 Figure 2.10 (Seated Split)
When this becomes easy for you and you are able to be close to having your head touch the ground on the forward bend, or if your find this easy from the start, you can do the more full version of this exercise. Begin seated on the floor as above, with both legs extended, spread as far apart as is comfortable, with the back of the knees very close to the ground without locking them, and feet perpendicular to the ground. Keep your back straight. Place your hands on your legs, below your knees, and as you incline forward as above, slide them down to your feet. Grab your feet and keep them held perpendicular to the ground, not tilted forward or splayed out to the sides. Take a comfortable deep breath in, and while slowly exhaling, lower your torso farther forward, evenly between your legs. Continuing to hold your feet perpendicular to the ground, gently pull on them as you incline your upper body forward. Repeat the breath and increase the stretch on the exhale (Fig 2.10). When you reach the place beyond which you can stretch no further, hold that stretch for five to ten slow, deep breaths, allowing yourself to relax into that stretch more fully with each exhalation. Then release your feet, place the palms of your hands on the floor in front of you spread slightly wider than shoulder width apart, and use them to push yourself back to an upright seated position, so you won’t strain your back. Repeat the stretch once or twice more.
Variation
Some people find either seated version of this stretch too difficult. Rather than pass on this exercise entirely, this variation will be particularly helpful in beginning the stretch, and will in time enable you to do the seated version. Here, lie on your back with your butt against a wall, your legs extended upward, the backs of your knees as close to the wall as you can comfortably get them without locking them. Your arms should be palms down on the floor, either extended straight out to your sides or angled toward the wall, whichever feels best to you. In this position, spread your legs as wide as is possible, still keeping them against the wall for support (Fig 2.11 ). That may only be a few inches apart to start with. Breathe, and on each exhalation, be conscious of letting your legs relax more. If they relax enough to spread a little wider, that’s great. In this position, gravity is only working on the weight of your legs, which is much less than the weight of your torso, so it won’t make you want to stretch more than you’re able. When you reach the point at which your legs won’t spread any farther, take five to ten slow, deep breaths, allowing yourself to get more relaxed with whatever amount of stretch you have. Then bring your legs back together, roll to one side or the other, and sit or get up. Whenever you’re ready, after a few weeks or month of this variation, you may feel ready to begin the seated version of this exercise to increase the benefits it provides.
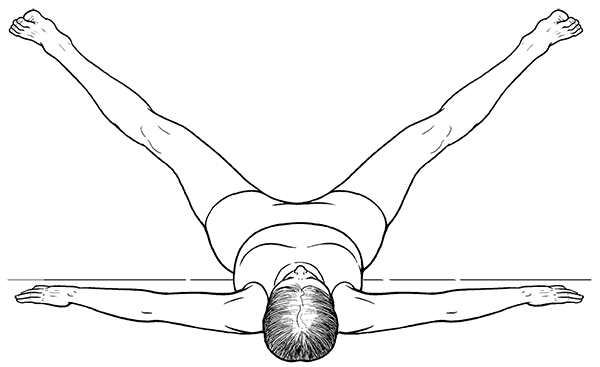 Figure 2.11 (Seated Split)
Note: While there is no absolute order in which these exercises must be practiced, the order given throughout this book is suggested because it helps to progressively open related body regions. At this point, you may want to practice the 8. Seated Torso Twist, the eighth exercise given in chapter 6. It can readily prepare the Hip Rotator Stretch, and it is convenient because you are in a seated position on the floor.
The hip rotators cross below and deep into the gluteal muscles (hip extensors), attaching on one end to the femur, in the upper thigh. They function both on the legs and the hips, and are included here as this exercise conveniently follows the ones preceding it. It could just as appropriately have been placed in the chapter on hip exercises.
Purpose
Physical: Opens up the hip rotator muscles, helps stabilize the pelvis and hips, reduces low back and hip pain. The hip rotators attach to the upper thigh bone (the greater trochanter of the femur) on one end, and to the inner and lower border of the upper edge of the back of the hip bone, the ilium of the upper pelvis and ischium and ischial tuberosity of the lower pelvis on the other. Most of the muscles in the low back attach to the upper border of the outer surface of the ilium, while some attach to the sacrum. When either or both sets of muscles are tight, it creates a type of tug of war, with the upper part of the ilium as the center point of the war. That causes hip and pelvis instability, which can lead to various gait problems, and is one significant cause of the lower back pain that plagues so many people.
Energetic: Opens and activates the lower portion of the Gall Bladder meridian, which runs through the posterio-lateral to lateral (outside) portion of the butt and down the lateral sides of the legs. This meridian facilitates physical, emotional, and energetic balance. The Gall Bladder meridian is called the Leg Shao Yang, or Lesser Yang meridian, and occupies a region of medium depth in the body. In that position, it can harmonize more interior processes (Yin) with more exterior (Yang), as one aspect of energetic balance. Through its paired Yin organ, the Liver, it helps promote the smooth flow of qi, which aids in creating emotional stability. Through its connection with the extra meridian called the Yang Linking meridian, which also runs up the lateral leg following a similar pathway as the Gall Bladder meridian, it helps to stabilize and strengthen the leg. Here we can see how the physical and energetic purposes dovetail nicely and are mutually supportive.
From a different viewpoint, there is a type of very deep bodywork known as Structural Integration, or Rolfing, as it came to be known, since it was developed by a woman named Ida Rolf in the 1920s. Through decades of recorded observation Rolfers empirically found that an emotion commonly stored in the hip rotator is the sense of having “unrealistic expectations of oneself or of others,” and that releasing the hip rotators often helped to similarly release that life perspective.
Techniques Used
Stretching, Daoist Yoga, focused breathing.
Method
Lie on your back with your knees bent and your feet flat on the floor. Cross your right leg over your left, with your lower right leg just above the ankle, resting just above (toward your torso) your left knee. This creates a roughly triangular space between your thighs. Reach through that space with your right hand, and reach around your left leg with your left hand (Fig 2.12 ). Interlock your fingers just below your knee. Alternatively, if you can’t reach your left leg below the knee, you can interlock your fingers behind your upper left thigh, just above the back of the knee. Before doing anything else, do your best to relax your entire back and shoulders, so that there is no bow in your back and both your low back and shoulders comfortably touch the floor. You may already feel a significant stretch through your right buttocks, where the hip rotators are located.
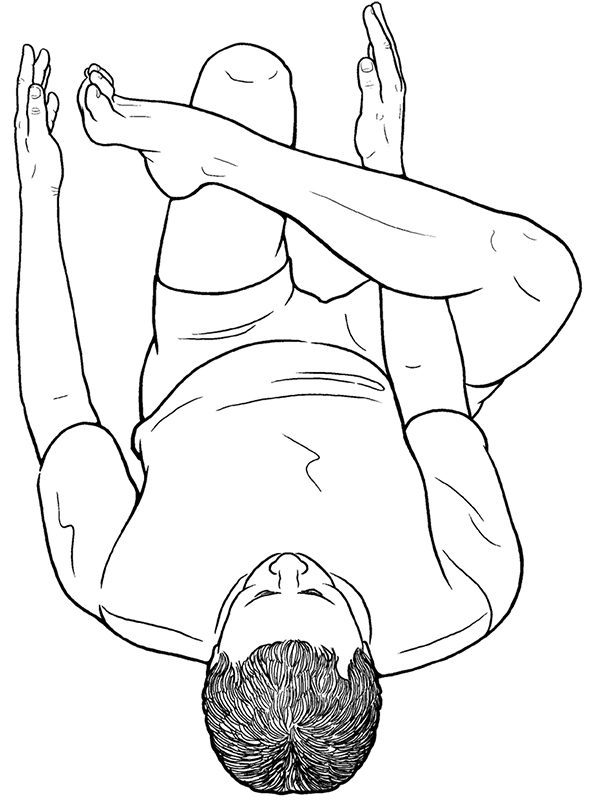 Figure 2.12 (Hip Rotator Stretch)
Your ultimate objective is to be able to pull on your left leg so that your right lower leg rests on your chest. This must be approached very slowly and carefully, and may take many months to accomplish. As with the other stretches, you’ll use your breath to gradually increase the stretch. Take a comfortable deep breath in, and while slowly exhaling, gently pull on your left leg, drawing it, and your right lower leg, closer to your body (Fig 2.13 on next page ). Do your best to keep your back relaxed, straight and not bent, with your shoulders remaining on or very close to the floor. Repeat the breath and increase the stretch on the exhale. When you reach the place beyond which you can stretch no further, hold that stretch for five to ten slow, deep breaths, allowing yourself to relax into that stretch more fully with each exhalation. Then switch leg positions and repeat, stretching your left hip rotators. You can repeat this stretch up to two more times per side. Once you can get your leg to touch your chest, hold one stretch for two minutes, and that’s enough.
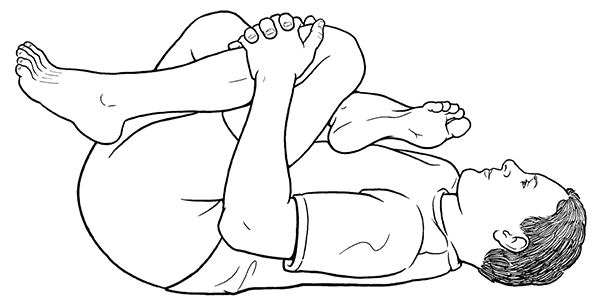 Figure 2.13 (Hip Rotator Stretch)
If your hip rotators or low back are very tight, you may not be able to increase the stretch at all in the beginning. In that case, just hold your starting position, and breathe as directed above without trying to increase the stretch. Do try to become more relaxed and release whatever tension you may feel, especially focusing on the exhales to best accomplish that. As you are able to increase the relaxation and release, you will find that you can begin to increase the stretch.
The last exercise in this section is not so much for the legs as it is for the whole back. It’s included here because being that it is begun sitting on the floor, it’s convenient to do this one after or between any of the previous exercises.
Purpose
Physical: Opens the back, mobilizes each vertebra to decrease vertebral compression and increase vertebral motion, which helps treat some types of back pain and reduces back stiffness. It also massages all the small muscles of the back, including the ones that attach to adjacent vertebrae, so they get more blood, oxygen, and nourishment to improve function and flexibility.
Energetic: Stimulates the Urinary Bladder meridian, which runs in two parallel lines on either side of the spine down the centerline of the back of your legs. In addition to benefiting the Urinary Bladder itself, there are points along the UB meridian that access the energy of every organ in the body, so the whole body receives energetic benefit. Stimulates the Du meridian (Governing Vessel) which governs the function of all the yang meridians in the body, another way to energetically benefit the whole body. Between the physical and energetic benefits, this can be a very invigorating exercise.
Techniques Used
Primarily, rocking as a type of self-massage. For people who already have experience, the mind can also be used to increase the daoyin aspect of inducing and guiding qi through the UB and Du meridians.
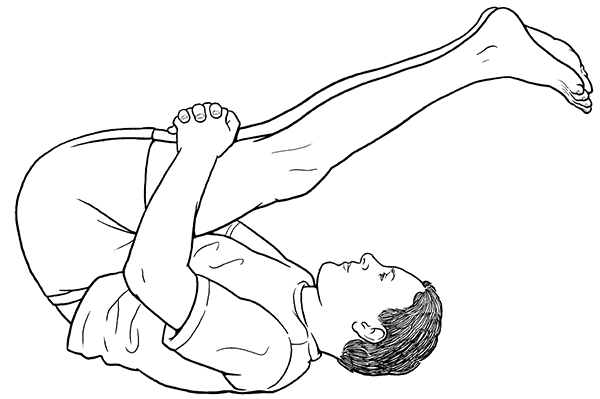 Figure 2.14 (Back Rock and Roll)
Method
Sitting on the floor, bend both knees so that both feet are flat on the floor in front of you, with your knees drawn toward your chest. Interlock the fingers of both hands at the lower thigh, below the bend at the back of the knees. Keep your fingers interlocked through the entire practice. With a forward bend in your back, rock backward so that your shoulders come close to touching the floor. As you do so, unbend your knees, extending your legs, and let your toes approach the floor behind your head (Fig 2.14 on previous page). This provides an extra stretch to your hamstrings, and extra stimulation to your UB meridian. Then, bend your knees and use that momentum to roll yourself back up to the upright seated position in which you began. Then continue to rock backward and roll forward, in a fairly quick rhythm. Let yourself have fun with this one! If you do this exercise on a regular basis, repeat between ten to fifteen times for its general health benefits. If you want to do more though, you can do as many as you’d like.