Our back is one of the most important external parts of our body, and is often the most overlooked—until it hurts. Relative to the front of the body—which is softer, more vulnerable, and allows easier access to most internal organs—the back is tougher, harder, and more protective, both physically and energetically. This is in keeping with the Chinese understanding that the back of the body is more Yang, while the front of the body is more Yin. In Western understanding, this is expressed colloquially when someone is feeling weak or frightened and may want to “curl up in a ball” or “revert to a fetal position.” When one is physically under assault by an animal or some other attacker they may be unable to fight against, curling up in a ball is a natural self-protective response to that danger.
The vertebrae (the bones of the spinal column) are dense bones, and their rounded structure effectively shields the soft spinal cord within. At the rear of each vertebra is a protrusion called the spinous process, the bony tip of the vertebra which is what is felt along the center of the back. In addition to being an attachment point for various muscles, the spinous process provides an extra measure of protection against any force that may strike the back. Tough ligaments “knit” the vertebrae together, providing greater flexible stability. Between each two vertebrae are cartilaginous discs, tough on the surface and springy on the inside, to provide cushioning and shock absorption between vertebrae. Dense muscles flank the vertebral column, and broad dense muscles cover the entire back and ribcage; both provide further structural support and create motion in every plane. Each rib also articulates with (touches and attaches to) the sides of the vertebrae, and there are muscles and cartilage between each rib. While just a very general description of the structure of the back, this should give you a good idea of its protective design.
Within the vertebral column is the spinal cord, the nervous system’s main “information superhighway,” allowing the brain to communicate with virtually everything in the body. Spinal nerves exit the spinal cord between each vertebra, sending functional information to every part of the body to make sure every organ, muscle, and other body tissues are working properly. They also receive sensory information so the subconscious, automatic parts of the brain can make appropriate decisions based on what the body has to report about itself and the environment, and they inform our conscious mind so we can actively make the best choices for ourselves.
On a purely energetic level, the Du meridian, or Governing Vessel, runs upward behind the center of the spine, and governs all the Yang aspects of the body, fully one-half of all body processes and activities. Along the Du meridian are numerous conventional acupuncture points, some of which correspond to various developmental stages of the trajectory of one’s life, more of a spiritual consideration. At the center of the top of the head, there is a point on the Du meridian called Bai Hui, or “One-hundred Convergences,” both a direct and an indirect meeting point for all the most prominent energy lines in the body. These are just a couple of ways to demonstrate the influence of the Du meridian, which extends much farther throughout both the physical and the spirit body than you might expect, and includes many aspects of mental functioning.
Flanking the spine are two branches of the Urinary Bladder (UB) meridian, the inner branch being about 11⁄2 inches from the center of the spine, and the outer branch being about 3 inches out. The inner branch of the UB meridian has points which influence the function of every internal organ, including the respiratory diaphragm. Those points almost entirely correspond to the locations of the spinal nerves that influence the same organs. The outer UB line contains points that influence the emotional energies associated with the various organs, and some have a connection with spiritual energies too.
From this you can see how the health of the back and spine influences the health of the entire body. If an injury causes a muscle spasm or damage to a vertebra or disc, or inactivity causes increasingly tight back muscles and spinal compression and those or any number of other possible back problems go uncorrected, much of the life energy at those points is shut off. Degeneration sets in, and aging is accelerated. According to Chinese medicine, the Kidneys, which reside in the low back, are responsible for much of our vitality, sexual energy, the health of all the bones in the body (including the teeth), aspects of hearing, and the manifestation and condition of head hair, as well as the commonly understood functions associated with detoxification and fluid metabolism as regulated through the urinary tract. These are all things we see commonly affected by age. In the context of the exercises presented in this book, taking care of your back may be the single most important thing you can do to stay healthy and vital, and slow the aging process.
Purpose (Physical and Energetic)
This exercise is a convenient linking exercise with the previous arm and shoulder set, but may be practiced at the very beginning of an exercise session to warm up and vitalize much of the entire body, or can be done at any time as a stand-alone exercise as a general tonic and antidote to too much sitting. With practice, you can use it to “pump” and massage the inguinal lymph glands, benefiting the immune system. It is often used as a warm-up before doing a taiji set. Some people may recognize this as similar to the First Arm Swing of the Three Arm Swings of the Energy Gates qigong set, but it is not the same thing. This version is simpler, does not contain the neigong aspects of the First Arm Swing, but does offer more benefit to all the physical structures of the back. By extension, the energetics discussed in the introduction to this section are also benefited. All of the vertical acupuncture meridians of the back (Du and UB) and core meridians are stimulated, as well as the horizontal Dai meridian. Paidagong, slapping and patting, additionally dislodges stagnant qi around the kidneys and low back. When done vigorously, it is also a very safe zero-impact aerobic exercise.
Techniques used
Joint mobilization of the spine and shoulders; stretching of most of the torso muscles, legs, and arms; induction of qi through all of the meridians; paidagong.
Method
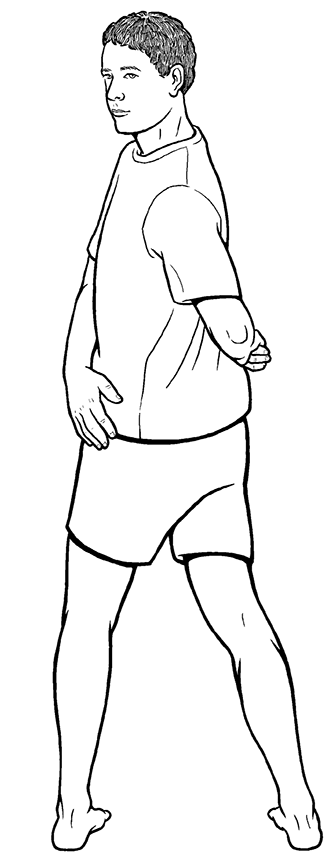
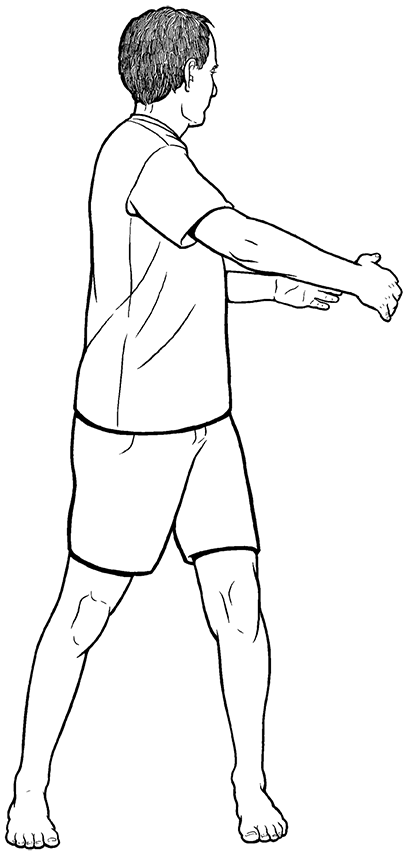
Stand with your feet parallel, slightly wider than shoulder width apart. Make sure there is no furniture, person, or any other type of obstruction within extended arms’ length. Imagine a pole running perpendicularly through the center of your body, and turn your torso around that pole, first to one side and then the other. Keep your arms completely relaxed, hanging loose at your sides (Fig 6.1A). Stay perpendicular to the ground; do not lean from side to side. Feel the vertebrae rotate over each other and the attached back muscles stretch as you turn. The muscles around your waist will also stretch with the twist. Turn your head in the same direction as your torso so that your neck also fully pivots around that center pole. Try to look at the wall directly behind you by the endpoint of the turn in both directions (Fig 6.1B and Fig 6.1C). Gradually turn faster so that your relaxed arms raise from the motion of the turn only. Do not use any effort to raise your arms.
If you want, you may increase the power of the turn by shifting your weight to your left leg as you turn left, and then to your right leg as you turn right, still without leaning. That may give you a sense of springiness in your legs as you turn side to side, and blood flow through your legs will increase. If you are able to feel that, you are also massaging the inguinal lymph glands, benefiting your entire immune system. As you turn faster and with more power, your arms will raise higher. Your hands will begin to slap and tap your body, starting at your thighs and hips, but in time and with practice, they’ll rise to the height of your low back and the top of your pelvis. The tapping and patting should feel comfortable, not forced, hard, or painful.
There’s no set amount of time to do this. As a warm-up, or contained within an exercise set, one to two minutes can be enough, although longer is fine. If you do this as a stand-alone practice, you may want to do it for five minutes or more. Let your senses be your guide. At the completion of the Torso Twist, your back, waist, and arms should feel loose, energized, open, and relaxed.
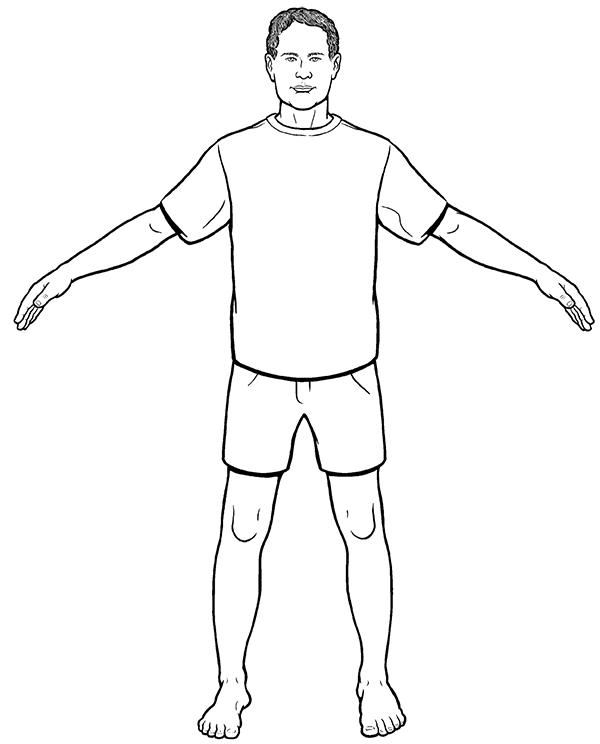 Figure 6.1A (Torso Twist with Arm Swing)
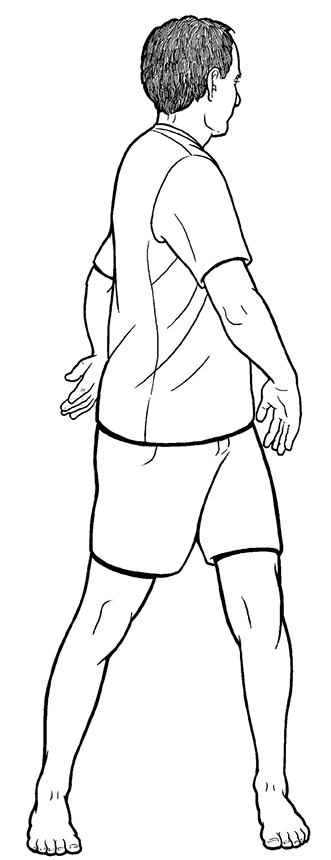
Figures 6.1B and 6.1C (Torso Twist with Arm Swing)
Variations
Variation One: Hug a Tree and Lead with Elbows: In this variation of the Torso Twist, you can target select vertebrae that may feel particularly stuck or tight, if they fall between the range of the height of your shoulders and elbows when your arms are at your sides. Otherwise, the purpose and techniques used are the same as in the primary version. Most of the method is the same except as follows.
Figures 6.2A and 6.2B (Torso Twist with Arm Swing)
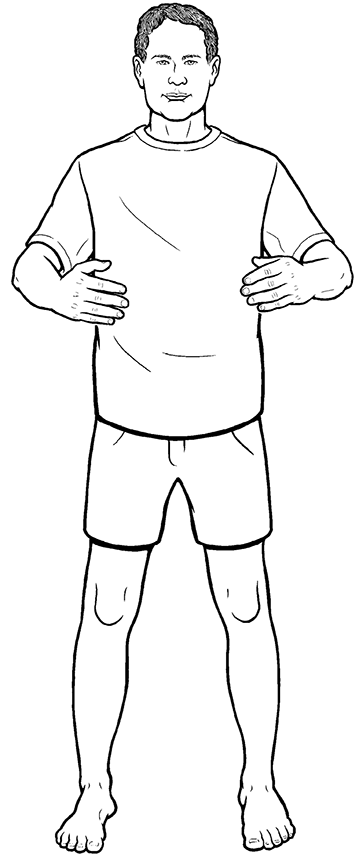
Hold your arms in front of you as though hugging a tree. Hold them at the height of the tight area of your back that you want to target most (Fig 6.2A). As above, stay perpendicular to the ground, and turn from side to side, pivoting around your centerline. The difference here is that you want to lead the turn with your elbows, as though you were jabbing someone behind you, so as you turn to the left, lead with your left elbow, and then with your right as you turn to the right (Fig 6.2B). Try to maintain the sense of hugging the tree, so that your hands and arms don’t collapse in toward your body much. The weight of your arms alone is enough to add to the torque in your spine at the targeted vertebral segments, so don’t use much force with the backward jab of your elbow. Feel free to experiment with your arms’ height level until you find what feels best to you. Even though you can’t lower your arms below the height of your elbows in this exercise, at that lowest point it will also increase the twist in your low back, allowing you somewhat more access to that region too. You may feel or hear cracks and pops in your back, just as in a chiropractic adjustment. That’s normal and should not be cause for alarm.
Variation Two: Hug a Tree with Qigong Energetics, for Daimai: The Daimai, or girdling or belt meridian, is the only one which has a horizontal trajectory around the torso. It intersects all the Twelve Regular meridians, and the remaining seven of the Eight Extraordinary meridians, being the eighth itself. One of its functions is to bind and stabilize all the other meridians, and in that capacity it has a positive effect on the entire body. It also intersects the Dantian in the front of the body, and the kidneys and the Mingmen at the rear of the body. All the extraordinary meridians serve as reservoirs of Qi and Blood. Due in part to its location and intersections, the Daimai influences all reproductive health, and plays a particularly beneficial role in gynecological health.
Practice this variation only after you have some success practicing Dragon Playing with a Pearl, in chapter 11. It will only have noticeable beneficial effect if you can make a tangible qi connection between your hands and your torso, and Dragon Playing with a Pearl will help you to cultivate that ability.
Here you will begin as in the first variation above, and will place your arms in front of you as though hugging a tree, with this difference: start with your hands as far away from your body as possible, with your palms facing you at the height of your Dantian, just a little below your belly button. Gradually move them closer to your belly, until you feel a distinct energetic connection from your palms to your torso. That energetic connection should feel very much the same as the one you made between your palms when practicing Dragon Playing with a Pearl. This one is more challenging than feeling the qi between your palms only, so be patient and be honest with yourself as to what you are feeling.
Keep your torso perpendicular to the ground, and turn from side to side, slowly pivoting around your centerline. Try to maintain the sense of hugging the tree, so that your hands and arms don’t collapse in toward your body, and keep the distance between your fingers as uniform as possible as you turn. You won’t be leading with your elbows here. More importantly, maintain the sense of energetic connection from your hands to your torso. Your palms should trace the trajectory of your Daimai at the front portion of your body only, from just above one hip to the other hip, or as near as you can get.
As you turn to the right, slightly cup the palm of your right hand, pulling your qi through the Daimai to the right, as you slightly straighten your left palm, pushing your qi to the right. Reverse that as you turn to the left. Do this in each direction as many times as you’d like. This will smooth and harmonize qi flow through your Daimai, and will engender a feeling of peacefulness and be calmly energizing. If you’re working to remedy a reproductive or gynecological problem, fifteen or twenty minutes a day is recommended.
2. Pelvic Tilt (Forward and Back)
Purpose
Physical: Releases tension in the low back muscles; mobilizes the lumbar vertebrae, increases blood flow to and around the kidneys.
Energetic: Frees qi obstruction in the lower Du meridian and the Mingmen (reducing low back pain from qi and blood stagnation); promotes qi flow through the Du, Ren, and Dai meridians; benefits the Kidneys.
Techniques used
Stretching, joint mobilization, focused breathing.
Method
Stand with your feet parallel, shoulder width apart. Feet parallel is especially important in this exercise, as low back tension frequently causes feet to splay outward at the toes. If you keep your feet parallel, you will increase the stretch exactly on those tight areas of your low back.
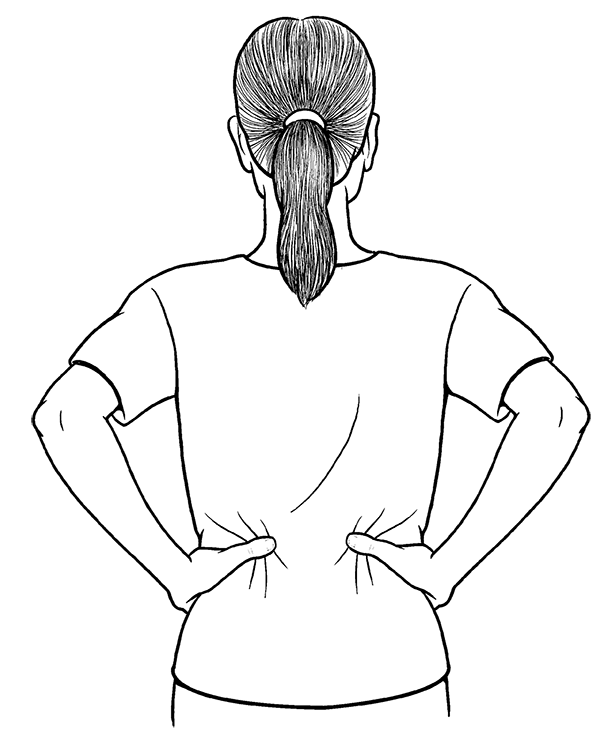 Figure 6.3 (Pelvic Tilt—Forward and Back)
Optionally, and a good idea for the first few times you try this at least, place your hands on the sides of your hips, so that your little fingers are at or slightly above the crest of your hipbones, fingertips forward. Spread your thumbs to your back, so that the pads and tips of the thumbs are just below your lowest ribs, as close to your spine as they can naturally reach. Your thumbs are now in a position to be a landmark to assist you in doing this exercise optimally (Fig 6.3).
Slowly inhale deep into your belly, and as you do so, tilt your pelvis so that your tailbone moves forward, stretching and opening the back of your low spine (Fig 6.4A). If you can get the pressure from your breath to reach your lower belly, that will increase the stretch in your low back. Try to keep the stretch confined to the region below your thumbs, from their tips down to your tailbone. While it’s not bad or dangerous to allow the portion of your back higher than your thumbs to move, it can easily minimize the amount of stretch in your lower back, which is the particular focus of this exercise. On an exhalation, tilt your pelvis in the opposite direction, moving your tailbone and your butt rearward, again doing your best to confine the motion to the region below your thumbs (Fig 6.4B). This will increase the natural concave curve of your lumbar spine. Repeat this at least ten times, but after that you can continue for as long as you’d like.
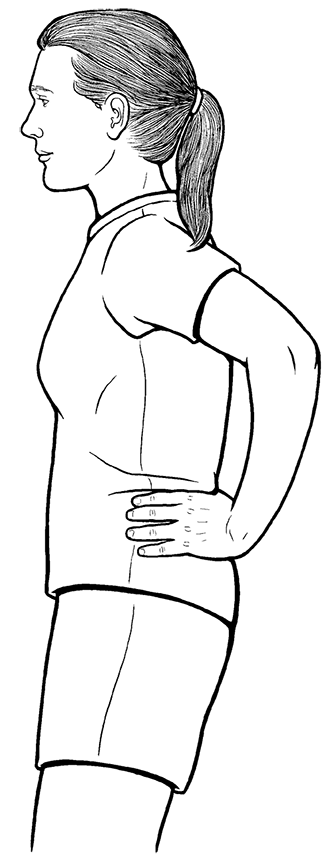
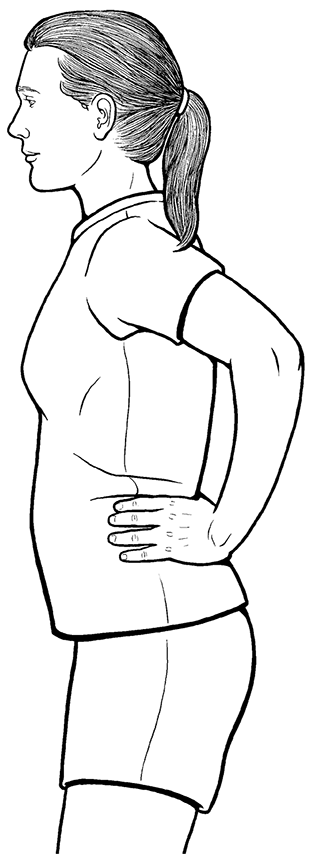
Figure 6.4A and 6.4B (Pelvic Tilt —Forward and Back)
If your low back is particularly tight, as is true for many people, you may feel or even hear crackling in your low back during this exercise, and as your back opens more over time, you may even feel or hear a vertebra snap or pop, like getting a spinal adjustment. In the absence of pain, this is normal, beneficial, and nothing to be alarmed by.
Purpose
Physical: As a continuation of what came before, while introducing new planes of motion, it will release tension in the low back muscles, mobilize the lumbar vertebrae, and increase blood flow to and around the kidneys.
Energetic: Frees qi obstruction in the lower Du meridian and the Mingmen (reducing low back pain from qi and blood stagnation); promotes qi flow through the Du, Ren, and Dai meridians; benefits the kidneys.
Techniques used
Stretching, joint mobilization, focused breathing.
Method
Stand with your feet parallel, shoulder width apart or slightly wider. If you keep your feet parallel, you will increase the stretch exactly on the tightest, most restricted areas of your low back. Optionally, place your hands on the sides of your hips, so that your little fingers are at or slightly above the crest of your hipbones, fingertips forward. Spread your thumbs to your back, so that the pads and tips of the thumbs are just below your lowest ribs, as close to your spine as they can naturally reach. Your thumbs are now in a position to be a landmark to assist you in doing this exercise optimally. Keep everything above your thumbs as still as possible, and only move everything below your thumbs.
Similarly to a hula dancer, slowly circle your hips in clockwise circles (Fig 6.5). See if there are any parts of that circle that feel stuck or unable to circle as smoothly as the rest of the circle. That indicates an area of restriction that needs more attention, so if necessary, slow your circles even further to smoothly get through the stuck areas. After a minimum of twelve, circle as long as you like, enough for your back to begin to feel more open and comfortable, and then repeat in counterclockwise circles for the same amount of time.
In this exercise, your breath does not need to coordinate with the movement. It should be a full breath, though, slow and deep into your belly. Do your best to keep it completely smooth on the inhale and the exhale, with no gaps, no held breath, at any time. The smoother and more “circular” you make your breath, the smoother and freer your physical hula circles will be.
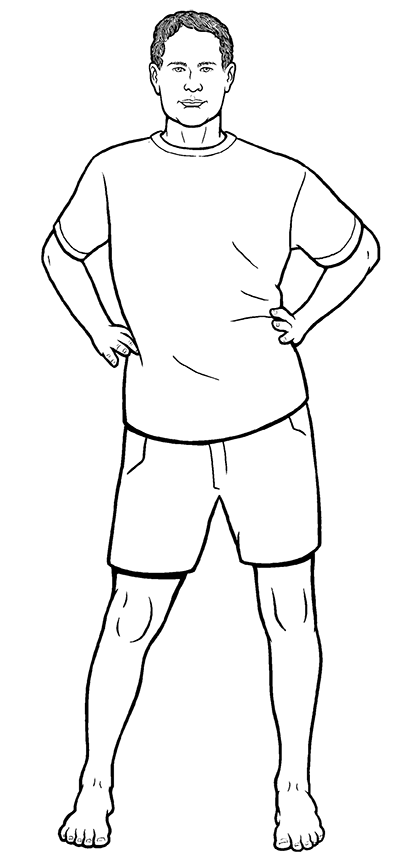 Figure 6.5 (Hula Rolls)
The name of this exercise comes both from its purpose, opening and harmonizing various Yin and Yang meridians, and from the image used to help perform it best, that of rotating a large taiji (yin yang) mandala between your arms.
Purpose
Physical: Strongly stretches the muscles between the sides of the upper pelvis and lowest ribs; stretches the sides of the intercostal muscles (between the ribs); laterally flexes and extends the entire vertebral column, stretching the related small internal muscles, tendons, and ligaments. Massages the sides of the liver and spleen, and benefits the lungs.
Energetic: Opens and stimulates the Gall Bladder meridian, energetically benefiting the Liver, Gall Bladder, tendons and ligaments. Frees the Du and urinary bladder meridians. Additionally, the arm movements help open the Yin and Yang Arm meridians of the Heart, Lungs, Pericardium, Small and Large Intestines, and Sanjiao/Triple Burner.
Techniques used
Stretching, joint mobilization, visualization, focused breathing.
Method
Stand with your feet parallel, slightly wider than shoulder-width apart. Raise your arms out to your sides, imaginging that you are holding a large Yin-Yang mandala between your hands, somewhat like a very large ball. Try to feel the connection between your hands, even at that distance apart (Fig 6.6A). With the sense that you are rolling your hands around the surface of the large ball, raise your right arm straight up over your head so that your palm is more or less facing the center of the top of your head, with your fingertips pointing left. Try to keep your shoulder lowered so that it does not approach your right ear. Your elbow should point toward the right, creating just a slight bowing of your arm. Simultaneously place your left hand in front of you, palm facing up on the midline of your body, at about the height of your pubic bone. The tip of your left elbow should point toward the ground in front of the left side of your body.
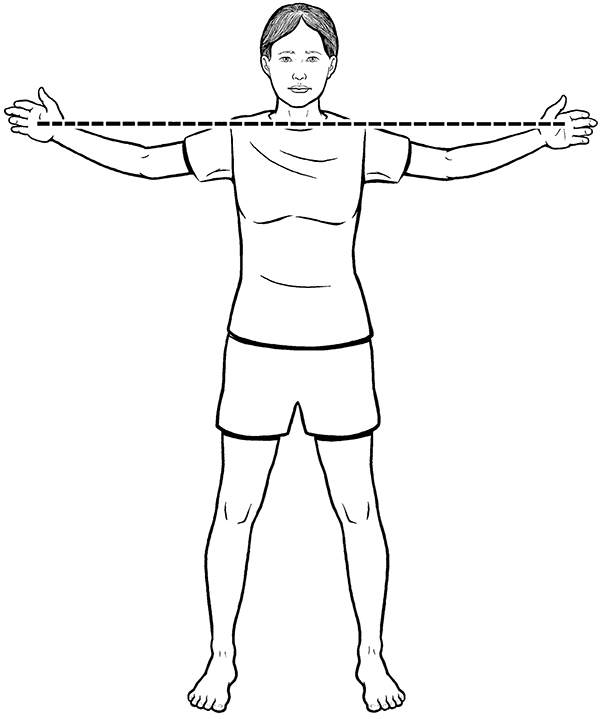 Figure 6.6A (Yin-Yang Side Bend)
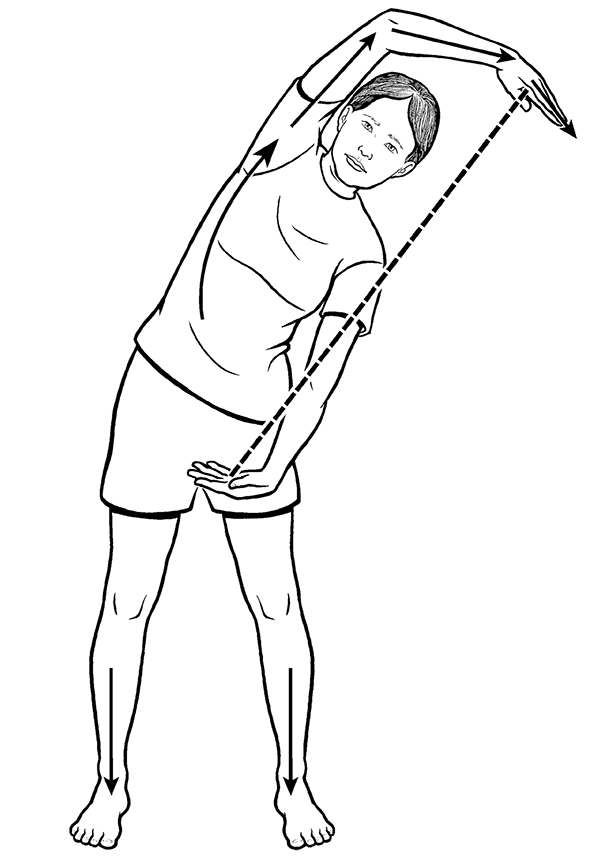 Figure 6.6B (Yin-Yang Side Bend)
Without bending or leaning forward or backward, bend to the left primarily from the left side of your waist, rotating the mandala counterclockwise to the left as you do so. Your left hand will move toward (or possibly past) the front of your right hip, while your left hand moves well beyond the left side of your head (Fig 6.6B). Because you are holding the large taiji ball, your hands and arms will not collapse or come any closer together than they were in your starting position. If you allow them to come any closer together, you will minimize the stretch and minimize the benefit. Feel your arms extending, out of your armpits and all the way beyond your fingertips. Doing that, you will feel the stretch more strongly along the left side of your body. You may feel or hear popping and cracking in your back as the vertebrae open on their sides. That’s nothing to be alarmed by, and in fact will make your back feel more comfortable and open, like a chiropractic adjustment. The right side of your body may feel compressed, especially between the side of your pelvis and your lower ribs. That’s okay too, and helps to massage your spleen, intestines, and pancreas. You do want to try create some sense of openness there nevertheless, so it doesn’t become uncomfortably compressed. Better yet is to feel a springiness, so the compressed side feels like it wants to bounce back open.
Rotate the taiji ball clockwise, to the left, as you return to an upright position. Although you don’t stop in the upright position, as you pass through it your arms will be spread to your sides. Continue your bend to the left this time, again from your waist and still making sure you do not lean forward or backward, keeping your arms moving in a clockwise circle. At the end point, your right hand will be more or less palm down and facing your left hand, which is more or less palm up just past your right hip. Still feel for the connection between your palms as though you are holding the large ball. Arms should feel extended out from the armpits all the way beyond the tips of the fingers. Then return to an upright position, and repeat to the right. Do ten to twelve repetitions.
Breathing can be done in one of two ways. If the stretch is very easy for you, inhale as you bend to the side. That will make your lungs and belly expand more, which will increase the stretch both internally and externally. Exhale as you return to an upright position. If the stretch is difficult for you, exhale as you bend to the side. Exhalations always help muscles to relax and release and thus will make the stretch easier for you. Also, less expansion of your lungs and belly will decrease the internal pressurization, again making it easier for you.
Variation
This familiar variation is taken from the Baduanjin Eight Golden Brocades qigong set. The purpose, benefits, and methods are very similar with these exceptions.
Interlock the fingers of both hands together, palms up in front of your low belly. Keep your fingers interlocked throughout. Raise your arms above your head, and turn your hands so the palms are facing the sky. Exert a gentle pressure upward, as though you were trying to push something, but avoid locking your elbows, keep a slight bend in them (Fig 6.7A). This increases the stretch through your arms and into your palms. Bend side to side and breathe as instructed above, maintaining the sense of pushing with your interlocked fingers (Fig 6.7B).
By having the back of your wrists more closed and the front of your wrists more open, this variation stretches the Yin surfaces of the arms more, increasing qi flow through the Arm Yin meridians of the Heart, Pericardium, and Lungs while decreasing it through the Yang meridians of the Large and Small Intestines and the Sanjiao. You might chose this variation if you know you want to target your heart and lungs more, or want to open the yin surfaces of your arms more. The muscles there tend to constrict with overuse, so the additional stretch may feel better to you. The benefits throughout the legs, torso, and spine are otherwise identical to the primary version.
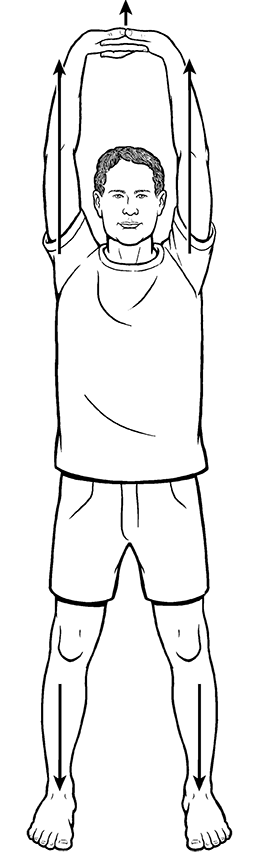
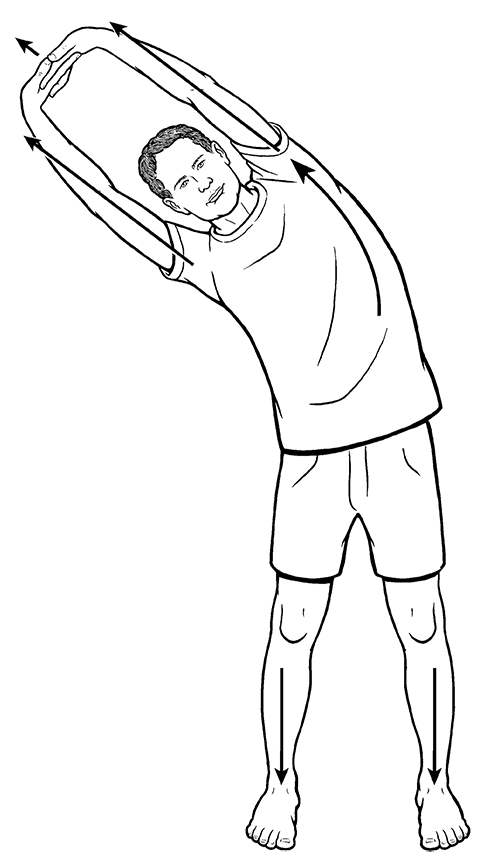
Figure 6.7A and 6.7B (Yin-Yang Side Bend)
Like the Eight Golden Brocades, the Swimming Dragon is another simple, popular qigong practice; it has one main and two secondary movements. Here, we’ll use a secondary movement to continue opening the back and spine while adding benefit to the pelvis and hips.
Purpose
Physical: Stretches the muscles between the sides of the upper pelvis and lowest ribs; stretches the neck muscles while rotating the cervical spine; laterally flexes and extends the entire vertebral column in an S curve, stretching the related small internal muscles, tendons, and ligaments. This can help minimize the discomfort of scoliosis. This is one of the few exercises that stretches the hips. Massages most of the internal organs.
Energetic: Benefits the Gall Bladder and Spleen meridians, and frees the Du and Urinary Bladder meridians. Laterally unbinds the Shoulder’s Nests and Kwa, gently pumping qi flow through those energetic structures and furthering the connection through the core side channels between the legs and torso, and arms and torso.
Techniques used
Stretching, joint mobilization, focused breathing.
Method
To establish your starting position, stand with your feet very close together. Ideally, they should be touching along their entire length, but if your balance makes that too difficult, spread your feet apart only wide enough so that you feel secure and stable. Keep them parallel. Place your palms together in front of your chest, fingers pointing toward the sky, thumb side toward your chest and little finger side directed outward in front of you, in a “prayer hands” position. Push your palms together with a gentle pressure, and keep your elbows pointing straight out to your sides, doing your best to keep them pointing that way throughout this exercise.
Next, without moving your feet, simultaneously move your hips to the right, while pushing your elbows to the left, and turn your head to the right so that your chin moves close to or over your right shoulder. This creates a lateral S-shaped curve in your spine from the tip of your tailbone to the base of your skull (Fig 6.8 on next page).
In this movement, some deviation is inevitable, but you nevertheless want to strive to keep your arms parallel to the ground, both elbows pointing to the sides exactly perpendicular to your body, and to keep every part of your torso facing straight forward, including your hips and knees. It’s very common to rotate your body so that your right hip moves rearward and your left hip forward. While doing so is not dangerous, it does minimize the lateral stretch in your spine and hips, thereby minimizing the overall benefits.
Return to your starting position, and repeat in the opposite direction, moving your hips to the left, elbows to the right, and turning your head to the left. Again return to starting position.
Inhale as you turn to the side, and exhale as you return to your starting position. Pace your movement to match a comfortable breathing rate. Repeat at least ten times, but it’s fine to do more if you’d like.
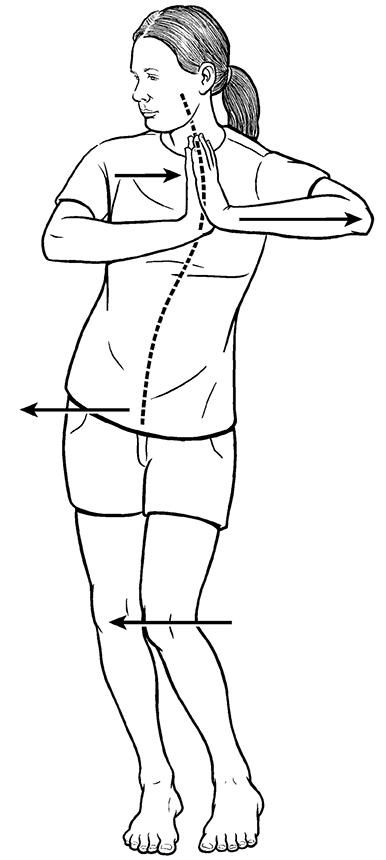 Figure 6.8 (Lateral Swimming Dragon)
6. Standing To e Touch, Legs Together
This is a common exercise with some variation used in many traditions, including standard Western gymnastics. This version is done more slowly than may be seen in a gym class, using breath to facilitate the release and stretch. It will further open the back and spine, and has associated energetics involved.
How far you bend forward may be limited by a restriction in your back, but equally common the restriction may be in your hamstrings. It may be helpful to do the hamstring stretches in the Seated Leg exercises section before attempting this one, especially if you have a known back problem, to minimize any possible strain. In this standing version, gravity will be pushing down more on your back than in the seated hamstring stretch.
Purpose
Physical: Stretches and opens the back muscles, and will additionally stretch the hamstring muscles if they are tight. Increases space at the rear of the vertebral column, improving the alignment of the vertebrae. This also reduces compression on the intervertebral discs, reducing disc wear, and allows them to rehydrate (absorb fluid) and “plump up,” so they can better cushion the vertebral bones. That reduces bone wear and may help to prevent arthritic changes in the back. Because of positional changes in the head, coupled with the stretch through the neck, blood flow into and out of the brain may be improved.
Energetic: Opens the Urinary Bladder and Du meridians, removing obstruction to qi flow in those channels. Associated benefits are discussed in the introduction to this chapter.
Techniques used
Stretching, gravity-facilitated release, Daoist yoga, focused breathing.
 Figure 6.9 (Standing Toe Touch, Legs Together)
Method
Stand with your feet very close together. Ideally they should be touching along their entire length, but if your balance makes that too difficult, spread your feet apart only wide enough so that you feel secure and stable. Keep them parallel. Also keep your knees straight, but not locked, through the entire exercise. Inhale, and then on the exhalation bend forward, moving the tips of your fingers toward the tips of your toes. At some point before you’re able to reach your toes, you may be unable to bend farther, coming to the end of your stretch. In that position, simply take a few more slow, deep breaths, direct your breath to the tight areas of your back, and on every exhalation release more of that tension as best as possible. You may find that you’re able to get your fingers a little closer to your toes in that way. Do not try to forcibly stretch your arms to make your fingers extend to your toes. That will often put an undue strain on your back. Remember, the purpose here is not to touch your toes—that’s just a reference target—but to open your back.
If you can touch your toes, you may comfortably be able to place the palms of your hands flat on the ground (Fig 6.9). That’s the next and final physical step to work toward in this exercise. Until that becomes comfortable, breathe as directed above to facilitate more release in your back. Some very flexible people may be able to grasp the back of their ankles and pull their forehead to their knees, common in yoga practices for example, but that’s neither necessary nor desirable for this exercise.
At whatever point you come to the end of your stretch, let your neck relax, so that your head hangs loose, pointing toward the ground. Feel the weight of your head create a traction that further stretches your back, continuing through your entire neck. Again use your breath to release any tension you may feel, allowing your entire back to open more fully. Stay in this stretch for just two or three breaths at first, gradually building up to ten breaths over the course of a month or more.
On an inhalation, rise slowly to full upright position. It’s possible you may feel dizzy, either while bent forward or more typically when rising. This is due to changes in bloodflow and pressure into and out of your head; it can be minimized by rising slowly. With continued practice over time, the dizziness will pass, one yardstick of improvement, but take it slowly and carefully until then.
7. Opposite Leg Toe Touch, the Whole Body Windmill
This exercise builds on and adds to the previous one, and so should only be attempted after you can at least touch your toes with the tips of your fingers. It is similar to but different from the common Windmill Toe Touch practiced in calisthenics.
Purpose
Physical: Stretches and opens the back muscles, stretches the hamstring muscles, and increases space at the rear of the vertebral column, improving the alignment of the vertebrae. A rotational component is added to the stretch through the back and torso, legs, and neck. Although not specifically an exercise for the shoulders, the arms are used here in a way that moves the shoulders through a large portion of their range of motion, opening them and the armpits. Practiced more vigorously than the previous exercise, bloodflow is increased throughout the body. Because of positional changes in the head, coupled with the rotational stretch through the neck, bloodflow into and out of the brain may be improved.
Energetic: Opens the Urinary Bladder and Du meridians, removing obstruction to qi flow in those channels. Because the rotation of the torso opens the sides of the body, the Gall Bladder meridian is stimulated. The internal organs—especially the liver, gall bladder, stomach, and spleen—are massaged and are benefited physically and energetically.
Techniques used
Stretching, twisting (rotational stretch), focused breathing.
Method
Stand with your feet parallel and 2 1⁄2 to 3 feet apart in a comfortably wide stance, knees straight but not locked. Raise your arms straight out at your sides so that your hands are at about the height of your shoulders, fingers to the sky and palms facing outward as though you were standing in a narrow hallway and your palms were touching the walls to either side of you. Elbows should be straight but not locked, and ideally the tips of the elbows should be pointed down toward the ground (Fig 6.10A). That will help keep your shoulders and neck open.
Inhale fully, and on a slow exhale bend forward, keeping your spine straight as much as possible, while turning your torso to the left. Lower your right arm and extend your right hand to touch your left foot. If you are able to stretch farther, place the palm of your hand on the ground directly in front of your left foot, or to the left of your foot if you want even more stretch. Simultaneously raise your left arm, moving it above your head so that the palm is facing the sky and your fingertips are pointed to the right. Turn your head to the left, and look upward toward your left hand as your right hand touches your left foot (Fig 6.10B). Inhale as you rise to your starting position, upright and arms out to your sides, and then repeat, this time turning to the right.
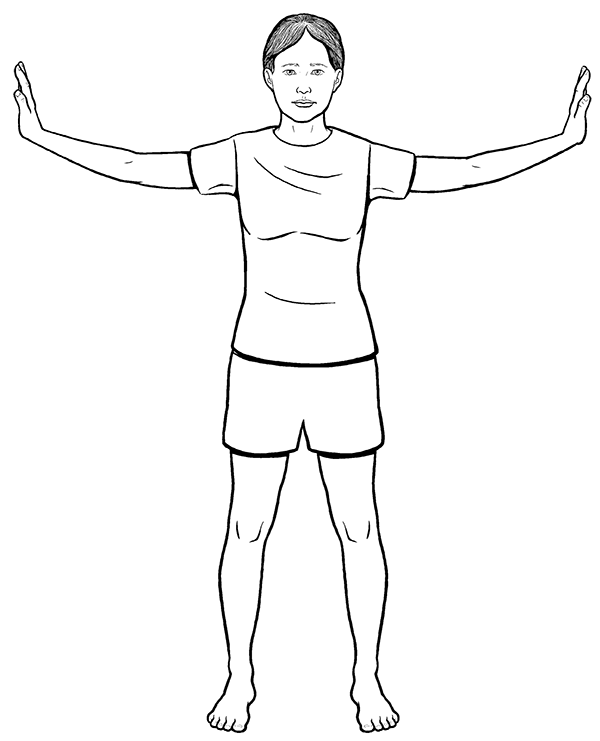 Figure 6.10A (Opposite Leg Toe Touch,
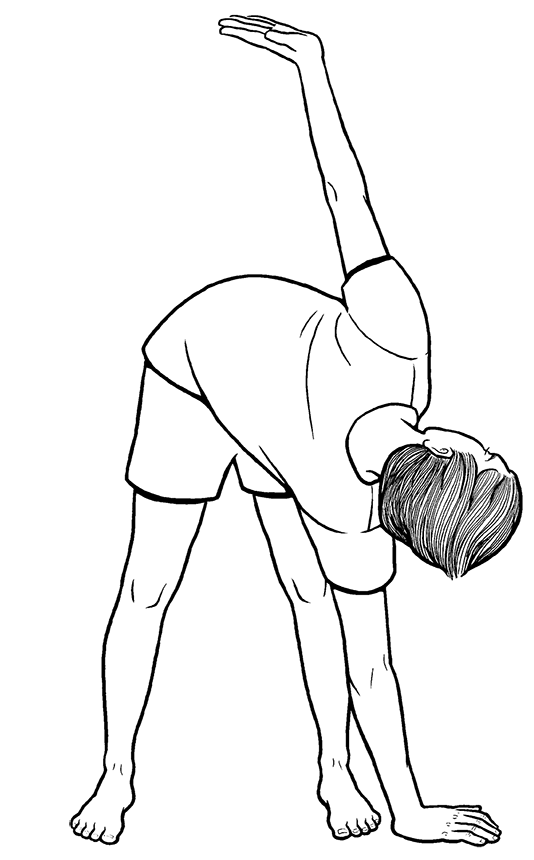 Figure 6.10B (Opposite Leg Toe Touch,
If you want to increase the release in a tight body part, you can hold the position with your hand to the ground and head turned to your upper hand, and breathe into any tight area for a number of breaths before returning to an upright position. If you want more aerobic benefit, you can do the exercise more rapidly once you are comfortable with it.
This is a variation of a popular yoga posture, an example of how similar exercises may arise in different cultures, sometimes for the same or similar purposes, and sometimes for very different ones. This is another more challenging stretch, requiring your legs and hips to be already fairly open. Depending on how flexible you are currently, and as a reminder, you may elect to skip this exercise for now, until your body opens more from practicing other exercise. This is of course true for any exercise you may find too difficult. Don’t let that discourage you from doing the ones you can, as they will help you on their own and make it possible for you to do more difficult ones farther down the road.
Purpose
Physical: Creates a strong rotational stretch throughout the whole spine, increasing the benefits begun in other rotational spine stretches, and stretches the hip rotator muscles. Helps stabilize the pelvis and hips, opens the low back, promotes freer movement between the pelvis and low back, and reduces low back pain.
Energetic: Opens the Urinary Bladder and Du meridians, removing obstruction to qi flow in those channels. Both the rotation of the torso and the hip rotator stretch opens the sides of the body, so the lower portion of the Gall Bladder meridian is opened and qi flow is stimulated. Opens and activates the Daimai (Girdling or Belt Vessels, which energetically bind and connect with all the regular acupuncture meridians), benefits the kidneys, and stimulates the Mingmen (Life Gate, or Gate of Vitality, an energy center located between the Kidneys.)
Techniques used
Stretching, rotational stretch/twist, Daoist yoga, focused breathing.
Method
Sit on the floor. Fold your right leg beneath you by bending your right knee, keeping your knee on the ground, and slide your right foot beneath your left upper thigh, so that your right heel is at or just under your left buttock. With your left leg bent at the knee, place your left foot flat on the floor just to the right of your right knee. In this position, your left leg is crossed over your right. Keep your lower left leg from knee to ankle as close to vertical as possible, that is, not leaning to one side or the other. Place your left palm flat on the floor for support, just to the left of, or as far to the rear of your left hip as is comfortable. Alternatively, you may prefer to make a fist instead of using a flat palm, as that will give your left side slightly more lift and aid in keeping your spine perpendicular to the ground. Turn your body a little to the left, and place your right elbow just to the left of your left knee, in solid contact with it. Make a soft fist with your right hand, and move your right forearm perpendicular to the ground, so that your fist is directed toward the sky. For many people, this is already a significant stretch.
If you’re able, keeping your right forearm perpendicular, move it to the right, pushing your left knee farther to the right. Simultaneously push your left hand into the ground and forward, so that it moves your torso rearward to the left (Fig 6.11). This will twist your whole spine, and your lumbar (low back) spine in particular. It’s common to feel and hear a cracking and popping when doing this, much like a chiropractic adjustment. Do your best to keep your spine upright, perpendicular to the ground.
When you reach the limit of your stretch, incorporate your breath in order to gradually increase the stretch. Inhale slowly and fully into the areas you feel are most tight, and on an equally slow and full exhale, release the tension in those places and see if you can increase the stretch just a little more, turning your body slightly more to the left. Repeat until you are unable to increase the stretch, being careful to avoid causing yourself pain. Hold this stretch for just four or five breaths to start, breathing into any areas of tension or discomfort, and release that tension with each exhalation. Over time, you can increase that to ten or more if you like. Then repeat the above in the opposite direction, facing right.
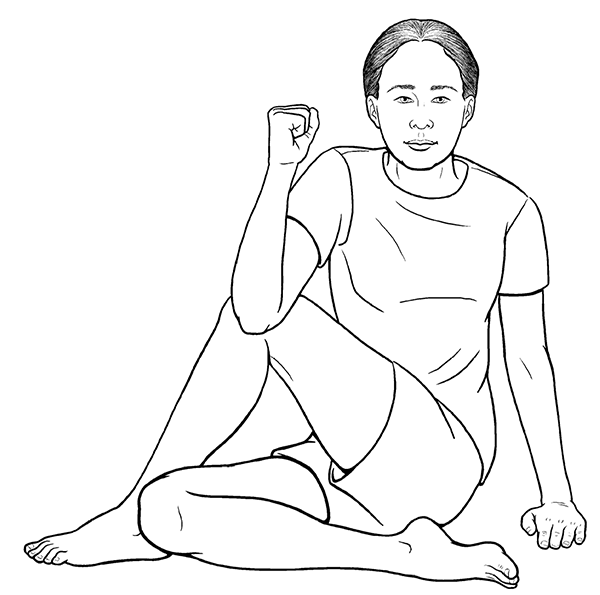 Figure 6.11 (Seated Torso Twist)
If your hip rotators or low back are very tight, you may not be able to increase the stretch at all in the beginning. In that case, just hold your starting position, and breath as directed above without trying to increase the stretch. Do try to become more relaxed and release whatever tension you may feel, especially focusing on the exhales to best accomplish that. As you are able to increase the relaxation and release, you will find that you can begin to increase the stretch.
Variation
If you’re unable to get into the full starting position but can get your legs close, try this variation. Once you’re seated properly, grasp your left knee with your right hand, right fingers curling around the knee, and place your left hand on top of your right. Then gently pull your knee to the right with your right hand, while pushing with the left (Fig 6.12). This will move your knee to the right and your torso to the left as in the original exercise, but is a bit easier, you may increase the stretch in smaller increments, and you will be less able to overturn and overstretch, a built-in safeguard against doing too much. Use your breath to relax into this stretch as directed above. Repeat in the opposite direction.
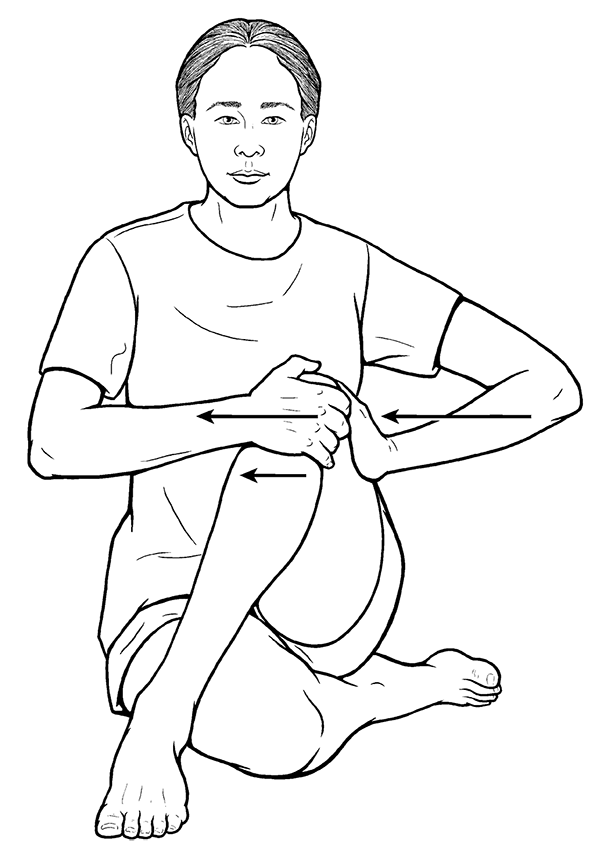 Figure 6.12 (Seated Torso Twist)
9. Lying Du Meridian Back Extension
As in the previous exercise, this has a counterpart in Hatha yoga: the Cobra pose. There are other ways to do back extensions, standing variations, but lying down offers more protection for an injured or weak back, and less chance of injury than in standing variations. It also mimics the way we first activated our Du meridian as babies.
The Du meridian is one of the Eight Extra (Extraordinary) meridians. While all meridians form during embryonic development, the Eight Extra meridians are believed to only fully activate sometime after birth. The physical activity a baby engages in to both promote and reflect the activation of the Du meridian involves gradually pushing him- or herself toward an upright position. First, the upper part of the back activates, near the base of the neck, at the acupoint Du 14, and the baby raises his or her head. Soon after, the lower back is activated, near the point Du 4, and the baby arches his or her back, pushing itself up, elongating the paravertebral muscles and spine. You’ll see that this exercises mirrors that process exactly. In a baby, this instinctive behavior is the physical manifestation of perceptual and psychological states, the lifting of the head allowing the baby to look toward the horizon, establishing an initial goal. Once the goal is seen, the baby develops the posture to move toward that goal. In very goal-oriented adults, this can be a causative factor in stiff necks and low back pain from doing too much. None of the other back exercises taught here involve extension, so they all will counterbalance that tendency. Done gently, back extensions can unlock those stiff areas in different ways and provide other benefits as well.
Purpose
Physical: Opens the front of the spine, elongates the paraspinal muscles (the muscles that are at either side of the vertebral column), massages the kidneys and adrenals, may improve general and sexual vitality.
Energetic: Stimulates qi flow through both the Du and Ren meridians, and secondarily the Urinary Bladder, Kidney, Stomach, Spleen, and Liver meridians. The Du meridian governs the body’s Yang qi, and the Ren governs the Yin qi. They overlay the Microcosmic Orbit, which has a harmonizing effect on the whole body; the energetic benefits are far-reaching.
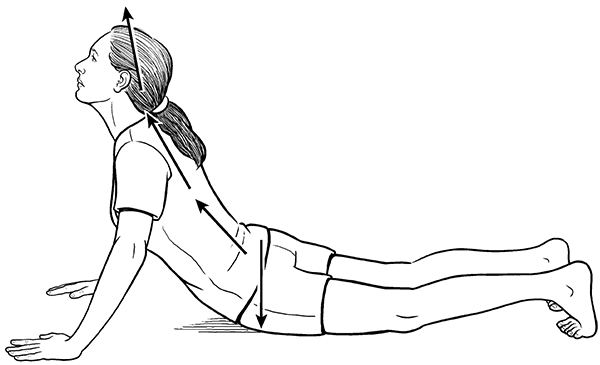 Figure 6.13 (Lying Du Meridian Back Extension)
Techniques used
Stretching, back extension, focused breathing.
Method
Lie face down on the ground, with your palms down directly under or slightly in front of your shoulders, as though you were about to do pushups. Your toes can be pointing straight back or curled so that the toe pads are touching the ground. Lift your head so that you are looking straight forward. Then on an exhalation, push up with your hands and arms, and only gently engage your low back muscles to arch your back. Make sure you support your weight with your hands and arms throughout, as this will prevent the possibility of back strain. Keep your pelvis in contact with the ground, which will increase the rearward bend in your low back. Feel a lengthening of your entire spine, from your tailbone to the top of your head. If you feel a compression in your back, press your hands a little more strongly into the ground to try to lengthen your spine and reduce the compression (Fig 6.13). If you are not able to do that, you may need to lower your chest slightly closer to the ground, only to the point where the compression disappears. If you are able, arch your back far enough to be able to look straight up to the sky. You may feel a stretch along the front of your belly. That is both normal and beneficial. At whatever point you reach your limit of extension, take a few slow, deep breaths. Breathe into any area of restriction, and on the exhalation, try to relax and release it. You may be able to increase your extension after a few exhalations. Hold this posture for five to ten breaths, and then lower yourself back to your starting position on an exhalation. Repeat three times.