Chapter 8
Combining Other Crafts with Jewelry Making
In This Chapter
![]() Using scrapbooking methods to create custom jewelry components
Using scrapbooking methods to create custom jewelry components
![]() Knitting and crocheting bold accessories
Knitting and crocheting bold accessories
![]() Stitching some truly unique jewelry
Stitching some truly unique jewelry
Chances are if you’re interested in making jewelry, you’re interested in other crafts as well. You may be an expert at scrapbooking but new to jewelry making. Or maybe you’re an accomplished knitter but haven’t ever strung a bead. I love almost all craft mediums and am skilled (to varying degrees, of course) in many different mediums. Something special happens when you combine craft mediums.
In this chapter, I coordinate a few of my other craft-loves with jewelry making to create fun beginner projects that will get your creative juices flowing and let you use some of the other tools you may have on hand. This chapter may just be the push you need to pick up that crochet hook you’ve been eyeing and get stitching!
Tapping into Scrapbooking Techniques
Scrapbooking is still a popular hobby. People preserve memories in artistic ways in books of all sizes. Scrapbooking has left the simple photo album in the dust. Many people incorporate texture and mixed media into scrapbook pages to create works of art.
In this section, I give you some ideas for using scrapbooking techniques and materials to create custom jewelry pieces. I show you that rubber stamps aren’t just for paper. With the right ink, you can stamp virtually any surface, including shrink plastic. You can use glass tiles to showcase your favorite scrapbooking paper to create pendants or other pieces. And finally, I show you how to turn your favorite photos into a one-of-a-kind charm bracelet.
Rubber stamping custom components
Rubber stamping is a popular technique to embellish scrapbook pages or make handmade cards and invitations. Walk into a crafts store or scrapbook store, and you can find rubber stamps of pretty much anything. Whether you’re into sports, animals, cooking, or vintage items, there’s a stamp to match. Use them to make charms, tags, or earrings. Project 8-1 shows you how to use rubber-stamping techniques and shrink plastic sheets to create some truly fun earrings.
 Stamping is a great crossover technique for use with polymer clay jewelry pieces as well. You can even use a stamp without ink to create an impression on your clay before you bake it. For detailed instructions on using this technique to make a Funky Flower Initial Pendant, see Chapter 12 in my other book, Jewelry & Beading Designs For Dummies (Wiley).
Project 8-1: Shrink Plastic Chandelier Earrings
Some rubber stamps are so pretty you don’t want them hidden away in an album. Instead, you can wear the stamped images all the time by using them to make earrings or charms from shrink plastic. I used a large chandelier stamp to make the Shrink Plastic Chandelier Earrings in Figure 8-2.
You can use any stamp to create similar earrings. I recommend that you choose a large stamp because the plastic shrinks to roughly one-third of its original size during heating. Take a look at Figure 8-1 to see the before and after versions of the chandelier component.
Tools and Materials
Chandelier rubber stamp
Alcohol-based ink stamping pad, silver (I used Staz-On)
1 sheet shrink plastic, black (I used Shrinky Dinks brand)
Oven or toaster oven
Scissors
1⁄8-inch hole punch
6 2-inch lengths of 24-gauge pink wire
12 2mm bicone clear AB Swarovski crystals
6 2mm bicone pink Swarovski crystals
Nylon- tipped round pliers
Chain-nose pliers
10 silver jump rings
2 lever-back earwires, silver
Small file (optional)
1. Preheat your oven to 250 degrees. Double check the instructions on the brand of shrink plastic you purchase. Follow the preheating directions if they differ from mine.
2. Stamp two chandelier images onto the sheet of shrink plastic. Let the images dry for a few minutes so they don’t smear. Use the scissors to cut out the chandeliers, following their shape as closely as possible.
Use the scissors to round out any hard edges before baking. As the piece shrinks, it gets thicker. Pointed edges become sharper and can be painful to the wearer. You don’t want your candles to stab anyone! If you find any sharp edges after baking, you can file them down a bit, but it’s easier to round them before baking.
3. Punch four holes in each chandelier: one at the top and three along the bottom. You will hang an earwire at the top and three beaded dangles along the bottom to create the traditional chandelier look.
4. Follow the manufacturer’s directions to shrink your components. The directions for Shrinky Dinks recommend baking the pieces on a cookie sheet lined with brown paper. Other brands may recommend parchment paper or foil. Set them aside to cool.
Don’t be alarmed if the pieces distort, warp, and wrinkle during the cooking process. They will likely flatten out completely (as shown in Figure 8-1) in the oven. If they don’t, they’re probably not finished. Wait a bit longer for them to flatten out. If they stop changing shape and are still a bit bowed, use a flat-bottomed jar or glass to flatten them while they are warm. They’ll be malleable for 30 to 45 seconds, so work fast. You can heat them up again if you need to, though, so if you need to work on each one separately, don’t panic.
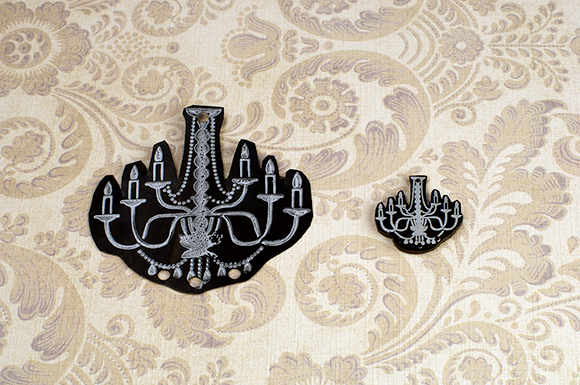
Photograph by Andy Dismore
Figure 8-1: Earring components before and after shrinking.
 The shrink plastic needs to be in the oven only a couple of minutes, so stay close by and watch the pieces with the oven light on until they are finished. And remember, the plastic, oven, and cookie sheet will be hot. Make sure you use an oven mitt or hot pad to touch hot surfaces.
5. While the components are cooling, make your bead dangles. Create a 1⁄4-inch spiral on one end of a pink wire. String beads in this order: one clear, one pink, one clear. Using your pliers, create a wrapped loop. See Chapter 6 for help with wrapped loops and working with wire. Repeat until you you’ve used all your beads and wire. Set aside.
I highly recommend using nylon-tipped round-nose pliers for this project. Regular pliers can nick the colored wire and damage the color coating, which looks pretty sloppy. If you don’t want to buy separate pliers for this project, consider getting a tub of Tool Magic (available at most crafts stores) to coat the tips of your pliers and protect your wire. Take a look at Chapter 2 for more tips on using the right tool for the right job.
6. Use your pliers to open a jump ring. Slip one bead dangle onto the jump ring. Slip the jump ring through one open hole on the bottom edge of the chandelier. Use your pliers to close the jump ring. Repeat with two more dangles. Slip one more jump ring through the top hole of the chandelier component. Add the loop of the earwire. Close the jump ring. Set aside.
Save time and use your pliers to open all your jump rings at once. You can open them one at a time, of course, but I like to open mine up at the same time; I feel like I’m running my own little factory. Take a look at Chapter 2 for help opening and closing jump rings.
7. Repeat Step 6 to make your second earwire and complete your set.

Photograph by Matt Bowen
Figure 8-2: Shrink Plastic Chandelier Earrings.
Repurposing paper for jewelry designs
Scrapbook papers provide an endless supply of inspiration for creating a layout of your family’s photos. But the next time you’re browsing the stacks and racks of glorious paper, turn your creative eye toward making fun and funky accessories.
The technique I demonstrate in Project 8-2 works well with digital scrapbooking too. You can create a mini-layout that fits inside the glass tile used in this project and wear it around every day. Just resize your layout to fit your glass tile, and print it on a laser printer. (Inkjet prints tend to run and smear when glaze is applied to them.) Then follow the remaining directions in the project to create your own mini-masterpiece.
Project 8-2: Scrapbook Paper Pendant
For this project, which is pictured in Figure 8-4, I was looking to create a colorful piece to bring in some whimsy to my everyday wardrobe. And I wanted to include my current obsession: fat little birds. The little owl sticker I chose falls squarely into that category. Of course, you can use whatever papers and embellishments you want. However, I recommend that you don’t use more than two layers so that your glass tile adheres to your paper properly.
 On the DVD that accompanies the printed version of this book (and at
 http://booksupport.wiley.com for you e-readers), I do a similar version of this project using a vintage-inspired postage stamp and antique copper findings.
Tools and Materials
1 1-inch rounded square domed glass tile
Piece of scrapbook paper
Stickers (optional, but I recommend a fat little bird)
Glass-polishing microfiber cloth
Diamond Glaze
Paintbrush
Cutting mat and X-Acto knife
File
E-6000 glue
Glue-on silver bail
Silver ball chain with clasp
1. Prepare your paper and stickers, if using. Slide your glass tile around the paper to decide exactly which section of the paper to capture with the tile. The domed glass magnifies the image underneath it, so slide it around to make your selection. Take a look at Figure 8-3 to see how I framed the scrapbook paper for my pendant.
2. Use a paintbrush to apply a generous amount of Diamond Glaze to a section of paper you’re using. Using a microfiber cloth, polish the flat bottom of a glass tile to remove any fingerprints or debris. Place the cleaned tile on top of the glaze. Lay it gently on the paper; don’t press it into place. The tile should float on top of the glaze. Make sure the tile is squared up and lined up on the image when you’re done. Allow the pendant to dry about an hour.

Photograph by Andy Dismore
Figure 8-3: Select the section of paper you want to frame with the glass tile.
3. Lay the dried pendant on a cutting mat. Cut around the pendant with an X-Acto knife. Use your file to smooth away any rough edges. Use the paintbrush to apply a thin layer of Diamond Glaze to the back of the pendant to fully seal the back of the paper. Allow the pendant to dry upside down completely.
If I’m not in a hurry, I usually let it sit overnight at this stage. Make several at a time, and wake up to presents for all your friends and neighbors.
4. Examine your beautiful work and determine what is the top and what is the bottom. Figure out how you want the pendant to hang. Slide your bail around to decide where to place it. You may decide diagonal is best, or square may be just right. It’s your call.
5. When you’re satisfied with the placement, apply a smidge of E-6000 to the glue pad of the bail. Holding the tile with the right side facing you, press the bail gently into place on the back. Flip it over, and make sure the bail firmly adheres to the tile. Turn it back with the right side facing you to make minor adjustments. Let the pendant dry for a couple of hours.
Take a look at this book's DVD (or go to http://booksupport.wiley.com for you e-readers) for a detailed look at attaching bails (both glue-on and pinch bails) to tiles and cabochons to create pendants and charms.
6. String the completed pendant onto the ball chain to create the necklace.
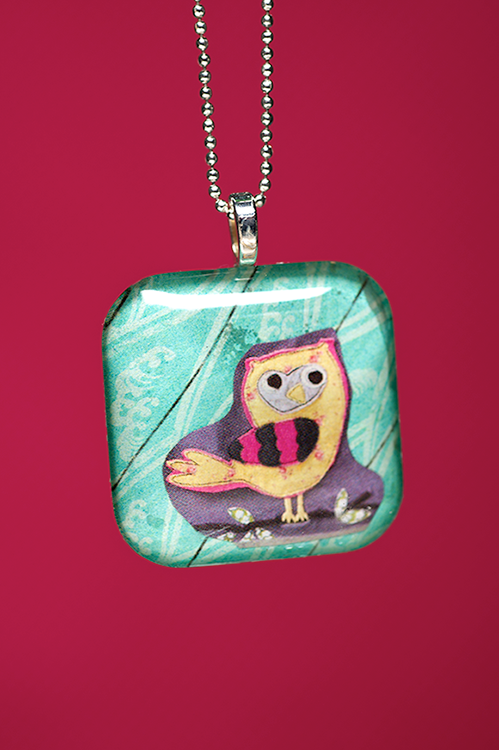
Photograph by Matt Bowen
Figure 8-4: Scrapbook Paper Pendant.
Using photos for one-of-a-kind pieces
Photos are a great way to create unique jewelry pieces. Use photo-editing software to crop your pictures, and then resize them for your projects. I recommend that you print the pictures on a printer that uses toner because inkjet photos run when you apply adhesives or sealers to them. If you don’t have a laser printer at home, you can make color copies of your cropped and resized inkjet versions at an office supply store.
Alternatively, you can upload them to the photo printer of your choice and have photos made of your tiny masterpieces-in-the-making. Brick and mortar chains like Walmart, Costco, and Target let you upload from home and pick photos up the same day. Or you can use an online print house, like Snapfish (www.snapfish.com), that can print photos and mail them to you.
Project 8-3: Instagram Bracelet
The social media service Instagram (www.instagram.com) allows users to create and upload vintage-y looking photos to their profile. Then followers can comment on and like the photos. I use this site quite a bit, but my kids are crazy about it. They upload pics of breakfast, their feet, our dog, whatever. Because the images are constantly changing, I wanted a way to preserve a few of my favorites from this year. Printing them out and placing them in a scrapbook was one possibility, but I thought a memory bracelet would be even more fun.
One of the reasons Instagram is visually appealing is that all the photos are square. Seriously. All. Of. Them. So even when the photos are treated with different filters or taken of different countries, people, weather, pets, or so on, this shape unifies them. I wanted to create a bracelet that would mimic that square shape. Voilà! The Instagram Bracelet shown in Figure 8-7 was born.
I ordered my bracelet kit from Sun and Moon Craft Kits (www.sunandmooncraftkits.com). I purchased the shiny silver square bracelet kit with 6 15mm bezels. If you use this same bracelet kit, format your pictures to .55 × .55 inches, and they will fit perfectly. If you choose a different bracelet, just measure the bezel and format your pictures to match.
Tools and Materials
8-inch bracelet kit with square bezels and domed glass tiles
A selection of photos sized to fit your bezels
Glass-polishing microfiber cloth
Diamond Glaze
Paintbrush
Cutting mat and X-Acto knife
Nail file
1. Use a paintbrush to apply a generous amount of Diamond Glaze to one photo. Using a microfiber cloth, polish the flat bottom of a glass tile. Place the cleaned tile on top of the glaze. Don’t press it into place, or you’ll create tiny bubbles or glittery occlusions in the finished piece. Make sure the tile is squared up and lined up on the photo when you’re done. Repeat this step with remaining photos and tiles. Allow them to dry completely, about an hour.
I glue the tiles onto my photos before cutting them out. I find this technique makes it easier to keep the tiles square on the photos. Take a look at them in Figure 8-5.
2. Trim around the glass tiles with the X-Acto knife. Use the file to smooth any rough edges on the paper. Dry fit the glass tiles into the bezels before gluing to make sure they fit. Continue trimming and filing as necessary to get them to fit.
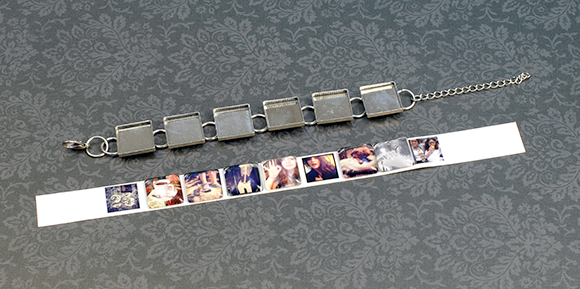
Photograph by Andy Dismore
Figure 8-5: Glue the tiles to the photos.
3. Apply a small dab of Diamond Glaze to one bezel. Place one glass tile into the bezel. Press it firmly into the bezel to make sure you have a good fit. Take a look at Figure 8-6 to see this technique.
4. Repeat Step 3 with remaining tiles and bezels to complete your bracelet.
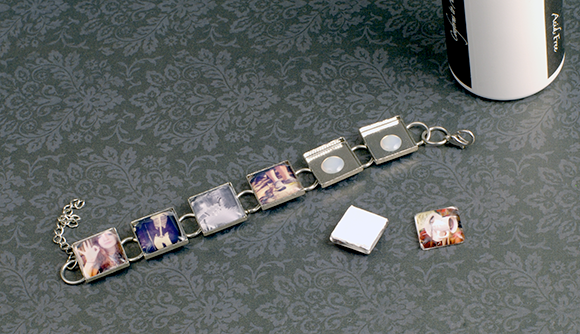
Photograph by Andy Dismore
Figure 8-6: Glue your tiles into the bezels.

Photograph by Matt Bowen
Figure 8-7: Instagram Frame Bracelet.
Finding Inspiration in Fiber Arts
Knitting and crocheting are two of the most popular fiber arts. Because they’re already used to make clothing and accessories, they both lend themselves easily to jewelry design. You can crochet a simple chain and slide on a pendant, or knit a small swatch and attach a pin back for an easy accessory. In this section, I give you two slightly more complicated, but still very doable, projects.
Don’t stop with knitting and crochet. Embroidery is another great technique for embellishing beaded items and jewelry pieces.
Project 8-4: Braided Knitted Bracelet
This bold and chunky bracelet, shown in Figure 8-10, is a great beginner knitting project because gauge really doesn’t matter. In knitting, gauge refers to the number of stitches and rows in an inch of fabric. Because you knit the strands of the bracelet to certain lengths rather than a set number of stitches, you can’t go wrong. You just get lots of practice making the knit stitch without the hassle of trying to make it a specific size.
You may notice that the bracelet doesn’t have a clasp. Once you knit it up and weave the tails together, you simply slip it over your wrist. For this reason, I use acrylic yarn; I think it holds its shape a bit better. I didn’t want it to sag and stretch over time. You can, of course, use whatever material (or color) you like.
If you need help with knitting basics, such as casting on or binding off, take a look at Knitting For Dummies by Pam Allen, Trisha Malcolm, Rich Tennant, and Cheryl Fall (Wiley), or search for videos of these techniques at www.dummies.com.
Tools and Materials
2 size 5 double pointed needles
1 ounce worsted weight dark grey yarn, acrylic (you need 1⁄4 skein of yarn at most)
Yarn needle
1. Cast five stitches onto one needle. Using the other needle, knit all five stitches. Do not turn your work. Simply slide the stitches to the opposite end of the needle and knit them again. The stitches curve around to create a rounded cord.
If you'd like a video to show you how to knit an I-cord, take a look at http://www.dummies.com/how-to/content/how-to-knit-an-icord.html
2. Continue knitting until your I-cord reaches 91⁄2 inches. Bind off. Repeat five times, creating six I-cords in total.
3. String the end of the tips of all six I-cords onto a knitting needle to stabilize them for braiding. Take a look at Figure 8-8 to see how this looks.
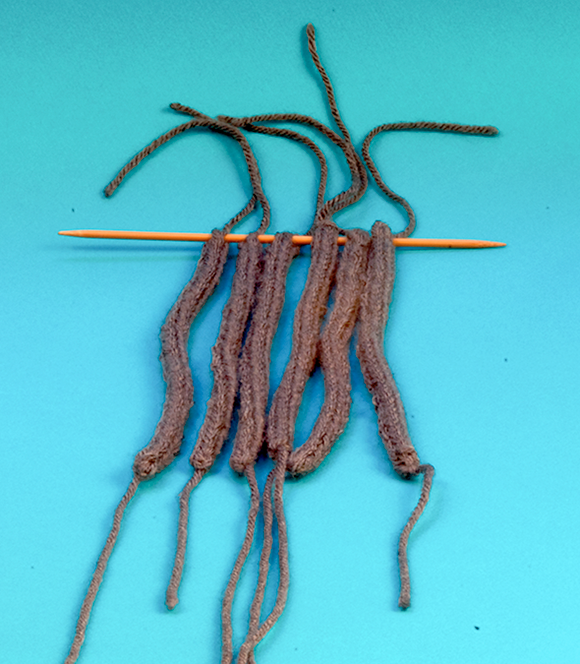
Photograph by Andy Dismore
Figure 8-8: String I-cords onto a knitting needle to stabilize them for braiding.
4. Braid the I-cords. Hold two I-cords together to create a single strand. You should have three strands. Make a simple braid by passing the left strand over the middle, then the right strand over the middle. Repeat until you’ve braided the length of the bracelet. String the open ends of the I-cords onto another knitting needle to hold them into place. Take a look at Figure 8-9 to see how this looks.
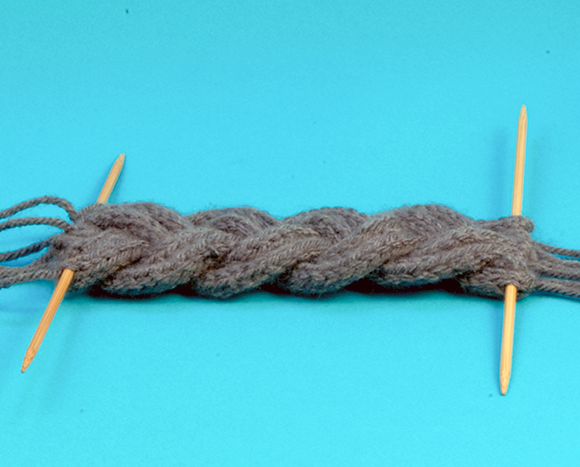
Photograph by Andy Dismore
Figure 8-9: Braid the I-cords and then secure them temporarily with the other needle.
5. Using a yarn needle and the tails of the I-cords, join the ends of the bracelet. Maintain the flow of the braid and remove each I-cord as you join it to its partner on the other needle. Continue until all the ends are joined. Trim any lingering tails.
6. Block, or reshape, your bracelet if necessary.
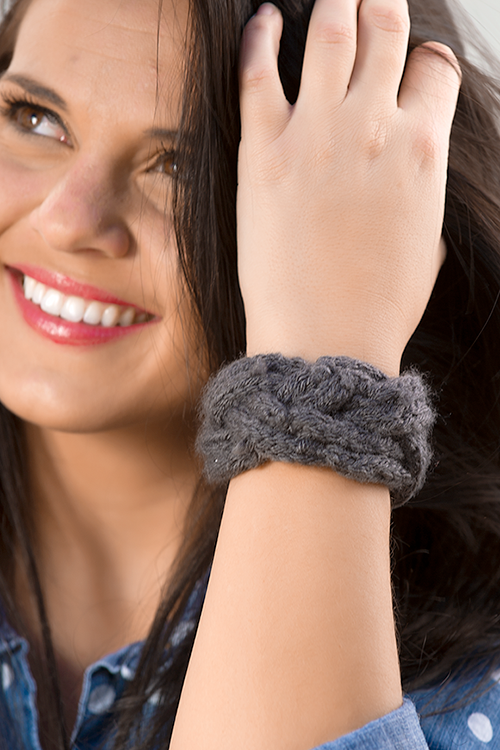
Photograph by Matt Bowen
Figure 8-10: Braided Knitted Bracelet.
Project 8-5: Crochet Flower Necklace
Crochet is an incredibly popular hobby. I must confess, though, that when my great-grandmother was trying to teach me, I should have paid more attention. Crocheting flowers is often one of the first projects someone new to crochet will tackle, and this project is a great way to display your favorite crochet flower patterns. Take a look at Crocheting For Dummies by Karen Manthey, Susan Brittain, and Julie Holetz (Wiley) if you need help to get started.
If you are like me and not yet handy with a hook, you can buy ready-made crocheted flowers. I got these sets at Hobby Lobby. That’s all you need to enjoy the semi-handmade beauty of this bold necklace pictured in Figure 8-13.
I create several statement necklaces in this book that can be used interchangeably with different chains and cords. This necklace is one of them. I sew on jump rings to allow you to change the chain whenever it strikes your fancy.
Tools and Materials
4 magenta crochet flowers (1 large, 1 medium, 2 small)
4 dark gray crochet flowers (1 large, 1 medium, 2 small)
4×5-inch half-moon piece of felt backing, any color (I used black.)
Fabric glue, clear-drying (I used Fabri-Tac.)
Needle and coordinating thread (I used black.)
2 10mm jump rings, any color (I used antique bronze.)
2 lobster claws, any color (I used antique bronze.)
12 inches large link chain (oxidized silver)
2 pairs of pliers (chain-nose preferred)
1. Arrange the crochet flowers on the felt backing in a pattern you like. Move them around to make sure you like the placement, color combination, and size variations. Make sure to completely cover the felt backing so you can’t see it from the front. Overlap the flowers to create a full, layered look. Use Figure 8-11 as an example.
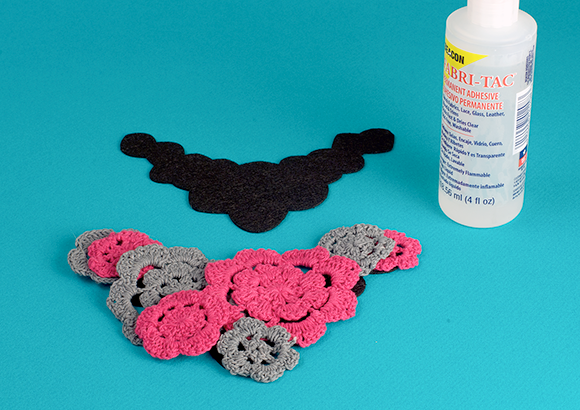
Photograph by Andy Dismore
Figure 8-11: Arrange the crochet flowers on the felt backing.
If you create a different arrangement with your flowers, take a quick snapshot of your arrangement so you can remember what it looks like. You’ll appreciate the visual reminder as you’re gluing the flowers together in Step 2.
2. When you’re happy with the arrangement, remove the flowers. Working from the bottom-most layer, use the fabric glue to glue the flowers into place onto the felt. Continue gluing and layering flowers until they’re all in place. Set aside to dry for 24 hours.
Do your best to avoid getting glue on the fronts of the flowers. While the glue is clear, it can still mar your piece by leaving either a wet-looking spot or sort of a flaky stain.
3. When the piece is dry, double check to make sure the flowers are solidly connected. If you do have any visible small glue bits, now’s the time to gently scratch them with a straight pin or sewing needle, and brush them away.
4. Turn over your piece to reveal the back of the felt backing. Sew a jump ring onto each tip of the felt. Repeat with the remaining jump ring. Use the pliers to attach the loop of a lobster claw to each jump ring.
Make sure to place the rings low enough on the tips that neither the jump rings nor the lobster claws are visible. Take a look at Figure 8-12 to see how this looks.
Photograph by Andy Dismore
Figure 8-12: Sew jump rings onto the back of the felt.
In my opinion, hiding the metals gives you more flexibility to choose and switch out your chain material later; you don’t have to worry about matching or contrasting it. Plus, I like the way the chain disappears behind the flowers. It’s definitely a personal preference, however, and if you want to show the jump rings and lobster claws, you certainly may. That’s the beauty of making a project yourself: You get to make these decisions.
5. Attach each end of the chain to a lobster claw to complete the necklace.
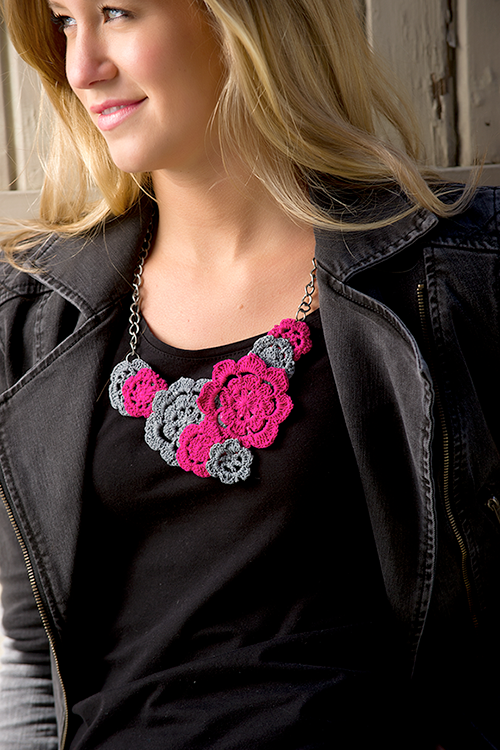
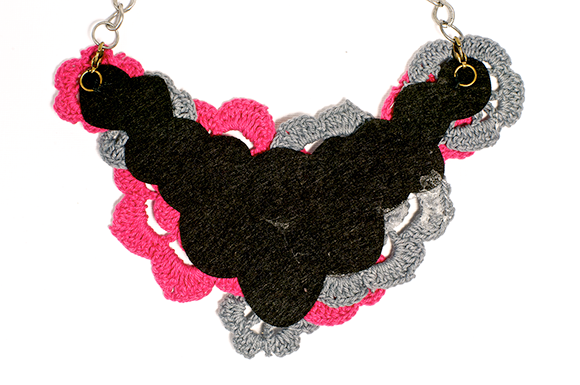
Photograph by Matt Bowen
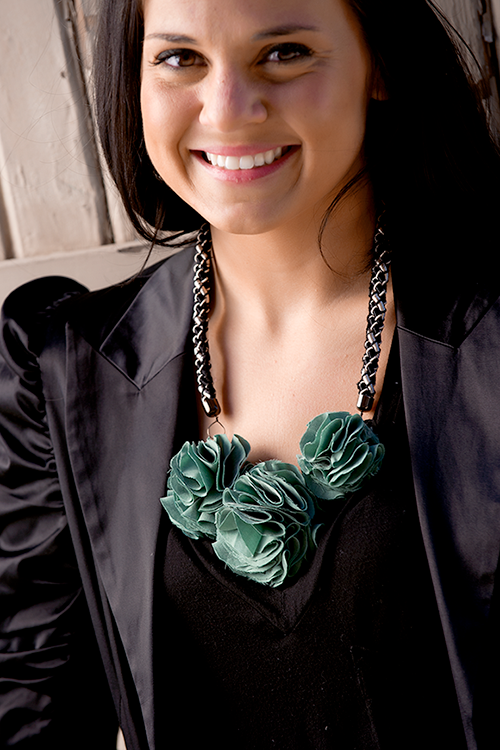
Figure 8-13: Crochet Flower Necklace.
Sewing It All Together
Yes, this section is all about sewing your way to beautiful, fashionable accessories. No, you do not need a sewing machine to create any of these pieces. The only sewing-specific equipment you need is a needle and thread. It doesn’t get much simpler than that!
In this section I use sewing techniques, notions, and materials to create several fashionable accessories. The first is a statement necklace made from fabric pom poms. The next is a Fabric Flower Pin made from scrap fabric. And finally I show you how to create a Steampunk- inspired choker straight out of a Victorian clockwork shop with a bit of sewing and some wire wrapping.
Project 8-6: Fabric Pom Pom Bib Necklace
Some might say that I’m a bit addicted to creating fabric pom poms at the moment. I had looked longingly at them in design magazines, in catalogs, and online for years before realizing how simple they really are. Now I’m making them myself constantly. What better way to show off your latest crafting obsession than to wear it around your neck for all to see? Check out my creation in Figure 8-16.
This necklace is another one that allows you to swap out different elements as you like. Wear the bib, the wide statement part of the necklace, with the cord I include in the project steps, or simply add a chain like in Project 8-5.
The sizes of the circles you trace don’t have to be extremely precise. For example, a standard lid to a canning jar is about 3 inches across (not quite, but almost). It’s perfect to create the largest circles. You need three different sizes — small, medium, and large — to create the effect.
Tools and Materials
24×36-inch piece of fabric, sage green (I used a thin microfiber with a very slight nap)
3 circle templates, diameters roughly 2 inches, 21⁄2 inches, and 3 inches
Fabric marker
Fabric scissors
2 4×5-inch half-moon pieces of felt backing (I used black.)
Needle and coordinating thread (I used black.)
2 10mm jump rings, any color (I used antique bronze.)
2 lobster claws, any color (I used antique bronze.)
2 pairs of pliers (chain-nose preferred)
Loop-making pliers (or a fat, round marker) to create a 10mm loop
10 inches 8mm black and white twisted cord
8 inches 18-gauge wire, half hard, antique bronze
2 8mm cord ends, antique bronze
E-6000 glue
Wire cutters
1. Trace 20 circles of each diameter onto fabric to create a total of 60 circles. Cut them out. Set them aside in separate stacks. Use sharp scissors to cut out the circles so they have a nice clean edge. Doing so makes the finished necklace look much more professional.
Don’t mix the different sizes of circles. Use only one size fabric circle to create a pom pom. If the circles aren’t the same size, the edges won’t be even, and your finished pom pom’s shape will be distorted.
2. Create the large pom pom. Take one 3-inch fabric circle and fold it in half. Fold it in half again to make a cone. Using the needle and thread, sew through the tip of the cone to secure it. Continue folding and connecting the 3-inch circles until you have them all on a single thread. Slide the cones together to begin to form a flower. Use Figure 8-14 as a guide. When you’re happy with the size and shape of your pom pom, sew it to the center of the felt backing.
3. Repeat Step 2 two more times to create a medium-sized and then a small pom pom. Attach each pom pom to the open corners of the felt backing, covering it completely.
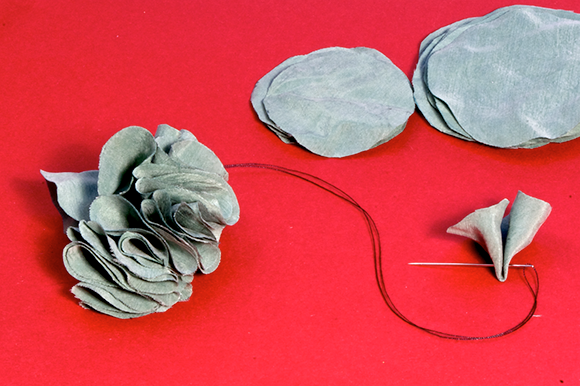
Photograph by Andy Dismore
Figure 8-14: Create cones and sew them together to create pom poms.
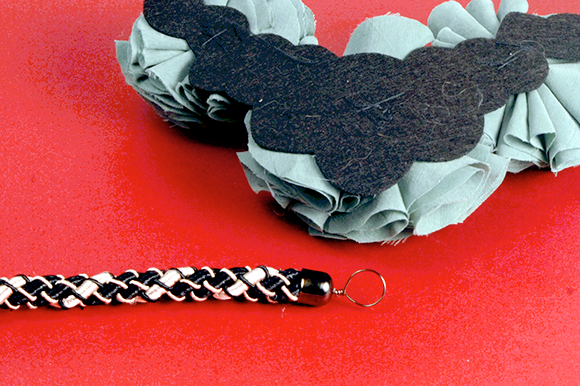
4. Turn the bib over. Sew the jump rings onto the corners of the back of the felt backing. Refer back to Figure 8-12 to see how to do this step. Use the pliers to attach lobster claws to each jump ring. Set the bib aside.
5. Cut the wire in half. Tightly wrap the end of one piece of wire around the tip of twisted cord. (It should look very similar to Figure 5-11 in Chapter 5.) The goal here is to secure the various strands of the cord tightly without adding bulk to it. Slide the cord end onto the wire and fit it over the end of the cord and wire bundle. Make sure that the cord end covers it all. If it doesn’t, remove the wire and try again. The transition between the cord and cord end should be clean. Take a look at Figure 8-15 to see how these connect.
Photograph by Andy Dismore
Figure 8-15: Use wire and a cord end to terminate you necklace segment cleanly.
6. When your wire is positioned properly, apply a dab of E-6000 to the tip of the bundle. Slide the cord end into place. Pull the wire through the end cap snuggly, ensuring that the cord is in firm contact with the cord end. Use your large loop-making pliers (or a large marker) to make a wrapped loop like the one in Figure 8-16. Check out Chapter 6 if you need details on how to make wrapped loops.
7. Repeat Steps 5 and 6 with the remaining supplies. Clip the bib to the loops on the cord to complete the necklace.
Photograph by Matt Bowen
Figure 8-16: Fabric Pom Pom Bib Necklace.
Project 8-7: Fabric Flower Pin
This funky pin is a great addition to a backpack, beanie, or blouse. Make it with fabric scraps, recycled jeans, or even old T-shirts. You can make it in a million colors and sew on beads of your choice to change your look daily. If you’re not a pin wearer, feel free to skip the pin back and sew this flower onto a headband.
I used a rotary cutter and cutting mat to quickly cut a strip from a standard length of fabric. You can use scraps and simply sew them together to get enough length to make this flower in a funky patchwork design.
Tools and Materials
11⁄2- or 2×54-inch strip of fabric (I used a green and white floral print)
1 2-inch felt circle
1 sew-on pin back
3 6mm round faceted crystals, clear
Needle and coordinating thread
Instant bond fabric glue (I used Tear Mender.)
Clothespin (optional)
1. Using the needle and coordinating thread, hand sew the pin back onto the felt circle. Turn it over.
2. Apply a dab of fabric glue to the center of your felt. Set aside. Beginning at one end of your fabric strip, twist the fabric into a makeshift cord. Press the end of the twisted fabric into the dab of fabric glue and begin to coil the fabric around itself. Take a look at Figure 8-17 to see how this works.
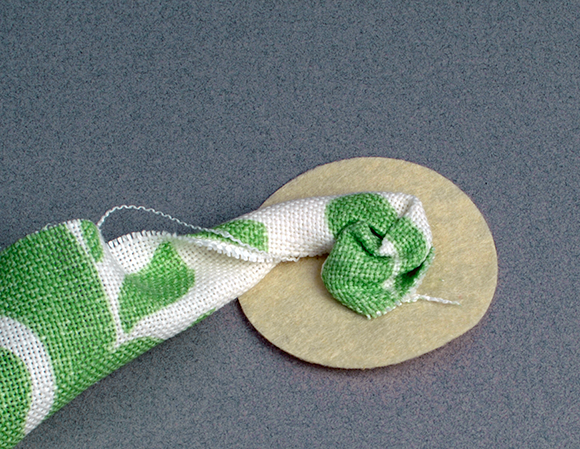
Photograph by Andy Dismore
Figure 8-17: Twist the fabric and coil it around itself working from the center out.
3. Apply more glue as you need to, working from the center of the felt circle toward the outside edge. Continue twisting the fabric and coiling it around itself until you use all the fabric and it looks like Figure 8-18. Tuck the end and edges in neatly, using more glue to secure it. Clamp the end with a clothespin if necessary to let it dry.
If you use Tear Mender, it dries very quickly and you likely won’t need to clamp the end. Feel free to use a different fabric glue if you prefer; just adjust your drying time as necessary.
4. When the glue is dry, sew the crystals onto the center of the flower.

Photograph by Andy Dismore
Figure 8-18: Continue coiling and twisting your fabric to make a flower.

Photograph by Matt Bowen
Figure 8-19: Fabric Flower Pin.
Project 8-8: Steampunk High Collar Choker
Lace and trims from the sewing department are the basics of this easy choker. Choose a favorite cameo, and you’re on your way to making this design your own.
I love using mixed metals in Steampunk designs because it gives a piece a sort of cobbled-together-in-your-home-laboratory feel. If you prefer, you can definitely use all brass, all silver, or all whatever metal you choose.
Make a necklace extender for this choker. Because you want it to fit tight along the neck, you want to make sure you can get it tight enough to display everything properly, so you may need to wear it a little higher (or lower) than other chokers. The extender helps you get the right fit every time.
Tools and Materials
14 inches scalloped lace, ivory
14 inches lace and pearl trim, chocolate
Straight pins
Needle and brown thread
Scissors
2 ribbon ends, antique copper
Hypo Cement
2 16mm spoked gear links, brass
2 18mm closed gear links, brass
2 20mm open gear links, antique brass
2 25mm open gear links, brass
20×30mm oval cameo with filigree setting, antique brass
1 25mm spoked gear link, brass
3 4mm round pearls, ivory
3 2-inch headpins, antique brass
9 8mm jump rings, antique brass
1 lobster clasp, antique brass
5–6 inches of small link chain
Chain-nose pliers
Wire cutters
Round-nose pliers
1. Pin the lace and trim together lengthwise as shown in Figure 8-20. Sew the pieces together, hiding the working thread on the back of the piece. Tie a knot in the thread on the back and trim any extra. This becomes the base of the choker. Set aside.
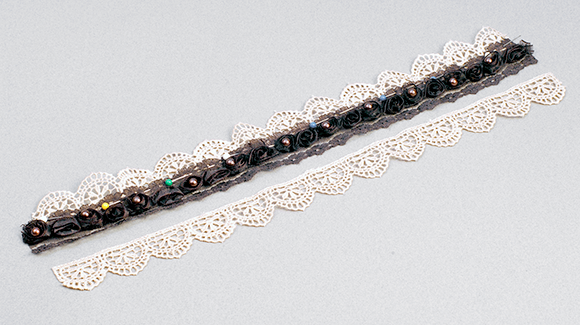
Photograph by Andy Dismore
Figure 8-20: Sew the trim and lace together to create the choker.
2. Create the gear layers using Figure 8-21 as a guide. Using the Hypo Cement, glue a 16mm spoked gear link to an 18mm closed gear link, as shown in the top set of gears in Figure 8-21. Repeat to make a second set. Next glue a 20mm open gear link to a 25mm open gear link. It should look like the lower set in Figure 8-21. Repeat to make a second set. Set all four sets aside to dry for 10 minutes or so.
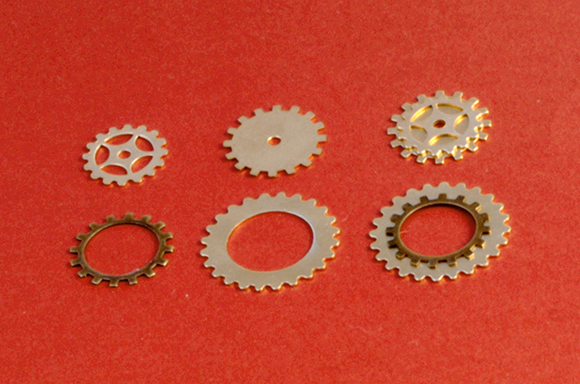
Photograph by Andy Dismore
Figure 8-21: Glue gears together to create multidimensional elements.
For best results, add a small amount of Hypo Cement to the underside of the top gear link, rather than to the top of the bottom link. This technique allows you easily to put the glue precisely where you need it. And it improves the chances that the glue won’t be visible.
3. String one pearl onto a headpin. Follow it with the 25mm spoked gear link. Use chain-nose pliers to bend the wire at a 90-degree angle. The pearl is now the center of the gear, and the wire is flat against the gear. Use your pliers to create another 90-degree angle about 1⁄8 inch above the gear. Use the round pliers to begin a wrapped loop, but before closing it, slide the loop onto the bottom of the cameo’s filigree setting. Then, pick the setting up and make sure both the pearl and gear component and the cameo and setting are facing the same way. Also double check that the pearl and gear component are hanging from the exact middle of the bottom of the cameo setting. Once you’ve confirmed both, finish the wrapped loop.
4. Use pliers to open a jump ring. Slide it to the top of the cameo setting. Before closing it, attach the jump ring to the lowest point of the center-most scallop of the lace. Take a look at Figure 8-22 for placement. Close the wrapped loop.
Throughout the remainder of the project, I recommend that you pick up and double check the placement of dangles and components. You want them all to hang well and connect properly, so make any needed adjustments as you go.
5. String another pearl onto a headpin. Then string on one of the layered spoked gear sets you made in Step 2. Make sure the pearl is situated on top of the smaller gear rather than on top of the larger gear. Take a look at Figure 8-22 to see how this looks. Use pliers to make a 90-degree bend in the wire so that it lays flat against the back of the gears. Make a 90-degree bend just above the gear as you did in Step 3. Create a wrapped loop. Repeat with the remaining layered spoked gear set, headpin, and pearl. Set aside.
6. Use jump rings to attach remaining components to the necklace, using Figure 8-22 for placement.
7. Use your pliers to attach the ribbon ends to the ends of the choker. Look at Figure 9-24 in Chapter 9 for help attaching ribbon ends. Use the pliers to open a jump ring. Slide on the lobster clasp. Then slide the jump ring through the loop of one ribbon end. Close the jump ring.
8. Attach another jump ring to the other ribbon end. Before closing it, slide on the chain. Close the jump ring to complete the necklace.
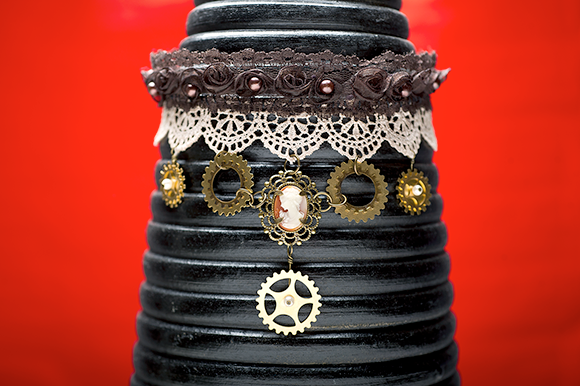
Photograph by Matt Bowen
Figure 8-22: Steampunk High Collar Choker.