Chapter 11
Making Jewelry for Men
In This Chapter
![]() Looking at what’s hot for dudes
Looking at what’s hot for dudes
![]() Making pieces from the right stuff
Making pieces from the right stuff
![]() Choosing the right colors
Choosing the right colors
If you’re like me, you love making presents for people you love. That’s how I got started making jewelry: I was looking for an inexpensive way to make presents for my family and friends. My female recipients were easy, but men tended to stump me. Most of my male relatives didn’t wear jewelry. Or if they did, it was gold chain. (It was the ’90s. Try not to judge them too harshly.)
In this chapter, I put together my best tips for making jewelry that guys like and will actually wear. It’s no good to put time and money into a piece if your favorite guy won’t wear it. I give you the latest in trends for men’s jewelry. I also help you figure out what materials and colors work in men’s designs.
Identifying Men’s Design Trends
Men tend to prefer simple designs rather than elaborate, detailed pieces. They also generally appreciate nontraditional materials (although natural materials can fit the bill as well) and organic colors. The first project in this chapter illustrates how you can tap into these design fundamentals to make a bracelet fit for a man.
Project 11-1: Paracord Survival Bracelet
Paracord is a woven nylon cord, originally designed for parachutes. These days, civilians and military personnel commonly use it to fasten, harness, and hang just about anything. Hikers and campers wear survival bracelets made from paracord so the wearer can quickly unravel the bracelet and have access to 9 or so feet of cord. This material is readily available today; look for the distinction “550” to indicate the cord can hold up to 550 pounds.
Paracord comes in many colors. You can get basic colors like black, blue, and red at your local crafts store. If you want a patterned color like the peacock I used in this project (shown in Figure 11-8), check out online shops, such as www.paracordplanet.com.
 If you’d rather make this bracelet in one color, choose 10 feet of one single paracord.
Tools and Materials
5 feet 550-pound paracord, white
5 feet 550-pound paracord, peacock
3⁄4-inch contoured side release buckle
Scissors
Clipboard
Flexible measuring tape (like you’d use for sewing)
Needle-nose pliers
Lighter
1. Heat one end of each strand of paracord as shown in Figure 11-1. Continue heating until you see the nylon begin to melt.
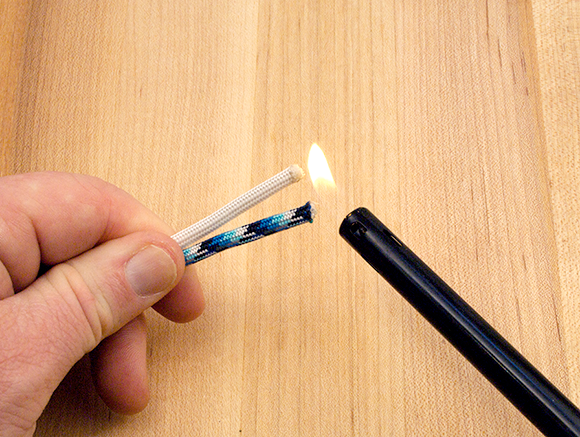
Photograph by Andy Dismore
Figure 11-1: Heat one end of each strand until it begins to melt.
2. When ends begin to melt, carefully touch them together, like I did in Figure 11-2.
 The nylon will be hot. Use your pliers to help press the melted ends together.

Photograph by Andy Dismore
Figure 11-2: Touch the melting ends to join the strands.
3. When the strands cool and the connection is solid, tie a lark’s head knot (see Chapter 5) to secure the strands to one side of the buckle. Tuck the melted connection under the buckle. You’ll cover it with knots later; just make sure it’s not resting on the buckle itself. Your bracelet should look like Figure 11-3.

Photograph by Andy Dismore
Figure 11-3: Attach the buckle with a lark’s head knot.
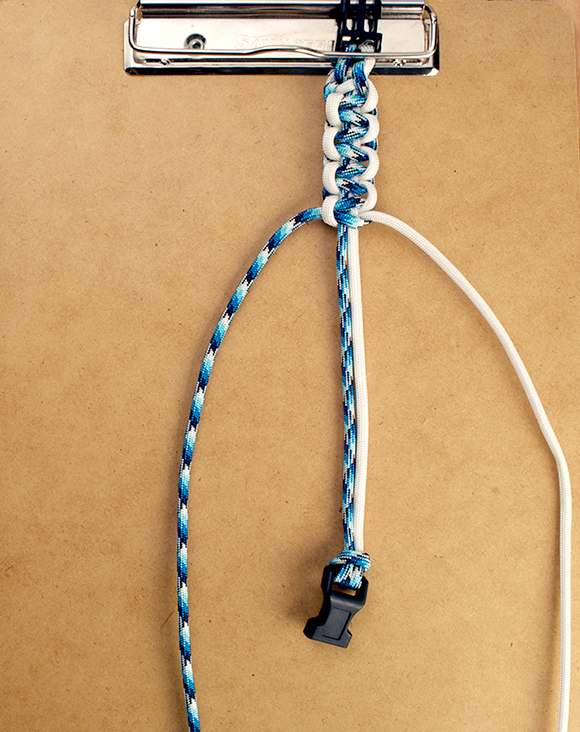
4. Attach the second half of the buckle with a square knot. Slide both tails through the buckle. Wrap the right strand over the front of the center strands and the left strand around the back. Then pull the tail of each strand out through the loops you just made. This step looks like an upside down pretzel, as in Figure 11-4. Pull the tails taut. At this point, double-check your length. From end to end, including the buckles, your bracelet should measure 9 inches.

Photograph by Andy Dismore
Figure 11-4: Tie on the other side of the buckle with a square knot.
You can make your bracelet a bit smaller or a bit larger, up to an inch either way, with this length of cord. Measure your bracelet at this point and adjust the length as you’d like before you move on to the next step. Also, make sure that both pieces of your buckle are facing the same way. It’s easy to mix them up at this step.
5. Clip the second end of the buckle to a clipboard to hold your work as you tie knots. Tie another square knot under the one you made in Step 4, as shown in Figure 11-5.

Photograph by Andy Dismore
Figure 11-5: Tie a second square knot to begin the pattern.
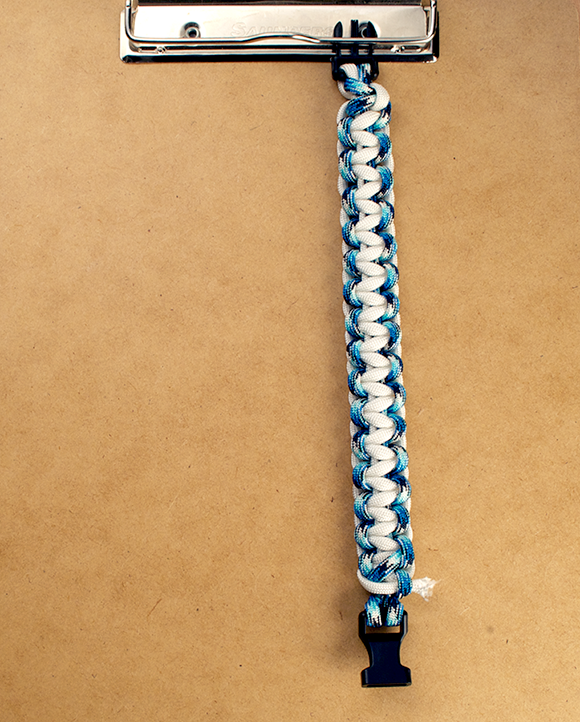
6. Continue tying knots down the length of the bracelet. This series of square knots is known as a cobra pattern. You can see it forming in Figure 11-6.
Photograph by Andy Dismore
Figure 11-6: Continue tying knots down the length of bracelet.
7. When you reach the first buckle, trim your ends; see Figure 11-7.
Photograph by Andy Dismore
Figure 11-7: Trim the ends when you reach the buckle.
8. Using the lighter again, melt the ends and use pliers to press the melting nylon into the underside of the bracelet. Continue heating and securing until you have a good seal. Straighten out the knots to hide any exposed melts.
Photograph by Andy Dismore
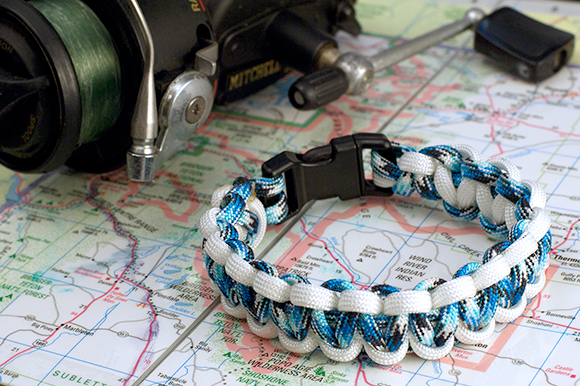
Figure 11-8: Paracord Survival Bracelet.
 If you need to use the cord in this bracelet for an emergency, simply disconnect the melt with a good yank or a knife, and quickly unravel the length. Save the buckle to retie a bracelet later.
 On the DVD that comes with this book (and at
 http://booksupport.wiley.com for you e-readers), I use this same technique and materials to make a collar for the pup in your life. You need a few more findings because you'll likely want to attach a leash. To the dog, I mean. The video comes with a full supply list.
Understanding Why Materials Matter
Using guy-friendly materials is essential to making jewelry that men like and will actually wear. They often like pieces made from nontraditional materials like paracord and stainless steel. I combine both in Project 11-2. They also tend to like natural materials such as stringing materials made from fibers (including hemp, flax, bamboo, silk, and cotton) and leather (suede lacing, round cord, and braided cord). For beads and components, they gravitate toward large, simple stones and chunky precious metals.
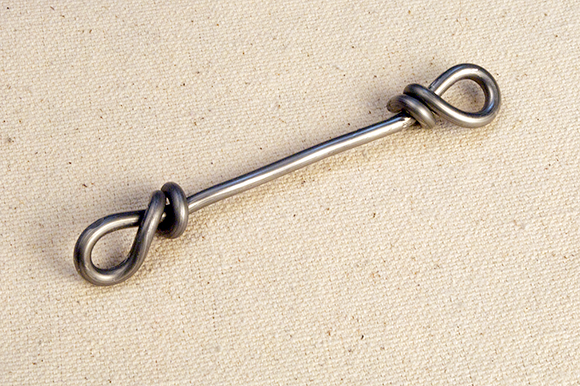
Project 11-2: Shackle Loop Bracelet
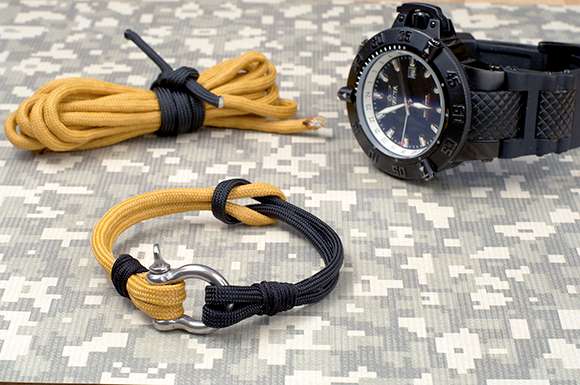
Using materials like nylon paracord and silk beading cord, coupled with stainless steel hardware, this simple bracelet (shown in Figure 11-10) is elegant and casual at the same time.
Tools and Materials
10 inches 550-pound paracord, black
10 inches 550-pound paracord, gold
1⁄2-inch stainless steel bow shackle
Lighter
5 inches 1mm silk beading cord, black
Scissors
Hypo Cement
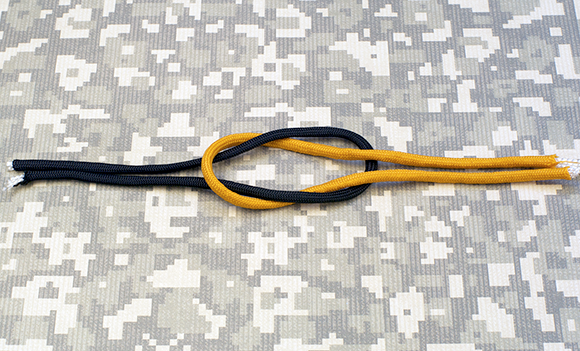
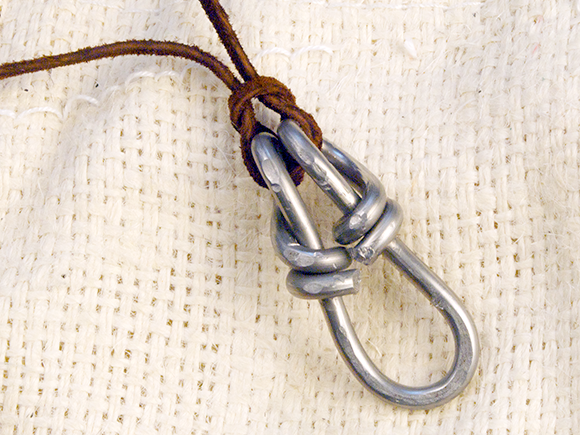
1. Make a loop in the black paracord. Slide the gold paracord through the black loop, interlacing the two, as shown in Figure 11-9.
Photograph by Andy Dismore
Figure 11-9: Interlock the two cords in a simple knot.
2. Even up the ends of the black paracord. Slide on the bow shackle. Use the lighter to melt the ends of the black paracord. While it’s hot, fold over the end of the paracord to make a loop attaching the shackle. Use the pliers to attach the hot nylon into the length of the bracelet to close the loop. Repeat to attach the gold paracord to the shackle.
This technique is similar to one I use in Project 11-3. Take a look at Figure 11-12 to see a close-up of this step without the clasp if you need help.
3. Wrap the silk bead cord around the ends of the paracord and the bracelet. This step serves simply to hide the ends and finish the bracelet professionally. After you cover the ends, cut the cord and secure it with a dab of glue. Repeat with the other side of the bracelet.
Photograph by Andy Dismore
Figure 11-10: Shackle Loop Bracelet.
Project 11-3: Button-loop Closure Braided Leather Wrap Bracelet
Wrap bracelets are hot for men and women alike. This one is simple and can be made quickly. Combining stringing and a little wire wrapping, you can make this bracelet in a matter of minutes.
Tools and Materials
26 inches 2mm braided leather cord, black
5 12mm Thai silver beads with 2mm stringing holes
1⁄2-inch stainless steel bow shackle
1 shank button
4 inches 18-gauge wire, silver
Chain-nose pliers
Wire cutters
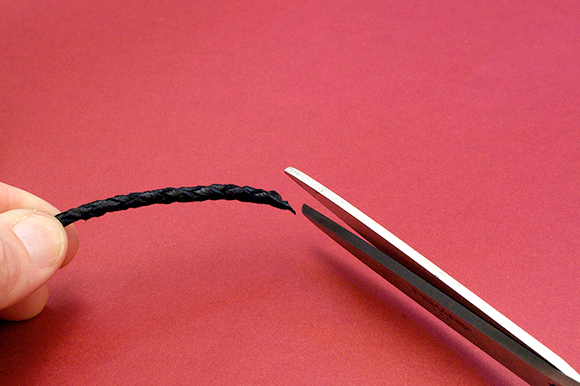
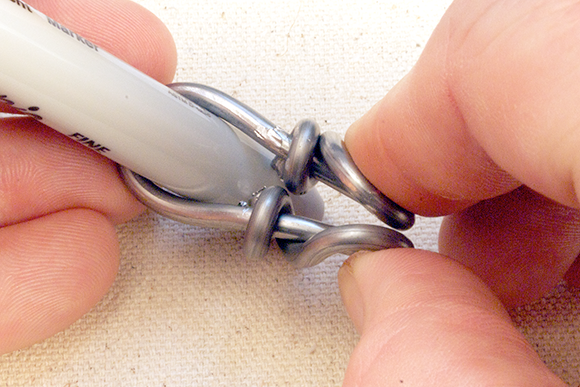
1. On one end of the cord, slide on the button. If necessary, trim the end of the cord (as shown in Figure 11-11) to a point and then thread the cord through the button shank.
Photograph by Andy Dismore
Figure 11-11: Trim the thick cord to thread on the button.
2. Wire-wrap the end of the strand to create a loop securing the button. Use about 2 inches of wire. Cut the wire.
3. On the tail of the cord, string on the five beads in whatever order you prefer. Create a loop large enough for the button to slip through in the open end of the cord. Wire-wrap the end of the strand to the strand to close the loop, as shown in Figure 11-12.

Photograph by Andy Dismore
Figure 11-12: Wire-wrap the end to cleanly close the loop.
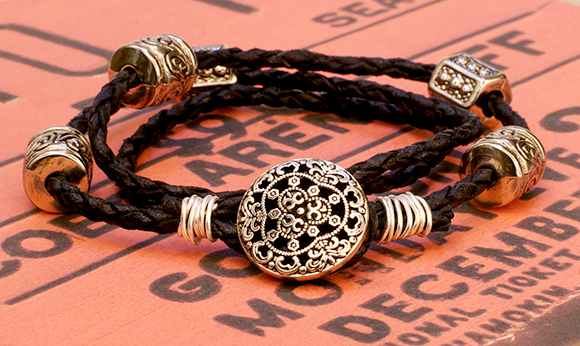
4. Wrap the bracelet multiple times around your wrist to wear it, as shown in Figure 11-13.
Photograph by Andy Dismore
Figure 11-13: Button-loop Closure Braided Leather Wrap Bracelet.
Considering Scale and Color
For men’s jewelry, size matters. Men’s jewelry tends to have a larger scale. Cording is thicker. Beads are larger. Clasps are chunkier. No technique is off limits: Wire wrapping, stringing, and metal stamping are all appropriate for and embraced by many men.
Men’s jewelry tends to be more neutral in color than women’s designs. Ambers, yellows, browns, and rusts all make great additions to men’s designs.
In this section, I use larger scale components (like lava nuggets or a chunky wire pendant) and neutral colors to create pieces with an organic, masculine feel.
I include a quick but elegant project for men, the Multi-color Leather and Suede Bracelet, on the DVD that accompanies the printed version of this book (and at http://booksupport.wiley.com for e-readers). I use three contrasting colors of leather and suede and connect them with a chunky sterling silver clasp.
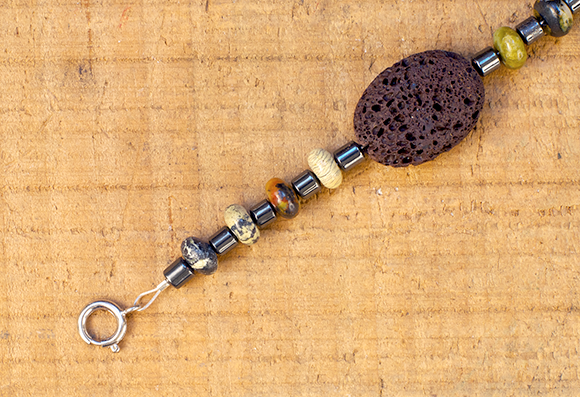
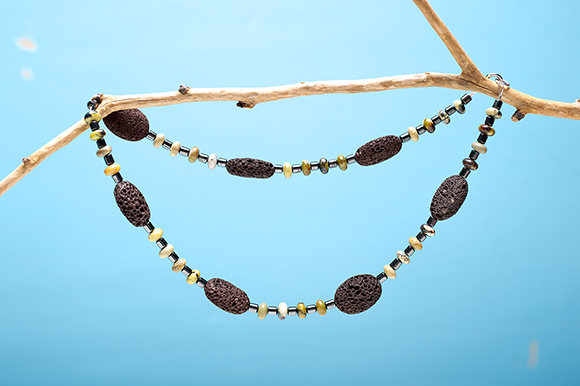
Project 11-4: Lava and Yellow Turquoise Necklace
This necklace, featured in Figure 11-15, is made with basic bead-stringing techniques but with natural materials in neutral colors. Rough lava rock and smooth yellow turquoise rondelles are separated by hematite tubes.
Tools and Materials
20 inches beading wire
8mm jump ring
8mm spring ring clasp
2 crimp tubes
Crimping pliers
40 3mm×5mm tubes, hematite
32 3mm×7mm rondelles, yellow turquoise
7 25mm×15mm ovals, lava rock
1. Use the crimp pliers and one crimp tube to attach the spring ring clasp to one end of the bead wire. String beads in this order: tube, rondelle, tube, rondelle, tube, rondelle, tube, rondelle, tube. Slide on a lava rock. Take a look at this pattern in Figure 11-14.
Photograph by Andy Dismore
Figure 11-14: Repeat this bead pattern to create the necklace.
2. Repeat the Step 1 pattern six more times.
3. Slide on one more set of nine smaller beads in this order: tube, rondelle, tube, rondelle, tube, rondelle, tube, rondelle, tube.
4. Use crimping pliers to add the jump ring to terminate the bead strand. Trim the tail of the beading wire or tuck it down into the beading strand.
Photograph by Matt Bowen
Figure 11-15: Lava and Yellow Turquoise Necklace.
Project 11-5: Heavy Metal Pendant on Leather Cord
This chunky pendant, shown in Figure 11-18, is easy to create and makes a bold statement.
When you work with large gauge wire, like the 10-gauge aluminum wire in this project, work with dead soft wire so you can manipulate it fairly easily, and then harden it by hammering it with a chasing hammer. This step work hardens the metal to help it keep its shape. For more information on wire gauge, wire hardness, and wire wrapping, stop by Chapter 6.
Tools and Materials
8 inches 10-gauge aluminum wire, dead soft
8mm round-nose pliers (or a pencil)
Permanent marker (or ring mandrel)
Chasing hammer
Steel bench block
26 inches leather cord
1. Using the round-nose pliers (or a pencil), make a wrapped loop on each end of the wire, as shown in Figure 11-16. Take a look at Chapter 6 if you need help with wrapped loops. These loops become the bail of the pendant.
2. Place the marker (or ring mandrel) in the center of the wire. Bend the wire in half around the marker, as shown in Figure 11-17.
Photograph by Andy Dismore
Figure 11-16: Make wrapped loops in each end of the wire.
Photograph by Andy Dismore
Figure 11-17: Bend the wire around the marker.
3. Gently hammer the pendant with the flat end of a chasing hammer on the bench block. This step helps the pendant keep its shape.
4. String the pendant onto the leather cord. Tie an adjustable knot, like the one shown in Figure 5-15 in Chapter 5, to complete the necklace.
Photograph by Andy Dismore
Figure 11-18: Heavy Metal Pendant on Leather Cord.