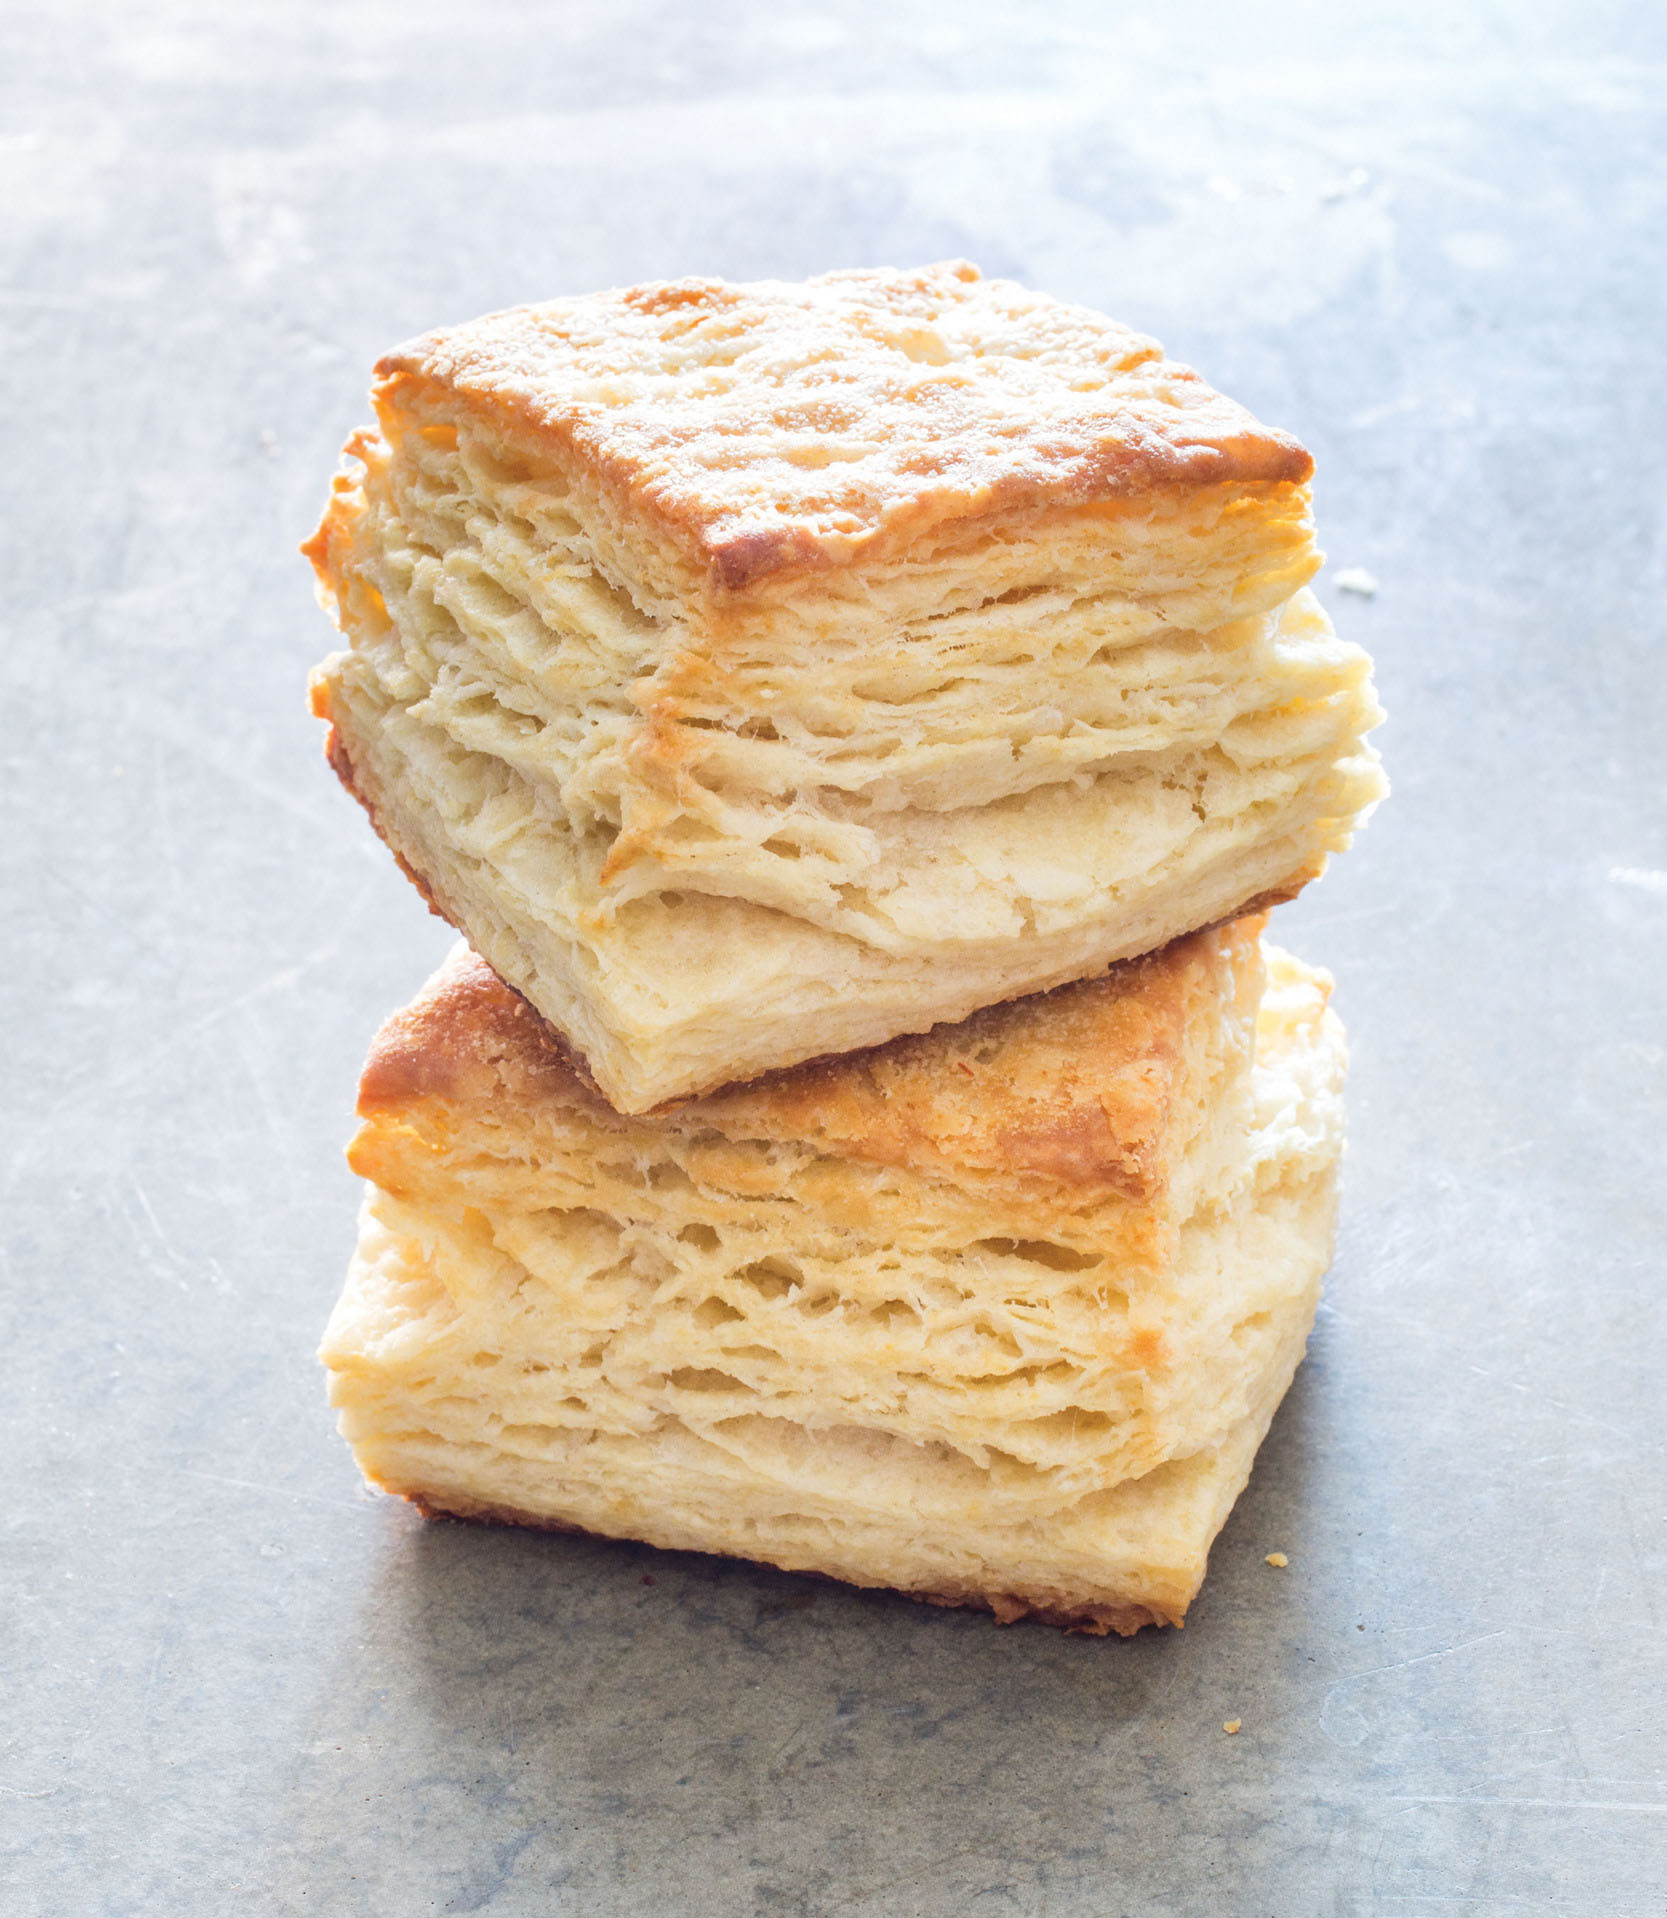
From the enormous soft and fluffy Southern cat head to the simple drop, I love biscuits of all kinds. But my current obsession is a specimen I’ve recently found in several restaurants. It’s crisp and crunchy on the outside but tender and light as air inside, with flaky strata that peel apart like sheets of buttery paper in a way that rivals a croissant. No, this is not an everyday biscuit; it’s an ethereal, once-in-a-while treat rich enough that there’s no need to spread on any extra butter, just a slathering of jam, if that. But when I tried recipes billed as “rich and tender flaky biscuits,” very few lived up to the promise, and those that did required a lengthy process of folding the dough and letting it rest that was as much work as making croissants. I set out to see what I could do to produce my ideal flaky biscuit with considerably less fuss.
A FLAKY FOUNDATION
Despite the failures, those early tests did help sort out a few things. First, I’d use only butter rather than a mixture of butter and shortening. Shortening lacks flavor, and I also found that it inhibited the formation of distinct layers. As in pie crusts, leaving distinct pieces of fat in the dough (what many recipes refer to as “pea-size” pieces) is key to producing flakiness. As the biscuits cook, the bits of fat melt into the dough, leaving small voids. Then, as the water in the dough turns to steam, it expands these gaps and creates layers. The problem with shortening is that it has a soft texture and tends to combine with the flour rather than stay distinct like butter. Most recipes I found called for 2 to 4 tablespoons of fat per cup of flour; I suspected that I could squeeze in more. I settled on 16 tablespoons butter to 3 cups flour—a little more than 5 tablespoons per cup.
As for the type of flour, unlike ultratender, fluffy Southern-style biscuits that demand a specialty low-protein flour (generally 7 to 8 percent) like White Lily, my early tests confirmed that flaky biscuits are better off made with all-purpose flour. This is because all-purpose flour has a little more protein (10 to 12 percent), and when combined with water, the protein in flour produces gluten. The more protein, the more gluten, which translates to a biscuit dough with more strength that can bake up with distinct, structured layers rather than cakey and fluffy. I tried bread flour (which is closer to 13 percent protein) but found that it created an overly strong gluten network that produced tough biscuits. The best results came from using King Arthur all-purpose flour, which is 12 percent protein.
Grated butter, a series of folds, and a brief rest in the fridge produce the flakiest, most tender biscuits.
I also determined that I’d use buttermilk rather than milk for its distinctive tang, a touch of sugar for complexity, a little baking soda to enhance browning and add some lift, and, finally, baking powder for additional lift. As for shaping, I settled on square biscuits. Round biscuits were pretty, but they left too much scrap dough and rerolling those scraps produced biscuits that were tough. Shaping the dough into a square slab and then cutting that into squared-off biscuits was fast and meant no rerolling—and no waste.
CUT THE FAT
I moved on to the heart of the matter: mixing and shaping. Many biscuit recipes require that you spend a lot of effort getting the butter into small, even, pea-size pieces by cutting it into the dry ingredients using a dough cutter, a pair of knives, a food processor, or your hands. The problem with most of these approaches is that it’s far too easy to over- or underdo it, both of which hamper flakiness. I found that the most consistent method was to grate the butter using the large holes of a box grater, a trick I picked up from our recipe for Blueberry Scones.
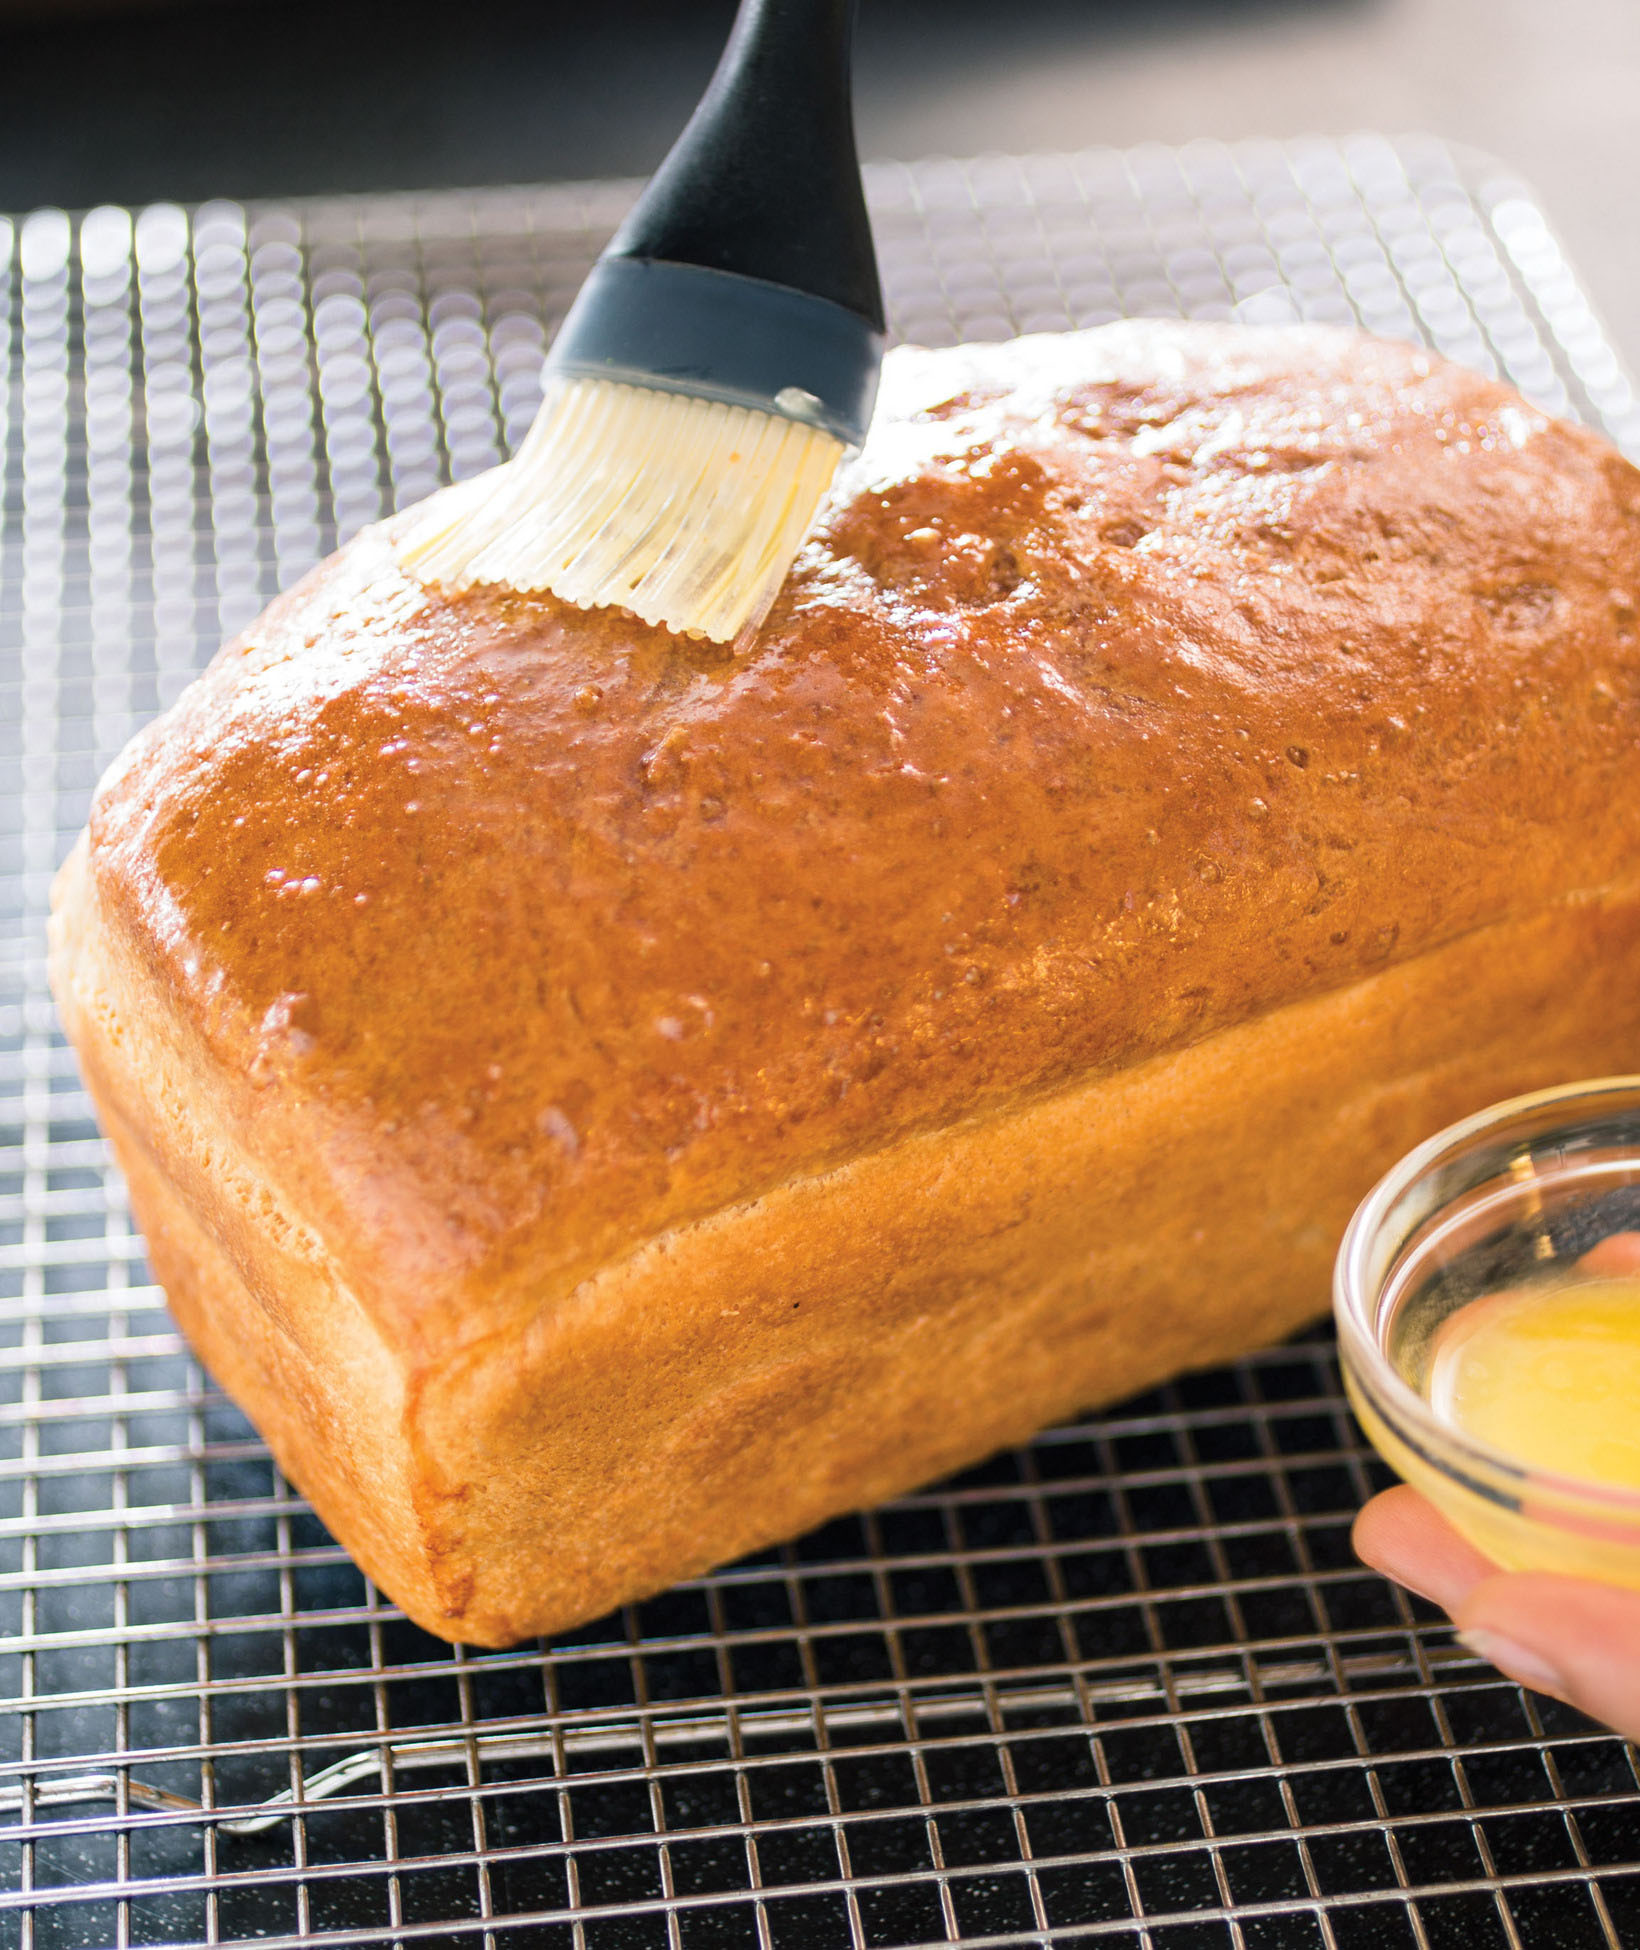
Of course, the effort is moot if these shreds of butter soften during mixing and shaping. To avoid that, I froze the butter for 30 minutes before grating it. And to get around the awkwardness of grating the stubs, I saved the last tablespoon of each stick to melt and brush on the tops of the biscuits just before baking them, which would improve crisping and browning.
BETWEEN THE FOLDS
The grated butter helped create some layering but not nearly as much as I was after. In pie dough, leaving the butter in small pieces is sufficient to get the right flaky effect, but that’s because pie dough contains far less liquid (and far more butter) and is rolled out thin, a pair of factors that inherently smears the butter into thin sheets among floury layers. But in a wet, minimally rolled-out slab of biscuit dough, the butter pieces just float randomly in the mixture like raisins in a muffin batter. And that’s where folding comes in. This process starts with rolling out the dough into a large, thin rectangle and then folding it into thirds like a letter. You then press the dough together to seal the package tightly, turn it 90 degrees, and repeat. The special thing about folding dough is that the technique works by multiplication, not addition. Each fold doesn’t simply give you one more layer; it creates an exponentially greater number of layers because it’s a trifold every single time, not a single fold.
Folding my biscuit dough, at least in the early stages, was a messy affair: It started out shaggy and crumbly—anything but a cohesive mass—and it seemed like I wasn’t really doing anything useful. But slowly and surely, the dry bits and the wet bits came together; by the fourth fold, the process was pretty tidy. The interesting thing was, I found in subsequent tests that the messier—and less mixed—the dough was in the beginning, the better. Even in those first few messy “folds,” the slivers of butter were getting pressed and stretched into thinner and thinner sheets among clumps of wet and dry dough. If I mixed the dough in the bowl to the point where it was uniform before I folded it (which is what most recipes call for) or if I added more liquid to help bring the dough together, I ended up with layers that were less defined.
Some recipes call for letting the dough rest for as long as 30 minutes after every set of folds. This is because with each set the gluten in the dough gets stronger, making the dough increasingly harder to roll out. But because my dough wasn’t cohesive for the first few sets of folds, gluten didn’t develop at the same pace, and I could make five folds without any resting.
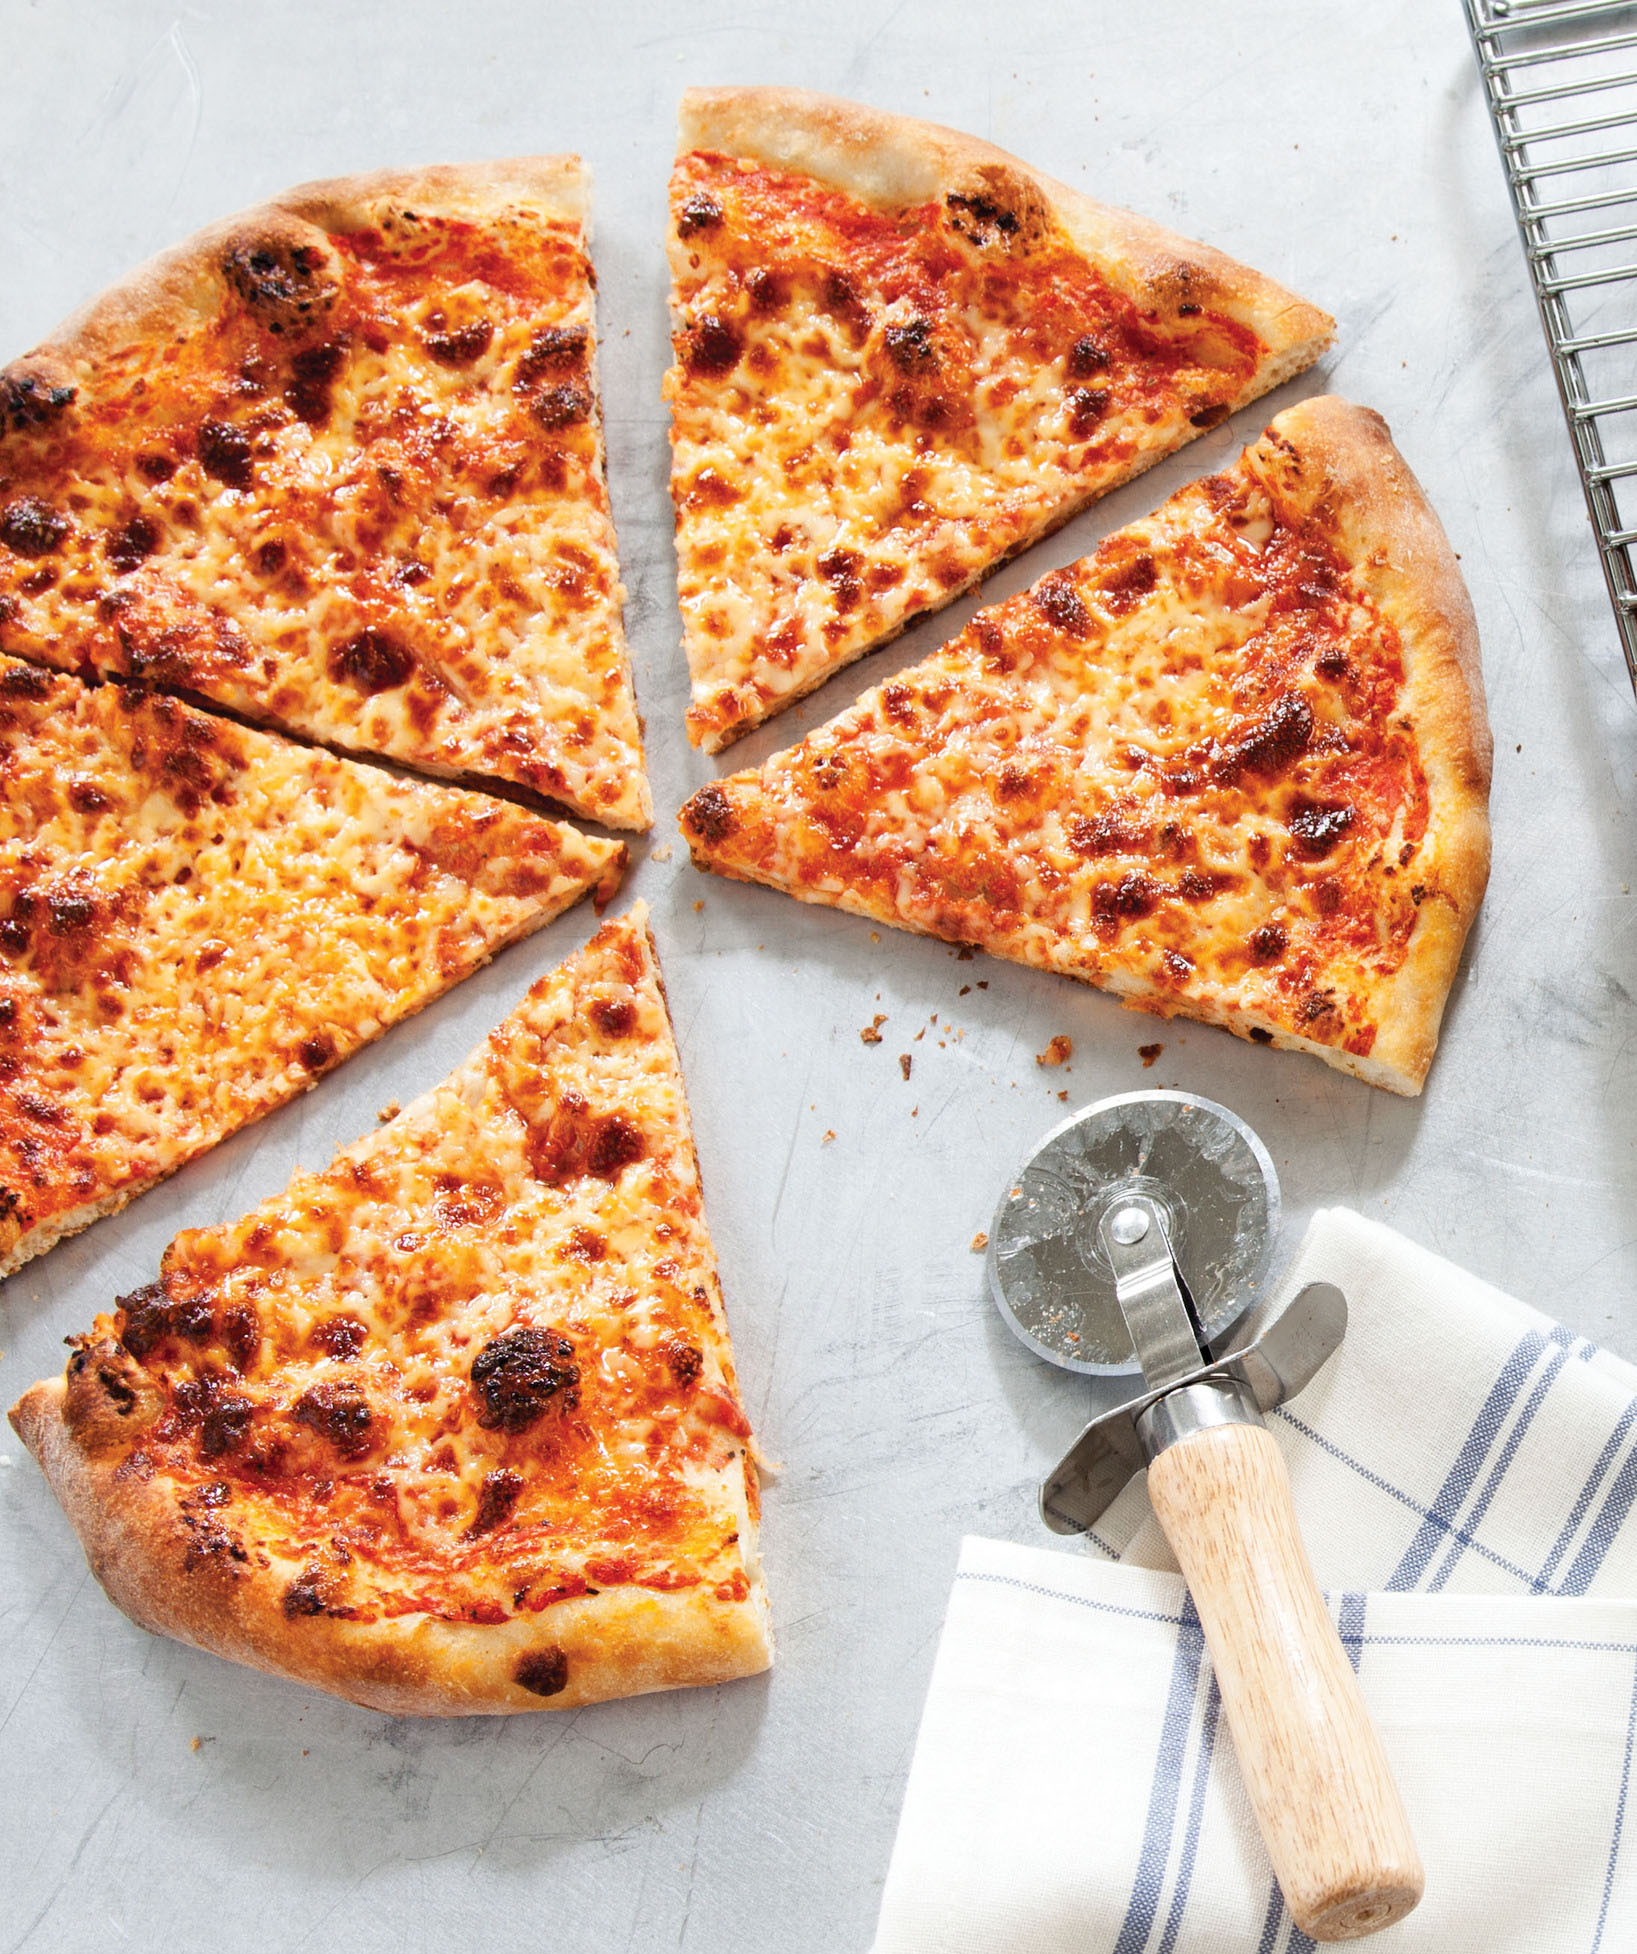
When I cut this dough into squares, each biscuit looked like the side view of a book, with layers that pulled away from one another dramatically during baking—just the effect I’d hoped for. There was only one problem: Most of the biscuits were coming out of the oven lopsided. In fact, of the nine biscuits the recipe produced, only the one cut from the center of the dough came out square and level.
I realized that the edges of the dough slab were being compressed during the rolling and folding process. Trimming away ¼ inch from the perimeter of the dough before cutting the biscuits took care of that, but the biscuits were still a bit wonky. By the fifth fold, the layers of dough were taut like stretched rubber bands. Once the layers started to separate in the oven, this tension caused them to slip and slide in different directions, leaving the biscuits lopsided. A single 30-minute rest in the refrigerator—a far cry from the multiple rests other recipes required—gave them time to relax. With that, I had buttery, superflaky biscuits that consistently rose up tall and true.
We prefer King Arthur all-purpose flour for this recipe, but other brands will work. Use sticks of butter. In hot or humid environments, chill the flour mixture, grater, and work bowls before use. The dough will start out very crumbly and dry in pockets but will be smooth by the end of the folding process; do not be tempted to add extra buttermilk. Flour the counter and the top of the dough as needed to prevent sticking, but be careful not to incorporate large pockets of flour into the dough when folding.
3 cups (15 ounces) King Arthur all-purpose flour
2 tablespoons sugar
4 teaspoons baking powder
½ teaspoon baking soda
1½ teaspoons salt
16 tablespoons (2 sticks) unsalted butter, frozen for 30 minutes
1¼ cups buttermilk, chilled
1. Line rimmed baking sheet with parchment paper and set aside. Whisk flour, sugar, baking powder, baking soda, and salt together in large bowl. Coat sticks of butter in flour mixture, then grate 7 tablespoons from each stick on large holes of box grater directly into flour mixture. Toss gently to combine. Set aside remaining 2 tablespoons butter.
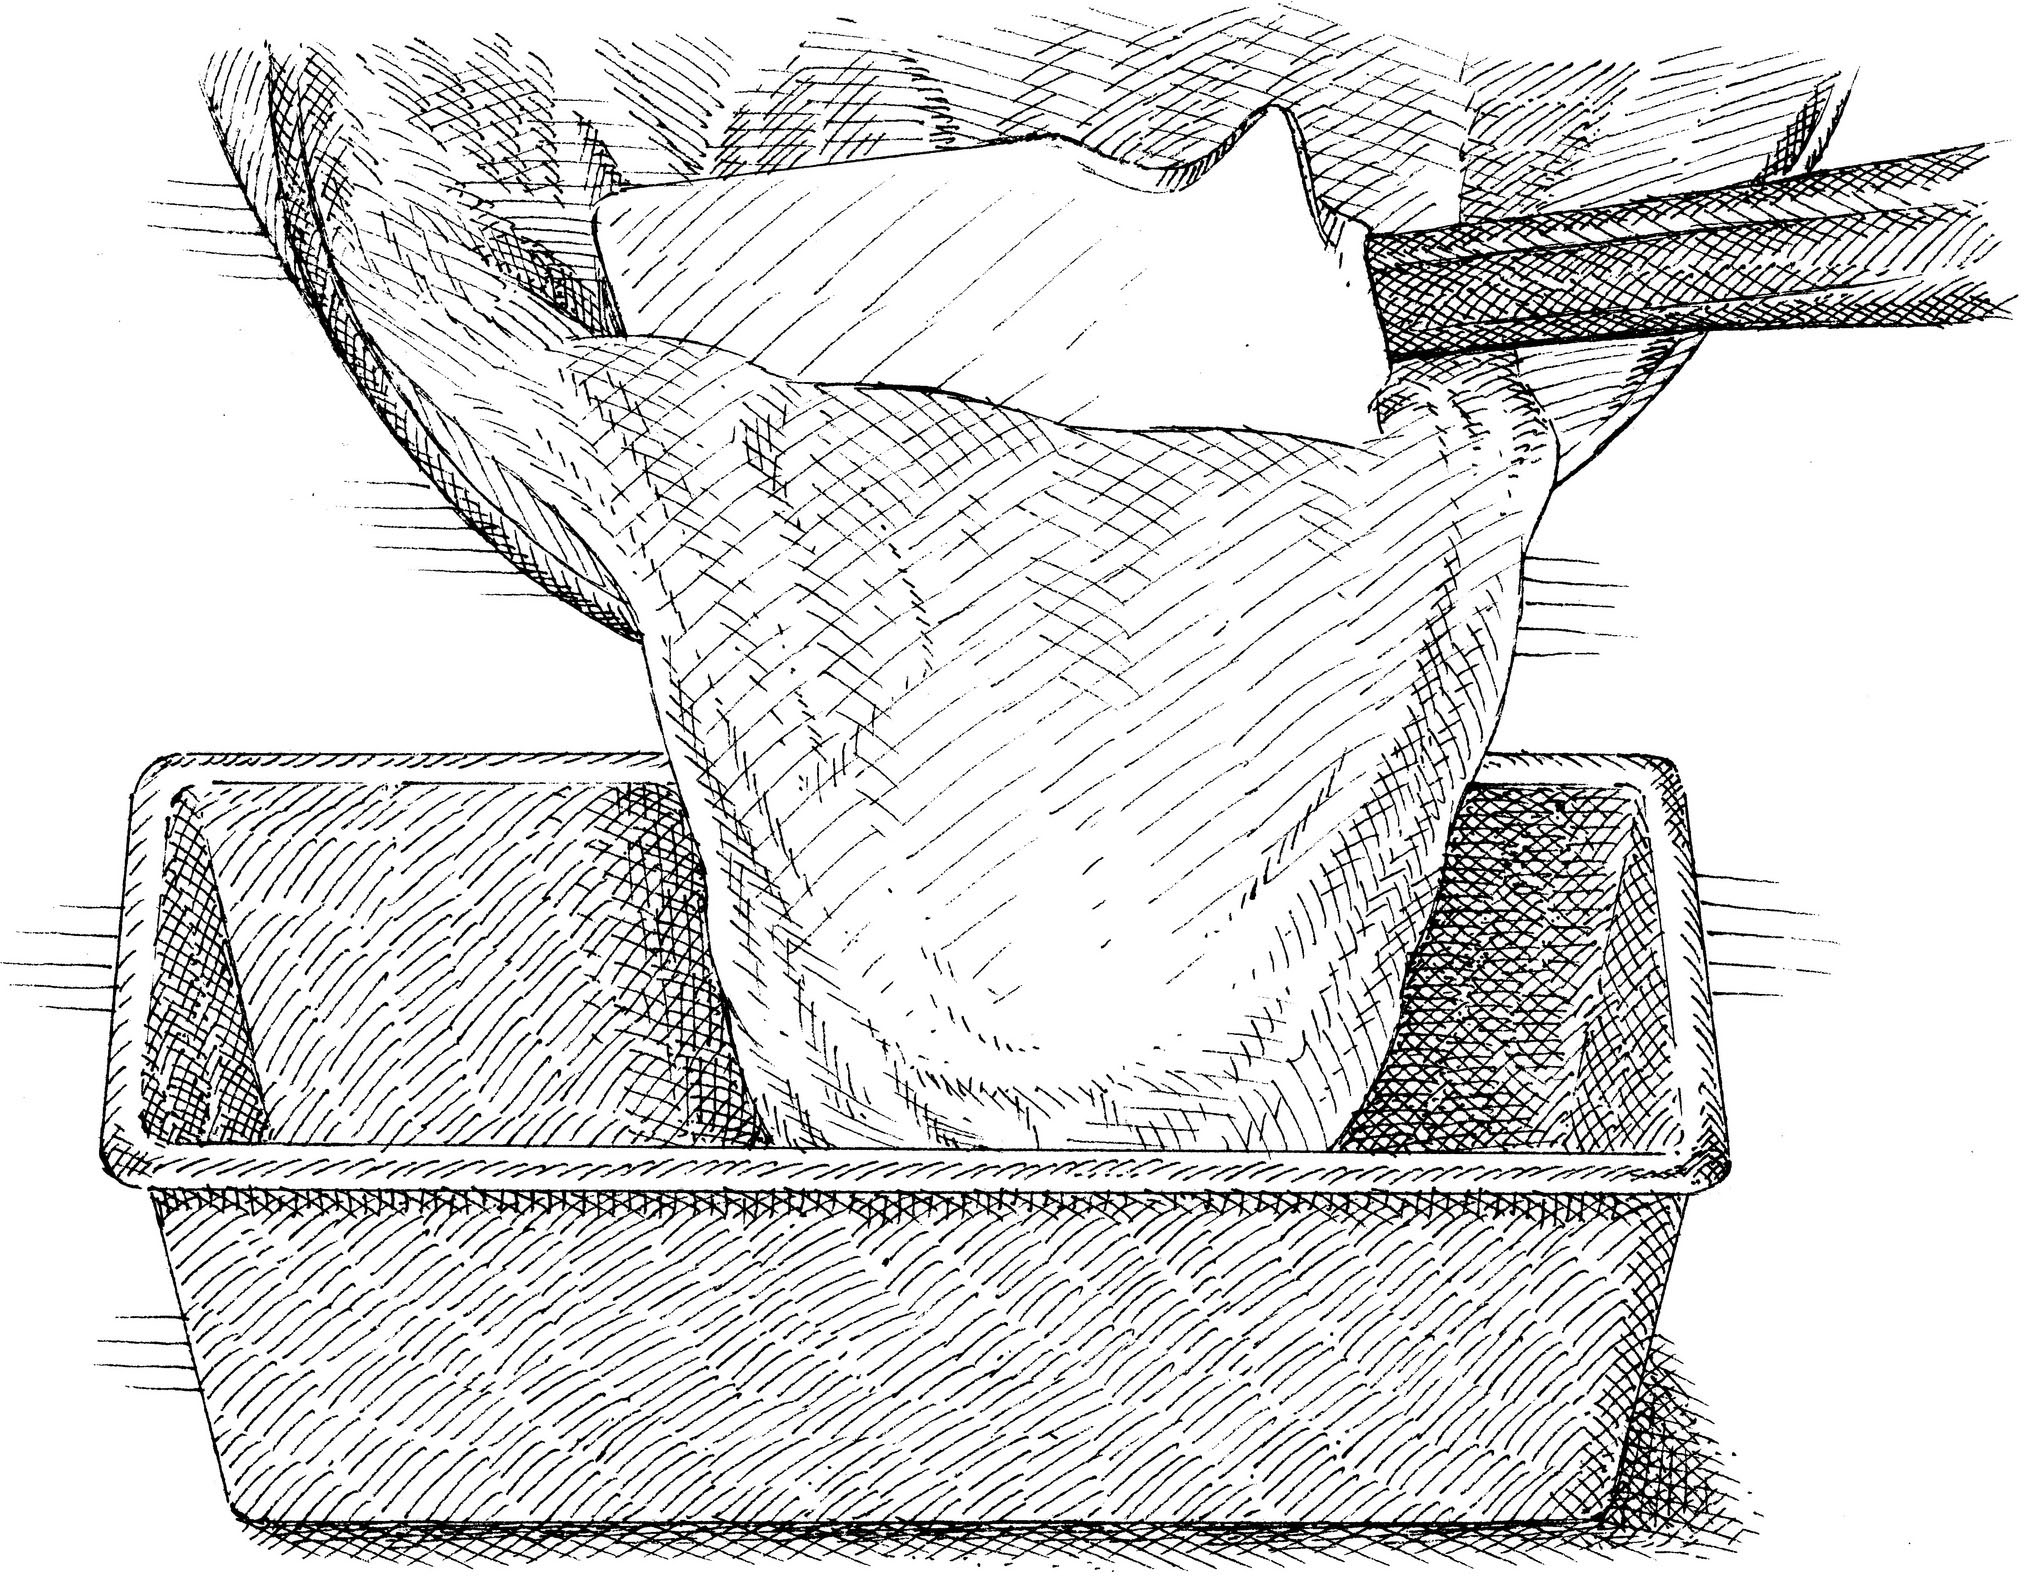
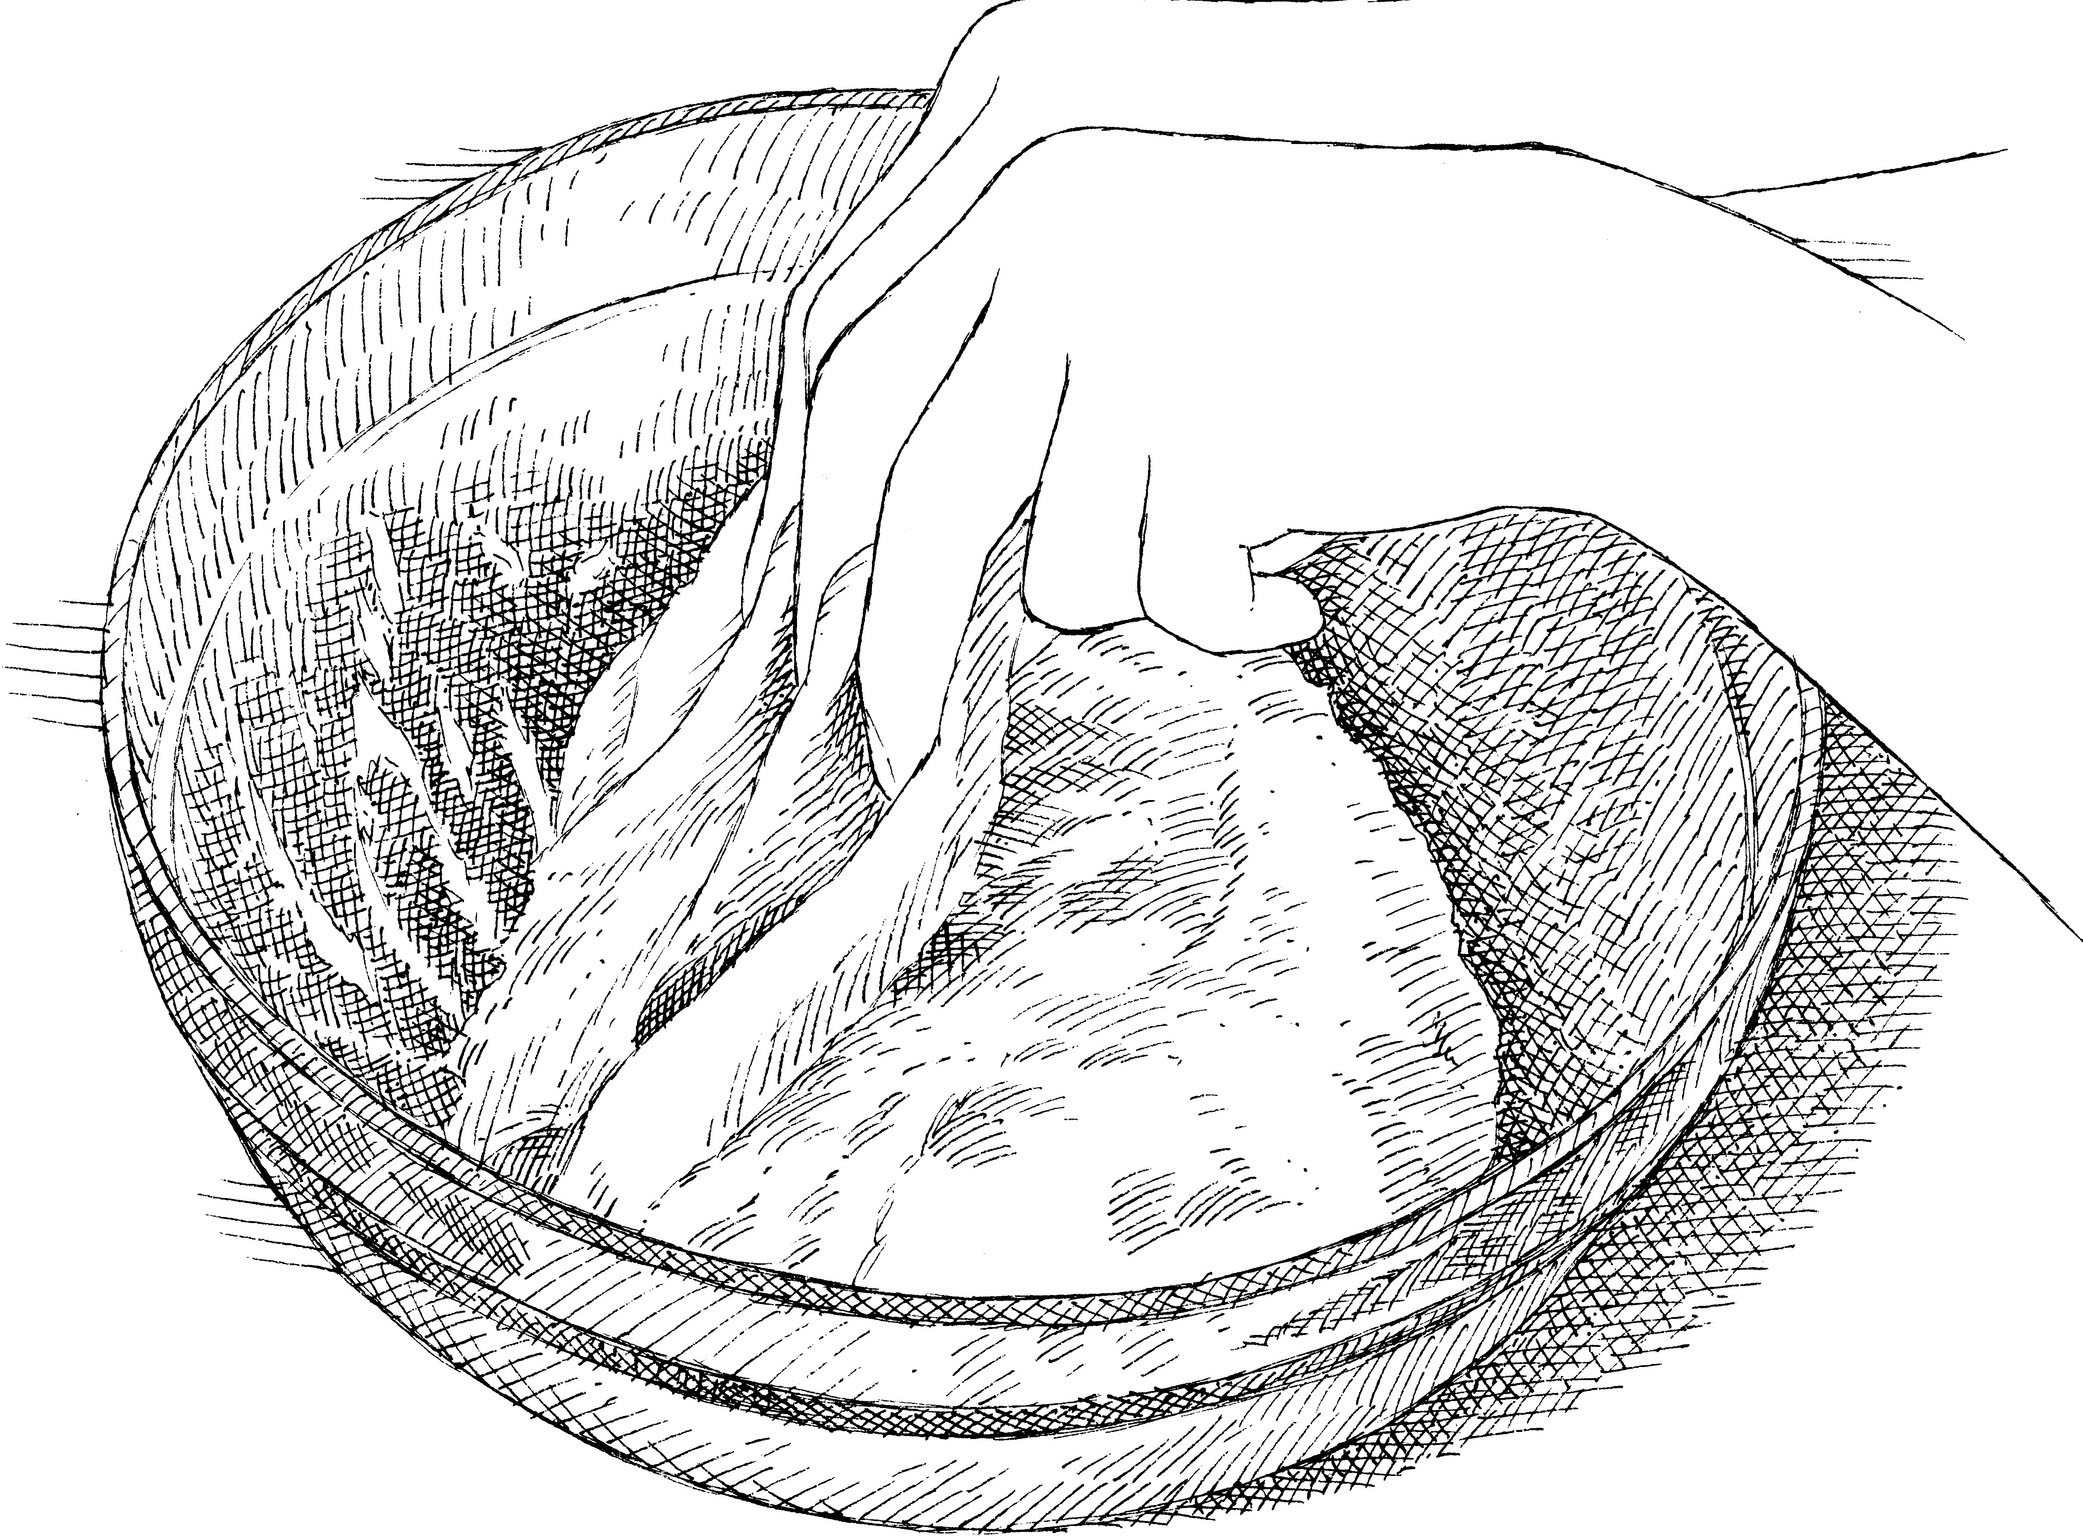
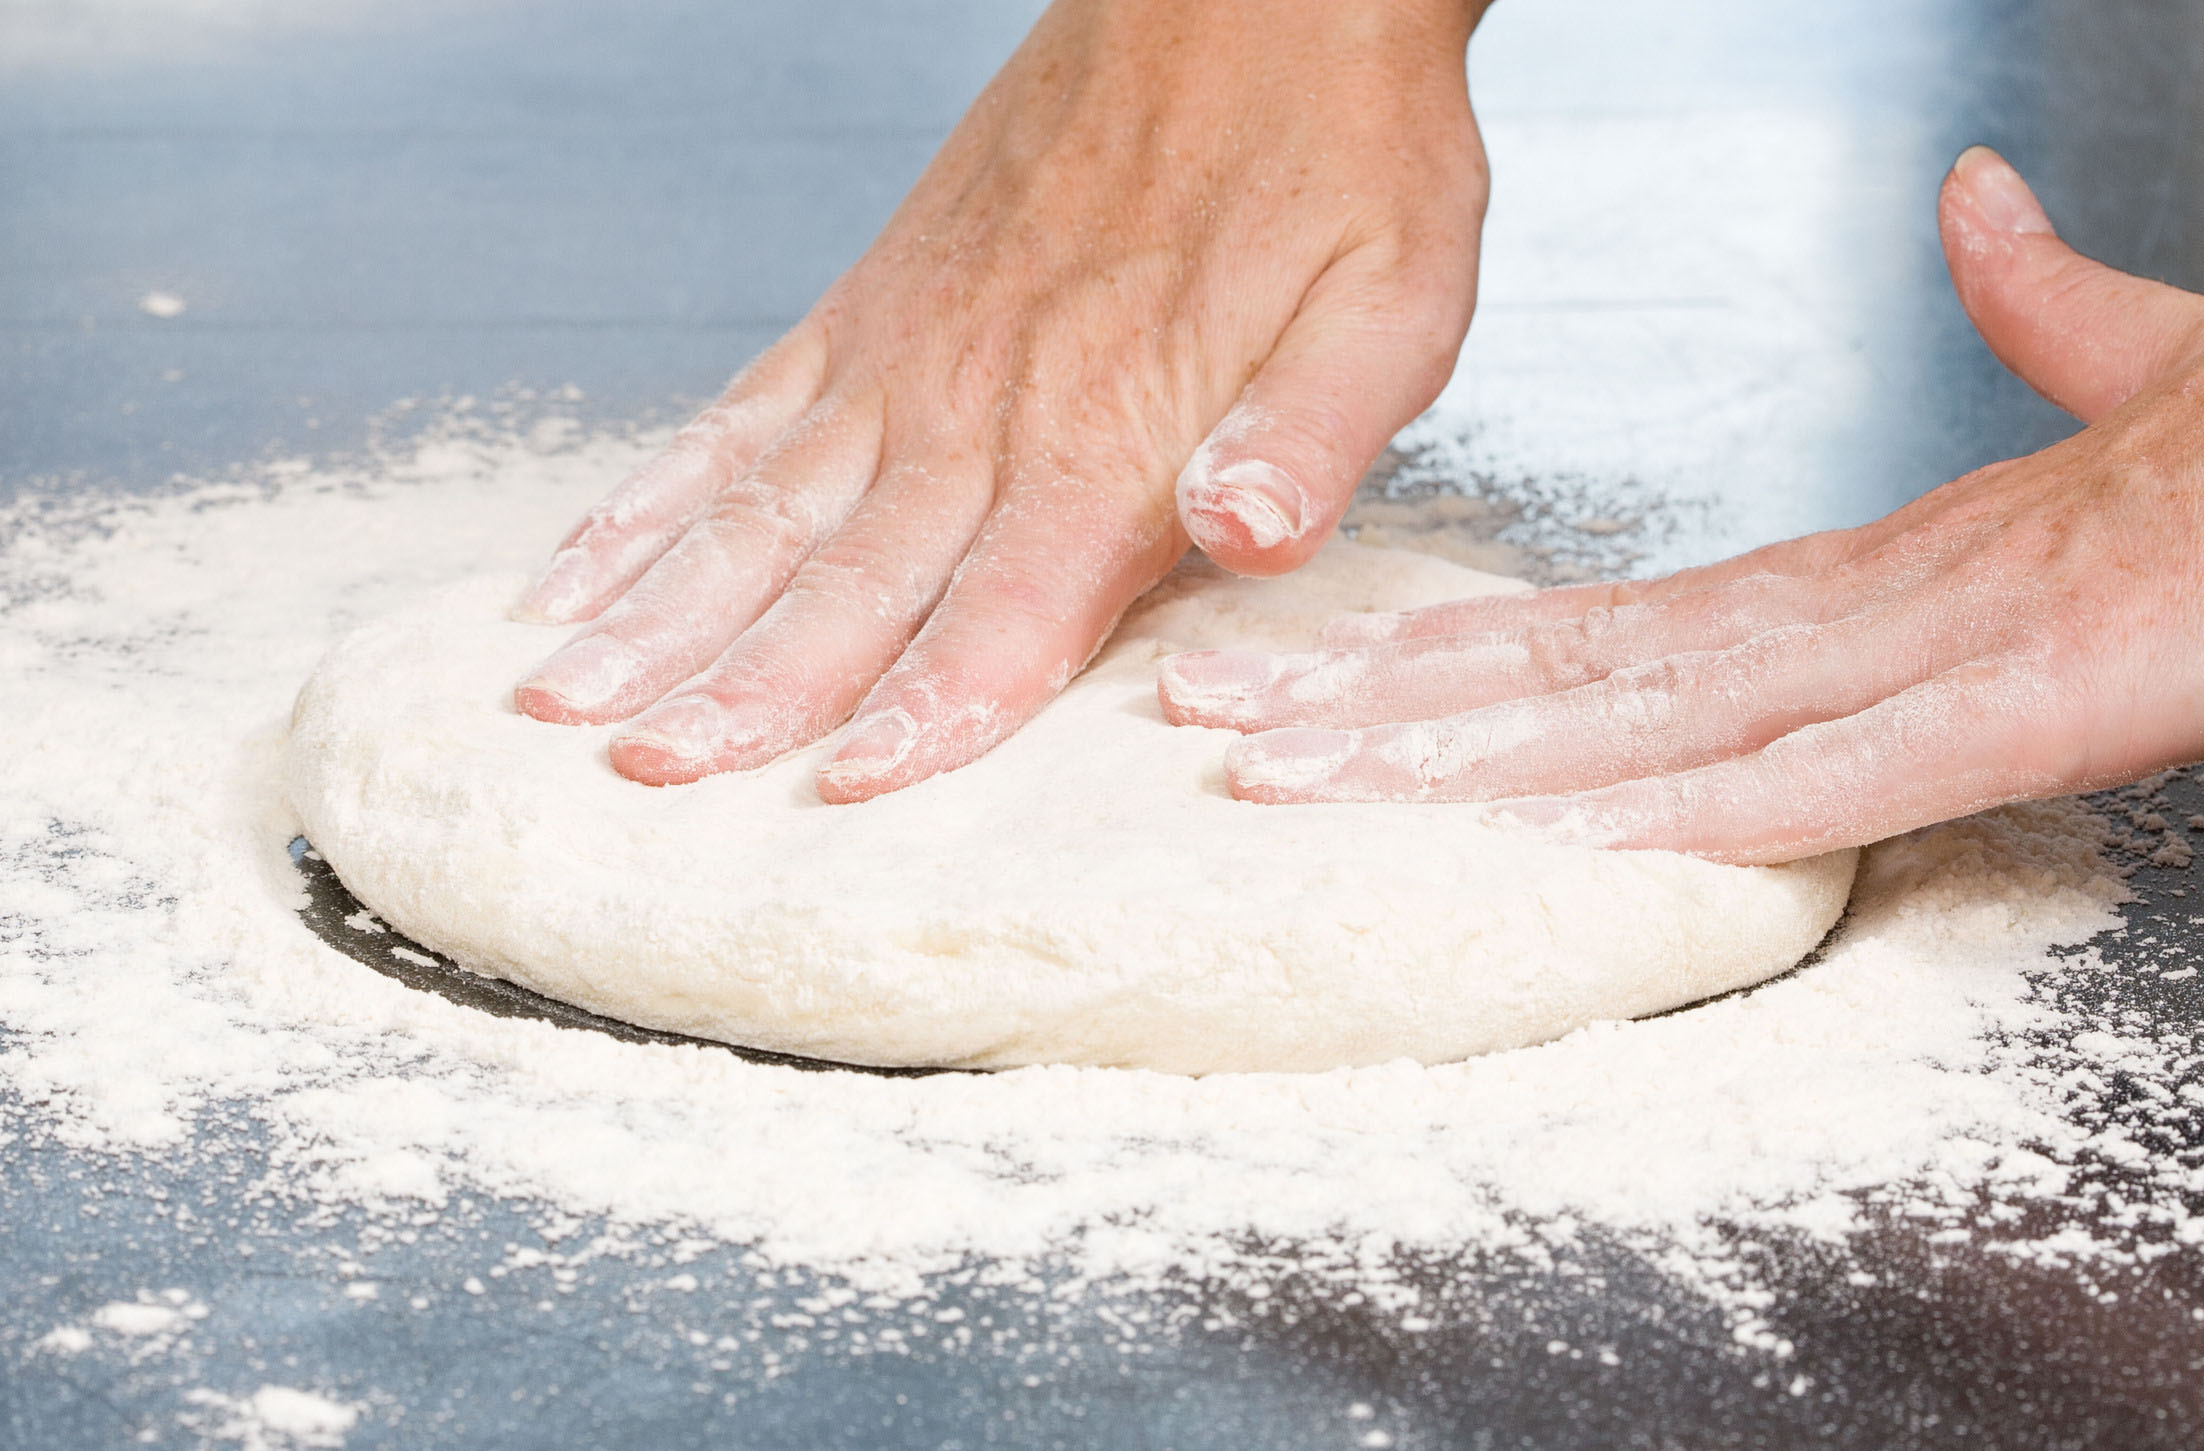
2. Add buttermilk to flour mixture and fold with spatula until just combined (dough will look dry). Transfer dough to liberally floured counter. Dust surface of dough with flour; using your floured hands, press dough into rough 7-inch square.
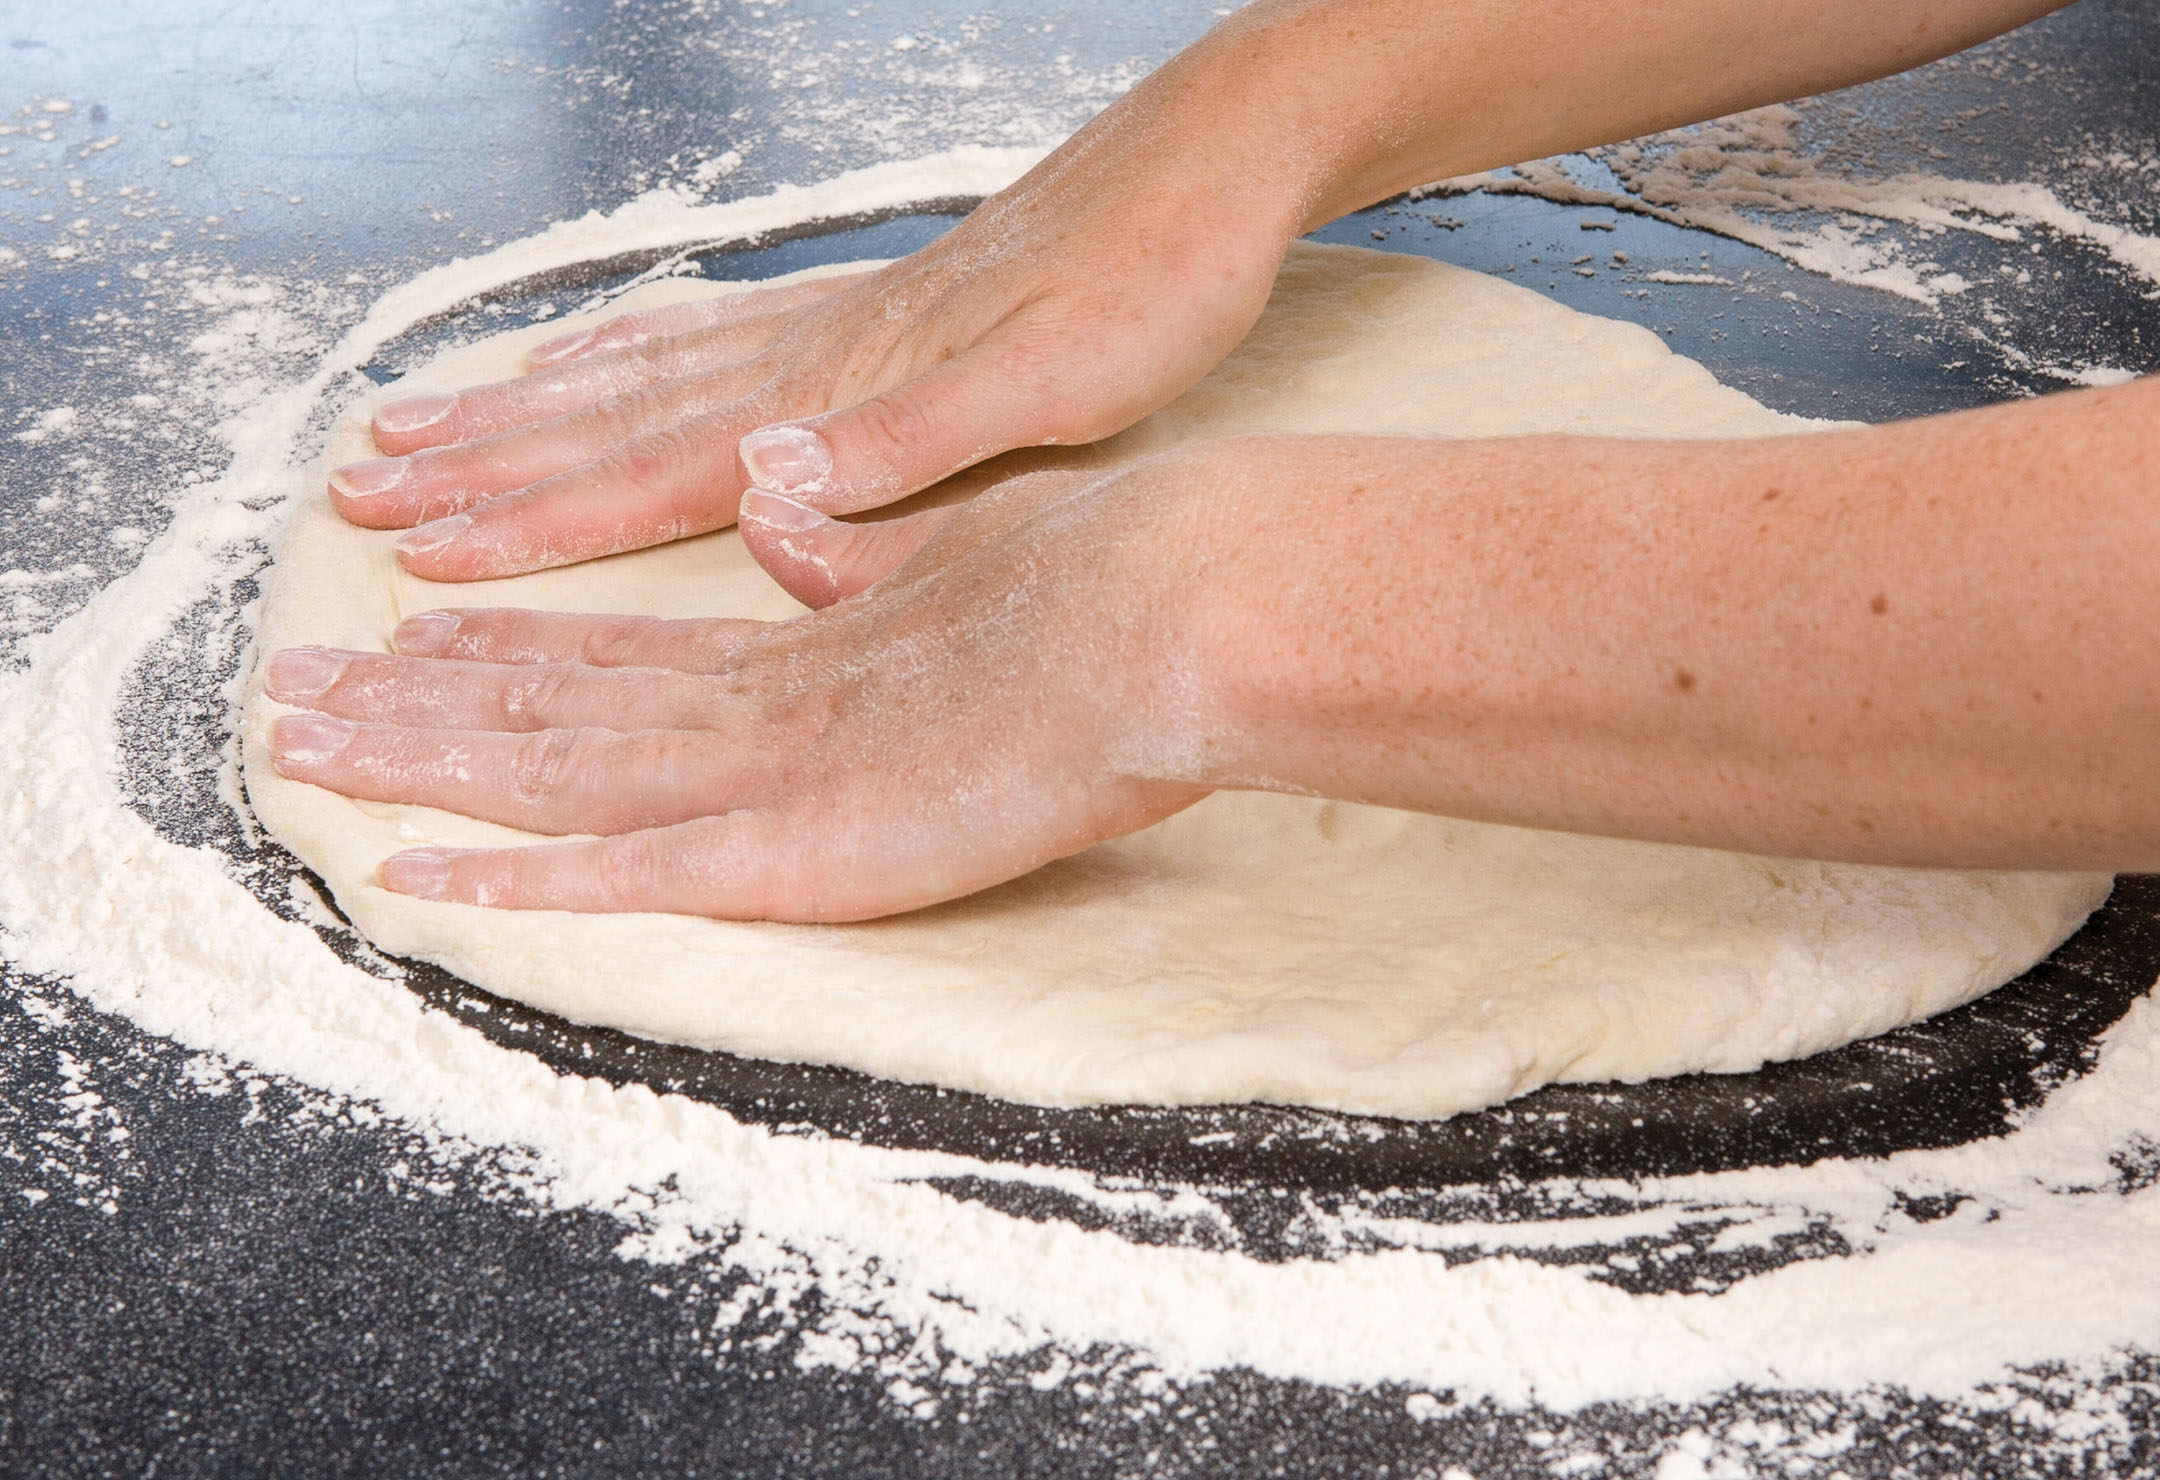
3. Roll dough into 12 by 9-inch rectangle with short side parallel to edge of counter. Starting at bottom of dough, fold into thirds like business letter, using bench scraper or metal spatula to release dough from counter. Press top of dough firmly to seal folds. Turn dough 90 degrees clockwise. Repeat rolling into 12 by 9-inch rectangle, folding into thirds, and turning clockwise 4 more times, for total of 5 sets of folds. After last set of folds, roll dough into 8½-inch square about 1 inch thick. Transfer dough to prepared sheet, cover with plastic wrap, and refrigerate for 30 minutes. Adjust oven rack to upper-middle position and heat oven to 400 degrees.
4. Transfer dough to lightly floured cutting board. Using sharp, floured chef’s knife, trim ¼ inch of dough from each side of square and discard. Cut remaining dough into 9 squares, flouring knife after each cut. Arrange biscuits at least 1 inch apart on sheet. Melt reserved butter; brush tops of biscuits with melted butter.
5. Bake until tops are golden brown, 22 to 25 minutes, rotating sheet halfway through baking. Transfer biscuits to wire rack and let cool for 15 minutes before serving.
TO AVOID SLUMPS, RELAX AND TRIM
Folding the dough multiple times creates great layering—but it also compresses the edges and causes tension that makes the layers separate and slide in different directions in the oven. Our fixes: We let the dough relax for 30 minutes in the fridge after folding and then trim away the compressed edges before cutting the dough into individual biscuits.
PREVENTABLE
flaw Slumping is easily fixed by letting the dough rest.
THE FLUFFIEST DINNER ROLLS
ANDREA GEARY,January/February 2016
I used to think that the Old Testament adage “There is nothing new under the sun” could be applied to bread baking. Most “new” bread recipes are actually just modern twists on established recipes or resurrections of bygone techniques. So I was intrigued when I read about tangzhong, an oddball bread-making technique that originated in Japan and was popularized by pastry chef Yvonne Chen in the early 2000s.
Instead of simply combining the dry and wet ingredients and kneading as you would to make a conventional loaf, you begin by cooking a portion of the flour and liquid to form a pudding-like paste that you then let cool and mix into the dough. Fans of the method claim not only that it produces bread with a particularly moist, airy, feathery crumb but also that the loaf remains fresh and soft longer than conventional bread.
Curious, I made a popular published Japanese milk bread recipe (a soft, rich sandwich loaf with a snow-white crumb that’s a staple in Asian bakeries) that employs the tangzhong method and was immediately won over: The dough was soft and silky, and its pillowy crumb was made up of delicate, almost croissant-like sheets. Eating it gave me the kind of satisfaction I get from a really good dinner roll—except that this bread was even fluffier and, as promised, maintained its impressively moist, plush crumb over the next couple of days.
So, what if I applied this Japanese technique to my usual pull-apart dinner roll recipe? If it worked, it could potentially yield the best dinner rolls I’d ever made and give them a perk that most rolls don’t have: make-ahead potential.
WELL HYDRATED
In the recipes I found that employ the tangzhong method, the paste is about 5 parts liquid to 1 part flour and makes up 15 to 20 percent of the total dough weight. My standard dinner roll recipe yields 25 ounces of dough, so to make about 5 ounces of paste, I whisked together ½ cup of water and 3 tablespoons of bread flour in a saucepan. As I stirred the mixture over medium heat, its consistency went from heavy cream to thick pudding. I set the paste aside to cool while I added the remaining ingredients to the stand mixer bowl: 2 cups of bread flour, instant yeast, a little sugar and salt, 4 tablespoons of softened butter, an egg, and ¼ cup milk. Then I added the cooled paste and started mixing. But after 3 minutes, I knew something was wrong: The dough, which is usually slightly sticky and workable, was dry and tight.
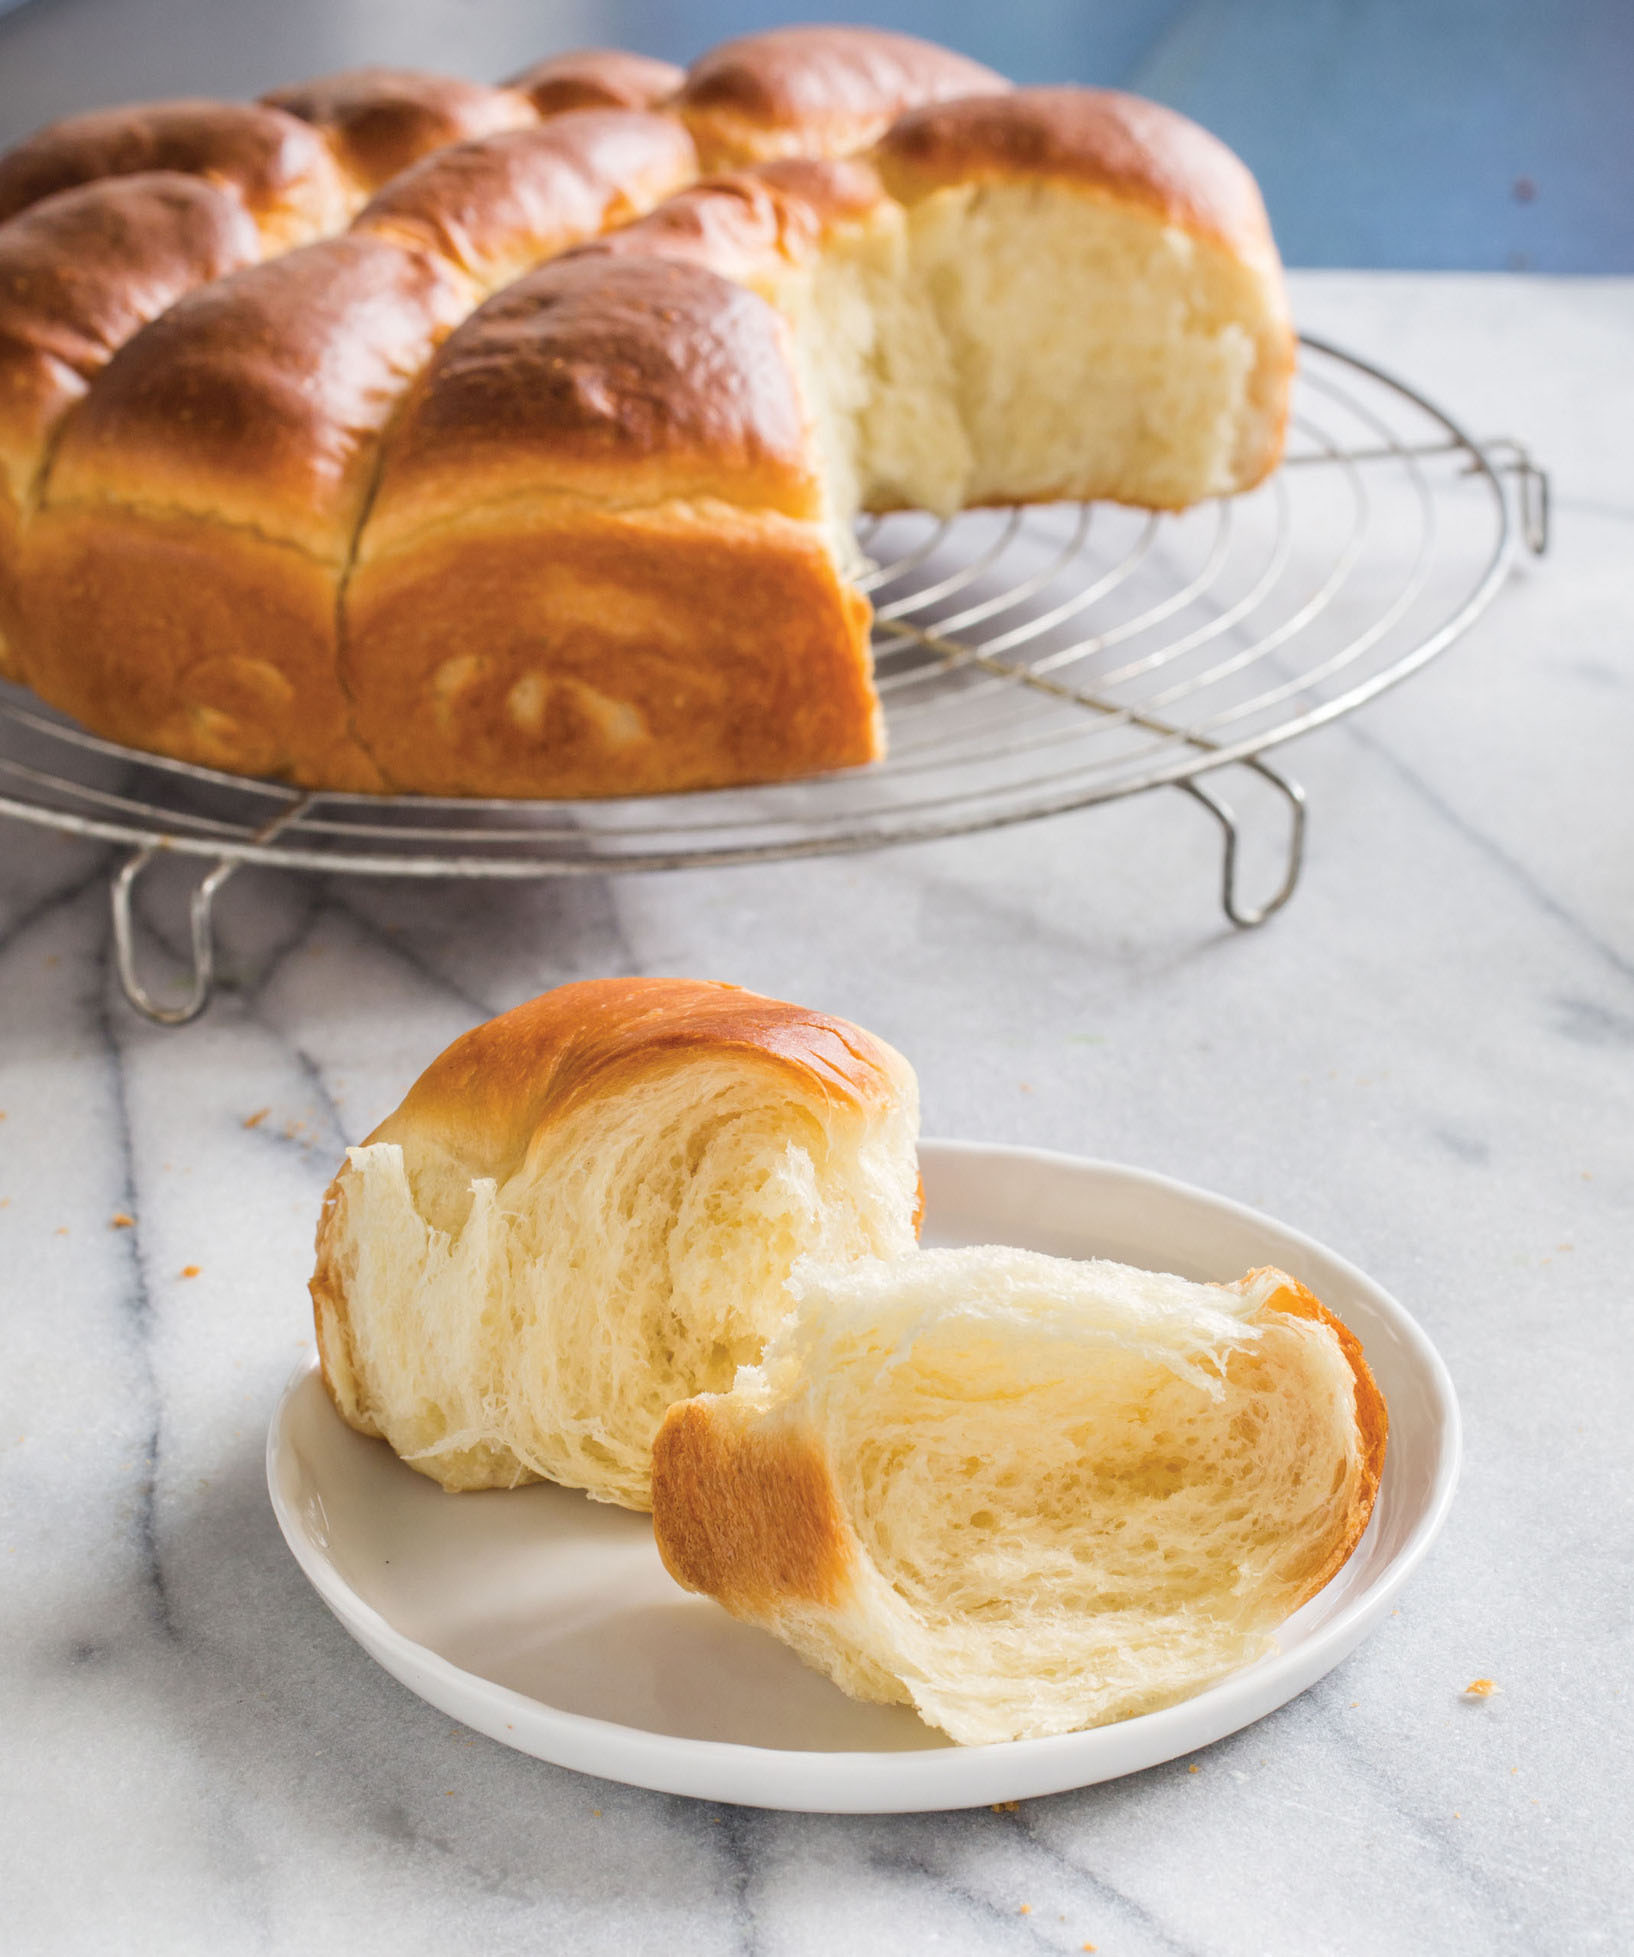
Incorporating a cooked flour paste into the dough creates soft, superfluffy rolls that can be made in advance.
I knew this wasn’t typical for a tangzhong dough; the Japanese milk loaf dough I’d made had been soft and smooth. The discrepancy lay in the hydrations of the two doughs: My standard dough had a hydration of 60 percent (meaning there were 6 parts liquid to every 10 parts flour), while the hydration of the Japanese milk bread was 80 percent, which I later learned was typical for a dough using the tangzhong method. Ordinarily, that much liquid would make a dough slack, sticky, and hard to shape, but not so with my milk bread.
I made another batch of rolls with a hot-water paste, but this time I added extra milk (½ cup total) to the dough to bring the hydration to 80 percent. Sure enough, the dough was soft and silky, not sticky, and held its shape nicely after kneading.
So why wasn’t it a sticky mess? In a standard dough, where you mix cold water and flour, most of the water is not absorbed, so the stickiness you feel is so-called free water. But flour can absorb twice as much hot water as cold water. Heating the water for the paste allows it to be fully absorbed by the flour; in essence, a portion of what would be free water in a standard dough gets locked away. Thus, when the flour paste is mixed with the rest of the ingredients, the dough is smooth, not sticky.
From there, I knocked the air out of the doubled dough to eliminate large air bubbles and encourage a fine crumb, portioned it into 12 pieces, rolled each into a taut ball, and arranged the rolls in a greased cake pan to rise. Baked at 375 degrees until they were deep golden brown, these rolls were moist and flavorful—but they were a bit squat and the crumb was coarse.
BUILDING STRENGTH
A close look at some tangzhong recipes revealed my mistake: I had added more moisture to my dough without building any additional structure to support the greater expansion of steam produced by the extra water. So I made a few changes. First, I added an autolyse—a brief resting period between mixing and kneading the dough that alters the gluten-forming proteins so they can link up more effectively. Withholding sugar and salt until after the autolyse makes this little power nap even more effective, since those ingredients would otherwise slow the alteration of the proteins. Second, I waited until the second half of the kneading period—when the gluten was well established—to add the butter, since fat makes the gluten strands slippery and unable to “grab” each other to form a network. I also streamlined my method by microwaving the flour paste; roughly 60 seconds on high did the trick. And rather than wait for the hot paste to cool (so it wouldn’t kill the yeast on contact), I added it to cold milk and whisked them together until the mixture was merely warm.
My rolls were now lighter and boasted a finer crumb, but those gossamer-thin layers were still missing, and I wondered if altering my shaping method might help.
When dough is kneaded, the flour proteins link up in a fairly random way. Rounding each portion of dough into a tight ball, as you typically would when shaping dinner rolls, organizes the proteins on the exterior into a kind of membrane (bakers call this a “gluten cloak”) but does not affect the proteins on the interior, which remain random. The Japanese milk bread’s shaping method was elaborate, and now I suspected that it was the key to the bread’s delicate vertical layers. To shape that loaf, I had divided the dough into four pieces, rolled each one into a rectangle, and folded each rectangle into thirds like a business letter; I then flattened each piece of dough out again and rolled it up again like a jelly roll before nestling it into the loaf pan with the others.
Because I was shaping 12 dinner rolls instead of four larger dough pieces, I tried a simplified version, flattening each piece into a long, narrow rectangle before rolling it up and placing it in the pan. When the rolls had doubled, they looked especially smooth and plump, thanks to the strong gluten development. I baked them to a deep golden brown, removed them from the pan, and brushed them with ½ tablespoon of melted butter.
When I pulled one roll from the round, it separated from the others cleanly, and I delightedly peeled away layer after delicate layer. The combined effect of the added liquid in the flour paste, the well-developed gluten, and the unusual shaping had given me the ideal dinner roll: moist, tender, and particularly fluffy. The most convincing part of all: The rolls were great the next day when I refreshed them in the oven, a real bonus when making them for a holiday dinner.
We strongly recommend weighing the flour for the dough. The slight tackiness of the dough aids in flattening and stretching it in step 5, so do not dust your counter with flour. This recipe requires letting the dough rest for at least 2 hours before baking. The rolls can be made a day ahead. To refresh them before serving, wrap them in aluminum foil and heat them in a 350-degree oven for 15 minutes.
Flour Paste
½ cup water
3 tablespoons bread flour
Dough
½ cup cold milk
1 large egg
2 cups (11 ounces) bread flour
1½ teaspoons instant or rapid-rise yeast
2 tablespoons sugar
1 teaspoon salt
4 tablespoons unsalted butter, softened, plus ½ tablespoon, melted
1. For the flour paste: Whisk water and flour together in small bowl until no lumps remain. Microwave, whisking every 20 seconds, until mixture thickens to stiff, smooth, pudding-like consistency that forms mound when dropped from end of whisk into bowl, 40 to 80 seconds.
2. For the dough: In bowl of stand mixer, whisk flour paste and milk together until smooth. Add egg and whisk until incorporated. Add flour and yeast. Fit stand mixer with dough hook and mix on low speed until all flour is moistened, 1 to 2 minutes. Let stand for 15 minutes.
3. Add sugar and salt and mix on mediumlow speed for 5 minutes. With mixer running, add softened butter, 1 tablespoon at a time. Continue to mix on medium-low speed 5 minutes longer, scraping down dough hook and sides of bowl occasionally (dough will stick to bottom of bowl).
4. Transfer dough to very lightly floured counter. Knead briefly to form ball and transfer, seam side down, to lightly greased bowl; lightly coat surface of dough with vegetable oil spray and cover with plastic wrap. Let rise until doubled in volume, about 1 hour.
5. Grease 9-inch round cake pan and set aside. Transfer dough to counter. Press dough gently but firmly to expel all air. Pat and stretch dough to form 8 by 9-inch rectangle with short side facing you. Cut dough lengthwise into 4 equal strips and cut each strip crosswise into 3 equal pieces. Working with 1 piece at a time, stretch and press dough gently to form 8 by 2-inch strip. Starting on short side, roll dough to form snug cylinder and arrange shaped rolls seam side down in prepared pan, placing 10 rolls around edge of pan, pointing inward, and remaining 2 rolls in center. Cover with plastic and let rise until doubled, 45 minutes to 1 hour.
6. When rolls are nearly doubled, adjust oven rack to lowest position and heat oven to 375 degrees. Bake rolls until deep golden brown, 25 to 30 minutes. Let rolls cool in pan on wire rack for 3 minutes; invert rolls onto rack, then reinvert. Brush tops and sides of rolls with melted butter. Let rolls cool for at least 20 minutes before serving.
WHAT IS THIS THING CALLED TANGZHONG?
The tangzhong method calls for briefly cooking a portion of the flour and water to make a paste, which is then combined with the rest of the ingredients. By using hot water, we can actually add more liquid to the dough because flour can absorb twice as much hot water as cold water. The superhydrated dough yields rolls that are not just moist but also fluffy because the water converts to steam, which acts as a leavening agent, creating rise. The extra water also increases gluten development, giving the bread the structure it needs to contain the steam rather than letting it escape.
HOT WATER PASTE
The paste should be stiff and smooth.
PERFECT STICKY BUNS
ANDREA GEARY,May/June 2016
I once made sticky buns at home, and I enjoyed every step of the baking process, from rolling the spiced sugar filling up in the firm, smooth dough to nestling the tidy spirals in the nutty caramel topping to flipping the baked buns onto a platter and watching the glaze drip down the sides. But when it came to the final step—actually eating a bun—I felt betrayed.
Even when slightly warm, the bread part was drier and tougher than I had anticipated, and the topping was so firm that I feared for my fillings. A few hours later, the buns were downright hard from top to bottom, but it didn’t really matter. They were so overwhelmingly sweet that finishing one had been a feat, and I couldn’t muster enough enthusiasm to repeat the experience.
When I was finally ready to attempt sticky buns again, I set some firm goals: This time around the bread would be moist, soft, and fluffy, and the topping would be substantial enough to sit atop the buns without sinking in but not so hard that it stuck in my teeth. And, of course, I’d keep the overall sweetness in check so that I could eat an entire bun.
A HARD CASE
Most sticky bun recipes follow a common procedure: First, you make a yeast dough, and while it rises you mix up a filling and a topping. The filling is often just sugar and a bit of spice but may also include ingredients such as softened butter, dried fruit, and chopped nuts. The topping usually involves cooking butter and sugar and maybe honey or maple syrup together in a saucepan, pouring the mixture into a baking pan, and scattering the surface with nuts. You flatten the risen dough into a rectangle, sprinkle the filling over it, and roll it up like a jelly roll. Cut the dough cylinder into pieces, place them in the pan, let them rise, and then bake, flip, and enjoy (in theory).
I chose simple formulas to act as placeholders for the filling and topping so I could concentrate on creating a dough that would bake up soft and light. I started with a couple of basic yeast doughs made with flour, milk, sugar, butter, and eggs, as well as some that included ingredients like rolled oats and instant mashed potatoes for their purported moisture-retaining qualities.
In dough form, each of these was pleasantly smooth and springy, a joy to work with. Unfortunately, all of the recipes—even those with oats and mashed potatoes—yielded buns that were drier and harder than my ideal. I was quickly learning that, while firm, smooth doughs are the least sticky and as such the easiest to shape, they inevitably yield tight, tough bread.
Fair enough. I was willing to struggle with a slack, sticky dough if it gave me the light, moist results I was after, so I mixed together a buttery, eggy brioche dough. As expected, its softness made it difficult to roll into a cylinder, and when I sliced it into pieces, they stuck to the knife, which left them mangled. But that’s not what discouraged me. When baked, the rich, sugar-filled brioche topped with buttery, nutty caramel was just too much of a good thing. I couldn’t finish a full portion.
It seemed that the three qualities I wanted most in a dough—easy to work with, not too rich, light and fluffy when baked—were incompatible. And then I realized that I had tackled a similar problem a few months earlier.
LIGHTEN UP
While developing a recipe for dinner rolls, I had learned about an interesting Asian bread-baking technique called tangzhong, in which a portion of the flour and liquid in a recipe is cooked together until it forms a pudding-like gel, which is then added to the bread dough. This allows you to add more liquid to the dough, yet the added water doesn’t make the dough sticky or difficult to work with because that precooked gel traps it. The extra water converts to steam during baking, which made my rolls fluffy and light. And with a fraction of the eggs and butter found in a rich brioche and just a few tablespoons of sugar, they aren’t too decadent.
Easy to work with? Light and moist without too much richness? Obviously the sticky bun–tangzhong marriage was meant to be.
Given that sticky buns are a bit of work and something that you tend to make for an occasion, I wanted to make enough to fill a 13 by 9-inch pan, so I increased my dinner roll recipe by one-third. I cooked a small amount of flour and water together in the microwave until it had formed a smooth paste and then whisked the mixture with milk to cool it down to ensure that it wouldn’t kill the yeast. I stirred in eggs, flour, and instant yeast and let the mixture rest for 15 minutes before adding some salt and a modest amount of sugar. I then let the mixer knead the dough for 5 minutes. Next, I added some softened butter and mixed for 5 minutes more before setting the dough aside to rise while I made the filling and topping.
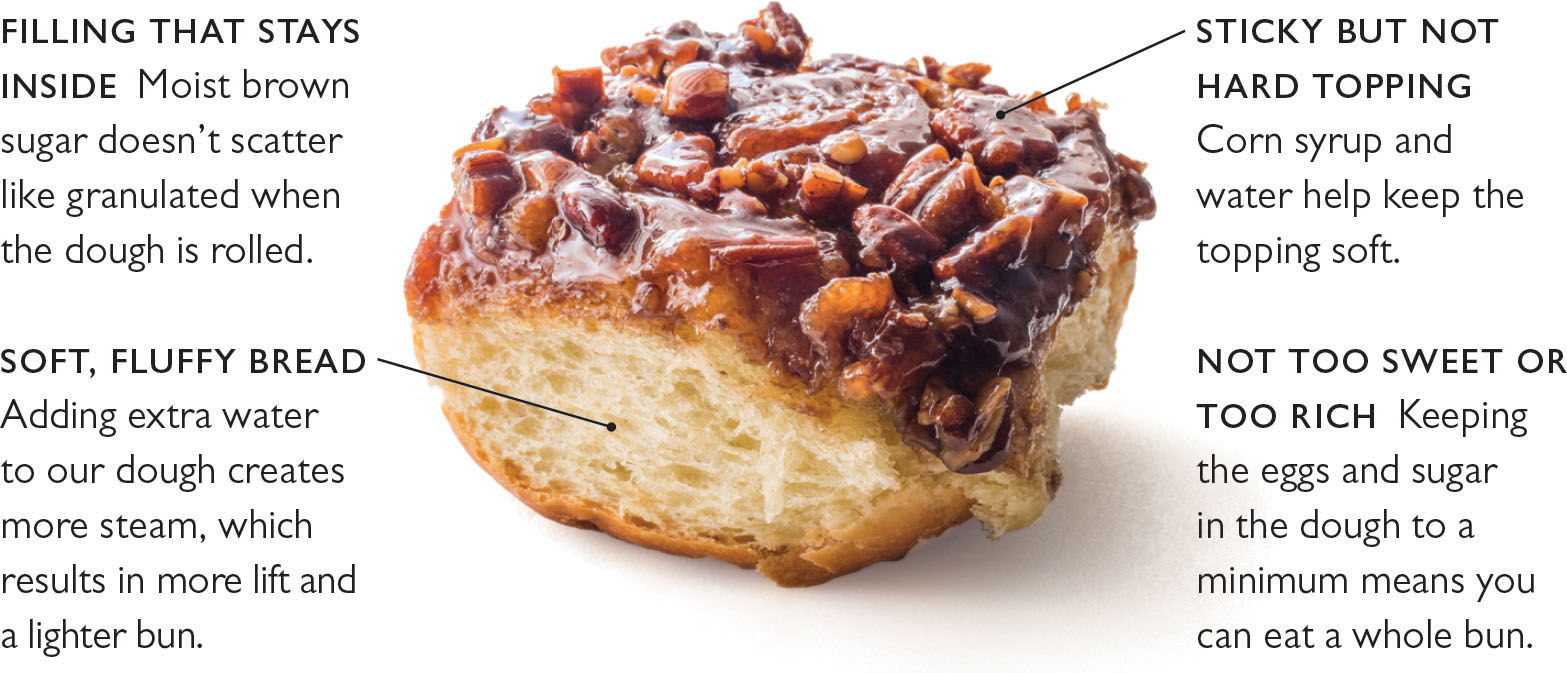
A highly hydrated dough makes for fluffy, soft buns; dark corn syrup and water create a gooey but not-too-sweet topping.
Why wait to add the salt and sugar? They are hygroscopic, which means they attract water and would divert moisture away from the flour, delaying the formation of gluten. Pausing before adding salt and sugar allows the gluten-forming proteins to fully hydrate so that they can link up and create structure, giving the buns height and lightness when baked. And because my sticky buns would have a heavy topping to support, a sound structure would be crucial.
I turned the risen dough out onto the counter and patted and stretched it to form a rectangle, a technique I found easier and more effective than rolling this soft dough with a pin. I sprinkled on the filling, rolled the dough into a tight cylinder, and sliced it into portions using a length of dental floss, which kept the pieces neat and round. I transferred the pieces to the pan, let them rise, and then baked them.
When I retrieved the buns from the oven, I found that almost every one had blossomed into a tall cone shape, but otherwise, these moist, fluffy buns were a success. After a few more tests, I realized that the dough expanded so much when it baked that it had nowhere to go but up. Keeping the cylinder a little looser produced tall but level buns.
TOPPED OFF
It was time to examine the filling and topping. My placeholder filling was just ¾ cup of sugar and 1 teaspoon of cinnamon. It tasted okay, but the dry, loose mixture had a tendency to roll and shift over the surface of the dough when I formed the cylinder, which left some pieces with less filling than others.
Some bakers encourage the filling to stick by brushing the dough with melted butter (a little rich) or water (a bit messy) or by mixing butter into the filling and smearing it over the dough (rich, messy, and also a pain). Instead, I switched to using dark brown sugar; its moistness helped it stick to the tacky dough, so I could roll it up easily.
The topping required a little more trial and error. My placeholder was a mixture of brown sugar, butter, honey, and cream that was cooked in a saucepan, poured into the baking pan, and covered evenly with a layer of chopped pecans. It baked up a bit too firm, and I wasn’t crazy about the assertive flavor of the honey or the overall sweetness.
The first thing to go was the saucepan. I simply melted the butter in a bowl in the microwave and then stirred the other ingredients into it. Next, I substituted dark corn syrup for the honey. Because it contains water, it produced a softer texture than I’d get with just granulated or brown sugar; plus, the sugar in corn syrup is fully dissolved, which helped avoid grainy results. It gave me a topping that was a little less sweet and also a little less distinctive, so it didn’t overpower the cinnamon in the filling or the pleasant yeastiness of the bread.
But that cream bothered me. I was using just 2 tablespoons, so it was hardly worth buying a carton, but eliminating it made the topping even firmer. And then it occurred to me: Cream is mostly water and fat, and my buttery topping was hardly lacking in the fat department. Substituting water for the cream did the trick and, by decreasing the fat and increasing the liquid with this swap, I created a topping that was substantial, gooey, and sticky—yet not too firm.
Though I’d typically make these buns to give to a crowd, they’re now so fluffy and light that the prospect of keeping more than one for myself is pretty tempting.
These buns take about 4 hours to make from start to finish. For dough that is easy to work with and produces light, fluffy buns, we strongly recommend that you measure the flour for the dough by weight. The slight tackiness of the dough aids in flattening and stretching it in step 6, so resist the urge to use a lot of dusting flour. Rolling the dough cylinder tightly in step 7 will result in misshapen rolls; keep the cylinder a bit slack. Bake these buns in a metal, not glass or ceramic, baking pan. We like dark corn syrup and pecans here, but light corn syrup may be used, and the nuts may be omitted, if desired.
Flour Paste
⅔ cup water
¼ cup (1⅓ ounces) bread flour
Dough
⅔ cup milk
1 large egg plus 1 large yolk
2¾ cups (15⅛ ounces) bread flour
2 teaspoons instant or rapid-rise yeast
3 tablespoons granulated sugar
1½ teaspoons salt
6 tablespoons unsalted butter, softened
Topping
6 tablespoons unsalted butter, melted
½ cup packed (3½ ounces) dark brown sugar
¼ cup (1¾ ounces) granulated sugar
¼ cup dark corn syrup
¼ teaspoon salt
2 tablespoons water
1 cup pecans, toasted and chopped (optional)
Filling
¾ cup packed (5¼ ounces) dark brown sugar
1 teaspoon ground cinnamon
1. For the flour paste: Whisk water and flour together in small bowl until no lumps remain. Microwave, whisking every 25 seconds, until mixture thickens to stiff, smooth, pudding-like consistency that forms mound when dropped from end of whisk into bowl, 50 to 75 seconds.
2. For the dough: In bowl of stand mixer, whisk flour paste and milk together until smooth. Add egg and yolk and whisk until incorporated. Add flour and yeast. Fit stand mixer with dough hook and mix on low speed until all flour is moistened, 1 to 2 minutes. Let stand for 15 minutes. Add sugar and salt and mix on medium-low speed for 5 minutes. Stop mixer and add butter. Continue to mix on medium-low speed for 5 minutes longer, scraping down dough hook and sides of bowl halfway through (dough will stick to bottom of bowl).
3. Transfer dough to lightly floured counter. Knead briefly to form ball and transfer seam side down to lightly greased bowl; lightly coat surface of dough with vegetable oil spray and cover bowl with plastic wrap. Let dough rise until just doubled in volume, 40 minutes to 1 hour.
4. For the topping: While dough rises, grease 13 by 9-inch metal baking pan. Whisk melted butter, brown sugar, granulated sugar, corn syrup, and salt together in medium bowl until smooth. Add water and whisk until incorporated. Pour mixture into prepared pan and tilt pan to cover bottom. Sprinkle evenly with pecans, if using.
5. For the filling: Stir sugar and cinnamon in small bowl until thoroughly combined; set aside.
6. Turn out dough onto lightly floured counter. Press dough gently but firmly to expel air. Working from center toward edge, pat and stretch dough to form 18 by 15-inch rectangle with long edge nearest you. Sprinkle filling over dough, leaving 1-inch border along top edge; smooth filling into even layer with your hand, then gently press mixture into dough to adhere.
7. Beginning with long edge nearest you, roll dough into cylinder, taking care not to roll too tightly. Pinch seam to seal and roll cylinder seam side down. Mark gently with knife to create 12 equal portions. To slice, hold strand of dental floss taut and slide underneath cylinder, stopping at first mark. Cross ends of floss over each other and pull. Slice cylinder into 12 portions and transfer, cut sides down, to prepared baking pan. Cover tightly with plastic wrap and let rise until buns are puffy and touching one another, 40 minutes to 1 hour. (Buns may be refrigerated immediately after shaping for up to 14 hours. To bake, remove baking pan from refrigerator and let sit until buns are puffy and touching one another, 1 to 1½ hours.) Meanwhile, adjust oven racks to lowest and lower-middle positions. Place rimmed baking sheet on lower rack to catch any drips and heat oven to 375 degrees.
8. Bake buns on upper rack until golden brown, about 20 minutes. Tent with aluminum foil and bake until center of dough registers at least 200 degrees, 10 to 15 minutes longer. Remove foil and let buns cool in pan on wire rack for 5 minutes. Place rimmed baking sheet over buns and carefully invert. Remove pan and let buns cool for 5 minutes. Using spoon, scoop any glaze on baking sheet onto buns. Let cool for at least 10 minutes longer before serving.
THE IDEAL STICKY BUN
Most sticky buns are dense and dry, with a filling that’s fussy to work with and a topping so sticky that chewing it makes your jaw ache. Plus, the whole package is usually so rich that you can’t finish an entire bun. Here’s how we made a better bun.
HOW WE GOT TO MOIST STICKY BUNS
Our ideal was a light, moist bun that wasn’t too rich or sweet, so we could eat the whole thing without regret. Here’s how we got there.
TEST 1 Make a basic yeasted dough.
WHY WE TRIED IT Most are not too sticky, which makes them easy to work with.
RESULT The buns were dense and dry.
TEST 2 Replace some flour with rolled oats.
WHY WE TRIED IT We hoped the oats would help retain moisture and soften the buns.
RESULT No improvement.
TEST 3 Add mashed potatoes.
WHY WE TRIED IT Instant mashed potatoes also have moisture-retaining properties for the promise of a softer bun.
RESULT No improvement.
TEST 4 Add eggs and butter.
WHY WE TRIED IT Eggs and butter add fat; eggs also add water.
RESULT The buns were tender but too rich; the dough was overly sticky.
TEST 5 Add a cooked flour-and-water paste.
WHY WE TRIED IT Also known as tangzhong, this technique allowed us to add more water without making the dough too wet.
RESULT The buns were light and moist; the dough was simple to roll and cut.
A cooked flour-and-water paste is the best route to moist yet fluffy buns.
USE THE CORRECT PAN
If a recipe specifies a particular pan—metal or glass—don’t be tempted to swap one for the other. Each material conducts heat at a different rate, and baking for more or less time to account for that difference won’t give you identical results. Case in point: Our Sticky Buns recipe calls for a metal baking pan. When we tried baking the buns in a glass baking dish, which conducts heat more slowly than a metal pan, we had to extend the baking time by 10 minutes to ensure that the buns in the center of the dish were done. But since glass retains heat longer than metal, the buns on the edges of the dish turned dry and hard. For best results, stick with the pan the recipe calls for.
THESE BUNS PALE IN COMPARISON
Our buns baked in glass instead of metal were pale and undercooked in the center.
THE BEST CINNAMON SWIRL BREAD
DAN SOUZA,March/April 2012
Cinnamon swirl bread always sounds terrifically appealing in theory, but until recently, I’ve ended up being disappointed every time I’ve tried it. My ideal is a fluffy, delicate crumb that’s studded with plump raisins and laced with a substantial swirl of gooey cinnamon sugar. But most versions I’ve sampled are either austere white sandwich loaves rolled up with a bare sprinkle of cinnamon and sugar or overly sweet breads ruined by gobs of filling oozing from the cracks.
When I finally stumbled upon cinnamon bread nirvana, it was in the unlikeliest of places: Tokyo’s Narita Airport. After one bite of a lightly toasted slice of swirl bread that I’d bought at a bakery kiosk, I realized I’d found it. Beneath the lightly crisp exterior, the crumb was so springy, moist, and feathery it could be pulled into cotton candy–like strands. This style of milky-sweet Japanese white sandwich bread, called shokupan, proved the perfect foil for a sweet, viscous spiral, which, in this case, was red-bean paste. I vowed to figure out a cinnamon swirl version with raisins once I was back home.
TURNING JAPANESE
I decided to focus first on the bread and worry about incorporating the swirl and the raisins later. But when recipes for shokupan written in English proved hard to come by, I sought out an expert: Takeo Sakan, head baker at Boston’s acclaimed Japonaise Bakery & Café. To help better understand how shokupan is made, we compared it with American sandwich bread. The two styles share a number of the same ingredients: flour, yeast, salt, water, milk, sugar, and butter. Shokupan, however, boasts considerably more fat (roughly twice as much butter, plus an egg) and more sugar, which accounts for its particularly tender crumb. Another major difference: Shokupan contains more gluten—the network of proteins that builds structure and allows bread to rise high and retain its springy crumb. To achieve that result, Sakan relies on a combination of thorough kneading and specialty high-gluten flour, which contains even more of the structure-building proteins than regular bread flour. It’s that marriage of particularly strong gluten and tenderizers like fat and sugar that produces shokupan’s airy-yet-sturdy crumb.
I took careful notes and returned to the test kitchen emboldened to mix up my own version. There was one change to Sakan’s recipe I’d make immediately, however: Since the high-gluten flour he used requires mail-ordering, I’d have to stick with bread flour and worry about making up for the lack of gluten later. Otherwise, I followed his lead: I mixed the flour with yeast, sugar, and nonfat dry milk powder; added water (1½ cups) plus an egg and 8 tablespoons of softened butter for richness; and kneaded the mixture in a stand mixer for a few minutes until it formed a cohesive mass. After letting the dough rest for about 20 minutes, I added the salt and then let the mixer knead the dough for a longer stretch—about 10 minutes, by which time the dough was smoother and more workable. I mixed in a generous handful of golden raisins (which are more plump and moist than dark raisins) and left the dough to proof in a turned-off oven. Because warm, humid air stimulates yeast activity and speeds rise time, I’d placed a loaf pan of boiling water on the oven floor, simulating the proof boxes used by professional bakers. Forty-five minutes later, I patted the dough into a rectangle, sprinkled a placeholder cinnamon sugar filling over the surface, rolled it into a spiral, fitted it into a loaf pan, and let it proof for another 45 minutes. I brushed the dough with an egg wash for shine and baked it until the crust was dark brown.
But while the color of the bread was handsome, the crumb itself was far from ideal. Among other problems, I couldn’t replicate the bread’s hallmark lift and airy texture. In fact, I could tell something had gone wrong as soon as I’d mixed up the dough. Unlike the springy, elastic mass that Sakan had made, mine was slack and easily extensible. The reason, no doubt, had a lot to do with the lower-protein bread flour.
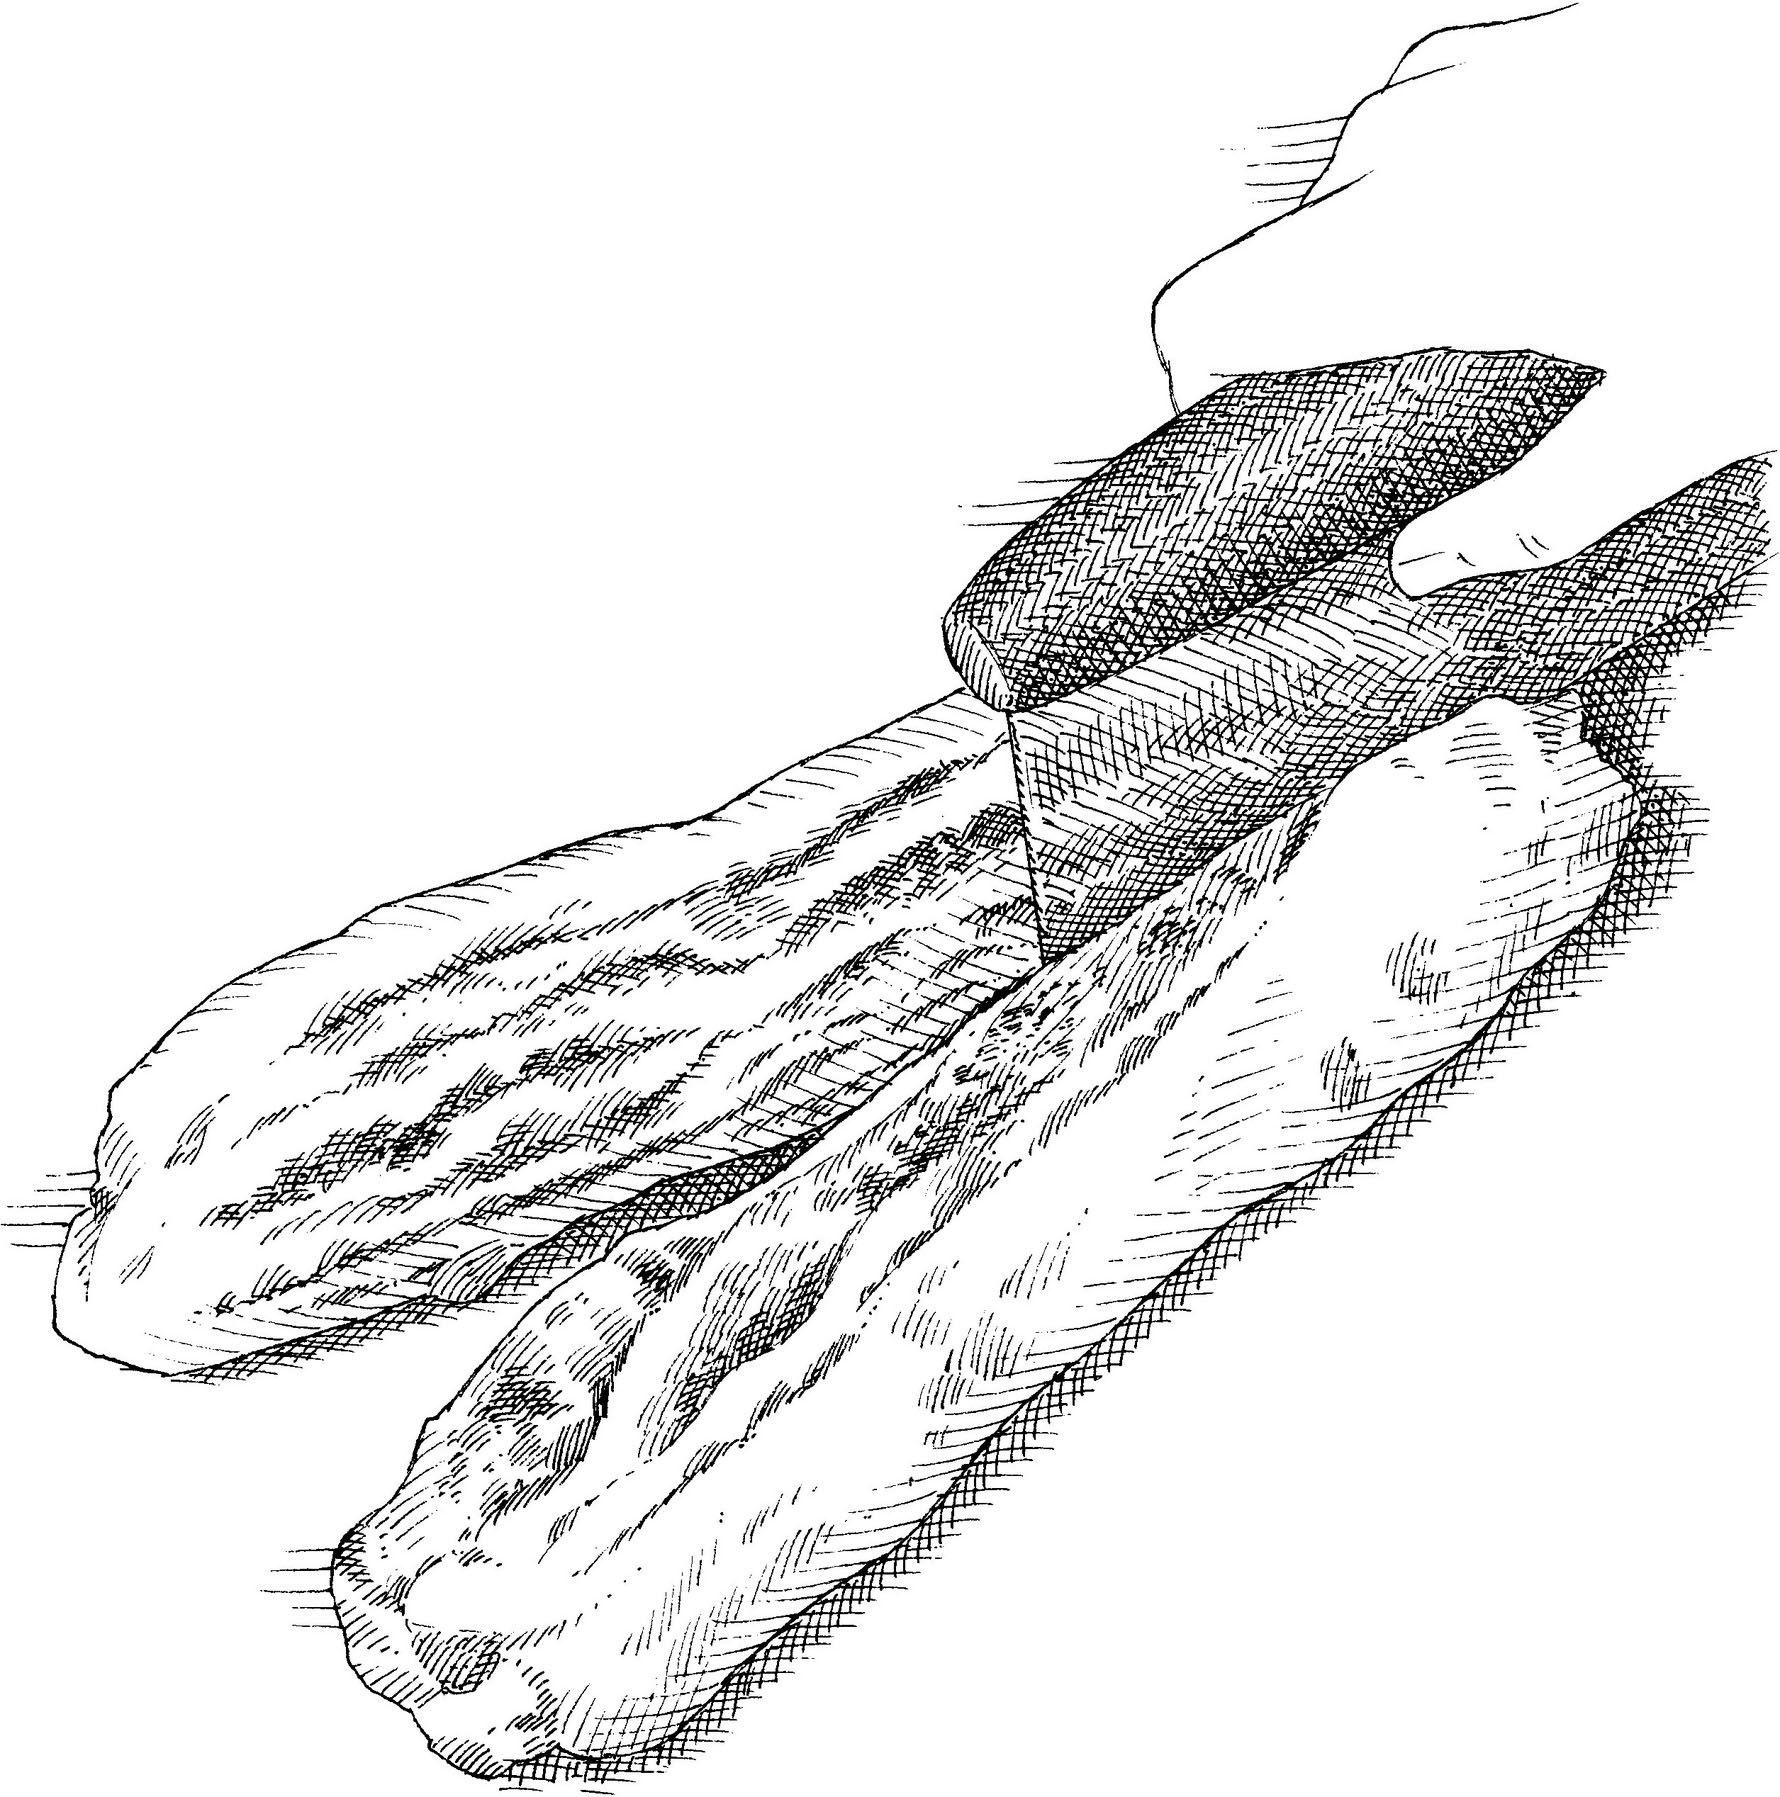
Using a series of folds and letting the dough rest before adding the butter gives it enough structure to hold in the sweet filling.
ON THE RISE
I had one solution in mind to strengthen the dough: Work in more air. While you might think of oxygen as merely providing lift to baked goods, it’s also the driving force behind gluten development, enabling the proteins in flour to cross-link and form a tightly bonded network. The more oxygen the dough gets, the tighter the bonds will be, and the stronger the gluten network. My first test: introducing two sets of “folds” into the process. By deflating the dough and folding it back onto itself several times, I incorporated more air into it, thereby encouraging the bread to expand and rise more. I also increased the kneading time to about 15 minutes, rendering it even more elastic and better able to trap gas for a taller rise. This bread baked up noticeably higher, but still not as tall as the shokupan loaves I’d tasted.
Leaving the technique alone for the moment, I scanned my ingredient list for other ways to boost the bread’s height. When I got to the butter, I paused. I knew that incorporating it into the dough at the outset was coating the flour proteins with fat, preventing them from bonding and inhibiting gluten formation. A better method, I reasoned, would be to knead the dough almost completely to develop gluten and then work in some softened butter during the final minutes of kneading. The idea worked, save for the soft butter pieces smearing into the dough and not incorporating evenly. Tossing the pieces with a tablespoon of flour before letting them soften helped the dough grip the butter and pull it into the dough. The resulting loaf was gorgeously lofty—by far the best yet. It would serve as the perfect counterpoint for my next challenge: a gooey cinnamon sugar swirl.
MIND THE GAP
I thought perfecting a thick cinnamon swirl would be the easy part of making this bread—until my first attempt at incorporating it. The bread rose beautifully tall during the first half of baking and then sprung a leak and spewed molten cinnamon sugar from its crevices. When I sliced it open, I discovering a mangled mix of dense bread, huge gaps, and puddles of filling—all perennial problems with swirled breads.
Our science editor explained: All of these issues boil down to the fact that the sugary filling and bread don’t readily bind. During proofing, the gas produced by the yeast leaks from the dough into the spiral, and because it has no place to go, the gas pushes apart the layers of dough. This separation becomes more distinct during baking, when steam also fills the gaps. At the same time, all that pressure compresses the dough, further widening the trails for the cinnamon sugar filling to flow to the bottom of the bread and eventually burst through its seam.
What I needed, then, was a way to encourage binding between the swirl and the dough. I added a slew of different ingredients to the filling to see if any would help it adhere: flour, eggs, pectin, corn syrup, pureed raisins, cooked caramel, crushed cinnamon cereal, and ground-up nuts. Most of the loaves still baked up with comically large gaps. In desperation, I even went so far as to make a second dough spiked with cinnamon and roll that up with the regular dough. That took care of the gapping problem but also did away with the gooey filling.
That’s when I realized that adding extra ingredients to the swirl might not be as effective as examining the ingredients I already had in it. Up to this point, the filling consisted of ½ cup of granulated sugar and 1 tablespoon of ground cinnamon per loaf. I baked more loaves, this time trading the granulated stuff for confectioners’ sugar as well as tripling the cinnamon. These loaves showed significant improvement: When confectioners’ sugar absorbs water from the dough, it immediately dissolves, forming a sticky paste. This paste is thickened by the cornstarch in the confectioners’ sugar along with the abundance of carbohydrates in the cinnamon. The thickened paste doesn’t pool at the bottom of the bread as readily and is sticky enough to help bind the layers as the bread expands during proofing.
This was by far the best loaf I had made to date, but unfortunately, I couldn’t always replicate it; I still got the occasional spewing leak or gaping hole. Lightly spraying the dough with water before and after dusting on the filling helped the paste form even more quickly, but it wasn’t enough.
FROM RUSSIA WITH LOAVES
I started to wonder if there was anything I could do during shaping to help the situation. Since gas trapped between the layers of dough was the trigger for the gapping, perhaps what I needed was to provide a way for it to escape. I tested a multitude of different shaping techniques that created crevices in the dough that would allow gas to escape, including monkey bread and braids. The easiest of these shaping methods, which cut down on gapping and leaking considerably, was an attractive weave called a Russian braid. To make it, I sprinkled the filling over the dough, rolled it into a cylinder just as before, and then halved it lengthwise to reveal the striations of dough and filling. I then stretched these two halves slightly and twisted them together (keeping the cut surfaces facing up to expose the nice-looking striations). Any gas that would have been trapped between the layers was able to escape, and the bread baked up tightly seamed and beautifully marbled. To prevent any risk of burning the raisins or the bread’s sugary surface, I pushed the exposed pieces of fruit into the braid and tented the loaves with aluminum foil halfway through baking.
This was the bread I’d always envisioned: a burnished crust encasing springy, airy, slightly sweet bread streaked with thick lines of gooey cinnamon filling.
Cinnamon Swirl Bread
Cinnamon Swirl Bread
MAKES 2 LOAVES
To achieve the proper dough consistency, make sure to weigh your ingredients. The dough will appear very wet and sticky until the final few minutes of kneading; do not be tempted to add supplemental flour. The test kitchen’s preferred loaf pan measures 8½ by 4½ inches; if using 9 by 5-inch loaf pans, start checking for doneness 5 minutes early. To make ahead, store the baked and cooled loaves in a double layer of plastic wrap at room temperature for up to two days. To freeze the bread for up to one month, wrap it with an additional layer of aluminum foil.
Dough
8 tablespoons unsalted butter
3¾ cups (20 ounces) bread flour, plus extra for work surface
¾ cup (2¾ ounces) nonfat dry milk powder
⅓ cup (2⅓ ounces) granulated sugar
1 tablespoon instant or rapid-rise yeast
1½ cups (12 ounces) warm water (110 degrees)
1 large egg, lightly beaten
1½ teaspoons salt
1½ cups (7½ ounces) golden raisins
Filling
1 cup (4 ounces) confectioners’ sugar
3 tablespoons ground cinnamon
1 teaspoon vanilla extract
½ teaspoon salt
1 large egg, lightly beaten with pinch of salt
1. For the dough: Cut butter into 32 pieces and toss with 1 tablespoon flour; set aside to soften while mixing dough. Whisk remaining flour, milk powder, sugar, and yeast together in bowl of stand mixer. Using stand mixer fitted with dough hook, add water and egg and mix on medium-low speed until cohesive mass forms, about 2 minutes, scraping down bowl if necessary. Cover mixing bowl with plastic wrap and let stand for 20 minutes.
2. Adjust oven rack to middle position and place loaf or cake pan on bottom of oven. Remove plastic from mixer bowl, add salt, and mix on medium-low speed until dough is smooth and elastic and clears sides of bowl, 7 to 15 minutes. With mixer running, add butter, few pieces at a time, and continue to knead until butter is fully incorporated and dough is smooth and elastic and clears sides of bowl, 3 to 5 minutes longer. Add raisins and mix until incorporated, 30 to 60 seconds. Transfer dough to large greased bowl and, using bowl scraper or rubber spatula, fold dough over itself by gently lifting and folding edge of dough toward middle. Turn bowl 90 degrees; fold again. Turn bowl and fold dough 6 more times (total of 8 folds). Cover tightly with plastic and transfer to middle rack of oven. Pour 3 cups boiling water into loaf pan in oven, close oven door, and allow dough to rise for 45 minutes.
3. Remove bowl from oven and gently press down on center of dough to deflate. Repeat folding step (making total of 8 folds), re-cover, and return to oven until doubled in volume, about 45 minutes.
4. For the filling: Whisk filling ingredients together until well combined; set aside.
5. Grease two 8½ by 4½-inch loaf pans. Transfer dough to lightly floured counter and divide into 2 pieces. Working with 1 piece of dough, pat into rough 6 by 11-inch rectangle. With short side facing you, fold long sides in like business letter to form 3 by 11-inch rectangle. Roll dough away from you into ball. Dust ball with flour and flatten with rolling pin into 7 by 18-inch rectangle with even ¼-inch thickness. Using spray bottle, spray dough lightly with water. Sprinkle half of filling mixture evenly over dough, leaving ¼-inch border on sides and ¾-inch border on top and bottom; spray filling lightly with water. (Filling should be speckled with water over entire surface.) With short side facing you, roll dough away from you into firm cylinder. Turn loaf seam side up and pinch closed; pinch ends closed. Dust loaf lightly on all sides with flour and let rest for 10 minutes. Repeat with second ball of dough and remaining filling.
6. Working with 1 loaf at a time, use bench scraper to cut loaf in half lengthwise; turn halves so cut sides are facing up. Gently stretch each half into 14-inch length. Line up pieces of dough and pinch 2 ends of strips together. Take piece on left and lay over piece on right. Repeat, keeping cut side up, until pieces of dough are tightly twisted. Pinch ends together. Transfer loaf, cut side up, to prepared loaf pan; push any exposed raisins into seams of braid. Cover loaves loosely with plastic, return to oven, and allow to rise for 45 minutes. Remove loaves and water pan from oven; heat oven to 350 degrees. Allow loaves to rise at room temperature until almost doubled in size, about 45 minutes longer (top of loaves should rise about 1 inch over lip of pan).
7. Brush loaves with egg mixture. Bake until crust is well browned, about 25 minutes. Reduce oven temperature to 325 degrees, tent loaves with aluminum foil, and continue to bake until internal temperature registers 200 degrees, 15 to 25 minutes longer.
8. Transfer pans to wire rack and let cool for 5 minutes. Remove loaves from pans, return to rack, and cool to room temperature before slicing and serving, about 2 hours.
A BETTER BASE FOR CINNAMON SWIRL BREAD
The usual base for cinnamon swirl bread is American sandwich bread, but we looked to a different source: shokupan, Japan’s version of the same loaf. Shokupan relies on lots of fat, high-protein flour, and thorough kneading to create a crumb that’s feathery light yet still strong enough to support a gooey cinnamon filling.
JAPANESE SHOKUPAN
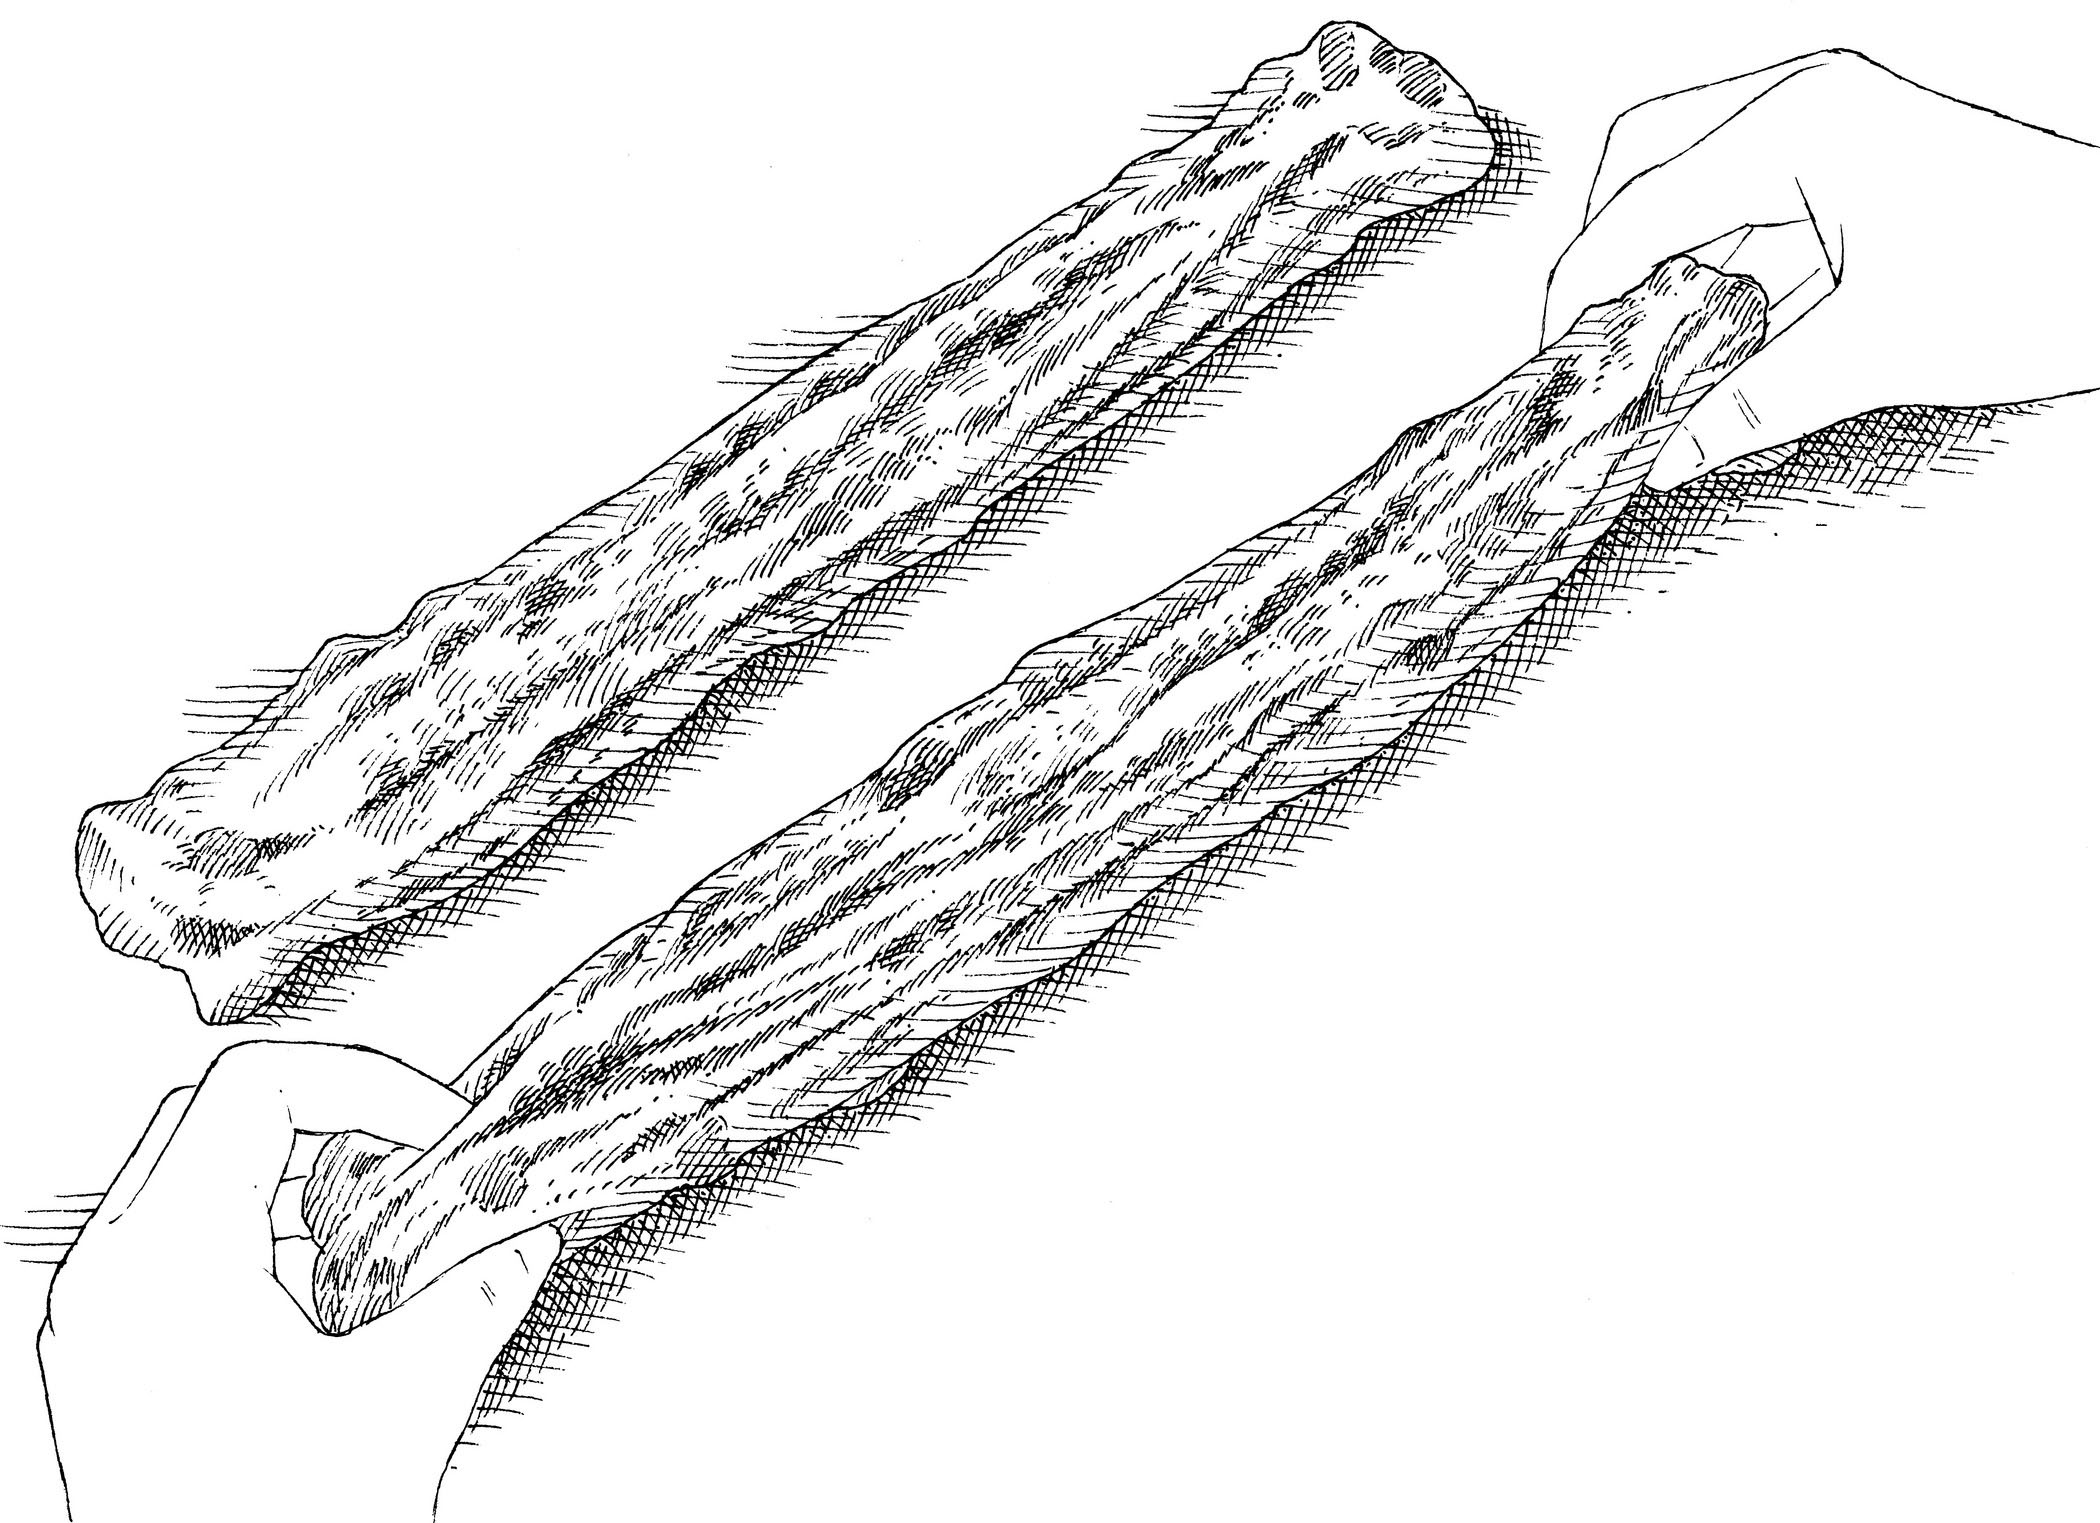
WEAVING A TIGHT CINNAMON SWIRL BREAD, RUSSIAN-STYLE
The benefit of a Russian braid is that the twisted shape tightly seals the pieces of dough together while providing plenty of escape routes for the excess air that would otherwise create tunnels in the loaf.
CUT LENGTHWISE Using bench scraper or sharp chef’s knife, cut filled dough in half lengthwise. Turn halves so cut sides are facing up.
STRETCH With cut sides up, stretch each half into 14-inch length, then pinch ends together.
FOLD AND PINCH Take left strip of dough and lay it over right strip of dough. Repeat, keeping cut sides face up, until pieces are tightly twisted. Pinch ends together.
REALLY GOOD PUMPKIN BREAD
LAN LAM,September/October 2012
After testing a half-dozen recipes for pumpkin bread, I found myself thinking of it as the John Doe of quick breads: No loaf was remarkably bad—and none was remarkably good. They were all just fine.
So when I set out to make a great one, I knew I’d need a bread that had just the right texture—neither too dense nor too cakey—and a rich pumpkin flavor that was properly tempered with sweetness and gently enhanced rather than obscured by spices.
While you might think that the best pumpkin bread would begin with from-scratch pumpkin puree, I found a loaf made with from-scratch puree only marginally better than one made with canned—and it was a lot more work. But I was definitely going to have to do something to improve the canned puree, since it had noticeable metallic, raw flavors. After I failed in my attempts to mask that canned flavor by using more spices or adding molasses or prune puree (the spices overwhelmed the pumpkin flavor, while the other two just tasted slightly odd), I wondered if I was overthinking the problem: The puree tasted raw, so why not cook it? I dumped a can of the puree into a saucepan and stirred it over medium heat until it barely began to caramelize. I then cooled it down and quickly stirred together another batch of bread using the cooked puree. Tasters marveled at the rich, full pumpkin flavor of this loaf.
However, the texture of these loaves was a little dense and dry. By cooking down the pumpkin I had driven off some of the moisture, so I added a bit of buttermilk. But caramelizing the puree had also increased its sweetness, throwing off the balance of flavors. I needed to add a bit of tanginess. Since gently tangy cream cheese is often slathered onto slices of pumpkin bread, I tried directly incorporating it into the batter. I didn’t even have to dirty a stand mixer to do it—I simply cut a block of cream cheese into small chunks, tossed them into the pan with the hot puree, and stirred—the lumps became streaks that melted away with a few swirls of the spatula, achieving the dual goals of melting the cream cheese and cooling the puree.
Precooking canned pumpkin puree and adding a bit of cream cheese yields a loaf with deep yet balanced flavor.
Could I simplify even further and just stir everything together in the saucepan? I cracked my eggs into the measuring cup with the buttermilk, gave them a quick whisk and then stirred them into the puree. The dry ingredients were easy to mix in. And happily, these loaves had perfectly balanced flavor plus just the texture I was after: moist but not greasy, with a crumb that was neither cakey nor dense.
For some textural contrast, I topped the bread with a simple streusel. John Doe no longer, this was a pumpkin bread to make you sit up and take notice.
The test kitchen’s preferred loaf pan measures 8½ by 4½ inches; if using 9 by 5-inch loaf pans, start checking for doneness 5 minutes early.
Topping
5 tablespoons packed (2¼ ounces) light brown sugar
1 tablespoon all-purpose flour
1 tablespoon unsalted butter, softened
1 teaspoon ground cinnamon
⅛ teaspoon salt
Bread
2 cups (10 ounces) all-purpose flour
1½ teaspoons baking powder
½ teaspoon baking soda
1 (15-ounce) can unsweetened pumpkin puree
1 teaspoon salt
1½ teaspoons ground cinnamon
¼ teaspoon ground nutmeg
⅛ teaspoon ground cloves
1 cup (7 ounces) granulated sugar
1 cup packed (7 ounces) light brown sugar
½ cup vegetable oil
4 ounces cream cheese, cut into 12 pieces
4 large eggs
¼ cup buttermilk
1 cup walnuts, toasted and chopped fine
1. For the topping: Using your fingers, mix all ingredients together in bowl until well combined and topping resembles wet sand; set aside.
2. For the bread: Adjust oven rack to middle position and heat oven to 350 degrees. Grease two 8½ by 4½-inch loaf pans. Whisk flour, baking powder, and baking soda together in bowl.
3. Combine pumpkin puree, salt, cinnamon, nutmeg, and cloves in large saucepan over medium heat. Cook mixture, stirring constantly, until reduced to 1½ cups, 6 to 8 minutes. Remove pot from heat; stir in granulated sugar, brown sugar, oil, and cream cheese until combined. Let mixture stand for 5 minutes. Whisk until no visible pieces of cream cheese remain and mixture is homogeneous.
4. Whisk together eggs and buttermilk. Add egg mixture to pumpkin mixture and whisk to combine. Fold flour mixture into pumpkin mixture until combined (some small lumps of flour are OK). Fold walnuts into batter. Scrape batter into prepared pans. Sprinkle topping evenly over top of each loaf. Bake until skewer inserted in center of loaf comes out clean, 45 to 50 minutes. Let breads cool in pans on wire rack for 20 minutes. Remove breads from pans and let cool for at least 1½ hours. Serve warm or at room temperature.
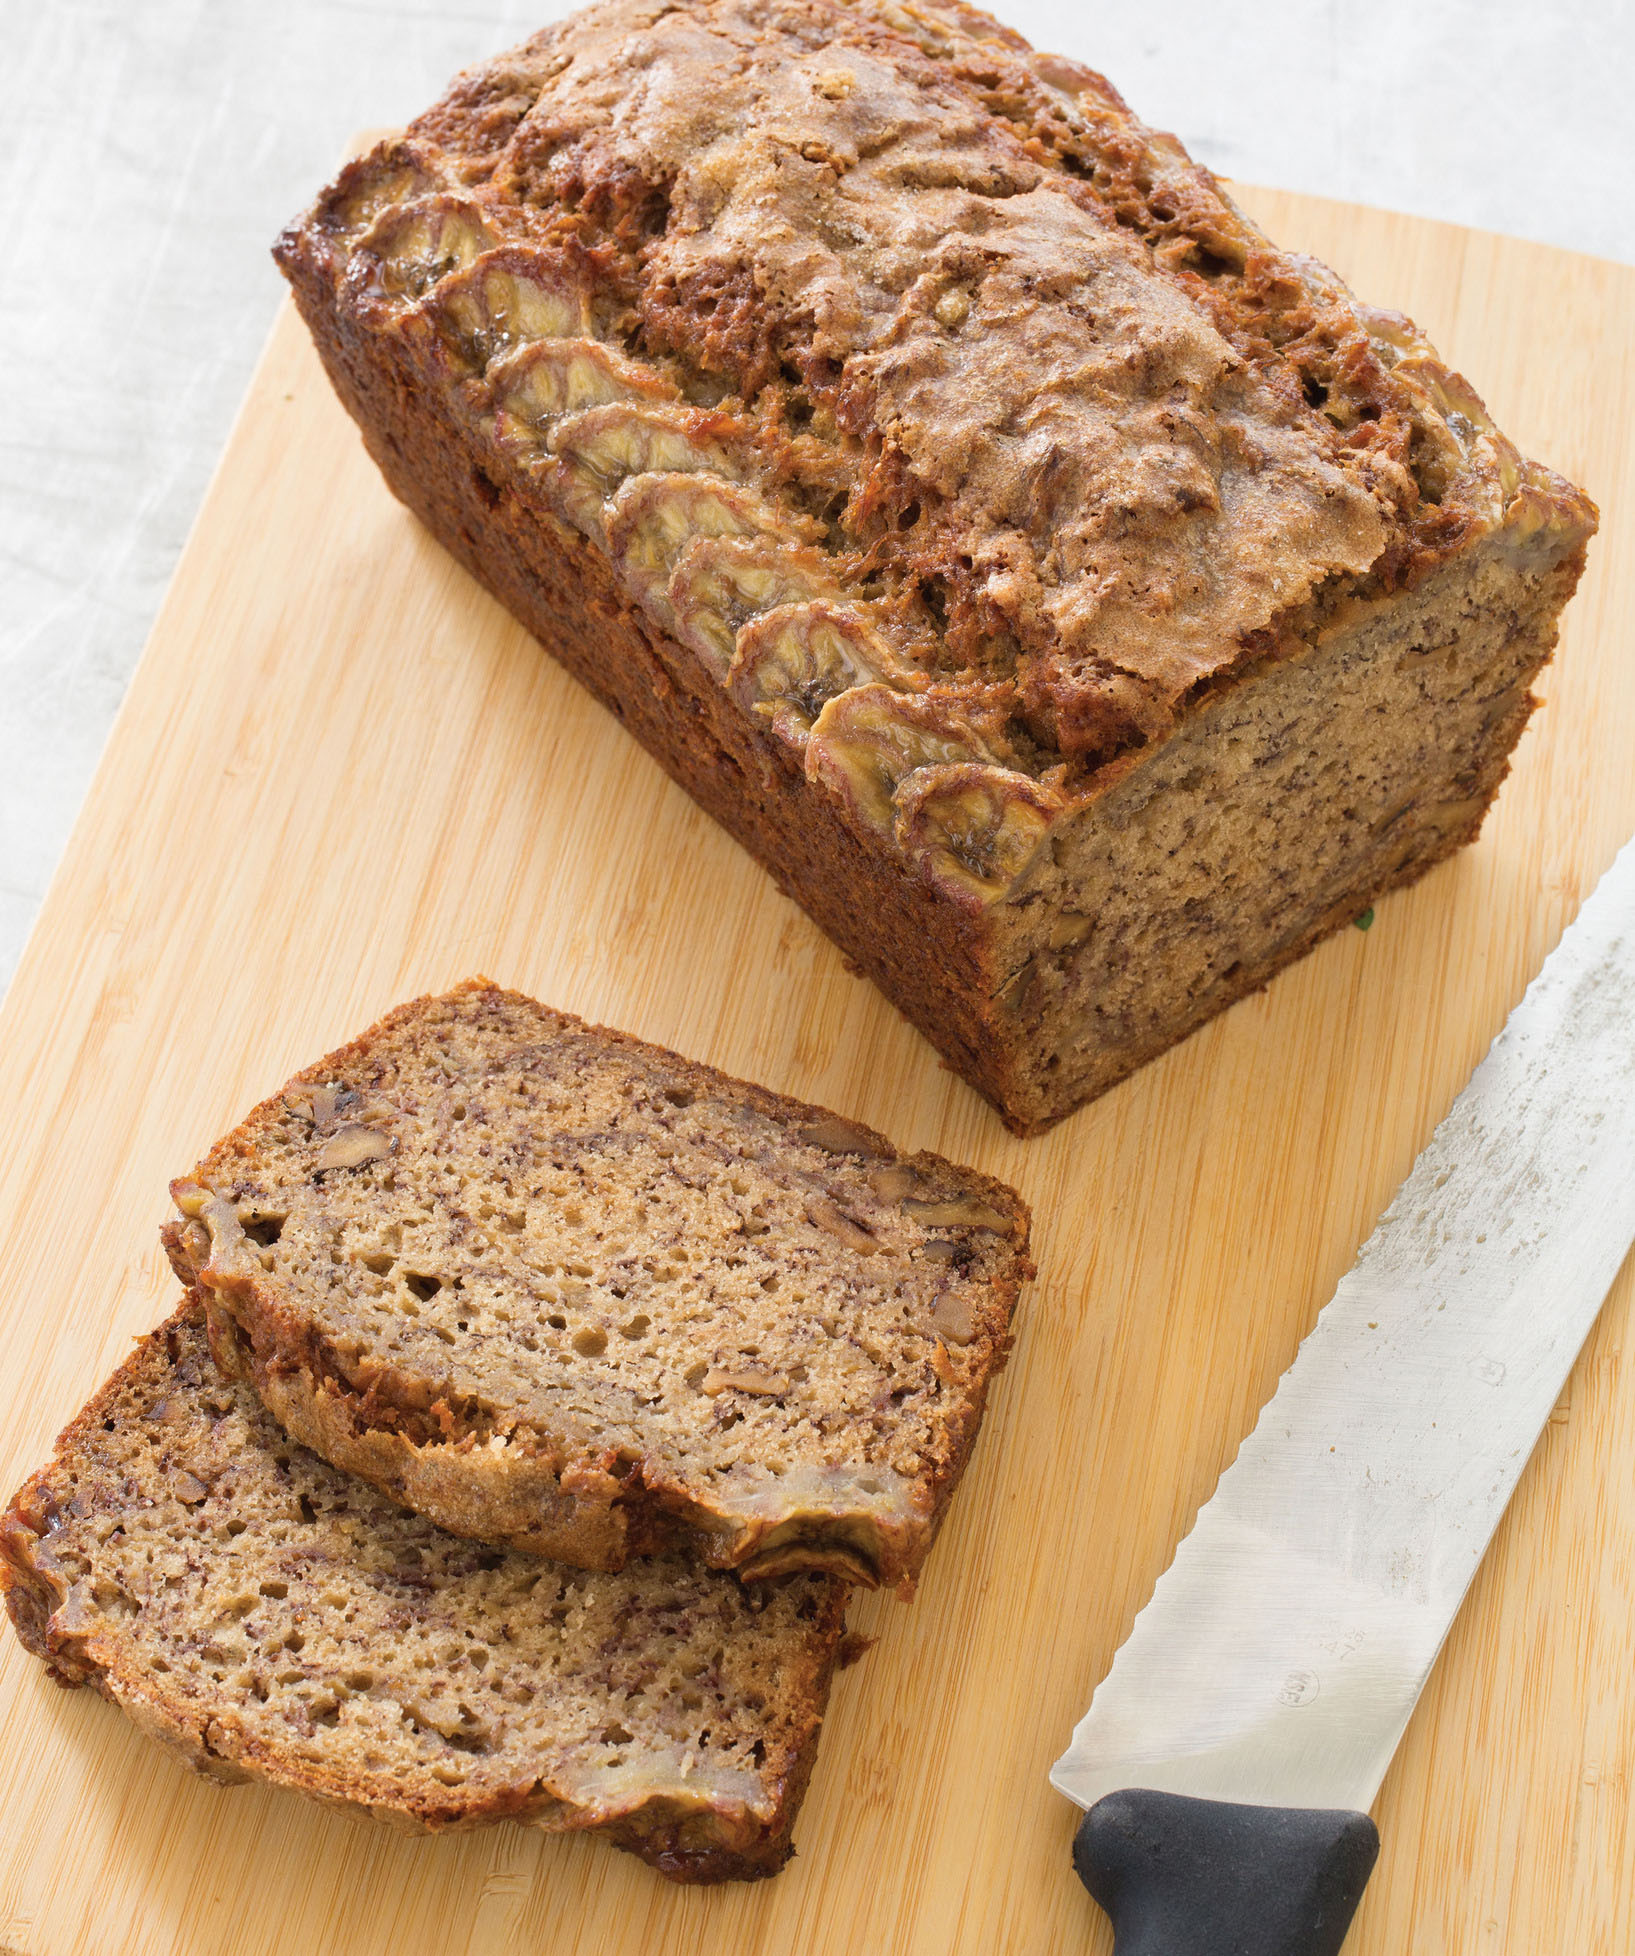
ULTIMATE BANANA BREAD
ANDREA GEARY,July/August 2010
The tradition of banana bread–baking is more heavily steeped in parsimony than indulgence: When bananas get covered with brownish-black spots, the frugal alternative to pitching them in the trash has always been to mash them up, add them to a quick bread batter, and bake.
I’m all for thrift in the kitchen, but I’ve yet to come across a banana bread recipe that actually makes me glad I saved those overripe specimens. Depending on the fat-to-flour ratio—and just how spotty those bananas really were—the crumb varies from cottony and tough to dense and damp, with a typically overbaked ring crusting over the exterior. Even more discouraging, all that ripe banana flavor somehow seems to vaporize during baking, leaving me with a ho-hum loaf that just begs for the added oomph of chocolate chips, coconut, rum, or gobs of cream cheese slathered on top. Without upsetting the humble charms of this bread, what would it take to create a moist, tender loaf that really tasted like bananas?
CONCENTRATION CONSTERNATION
Just to reacquaint myself with the core problems, I cherry-picked a few promising-looking recipes to make in the test kitchen, most of which followed a formula along these lines: Combine mashed, ripe bananas with vegetable oil, eggs, and sugar; fold that into a dry mix of flour, baking soda, and salt; and scrape the batter into a loaf pan before popping it into a 350-degree oven for about an hour. I suppose the breads were passable as PTA-meeting handouts—sweet-smelling and pleasant enough to eat while warm and fresh—but their banana flavor was utterly forgettable.
Except for one loaf, that is. With a stature that was a good half-inch shorter than the other breads and an interior crumb that could only be described as wet, it wasn’t much to look at. (One taster actually used the word “sludgy.”) But it took only a couple of bites before my colleagues and I were returning for seconds, declaring that this loaf had unprecedented true fruit flavor. Why the drastic difference? Simple: This recipe called for roughly the same amount of flour, sugar, fat, and eggs as all the others, but twice the number of bananas—six instead of the usual three. Their effect was both a blessing and a curse: Doubling the bananas may have doubled the flavor, but it also oversaturated the batter. My task was clear—figure out how to cram as many bananas as possible into the loaf without sinking its cake-like structure.
We pack our banana bread with tons of banana flavor by reducing the bananas’ liquid, getting rid of moisture while concentrating flavor.
Since it was clear that simply mashing up more bananas to add to the batter compromised the crumb, I decided to limit myself to three pieces and try alternative avenues to ratcheting up the flavor. A few of the more inventive recipes I came across stirred crushed banana chips into the batter; presumably, the chips’ toasty, concentrated flavor would pick up where the fresh fruit left off. Wrong. The loaf I made with ½ cup of ground chips had no more flavor than previous batches; in fact, it was even a bit drier. Turns out, banana chips are made from underripe bananas (because they withstand processing better than ripe fruit), and underripe bananas are largely composed of moisture-absorbing starch. Scratch that off the list.
If banana chips were too dehydrated, maybe the answer to bigger banana flavor was to start at the source—actual ripe bananas—and drain their liquid myself. That way, I’d get all the benefits of the fruit’s creamy sweetness and be able to control the moisture level. Flipping through the test kitchen archives for ideas, I came across a recipe for low-fat banana bread, where we discovered that roasting the fruit not only helped some of the excess moisture evaporate, but also concentrated its rich brown-sugar notes. My goal was to remove enough moisture so that two more bananas (for a total of five) wouldn’t overwhelm the batter. Unsure how much moisture would escape through the skin, I roasted batches of bananas three different ways—peels intact, peels split, and peels removed—and then incorporated them into the batter. No matter what the roasting method, five bananas still produced an unacceptably wet loaf, so I scaled back to four bananas. This time around, the split-peel loaf stood out for a nice, moist (but not pudding-like) crumb and a fruity flavor that was a significant step up from any three-banana loaf I’d made. But roasting tacked 45 minutes onto the recipe. And were four bananas really as high as I could go?
LIQUID ASSET
My patience with this process was growing thin. Then a thrifty colleague mentioned that in lieu of throwing out bananas too ripe to eat, she saves them in the freezer, though she has seen them exude quite a lot of liquid when thawed. Armed with this promising nugget, I thawed some very ripe bananas I had stored in the freezer; sure enough, five of them yielded around ⅔ cup of liquid. I pureed the fruit, added it to my bread, and was rewarded with a flavor-packed loaf boasting a moist, fully baked crumb. My enthusiasm was renewed—until I realized this discovery would be moot if I had no frozen ripe bananas at the ready.
I had no choice but to return to trying to cook off extra moisture. This time around, I moved my efforts out of the oven and onto the stove: I tried simmering the mashed bananas as well as dicing and sautéing them—but the direct heat in both attempts gave the fruit an overcooked, jammy flavor. I was stumped until I remembered a solution for removing moisture from waterlogged eggplant: microwaving it. I placed five bananas in a glass bowl and zapped them on high power for about 5 minutes, then transferred the now-pulpy fruit to a sieve to drain. Bingo! This caused them to release as much liquid as the thawed frozen bananas. Furthermore, since the bananas were heated for only a short time, they didn’t take on the overly cooked flavor of the simmered puree or sautéed bananas.
But what to do about the banana liquid I’d collected? I couldn’t bear the thought of pouring all that sweet flavor down the drain. (In cooking terms, it seemed as blasphemous as throwing away the fond.) I transferred this liquid to a saucepan, cooked it down to 2 ounces, and then added it back to the mashed bananas (along with another ¼ cup of flour to compensate for the extra liquid). As crazy as it sounded to extract banana liquid only to put it back (albeit in concentrated form), the result was a revelation. Not only did this step infuse the bread with ripe, intensely fruity banana flavor, it also assuaged my frugal Yankee conscience. Furthermore, the extra moisture in the batter helped to create a crumb that was tender through and through, without being framed by overly crusty sides.
THE SIXTH SENSE
With the flavor problem solved, a few minor tweaks completed the recipe: I exchanged the granulated sugar for light brown sugar, finding that the latter’s molasses notes better complemented the bananas. A teaspoon of vanilla rounded out the bananas’ faintly boozy, rum-like flavor, as did swapping out the oil for the nutty richness of butter. I also added ½ cup of toasted walnuts to the batter, finding that their crunch provided a pleasing contrast to the rich, moist crumb.
This banana bread was a true showpiece, from its deep golden crust all the way through to the center’s velvety crumb, yet lingering in the back of my mind was the urge to actually double the number of bananas in the conventional recipe. Wondering if the crust might benefit from a little embellishment, I sliced a sixth banana and shingled it on top of the batter. A final sprinkle of sugar helped the buttery slices caramelize and gave the loaf an enticingly crisp, crunchy top. I now make a point of always having a bunch of ripe bananas waiting in the wings.
Be sure to use very ripe, heavily speckled (or even black) bananas in this recipe. The test kitchen’s preferred loaf pan measures 8½ by 4½ inches; if using a 9 by 5-inch loaf pan, start checking for doneness 5 minutes early.
1¾ cups (8¾ ounces) all-purpose flour
1 teaspoon baking soda
½ teaspoon salt
6 very ripe large bananas (2¼ pounds), peeled
8 tablespoons unsalted butter, melted and cooled
2 large eggs
¾ cup packed (5¼ ounces) light brown sugar
1 teaspoon vanilla extract
½ cup walnuts, toasted and chopped coarse (optional)
2 teaspoons granulated sugar
1. Adjust oven rack to middle position and heat oven to 350 degrees. Grease 8½ by 4½-inch loaf pan. Whisk flour, baking soda, and salt together in large bowl.
2. Place 5 bananas in separate bowl, cover, and microwave until bananas are soft and have released liquid, about 5 minutes. Drain bananas in fine-mesh strainer set over medium bowl, stirring occasionally, for 15 minutes; you should have ½ to ¾ cup liquid.
3. Transfer drained liquid to medium saucepan and cook over medium-high heat until reduced to ¼ cup, about 5 minutes. Return drained bananas to bowl. Stir reduced liquid into bananas and mash with potato masher until mostly smooth. Whisk in butter, eggs, brown sugar, and vanilla.
4. Pour banana mixture into flour mixture and stir until just combined, with some streaks of flour remaining. Gently fold in walnuts, if using. Scrape batter into prepared loaf pan and smooth top. Slice remaining banana on bias into ¼-inch-thick slices and shingle down both sides of loaf pan, leaving center clear to ensure even rise. Sprinkle granulated sugar over top.
5. Bake until skewer inserted in center comes out clean, 55 minutes to 1¼ hours, rotating pan halfway through baking. Let loaf cool in pan for 15 minutes, then turn out onto wire rack and continue to cool. Serve warm or at room temperature.
WHO KNEW? BANANAS HAVE JUICE
Typical banana bread contains just three pieces of fruit. Here’s how we upped the number to five without turning the loaf into pudding.
1. EXTRACT JUICE, THEN STRAIN Microwaving ripe bananas for 5 minutes causes them to release “juice,” which we strain out using a fine-mesh strainer.
2. REDUCE THE JUICE Reducing the banana liquid yields a concentrated liquor, intensifying flavor without making the loaf wet.
QUICK CHEESE BREAD
REBECCA HAYS,May/June 2004
Cheese bread sounds like a great idea, a pairing of two of America’s favorite foods. Unlike pizza, wherein bread dough is merely topped with cheese, a true cheese bread involves a more intimate relationship, going well beyond the quick blind date in which the two ingredients are merely thrown together and then heated. Good cheese bread displays a subtle balance of flavor and texture, neither party getting the upper hand. But most of the recipes I tested offered the worst of both worlds: dry bread and no cheese flavor.
The quickest (and easiest) recipe I came across was a chemically leavened bread that I mixed up in 10 minutes; the most difficult required a trip to a cheese shop plus a 48-hour time investment. Made with yeast, this bread was fantastic, and I will likely make it again when I have a spare weekend. But for most purposes, cheese bread ought to be quick.
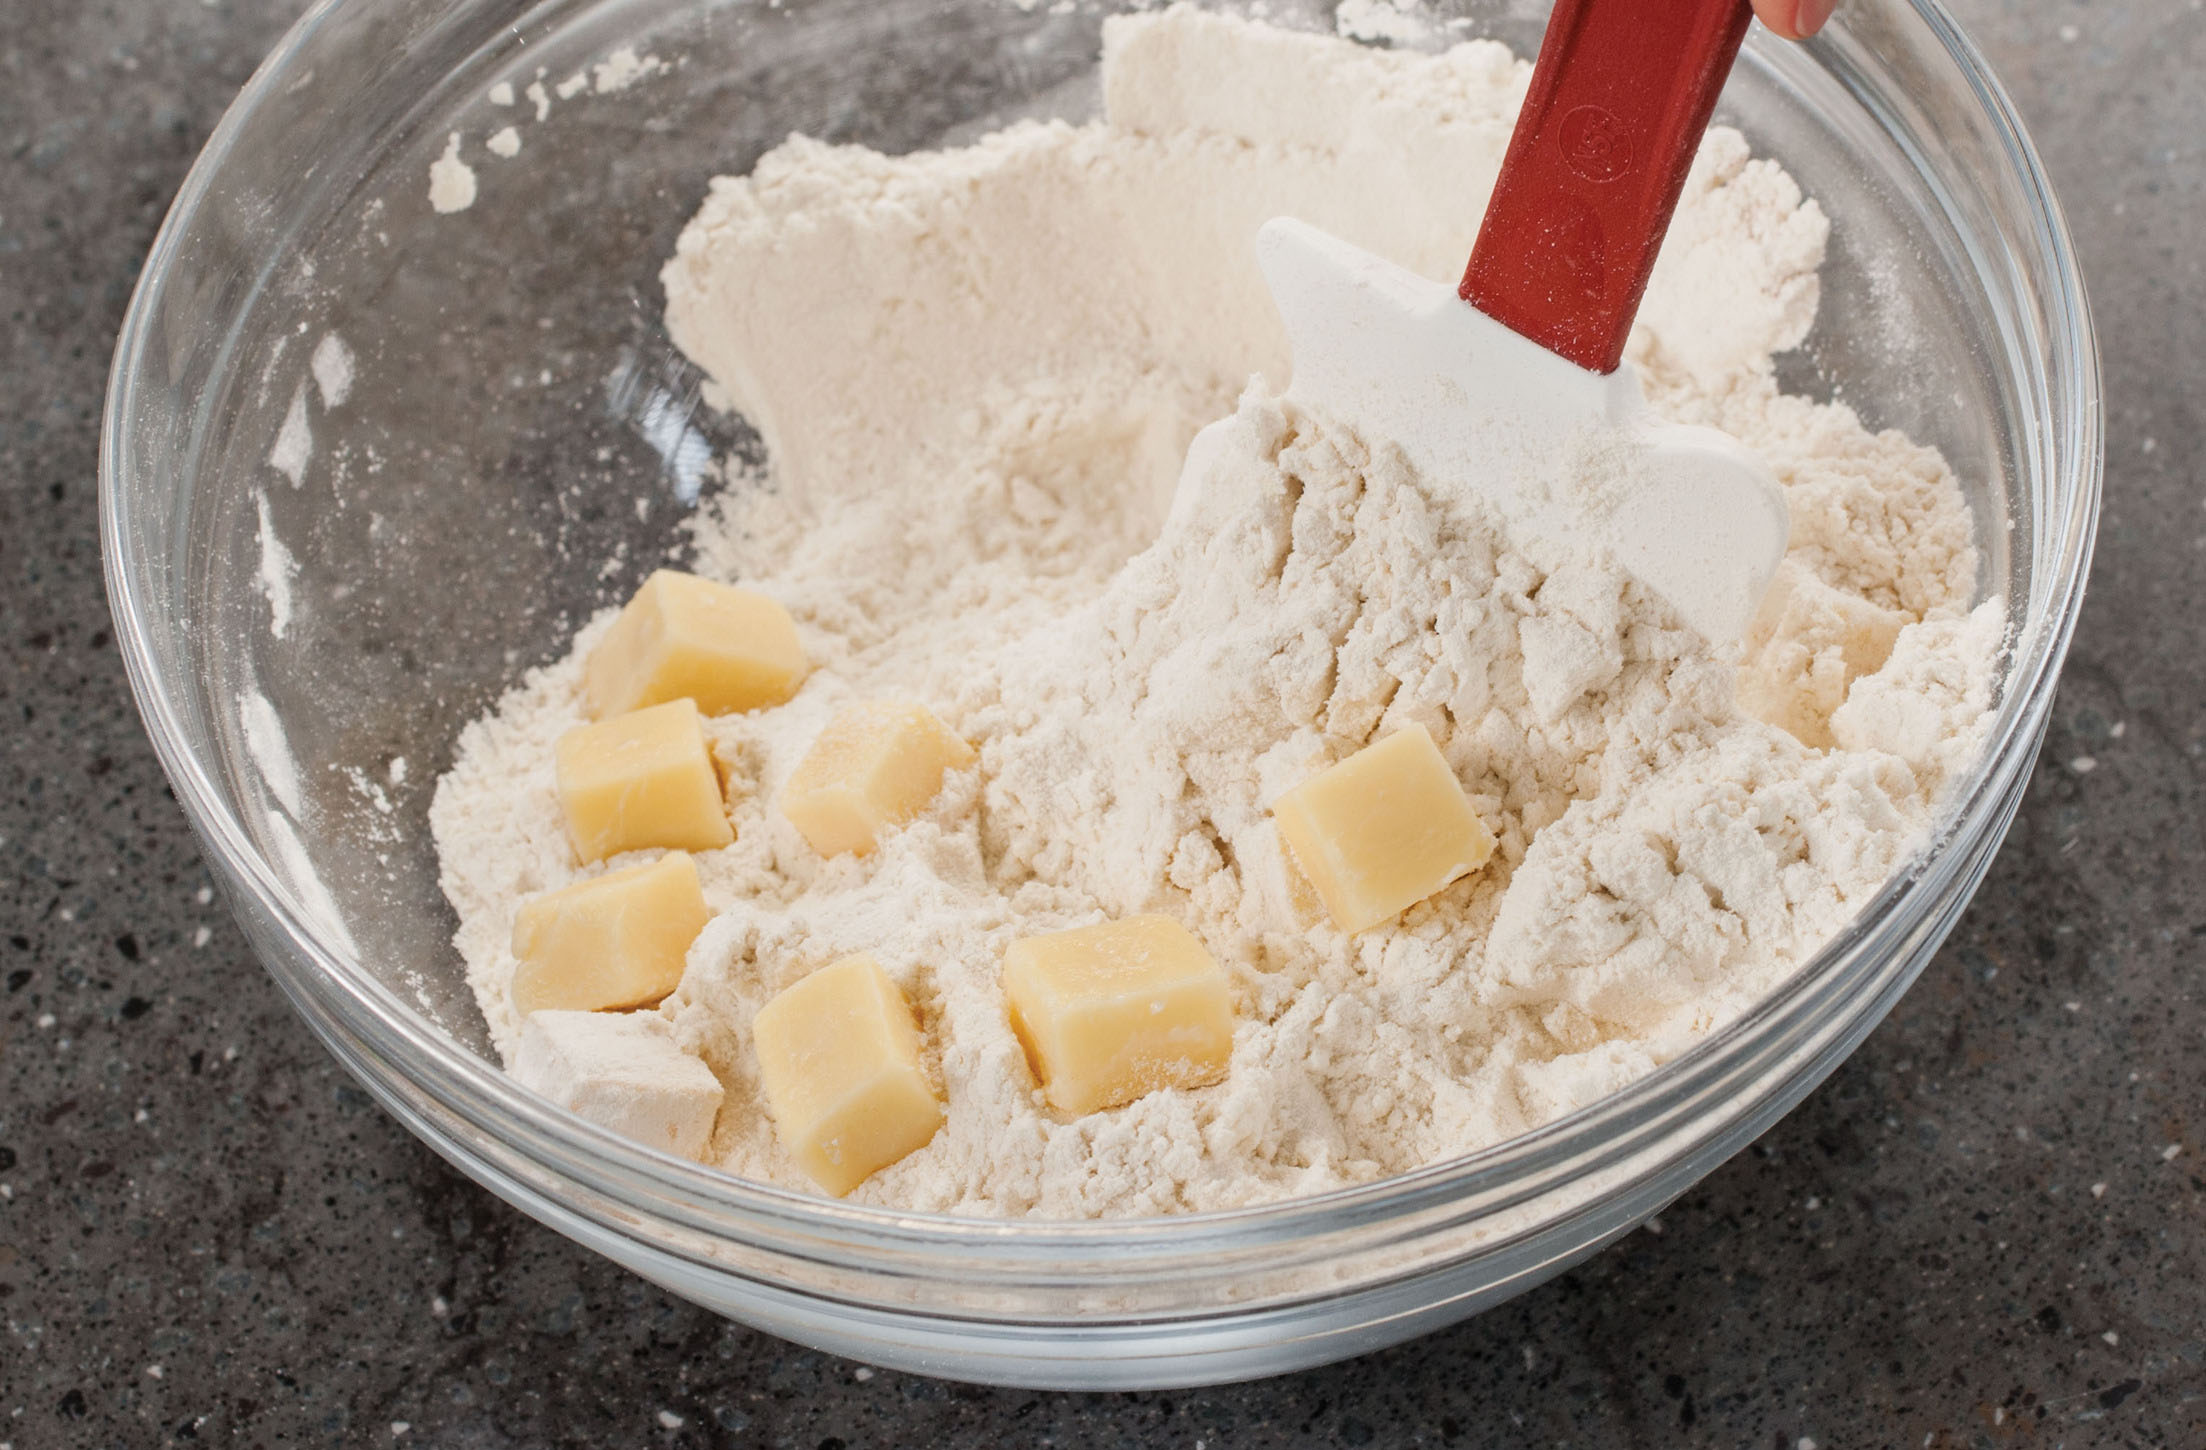
I baked a half-dozen more quick recipes, but the results were awful—tough and devoid of cheese flavor. My colleagues yearned for a moist, hearty bread with bits of cheese throughout, plus a cheesy crust. My first step toward this end was to create a working recipe that consisted of 3 cups flour, 1 tablespoon baking powder, 6 tablespoons melted butter, 2 cups milk, and one egg. For the cheese, I chose shredded cheddar, the most frequently used type in my stack of recipes. My working recipe had lots of problems, but I could now methodically test every variable.
CONSTRUCTING THE BREAD
I first experimented with different flours, making one loaf with all-purpose, another with bread flour, and yet another with half bread and half all-purpose flour. A few tasters noticed that the breads made with the higher-protein bread flour were slightly rubbery, but though the difference was not that dramatic, all-purpose was clearly the best, and most convenient, choice.
Buttermilk is a common ingredient in quick breads, and it produced a decent loaf. Skim milk was too watery and produced a crumbly, dry loaf. The whole milk version was the best, though, with a creamier, cleaner, cheesier flavor.
I next tinkered with the amount of butter, which was preferred over oil for its flavor. Starting with 6 tablespoons, I worked my way down to a mere 3, putting an end to greasiness. Less fat also pushed the bread away from the texture of a delicate cake and toward that of a hearty muffin. The single egg I’d been using turned out to be just right. When I omitted it, the loaf failed to rise properly and had little structure. Loaves made with more than one egg were beautifully golden but tasted like quiche.
For maximum flavor, this bread has cheese baked into the top and bottom crusts as well as the dough itself.
So far so good, but I was falling short in the texture department. Because I wanted a rich loaf, similar to a good banana bread, I replaced a portion of the milk in each of two breads with scoops of yogurt and sour cream, respectively. Given that this was cheese bread, it also seemed logical to try cottage cheese, cream cheese, goat cheese, and ricotta. In the end, most tasters chose the sour cream–based bread. It was rich and moist without being greasy, just what I’d been aiming for. The sour cream also added a nip of tartness to the bread, offsetting the richness of the cheese without overpowering it.
It was time to decide on the leavening: baking soda or baking powder. To do its job, baking soda needs an acidic ingredient (such as the lactic acid in sour cream), while baking powder is self-reliant, essentially composed of baking soda plus one or two acids. I made two breads, one with 1 tablespoon baking powder (this was a heavy batter that needed a decent amount of powder for proper leavening) and a second with ¾ teaspoon baking soda. (One teaspoon of baking powder contains ¼ teaspoon of baking soda.) Both breads rose into beautiful domed loaves, but the bread made with baking powder was preferred, possessing a more complex flavor.
Curious about these findings, I had the pH levels of the finished breads tested and discovered that the bread made with baking powder was quite acidic, with a pH of 5.8, whereas the bread made with baking soda was actually alkaline, with a pH of 8.3. The reason? The baking soda had neutralized the lactic acid in the sour cream, whereas the baking powder, which brings its own acid to the mix, had not. The acid was giving the bread more flavor.
WORKING IN THE CHEESE
Test results showed that small chunks, not shreds, were best, as they melted into luscious, cheesy pockets. In terms of the cheese itself, I tested five supermarket offerings: extra-sharp cheddar, Muenster, Asiago, Gruyère, and Monterey Jack. Cheddar and Asiago were the leaders of the pack, with Muenster and Monterey Jack being too mild and Gruyère too pungent (although I liked this last cheese in a variation made with bacon). Excess cheese weighed down the bread, causing it to collapse. With a modest 4 ounces of cheese, the bread had plenty of flavor but still rose to its full potential.
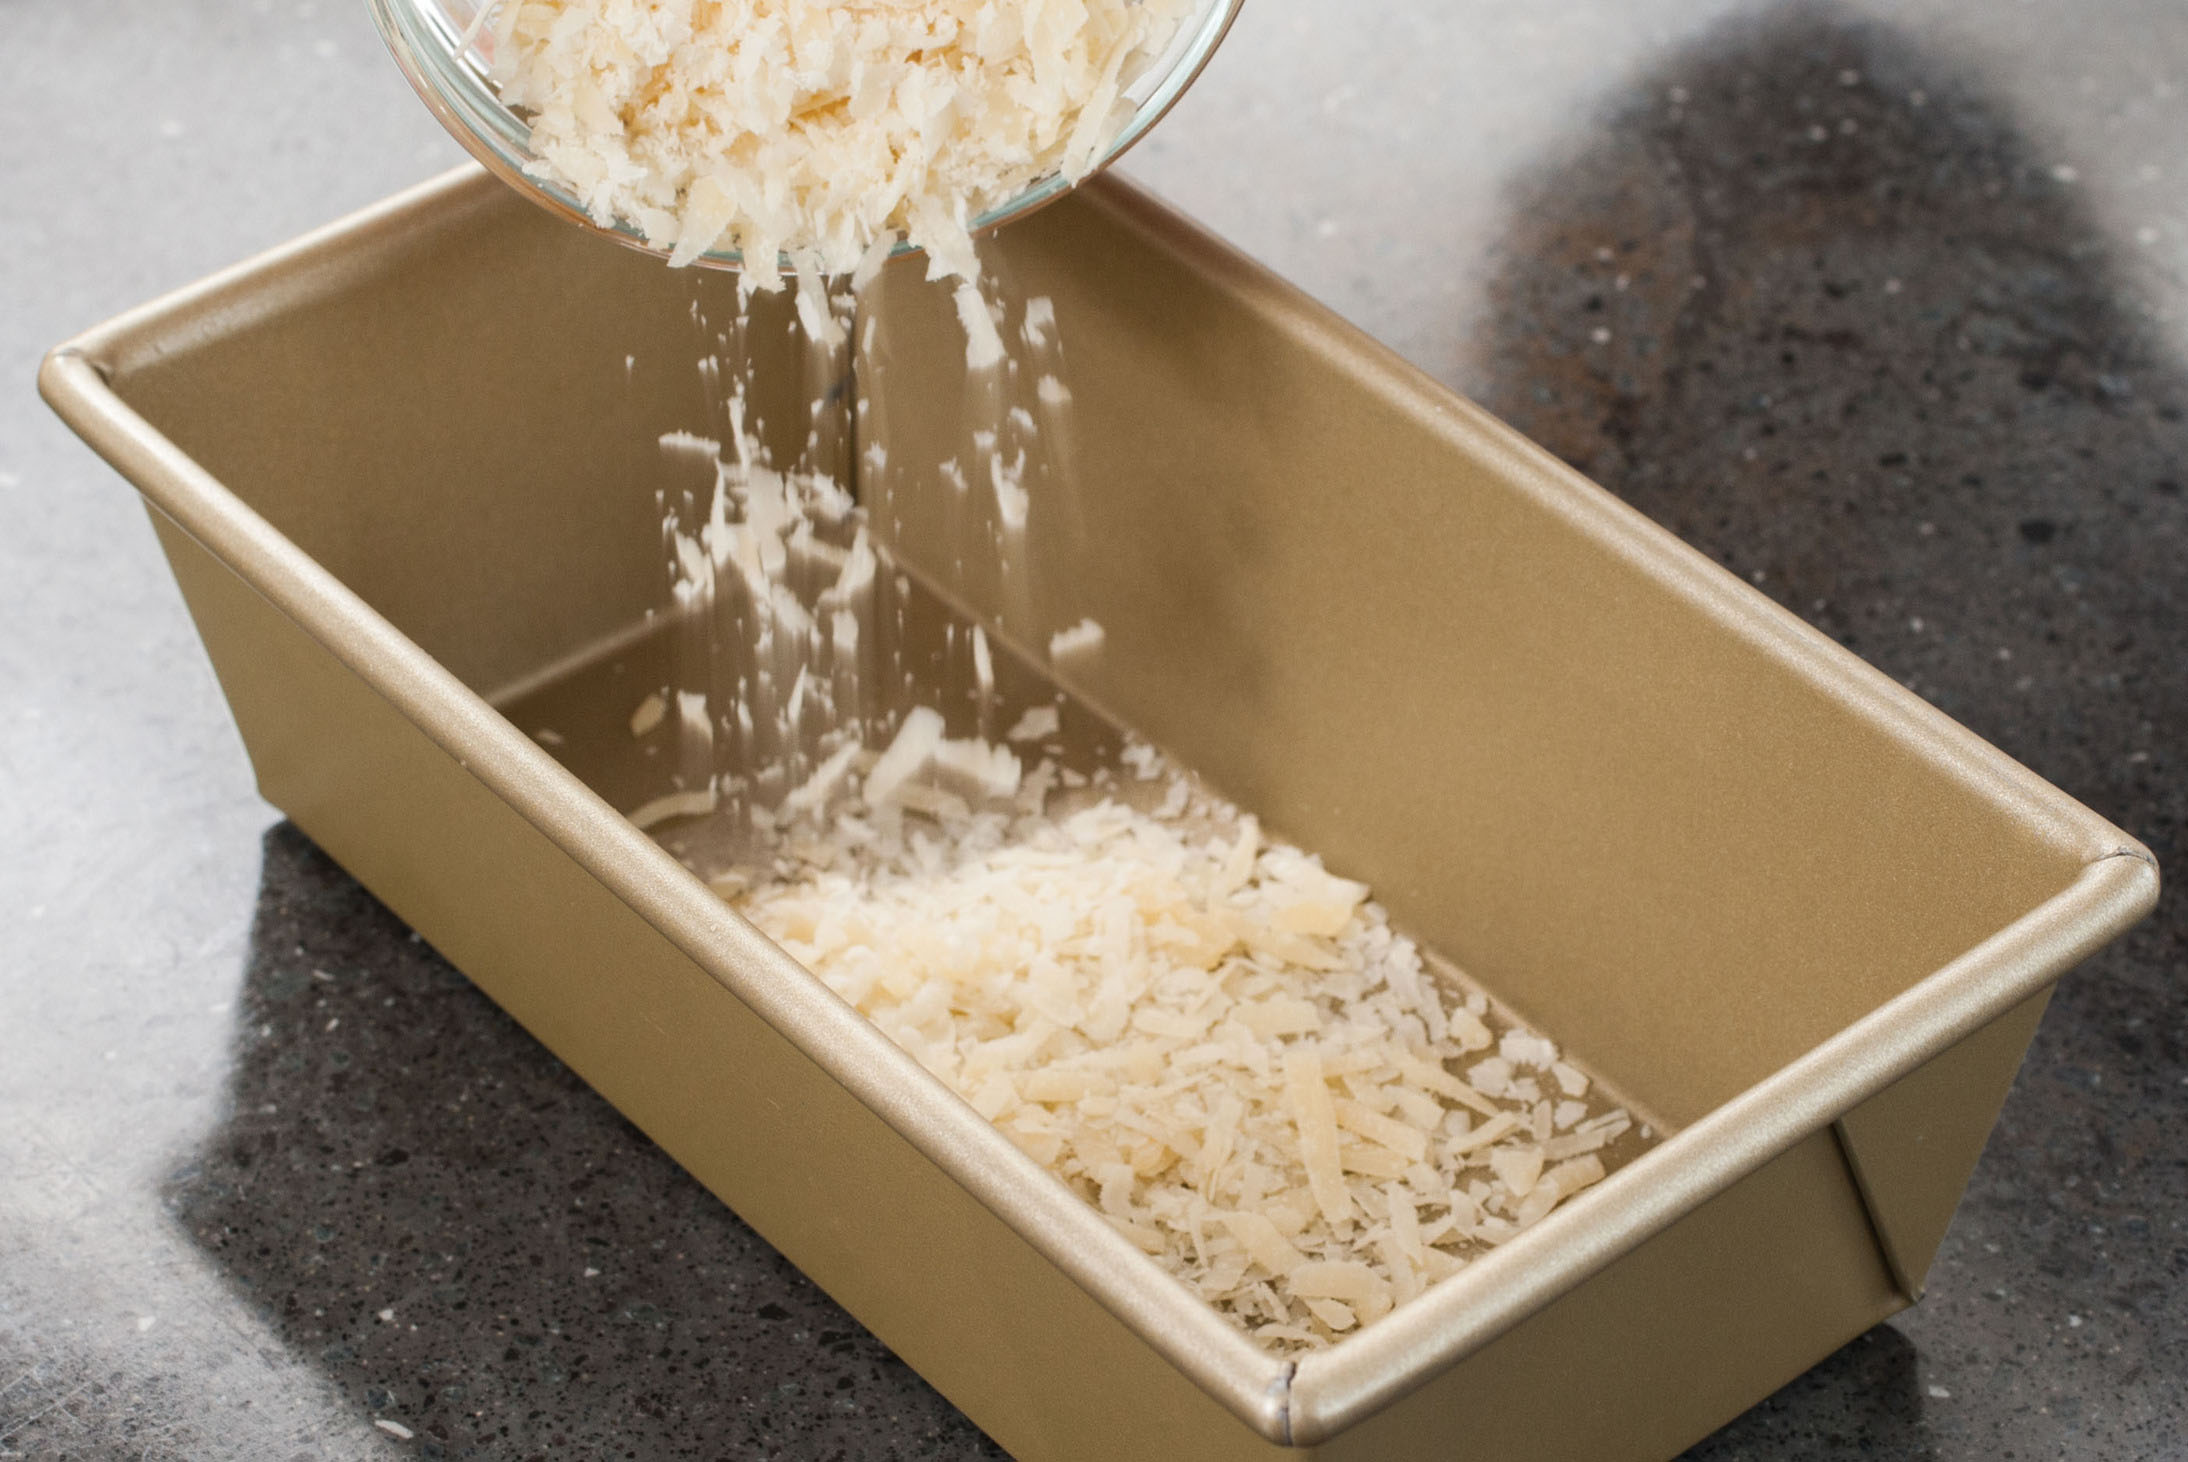
The final problem: getting rich flavor and color on the top crust. The solution was a topping of shredded nutty, salty Parmesan. A colleague suggested that I coat the bottom of the pan with cheese as well, thus doubling the cheesy exterior. Now every bite was packed with flavor. The Parmesan also turned the crust a deep bronze color.
In the end, my cheese bread tasted like recipes that required considerable preparation time, but this recipe was oven-ready after just 15 minutes of hands-on work.
Use the large holes of a box grater to shred the Parmesan. A mild Asiago, crumbled into ¼- to ½-inch pieces, can be used instead of the cheddar. (Aged Asiago that is as firm as Parmesan is too sharp and pungent.) If, when testing the bread for doneness, the toothpick comes out with what looks like uncooked batter clinging to it, try again in a different but still central spot. (A toothpick hitting a pocket of melted cheese may give a false indication.) The bread is best when made with whole milk, but it will taste fine if you have only 2 percent low-fat milk on hand; do not use skim milk. The test kitchen’s preferred loaf pan measures 8½ by 4½ inches; if you use a 9 by 5-inch loaf pan, start checking for doneness 5 minutes early.
1. Adjust oven rack to middle position and heat oven to 350 degrees. Spray 8½ by 4½-inch loaf pan with vegetable oil spray, then sprinkle ½ cup Parmesan evenly in bottom of pan.
2. Whisk flour, baking powder, salt, cayenne, and pepper together in large bowl. Using rubber spatula, stir in cheddar, breaking up clumps, until cheese is coated with flour. Whisk milk, sour cream, melted butter, and egg together in medium bowl. Gently fold milk mixture into flour mixture until just combined (batter will be heavy and thick; do not overmix). Transfer batter to prepared pan; spread to sides of pan and smooth top with rubber spatula. Sprinkle remaining ½ cup Parmesan evenly over surface.
3. Bake until deep golden brown and toothpick inserted in center comes out clean, 45 to 50 minutes, rotating pan halfway through baking. Let loaf cool in pan on wire rack for 5 minutes. Remove loaf from pan and let cool on wire rack for 45 minutes before serving.
variations
Quick Cheese Bread with Bacon, Onion, and Gruyère
Cook 5 slices bacon, cut into ½-inch pieces, in 10-inch nonstick skillet over medium heat, stirring occasionally, until crispy, 5 to 7 minutes. Using slotted spoon, transfer bacon to paper towel–lined plate and pour off all but 3 tablespoons fat from skillet. Add ½ cup finely chopped onion to skillet and cook, stirring frequently, until softened, about 3 minutes. Substitute Gruyère for cheddar and omit butter. Add bacon and onion to flour mixture with cheese in step 2.
Quick Cheese Muffins
MAKES 12 MUFFINS
Adjust oven rack to middle position and heat oven to 375 degrees. Reduce Parmesan cheese to 2 ounces and cut cheddar into ¼-inch cubes. Spray 12-cup muffin tin with vegetable oil spray, then sprinkle each muffin cup with about 1 teaspoon grated Parmesan cheese, tapping and shaking pan so that cheese evenly coats sides and bottom of each cup. Prepare batter as directed. Using ice cream scoop or large spoon, divide batter evenly among prepared muffin cups, dropping batter to form mounds (do not level or flatten batter). Sprinkle remaining Parmesan evenly over surface of batter. Reduce baking time to 20 to 25 minutes, rotating muffin tin halfway through baking. Let muffins cool in tin on wire rack for 5 minutes, then invert muffins onto wire rack, turn right side up, and continue to let cool until warm, about 30 minutes.
MAKING CHEESE BREAD
1. Coat bottom of greased loaf pan with Parmesan cheese to create flavorful crust.
2. Add cubed cheese to bowl with dry ingredients and mix well, breaking apart pieces that clump.
3. Whisk wet ingredients in second bowl. Pour into bowl with dry ingredients and fold until combined.
4. Scrape batter into prepared pan, sprinkle with remaining Parmesan, and bake.
FRESH CORN CORNBREAD
BRIDGET LANCASTER,July/August 2013
Cornbread falls into two main styles: the sweet, cakey Northern type and the crusty, savory kind more often found in Southern kitchens. Each has its die-hard fans, but—let’s face the facts—neither tastes much like corn. This is because most cornbreads are made with cornmeal alone, and no fresh corn at all. Furthermore, the so-called “field” or “dent” corn used to make cornmeal is far starchier (read: less flavorful) than the sweet corn grown to eat off the cob.
But getting real corn flavor in cornbread wouldn’t be as simple as tossing some fresh-cut kernels into the batter. When I tried, I found that I needed to add at least 2 whole cups of kernels for the corn flavor to really shine, and since fresh kernels are full of moisture, the crumb of the cornbread was now riddled with unpleasant gummy pockets. What’s more, the kernels turned chewy and tough as the bread baked. But I was determined to find a way to get true sweet corn flavor in cornbread.
For a cornbread that actually tastes like sweet corn, not cornmeal, the secret is cooking down pureed fresh corn until it becomes corn butter.
CORN STALKER
I decided to work on the cornbread base first. The little bit of sweetener added to Northern-style versions helped fresh corn flavor break through, so I settled on that archetype. For my working recipe, I used slightly more cornmeal than flour and decided to abandon fine-ground cornmeal in favor of the stone-ground type, which contains both the hull and the oil-rich germ of the corn kernel. The upshot: a more rustic texture and fuller flavor. For the liquid component, I would stick with traditional tangy buttermilk. Three tablespoons of melted butter and two eggs provided richness, and baking the cornbread in a cast-iron skillet allowed it to develop a brown, crisp crust.
With the batter figured out, I turned back to the problems of the fresh corn. I wondered if I could get rid of the unpleasantly steamed, chewy texture of the kernels by soaking them in a solution of water and baking soda before adding them to the batter—a technique we recently used to tenderize kernels for a fresh corn salsa. (The baking soda helps soften the hulls of the kernels.) Sure enough, the kernels were tender—until they were baked in the bread and the heat of the oven toughened them right back up. And I still had the issue of all those wet, gummy pockets. Out of ideas, I was idly flipping through cookbooks when I came across a recipe for “corn butter” made by pureeing fresh kernels and then reducing the mixture on the stove until thick. I tried it using three large ears of corn and found that the puree thickened and turned deep yellow in minutes, transforming into a “butter” packed with concentrated corn flavor. While the recipes I found used the corn butter as a spread, I added the reduced puree right to a batch of batter, baked it—and rejoiced. My cornbread tasted like real corn, without any distracting chewiness.
Since cooking the corn puree drove off moisture, my bread no longer had gummy pockets, but now the bread was almost too dry and even a little crumbly—a result of the large amount of natural cornstarch (released by pureeing the kernels) that was now absorbing moisture in the batter. This problem was easy to solve by increasing the amount of fat in the batter: an extra egg yolk and 2 more tablespoons of butter did the trick.
Moist, tender, and bursting with corn flavor, my cornbread tasted like a bite of corn on the cob.
We prefer to use a well-seasoned cast-iron skillet in this recipe, but an ovensafe 10-inch skillet can be used in its place. Alternatively, in step 4 you can add 1 tablespoon of butter to a 9-inch cake pan and place it in the oven until the butter melts, about 3 minutes.
1⅓ cups (6⅔ ounces) stone-ground cornmeal
1 cup (5 ounces) all-purpose flour
2 tablespoons sugar
1½ teaspoons baking powder
¼ teaspoon baking soda
1¼ teaspoons salt
3 ears corn, kernels cut from cobs (2¼ cups)
6 tablespoons unsalted butter, cut into 6 pieces
1 cup buttermilk
2 large eggs plus 1 large yolk
1. Adjust oven rack to middle position and heat oven to 400 degrees. Whisk cornmeal, flour, sugar, baking powder, baking soda, and salt together in large bowl.
2. Process corn kernels in blender until very smooth, about 2 minutes. Transfer puree to medium saucepan (you should have about 1½ cups). Cook puree over medium heat, stirring constantly, until very thick and deep yellow and it measures ¾ cup, 5 to 8 minutes.
3. Remove pan from heat. Add 5 tablespoons butter and whisk until melted and incorporated. Add buttermilk and whisk until incorporated. Add eggs and yolk and whisk until incorporated. Transfer corn mixture to bowl with cornmeal mixture and, using rubber spatula, fold together until just combined.
4. Melt remaining 1 tablespoon butter in 10-inch cast-iron skillet over medium heat. Scrape batter into skillet and spread into even layer. Bake until top is golden brown and toothpick inserted in center comes out clean, 23 to 28 minutes. Let cool on wire rack for 5 minutes. Remove cornbread from skillet and let cool for 20 minutes before cutting into wedges and serving.
EASY SANDWICH BREAD
ANDREA GEARY,January/February 2014
A freshly baked loaf of bread is one of life’s great pleasures. But these days, most people don’t have 4 hours to devote to mixing dough, waiting for it to rise for an hour or so—twice—plus kneading (even if it’s the stand mixer approach of most recipes today), shaping, and baking. While I can appreciate the classic bread-making process, I wondered: Could I find a way to make a yeasted loaf of bread in about half of the time? Furthermore, could I possibly avoid, or at least shortcut, some of the work?
I began by scouring cookbooks and websites for clever bread-making tricks and came across an old-fashioned type of loaf: batter bread. As its name implies, the yeasted loaf begins with a fluid batter (not a thick dough) that’s made of all-purpose flour, yeast, salt, sugar, and quite a bit of water. Since its hydration level is so high (80 to 85 percent), the batter is beaten with a paddle instead of a dough hook (usually for about 5 minutes) and is transferred straight from the mixing bowl to a prepared loaf pan, no shaping required. And some recipes call for only one rise rather than the two needed to make most traditional loaves. They all promised tender loaves with great flavor—homemade sandwich bread without all the work. Was it too good to be true?
Using a moderate amount of water and leaving the salt out of our dough until the second rise allows our bread to build structure fast.
Well, yes and no. The few batter bread recipes I tried featured quick and easy aspects—less time being kneaded in the mixer (some even relied on just a wooden spoon and bowl), abbreviated or fewer proofs, and no shaping—that met my requirements. But that speed and simplicity came at a price. The loaves were generally squat and dumpy-looking, with bumpy, sunken tops instead of smooth, tender domes. Slicing revealed damp, fragile interiors that were exceedingly yeasty but otherwise bland. I wanted great-tasting bread with a soft, uniform crumb sturdy enough to support sandwich fillings. To get a loaf that justified even a modest effort, I’d have to make some serious modifications.
BUILDING CHARACTER
I decided to solve the easiest problem first: that single-note yeast flavor. For quick rising, all the batter bread recipes that I found rely on more than twice as much yeast as traditional loaf recipes do: 2¼ teaspoons versus 1 teaspoon. But all that yeast was giving the breads an overly yeasty, not “bready,” flavor. Nevertheless, I was committed to sticking with the large amount since it made such a huge time savings.
My strategy was to cover up part of the yeastiness by working in some more flavorful ingredients. Adding a few tablespoons of melted butter was a good start, and substituting whole-wheat flour for a portion of the all-purpose flour provided nutty, wheaty depth. I also traded the sugar for 1 tablespoon of honey, which contributed complexity, and, because heat causes honey to break down into simple sugars that encourage browning, it also gave the crust more color.
Next up: building that complexity. In traditional bread, complexity develops by way of fermentation, which happens during the first and second rises. In these two proofing stages (each of which takes about an hour) the yeast consumes the sugars that are created as the starches in the flour break down, producing the gases essential for making the dough rise. Along the way, a multitude of flavorful byproducts are generated: sugars, acids, and alcohol. Knowing this, I decided I couldn’t get by with just one rise. Two 20-minute proofs—one after mixing the batter and one after transferring it to the pan—would allow for some flavor development.
My bread, which was coming together in about 90 minutes, now had quite a bit more depth, and the yeast flavor was much less noticeable than in previous versions. But it still wasn’t winning points for its damp, fragile texture or sunken appearance.
NETWORK FAILURE
Yeasted breads derive their light, airy structure from gluten, a stretchy protein network that forms only when wheat flour is combined with water. That network traps the gases given off by the yeast, inflating the dough and causing it to rise. (If the gluten structure is weak, the network can’t hold enough gas and the bread will collapse in the heat of the oven.) When a dough is initially mixed, the proteins that form the network are weak and disorganized. They need to align in order to link up and acquire strength. Given enough time, they will line up on their own, or they can be physically encouraged to do so by kneading.
You’d think that my bread would have had a strong gluten network since I had been beating the batter in the mixer for 5 minutes. Yet the loaf’s inadequate volume, sunken top, and fragile crumb suggested otherwise.
Before launching an in-depth investigation into the disappointing structure and crumb, I made a quick adjustment: I swapped the all-purpose flour for higher-protein bread flour. More gluten-forming proteins in the bread-flour dough would surely result in a more robust structure. This switch was a step in the right direction, but my loaf still had a long way to go.
My batter had so much water in it that the loaf was damp. Maybe that was too much liquid? The hydration level of a dough (or batter, in this case) affects gluten strength: Generally, the more water, the stronger and more extensible the gluten strands are and the better able they are to provide support. That translates into a sturdier, airier bread. But there’s a tipping point: Unless you are planning on a long fermentation—which I wasn’t—too much water can actually inhibit the formation of gluten. I had been using 1¾ cups warm water (using warm, rather than room-temperature, water helps jump-start the yeast’s activity, ensuring a faster rise). Guessing that my existing batter was too wet, I reduced the water in my next batch to 1¼ cups.
I beat the batter for 5 minutes on medium speed, then set it aside to rise. (The hydration level was still notably high; the dough was still pourable.) After 20 minutes, I transferred the mixture to a greased loaf pan, smoothed the top with a spatula, and let it rise again briefly before baking it. After the loaf cooled, I evaluated it for signs of improvement. It had a better top: not quite domed, but at least it wasn’t lumpy or sunken. When I sliced it, I found a crumb that was not as damp as those of my earlier versions, but it was still fragile. I had made modest progress but not enough.
In other test kitchen bread recipes, we have waited to add the salt until later in the mixing process. Why? Salt inhibits both the ability of flour to absorb water and the activity of the enzymes that break down proteins to begin the process of forming gluten. By delaying the addition of salt, I hoped that my bread would develop a stronger gluten network. I mixed the flours, yeast, honey, water, and butter until everything was combined and let the batter rise for 20 minutes. Then I added the salt (dissolved in 2 tablespoons of water for even distribution) and proceeded with mixing, rising, and so on.
At last I had a complete success. The resulting loaf was crowned with a rounded top, and the crumb was more resilient and no longer wet. I had a flavorful sandwich bread that could be made start to finish in about 90 minutes. To highlight my crowning achievement, I brushed the risen loaf with a shine-enhancing egg wash before baking. As a finishing touch, I brushed the warm loaf with melted butter after turning it out on the cooling rack, which augmented the sheen and made the thin crust even more tender and delicious.
This bread is so easy and quick that fitting it into my schedule will be no problem.
The test kitchen’s preferred loaf pan measures 8½ by 4½ inches; if using a 9 by 5-inch loaf pan, start checking for doneness 5 minutes early. To prevent the loaf from deflating as it rises, do not let the batter come in contact with the plastic wrap. This loaf is best eaten the day it is made, but leftovers may be wrapped in plastic wrap and stored for up to two days at room temperature or frozen for up to one month.
2 cups (11 ounces) bread flour
6 tablespoons (2 ounces) whole-wheat flour
2¼ teaspoons instant or rapid-rise yeast
1¼ cups plus 2 tablespoons warm water (120 degrees)
3 tablespoons unsalted butter, melted
1 tablespoon honey
¾ teaspoon salt
1 large egg, lightly beaten with 1 teaspoon water and pinch salt
1. In bowl of stand mixer, whisk bread flour, whole-wheat flour, and yeast together. Add 1¼ cups warm water, 2 tablespoons melted butter, and honey. Fit stand mixer with paddle and mix on low speed for 1 minute. Increase speed to medium and mix for 2 minutes. Scrape down bowl and paddle with greased rubber spatula. Continue to mix 2 minutes longer. Remove bowl and paddle from mixer. Scrape down bowl and paddle, leaving paddle in batter. Cover with plastic wrap and let batter rise in warm place until doubled in size, about 20 minutes.
2. Adjust oven rack to lower-middle position and heat oven to 375 degrees. Spray 8½ by 4½-inch loaf pan with vegetable oil spray. Dissolve salt in remaining 2 tablespoons warm water. When batter has doubled, attach bowl and paddle to mixer. Add salt-water mixture and mix on low speed until water is mostly incorporated, about 40 seconds. Increase speed to medium and mix until thoroughly combined, about 1 minute, scraping down paddle if necessary. Transfer batter to prepared pan and smooth surface with greased rubber spatula. Cover with plastic wrap and leave in warm place until batter reaches ½ inch below edge of pan, 15 to 20 minutes. Uncover and let rise until center of batter is level with edge of pan, 5 to 10 minutes.
3. Gently brush top of risen loaf with egg mixture. Bake until deep golden brown and loaf registers 208 to 210 degrees, 40 to 45 minutes. Using dish towels, carefully invert bread onto wire rack. Reinvert loaf and brush top and sides with remaining 1 tablespoon melted butter. Let cool completely before slicing and serving.
POURABLE DOUGH
The dough for this sandwich bread is so wet that it is actually more like a batter. After a brief first rise, you simply pour it straight from the mixer bowl into the loaf pan—you couldn’t shape it even if you tried.
KEYS TO FASTER AND EASIER BREAD
While most breads require several hours, ours takes only 90 minutes from start to finish. Here’s how we did it.
MORE YEAST
Lots of yeast means a faster rise—20 minutes versus up to 2 hours for a standard loaf.
HIGHER HYDRATION
More water in the dough (up to a point) enhances gluten structure without requiring as much kneading; it also results in pourable dough that doesn’t need shaping.
PADDLE ATTACHMENT
Using a paddle instead of a dough hook allows for more aggressive, faster kneading.
EASY MULTIGRAIN SANDWICH BREAD
ERIKA BRUCE,March/April 2006
When it comes to multigrain bread, there are two distinct styles: the rustic free-form loaf found in artisan bakeries and your basic sandwich loaf. While the hearty, rustic loaves sport a thick, crunchy crust and a flavorful, chewy interior, re-creating this version at home requires lots of time (for an overnight sponge) and special equipment (a superhot oven, a baking stone, and so on).
Sandwich-style multigrain bread, on the other hand, requires only a loaf pan and a modest amount of effort. The problem is that the hearty, multigrain flavor is usually sacrificed for the light, tender texture that is well suited to sandwiches, and you end up with all fluff and no substance. Even the small amount of effort necessary to make this loaf should yield something tastier than presliced supermarket bread.
After digging through cookbooks geared more toward the bread hobbyist than the casual cook, I found a few recipes that held promise. Lengthy ingredient lists, which included obscure grains, called for an excursion to the natural foods store, but the techniques were straightforward enough. Unfortunately, these doughs—full of heavy grains and whole-grain flours—baked into poorly risen loaves, dense and heavy as bricks. I wanted a lighter loaf, tender enough for a sandwich yet with the sweet, nutty, complex flavor of bakery bread.
GLUTEN FOR PUNISHMENT
Using instant yeast for a quick rise, I started with our basic whole-wheat sandwich bread recipe, calling for 6 cups of flour (roughly half whole-wheat and half all-purpose), 2½ cups of water, ¼ cup of honey, and a tablespoon of salt. I replaced some of the flour with a generous cup of mixed grains (I’d work out the precise components later). The result was one dense and heavy loaf. It was obvious that the added grains were the problem. I knew that the sharp flakes of bran in whole-wheat flour can actually slice through and weaken the matrix of gluten—a protein made when flour and water are mixed—that gives all breads their strength and structure. Apparently, the rough-edged grains were having the same effect. That plus their added weight were impeding the development of gluten. To get the light texture I was after, the bread needed more gluten.
Because the protein content of any flour is an indicator of how much gluten it will produce, I thought first to switch out all-purpose flour (protein content of 10 to 12 percent) for bread flour (12 percent or more). But this only made the bread chewier, not less dense. Next I tried reducing the whole-wheat flour to half of the amount of all-purpose; any less meant sacrificing flavor. (While whole-wheat flour has a high protein content—about 14 percent—its density, like its bran flakes, can impede gluten development.) This step did alleviate some of the denseness, but the bread still felt heavy and dry. I added melted butter, which lubricated and tenderized the dough, but it didn’t create more lift. I went so far as to add vital wheat gluten (made by stripping away most components of flour, leaving behind a whopping 75 to 80 percent pure protein). At last, I sliced into a well-risen loaf with a light, feathery crumb, but the wheat gluten left behind a bitter aftertaste. Frustrated, I moved on to kneading in hopes of finding a solution.
WORKING IT OUT
While the purist mode of some multigrain recipes requires kneading the dough by hand, I wanted to avoid a full workout. I pulled out my trusty stand mixer and mixed the dough on medium-high speed in an effort to kick-start the gluten development (gluten, once hydrated, is stretched and strengthened via mechanical action). But the texture was crumbly. I tried lowering the mixer speed and experimenting with timing: After 3 minutes of mixing, the bread hardly rose in the pans; after 5 minutes, the loaves had better height. I kept mixing until the dough became very elastic and bounced back when I poked it, a total of about 10 minutes. This dough rose well and sported a mediumholed, albeit still crumbly, texture.
For a light and flavorful multigrain loaf, we turn to an unexpected source: seven-grain hot cereal mix.
Next, I ran through the gamut of traditional bread-mixing techniques to see if any proved helpful. Some recipes call for punching down the dough after the first rise, a step that redistributes the sugars (broken-down starches) that feed the yeast and get it working more rapidly. But speeding up the yeast action served only to give the bread a boozy flavor (alcohol is a byproduct of yeast metabolism). I then decided to try an autolyse, a resting period just after the initial mixing of water and flour that gives the flour time to hydrate. This step proved vital, ramping up the development of gluten (which depends on water) and making the dough less tacky and so easier to work with and the baked loaf less crumbly. The bread now had a nice chew, without being tough.
AGAINST THE GRAIN
I was ready to tackle the grains. Driving all over town collecting one obscure grain here and another there was an onerous task. Could I pare down the list without losing the multidimensional flavor profile? I started with basic grains that were available at the supermarket: cornmeal, rolled oats, and rye flour. But this abridged grain mixture produced a loaf that was more of a muddy-tasting rye than a sweet, earthy multigrain bread. I returned to the supermarket in search of other options. As I scanned the shelves of steel-cut oats and Cream of Wheat in the hot cereal section, my eyes fell upon a package of seven-grain cereal, a handy mixture of ground whole grains, including the hard-to-find varieties. I quickly snatched up a package and headed back to the kitchen to see if it could deliver flavor as well as convenience.
Sure enough, the complexity was there—from the nutty flax seed to the tangy rye and sweet wheat—but some of the grains remained distractingly hard and crunchy, even after baking. I tried soaking them for up to 24 hours before mixing them into the dough, but they seemed impervious to room-temperature water. Because these grains were meant to make a hot cereal, I tried cooking them per the package instructions, allowing the mixture to cool before adding my yeast, flours, and salt. But this dough was soupy and wet, requiring a startling 2 cups of additional flour before it became manageable.
Not discouraged, I tried using only the amount of water already called for in my bread recipe, bringing it to a boil, and pouring it over the grains. Once cooled, this thick porridge produced a dough with the right moisture content and a baked loaf with grains that added interesting textural contrast without cracking any teeth.
Now the only thing missing from my bread was the welcome (gentle) crunch of seeds. I tried poppy and sesame, but they were too small and got lost in the mix of grains. Sunflower and pumpkin seeds were better able to distinguish themselves from the crowd and added a nutty richness as well. Last, I rolled the shaped loaves in oats to give them a finished, professional look. While my tasters had undoubtedly suffered through plenty of barely edible loaves, in the end they could hardly believe that the ones they were eating hadn’t been smuggled in from the bakery down the street. Not bad for just a few hours in the kitchen.
Don’t confuse the seven-grain hot cereal mix called for in this recipe with boxed, cold breakfast cereals that may also be labeled “seven-grain.” Do not substitute instant oats in this recipe. For an accurate measurement of boiling water, bring a full kettle of water to a boil and then measure out the desired amount. The test kitchen’s preferred loaf pan measures 8½ by 4½ inches; if using 9 by 5-inch loaf pans, start checking for doneness 5 minutes early.
1¼ cups (6¼ ounces) seven-grain hot cereal mix
2½ cups boiling water
3 cups (15 ounces) all-purpose flour, plus extra as needed
1½ cups (8¼ ounces) whole-wheat flour
¼ cup honey
4 tablespoons unsalted butter, melted and cooled
2½ teaspoons instant or rapid-rise yeast
1 tablespoon salt
¾ cup unsalted pepitas or sunflower seeds
½ cup (1½ ounces) old-fashioned rolled oats or quick oats
Vegetable oil spray
1. Place cereal mix in bowl of stand mixer. Pour boiling water over cereal mix and let stand, stirring occasionally, until mixture cools to 100 degrees and resembles thick porridge, about 1 hour. Whisk all-purpose flour and whole-wheat flour together in separate bowl.
2. Fit stand mixer with dough hook; add honey, butter, and yeast to cooled grain mixture; and mix on low speed until combined. Add flour mixture, ½ cup at a time, and mix until cohesive mass starts to form, 1½ to 2 minutes. Cover bowl with plastic wrap and let dough rest for 20 minutes. Add salt to dough and knead on medium-low speed until dough clears sides of bowl, 3 to 4 minutes (if it does not clear sides, add extra 2 to 3 tablespoons all-purpose flour and knead until it does); continue to knead dough for 5 minutes longer. Add pepitas and knead for another 15 seconds. Transfer dough to lightly floured counter and knead by hand until pepitas are evenly dispersed and dough forms smooth, round ball, about 30 seconds. Transfer dough to large, lightly greased bowl; cover bowl tightly with plastic and let dough rise at room temperature until nearly doubled in size, 45 minutes to 1 hour.
3. Grease two 8½ by 4½-inch loaf pans. Spread oats on rimmed baking sheet. Transfer dough to lightly floured counter and divide in half with bench scraper. Press 1 piece of dough into 9 by 6-inch rectangle, with short side facing you. Roll dough toward you into firm cylinder, keeping dough taut by tucking it under itself as you go. Turn cylinder seam side up and pinch it closed. Repeat with second piece of dough. Spray cylinders lightly with oil spray and roll in oats to coat evenly; place coated cylinders seam side down in prepared pans, pressing gently into corners. Cover pans loosely with greased plastic and let dough rise at room temperature until nearly doubled in size, 30 to 40 minutes. (Dough should barely spring back when poked with your knuckle.)
4. Thirty minutes before baking, adjust oven rack to middle position and heat oven to 375 degrees. Bake until loaves register 200 degrees, 35 to 40 minutes. Let loaves cool in pans on wire rack for 5 minutes. Remove loaves from pans and let cool completely on rack, about 2 hours, before slicing and serving. (Bread can be wrapped in double layer of plastic and stored at room temperature for up to 2 days. Wrapped in additional layer of aluminum foil, bread can be frozen for up to 1 month.)
NO-KNEAD BREAD 2.0
J. KENJI LOPEZ-ALT,January/February 2008
In November 2006, New York Times writer Mark Bittman published a recipe developed by Jim Lahey of the Sullivan Street Bakery in Manhattan that promised to shake up the world of home baking. The recipe did the seemingly impossible. It allowed the average home cook to bake a loaf of bread that looked like it had been produced in a professional bakery. The recipe, which instantly won legions of followers, was exceedingly simple: Combine a few cups of flour, a tiny amount of yeast, and a little salt in a bowl; stir in some water until the ingredients just come together; and leave the dough to rise. After 12 to 18 hours, the dough is turned a couple of times, shaped, risen, and baked in a Dutch oven. An hour later, out comes the most beautiful loaf most people have ever baked at home—and all with no kneading.
At first, it seemed unlikely that there was anything to improve upon here. The recipe was remarkably easy and worlds better than other no-fuss breads. But there were some complaints amid all the praise. I decided to give the existing recipe to five inexperienced bakers to see what (if any) issues arose, and noticed a problem even before we sliced into them. While all were beautifully browned and crisp, the loaves varied wildly in size and shape, ranging from rounded mounds to flat, irregular blobs. And though the crusts were extraordinary—better than any I’d ever produced—the flavor fell flat in every sample. It simply did not capture the complex yeasty, tangy flavor of a true artisanal loaf. I wondered if I could make this bread more consistent and better-tasting.
ANALYZING AUTOLYSIS
I decided to tackle the problem of shape first. Thanks to the ingenious use of a Dutch oven, the bread always acquired a dark, crisp crust, but the loaves took on a disconcertingly broad range of forms. After watching testers make the recipe a few times, I realized what the problem was: The dough’s wetness was making it too delicate to handle. Though it was well risen before baking, it was deflating on its way into the pot. In addition, because of its high moisture content, the dough was spreading out over the bottom of the pot before it could firm up properly. I analyzed the no-knead recipe and found that its dough is 85 percent hydrated—meaning that for every 10 ounces of flour, there are 8.5 ounces of water. Most rustic breads, on the other hand, max out at around 80 percent hydration, and standard sandwich breads hover between 60 percent and 75 percent hydration. This got me to thinking: What would happen if I reduced the water?
To find out, I made a batch of dough in which I cut the hydration to 70 percent. Sure enough, this dough was much easier to handle and emerged from the oven well risen and perfectly shaped. But instead of having an open, airy crumb structure, this loaf was dense and chewy, with rubbery pockets of unleavened flour. So more moisture led to an open but squat loaf and less moisture led to a high but dense loaf. Was there a way to reconcile these two extremes?
Many bread recipes call for a rest period after adding water to the flour but before kneading. This rest is called “autolysis” (although most bakers use the French term autolyse). In most recipes, autolysis is just 20 to 30 minutes, but the no-knead bread calls for something completely out of the ordinary: a 12-hour rest. I hoped I could analyze the mechanics of this lengthy autolysis to help me solve the textural problem.
The ultimate goal of making bread dough is to create gluten, a strong network of cross-linked proteins that traps air bubbles and stretches as the dough bakes, creating the bubbly, chewy crumb structure that is the signature of a good loaf. In order to form these cross-links, the proteins in the flour need to be aligned next to each other. Imagine the proteins as bundled-up balls of yarn you are trying to tie together into one longer piece, which you’ll then sew together into a wider sheet. In their balled-up state, it’s not possible to tie them together; first you have to untangle and straighten them out. This straightening out and aligning is usually accomplished by kneading.
But untangling and stretching out short pieces of yarn is much easier than untangling entire balls. This is where autolysis comes in. As the dough autolyzes, enzymes naturally present in wheat act like scissors, cutting the balled-up proteins into smaller segments that are easier to straighten during kneading. This is why dough that has undergone autolysis requires much less kneading than freshly made dough. And here’s where the hydration level comes in: The more water there is, the more efficiently the cut-and-link process takes place.
A lower hydration level and 1 minute of kneading makes this revolutionary method even better.
So this was the explanation for how the no-knead bread recipe published in The New York Times worked. With 85 percent hydration and a 12-hour rest, the dough was so wet and had autolyzed for so long that the enzymes had broken the proteins down into extremely small pieces. These pieces were so small that, even without kneading, they could stretch out and cross-link during fermentation and the brief turning step. At 70 percent hydration, there simply was not enough water in my dough for the enzymes to act as efficiently as they had in the original recipe. As a result, many of the proteins in my finished bread were still in a semiballed-up state, giving my bread an overly chewy texture.
What if the secret was actually adding some kneading? I knew that even at a relatively dry 70 percent hydration, the proteins in my dough had already been broken down significantly by the long autolysis. All they probably needed was a little kneading to untangle and create an airy, light crumb.
This time, I gave the rested dough the bare minimum of kneads—adding just 1 minute to the no-knead recipe—and continued exactly as I had before. The dough emerged from the oven beautifully browned and perfectly shaped. After letting it cool, I cut into it to reveal an ideal crumb structure. And I found that since such a small amount of kneading could develop gluten in such a forceful manner, I could reduce the minimum time of the rest period from 12 hours to 8 hours.
NO SUBSTITUTE FOR FLAVOR
Now that I had bread with a great shape and texture, I turned my attention to solving the problem of the loaf’s lackluster taste. How could I get the complex, almost tangy flavors of bakery breads made with fermented starters?
Since I was partially looking for acidity and tang, I started by adding vinegar. The majority of bottled vinegars are 5 percent solutions of acetic acid—the same acid produced by bacteria during dough fermentation. Since other vinegars would introduce undesirable flavors to the bread, I experimented with different amounts of distilled white vinegar, settling on one tablespoon.
What I needed now was a concentrated shot of yeasty flavor. Luckily, beyond bread, there is another commonly available substance that relies on yeast for flavor: beer.
After testing different types, I discovered that light American-style lagers gave the loaf a distinct “bready” (not “beery”) aroma that could fool anyone who had not seen the lager go into the dough. It turns out that the yeast in lagers is treated in a way that closely resembles the way yeast acts in dough, resulting in the production of similar flavor compounds.
Through the simplest of tweaks—less hydration, the addition of vinegar and beer, and a few seconds of kneading—I had a loaf of bread that looked and tasted incredible.
Although an enameled cast-iron Dutch oven will yield the best results, the recipe also works in a regular cast-iron Dutch oven or heavy stockpot. Check the knob on your Dutch oven lid, as not all are ovensafe to 425 degrees; look for inexpensive replacement knobs from the manufacturer (or try using a metal drawer handle from a hardware store). This dough rises best in a warm kitchen—at least 68 degrees.
3 cups (15 ounces) all-purpose flour
1½ teaspoons salt
¼ teaspoon instant or rapid-rise yeast
¾ cup water, room temperature
6 tablespoons mild-flavored lager, such as Budweiser, room temperature
1 tablespoon distilled white vinegar
Vegetable oil spray
1. Whisk flour, salt, and yeast together in large bowl. Add water, beer, and vinegar. Using rubber spatula, fold mixture, scraping up dry flour from bottom of bowl, until shaggy ball forms. Cover bowl with plastic wrap and let sit at room temperature for at least 8 hours or up to 18 hours.
2. Lay 18 by 12-inch sheet of parchment paper on counter and coat lightly with oil spray. Transfer dough to lightly floured counter and knead by hand 10 to 15 times. Shape dough into ball by pulling edges into middle. Transfer loaf, seam side down, to center of greased parchment paper. Using parchment paper as sling, gently lower dough into heavy-bottomed Dutch oven. Mist dough lightly with oil spray, cover loosely with plastic, and let rise at room temperature until doubled in size, about 2 hours. (Dough should barely spring back when poked with your knuckle.)
3. Adjust oven rack to middle position. Lightly flour top of loaf. Using sharp serrated knife, cut ½-inch-deep X into top of loaf. Cover pot and place in oven. Heat oven to 425 degrees. Once oven reaches 425 degrees, bake for 30 minutes.
4. Remove lid and continue to bake until crust is deep golden brown and loaf registers 210 degrees, 20 to 30 minutes longer. Carefully remove loaf from pot using parchment sling and transfer to wire rack, discarding parchment. Let cool completely, about 2 hours, before serving. (Bread is best eaten on day it is baked but will keep, wrapped in double layer of plastic and stored at room temperature, for up to 2 days. To recrisp crust, place unwrapped bread in 450-degree oven for 6 to 8 minutes.)
variations
Almost No-Knead Bread with Olives, Rosemary, and Parmesan
Add 2 cups finely grated Parmesan and 1 tablespoon minced fresh rosemary to flour mixture in step 1. Add 1 cup chopped pitted green olives with water.
Almost No-Knead Cranberry-Pecan Bread
Add ½ cup dried cranberries and ½ cup toasted pecans to flour mixture in step 1.
Almost No-Knead Seeded Rye Bread
Substitute 1 cup plus 2 tablespoons rye flour for 1¼ cups plus 2 tablespoons all-purpose flour. Add 2 tablespoons caraway seeds to flour mixture in step 1.
Almost No-Knead Whole-Wheat Bread
Substitute 1 cup whole-wheat flour for 1 cup all-purpose flour. Stir 2 tablespoons honey into water before adding it to flour mixture in step 1.
FOOLPROOF BRIOCHE
ANDREW JANJIGIAN,March/April 2013
Well-made brioche is something of a miracle: Despite being laden with butter and eggs, it manages to avoid the density of a pound cake and turn out incredibly light and airy. Yet this gossamer-wing texture still provides brioche with enough structure to serve as a base for a sandwich, a slice of toast slathered with jam, or even the foundation for bread pudding. But achieving these results is a balancing act—and a tricky one at that.
Most butter-enriched doughs, like those for sandwich bread or dinner rolls, contain between 10 and 20 percent butter. The average brioche recipe brings the ratio up to 50 percent (or 5 parts butter to 10 parts flour). Because fat lubricates the wheat proteins in the flour, any amount at all will inhibit their ability to form gluten, the network of cross-linked proteins that gives bread its structure. The more fat the greater the interference. This can make brioche incredibly tender—or it can cause the dough to separate into a greasy mess.
The typical brioche method goes as follows: After a sponge of flour, yeast, and water sits overnight in order to ferment and build flavor, additional flour, yeast, and water, as well as salt, sugar, and several eggs, are added, and the mixture is kneaded in a stand mixer until a strong gluten network has begun to form. The next step is to add butter, softened to just the right temperature, a few tablespoons at a time. Only after one portion is fully incorporated into the dough is the next added. This painstaking process, which can take more than 20 minutes, is necessary to ensure that the butter is completely and evenly combined without causing the dough to separate. Next, the dough is left to rise at room temperature for a few hours and then chilled in the refrigerator for anywhere from an hour to overnight to firm up the butter—an essential step when shaping a sticky, wet dough. Once cold, the dough is shaped into loaves, left to rise yet again, and—at long last—baked. Phew.
My goal: to make tender, plush brioche with butter-rich flavor but no butter-induced headache.
BUTTER UP
Though tempting, I knew that dumping everything (butter included) together at the start and letting the stand mixer knead it all into submission wouldn’t work. All that softened butter would coat the wheat proteins (which normally come together to form gluten as soon as water is added to the mix) so thoroughly that no amount of kneading would develop sufficient structure.
To simplify this rich loaf, we eliminate the step of carefully kneading in softened butter in favor of melted butter and an extended rest period.
But what about cold butter? Cut into the flour before adding other ingredients, the solid little chunks surely wouldn’t coat the proteins as readily as softened fat, making it possible to develop at least some gluten—or so I hoped.
Using a respectable 45 percent fat-to-flour ratio and simplifying things by leaving out the sponge, I began by cutting cold butter into flour in a food processor. After transferring the mixture to the bowl of a stand mixer, I threw in the yeast, sugar, and salt. With the dough hook turning, I gradually added some water and a few beaten eggs. The dough was quite wet but still had a surprising amount of structure. After putting the dough through the usual steps—proof, chill, proof—I baked it, fingers crossed.
The results? Not great, but not half bad either. The interior crumb was far too open, with large, irregular holes, and the bread had a cottony, crumbly texture, both of which suggested that it needed more gluten development. But its having any structure at all meant that I was onto something.
KNEADLESSLY COMPLICATED
A familiar approach popped to mind: the “no-knead” bread technique first popularized by Mark Bittman and Jim Lahey in The New York Times, which we adapted for our Almost No-Knead Bread. Basically, you combine all your ingredients and let the mixture sit for hours. During this long rest, enzymes naturally present in wheat help untangle the wheat proteins that eventually come together to form an organized gluten network. This allows the dough to stitch itself together into a loaf containing plenty of structure with only a bit of stirring and a couple of folds—no actual kneading required. The key to this technique is a very wet dough (the more water the more efficient the enzymes). And happily, brioche dough is highly hydrated.
I gave the no-knead approach a whirl, cutting the butter into the flour in the food processor like before but then simply mixing the liquid ingredients into the dry ones and stirring with a wooden spoon. This produced a dough that was soupy—exactly what I wanted. I covered it and let it sit at room temperature while it proofed, giving it a series of folds at 30-minute intervals to encourage the gluten to form. As I’d hoped, after several hours, the dough had just as much strength as the previous machine-kneaded one. Even better: After being chilled, shaped, and proofed a second time, it baked up just as nicely. Feeling emboldened, I wondered if I could eliminate the food processor step as well. So this time, I melted the butter, let it cool, then whisked it into the egg and milk mixture before adding the liquid to the dry ingredients. This simplification produced a loaf that was indistinguishable from the one in which I’d cut the butter into the flour first.
STRUCTURAL ENGINEERING
Still, my loaves remained cottony and open-crumbed—a sure sign that they needed more gluten than my hand-mixed method could provide on its own. But I had a few tricks up my sleeve.
First, the flour: Since its protein content is directly related to its ability to form gluten (the more protein it has the more structure it can provide to the dough), it was no shock that brioche made with flour containing the highest amount of protein—bread flour—was the clear winner.
Next, I’d let the dough sit even longer, a process that would not only increase gluten development but also add more flavor, since it would give the starches in the dough more time to ferment (a role normally played by a sponge). Gluten development and fermentation are slowed but not halted by cold temperatures, so I’d also extend the dough’s second rest in the fridge (where it wouldn’t run the risk of overproofing and collapsing), giving it even more strength. Sure enough, brioche made from dough that was allowed to rest overnight in the fridge was much improved: It had a more finely textured and resilient crumb than any previous versions, as well as a more complex flavor.
Lastly, I gave some consideration to my shaping method. Until now, I’d been forming the dough into a single long loaf. I realized that I could add even more strength and structure to the dough by dividing it in two and shaping each half into a tight, round ball instead. Placed side by side in the pan, the two balls merged during rising and baking to form a single loaf. Even this little bit of extra manipulation made the crumb a bit finer and more uniform. And if shaping them once was good, I figured that twice might be even better. After letting the dough rounds rest, I patted them flat once more and then reshaped them into tight balls. As expected, the interior crumb was fine-textured, uniform, and resilient but still delicate.
Finally, I had a reliable and relatively hands-off brioche recipe that could hold its own against those from the best bakeries in town.
If you don’t have a baking stone, bake the bread on a preheated rimmed baking sheet. The test kitchen’s preferred loaf pan measures 8½ by 4½ inches; if using 9 by 5-inch loaf pans, start checking for doneness 5 minutes early.
3¼ cups (17¾ ounces) bread flour
2¼ teaspoons instant or rapid-rise yeast
Salt
7 large eggs
½ cup water, room temperature
⅓ cup (2⅓ ounces) sugar
16 tablespoons unsalted butter, melted and cooled slightly
1. Whisk flour, yeast, and 1½ teaspoons salt together in large bowl. Whisk 6 eggs, water, and sugar together in medium bowl until sugar has dissolved. Whisk in butter until smooth. Add egg mixture to flour mixture and stir with wooden spoon until uniform mass forms and no dry flour remains, about 1 minute. Cover bowl with plastic wrap and let stand for 10 minutes.
2. Holding edge of dough with your fingertips, fold dough over itself by gently lifting and folding edge of dough toward middle. Turn bowl 45 degrees; fold again. Turn bowl and fold dough 6 more times (total of 8 folds). Cover with plastic and let rise for 30 minutes. Repeat folding and rising every 30 minutes, 3 more times. After fourth set of folds, cover bowl tightly with plastic and refrigerate for at least 16 hours or up to 48 hours.
3. Transfer dough to well-floured counter and divide into 4 pieces. Working with 1 piece of dough at a time, pat dough into 4-inch disk. Working around circumference of dough, fold edges of dough toward center until ball forms. Flip dough over and, without applying pressure, move your hands in small circular motions to form dough into smooth, taut round. (If dough sticks to your hands, lightly dust top of dough with flour.) Repeat with remaining dough. Cover dough rounds loosely with plastic and let rest for 5 minutes.
4. Grease two 8½ by 4½-inch loaf pans. After 5 minutes, flip each dough ball so seam side is facing up, pat into 4-inch disk, and repeat rounding step. Place 2 rounds, seam side down, side by side into prepared pans and press gently into corners. Cover loaves loosely with plastic and let rise at room temperature until almost doubled in size (dough should rise to about ½ inch below top edge of pan), 1½ to 2 hours. Thirty minutes before baking, adjust oven rack to middle position, place baking stone on rack, and heat oven to 350 degrees.
5. Beat remaining 1 egg with pinch salt. Remove plastic and brush loaves gently with egg. Set loaf pans on stone and bake until golden brown and internal temperature registers 190 degrees, 35 to 45 minutes, rotating pans halfway through baking. Transfer pans to wire rack and let cool for 5 minutes. Remove loaves from pans, return to wire rack, and let cool completely before slicing and serving, about 2 hours.
MELTED BUTTER EASES THE WAY
Traditionally, making a rich dough like brioche means adding softened butter tablespoon by tablespoon to already-kneaded dough. It’s a painstaking process, but if the butter isn’t added slowly, the dough can break into a greasy mess. With our simpler “no-knead” technique, however, the dough (which must be very wet) sits for a long time, stitching itself together to form gluten without any help from a mixer. With kneading out of the equation, we were able to simply melt the butter and add it all at once.
FOLDING THE DOUGH
Gently lift edge of dough and fold it over itself. Turn bowl 45 degrees and repeat until you’ve made full circle (total of 8 folds).
FOOLPROOF THIN-CRUST PIZZA
ANDREW JANJIGIAN,January/February 2011
Pizza was the first food I learned to make as a kid, and I’ve been determined to perfect it ever since. Over the years, my dogged pursuit of the ideal crust—thin, crisp, and spottily charred on the exterior; tender yet chewy within—has led me into exhaustive research and experiments, and even compelled me to extremes. I’ve been known to override the lock on my oven during its white-hot cleaning cycle. I’ve even built a wood-fired oven in my backyard.
But despite those efforts, I had yet to produce a recipe that was both reliable and reasonable for someone baking in a conventional oven. After the 10 to 12 minutes necessary to crisp the crust, the interior inevitably turns dry and tough. Plus, the raw dough itself is a devil to work with: Too wet and it becomes sticky; too dry and it’s a stiff, dense wad. And forget stretching it into a neat circle; most of the time it either rips or springs back like a rubber band. If I were really going to bring home the kind of pizza I’ve come to crave when dining out, I’d have to take each element back to the drawing board.
TESTING THE WATER
Like other lean doughs, pizza tends to have a short ingredient list (often just flour, water, salt, and yeast), so each element counts for a lot. Flour was the obvious first consideration, and I opted for high-protein (about 13 percent by weight) bread flour. It’s a typical choice when a chewy, nicely tanned crust is the goal, since the proteins both encourage gluten development and brown easily.
The other major factor is the hydration level of the dough—in other words, the weight of the water in relation to the weight of the flour. From my recent work on focaccia, I knew that low-hydration doughs (55 to 70 percent water) generally result in the type of tight, even crumb you might find in sandwich bread, whereas a higher hydration (70 percent and up) produces the looser, airier, more bubbly crumb typical of rustic artisan-style breads. Figuring my goal was somewhere in the middle, I started my testing by mixing together five moderately wet doughs (from 58 to 67 percent hydration), kneading all the ingredients with our preferred food-processor method. (A more conventional stand-mixer method might take 15 to 20 minutes before the dough turns into a shiny, elastic mass, but we’ve recently found that a food processor turns out comparably kneaded results in less than 2 minutes.) I let the dough proof at room temperature for a few hours, shaped and topped the pies with our quick no-cook pizza sauce (a placeholder at this stage) and a generous handful of shredded mozzarella, and shuttled them onto blazing hot (500-degree) baking stones to cook. I pulled them out roughly 10 minutes later, once the crusts had puffed up a bit and blistered in spots and the cheese was melted and spotty brown.
An extended fermentation in the fridge gives our pizza dough complex flavor with minimal effort; baking on a high rack ensures great browning.
Just as I’d expected, the lower-hydration doughs were not only stiff and difficult to shape into even rounds when raw, but also tough to chew once baked. But really wet doughs weren’t ideal either; though they emerged significantly more tender from the oven, all that water had made the raw dough so sticky and soft that it tended to tear when stretched. The best of the bunch fell at about 61 percent—enough to stretch easily without ripping or sticking to my fingers and retain moisture as it baked. With further experimentation, I found that I could raise the hydration level to 63 percent and still be able to handle this stickier dough by adding a little extra flour to the exterior as I shaped and stretched the pie. Such a judicious use of “bench flour” allowed me to increase the hydration of the dough while still maintaining the ability to shape it easily.
COLD STORAGE
With this dough I had a good jumping-off point, but pizza perfection was still a long way away. First off, instead of being thin and just a bit floppy, like a good parlor pie, my crust was bready and overinflated—more like focaccia than pizza—even when stretched as thinly as possible. Even more troubling, the dough was lacking in flavor, save for a strong yeastiness.
Simply dialing back on the yeast seemed like an obvious test—and did help deflate the too-puffy crust just a bit. But it also wiped out what little flavor the dough started with. Since keeping the yeast to a minimum was a given, I clearly needed an altogether different approach to fermentation.
First, a little background on the relationship between fermentation and dough’s texture and flavor. When dough is first mixed, tiny “seed” bubbles form that expand with carbon dioxide at two different junctures: once when the bread is proofed and again when a last burst of carbon dioxide is produced during the first few minutes of baking. The larger the bubbles in the dough prior to baking, the more open and puffy the final dough will be. One way to minimize the size of the bubbles is to chill the dough as it proofs. Aside from producing finer, tighter air bubbles, cold fermentation has the added benefit of creating more flavorful dough. Why? Because at lower temperatures, yeast produces less carbon dioxide and more of the initial side products of fermentation: flavorful sugars, alcohol, and acids.
With that in mind, I mixed up a new batch of dough and immediately placed it in the refrigerator to proof. The next day, I pulled it out, divided and shaped it into rounds, and let it warm to room temperature while I preheated my baking stone. I was skeptical at first; unlike the room temperature–proofed batch, this dough looked pretty unremarkable, showing none of the telltale signs of active fermentation such as an airy, bubbly structure. But one sniff of its heady, slightly boozy aroma clearly indicated that plenty had been happening beneath the surface. Furthermore, this tighter, smoother mass of dough proved much easier to work with, pulling effortlessly into a circle that gradually tapered in thickness from edge to center. I shouldn’t have been surprised by this latter development. Besides slowing carbon dioxide production, chilling dough slows down gluten development so that dough literally stays looser, making it easier to stretch and hold its shape without snapping back. And the pizza it produced? Vastly better than previous attempts: Though not perfect, the dough was more complexly flavored and crisp than any other pie I’d made, with an interior that boasted decent tenderness and chew. Even the rim offered just the right degree of puffiness and functioned as an ample handle.
I had to wonder: If 24 hours of cold fermentation had such a dramatic effect on the dough, what would happen if I left it in the fridge even longer? Three days later, I had my answer. I’d mixed together and chilled a batch of dough each day over a 72-hour period, and the pizza bake-off proved that its flavor improved as time went by. (Push the fermentation beyond three days, however, and the yeast finally starts to produce a surplus of carbon dioxide, rendering the dough puffy.) True, cold fermented dough wasn’t exactly quick, but the recipe was a snap to make. Plus, the long rest wasn’t altogether inconvenient; with a little planning, this dough had great make-ahead potential.
HOT STONE
But the crust’s crispness—or lack thereof—continued to nag me. Adding a tablespoon of oil to the dough helped a bit, but not enough. I had one other idea about how to encourage more crunch and color: sugar. We often sprinkle a spoonful over poultry skin to help it darken and crisp up in the oven, and I saw no reason the same trick couldn’t be used here. I worked 2 teaspoons into the dough and, sure enough, the next pizza I pulled from the oven was tinged a slightly deeper shade of brown. But it still wasn’t enough.
The real problem was the same one I’d been trying to address with all of my radical pizza-baking experiments over the years: Home ovens simply don’t get hot enough to produce a deeply browned crust before the interior crumb dries out and toughens. The best solution has always been the hottest setting on the oven dial and a pizza stone, which soaks up the radiating heat like a sponge. Following that logic, most recipes call for the stone to be placed as low in the oven as possible, where it gets maximum exposure to the main heating element. But when I thought about it, that technique didn’t really make sense—and I even had an industry clue to prove it: commercial pizza ovens. These wide, shallow chambers quickly reflect heat from the floor back onto the top of the pie as it cooks, preventing the crust from drying out before the toppings have browned. Obviously I couldn’t alter the shape of my oven—but I could move the stone up closer to the top to narrow the gap between the stone and the ceiling. After a series of tests with thermocouples and an infrared thermometer, I found the best position for the stone is really as close to the top of the oven as possible—about 4 inches or so from the ceiling, which left just enough headroom to comfortably house the pie. When I pulled this latest attempt from my newfangled setup, the results were a revelation: Everything had baked in sync, producing a pizza that was thoroughly crisp, well browned on both top and bottom, and slightly chewy, just like a good parlor slice.
TO TOP IT OFF
All I had left to do was tweak the toppings. A splash of red wine vinegar gave my no-cook sauce a jolt of flavor. As for the cheese, I supplemented the creamy, stretchy mozzarella with a fistful of sharp, salty, finely grated Parmesan. And that’s where I stopped. Of course, additional toppings are fine (provided one doesn’t use too heavy a hand); but for me, this simple-to-make, simply dressed pie bakes up perfect as-is.
If you don’t have a baking stone, bake the pizzas on an overturned and preheated rimmed baking sheet. You can shape the second dough round while the first pizza bakes, but don’t add the toppings until just before baking. You will need a pizza peel for this recipe. It is important to use ice water in the dough to prevent it from overheating in the food processor. Semolina flour is ideal for dusting the peel; use it in place of bread flour if you have it. The sauce will yield more than needed in the recipe; extra sauce can be refrigerated for up to one week or frozen for up to one month.
Dough
3 cups (16½ ounces) bread flour
2 teaspoons sugar
½ teaspoon instant or rapid-rise yeast
1⅓ cups ice water
1 tablespoon vegetable oil
1½ teaspoons salt
Sauce
1 (28-ounce) can whole peeled tomatoes, drained
1 tablespoon extra-virgin olive oil
1 teaspoon red wine vinegar
2 garlic cloves, minced
1 teaspoon salt
1 teaspoon dried oregano
¼ teaspoon pepper
1 ounce Parmesan cheese, grated fine (½ cup)
8 ounces whole-milk mozzarella, shredded (2 cups)
1. For the dough: Process flour, sugar, and yeast in food processor (fitted with dough blade if possible) until combined, about 5 seconds. With processor running, slowly add water and process until dough is just combined and no dry flour remains, about 10 seconds. Let dough stand for 10 minutes.
2. Add oil and salt to dough and process until dough forms satiny, sticky ball that clears sides of bowl, 30 to 60 seconds. Transfer dough to lightly oiled counter and knead briefly by hand until smooth, about 1 minute. Shape dough into tight ball and transfer to large, lightly oiled bowl; cover bowl tightly with plastic wrap and refrigerate dough for at least 24 hours or up to 3 days.
3. For the sauce: Process all ingredients in clean, dry workbowl of food processor until smooth, about 30 seconds. Transfer sauce to bowl and refrigerate until ready to use.
4. One hour before baking, adjust oven rack 4 to 5 inches from broiler element, set baking stone on rack, and heat oven to 500 degrees. Transfer dough to clean counter and divide in half with bench scraper. Form each piece of dough into smooth, tight ball. Space balls at least 3 inches apart on lightly greased baking sheet. Cover sheet loosely with plastic coated with vegetable oil spray; let dough stand for 1 hour.
5. Coat 1 dough ball generously with flour and place on well-floured counter (keep other ball covered). Using your fingertips, gently flatten dough into 8-inch disk, leaving 1 inch of outer edge slightly thicker than center. Using your hands, gently stretch disk into 12-inch round, working along edges and giving disk quarter turns. Transfer dough to well-floured pizza peel and stretch into 13-inch round. Using back of spoon or ladle, spread ½ cup sauce in thin layer over surface of dough, leaving ¼-inch border around edge. Sprinkle ¼ cup Parmesan evenly over sauce, followed by 1 cup mozzarella. Carefully slide pizza onto baking stone and bake until crust is well browned and cheese is bubbly and beginning to brown, 10 to 12 minutes, rotating pizza halfway through baking. Transfer pizza to wire rack and let cool for 5 minutes before slicing and serving.
6. Repeat process of shaping, topping, and baking with remaining dough and toppings.
TOPPING TIPS
We like our Thin-Crust Pizza simply dressed with tomato sauce and handfuls of shredded mozzarella and Parmesan, but additional toppings are always an option—provided they’re prepared correctly and added judiciously. (An overloaded pie will bake up soggy.) Here are a few guidelines for how to handle different types of toppings:
HEARTY VEGETABLES Aim for a maximum of 6 ounces per pie, spread out in a single layer. Vegetables such as onions, peppers, and mushrooms should be thinly sliced and lightly sautéed (or microwaved for a minute or two along with a little olive oil) before using.
DELICATE VEGETABLES AND HERBS Leafy greens and herbs like spinach and basil are best placed beneath the cheese to protect them or added raw to the fully cooked pizza.
MEATS Proteins (no more than 4 ounces per pie) should be precooked and drained to remove excess fat. We like to poach meats like sausage (broken up into ½-inch chunks), pepperoni, or ground beef for 4 to 5 minutes in a wide skillet along with ¼ cup of water, which helps to render the fat while keeping the meat moist.
SHRINK YOUR HEADROOM
Baking the pizza on the top rack—rather than the usual approach of placing it near the bottom of a home oven—means heat will hit the top of the pie, browning the toppings before the crust overcooks.
SHAPING THIN-CRUST PIZZA DOUGH
1. DIVIDE Once dough has fermented in fridge, halve dough and shape into balls. Place on lightly oiled baking sheet and cover with oiled plastic wrap. Let rest for 1 hour to allow dough to return to room temperature.
2. FLATTEN On well-floured surface and using your fingertips, gently flatten dough into 8-inch disk, leaving outer edge slightly thicker than center to create fatter “handle.”
3. STRETCH With your hands, stretch dough into 12-inch round, working along edges and giving dough quarter turns. Transfer to well-floured peel and stretch to 13-inch round.