irresistible soups and starters
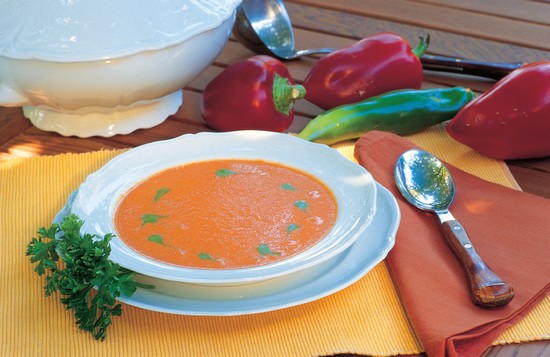
cream of roasted pimiento soup
The velvety green cream drizzled on this rosy-red soup makes this perfect for an elegant first course.
1 tablespoon canola oil
1 medium yellow onion, chopped
2 garlic cloves, minced
1 large green poblano or ‘Anaheim’ pepper, roasted, peeled, and seeded
10 pimiento or other red bell peppers (about 2½ lbs/1.2 kg), roasted, peeled, and seeded 2 cups (500 ml) chicken stock or one
¼-oz (500-ml) can of chicken stock
¼ teaspoon ground cumin
¼ teaspoon salt or to taste
¾ cup (190 ml) heavy cream
Pour the oil into a medium nonstick frying pan, heat, and add the onions and garlic. Sauté over medium heat until the onions are translucent, about 7 minutes, and reserve.
In a blender, put the poblano pepper and 1 tablespoon of the chicken stock, and purée to a smooth paste. Using a rubber spatula, scrape the paste into a small bowl, add 1 teaspoon of heavy cream, and stir to combine. (If any lumps remain, force the mixture through a fine sieve.) Pour the green pepper mixture into a plastic squeeze bottle or a small bowl and set aside.
Wash the blender, then place the pimiento peppers, the onion mixture, the remaining chicken stock, the cumin, and salt in the blender and purée. (You may have to do this in two batches.) Pour the pimiento mixture into a saucepan and bring it to a simmer. Remove from the heat and stir in the rest of the heavy cream. Reheat the soup if necessary, but do not allow it to boil or it may separate.
To serve, pour the soup into 4 soup bowls, dividing it equally. Using the squeeze bottle, make a pattern of poblano cream on the soup (or drizzle cream from a spoon in a decorative pattern) and serve immediately. Serves 4 to 6.
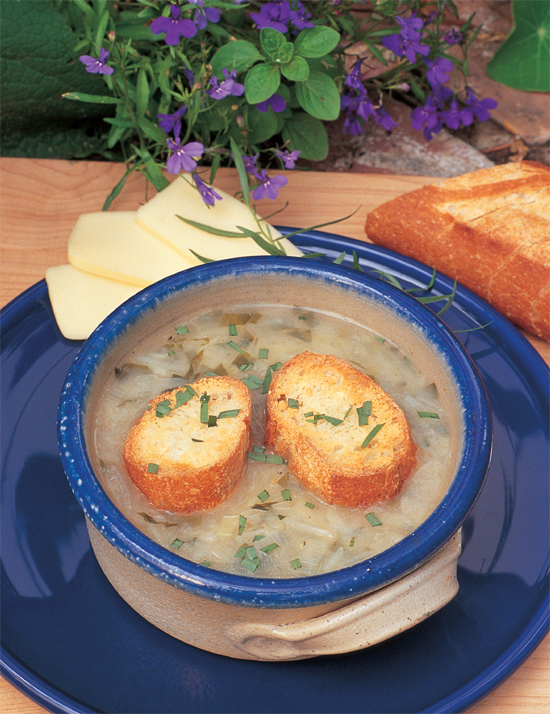
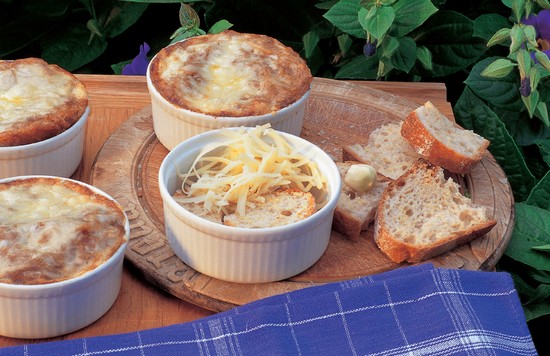
Few recipes feature the onion as well as this traditional French onion soup. Carefully browning the onions is the secret to a rich flavor.
4 tablespoons (½ stick) butter
8 to 10 medium onions (8–10 cups/800 g–1 kg), thinly sliced
2 garlic cloves, divided
1 teaspoon sugar
3 tablespoons all-purpose flour
8 cups (2 liters) beef or chicken stock
¾ cup (190 ml) dry white vermouth
Salt and freshly ground black pepper
3 tablespoons cognac or brandy
8 slices toasted French bread
2 cups (220 g) grated Swiss cheese, divided
1 tablespoon extra-virgin olive oil
To make the soup: In a large saucepan, melt the butter and stir in the onions and 1 clove minced garlic, cover, and cook them slowly over low heat for about 15 minutes, stirring occasionally. Uncover, stir in the sugar, and cook on low to medium heat for 30 minutes, or until onions are well browned. Stir them often, scraping the bottom of the pan to prevent burning. Sprinkle on the flour and stir for 2 to 3 minutes. Remove pan from heat, slowly stir in the stock and ver-mouth, and salt and pepper to taste. Cover and simmer on low heat for 30 minutes. Stir in the cognac or brandy. The soup may be either served as is or frozen at this point.
To make the gratin: Preheat the oven to 350°F (160°C). Rub the remaining garlic clove over the toasted bread. Place a little soup in each of eight ovenproof ramekins or soup bowls. Divide ½ cup (55 g) of the grated cheese evenly among the bowls. Put 1 slice of bread in each bowl; cover with more soup and the remaining cheese. Drizzle oil over each bowl and place in the oven for 20 minutes; then set the bowls under the broiler to lightly brown the cheese. Serve immediately. Serves 8.
Vichyssoise is an elegant but easily made first course. Make it with blue potatoes and you’ll really delight your guests. To get the lavender effect you need to use the very deep purple varieties. Medium or light blue potatoes will give you a sickly gray, not lavender, soup. Serve this lavender vichyssoise in white or clear glass bowls so the color is featured, garnished with chives and chive florets.
2 tablespoons butter
3 onions, diced (about 3 cups/450 g)
3 to 4 deep-blue potatoes, peeled and cubed (about 3 cups/525 g)
1 tablespoon fresh lemon juice
1 cup (250 ml) half-and-half
Salt and freshly ground black pepper
Dash of nutmeg
Garnish: fresh chive leaves and flowers
In a large saucepan, melt the butter and sauté the onions over medium heat until softened but not browned, about 7 minutes. Add the potatoes and 3 cups (750 ml) of water. Cover and simmer until the potatoes are tender, 15 to 20 minutes.
Add the lemon juice, half-and-half, and seasonings and purée the soup in a food processor or blender. Chill and serve cold. Garnish by sprinkling the soup with the chives and the chive flowers, separated into florets. Serves 4.
golden gazpacho
This classic Spanish recipe is usually made with red tomatoes and green peppers, but here I put a spin on the ball and make it with gold tomatoes and yellow bell peppers.
7 to 10 medium ripe gold tomatoes
1 large yellow pepper
1 small onion, or 2 to 3 scallions (green onions)
2 garlic cloves, minced
½ green Anaheim chili pepper
1 small hot red chili pepper, or to taste
1 large or 2 small cucumbers, peeled
1 tablespoon extra-virgin olive oil
⅓ cup (85 ml) white wine vinegar
½ cup (125 ml) dry white wine
Salt and freshly ground black pepper
3 or 4 sprigs fresh cilantro
Garnish: cilantro sprigs, a slice of tomato, or diced avocado
Immerse the tomatoes in boiling water for 30 seconds, or until the skins have loosened. Peel them and remove the seeds and cores. Remove the seeds and membranes from the yellow pepper. Chop the rest of the vegetables coarsely for processing in the food processor or blender (if you use a food processor the soup will have some crunch; using the blender will give a smoother texture).
Process all ingredients in batches, pouring them into a large nonreactive bowl to mix. Refrigerate the soup at least 3 hours before serving. If the gazpacho is too thick, thin it with a little cold vegetable or chicken stock before serving. Taste and adjust seasonings. Serve the soup in individual bowls and garnish each serving as desired. Serves 4.
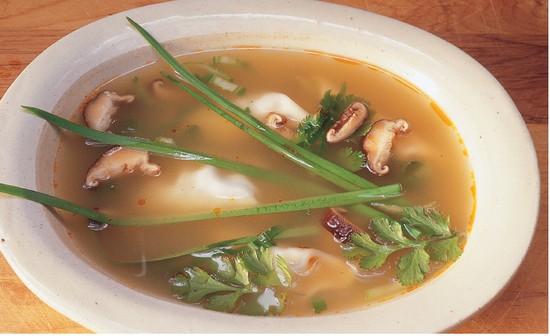
wonton dumpling soup with oriental chives
Created by Helen Chang, this version of the classic soup is light and savory. The dumpling dough can be purchased already prepared in your supermarket or an Asian market. Spinach can be substituted for the pac choi greens.
For the dumplings:
⅓ lb (170 g) ground pork
¾ cup (75 g) finely chopped cabbage
⅓ cup (20 g) finely grated carrots
½ cup (30 g) finely chopped fresh Oriental chive leaves
4 tablespoons finely grated peeled fresh ginger root, divided
2 tablespoons chopped cilantro
½ teaspoon freshly ground black pepper
1 teaspoon salt
1 teaspoon sugar
3 teaspoons cornstarch
1 egg, lightly beaten
One 12-oz (340-g) package square wonton skins, thawed if frozen
For the soup:
2 quarts (2 liters) chicken broth
10 to 12 mushrooms, thinly sliced
1 large head of pac choi, green leafy sections cut in narrow strips; large white stems reserved for another use
Hot pepper sauce (optional)
3 teaspoons chopped cilantro leaves
To make the dumplings: In a medium bowl, place the pork, cabbage, carrots, chives, 2 tablespoons grated ginger, cilantro, pepper, salt, sugar, and cornstarch. Add the egg and stir to combine the ingredients.
Place the wonton skins, a few at a time, on a clean work surface. (Meanwhile, keep the rest of the won-tons in the package, or place a slightly damp towel over them to prevent them from drying out.) Mound a teaspoon of filling in the middle of each wonton square and then fold to form a triangle or semicircle. Press the edges together to seal, then bend corners toward each other as you would for wontons. (Refer to the wonton package for folding directions.) Place the folded dumplings on a cookie sheet, leaving space between each one. Cover and refrigerate dumplings when filled, if not using immediately.
When ready to serve bring a large pot of water to a boil and add the dumplings and simmer for 5 to 6 minutes, or until they become translucent. Remove them from the water with a slotted spoon and divide them among 6 bowls.
To make the soup: In the meantime, pour the chicken broth into a large soup pot. Add the remaining 2 tablespoons of ginger. Bring to a simmer and add the mushrooms. Simmer over low to medium heat for one minute. Add the pac choi leaves and chives to the simmering broth. Add hot sauce to taste, if using.
To serve: Fill the bowls with broth and pac choi. Garnish each bowl with chopped cilantro. Serves 6.
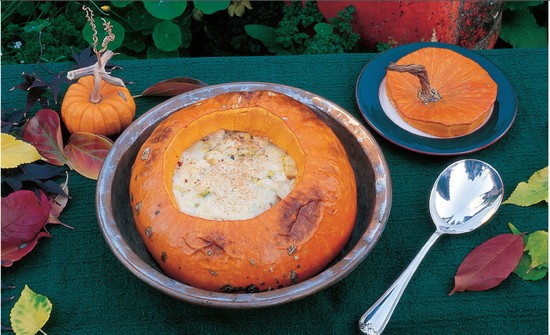
Rouge Vif d’Etampes is a French heirloom pumpkin reminiscent of Cinderella’s coach. In the 1800s Parisian chefs favored it as a base for vegetable stocks. I find it lends itself well to the following rich chowder, served in the French style—in the pumpkin. Serve this dish as you would a hearty chowder or stew.
6 cups (210 g) 1-in (2.5-cm) cubes of homemade-style white bread
1 (10–12-in/25–30-cm) Rouge Vif d’Etampes pumpkin
3 tablespoons extra-virgin olive oil
1 lb (500 g) leeks (about 5 medium), white and pale green parts only, finely chopped (about 5 cups)
1 medium fennel bulb, chopped (about 1½ cups/130 g)
6 garlic cloves, minced
1 teaspoon powdered saffron
1½ teaspoons dried thyme
1 tablespoon chopped fresh tarragon
1 teaspoon salt
½ teaspoon freshly ground black pepper
¼ teaspoon ground red pepper
Approximately 6 cups (1.5 liters) vegetable or chicken broth
Approximately 1½ cups (375 ml) half-and-half
½ lb (250 g) Gruyère cheese in ½-in (13-mm) cubes (about 1½ to 2 cups)
Preheat the oven to 350°F (175°C).
Put the bread cubes on a cookie sheet and bake them for 10 minutes, stirring once. Remove from oven and set aside.
Cut a 6-inch (15-cm) diameter lid from the top of the pumpkin. With a sharp metal spoon, scrape out the seeds and stringy membrane. Place the pumpkin on a shallow baking pan. If the pumpkin does not sit level on the pan, support the tilting side with a piece of rolled-up aluminum foil.
In a large sauté pan heat the oil and sauté the leeks, fennel, and garlic until tender, about 10 minutes. Turn off the heat and add the saffron, thyme, tarragon, salt, pepper, ground red pepper, and the bread cubes, tossing to mix thoroughly. Pour in the chicken broth and half-and-half, stir gently and ladle the mixture into the pumpkin. The pumpkin should be filled within 2 inches (5 cm) of the top. Distribute the cheese cubes on top and replace the lid.
Bake the pumpkin for about 1½ hours and then remove the lid and bake for another ½ hour, or until the pumpkin flesh is tender and the cheese is golden brown. If the skin starts to pucker around the outside, test for doneness. Watch carefully as the pumpkin will fall apart if overcooked.
Transfer the pumpkin to a large, warm serving platter or bowl. To serve, use a large serving spoon to scoop out some of the soup into each bowl, then scrape some of the flesh from the pumpkin and add it to the soup. Be careful not to break through the skin, as the liquid will leak out. Serves 4.
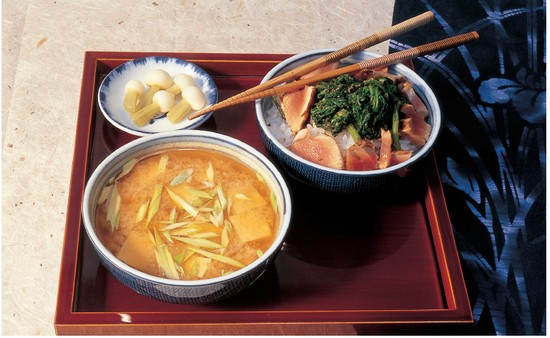
Miso soup is a traditional Japanese soup, eaten most often at breakfast. Miso paste is made from fermented soybeans and can be found in Asian and natural food stores in plastic tubs. There are all different kinds of miso—ranging in color from blonde to rich reddish-brown—depending on the ingredients from which it is made, the length of the fermentation process, and season. Miso contains acidophilus—the “helpful” bacteria found in yogurt—which will perish if miso is boiled.
Some versions of this soup are made with dashi (bonito flake stock) and kombu (seaweed). The version that appears here is suited more to Western tastes and is a great way to get acquainted with this lovely soup. After you have made it a few times try adding some kombu and/or dashi to the simmering water—but be careful, as the flavor from these ingredients can overpower your soup. Put the dashi in cheesecloth and use it as a “teabag” to flavor your miso gently. Kombu contains agents that accelerate the softening of the soup’s vegetables while they cook. If used, both the dashi and the kombu should be removed from the soup just before the water begins to boil.
1-in (2.5-cm) piece of fresh ginger root, sliced
1 medium carrot, minced
4 oz (125 g) firm tofu, in ½-in (13-mm) cubes
4 tablespoons miso paste (more or less to taste)
2 scallions (green onions), white part only, thinly sliced
Bring 1 quart (1 liter) of water and the ginger slices to a boil. Simmer for 5 minutes, then remove the ginger. Add the minced carrot and tofu, and simmer for another 2 minutes. Take the soup off the stove and allow to cool for 1 to 2 minutes. Add the miso and stir gently until it dissolves. Scatter the minced scallion on top and serve immediately. Serves 4.
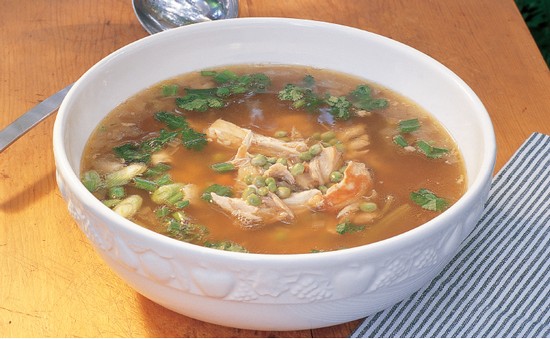
thai chicken soup with pigeon peas
This lovely light soup is a great beginning to a Thai meal or Chinese stir-fry. Some folks enjoy the fish sauce that gives an authentic Thai taste; others prefer to leave it out.
2 tablespoons vegetable oil
1 frying chicken (3–3½ lbs/1.5–1.7 kg), cut in 6 or 7 pieces
1 large onion, chopped
3 ribs celery, chopped
2 medium carrots, chopped
3 stalks lemongrass, chopped in 2-in (5-cm) pieces and slightly crushed to release flavors
1½ tablespoons grated fresh ginger root
4 garlic cloves, minced
4 Kaffir lime leaves
3 whole dried chilies
½ teaspoon ground coriander seeds
Salt and freshly ground black pepper
2 cups (300 g) shelled fresh pigeon peas or green peas (preferably fresh)
2 small scallions (green onions) sliced thinly, including 1 in (2.5 cm) of the greens
⅓ cup (20 g) chopped fresh cilantro
1 tablespoon lime juice
Optional: 1 tablespoon Thai fish sauce
In a very large sauté pan, heat the oil on medium. Add a few chicken pieces and brown on all sides. Repeat the process with the remaining chicken. Transfer the browned chicken to a large soup pot. Pour off the excess fat from the pan and add the onions. Sauté until translucent, about 7 minutes. Add the onions to the chicken along with 2 quarts (2 liters) of water. Add the celery, carrots, lemongrass, ginger, garlic, lime leaves, chilies, and ground coriander and bring to a boil. Skim off and discard any foam, reduce the heat, then simmer for 45 minutes.
Pour the chicken and liquid through a colander. Pour the stock back into the soup pan and let the fat rise to the top. Skim off and discard most of the fat on the surface. Meanwhile, cool and separate the chicken meat from the bones and skin, and add the meat back to the stock. You should have about 3 cups (375 g) of chicken meat.
Bring the soup back to a boil and add the pigeon peas and scallions and cook for about 5 minutes, just until the peas are tender. Add the cilantro, the lime juice, and the (optional) fish sauce to taste.
leek and potato soup with sorrel
This heart-healthy soup is thick and satisfying. It possesses all the richness of leeks but is balanced by the tangy sorrel. Serve it on a cold winter evening in front of the fire with a fine cheese and crusty bread.
1 tablespoon butter
2 tablespoons vegetable oil
2 medium onions, finely chopped (about 1 cup/150 g)
7 large leeks with most of the green removed, coarsely chopped (approximately 4 cups/360 g)
5 medium Yukon Gold or other boiling potatoes (approximately 1½ lbs/680 g), peeled and grated
Approximately 8 cups (2 liters) of homemade or low-sodium chicken broth
1 cup (40 g) chopped fresh sorrel leaves
1 teaspoon chopped fresh tarragon
Salt and freshly ground black pepper
In a large soup pot, melt the butter and add the oil and onions; over medium heat sauté them for about 5 minutes, or until soft. Add the leeks and sauté 5 more minutes. Add the potatoes and chicken broth and simmer until tender, about 20 minutes. Add more chicken broth if the soup is too thick. Add the sorrel and tarragon, and salt and pepper to taste. Adjust seasonings if necessary. Serve hot. Serves 4.
summer squash and corn chowder
This soup uses copious amounts of summer squash and is substantial enough to eat as a light supper. Serve it with corn bread and a green salad.
To remove kernels from the cob, cut a small piece off the blunt end to make it straight across, place the cob blunt-end down on a cutting board, and use a sharp knife to cut off the kernels. (Mail-order companies carry a gizmo for cutting the kernels off more easily.)
7 or 8 young 5- to 6-in-long (13–15-cm-long) summer squash (about 2 lbs/1 kg)
2 tablespoons unsalted butter or vegetable oil
1 large onion, finely chopped
½ teaspoon dried thyme
2 cups (350 g) fresh sweet corn kernels (about 5 ears of corn)
2½ cups (625 ml) milk
1 cup (250 ml) heavy cream
Salt and freshly ground black pepper to taste
⅛ to ¼ teaspoon ground red pepper
Garnish: sour cream
If you can pierce the skins easily with your fingernail, the squash do not need peeling; otherwise, peel them. Grate the squash; you should have about 8 cups (900 g). Steam the squash in a large steamer until tender, approximately 15 minutes. Mash the squash and set it aside.
In a large Dutch oven, melt the butter and over medium heat sauté the onion and thyme for about 5 minutes until translucent but not brown. Remove from heat and add the squash, corn, milk, and cream. Season with salt and peppers. Over medium heat stir the mixture to heat it thoroughly; do not bring the mixture to a boil, or it will curdle. Serve garnished with sour cream. Serves 4 to 6.
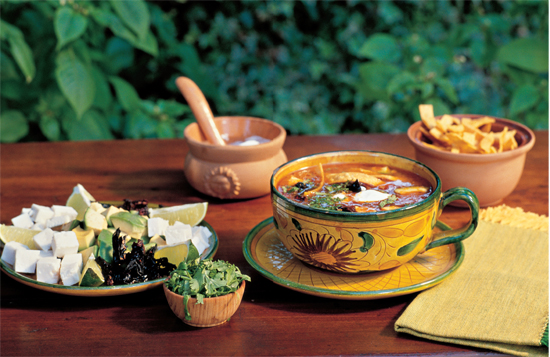
This rich and surprising soup is one of my favorite dishes. Its many flavors contrasting with the crisp tortillas and creamy avocados give your mouth a lot to think about. Serve it as a first course as is, or add beans and chicken meat for a filling entrée. As with many Mexican dishes, the garnishes are integral and allow diners to season the dish as they please. See page 35 for more information on toasting vegetables. (See photo on pages 72–73.)
For the broth:
4 cloves garlic, unpeeled
1 white onion, peeled
6 large paste tomatoe
8 cups (2 liters) chicken stock
2 tablespoons lard or vegetable oil
1 teaspoon dried oregano
Salt and freshly ground black pepper to taste
For the garnish:
2 chipotle peppers
2 dried ancho peppers
2 cups (500 ml) vegetable oil, divided
6 to 8 stale corn tortillas
1 large ripe avocado
½ lb (250 g) queso fresco, or mozzarella or Monterey Jack
¼ cup (65 ml) plus 1 tablespoon crema or sour cream
½ cup (25 g) chopped cilantro
3 limes, quartered
To make the broth: Heat a dry comal or cast-iron frying pan until very hot. Toast the garlic cloves in their skins until golden. Cut the onion into 8 sections and toast them in the same manner. Toast the tomatoes until their skins blister. Peel and seed the tomatoes. Peel the garlic. In a blender, purée the toasted garlic, onions, tomatoes and ¼ cup (65 ml) of the chicken stock. This can be done in two batches.
In a large soup pot, heat the lard. Carefully, because it splatters, add the purée. Reduce the heat and cook, stirring, about 10 to 15 minutes until the purée gets thick and darkens in color. Pour in the remaining chicken stock and the oregano; simmer for about 20 minutes. Season with salt and pepper to taste.
To make the garnish: Remove the stems and seeds from the chilies and cut them into strips ⅛ inch (3 mm) wide. In a frying pan, heat 1 tablespoon of the vegetable oil and fry the chilies, stirring, for 30 seconds. Drain them on a paper towel and set them aside. Stack the corn tortillas; cut them into quarters and then into strips ¼ inch (6 mm) wide. Add the remaining oil to the frying pan; heat the oil and fry the tortilla strips until they are golden. Remove them from the oil with a slotted spoon and drain them on a paper towel; set aside. Cut the avocado and the queso fresco into 1-inch (2.5-cm) cubes.
To serve the soup: Reheat the broth and ladle individual servings into 4 shallow bowls. Add a few avocado and cheese cubes, sprinkle with fried chilies, and top with tortilla strips. Add a tablespoon of crema, sprinkle with cilantro, and serve with lime wedges. Pass separate bowls of the garnishes so diners can add more if they want to fine-tune their dish. Serves 4.
Note: The three most important cheeses used in Mexican cooking are queso fresca, a soft, mild melting cheese—if not available, substitute with mozzarella or Monterey Jack; queso anejo (including cotija), an aged, crumbly, strong-flavored cheese—substitute with a mild feta; and the creamy, rich crema Mexicana that is similar to crème fraîche and sour cream.
spring vegetable soup with parsley dumplings
This is a basic soup that can be varied from season to season and from garden to garden. Serve with a rustic bread and a salad on the side.
For the stock:
1 chicken, approximately 4 lbs (2 kg)
1 onion, unpeeled
4 celery ribs
2 large carrots
2 garlic cloves
1 bay leaf
2 teaspoons thyme
2 teaspoons salt
For the soup:
2 cups (350 g) halved or quartered baby potatoes
1½ cups (230 g) sliced carrots (about 4 medium carrots)
1 cup (225 g) sliced celery (about 2 ribs)
1½ cups (225 g) shelled young peas (about 1 lb/500 g unshelled)
1½ cups (about 1 lb/500 g) sliced asparagus (1-in/2.5-cm pieces)
1 cup (100 g) sliced scallions (green onions)
2 cups (150 g) young spinach leaves
2 cups (150 g) young dandelion greens
Salt and freshly ground black pepper
For the dumplings:
1 egg
½ cup (60 g) all-purpose flour
3 tablespoons parsley, minced
½ teaspoon salt
⅛ teaspoon freshly ground nutmeg
To make the stock: Remove the skin and fat from the chicken. Cut it into pieces and set aside the breasts. Put the legs, thighs, wings, back, and neck into a large stockpot. Add the onion, celery, carrots, garlic, bay leaf, and thyme. Add 5 quarts (5 liters) of cold water and the salt and bring to a boil. Cover the stockpot and simmer over low heat for 2 hours. Remove the chicken and vegetables from the pot. Discard the vegetables, reserve the chicken, and set aside the broth.
To make the soup: Bring the stock to a boil and add the reserved chicken breasts, the potatoes, carrots, celery, and peas. Simmer for 10 minutes, then add the asparagus and scallions and simmer for 5 more minutes. Remove from heat. Remove the chicken breasts and drain them.
To make the dumplings: In a small bowl, blend the egg, flour, parsley, salt, and nutmeg with a fork until smooth. Bring the soup to a rolling boil. Dip a soup spoon into the boiling liquid, then use it to scoop out a small amount of batter from the bowl. Drop the spoonful of batter into the soup. The batter will drop easily from the spoon if you first dip the spoon into the boiling liquid each time. The dumplings rise to the surface when they are done. Cut the chicken breasts into cubes; remove the meat from the reserved thighs, wings, and back; and add them to the soup. Add the spinach leaves and dandelion greens and adjust seasoning with salt and pepper. Heat the soup to serving temperature and ladle it into warm bowls. Serves 6.
This is a world-class soup! The sweet, bright flavors of carrots contrast beautifully with the dusky flavors of the lovage, coriander, and parsley in the onion soup garnish. The presentation is most dramatic if you serve the soup in individual shallow bowls.
4 cups (600 g) sliced carrots
2 tablespoons vegetable oil
2 cups (300 g) chopped onion
1 garlic clove, finely chopped
1½ cups (375 ml) chicken broth
⅔ cup (170 ml) half-and-half, divided
1 tablespoon coriander or cumin seeds
2 stalks fresh lovage or fresh Italian parsley
Garnish: small sprigs of dill or lovage, or carrot leaves
To make the carrot soup: Steam the carrots until tender. In a large pan, heat the oil and sauté the onions until translucent, add the garlic, and sauté 1 more minute. In a food processor or blender, purée the onion mixture. Transfer ½ cup (120 ml) of the onion purée to a small saucepan and set it aside. Leave the remaining onion mixture in the food processor.
Add the steamed carrots to the food processor and blend until smooth. Transfer the mixture to a saucepan, add the chicken broth, stir, and simmer 1 minute. Remove the carrot soup from the heat and set it aside.
To make the onion soup: In a dry, heavy frying pan, lightly toast the coriander or cumin seeds—keep stirring to prevent them from burning. In a saucepan, heat ⅓ cup (85 ml) of the half-and-half, add the toasted coriander or cumin seeds and the lovage or Italian parsley. Remove from the heat, and let the mixture steep for about 30 minutes to blend the flavors. Strain the seeds and herbs and discard them. Pour the flavored half-and-half into the saucepan with the reserved onion purée.
Before serving, reheat the carrot soup and stir in the remaining ⅓ cup (85 ml) of the half-and-half, bringing it almost to a boil. Reheat the onion mixture. In both cases, do not let the mixtures boil or they will curdle.
To serve, half fill four individual shallow soup bowls with carrot soup. In the middle of each soup bowl, carefully ladle about ¼ cup (65 ml) of the onion mixture.
Garnish with small carrot leaves, a sprig of lovage, or dill. Serves 4.
citrus dip for begonia blossoms
The slightly crisp texture and sweet citrus flavor of begonias can be a spectacular ice-breaking appetizer. The blossoms come in many splashy colors, and a platterful makes a lovely centerpiece for a buffet table.
1 tablespoon honey
1 tablespoon frozen orange juice concentrate
1 teaspoon orange zest
½ teaspoon lemon zest
½ cup (125 g) nonfat yogurt
4 large organically grown tuberous begonia flowers
In a small bowl, combine the honey, orange juice concentrate, and orange and lemon zests. Add the yogurt and mix well. Pour the yogurt mixture into a small, decorative bowl, cover it with plastic wrap, and refrigerate until ready to serve.
Just before serving, gently wash the begonia blossoms and remove each of the petals at its base. Place the bowl of flavored yogurt on a large platter and arrange the petals in a decorative pattern around the bowl. Serve the appetizer within the hour to prevent the petals from wilting. Serves 4 to 6.
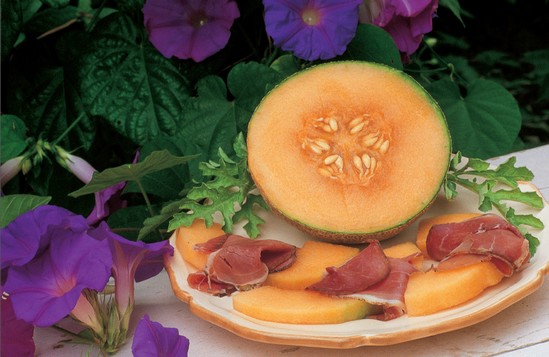
melon and prosciutto appetizer
When I visited Italy years ago, we tried an appetizer of melon slices with prosciutto at dinner one night and were instant fans of this classic dish. A piece of prosciutto was lightly wrapped around each piece of melon and eaten out of hand. The sweet perfume of the melon in contrast to the salty rich taste of the prosciutto was not to be forgotten. Once home, I made this recipe and it was such a hit with all my guests I often have it when melons are at their peak.
In the fall, wanting to extend the season of this wonderful dish, I tried making it with crisp, fresh ‘Fuyu’ per-simmons and it, too, was fabulous! It is now an easy fall classic for Thanksgiving. Instead of a cantaloupe I substitute 4 large or 6 medium ‘Fuyu’ persimmons that are crisp but fully ripe.
1 ripe cantaloupe
12 paper-thin slices of prosciutto (about ⅓ lb/170 g)
Slice the melon in half and remove the seeds. Cut it in quarters and remove the rind. Slice the quarters in thin slices and arrange them on a serving plate. Cut the prosciutto slices in 2- to 3-inch (5–8-cm) pieces and arrange on the plate among the melon slices. Cover with plastic wrap and refrigerate if not serving for a few hours. An hour before serving, take platter out of refrigerator and allow fruit and prosciutto to come to room temperature. Remove plastic wrap and serve. Serves 4 to 6.
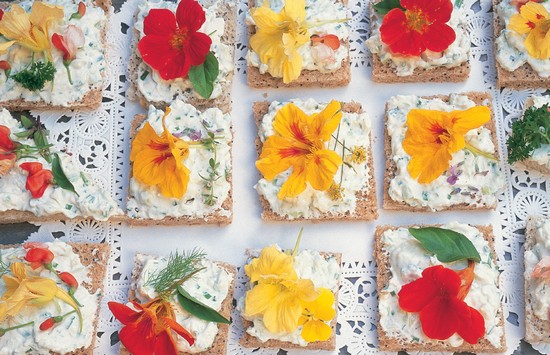
Edible flowers provide a striking palette with which to decorate food. With a small garden of edible flowers you can make your canapés look like edible art.
½ cup (25 g) snipped fresh dill or chive leaves
1 lb (500 g) natural cream cheese, softened
2 large loaves of dense sandwich or rustic-style unsliced bread, or 2 packages melba toast
A selection of edible flowers, 4 or 5 dozen: nasturtiums, borage, calendulas, pineapple sage, runner bean flowers, pansies, violas, violets, and mustard flowers
Herb leaves: sage, parsley, mint, dill, and basil
In a mixing bowl, add the dill and 3 tablespoons of water to the cream cheese and mix until smooth. If the mixture is too thick, add a little more water.
Trim the crusts off the bread and cut it into slices ⅓ inch (8 mm) thick. Cut the slices into large squares or rectangles 2½ to 3½ inches (6–8.5 cm) wide. Spread the cream cheese mixture on the bread—approximately 1 tablespoon per square—and arrange the squares on cookie sheets. Cover them lightly with plastic wrap and refrigerate until ready to decorate.
Carefully wash the flowers and herbs and gently pat them dry on paper towels. Lay them out on damp paper towels and cover with plastic wrap. Refrigerate until ready to use, but not for more than a few hours.
Decorate each canapé square with an edible flower or two and an herb leaf or two. Re-cover the canapés lightly with plastic wrap and refrigerate until serving time. The canapés may be made a few hours in advance, but do not prepare them any earlier, or the garnishes will wilt.
Put a paper doily on a decorative tray, place decorated squares on the tray, and serve. Serves 6 to 8 as an appetizer.
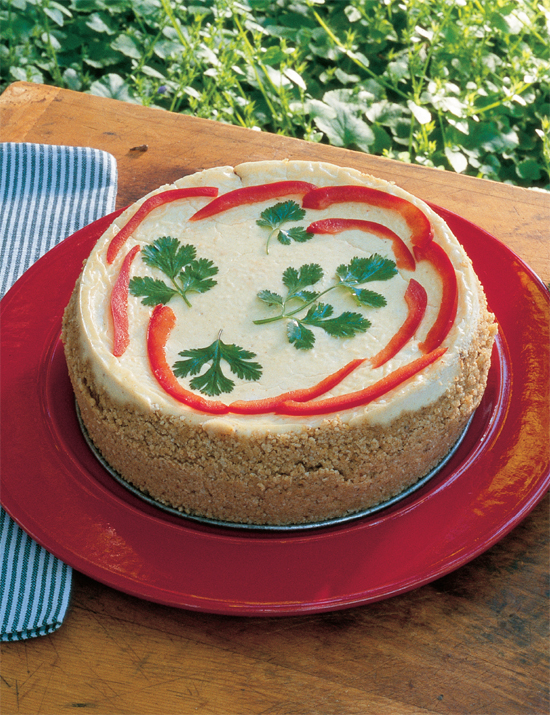
This is a spectacular, unusual first course and is also perfectly suited for a buffet. Serve the cheesecake with slices of avocado and have plenty of chopped cilantro available for garnishing.
For the crust:
2 cups (9-oz/225-g bag) ground restaurant-style white corn tortilla chips
½ cup (80 g) pine nuts
1 tablespoon chili powder
4 tablespoons (½ stick) unsalted butter, melted
For the filling:
¼ teaspoon coriander seeds
1 lb (500 g) natural cream cheese, at room temperature
¼ cup (65 ml) heavy cream
1 teaspoon cumin seeds, roasted and ground
2 eggs, at room temperature
4 large red bell peppers
½ teaspoon salt
1½ teaspoons chipotle powder
Garnish: red pepper slices and fresh cilantro
To make the crust: In a food processor, process the corn chips and pine nuts until they have the consistency of crumbs. Add the chili powder and the melted butter and process for a couple of seconds more. Press the mixture into the bottom and up the sides of a 9-inch (23-cm) diameter removable-bottom springform pan. Refrigerate the crust while you prepare the filling.
To make the filling: Heat a small dry frying pan on the stove, then add the cumin seeds and roast, shaking occasionally until the aromas are released. Cool and then grind.
Put the cream cheese into the bowl of a mixer equipped with the flat beater. Add the heavy cream, cumin, and coriander, and beat on medium speed until the ingredients are well combined. Scrape down the sides of the bowl, add the eggs, and beat for about 1 minute or until light and fluffy. To ensure a smooth filling, scrape down the sides once more and beat 1 minute longer.
Roast the peppers according to the instructions on page 35. Remove the skin and seeds and chop the peppers finely. Reserve a few strips for garnish. In a bowl, blend the chopped peppers with the salt and the chipotle powder.
To make the cheesecake: Preheat the oven to 300°F (150°C). Remove the prepared crust from the refrigerator. Spread one-half of the cream cheese mixture over the crust. Spoon the red pepper mixture on top of the cream cheese. Spoon the remaining cream cheese mixture over the peppers, then smooth over.
You will need to bake the cheesecake in a water bath using a baking dish or roasting pan wider but not deeper than the cheesecake pan. Using heavy-duty aluminum foil, wrap the bottom and sides of the springform pan to prevent water from soaking into the cake. Set the wrapped pan into the baking dish. Bring a kettle of water to a boil.
Set the baking dish with the cheesecake on the lower oven rack and carefully pour the boiling water into the dish to a depth of about 1 inch (2.5 cm). Slide the rack into the oven, taking care not to slosh water onto the cake. Bake the cheesecake for 1 hour, then turn off the heat and leave the cake in the oven for another hour.
Remove the cake from the oven; cool to room temperature and then chill in the refrigerator for at least 6 hours. To remove the cake from the pan, gently run a knife around the perimeter of the cake, then release the spring, removing the pan side but leaving the pan bottom.
Place the cheesecake on a decorative serving platter and garnish the top with some red pepper slices and fresh cilantro leaves. To slice into neat portions, use a sharp knife rinsed under hot water between each cut. Serves 12 to 16.
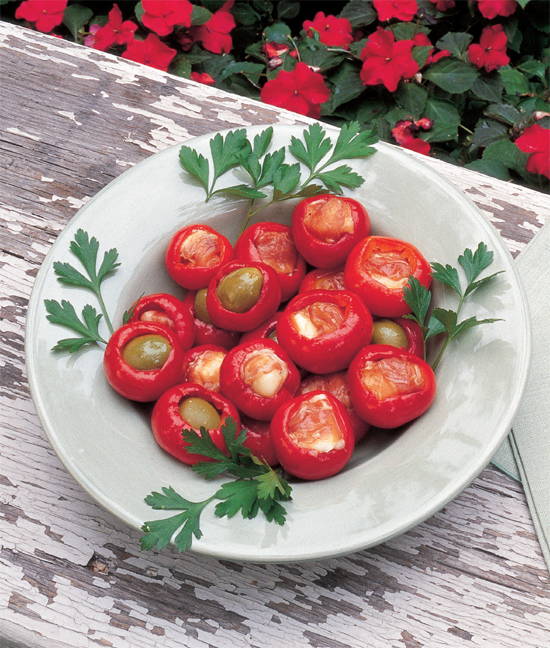
This fabulous appetizer is a classic Italian dish. It can be made with either hot or sweet cherry peppers.
24 ripe cherry peppers
1¼ cups (315 ml) white or red wine
⅓ lb (170 g) Monterey Jack cheese, or fine-quality mozzarella, cut in 1-in (2.5-cm) cubes
⅛ lb (65 g) prosciutto, thinly sliced and cut into strips
With a knife, cut off the top of each pepper. Using a melon baller or very small spoon, scoop out the seeds and pepper membranes.
In a saucepan, bring the wine to a boil. Add the peppers in two batches, poaching each batch for 1 minute. Drain the peppers cut side down on a paper towel.
Take a piece of cheese, wrap a tiny strip of prosciutto around it, and stuff it into a pepper. Repeat the process until all the peppers are stuffed. Place them on a platter and serve. Serves 6.
deep-fried squash blossoms with chili cream
This recipe is from Michael Isles, chef-instructor. I worked with Michael when he was the chef at Mudd’s Restaurant in San Ramon, California. The following Southwestern-style appetizer was a big hit with the patrons. The sauce can be used with other cooked vegetables, and served over grilled fish or poultry.
For the chili cream:
8 mild green ‘Anaheim’ chilies
1 red bell pepper
2 cups (500 ml) chicken stock
¼ cup (65 ml) heavy cream
Juice from ½ lime
Salt and pepper
For the squash blossoms:
12 squash blossoms
2 oz (65 g) pine nuts, chopped (about ½ cup)
4 oz (125 g) goat cheese
8 oz (250 g) natural cream cheese
2-in (5-cm) sprig fresh oregano, minced
⅛ teaspoon salt
⅛ teaspoon freshly ground black pepper
Flour for dredging
1 egg
½ cup (45 g) dried breadcrumbs
Peanut oil for frying
Garnish: fresh cilantro
To make the chili cream: Preheat the oven to 375°F (190°C). Roast the chilies and the bell pepper for 20 to 25 minutes. Place them in a paper bag to cool. Peel and seed the chilies and set them aside. Separately, peel and seed the bell pepper, dice, and set aside.
In a saucepan, bring the chicken stock to a boil. Add the roasted chilies, and simmer to reduce the liquid by one-quarter, stirring occasionally. Purée the mixture in a blender for about 45 seconds. Add the cream, the diced bell pepper, and lime juice to the purée. Season with salt and pepper to taste and set the cream aside.
To make the squash blossoms: Carefully examine the squash blossoms for critters and rinse out any you find. Remove the stamens because they could be bitter. In a dry cast-iron frying pan, toast the pine nuts over medium heat until barely golden, stirring to prevent burning.
In a small bowl, mix the cheeses, pine nuts, oregano, salt, and pepper. Fill a pastry bag with this mixture. One at a time, gently open the flowers and fill them with the cheese, leaving enough petal length to close the flower tightly.
Once all the blossoms are filled and closed, dredge each one lightly in the flour. In a small bowl, combine the egg with ¼ cup (65 ml) of water and mix them lightly. Dip the stuffed blossoms in the egg mixture, then drain and roll in enough breadcrumbs to coat them evenly, shaking off the excess.
Preheat the oven to 200°F (95°C). Using a large frying pan, pour in enough oil to cover the bottom to 2 inches (5 cm) deep. Heat the oil to 375°F (190°C) on a deep-frying thermometer. Deep-fry the stuffed blossoms a few at a time until they are golden brown. As they are done, drain each for a few minutes on a paper towel, then place them on a plate and put them in the oven to keep warm.
To serve, divide the cream sauce equally between 4 serving plates. Arrange 3 blossoms on each plate, garnish with cilantro, and serve immediately. Serves 4.
gudi’s potato pancakes with chives
In some parts of Germany these pancakes are made with grated onions. Here Gudi Riter, my kitchen assistant, used chives for a milder flavor and for their lovely green snippets of color. In Germany these pancakes are traditionally served with applesauce for a brunch or lunch. They are best eaten immediately out of the pan, when they are still hot and crisp.
2 lbs (1 kg) Yukon Gold or Yellow Fins potatoes, peeled
1 medium onion, peeled
½ cup (25 g) snipped fresh chives
2 eggs
3 tablespoons all-purpose flour
1 teaspoon salt
Freshly ground pepper and nutmeg
Vegetable oil
Garnish: chive blossoms
Finely grate the potatoes. (The best texture is achieved by using the second-smallest grater on a four-sided hand grater. The opening is less than ⅛ inch/3 mm.) When grated, the potatoes will almost have the consistency of paste. Place the grated potatoes in a fine sieve or cheesecloth for about 15 minutes, to allow as much liquid as possible to drain. Squeeze the potatoes with your hands to extract more moisture if the mixture is still runny. (Some potatoes have more liquid than others.) When dry enough, the potato paste will more or less form a loose ball. Grate the onion using the same grater size.
In a mixing bowl, mix well the potato paste, grated onion, chives, and eggs. Add the flour, salt, pepper, and nutmeg to taste, and mix again.
In a large frying pan, add enough oil to cover the bottom of the pan to a depth of about ⅛ inch (3 mm). Heat the oil over medium heat. With a tablespoon, put a generous dollop of batter into the pan and flatten it with the back of the spoon to about the size of the palm of your hand. Fry the pancakes, three or four at a time until golden brown on both sides (approximately 3 minutes per side). Remove the potato pancakes from the pan and drain them on paper towels. Serve immediately with a garnish of chive blossoms. Makes 12 to 14 small pancakes. Serves 2 or 3 as a side dish, more as an appetizer.

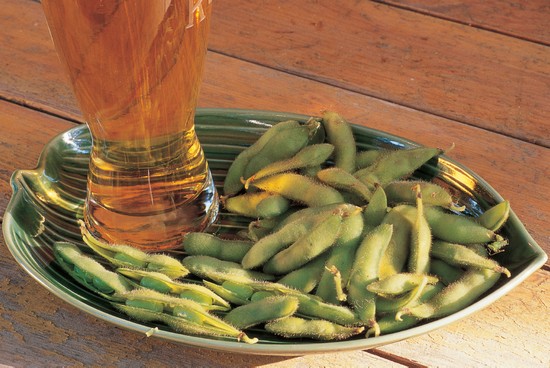
This recipe was suggested to me by June Tachibana, who sells fresh soybeans at the Palo Alto farmers’ market. She says this traditional Japanese snack is often enjoyed with beer. Salt helps keep the soybeans bright green.
2 tablespoons salt
½ lb (250 g) fresh green soybeans, pods on
Pour 2 quarts (2 liters) of water in a large saucepan and bring it to a boil. Add the salt and stir to dissolve. Add the soybeans and boil them for 4 to 6 minutes until the beans are tender and still firm but not mushy. Drain the beans in a colander. Put the beans in a bowl and serve. Have snackers peel their own beans and provide them with an extra bowl for the empty pods. Serves 2 as a snack.
mozzarella marinated with garlic, dried tomatoes, and basil
Arrive at a party with this lovely treat or serve it as an appetizer with focaccia or as part of an antipasto. Once the cheese and tomatoes have marinated, use the richly flavored olive oil for dressings or serve it with rustic bread for dipping. These mozzarella balls will keep in the refrigerator for about a week.
1 cup (55 g) dried tomatoes (see page 32)
¾ lb (340 g) fresh 1-in (2.5-cm) mozzarella balls
8 garlic cloves, minced, divided
1 teaspoon chopped fresh thyme, divided
1 teaspoon chopped fresh marjoram, divided
1 teaspoon whole green peppercorns or capers, divided
½ teaspoon salt, divided
¼ teaspoon freshly ground black pepper, divided
Approximately 1¼ cups (315 ml) extra-virgin olive oil
In a small bowl, pour 1 cup (250 ml) of boiling water over the dried tomatoes and let them sit for at least 15 minutes, or until they’re soft. Drain them and set them aside.
Remove the mozzarella balls from the brine and drain them.
In a quart jar with a lid, layer half the tomatoes on the bottom, then make a layer using half the garlic, herbs, and seasonings. Layer all the mozzarella balls next. Make a top layer of the remaining tomatoes, then the remaining garlic, herbs, and seasonings. Pour the olive oil over the final layer, making sure to cover all the ingredients. Refrigerate to marinate for at least 24 hours. Makes 1 quart (1 liter).
stuffed zucchini blossoms with goat cheese
You can’t get too many zucchini blossom recipes and this elegant Italian-style appetizer takes advantage of the midsummer zucchini explosion.
3 tablespoons extra-virgin olive oil, divided
1 medium onion, chopped
2 garlic cloves, minced
1 medium red bell pepper, roasted, seeded, and chopped
8 large paste tomatoes (2 lbs/1 kg), peeled, seeded, and chopped
1 tablespoon tomato paste
1 teaspoon sugar
1 teaspoon balsamic vinegar
½ cup (125 ml) dry red wine
½ teaspoon chopped fresh thyme
¼ cup (10 g) fresh basil, chopped
Salt and freshly ground black pepper to taste
8 small zucchini with their blossoms
6 oz (170 g) creamy-style goat cheese
2 tablespoons fresh basil, chopped
Garnish: fresh thyme leaves or chopped basil
Start by preparing the sauce. In a large saucepan heat 2 tablespoons of the olive oil and sauté the onions over medium heat until tender, about 7 minutes. Add the garlic cloves and sauté 4 minutes, or until they are soft but not brown. Add the bell pepper, tomatoes, tomato paste, sugar, and balsamic vinegar and simmer over low heat for about 45 minutes, or until the sauce is fairly thick, stirring occasionally. Add the wine, thyme, and basil and cook the sauce for 10 more minutes over medium heat. Press the sauce through a coarse sieve. You should have approximately 2 cups (500 ml) of sauce. Return the sauce to the saucepan, season it with salt and pepper, and set it aside.
Preheat the oven to 350°F (175°C). Carefully examine the zucchini blossoms for insects and remove the stamens and pistils. In a small bowl blend the goat cheese with 2 tablespoons of the basil. Fill each blossom with a scant tablespoon of the cheese. Try not to overstuff the blossoms or the cheese will ooze out as it cooks. Brush the bottom of a baking dish with 1 teaspoon of olive oil. Place the zucchini into the dish and drizzle them with the remaining olive oil. Bake them for 15 to 20 minutes, or until they are al dente and starting to brown, and the cheese has melted.
Warm the sauce and divide it equally among the plates. Spread the sauce to create a small pool on each plate and place the stuffed zucchini in the middle of the sauce. Garnish with the herbs and serve. Serves 8 as an appetizer, 4 as a side dish.
esquites (spicy corn kernels)
Kit Anderson bought this snacklike dish from a street vendor in Chapingo, Mexico, when she was visiting Professor Garrison Wilkes, a geneticist specializing in preserving corn varieties. She liked it so much we asked Professor Wilkes to track down the recipe. Esquites can be made with either field corn picked at the milk stage or with fresh, ripe sweet corn. In some versions, the corn is not fried in oil first, as it is here. Vendors sell it in cups with a spoon. See page 83 for tips on removing corn kernels from the cob.
¾ cup (190 ml) oil or lard
1 medium onion, chopped
4½ lbs (2.2 kg) corn kernels cut off the cobs
optional: ½ lb (250 g) longaniza sausage (found in Asian markets; substitute linguica)
2 to 5 serrano peppers, finely chopped, to taste
8 tomatillos, quartered
Half a handful epazote, chopped
1 to 2 tablespoons salt
Heat oil or lard in a large, heavy pot and sauté the onion. Add the corn, sausage, and chilies and fry over medium heat, stirring occasionally, until corn is slightly browned. Add the remaining ingredients and enough water to moisten slightly, cover, and simmer until corn is tender, 10 to 15 minutes. Makes enough for a fiesta.
Note: Epazote is a pungent herb shaped like a goosefoot, one of its common names. It is widely used in cooking in central and southern Mexico and the Yucatán. For aficionados, epazote is addictive and is indispensable in a bowl of black beans. While easily grown, it is sometimes difficult to find epazote in markets. It can be substituted with a combination of cilantro and lemongrass in many recipes.
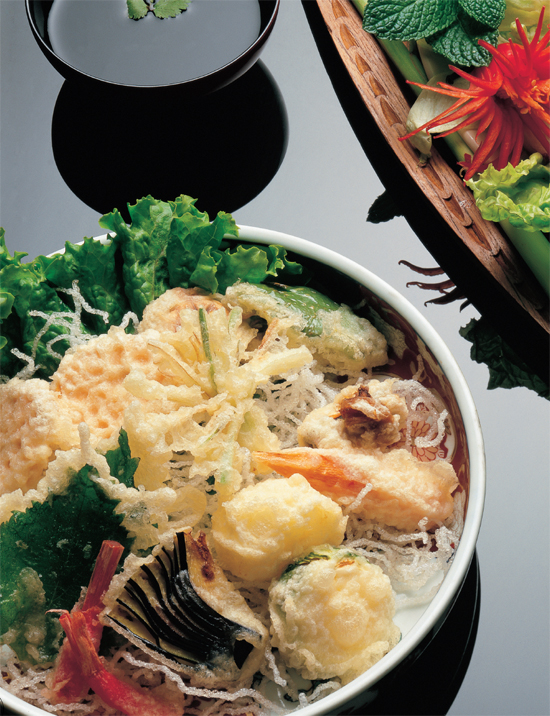
Tempura is a classic Japanese presentation and when done well is delightfully light and crunchy. Unlike most Japanese dishes, this is a meal that should be served piping hot. I’ve listed some of my favorite vegetables for tempura. Other vegetables, such as broccoli, yard-long beans, bell peppers, bamboo shoots, daikon radishes, and snow peas can also be used.
You will need a heavy deep pot for frying; a slotted spoon for lifting the fried foods out of the oil; a platter lined with paper towels to drain the fried vegetables; and a pair of long, wooden chopsticks (called cooking chopsticks) to dip the vegetables in the batter.
For the batter:
1 egg yolk
1 cup (250 ml) ice water
1 to 1 ¼ cups (100–120 g) sifted cake flour
1 pinch baking soda
For the tempura vegetables:
1 thin Japanese eggplant, sliced ⅛ in (3 mm) thick
1 carrot, sliced into thin coins on the oblique
1 zucchini, sliced ¼ in (6 mm) thick on the oblique
½ sweet potato, peeled and sliced about ⅛ in (3 mm) thick
8 fresh, small button mushrooms
8 slices of winter squash, peeled and sliced about ⅛ in (3 mm) thick
Perilla leaves
Shungiku leaves (optional—see page 181 for more information)
For the dipping sauce:
1 cup (250 ml) commercial dashi (or make your own)
3 tablespoons soy sauce
3 tablespoons mirin
Pinch of salt
For the condiments:
½ cup (30 g) peeled, grated white daikon radish
2 teaspoons grated fresh ginger root
Lemon wedges
To make the batter: With a fork, combine the egg yolk with the ice water in a small bowl. The batter should be the texture of heavy cream, just thick enough to coat the vegetables. Just before frying the vegetables, stir in the flour and the baking soda, beating just long enough to combine without overworking the batter.
To make the tempura: The key to good tempura is as follows: use only fresh vegetable oil.
The oil should be at least 3 inches (8 cm) deep. The ideal frying temperature for vegetables is 320 to 340°F (160–170°C). To test, drop a bit of batter into the oil. It should drop to the bottom and then rise slowly to the surface. Be careful not to overheat the oil; if the oil smokes, it is too hot. Do not crowd the pot; for best results less than half the oil surface should be covered with vegetable pieces. Have all your ingredients at hand and arranged in the order that you will use them.
Preheat the oven to warm, about 200°F (95°C). To cook, coat each vegetable piece with the batter and fry for 1 minute. With the chopsticks turn the pieces and fry for another minute until the pieces are golden and puff up. Drain the vegetables on the paper towels and skim crumbs from the oil using a metal slotted spoon. Place the vegetable slices on a warm platter and keep them in the oven until you are done, or better yet, serve each piece to your guests as it comes out of the oil. Repeat the process with the other vegetables.
To serve the tempura: Make the sauce by heating the dashi, and then stirring in the soy sauce, mirin, and salt. As is traditionally done in Japan, provide each diner with a shallow bowl of the warm dipping sauce, to which they can add grated daikon and ginger to taste. Serve the tempura accompanied by the lemon wedges. Serves 4.
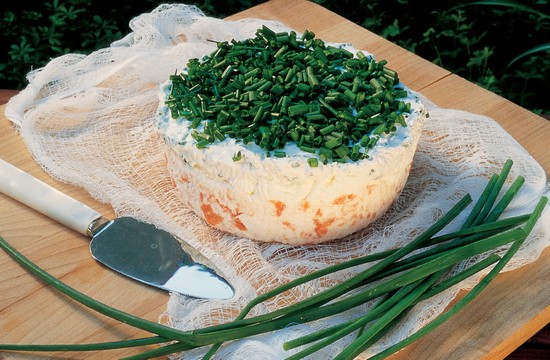
salmon, cream cheese, and chive torta
This stylish dish is great for a Sunday brunch served with bagels or as part of a buffet accompanied by crusty bread. The final flavor and texture of the dish depend on using good natural cream cheese, with no added gums, and choosing flavorful smoked salmon.
1 lb (500 g) natural cream cheese
½ cup (25 g) plus 2 tablespoons snipped fresh chives
½ cup (70 g) finely chopped smoked Alaska wild salmon
In a small bowl, crumble half of the cream cheese, add ½ cup (25 g) of the chives, and mix together with a fork. If necessary, add a few teaspoons of water to hold the mixture together and make it spreadable. Do not make it too soft, or the torta will not hold its shape.
To shape the torta, drape a small piece of cheesecloth to line a 2½- to 3-cup (625-to 750-ml) mold or straight-sided bowl. With a rubber spatula, form the bottom layer by spreading the chive and cream cheese mixture in the bottom of the mold, smoothing it out and filling any air holes.
In another bowl, crumble the remaining cream cheese and work in the salmon by repeating the procedure just outlined. Spread the salmon mixture on top of the chive mixture.
To unmold the torta, place a small serving plate facedown on top of the mold, making sure the cheesecloth is free of the plate and that the mold is centered on the plate. Hold the plate tightly against the top of the torta and turn the mold over. Lift off the mold and gently peel off the cheesecloth. To garnish, sprinkle the remaining 2 tablespoons of chives over the top. Serves 6 to 8.
Note: The best way to cut chives is to snip them with scissors. If you have extra chopped chives put them in a small self-sealing freezer bag and freeze them. They can be added directly to marinades and cooked dishes in the winter and won’t need defrosting.
This traditional flaky Greek dish has been the star at many a party. If your filo dough is frozen, defrost it overnight in the refrigerator. Remove the filo dough from the refrigerator at least 3 hours before preparing the strudel.
2 lbs (1 kg) fresh spinach
⅓ cup (75 g) salted butter
1½ cups (230 g) finely chopped onions
5 eggs, slightly beaten
1 lb (500 g) feta cheese
1 cup (25 g) chopped fresh dill
¼ cup (10 g) chopped fresh Italian parsley
¼ teaspoon freshly ground black pepper
2 to 3 cups (4–6 sticks/460–675 g) unsalted butter
3 one-lb (500-g) packages of filo (strudel) dough
To prepare the filling: Wash the spinach well in two or three changes of water. Put 1 inch (2.5 mm) of water in the bottom of a steamer and bring it to a boil. Steam half the spinach until just wilted, remove, and put in a large bowl. Repeat this procedure with the rest of the spinach. Cool the spinach and by hand squeeze out most of the liquid, then coarsely chop.
Melt the salted butter in a frying pan over low heat. Add the onions and slowly cook until translucent, about 10 minutes. Add the onions to the spinach. Cool. Add the eggs, feta cheese, dill, parsley, and pepper and mix well. Chill for 30 minutes. If liquid collects, drain the mixture.
To assemble the pastries: Have on hand three cookie sheets, a damp, clean dish towel, and a pastry brush. In the microwave oven, melt the unsalted butter in a small bowl. When working with filo dough, never let it dry out. Cover it with a barely damp dish towel.
Lay one sheet of filo dough on a clean surface and lightly paint a thin layer of melted butter on it. Lay another sheet on top, repeating this process until you have created four layers. Paint the top layer with butter. Cut strips approximately 3 inches (8 cm) wide, cutting across the width (shortest dimension) of the layered filo. Place approximately 1½ teaspoons of spinach filling 1 inch (2.5 cm) in from the end of one strip. Fold a corner of the strip diagonally over the filling to form a triangle, then fold the triangle over itself all the way to the end, just as you would fold a flag. Brush it with butter and place it on a cookie sheet. (Your first few pastries will probably be uneven, but you’ll soon perfect the technique.) Repeat with the remaining strips. Continue the layering procedure with the rest of the filo dough. Any leftover filling can be used to fill an omelet. (Pastries can be frozen at this point. Put them in the freezer on a cookie sheet lined with waxed paper. When they’re completely frozen, transfer them to plastic freezer bags.)
Preheat the oven to 350°F (175°C). Bake for about 35 minutes, or until golden brown. Serve warm. Makes about 60 (3-in/8-cm) pastries.