Windows Universal apps is a hot topic for Windows developers all over the world. With the release of Windows 8, Microsoft took a huge leap from targeting the desktop and laptop computers almost exclusively toward becoming a real player on the market for tablet PCs and smart phones. Windows 8 shipped with a new API for developing apps and a Windows Store that allows users to download apps in a secure and predictable way. With Windows 10 and the Universal Windows Platform (UWP), Microsoft has taken app productivity to the next level by introducing Universal apps. These apps can target all Windows platforms, from phones over Xbox to the Windows desktop.
Getting Started
Writing Universal apps requires a few initial steps before you can get going. In the previous version of Visual Studio, you were required to get a Windows 8 Developer License that should be renewed quite often. For Windows 10, this is no longer needed for development, though you still need a store account to be able to publish the app. While developing the app, you can simply register your Windows 10 device for development.
Before you can start working on Windows Universal apps, you must enable development on your device and, unless they're already installed, you must install Universal Windows App Development Tools.
If you are using Visual Studio Express for Windows 10, or if you open a solution to create a Windows Universal app in another version of Visual Studio, you will get prompted to enable Developer Mode with the dialog shown in Figure 23.1. When you see this dialog, click the link “settings for developers,” select the “Developer Mode” option, and then click yes to the warning that you are selecting a less secure option.
You may not have the Universal Windows App Development Tools installed. This comes automatically with some versions of Visual Studio, but if you don't have it, then simply open the New projects dialog Visual C# Windows Universal, and you should see a link to the installer. Click this link to install the tools.
Universal Apps
Windows Universal Apps are apps that can target multiple device types. Traditional applications, like the WPF desktop game you wrote earlier in this book, target a single device type, such as a PC. With the introduction of the Universal Windows Platform, Microsoft has made it possible to write a single app that is able to run on multiple devices, and much effort has been put into making development of this kind of app a pleasant experience for the developer.
The primary challenges of developing apps that work on a large set of heterogeneous devices are that you can't know in advance how large the screen is or how the user will interact with the device. If you simply scrunch the Karli Card WPF application from earlier in the book to the screen size of a phone, it will look terrible on even the largest of phones. Another aspect of this is that phone users will expect your app to be able to adjust its orientation on the screen. In this chapter we will introduce the concepts of responsive UI and adaptive triggers to solve these problems.
Universal Apps are deployed through the Windows Store, and this presents its own set of challenges for packaging the app. In order to get your app onto the store, you must undergo a fairly rigorous testing process and pass a number of requirements set by Microsoft. In the final part of this chapter we will examine this process so that you are ready to publish your own apps.
App Concepts and Design
There are great differences in how applications display themselves on a phone and on the Windows Desktop. The design of applications running on the Windows Desktop is largely unchanged, albeit with much better graphics, since the introduction of Windows 95. The design features a window with a caption bar, three buttons in the top-right to maximize, minimize, and close the application and buttons, radio-buttons, check-boxes, and so on to display content. The generation of apps that was introduced with Windows 8 does things a little differently. They are designed to work with touch rather than mouse and keyboard, may or may not have a caption bar, and can swivel to fit the orientation of the device they are running on, just to mention a few differences.
When Microsoft launched Windows 8, they also released a fairly substantial design guide for apps, and you should be aware of this guide, even if you don't have to stick to it at all times. Even though apps will run on a diverse set of devices, they have a number of common traits that you should be aware of, so let's take a look at some of them and compare how Windows Store apps match up against desktop applications.
Screen Orientation
All Windows applications should be able to resize themselves gracefully. One aspect that is particularly important is the fact that handheld devices can move in three dimensions. Your users will expect your app to move with the orientation of the screen. So, if the user flips her tablet around, your app should follow the movement.
Menus and Toolbars
Classic desktop apps use menus and toolbars for navigation between views. Universal apps can do so as well, but they are more likely to use toolbars than menus. Desktop apps usually display the visual components of the menu and toolbar all the time, but Universal apps will often choose not to do so to save precious real-estate on the smaller screen.
Rather than forcing your users to look at the complexity of your app through the menu, the app style presents the application to the users, and they can activate the menu when needed. When the menu is displayed, it should be simple, containing only the main options. It is up to you to decide where and when to display the menu.
Tiles and Badges
Windows uses something called live tiles to display the apps on the Start menu and page. The “live” part of the name springs from the fact that the tiles can change based on the current content or state of the app. For example, you will see photo apps rotating through your pictures on the Start page, mail clients displaying the number of unread mails, games displaying screenshots from the last save, and so on. The possibilities are virtually endless.
Providing a good tile for your application is more important than providing a good icon for a desktop application, and that's pretty important as well. Tiles are embedded in the manifest for the application, and, as you will see later in the chapter, they are easy to include using Visual Studio.
A badge is a small version of the tile that Windows can use on the Lock Screen and in other situations. You don't have to provide a badge for your app unless it will show notifications on the Lock Screen.
App Lifetime
Classic Windows Desktop applications can be closed by clicking a button in the top-right corner of the caption bar, but Universal apps don't normally display a caption bar, so how do you close them? Generally speaking, you don't need to close an app. Whenever a Universal app loses focus, it is suspended and will stop using processor resources entirely. This allows many apps to appear to be running at the same time, when in fact they are just suspended. The suspension happens automatically in Windows as soon as an app loses focus. It's not really something that you notice as a user, but it is a very important fact to know and handle as an app developer.
Lock Screen Apps
Some apps should keep running when they lose focus. Examples of this kind of app include GPS navigation and audio-streaming apps. Users expect these types of apps to continue running even if they start driving or begin using other apps. If your app needs to keep running in the background, you must declare it as a Lock Screen app and provide information to display notifications on the Lock Screen.
App Development
When you start developing Windows Universal apps, you have a number of options regarding programming and UI language. This book uses C# and XAML, but other possibilities include using JavaScript and HTML5, C++ and DirectX, or Visual Basic and XAML.
The XAML that is used to create the user interfaces of the Universal apps is not entirely identical to the XAML used by WPF, but it is close enough that you should feel comfortable working with it. Many of the controls you are familiar with exist for Universal apps as well, though they tend to look slightly differently than their Windows Desktop counterparts. There are also a number of controls that are optimized to touch.
Adaptive Displays
Adaptive displays are displays that are able to change in response to user actions such as a phone being flipped on its side or the window changing size. Your app should be able to gracefully switch from portrait to landscape mode when the user flips her phone on the side and should work and look good regardless of whether it is deployed on a laptop or on a phone.
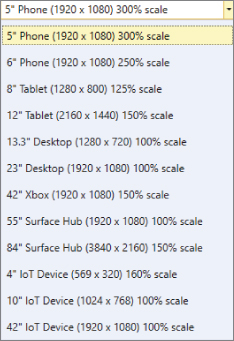
The first thing you will notice when you create a new Windows Universal app project is that the page displayed in the designer looks rather small. This is because this project defaults to a view that is optimized for a 5" phone display. You can change this using the Device Preview panel shown in Figure 23.2. You can also use this panel to change the layout from portrait to landscape.
A well-behaved app is able to display itself well in many if not all of the form-factors shown in the Device Preview panel. Considering that the range in this list is anything from a 569×320 pixels Internet of Things (IoT) device to a 3840×2160 pixels Surface Hub, this is a daunting task. Happily, you will be aided by Visual Studio and the Universal Windows Platform framework. When you change the resolution (or screen size) from the drop-down, Visual Studio will resize your application, and you will immediately be able to see what the page looks like. In addition to that, controls that assist in creating an adaptive design for the application are included in the toolbox, and you can take advantage of them to easily create UIs that will transform nicely.
Relative Panel
In Chapters 14 and 15 you used Grid and StackPanels controls to create a UI that worked well on a static display. But in a world where you must target many display sizes, you want something that will be better able to move the controls around for you. Enter the RelativePanel control.
The relative panel allows you to specify how controls should be positioned relative to one another. As you would expect, you can position controls to the left, right, above, or below other controls, but you can also do a few other nice tricks. It is possible to place a control in relation to the left, right, or center of another, both horizontally and vertically, and align the edges of the controls with the edges of the panel. This means no more fiddling with pixels to get two controls to line up perfectly on the display.
Adaptive Triggers
Adaptive triggers are new to the Visual State Manager. Using these triggers you can change the layout of your application based on the size of the display. When combined with a relative panel, this is a very potent feature that in a fairly straightforward manner lets you build what the web-world refers to as responsive UIs and Microsoft calls adaptive displays.
FlipView
The FlipView is a nice little control that works very well with handheld devices. It allows the user to swipe left or right to display some content. It is often used to display images one at a time and allows the user to use the swipe gesture to move between the images.
By default, the FlipView allows the user to swipe left or right to move the content in view, but this can be changed to move up or down. When a mouse is used, the scroll button will work as well.
Sandboxed Apps
At this point, it is worth taking a step back and looking at some of the limitations of the .NET framework for the Windows Universal Platform. Apps running on mobile devices have limited access to the OS on which they run, and this means that there are types of applications that you simply cannot write. If you require direct access to the file system to access Windows system files, for instance, you must write a classic Windows desktop application.
When you are writing Universal apps in C#, you will find that the limiting factor is in the .NET Framework that is referenced from your application, where common namespaces and classes are missing entirely or have fewer methods available than before. If you open Visual Studio, create a new Blank app, and then expand the References node, you will see that the references are very different from those for Windows Desktop Apps. There are three ApplicationInsights references, each of which allows you to monitor various aspects of your app, and two references to .NET and Windows. The first of the latter is a changed version of .NET and the second is the Windows Core API. At this point you might expect that you could simply change the references to use the normal .NET Framework, and indeed this will work. That is, it will work right up to the point when you try to publish your app to the Windows Store, at which point it will be rejected for non-compliance with the specifications.
The sandboxed nature of the Windows Universal Apps, and the process they must go through before they are admitted into the Windows Store, means that the users should rarely have to fear downloading malicious apps through the store. Obviously, there are people who will try to circumvent this, and users should never let their guard down; however, it is considerably harder to place malicious programs on Windows computers through Windows Store apps than it is through normal download and installation.
Disk Access
Desktop applications can access the disk pretty much as they like, with a few exceptions. One such exception is that they are normally prohibited from writing to the Program Files folder and other system folders. Windows Universal Apps can access only a few very specific locations on disk directly. These locations include the folder in which the app is installed, the AppData folder associated with the app, and a few special folders such as the Documents folder. Access to the files and folders have also been moved in the .NET Framework for Universal apps to make sure that the developer can't accidentally write to a forbidden location.
In order to allow the user control over where files should be stored and read from in your app, Windows provides you with three File Picker contracts: FolderOpenPicker, FileOpenPicker, and FileSavePicker. These picker classes can be used from your app to gain secure access to the local disk.
As you saw earlier, you can also use the KnownFolders class to access resources on a device. You should use the KnownFolders class when you want to read or write to locations that the user must grant access to for the app to be able to open them.
Serialization, Streams, and Async Programming
In Chapter 14, you used the [Serializable] attribute to allow classes to be serialized. .NET for Universal apps do not include this attribute, but you can use a similar attribute called [DataContract] instead. The DataContract attribute works with the DataContractSerializer class to serialize the content of a class. In order to get the serialized content to or from disk, you need to use some file access types, but unlike with normal .NET, you can't create these directly. Instead, you use file pickers to create the stream objects, which you can use with DataContractSerializer to save and load your files.
The next Try It Out demonstrates using DataContractSerializator with streams created by FileOpenPicker and FileSavePicker to load and save XML representations of a data model.
Navigation between Pages
Navigating between pages within an app is similar to how web applications navigate. You can call the method Navigate to go from one page to another; you can go back by calling the Back method. The following Try It Out demonstrates how to move between pages in an app using three basic pages.
The CommandBar Control
A CommandBar provides the users with much the same functionality that a tool bar provides in desktop applications, but you should keep them much simpler, usually limiting the available options to fewer than eight items in a bar.
You can display more than one CommandBar at a time, but keep in mind that this clutters up the user interface, and you should not display more than one bar just to show more options. On the other hand, if you want to provide more than one kind of navigation, it is sometimes beneficial to show a top and bottom bar at the same time.
Visual Studio ships with the CommandBar control, which makes it very easy to create this kind of control. The following Try It Out creates an App Bar with a number of standard items on it.
Managing State
Unlike a desktop application, an app must expect to be suspended at any time. This happens when the user switches to another app or to the desktop, so it's a very common scenario that must be handled by all apps. When an app is suspended, Windows will save the values of your variables and data structures and restore them when the app resumes. However, your app may have been suspended for an extended period of time, so if you have data that changes over time, such as a news feed, then you should refresh this when the app is restored.
When the app is suspended, you should also consider saving any data that should persist between invocations of the app, as you will not get a chance to do so if the app is subsequently terminated by Windows or the user.
When your app is about to be suspended, a Suspending event is sent, which you should handle. When the app is returned to life, it will receive a Resuming event. By handling these two events and saving the state of the application, you can return the app to the state it was in before the suspension, and the user shouldn't notice anything.
Common Elements of Windows Store Apps
All Windows Store apps should provide their own Tiles and Badges. Tiles give your app presence on the Start page in Windows and allow you to display information about the app. Badges allow Windows to display a small image that represents your app on the Lock Screen.
Tiles are important because users tend to be fickle and are inclined to make decisions based on how well an app presents itself. Also, a tile should be easily identifiable; if you make your users search for a tile that disappears in the other tiles, they're unlikely to be in a good mood by the time that they finally locate it.
There are many possible tile sizes in Windows Store apps and if your app is targeting many different display sizes, you should supply tailored tiles for all the suggested sizes, or at the very least provide tiles that scale well. If you don't provide a tile of the right size, Windows will scale what you do supply to the correct size and this will often look bad. So, for a professional app, make sure you tailor make tiles for every expected tile size.
Badges are smaller than the tiles (24 × 24 pixels) and are used when Windows displays the app on the Lock Screen. If you set a badge image for your app, you must also enable Lock Screen notifications. Badges can also be scaled, so provide all the appropriate sizes.
Splash screens are displayed while the app loads; and since that should take only a moment or two, they should not be too complex or provide any kind of information to the users, except for clearly identifying which app is currently starting. Splash screens are exactly 620 × 300 pixels, but you can make them smaller by making parts of the image transparent. And once again, scaled versions should be supplied.
Finally, you should supply a “Store Logo” of exactly 50 × 50 pixels and of course the scaled versions of it.
Tiles, badges, and logos are embedded in the apps package manifest, which can be edited easily in the Visual Studio Manifest Package editor. If you have downloaded the code for this book, you can use the tiles and badge supplied with the code (in the Assets folder), but otherwise you can quickly create the images in Paint or in a similar application.
The Windows Store
After you create your app, you will probably want to distribute it to the public, and the way to do this is to use the Windows Store. Microsoft has gone to great lengths to create a store that is secure and lets Windows users download apps from it without too much fear of downloading malicious code. Unfortunately, this means you must endure a lengthy process to get your app in the store.
Packaging an App
You have already seen some of the contents of the package.appxmanifest file when you had to specify the Picture Viewer required access to the Pictures Library and when adding Tiles to the app. When you are ready to package your app for the App Store, you must return to this file and set a number of other values.
Before you package your app, you should go through each of the six tabs for configuring the package.appxmanifest and consider every option you have:
Application: Name your app well! Along with the store logo, this is probably the very first thing your potential users see about your app, so naming it something generic is not effective. Try to pick an interesting name that also indicates the purpose of the app.
Visual Assets: In the last example you added tiles to the app. You should ensure that there is at least one image for every category on the Visual Assets tab.
Capabilities: On this tab you specify which capabilities your app requires. Be warned that users will view your app suspiciously if it requires capabilities that don't appear reasonable. For instance, if you require access to the chat messages on the device, there had better be a good reason; otherwise it is likely that this will be seen as a potential breach of privacy. Most apps shouldn't require more than a few capabilities, but you must pick all that you use. If you don't accurately specify what you need, then the app will receive an access denied exception when it tries to access the resource.
Declarations: On the Declarations tab, you can register the app as a provider of services. For instance, if your app works as a search provider, then you can add this declaration to the app and specify the required properties.
Content URIs: If your app navigates to a remote page, it will have limited access to the system. You can use Content URIs to give a web page access to geo-location devices and the clipboard.
Packaging: On this tab you can set the properties of the package, including the name of the developer/publisher, the version of the app, and the certificate used to sign the package.
Creating the Package
Once you have specified all you need in the appxmanifest, you are ready to package your app. You can do this directly from Visual Studio by selecting Store Create App Packages. This will launch the Create App Packages wizard. A few steps into the wizard you will be required to log in with a store account. If you don't have one, you must create one. You must have a store account to be able to publish to the app store and to be able to get paid for your app.
At some point during the wizard, you will be shown the Select and Configure Packages page. On this, it is important to select all three of the target architectures (x86, x64, and ARM) to allow the app to be deployed to the widest range of devices.
On the final page you will be given options on how to validate that your app can be submitted to the app store. Launch the Windows App Certification Kit and learn if your app is ready to be submitted. If any problems are detected, you must fix them and go through the Create App Packages wizard again. If your app passes inspection, you can upload the package.
What You Learned in This Chapter
Key Concept
Description
Windows Universal App XAML
Windows Universal app XAML is used with C# to create the GUI for Windows Universal apps. It includes many of the same controls that you know from WPF, but some have changed, others are missing, and new controls have been introduced.
Visual State manager
You saw how to use a Visual State manager to change the look of your controls and pages simply by changing the visual state of the control. This leads to a lot less code in exchange for slightly more complex XAML.
App State
Windows Universal apps are suspended when the user switches to another app or to the desktop, so it's important to handle this suspension and save the app state when it happens.
App store account
This account is used for deploying apps to the Windows Store.
Navigation
Navigation in Windows Universal apps is done in much the same way that it is in web applications, using method calls to move back and forth in the page structure.

 What You Learned in This Chapter