Beyond the Basics

Linked Crochet

Working linked crochet will make you feel like a crochet wizard. You work a new stitch in the horizontal bars of the previous stitch, in a sort of mini Tunisian method. When you get to the end of the row of linked double crochet (shown here)—presto! You’ve made, in effect, two rows of single crochet. Linked crochet is a lot drapier than single crochet, without the bulk. So you can make light spring garments. Because the stitches are linked, there’s full coverage, without little peekaboo holes. And—no disrespect to our favorite basic stitch—it’s a lot more engaging than single crochet.

To make linked double crochet:

Working on a base row of stitches:

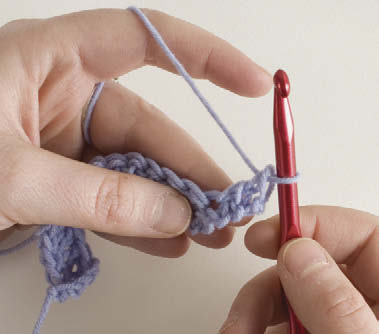
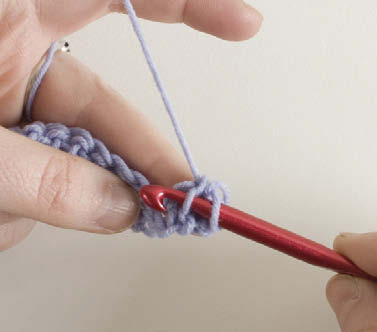
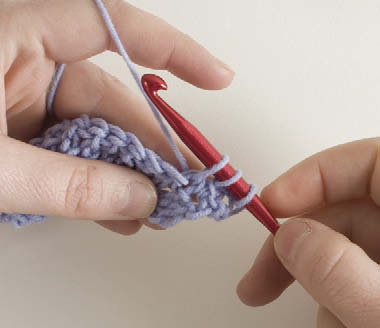
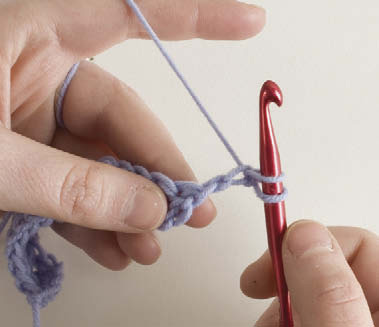
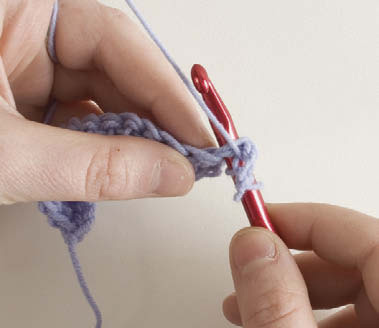
STEP 1: Ch 2, insert hook in second chain and draw up a loop (Figure 1), insert the hook in the stitch below as normal (Figure 2), [yarn over and draw through 2 loops] 2 times. First stitch completed (Figure 3).

Figure 1

Figure 1

Figure 2

Figure 2

Figure 3

Figure 3

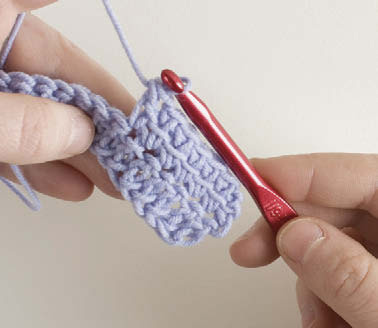
STEP 2: Insert hook in top horizontal bar of stitch just made (Figure 4) and draw up loop; insert hook in next stitch as usual and draw up loop (3 loops on hook; Figure 5), [yarn over and pull through 2 loops] 2 times.

Figure 4

Figure 4

Figure 5

Figure 5

Repeat Step 2 across (Figure 6).

Figure 6

Figure 6

Infinity Wrap

design by KRISTIN OMDAHL

Increases on one side of an infinity motif and decreases on the other side form the curves, with a section of working even in the middle. The self-striping yarn beautifully accentuates the directional geometry. A bobble-and-mesh edging is a playful alternative to fringe. This wrap is worked quite large and can be worn over a coat, as a coat, or even double as an exquisite throw.

Kathryn Martin

Finished Size

32" (81.5 cm) wide and 96" (244 cm) long.

Yarn

Chunky weight (#5 Bulky)

shown here: Plymouth Boku (95% wool, 5% silk; 99 yd [91 m]/1¾ oz [50 g];): #5 plum, 15 balls.

Hook

H/8 (5mm). Adjust hook size if necessary to obtain the correct gauge.

Notions

Yarn needle; stitch markers (m).

Gauge

12 dc and 6 rows = 4" (10 cm).

Download the diagrams for this project here.

Stitch Guide

5 dc Popcorn (5-dc pc): Ch 3 (counts as first dc), 4 dc in same st, remove hook from working lp, insert hook in 3rd ch of first dc in group just made, pick up working lp, draw lp through first dc to close, ch 1.

8 dc Cluster (dc8tog): [Yo, insert hook in next st, pull up a lp, yo and draw through 2 lps on hook] 8 times (9 lps on hook), yo, draw through all 9 lps on hook.

Motif

(make 5)

Ch 76.

ROW 1: 8 dc in 2nd ch from hook, dc in each of next 10 sts, [dc in next st, dc2tog (see Glossary) over next 2 sts, dc in each of next 5 sts] 8 times, turn—74 sts.

ROW 2: Ch 1, [dc in next 2 sts, dc2tog over next 2 sts, dc in each of next 3 sts] 8 times, dc in each of next 10 sts, 2 dc in each of next 8 sts, turn—74 sts.

ROW 3: Ch 1, [dc in next st, 2 dc in next st] 8 times, dc in each of next 10 sts, (dc in next st, dc2tog over next 2 sts, dc in each of next 3 sts) 8 times, turn—74 sts.

ROW 4: Ch 1, [dc in next st, dc2tog over next 2 sts, dc in each of next 2 sts] 8 times, dc in each of next 10 sts, [dc in each of next 2 sts, 2 dc in next st] 8 times, turn—74 sts.

ROW 5: Ch 1, [dc in each of next 3 sts, 2 dc in next st] 8 times, dc in each of next 10 sts, [dc2tog over next 2 sts, dc in each of next 2 sts] 8 times, turn—74 sts.

ROW 6: Ch 1, [dc2tog over next 2 sts, dc in next st] 8 times, dc in each of next 10 sts, [dc in each of next 3 sts, 2 dc in next st, dc in next st] 8 times, turn—74 sts.

ROW 7: Ch 1, [dc in each of next 3 sts, 2 dc in next st, dc in each of next 2 sts] 8 times, dc in each of next 10 sts, [dc2tog over next 2 sts] 8 times, turn—74 sts.

ROW 8: Ch 1, dc8tog (see Stitch Guide), dc in each of next 10 sts, [dc in each of next 5 sts, 2 dc in next st, dc in next st] 8 times, turn—75 sts. Fasten off.

Motif finishing

With yarn needle and yarn, close up motif as foll: Sk first 8 sts of Row 8 just worked, sew next 10 sts of Row 8 to row ends (see Figure 1, page 27) using mattress st (see Glossary). There should be 64 sts left on each side of motif. Mark the center point of side (see Figure 1).

Motif Joining

Side A

Join yarn with sl st at marked center of 64 sts (see Figure 1).

Figure 1. Sides A and B–Row 1 of Motif Joining Worked Across 1 Motif

ROW 1: Ch 1, *[dc2tog over next 2 sts, dc in next st] 3 times, dc in next st, [dc in next st, 2 dc in next st] 3 times, [2 dc in next st, dc in next st) 3 times, dc in next st, [dc in next st, dc2tog over next 2 sts] 3 times; working across top edge of each motif without fastening off, rep from * 9 more times, turn—320 sts.

ROWS 2–5: Rep Row 1.

ROW 6: Ch 3 (counts as dc), dc in each st across, turn—320 sts.

ROW 7: Ch 5 (counts as dc, ch 2), sk next 2 sts, *dc in next st, ch 2, sk next 2 sts; rep from * to last st, dc in last st, turn—107 ch-2 sps.

ROW 8: Ch 5, sk next ch-2 sp, dc in next dc, *ch2, sk next ch-2 sp, dc in next dc; rep from * across, turn.

ROWS 9–11: Rep Row 8 three times.

ROW 12: (See Figure 2.) Ch 1, sc in first dc, *ch 6 (counts as ch-3 and beg ch-3 of 5-dc pc), 5-dc pc (see Stitch Guide, page 26) in 3rd ch from hook, sl st blo in next 3 ch and in sc **, ch 2, sc in next dc, ch 2, sc in next dc; rep from * across, ending last rep at **, turn.

Figure 2. Reduced Sample of Sides A and B Pattern—Rows 6–12
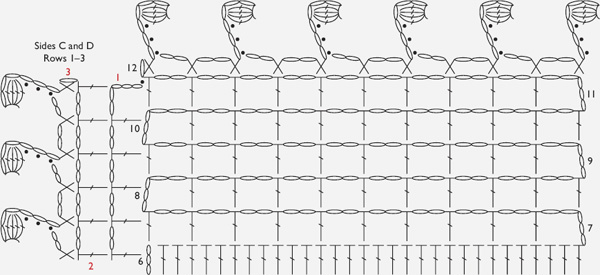
Rep Rows 1–12 for side B.

Finishing for Sides C and D

Along side C:

ROW 1: (See Figure 2.) Join yarn with sl st in last dc at corner, ch 5 (counts as dc, ch 2), dc in each dc along end of rows, *ch 2, dc in end of next dc row; rep from * across, turn.

ROW 2: Rep Row 7 from motif joining.

ROW 3: Rep Row 12 from motif joining. Fasten off.

Rep Rows 1–3 for side D.

Finishing

Weave in loose ends. Block to finished measurements.


Kristin Omdahl is a crochet and knit designer and author of Wrapped in Crochet, Crochet So Fine, and A Knitting Wrapsody, as well as the instructor on the DVD Innovative Crochet: Motifs (all from Interweave). See more of Kristin’s work at styledbykristin.com.
Alpine Frost Scarf

design by AMY O’NEILL HOUCK

With a simple shell pattern that evokes frost on a window, this merino lace scarf keeps away the chill. Easily alter the look by crocheting a wider or longer version.

Pamela Bethel

Finished Size

9" (23 cm) wide and 66" (168 cm) long after blocking.

Yarn

Sockweight (#1 Superfine)

shown here: Skacel Collection Merino Lace (100% merino wool; 1,375 yd [1,257 m]/3½ oz [100 g]; ): #36 off-white, 1 skein.

Hook

Size D/3 (3 mm). Adjust hook size if necessary to obtain the correct gauge.

Notions

Yarn needle.

Gauge

4½ reps and 14 rows = 4" (10 cm) in shell patt after blocking.

Stitch Guide

Half-shell (half-sh): (Ch 5, dc).

Shell (sh): (Dc, ch 2, dc, ch 2, dc).

Sh patt

(multiple of 6 sts + 3)

ROW 1: Dc in 6th ch from hook (counts as half-sh), sk 2 ch *sc in next ch, sk 2 ch, sh (see above) in next ch, sk 2 ch; rep from * to last ch, sc in last ch, turn.

ROW 2: Half-sh (see above) in first sc, *sc in center dc of next sh, sh in next sc; rep from * ending with sc in 3rd ch of half-sh from previous row, turn.

Rep Row 2 for patt.

Scarf

Ch 57. Work in sh patt (see Stitch Guide) until scarf measures about 56" (142 cm) (or about 10" [25.5 cm] shorter than desired length). Fasten off and weave in loose ends. Steam-block gently to measurements. Allow to dry.


Amy O’Neill Houck is the author of her own crochet book and lives in Alaska, where she’s able to make the most of her woolly stash year-round. She blogs at thehookandi.com.