by DONNA HULKA
One of the most popular articles on CrochetMe.com is Donna Hulka’s tutorial on The Magic Adjustable Ring, a way to crochet in the round without the pesky hole in the middle of your work. Adding this simple technique to your arsenal will make you feel like a crochet superhero.
Figure 1
Leaving a 6" (15 cm) tail, make a ring by placing the tail end of yarn behind the working yarn.
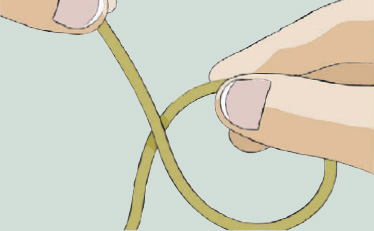
Figure 2
Insert your hook from front to back through the center of the ring, yo with the working yarn, and pull up a lp. Ch 1 (this assumes you’ll be making sc sts. Ch the appropriate number if you’ll be making hdc, dc, etc.).
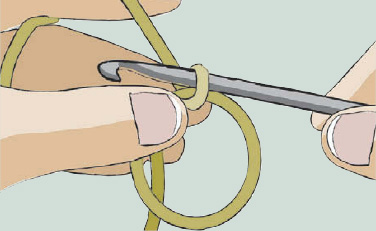
Figure 3
Continuing to hold the ring closed with your nondominant hand, work several sc sts into the ring, covering the tail.
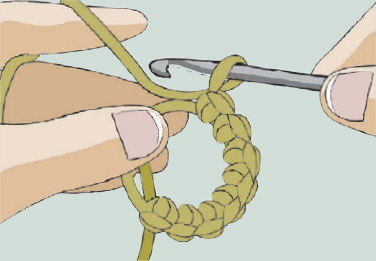
Figure 4
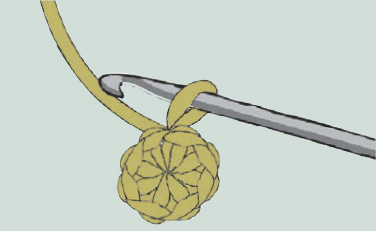
Pull the yarn tail to tighten the ring. Presto! No hole in the center of your work. Continue to work in the round as usual.
Donna Hulka’s crochet patterns have been featured in many books, including Crochet Me (Interweave). See more of Donna’s work at yarntomato.com.
design by KATHY MERRICK
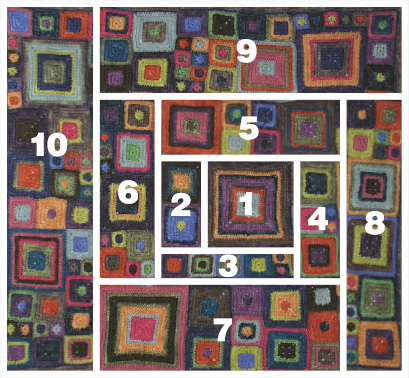
Inspired by the work of designers Kaffe Fassett and Liza Prior Lucy, this blanket offers a journey in color for the crocheter. The modules are all based on the same motif pattern; they vary only in the number of rounds worked. Crocheted in superwash wool, this blanket is sure to become a modern heirloom.

© Chris Hartlove
Finished Size
43" (109 cm) wide and 40" (101.5 cm) long.
Yarn
Sockweight (#1 Superfine)
shown here: Koigu Wool Designs KPM (100% merino wool; 175 yd [160 m]/13/4 oz [50 g];  ): #2424 taupe (A), 3 skeins; #2343 sage green (B), #2229 tomato red (C), and #2326 French blue (D), 2 skeins each; #2339 vicious green (E), #2236 purple-grey (F), #1239 golden brown (G), #2370 melon (H), # 1040 deep blue-green (J), #2332 citron (K), #1500 turquoise (L), #2260 bright lilac (M), #2151 baby blue (N), #1005 robin’s egg (O), #2233 rose (P), #1150 bright pink (R), and #2128 dusty lavender (S), 1 skein each.
Hook
Sizes E/4 (3.5mm) and C/2 (2.75mm). Adjust hook sizes if necessary to obtain the correct gauge.
Notions
Tapestry needle.
Gauge
A two-round square = 1¾" (4.5 cm) using larger hook.
Download the diagrams for this project here.

Notes
 There are six sizes of squares, each made in the same way. The sizes only vary by numbers of rounds worked: 2, 4, 6, 8, 10, or 12 rounds.
 Work over tails as you go along to save hours of finishing.
 Make squares in colors as desired or follow color charts as given on pages 104–105 to make the blanket as pictured.
 Change colors every round for two-round squares. For larger squares, use one color for two or more rounds.
 Make 50 two-round squares, 49 four-round squares, 16 six-round squares, 7 eight-round squares, 2 ten-round squares, and 2 twelve-round squares.
Two-Round Square
RND 1: Using larger hook, ch 4 (counts as ch 1, dc), (dc, [ch 2, 3 dc] 3 times, ch 2, dc) all in 4th ch from hook, join with sl st in 3rd ch of beg ch-4. Do not turn.
RND 2: Ch 3, dc in next dc, *(2 dc, ch 2, 2 dc) in ch-2 sp, dc in each of next 3 dc**, rep from * to ** twice more; (2 dc, ch 2, 2 dc) in last ch-2 sp, ending dc in next dc, join with sl st in top of beg ch-3.
Fasten off.

Four-Round Square
RNDS 1 AND 2: Rep Rnds 1 and 2 of two-round square.
RND 3: Ch 3, dc in each of next 3 dc, *(2 dc, ch 2, 2 dc) in ch-2 sp, dc in each of next 7 dc**, rep from * to ** twice more, (2 dc, ch 2, 2 dc) in last ch-2 sp, ending dc in each of next 3 dc, join with sl st in top of beg ch-3.
RND 4: Ch 3, dc in each of next 5 dc,*(2 dc, ch 2, 2 dc) in ch-2 sp, dc in each of next 11 dc**, rep from * to ** twice more, (2 dc, ch 2, 2 dc) in last ch-2 sp, ending dc in each of next 5 dc, join with sl st in top of beg ch-3.
Fasten off.

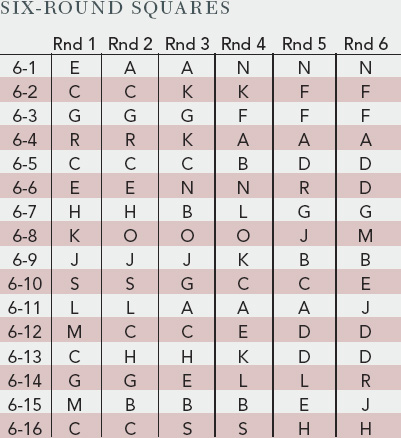


Each square is represented by 2 numbers; i.e., 4-1 identifies one individual motif.
Subsequent rounds of larger squares
Ch 3, dc in each dc across to next ch-2 sp, *(2 dc, ch 2, 2 dc) in ch-2 sp, dc in each dc to next ch-2 sp**, rep from * to ** twice more, (2 dc, ch 2, 2 dc) in last ch-2 sp, ending dc in each dc to end of rnd, join with sl st in top of beg ch-3. Fasten off.
Finishing
Follow assembly diagram on page 106 first joining squares to form units as numbered and then joining units in numerical order. Sew squares together using a tapestry needle and color A, matching edges, and working stitch to stitch.
Outer border
With smaller hook and D, attach yarn to one side of blanket, ch 3, dc in each edge st of blanket, working (2 dc, ch 2, 2 dc) in each corner ch-2 sp. Fasten off D, attach A. Work 2 rnds in A, and then 1 rnd in C working in same manner as Round 1. Fasten off. Block.
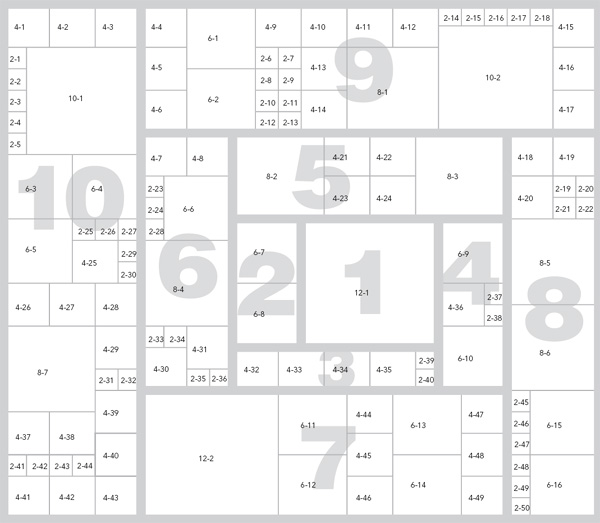
Each square is represented by 2 numbers; e.g., 4-1 identifies one individual motif.


 ): #2424 taupe (A), 3 skeins; #2343 sage green (B), #2229 tomato red (C), and #2326 French blue (D), 2 skeins each; #2339 vicious green (E), #2236 purple-grey (F), #1239 golden brown (G), #2370 melon (H), # 1040 deep blue-green (J), #2332 citron (K), #1500 turquoise (L), #2260 bright lilac (M), #2151 baby blue (N), #1005 robin’s egg (O), #2233 rose (P), #1150 bright pink (R), and #2128 dusty lavender (S), 1 skein each.
 There are six sizes of squares, each made in the same way. The sizes only vary by numbers of rounds worked: 2, 4, 6, 8, 10, or 12 rounds.


