
Don’t you just love these light and airy lanterns? When I combined this darling pattern with my Elizabeth Anne fabric line and my trusty stash of solids from P&B Textiles, I knew I had the perfect match!
Each Lantern block—large and small—is made using two prints (A and B) from the same color family. I suggest you choose fabrics that differ somehow; for example, in character or scale of the print. (You’ll notice that the scale of the print varies greatly between my Fabric A and Fabric B choices.) To complete each block, you’ll need a solid in a coordinating color and a white solid. You’ll use this white solid in every block, as well as for the setting rectangles and squares and for the inner-border strips.
Fabric Requirements
White solid: 1¼ yards for blocks, setting rectangles and squares, and inner border
Assorted A prints: ¾ yard total for blocks and outer border
Assorted B prints: 1 yard total for blocks and outer border
Assorted coordinating solids: ½ yard total for blocks
Backing: 1⅓ yards (if the backing is 44” wide—if not, double the amount)
Batting: 43” × 48”
Binding: ½ yard

Large Chinese Lantern Block
7½” × 7½” finished
Cutting
You will need 9 blocks. Each block is made using two prints (A and B), a solid in a coordinating color, and the white solid.
Rough Cut (for each block)
Print A (#1):
Cut one 2¼” × 8½” strip.
Coordinating solid (#2):
Cut two 1” × 8½” strips.
Print B (#3):
Cut two 2½” × 8½” strips.
White solid (#4 and #5):
Cut two 4” × 4” squares, then cut in half diagonally.
Traditional Cut (for each block)
Coordinating solid:
Cut two 3” × 1½” strips.
White solid:
Cut four 3” × 1½” strips.
Piecing
The lantern unit of each block is paper pieced. The top and bottom rows are pieced in the traditional way and sewn to the top and bottom edges of the paper-pieced unit to complete the block.
1. Cut out the paper pattern (page 54) ¼” just outside the dashed line.
2. Place the paper pattern, printed side down.
3. Position a print A strip (#1), right side up, on the unprinted side of the paper pattern. If you are using a thicker paper, hold it up to the light to help position the print strip.

4. Place one 8½” × 1” coordinating solid strip (#2) on top of the print A strip, with right sides together, matching the raw edges. Pin.

5. Turn the paper pattern over and stitch on the line between 1 and 2.

6. Fold the paper on the stitched lines between 1 and 2 and trim the seam allowance to ¼”.
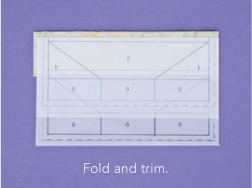
7. Press open.
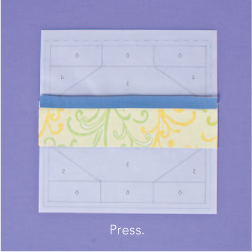
8. Repeat Steps 3–7 to add a coordinating solid strip (#2) to the opposite side of the print A strip (#1).

9. Place one print B strip (#3) on top of one coordinating solid strip (#2), with right sides together, matching the raw edges. Pin.

10. Turn the paper over and stitch on the line between 2 and 3.
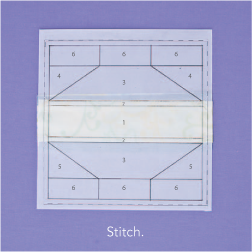
11. Fold the paper on the stitched line between 2 and 3 and trim the seam allowance to ¼”.
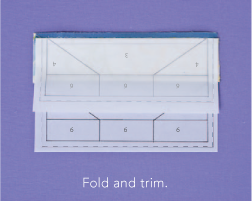
12. Press open.

13. Repeat Steps 9–12 to add a matching print B strip (#3) to the remaining coordinating solid strip (#2).

14. Fold the paper on the lines between 3 and 4 and trim the excess fabric to ¼”. Repeat for lines 3 and 5.
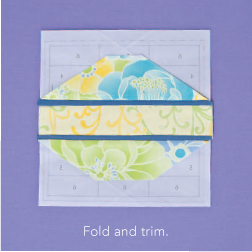
15. Place a white piece (#4) on the opposite corners of the unit from Step 14, with right sides together, matching the raw edges. Pin.
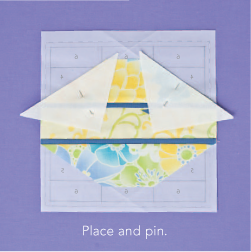
16. Turn the paper over and stitch on the lines between 3 and 4.
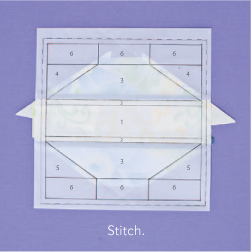
17. Press open.
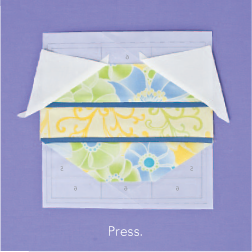
18. Fold the paper on the stitched lines between 3 and 6 and trim the seam allowance to ¼”.
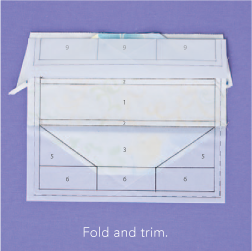
19. Repeat Steps 15–18 to add the two remaining corners (#5), sewing on the lines between 3 and 5.
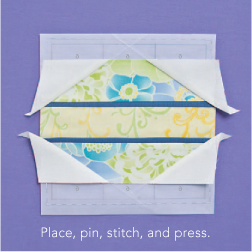
20. Sew one 3” × 1½” coordinating solid strip between two 3” × 1½” white strips, joining the 2” edges. Press toward the solid strip. Make 2.
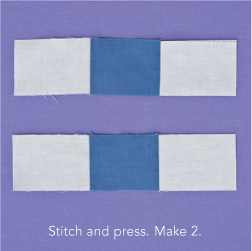
21. Line up one unit from Step 20 (#6) along the top edge of the unit from Step 19, making sure to match seamlines. Pin and stitch. Repeat to add the remaining unit from Step 20 to the bottom edge. Press toward the paper-pieced unit.
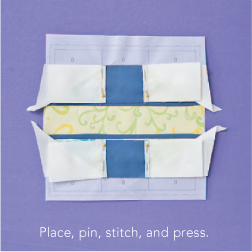
22. Turn the unit paper-side up and trim on the dashed outer line to leave a ¼” seam allowance.
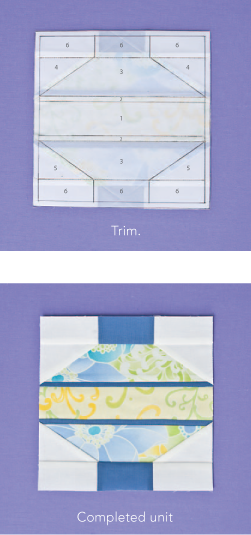

Small Chinese Lantern Blocks
3¾” × 3¾” finished
Cutting
You will need 7 blocks. Each block is made using two prints (A and B), a solid in a coordinating color, and the white solid.
Rough Cut (for each block)
Print A (#1):
Cut one 1½” × 4¾” strip.
Coordinating solid (#2):
Cut two ¾” × 4¾” strips.
Print B (#3):
Cut two 1¾” × 4¾” strips.
White solid (#4 and #5):
Cut two 2¾” × 2¾” squares, then cut in half diagonally.
Traditional Cut (for each block)
Coordinating solid:
Cut two 1¾” × 1” strips.
White solid:
Cut four 1¾” × 1” strips.
Piecing
These blocks are pieced the same way as the Large Chinese Lantern blocks. Only the sizes of the pieces and the size of the finished block are different.
1. Cut out the paper pattern (page 53) just outside the dashed line.
2. Refer to Large Chinese Lantern Block Piecing (pages 49–51).
Follow Steps 2–19, using one 1½” × 4¾” print A strip (#1), two ¾” × 4¾” coordinating solid strips (#2), two 1¾” × 4¾” print B strips (#3), and two 2¾” white squares cut in half diagonally (#4 and #5).
3. Sew one 1¾” × 1” coordinating solid strip between two 1¾” × 1” white strips, joining the 1” edges. Press toward the solid strip. Make 2.
4. Line up one unit from Step 3 along the top edge of the unit from Step 2, making sure to match seamlines. Pin and stitch. Repeat to add the remaining unit from Step 3 to the bottom edge of the unit. Press toward the paper-pieced unit.
5. Turn the unit paper-side up and trim on the dashed outer line to leave a ¼” seam allowance.
QUILT TOP
CONSTRUCTION
Press following the arrows.
1. From the white solid, cut two strips 4¼” × fabric width. From these strips, cut thirteen 4¼” × 8” rectangles and three 4¼” × 4¼” squares.
2. Arrange the large and small Chinese Lantern blocks, and the background squares and rectangles as shown. Sew the blocks, squares, and rectangles into sections. Press. Sew the sections into three horizontal rows. Press. Sew the rows together. Press.
1. From the white solid, cut two 1¼” × 34¼” strips. Sew onto the sides. Press toward the inner border.
2. From the white solid, cut two 2” × 32” strips. Sew onto the top and bottom. Press toward the inner border.
3. Remove the paper either now or after the final border has been sewn on.
Outer Border
1. From the A and B assorted prints, cut a total of 78 strips 2¼” × 4”. From one A print, cut four 4” × 4” squares.
2. Sew twenty-one 2¼” × 4” print strips together along their long edges to make a side border. Press. Make 2 and sew onto the sides.
3. Sew eighteen 2¼” × 4” print strips together along their long edges to make the top border. Press. Repeat to make the bottom border.
4. Sew a 4” print square to opposite ends of each unit from Step 3. Press and sew onto the top and bottom. Press.
Great job! Now it’s time to layer, baste, quilt, and bind with guidance from General Instructions (pages 8-13).

Quilt construction
Patterns are available to print from (http://tinyurl.com/paperpiecingwithalex-patterns)
