Chapter 11
Ten More Ways to Customize Your Camera
IN THIS CHAPTER
Storing your favorite settings as a custom shooting mode (C1 or C2)
Creating your own menu and custom folders
Changing the color space (sRGB versus Adobe RGB)
Assigning new functions to camera buttons
Exploring a host of autofocus tweaks
Have you ever tried to cook dinner in someone else’s house or work from another colleague’s desk? Why is nothing stored in the right place? The coffee cups, for example, should be stowed in the cabinet above the coffee maker, and yet there they are, way across the kitchen, in the cupboard near the fridge. And everyone knows that the highlighter pens belong in the middle top drawer, not the second one on the left. Yeesh.
In the same way, you may find a particular aspect of your camera’s design illogical or maybe a tad inconvenient. If so, check out this chapter, which introduces you to a slew of customization options not considered in earlier chapters.
Creating Your Own Exposure Modes
One of the most useful features for the experienced photographer is the presence of Custom Shooting Mode settings (C1 and C2) on the Mode dial. These options enable you to set up your own exposure modes. You start by selecting and saving all the camera settings you want to use when you switch to C1 or C2 mode. Then when you’re out shooting, you can invoke all those settings simply by setting the Mode dial to C1 or C2, as shown in Figure 11-1.
To take advantage of the two C modes, follow these steps:
Set up your camera.
Start by selecting the exposure mode on which you want to base the custom mode (Tv, Av, M, and so on). Then set the initial exposure, flash, autofocusing, Drive mode, and color options you want to use when you switch to your preferred C mode. Next, take a trip through the menus and select your preferred settings. You can store most menu settings except some of the options in Shooting Menus 3 and 4 (Movie), several Playback menu settings, a smattering of Setup Menu options, and My Menu settings. Please refer to the manual for an exhaustive list of what can and cannot be stored.
Open Setup Menu 4 and choose Custom Shooting Mode (C1, C2), as shown on the left in Figure 11-2.
The screen shown on the right in Figure 11-2 appears.
Choose Register Settings.
You see a selection screen.
Highlight the Custom Shooting Mode you want to register (C1 or C2) and then confirm your choice by choosing OK.
The camera stores your settings and returns you to the screen shown on the right in Figure 11-2.
As for the other two options on that menu, they work like so:
- Clear Settings: Select this option to returns C1 or C2 to its default state, which is modeled after the P (programmed autoexposure) mode.
- Auto Update Set(tings): When you’re working in either C mode, you can still change any camera setting — you’re not locked into the registered settings. If you enable this menu option and then vary a registered setting, the camera automatically registers that new setting as part of your selected C mode. Needless to say, you can get off track quickly if you enable this function, which is why it’s turned off by default.
 One quirk to note about both C modes: When the Mode dial is set to C1 or C2, you can't restore the camera defaults by choosing Clear All Camera Settings from Setup Menu 4 or Clear All Custom Functions from the Custom Functions menu. To reset the camera, you must first set the camera Mode dial to P, Tv, Av, M, or B.
Creating Your Very Own Camera Menu
You can create up to five custom menus, each containing up to six items from the camera’s other menus. Logically enough, the custom menu goes by the name My Menu and is represented by the green star icon. To create your menus, take these steps.
Set the camera Mode dial to P, Tv, Av, M, B, C1, or C2.
You can create and order from the custom menu only in these exposure modes.
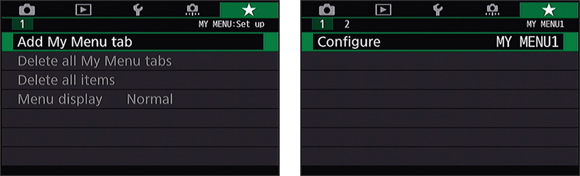
Press the Menu button to display the menus and then select the My Menu Setup menu.
You see the screen shown on the left in Figure 11-3. If you’ve not created any My Menus (sometimes called menu tabs), or have deleted them all, the My Menu Setup menu will be the only visible menu. If you have created My Menus, they are sorted before the Setup tab, which will always be last.
Choose Add My Menu Tab and select OK from the confirmation screen to create a tab.
You’ll see a blank My Menu tab with one option: Configure, as shown on the right in Figure 11-3.
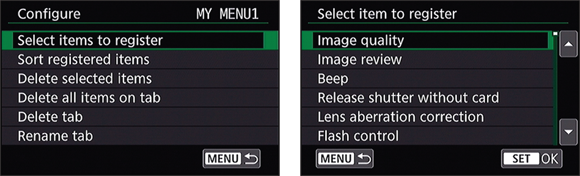
- Choose Configure to display the screen shown on the left in Figure 11-4.
Choose Select Items to Register.
You see a scrolling list that contains every item found on the camera’s other menus, as shown on the right in Figure 11-4.
Select an item to include on your custom menu and then tap Set or press the Set button.
 To add a specific Custom Function to your menu, scroll past the Custom Function category items to find the individual function. (The category items just take you to the initial menu screen for that category, and you still have to wade through multiple levels of steps to reach your function.)
After you choose the item, you see a confirmation screen.
Tap OK (or highlight it and press the Set button) to confirm.
You return to the list of menu options. The option you just added to your menu is dimmed in the list.
- Repeat Steps 6 and 7 to add up to five additional items to your menu.
Tap the Menu icon or press the Menu button when you’re done adding items.
You then see the My Menu Configure screen (refer to the left side of Figure 11-4).
Tap the Menu icon or press the Menu button again.
The My Menu screen appears, and the items you added are listed on the menu. The Configure option is at the end of each My Menu. To create more menus, select the My Menu Setup menu and return to Step 3.
After creating your tabs and menus, you can manage them as follows:
Give your menu priority. You can tell the camera to display your menu anytime you press the Menu button. To do so, choose Menu Display (shown grayed out on the left side of Figure 11-3) from the My Menu Setup menu. Then set the Display from My Menu Tab option to Enable. Enable the Display Only My Menu Tab option to exclusively show your menus.
- Change the order of menu items. Select one of your My Menus, choose Configure to navigate to the left screen in Figure 11-4, and choose Sort Registered Items. Tap an item (or highlight it and press Set) and then tap the up/down arrows at the bottom of the screen or press the Multi-controller up/down to move the menu item up or down in the list. Tap the Set icon or press the Set button to glue the menu item in its new position. Tap the Menu icon or press the Menu button to return to the My Menu Configure screen; press or tap Menu again to return to your custom menu.
- Rename tabs. Display your menu, choose Configure, and then select Rename Tab. Delete the default text and enter a custom tab name of up to 16 characters using the same text entry screen that you used to enter Copyright information (see Chapter 10).
Delete menu items. Display your menu, choose Configure, and then choose Delete Selected Items. (Refer to the left screen in Figure 11-4.) Choose the menu item that you want to delete; on the resulting confirmation screen, tap OK or highlight it and press the Set button.
To remove all items from your custom menu, choose Delete All Items on Tab. (Again, see the left side of Figure 11-4.)
- Delete a menu. Select your menu, choose Configure, and then Delete Tab. Confirm your decision by tapping OK or highlight it and press the Set button.
Creating Custom Folders
Normally, your camera automatically creates folders to store your images. The first folder has the name 100Canon; the second, 101Canon; the third, 102Canon; and so on. Each folder can hold 9,999 photos. If you want to create a new folder before the existing one is full, choose Select Folder from Setup Menu 1 and then choose Create Folder, as illustrated in Figure 11-5. You might take this organizational step so that you can segregate work photos from personal photos, for example.
The folder is automatically assigned the next available folder number and is selected as the active folder — the one that will hold any new photos you shoot. To make a different folder the active folder, just choose it from the list. The number next to a folder name indicates how many photos are in the folder.
Changing the Color Space from sRGB to Adobe RGB
By default, your camera captures JPEG images using the sRGB color space, which refers to an industry-standard spectrum of colors. (The s is for standard, and the RGB is for red, green, blue, which are the primary colors in the digital color world.) The sRGB color space was created to help ensure color consistency as an image moves from camera or scanner to monitor and printer; the idea was to create a spectrum of colors that all devices can reproduce. (You select the color space as you process and convert Raw images, not when you capture them. See Chapter 6 for details about Raw-image processing.)
However, the sRGB color spectrum leaves out some colors that can be reproduced in print and onscreen, at least by some devices. So, as an alternative, your camera also enables you to shoot in the Adobe RGB color space, which includes a larger spectrum (or gamut) of colors. Some colors in the Adobe RGB spectrum can’t be reproduced in print. (The printer just substitutes the closest printable color.) Still, Julie usually shoots in Adobe RGB to avoid limiting herself to a smaller spectrum from the get-go.
However, that doesn’t mean that it’s right for you. If you print and share your photos without making any adjustments in your photo editor, you’re better off sticking with sRGB because most printers and web browsers are designed around that color space.
If you do want to switch to Adobe RGB, set the camera to an advanced shooting mode and make the adjustment via the Color Space option on Shooting Menu 2. In all other modes, you're locked into sRGB.
When seen on your computer, Adobe RGB images start with an underscore, as in _MG_0627.jpg. Pictures captured in the sRGB color space start with the letter I, as in IMG_0627.jpg.
Changing the Direction of the Dials
When you shoot in the Tv and Av exposure modes, you adjust shutter speed or f-stop, respectively, by rotating the Main dial. In M mode, you rotate the Main dial to change the shutter speed and rotate the Quick Control dial to adjust the f-stop.
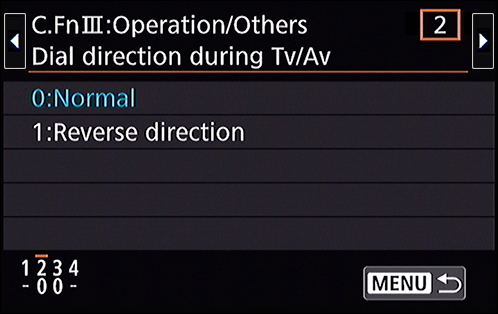
Normally, turning the dials clockwise or to the right increases the value being adjusted. If this seems backwards to you, head for the Custom Functions menu, choose the Operation/Others category, and then select the second Custom Function in the group, as shown in Figure 11-6. Then select the Reverse Direction option.
Changing All the Furniture Around
In addition to modifying the direction of the Main dial and Quick Control dial, you can change the function of the Set button, shutter button, AE Lock button, and a host of other controls. Please don’t take advantage of any of these options, though, until you’re thoroughly familiar with how the camera works using the original function settings. If you modify a control, it’s not going to behave the way our instructions in the book indicate that it should.
When you're ready to explore your options, take either of these routes:
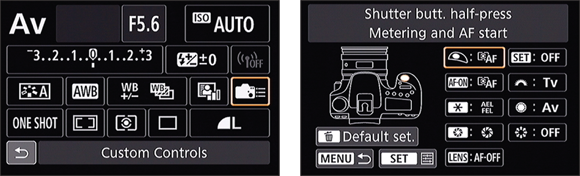
 Quick Control screen: Select the Custom Controls icon, as shown on the left in Figure 11-7, to display the mind-numbing screen shown on the right in the figure. This screen serves as Grand Central Station for customizing nine camera controls.
- Custom Functions menu: Open the Operation/Others section of the menu and then navigate to the Custom Controls screen, shown in Figure 11-8. Select one of the nine controls to display the same screen you see on the right in Figure 11-7.
Here’s how to make adjustments after you land on the screen shown on the right in Figure 11-7:
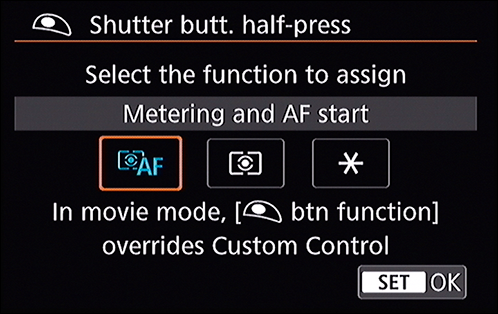
Select a control to customize. The controls are presented as two rows of icons running down the right side of the screen. The icons are, as you can see, somewhat cryptic, so it’s nice that as you highlight each one, the name of the button appears, along with its default function. For example, on the right screen in Figure 11-7, the shutter button icon is selected, and the label at the top of the screen indicates that the button is set to initiate exposure metering and autofocusing with a half-press of the button.
As you select the different controls, the camera graphic on the left side of the screen highlights the button you’re adjusting. In the figure, for example, the shutter button is lit.
One option, Lens control (last setting in left column of icons), is related only to certain super-telephoto lenses that have an AF Stop button. If your lens doesn’t have this button (the two kit lenses don’t), you can’t assign another function to it. You can, however, assign the AF Stop function to another button and pause AI Servo AF when shooting photos or Movie Servo AF when shooting movies.
Set the button function. After highlighting a control, tap Set or press the Set button to display the options available for that button. For example, Figure 11-9 shows the options available for the shutter button. As you scroll through the choices, the label above the icons shows you what the button will accomplish at that setting. Make your choice and tap Set or press the Set button to return to the initial setup screen.
If you need help understanding the individual functions that are available, dig out the manual that came with your camera or download it from www.canon.com/icpd. The section titled “Custom Controls” explains what happens when you select the various button settings.
Reset the default functions. To restore a button to its original function, choose the first option available for that button. To reset all the buttons to their defaults, tap the Default Set icon you see on the screen shown on the right in Figure 11-7 or press the Erase button.
You can’t simply choose the Clear All Custom Functions option on the Custom Functions menu to restore the defaults; neither does choosing the Clear All Camera Settings option on Setup Menu 4 do the trick. You must visit the Custom Controls screen to get back to square one.
- Exit the configuration screen. Press the Menu button or tap the Menu icon.
Disabling the AF-Assist Beam
In dim lighting, your camera emits an AF (autofocus)-assist beam from the built-in flash when you press the shutter button halfway — assuming that the flash unit is open, of course. This pulse of light helps the camera find its focusing target. In situations where the AF-assist beam might be distracting to your subject or to others in the room, you can disable it when you shoot in the advanced exposure modes. Open the Custom Functions menu, choose the Autofocus category, and then track down Function 6, AF-Assist Beam Firing.
You can choose from these settings:
- 0: The default; lets the AF-assist beam fire when needed
- 1: Disables the AF-assist beam of both the built-in flash and compatible Canon EX–series Speedlite external flash units
- 2: Disables the beam of the built-in flash while allowing the beam of a compatible EX-series Speedlite to function normally
3: Allows the external Canon EOS–dedicated Speedlite with infrared (IR) AF-assist to use only the IR beam, which prevents the external flash from pulsing a series of small flashes (such as the built-in flash) from firing
 An external Canon Speedlite has its own provision to disable the AF-assist beam: If you disable the AF-assist on the external flash, it doesn’t emit the AF-assist beam even if you select Option 3. In other words, the external flash’s own setting overrides the camera’s Custom Function setting.
Regardless of the Custom Function setting, the AF-assist beam continues to light from the built-in flash when the camera deems it necessary in the automatic exposure modes.
Controlling the Lens Focus Drive
It’s pretty annoying when you try to autofocus and the camera doesn’t get a good lock, but the lens motor keeps churning away like it’s trying to swim the English Channel. This problem occurs most often when you’re shooting low-contrast subjects in low light. If that keeps happening, consider changing the lens focus drive behavior.
You can make this adjustment only in the advanced exposure modes. So set the Mode dial to P, Tv, Av, M, B, C1, or C2 and then pull up the Custom Functions menu and select the Autofocus category. Navigate to Function 7, Lens Drive When AF Impossible. If you change the setting to Stop Focus Search, the camera won’t keep trying to focus when autofocusing fails.
Of course, you have another option when the autofocus motor can’t hone in on its target: Just set the lens to manual focusing and do the job yourself. Often, that’s the easiest solution to a focus problem.
Making the Flashing Red AF Points Go Away
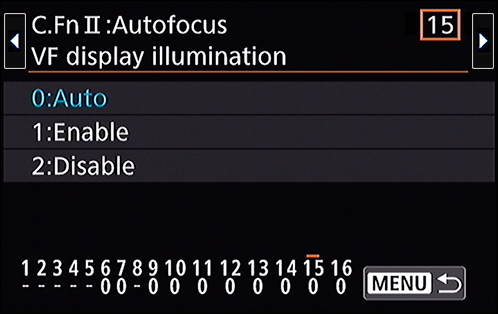
In dim lighting, the autofocus points that are used to establish focus flash red in the viewfinder when you initiate autofocusing. If you find them distracting, you can turn them off; if you instead want them to appear even in bright light, you can make it so. The control that adjusts this behavior is VF Display Illumination, which is Custom Function 15 in the Autofocus section. Figure 11-10 offers a look. You get three choices:
- 0: Auto: This is the default; the focus points flash red only in dim lighting.
- 1: Enable: Here’s the option to select if you always want to see the focus points flash red.
- 2: Disable: We know you figured out this one already. But do note that even if you choose Off, you still see the red AF points light up when you’re using an AF Area mode that enables you to select a specific point or zone. Otherwise you wouldn’t know what AF point you were selecting. See Chapter 8 for more about the AF Area mode.
Considering a Few Other Autofocusing Tweaks
Believe it or not, the preceding few sections only scratch the surface of the Autofocus section of the Custom Functions menu. Because our goal in this book is to tell you about every possible setting on your camera, the following list provides an introduction to the remaining menu options. They will no doubt delight the autofocusing wonks in the crowd, but for us, and for most others, we think, they just make us wonder “Does it really need to be this complicated?” (Wait, we write books explaining how things work; we should probably be celebrating complicated things.)
Anyhoo … here are the autofocus functions you can modify that we haven’t already covered. For more details, refer to the camera manual (you can download it from Canon) and review the section on Autofocus Custom Functions. Also see Chapter 8 for information about one final menu option, Select AF Area Selection Mode, which determines the AF Area modes available to you. This particular Custom Function option is critical to everyday shooting; leave all four options enabled, as they are by default, for now.
- Tracking Sensitivity: Related to the AI Servo AF mode; this setting controls how much the autofocus system reacts when an object other than your subject enters the focusing area or when your subject strays from the focusing points.
- Accel./Decel. Tracking: This one is also related to AI Servo AF mode; the default setting is designed for subjects moving at a fixed speed. The other settings are geared to subjects that are moving erratically.
- AF Point Auto Switching: This sets the AF point switching sensitivity when tracking moving objects. In other words, you can control how responsive the system is when it needs to switch AF points.
- AI Servo 1st Image Priority: When you use one of the Continuous Drive modes and AI Servo AF mode, this setting determines whether the camera takes the first shot as soon as the shutter button is pressed, even if focus is not yet achieved. You can tell the camera to wait for focusing to occur (choose the Focus Priority setting) or to go ahead and take the shot (choose Release Priority). The default, Equal Priority, tries to achieve a balance between the two.
- AI Servo 2nd Image Priority: This function controls what happens for shots taken after the first shot when you’re using Continuous shooting and AI Servo AF mode. Choose Shooting Speed Priority to make achieving the maximum frames per second rate the priority; choose Focus Priority to restrict the camera to taking the shot after focus is achieved. The default setting gives equal priority to both concerns.
 AF Area Selection Method: By default, you change the AF Area Selection mode by pressing the AF Area Selection button once to activate the setting and then pressing again to cycle through the four focusing options. If you change the setting of this Custom Function to Main Dial, you instead rotate the Main dial to cycle through the settings. You also can then use the Multi-controller to switch AF points or zones.
- Orientation Linked AF Point: Normally, the AF Area mode you select, as well as the AF point or zone you choose, remain in effect whether you orient the camera horizontally or vertically. If you change this setting to Select Separate AF Points, the camera remembers the settings you choose while holding the camera horizontally, vertically with the grip on top, and vertically with the grip on the bottom. Then when you rotate the camera, it automatically shifts to those settings.
- Initial AF Point, AI Servo AF: This option controls which AF point the AI Servo uses when the AF Area Selection mode is set to 45-point automatic. By default, the system selects whichever AF point it thinks is best. However, you can change this behavior and pre-select an AF point to start on, whether you’re using 45-point Auto Selection AF or Single-Point AF.
- Color Tracking for Auto AF Point Selection: Enabled by default, this function tells the autofocus system to look for and focus on certain skin tones when you’re in one of these AF Area Selection modes: Zone, Large Zone, or 45-point Automatic Selection.
- AF Point Selection Movement: By default, when you’re selecting an autofocus point, you hit a wall when you reach the edge of the grid of autofocus points. For example, if you select the far-right point, pressing the Multi-controller right accomplishes nothing. If you change this menu option to Continuous, the selection instead jumps to the point on the opposite edge of the grid.
- AF Point Display During Focus: By default, the selected AF point(s) are always displayed when you’re choosing an AF point, when the camera is ready to shoot but you haven’t yet pressed the shutter button halfway, during autofocusing, and when focus is achieved. Through this menu option, you can specify when you want the focus points to appear or specify that you always want to see all 45 points. (You probably are going to get tired of that last option quickly.)
- AF Microadjustment: Do not, we repeat, do not fool with this option unless you really understand autofocusing and you determine that the camera is consistently focusing in front of or behind the selected focus point. Even then, know that this feature, which enables you to fine-tune the autofocusing system, may just make things worse. In fact, we recommend that if you're having this problem, you take your camera to a good camera shop and ask an expert for help. Not only are you likely to get better results, but you'll get to enjoy looking at all the shiny new camera gadgets, one of which is sure to make the perfect addition to your camera bag.