To many people, the word focus has just one interpretation when applied to a photograph: Either the subject is in focus, or it’s blurry. But an artful photographer knows that there’s more to focus than simply getting a sharp image of a subject. You also need to consider depth of field, which is the distance over which focus appears acceptably sharp. This chapter explains all the ways to control depth of field and also discusses how to use your camera's advanced autofocus options.
In addition, this chapter dives into the topic of color, explaining White Balance, a feature that compensates for the varying color casts created by different light sources, and Picture Styles, which affect image sharpness and contrast as well as color.
Note: Focusing information in this chapter relates to viewfinder photography only. Both automatic and manual focusing work differently in Live View and Movie modes, so see Chapter 4 for focusing help when using those features.
Reviewing Focus Basics
Earlier chapters touch on various focus issues. In case you’re not reading this book from front to back, the following steps provide a recap of the basic process of focusing using the default options. (The next section explains how to stray from the defaults.)
If the camera is currently in Live View or Movie mode, exit to viewfinder mode before taking Step 1. If you move the focus switch on the lens while the Live View/Movie mode continuous autofocusing system is engaged, you can damage your equipment.
Set the focusing switch on the lens to manual or automatic focusing.
For autofocusing with the 18–55mm or 18–135mm kit lens, set the switch to the AF position. For manual focusing, move the focusing switch to the MF position.
Set focus:
To autofocus: In any exposure mode except the Sports Scene mode, frame your subject within the autofocus area brackets, labeled in Figure 8-1. Then press and hold the shutter button halfway. The focus lamp in the viewfinder lights, one or more of focus points flashes red and then turns black, as shown in the figure, to show you which focus points were used. You also hear a beep when focus is achieved. Focus is locked as long as you hold down the shutter button halfway.
The exception to this result happens when you shoot a moving subject in Scene Intelligent Auto, Creative Auto, or Flash Off modes. In this case, the camera adjusts focus as needed up to the time you take the shot. The focus symbol doesn't light but the camera beeps softly to let you know it's still focusing.
Sports mode always uses continuous autofocusing. Frame your subject initially so that it's under the black rectangle that appears at the center of the frame (which represents the active autofocus point) and press and hold the shutter button halfway. You can then reframe as needed as long as you keep the subject within the autofocusing brackets.
In both cases, if the focus light blinks rapidly, the camera can't find a focusing target. Try focusing manually instead.
For manual focus: Turn the focusing ring on the lens.
Even in the manual-focus mode, you can confirm focus by pressing the shutter button halfway. The autofocus point or points that achieved focus flash for a second, the viewfinder focus lamp lights, and you hear the focus-achieved beep.
FIGURE 8-1: The viewfinder offers these focusing aids.
Introducing the AF-ON button
If you’re nervous about pressing the shutter halfway for fear that you’ll accidentally take a photo, allow us to introduce you to the AF-ON button, labeled in Figure 8-2. In the advanced exposure modes (P, Tv, Av, M, B, C1, and C2), you can hold down this button to accomplish the same goal as pressing the shutter button halfway. If you’re using Evaluative exposure metering, exposure is also locked with your press of the AF-ON button; in other metering modes, exposure is set at the time you fully depress the shutter button, just as when you use the shutter button to set focus. You’ll notice that when you do go to take the shot, the shutter button has already lowered its head halfway as if by magic.
FIGURE 8-2: You can press the AF-ON button to autofocus instead of pressing the shutter button halfway.
Using the AF-ON button can also save time when you’re shooting a series of images of the same subject. If you use the shutter button to set focus, you have to press halfway to set focus for each shot. But if you keep pressing the AF-ON button, you can take as many shots as you want, and the camera will use the same focusing distance.
You also have the option of using the AF-ON button to set focus only and the shutter button to set exposure only, or vice versa. Some photographers like to use this setup so that exposure isn’t locked along with focus in the Evaluative metering mode. Chapter 11 tells you more about customizing the performance of the shutter button and AF-ON button; for now, though, (please) don’t take this step, or things aren’t going to work the way they’re described throughout this book.
Adjusting Autofocus Performance
In the point-and-shoot photography modes that we cover in Chapter 3, you’re stuck with the choices the camera makes for each exposure mode. But in the advanced exposure modes, you can tweak autofocusing behavior through two controls:
AF (autofocus) operation mode: This option determines whether the camera locks focus when you press the shutter button halfway or continues to adjust focus from the time you press the shutter button halfway until you press it the rest of the way to take the shot.
AF Area mode: This setting determines which of the 45 autofocus points the camera uses to establish focusing distance. At the default setting, all points are in play, and the camera typically focuses on the closest object, but you can choose to base focus on one of five focusing zones or on a single point that you select.
The next few sections detail both options. But two reminders before you dig in:
Information in this chapter assumes that you haven’t changed the default functions of camera buttons (such as the AF-ON button and the shutter button). We detail those customization options in Chapter 11. If you need to reset the camera to its defaults, choose the Clear All Camera Settings from Setup Menu 4. Next, visit the Custom Functions menu and choose Clear All Custom Func. (C.Fn). The Custom Functions menu, in particular, contains a bevy of autofocusing tweaks, and straying from the defaults will definitely confuse your journey as your familiarize yourself with the autofocusing system.
Again, the settings and techniques described here relate to viewfinder photography. Autofocusing works differently in Live View and Movie modes; Chapter 4 covers those topics.
AF Area mode: One focus point or many?
In the advanced exposure modes, you can specify how you want the camera to select that autofocus point that’s used to set the focusing distance. The option that controls this autofocusing behavior is the AF Area mode, and gives you four choices:
45-point automatic selection: This is the default mode; the camera selects the autofocusing point for you.
Zone AF: The 45 points are divided into nine zones, and you select which zone you want to use. The camera typically focuses on the closest object that falls within the selected zone. Each zone contains nine points.
Large Zone AF: The area within the AF brackets is divided into three large areas: left, center, and right. As is the case with Zone AF, the AF points within the selected large zone typically focus on the nearest subject. The large zones are effective at focusing on and tracking moving subjects.
Single-point AF: You select one of the 45 points to set the focusing distance. You must then frame your subject so that it falls under that focusing point.
The 80D features 45 dual cross-type AF points, a significant improvement on its predecessor, the 70D, which has 19. Dual cross-type AF points can detect and focus on horizontal and vertical lines in the scene, which gives them the capability to focus on a variety of subjects. Not only this, when you use a lens with a maximum aperture of f/2.8 or larger, the center point turns into a high-precision diagonal cross-type AF point, which includes a second cross-type pattern rotated 45-degrees to the original. This combination of patterns is even better at focusing than standard cross-type points. The catch is, of course, that not all lenses are able to use all 45 of the cross-type AF points, and only select lenses are able to use the center AF point in dual-cross mode. The manual organizes lenses into groups and explains what features they support.
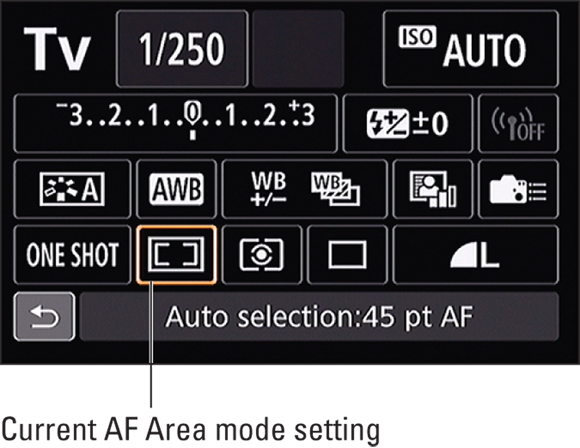
The fastest route to the option you want to use is the AF Area mode button, found on the top of the camera, just in front of the Main dial. (Look for the symbol shown in the margin here.) If the Shooting Settings display is active, the screen shown in Figure 8-3 appears. The icons at the top represent the four AF Area modes; to cycle through them, press the AF Area mode button. (The symbol to the right of the four mode icons reminds you that you must use the button for this job.) You see a similar display in the viewfinder, minus the AF Area button symbol and the touchscreen return symbol.
FIGURE 8-3: Press the AF Area mode button to switch from 45-point automatic focus point selection to Zone AF, Large Zone AF, or Single-point AF.
In Figure 8-3, the 45-point Automatic Selection setting is selected, and the focusing brackets in the middle of the screen represent the area that contains the 45 points.
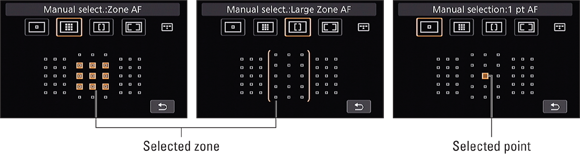
In Zone AF, the displays look like the one you see on the left in Figure 8-4. The orange AF points indicate which zone is selected; the small focus points within the squares are active. On the left screen in Figure 8-4, for example, the center zone is selected. In Large Zone AF, the display appears like the one shown in the center of Figure 8-4. The brackets indicate which zone is selected; the focus points within the brackets are active. For Single-point AF, you see just one orange square; that’s the selected focus point. Again, in Figure 8-4, we chose the center focus point.
FIGURE 8-4: Use the Multi-controller, Quick Control dial, or Main dial to select a focus zone (left and center) or point (right).
To select a different zone or point, press the Multi-controller up, down, left, or right. In Zone AF and Large Zone AF modes, you also can use the Main dial or Quick Control dial to cycle through the available zones; in Single-point mode, you can select a horizontal point by rotating the Main dial and a vertical point by rotating the Quick Command dial. If you’re working with the Shooting Settings display instead of monitoring things through the viewfinder, you can also simply tap the point or zone you want to use (although tapping a single point can be tricky because they’re so small).
In addition to using the AF Area mode button to change the setting, you can use the Quick Control screen to get the job done, as shown in Figure 8-5.
FIGURE 8-5: You also can access the AF Area mode setting via the Quick Control screen.
Here are a few additional related bits of info:
If all four AF Area modes don’t appear as available, visit the Custom Functions menu, select the Autofocus category of options, and check the status of the item named Select AF Area Selec. Mode. On this screen, you can enable and disable the individual AF Area modes. By default, all four AF Area modes are enabled, and you see a check mark above each mode icon. If the check mark is gone, the mode is disabled. Bring it back into the game by pressing the Set button, and then tapping the mode icon or highlighting it and pressing the Set button again. Tap OK or highlight it and press the Set button to finalize your choice.
In either Zone or Single-Point mode, you can quickly select the center focus point or zone by pressing the Set button.
While the AF Area Selection Mode display is active and the 45-point auto or either Zone mode is in force, the bottom of the viewfinder display shows the letters AF next to a dashed rectangle to remind you that the camera will automatically choose the focus point for you. This same readout appears in the LCD panel.
For Single-Point mode, the displays show the letters SEL plus a bracket symbol when the center point is selected. If you select a different point, you see the letters SEL and AF. Again, these indicators appear in the viewfinder and LCD panel while the AF Area Selection Mode display is active.
You also can display the initial AF Area mode selection screen (refer to Figure 8-3) by pressing the AF Point Selection button on the back of the camera. However, you still have to use the AF Area Mode button to cycle through the available settings. It's easy to mix up the purpose of the two buttons, so we simply use the AF Area Mode button for both tasks and leave the AF Point Selection button out of the mix.
Changing the AF (autofocus) operation mode
In addition to telling the camera where you want it to set focus, you can control how and when focus is set by selecting one of the following AF operation modes:
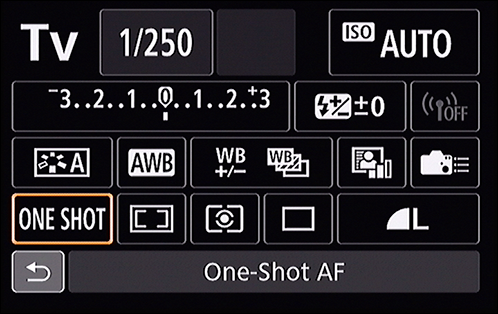
One Shot: This mode, geared to shooting stationary subjects, locks focus when you press and hold the shutter button halfway down. This setting is used for all scene modes except Sports. It’s also the default mode for the advanced exposure modes.
One important point to remember about One Shot mode is that if the camera can’t achieve focus, it won’t let you take the picture, no matter how hard you press the shutter button. Also be aware that if you pair One Shot autofocusing with one of the Continuous Drive modes, detailed in Chapter 2, focus for all frames in a burst is based on the focus point used for the first shot.
AI Servo: In this mode (the AI stands for artificial intelligence, if you care), the camera adjusts focus continually as needed from when you press the shutter button halfway to the time you take the picture. This mode is designed to make focusing on moving subjects easier, and it’s the one the camera uses when you shoot in the Sports scene mode.
For AI Servo to work properly, you must reframe as needed to keep your subject under the active autofocus point or zone if you’re using the Single-point or either Zone AF Area modes. If the camera is set to 45-Point Automatic Selection, the camera bases focus initially on the center focus point, but you can select a different point if you like. (See the preceding section for how tos or Chapter 11 to change the starting AF point AI Servo uses when in 45-Point Automatic Selection or either of the Zone AF modes.) If the subject moves away from the point, focus should still be okay as long as you keep the subject within the area covered by one of the other autofocus points.
In either case, the green focus dot in the viewfinder blinks rapidly if the camera isn’t tracking focus successfully. If all is going well, the focus dot doesn’t light, nor do you hear the beep that normally sounds when focus is achieved. (You might hear the autofocus motor whirring a little when the camera adjusts focus.)
If you use this AF operation mode with the Continuous Drive mode, focus is adjusted as needed between frames, which may slow the maximum shots-per-second rate. However, it’s still the best option for shooting a moving subject.
AI Focus: This mode automatically switches the camera from One Shot to AI Servo as needed. When you first press the shutter button halfway, focus is locked on the active autofocus point (or points), as in One Shot mode. But if the subject moves, the camera shifts into AI Servo mode and adjusts focus as it thinks is warranted. AI Focus is the setting used when you shoot in the Scene Intelligent Auto, Flash Off, and Creative Auto modes.
We prefer not to use AI Focus because we don’t want to rely on the camera to figure out whether we’re interested in a moving or stationary subject. So we stick with One Shot for stationary subjects and AI Servo for focusing on moving subjects.
One way to remember which mode is which: For still subjects, you need only one shot at setting focus. For moving subjects, think of a tennis or volleyball player serving the ball — so AI Servo for action shots.
You can the view current AF operation mode in the Shooting Settings screen, as shown on the left in Figure 8-6. To change the mode, you have two options:
AF button: Your fastest move is to press this button (on top of the camera, just above the LCD panel). All data but the current setting disappears from the LCD panel; rotate the Main dial to change the setting. If the Shooting Settings screen is active, you see the screen shown on the right in Figure 8-6. Again, either rotate the Main dial to choose a setting or just tap its icon and tap the return icon.
Quick Control screen: Select the AF operation mode icon, as shown in Figure 8-7. The selected AF operation mode setting appears at the bottom of the screen. Rotate the Main dial to cycle through the three mode options.
If you prefer, you can tap the icon or press Set to display the screen shown in Figure 8-6, where all the mode choices appear.
FIGURE 8-6: The current AF operation mode appears here.
FIGURE 8-7: You also can adjust the setting via the Quick Control screen.
Choosing the right autofocus combo
You’ll get the best autofocus results if you pair your chosen AF operation mode with the most appropriate AF Point Selection mode because the two settings work in tandem. Here are the combinations that we suggest:
For still subjects: One Shot and Single-Point AF Area Mode. You select a specific focus point, and the camera locks focus on that point at the time you press the shutter button halfway or press the AF-ON button. Focus remains locked on your subject even if you reframe the shot after you press the button halfway.
For moving subjects: AI Servo and 45-point Automatic AF Area Mode. Begin by selecting an initial focusing point; by default, the center point is selected, but you can select a different point if you prefer. Frame your subject initially so that it's under the selected point and then press the shutter button halfway (or press the AF-ON button) to set the initial focusing distance. The camera adjusts focus as needed if your subject moves within the frame before you take the shot. All you need to do is reframe to keep your subject within the boundaries of the autofocus brackets.
Keeping these two combos in mind should greatly improve your autofocusing accuracy. But in some situations, no combination will enable speedy or correct autofocusing. For example, if you try to focus on a very reflective subject, the camera may hunt for an autofocus point forever. And if you try to focus on a subject behind a fence, the autofocus system may continually insist on focusing on the fence instead of your subject. In such scenarios, don’t waste time monkeying with the autofocus settings — just switch to manual focusing.
Finally, remember that to have this level of control over autofocusing, you must use one of the advanced exposure modes.
Manipulating Depth of Field
Getting familiar with the concept of depth of field is one of the biggest steps you can take to becoming a more artful photographer. Depth of field refers to the distance over which objects appear acceptably sharp:
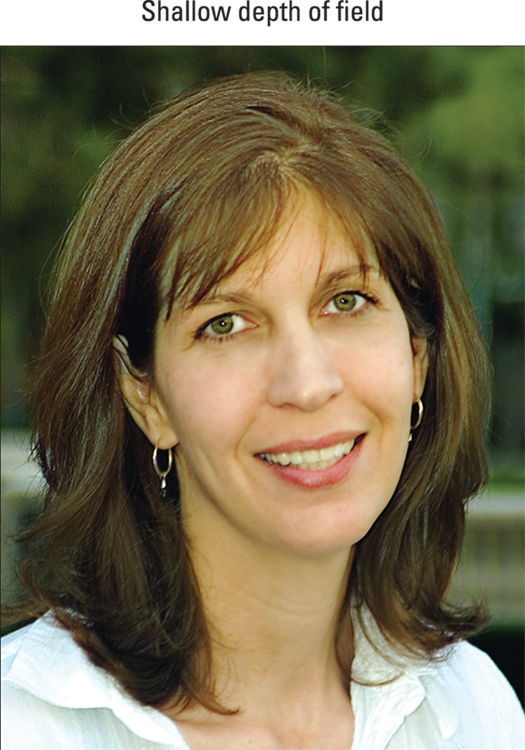
Shallow (small) depth of field: Only your subject and objects at the same (or nearly the same) distance from the lens appear sharp. Objects at a distance appear blurry.
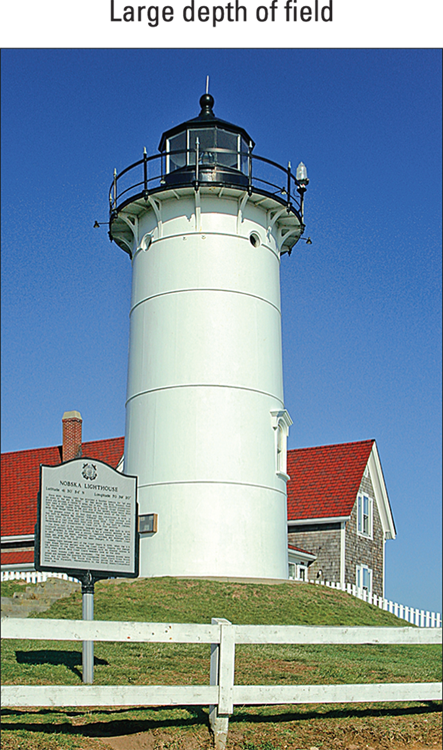
Deep (large) depth of field: The zone of apparent focus extends to include distant objects.
Which arrangement works best depends on your creative vision. In portraits, for example, a classic technique is to use a shallow depth of field, as in Figure 8-8. This approach increases emphasis on the subject while diminishing the impact of the background. Comparatively, for the photo shown in Figure 8-9, the goal was to give the historical marker, the lighthouse, and the cottage equal weight in the scene, so Julie used settings that produced a large depth of field to keep them all in focus.
FIGURE 8-8: A shallow depth of field blurs the background and draws added attention to the subject.
FIGURE 8-9: A large depth of field keeps both near and far subjects in sharp focus.
Note, though, that with a shallow depth of field, which part of the scene appears blurry depends on the spot at which you establish focus. In the lighthouse scene, for example, had she used settings that produce a short depth of field and set focus on the lighthouse, both the historical marker in the foreground and the cottage in the background might be blurry.
So how do you adjust depth of field? You have three points of control:
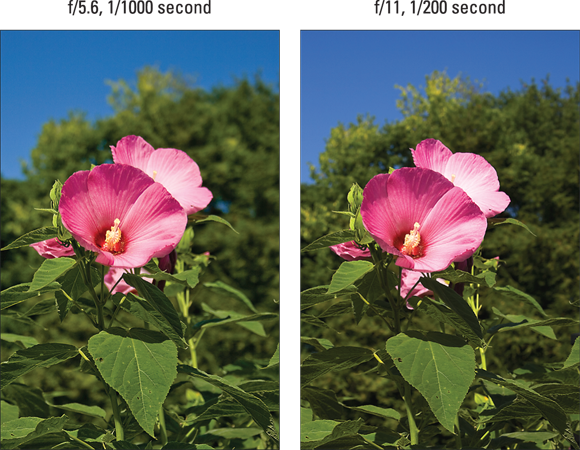
Aperture setting (f-stop): The aperture is one of three main exposure settings, all explained fully in Chapter 7. Depth of field increases as you stop down the aperture (by choosing a higher f-stop number). For shallow depth of field, open the aperture (by choosing a lower f-stop number).
Figure 8-10 offers an example. Notice that the trees in the background are more softly focused in the f/5.6 example than in the f/11 version. Of course, changing the aperture requires adjusting the shutter speed or ISO to maintain the equivalent exposure; for these images, she adjusted shutter speed.
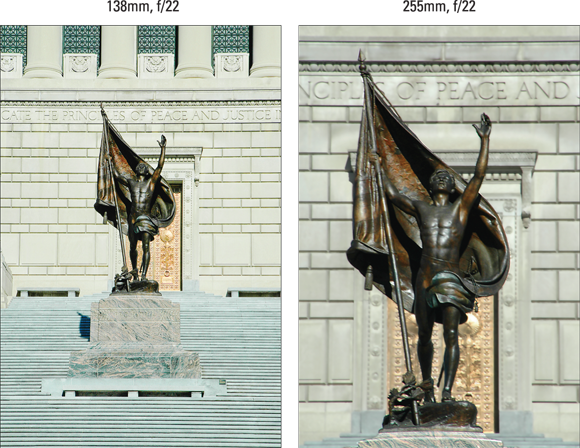
Lens focal length: In lay terms, focal length, which is measured in millimeters, determines what the lens “sees.” As you increase focal length (use a “longer” lens), the angle of view narrows, objects appear larger in the frame, and — the important point in this discussion — depth of field decreases. Additionally, the spatial relationship of objects changes as you adjust focal length.
For example, Figure 8-11 compares the same scene shot at focal lengths of 138mm and 255mm. The aperture was set to f/22 for both examples.
Whether you have any focal-length flexibility depends on your lens: If you have a zoom lens, you can adjust the focal length by zooming in or out. If your lens offers only a single focal length — a prime lens, in other words— scratch this means of manipulating depth of field (unless you change to a different prime lens, of course).
Camera-to-subject distance: When you move the lens closer to your subject, depth of field decreases.
FIGURE 8-10: Raising the f-stop value increases depth of field.
FIGURE 8-11: Using a longer focal length also reduces depth of field.
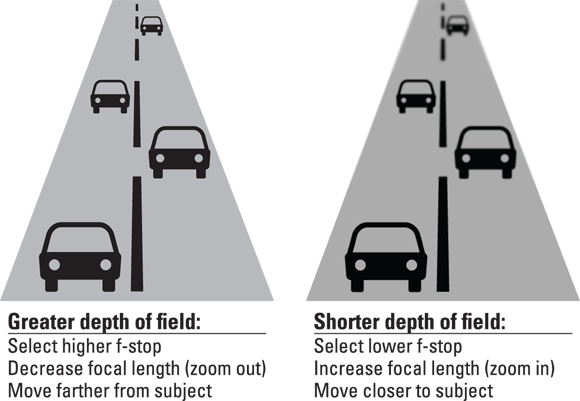
Together, these three factors determine the maximum and minimum depth of field you can achieve, as illustrated by Figure 8-12 and summed up in the following list:
To produce the shallowest depth of field: Open the aperture as wide as possible (select the lowest f-stop number), zoom in to the maximum focal length of your lens, and move as close as possible to your subject.
To produce maximum depth of field: Stop down the aperture to the highest possible f-stop setting, zoom out to the shortest focal length your lens offers, and move farther from your subject.
FIGURE 8-12: Aperture, focal length, and your shooting distance determine depth of field.
Here are a few additional tips and tricks related to depth of field:
Subject-to-camera distance: The extent to which background focus shifts as you adjust depth of field also is affected by the distance between the subject and the background. For increased background blurring, move the subject farther away from the background.
Aperture-priority autoexposure (Av) mode: When depth of field is a primary concern, try using aperture-priority autoexposure (Av). In this mode, you set the f-stop, and then the camera selects the appropriate shutter speed to produce a good exposure.
In dim lighting, you may encounter a situation where the shutter speed is too slow to permit handholding the camera. Lenses that offer optical image stabilization enable most people to handhold the camera at slower shutter speeds than nonstabilized lenses, but double-check your results. You can also raise the ISO setting to make the image sensor more reactive to light, but remember that high ISO can equal image noise. See Chapter 7 for help understanding all these issues.
Creative Auto mode: Creative Auto mode also gives you some control over depth of field via the Background Blur slider. Chapter 3 has details.
Scene modes: Some of the scene modes are designed with depth of field in mind. Portrait and Close-up modes produce shortened depth of field; Landscape mode produces a greater depth of field. You can’t adjust aperture in these modes, however, so you’re limited to the setting the camera chooses. And in certain lighting conditions, the camera may not be able to choose an aperture that produces the depth of field you expect from the selected mode.
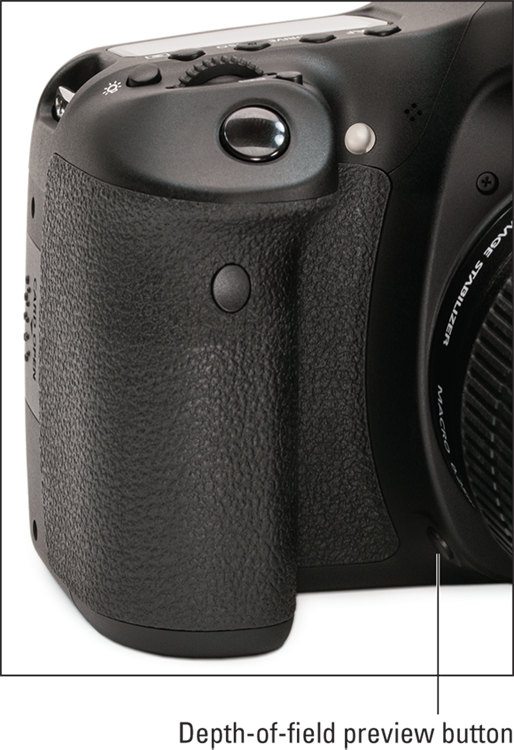
Depth-of-field Preview: When you look through your viewfinder and press the shutter button halfway to initiate autofocusing and exposure metering, you can see only a partial indication of the depth of field that your current camera settings will produce. You can see the effect of focal length and the camera-to-subject distance, but because the aperture doesn’t actually stop-down to your selected f-stop until you take the picture, the viewfinder doesn’t show you how that setting will affect depth of field.
By using the Depth-of-field Preview button, however, you can do just that in the advanced exposure modes. Found on the front of your camera, the button is labeled in Figure 8-13.
Press and hold the shutter button halfway and then press and hold the Depth-of-field Preview button with a finger on the other hand. Depending on the selected f-stop, the scene in the viewfinder may get darker. This effect doesn’t mean that your picture will be darker; it’s just how the preview works.
Note that the preview doesn’t engage if the aperture and shutter speed aren’t adequate to expose the image properly. You have to solve the exposure issue before you can use the preview.
FIGURE 8-13: Press this button to see how the aperture setting will affect depth of field.
Controlling Color
Compared with understanding some aspects of digital photography, making sense of your camera’s color options is easy-breezy. First, color problems aren’t all that common, and when they are, they’re usually simple to fix with a quick shift of your camera’s White Balance control. Second, getting a grip on color requires learning only a couple of new terms, an unusual state of affairs for an endeavor that often seems more like high-tech science than art.
The rest of this chapter explains your camera's major color options. Also check out Chapter 11, which explains an option that affects the color space of your photos (sRGB or Adobe RGB), available on Shooting Menu 2 when you use the advanced exposure modes. Stick with the default, sRGB, for now.
Correcting colors with white balance
Every light source emits a particular color cast. The old-fashioned fluorescent lights found in most public restrooms, for example, put out a bluish-green light, which is why our reflections in the mirrors in those restrooms always look so sickly. And if you think that your beloved looks especially attractive by candlelight, you aren’t imagining things: Candlelight casts a warm, yellow-red glow that’s flattering to the skin.
Science-y types measure the color of light, officially known as color temperature, on the Kelvin scale, which is named after its creator. You can see an illustration of the scale in Figure 8-14.
FIGURE 8-14: Each light source emits a specific color.
When photographers talk about “warm light” and “cool light,” though, they aren’t referring to the position on the Kelvin scale — or at least not in the way people usually think of temperatures, with a higher number meaning hotter. Instead, the terms describe the visual appearance of the light. Warm light, produced by candles and incandescent lights, falls in the red-yellow spectrum at the bottom of the Kelvin scale; cool light, in the blue-green spectrum, appears at the top of the scale.
At any rate, most folks don’t notice these fluctuating colors of light because our eyes automatically compensate for them. Similarly, a digital camera compensates for different colors of light through a feature known as white balancing. Simply put, white balancing neutralizes light so that colors are rendered accurately.
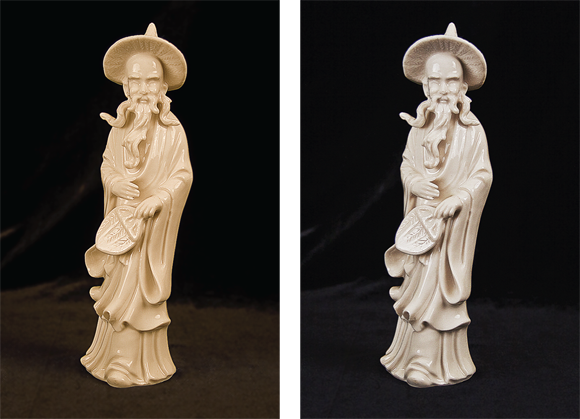
Your camera’s Automatic White Balance setting (Ambience priority), which carries the label AWB, tackles this process remarkably well in most situations. In some lighting conditions, though, the AWB adjustment doesn’t quite do the trick, resulting in an unwanted color cast like the one you see in the left image in Figure 8-15.
FIGURE 8-15: Multiple light sources resulted in a color cast in Auto White Balance (Ambience priority) mode (left); switching to manual White Balance control solved the problem (right).
Problems most often occur when your subject is lit by a variety of light sources. For example, Julie shot the figurine in Figure 8-15 under a mix of tungsten photo lights and strong window light. In Automatic White Balance mode, the camera didn't properly account for the mixed light, giving the original image a yellow tint. Switching to the Tungsten Light White Balance setting did the trick. The right image in Figure 8-15 shows the corrected colors.
Unfortunately, you can’t access the White Balance setting in any of the point-and-shoot exposure modes, although you can sometimes address color issues via the Shoot by Lighting or Scene Type setting when you shoot in a couple of the scene modes. (Chapter 3 has details on that setting and its relative, Shoot by Ambience.) So if color problems arise, shift to an advanced exposure mode and take advantage of the White Balance solutions outlined in the next few sections. If you shoot Raw images, you can edit White Balance settings on your computer after you’ve taken the photos.
Changing the White Balance setting
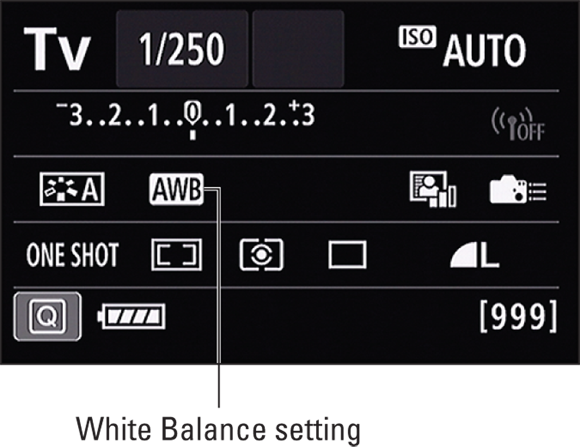
The available White Balance settings are represented by the symbols shown in Table 8-1. You can view the current setting in the Shooting Settings screen, as shown in Figure 8-16. To adjust the setting, you have two options:
FIGURE 8-16: This symbol represents the Automatic White Balance setting.
Quick Control screen: After you highlight the White Balance icon, the selected setting appears at the bottom of the screen, as shown in Figure 8-17, and you can then rotate the Main dial to cycle through the various options. If you want to see all settings at one time, tap the icon or press Set to display the selection screen you see on the right in the figure.
Shooting Menu 2: Select White Balance, as shown in Figure 8-18, to display the same selection screen you see on the right in Figure 8-17.
FIGURE 8-17: The Quick Control screen offers the fastest way to adjust the setting.
FIGURE 8-18: You also can set White Balance via Shooting Menu 2.
A couple of quick tips related to white balance:
The Auto White Balance (Ambience priority) setting is labeled AWB by the camera and is the same as Auto on other Canon cameras. There is another auto setting, however, which is called Auto White Balance (White priority). The camera puts a W next to the AWB label when this setting is selected to differentiate it from AWB.
Here’s how they are different: The Auto White Balance (Ambience priority) setting enhances warm tones when shooting in artificial light. Auto White Balance (White priority) reduces a scene’s warmth under the same lighting conditions and produces more neutral tones.
The K (Kelvin) setting enables you to specify a color temperature. After selecting the option, rotate the Main dial to select a value between 2500 and 10000.
If the scene is lit by several sources, choose the setting that corresponds to the strongest one. The Tungsten Light setting is usually best for regular incandescent household bulbs, by the way. Selecting the right setting for the new energy-saving CFL (compact fluorescent) bulbs can be a little tricky because the color temperature varies depending on the bulb you buy.
Your White Balance setting remains in force until you change it. To avoid accidentally using an incorrect setting later, get in the habit of resetting the option to Auto (Ambience Priority) after you finish shooting whatever subject it was that caused you to switch from automatic to manual white balancing.
Not sure which setting to choose? Try switching to Live View temporarily. As you adjust the White Balance setting, the live preview shows you the impact on your scene. See Chapter 4 for details on using Live View.
If none of the settings produce neutral colors, you can tweak the selected setting or even create a custom setting, as outlined in the next sections.
Creating a custom White Balance setting
If none of the preset White Balance options produces the right amount of color correction, you can create your own custom setting. To use this technique, you need a piece of card stock that’s either neutral gray (technically referred to as a gray card) or absolute white — not eggshell white, sand white, or any other close-but-not-perfect white. (You can buy reference cards made just for this purpose in many camera stores for less than $20.)
Position the reference card so that it receives the same lighting you’ll use for your photo. Then follow these steps:
Set the camera to the P, Tv, Av, M, C1, or C2 exposure mode.
You can’t create a custom setting in any of the fully automatic modes or in B (Bulb) mode.
Set the lens to manual focusing.
This step helps because the camera may have a hard time autofocusing on the card stock.
Frame the shot so that your reference card fills the center area of the viewfinder.
Make sure that at least the center autofocus point and the six surrounding points fall over the reference card.
Set focus and make sure that the exposure settings are correct.
Just press the shutter button halfway to check exposure. If necessary, adjust ISO, aperture, or shutter speed to get a proper exposure; Chapter 7 explains how.
Take the picture of your reference card.
The camera will use this picture to establish your custom White Balance setting.
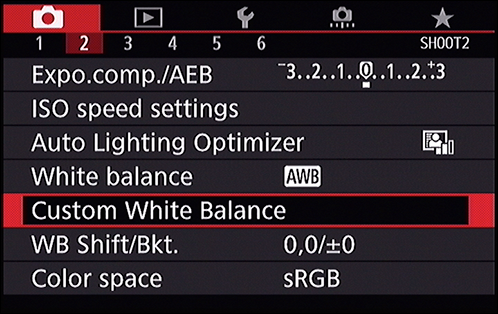
Display Shooting Menu 2 and choose Custom White Balance, as shown in Figure8-19.
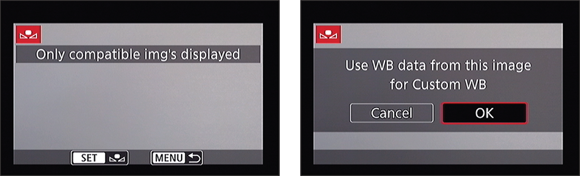
After you select the option, you see the screen shown on the left in Figure 8-20. The image you just captured should appear. If it doesn’t, use the normal playback controls to scroll to it. (Note that you may see additional data on the screen depending on the current playback display mode; press the Info button to cycle through the various displays.)
Tap the Set icon (or press the Set button).
You see the message shown on the right in Figure 8-20, asking you to confirm that you want the camera to use the image to create the custom White Balance setting.
Tap OK or highlight it and press the Set button.
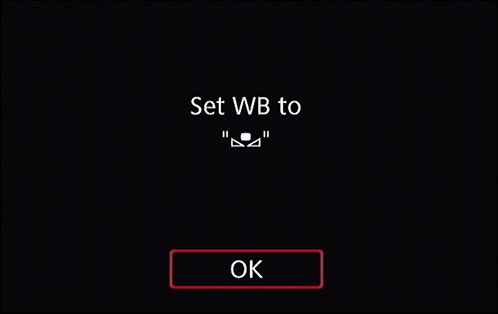
Now you see the screen shown on the right in Figure 8-21. This message tells you that the White Balance setting is now stored. The little icon in the message area represents the custom setting.
Tap OK (or highlight it and press Set).
FIGURE 8-19: You can create a custom White Balance setting from Shooting Menu 2.
FIGURE 8-20: Your white image appears on the screen (left); press or tap Set and then confirm that you want to store that image as your White Balance preset (right).
FIGURE 8-21: This screen reminds you to select the Custom Setting icon when you want to use your stored White Balance option.
Your custom White Balance setting remains stored until the next time you work your way through these steps. Any time you’re shooting in the same lighting conditions and want to apply the same White Balance correction, just select the Custom option as your White Balance setting. Remember, the icon for that setting looks like the one on the screen in Figure 8-21.
Fine-tuning White Balance settings
In addition to creating a custom White Balance setting based on a gray card, you can tell the camera to shift all colors to make them a little more blue, amber, magenta, or green no matter what White Balance setting you use. To access this option, White Balance Correction, follow these steps:
Set the Mode dial to an advanced exposure mode.
You can take advantage of White Balance Correction only in these modes.
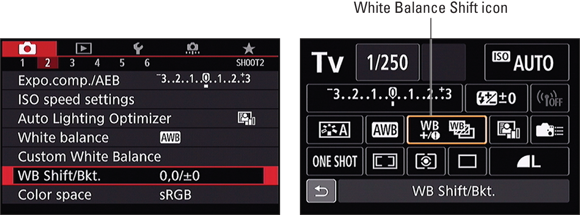
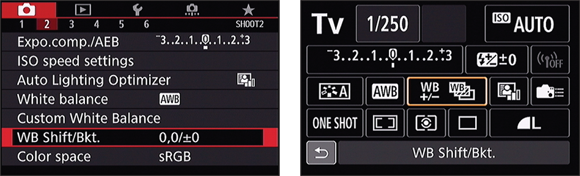
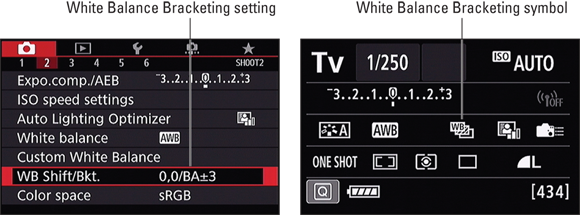
Select WB Shift/Bkt. from Shooting Menu 2 or from the Quick Control screen, as shown on in Figure8-22.
The first two numbers next to the option name in the menu indicate the current amount of fine-tuning, or shift, and the second value represents the amount of white balance bracketing enabled. (See the next section for details on that topic.) In the figure, all values are 0, indicating that no fine-tuning or bracketing is enabled.
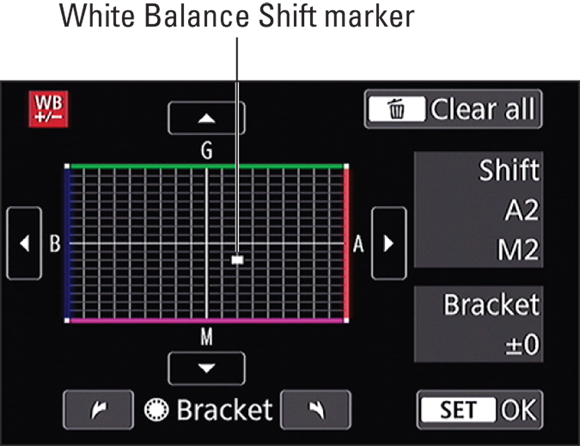
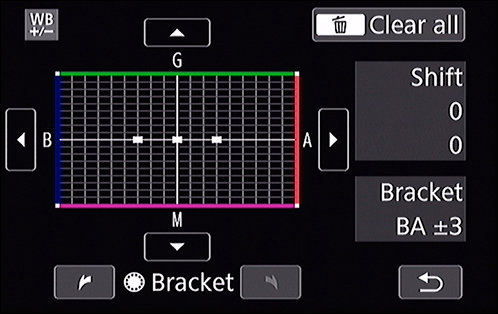
After you select the option, you see the screen shown in Figure 8-23. The screen contains a grid oriented around two color pairs: green and magenta (represented by the G and M labels) and blue and amber (represented by B and A). The little white square indicates the amount of white balance shift.
Use the Multi-controller to move the shift indicator marker in the direction of the shift you want to achieve.
You also can tap inside the grid where you want to place the marker, or tap the scroll arrows located on each side of the grid. Either way, the Shift area of the display tells the amount of color bias you’ve selected. For example, in Figure 8-23, the shift is two levels toward amber and two toward magenta.
If you’re familiar with traditional lens filters, you may know that the density of a filter, which determines the degree of color correction it provides, is measured in mireds (pronounced “my-reds”). The White Balance grid is designed around this system: Moving the marker one level is the equivalent of adding a filter with a density of 5 mireds.
Tap Set or press the Set button to apply the change and return to the menu.
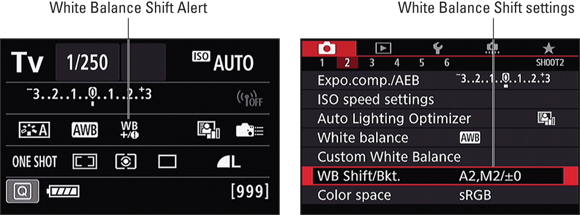
After you apply White Balance Correction, an alert symbol appears next to the White Balance symbol in the Shooting Settings display, as shown on the left in Figure 8-24. It’s your reminder that White Balance Shift is being applied. An alert symbol also appears in the viewfinder by default. (You can disable the alert via Custom Function 1 in the Operation/Others group of Custom Functions.)
You can see the exact shift values in Shooting Menu 2, as shown on the right in Figure 8-23, and also in the Camera Settings display. (To go from the Shooting Settings display to the Camera Settings display, press the Info button twice.) For example, in Figure 8-24, the values indicate a shift two steps toward amber (A) and two toward magenta (M).
Your adjustment remains in force for all advanced exposure modes until you change it. And the correction is applied no matter which White Balance setting you choose. Check the monitor or viewfinder before your next shoot; otherwise you may forget to adjust the white balance for the current light.
To cancel White Balance Correction, repeat the steps but move the marker back to the center of the grid in Step 3.
Be sure that both values in the Shift area of the display are set to 0.
As an alternative, press the Clear All button or tap its onscreen icon, found in the upper-right corner of the screen shown in Figure 8-23. However, doing so also cancels White Balance Bracketing, which we explain in the next section.
FIGURE 8-22: White Balance Correction offers one more way to control colors.
FIGURE 8-23: Move the marker around the grid to affect colors.
FIGURE 8-24: These indicators tell you that White Balance Shift is applied.
Many film-photography enthusiasts place colored filters on their lenses to either warm or cool their images. Portrait photographers, for example, often add a warming filter to give skin tones a healthy, golden glow. You can mimic the effects of these filters by simply fine-tuning your camera’s White Balance settings as just described. Experiment with shifting the white balance a tad toward amber and magenta for a warming effect or toward blue and green for a cooling effect.
Bracketing shots with white balance
Chapter 7 introduces you to automatic exposure bracketing, which enables you to easily record the same image at three different exposure settings. Similarly, your camera offers automatic White Balance Bracketing. With this feature, the camera records the same image multiple times, using a slightly different white balance adjustment for each one. You might try this feature to experiment with different color takes on a scene, for example.
Note a couple of things about this feature:
Because the camera records multiple images each time you press the shutter button, White Balance Bracketing reduces the maximum capture speed when you use the Continuous Drive modes. Of course, recording three images instead of one also eats up more space on your memory card.
The White Balance Bracketing feature is designed around the same grid used for White Balance Correction, explained in the preceding section. As a reminder, the grid is based on two color pairs: green/magenta and blue/amber.
By default, the camera records three images with each press of the shutter button. (We get into the topic of recording more than three shots after we show you the steps for using the default settings.) The camera always records the first of the three bracketed shots using a neutral white balance setting — or, at least, what it considers to be neutral, given its own measurement of the light. The second and third shots are then recorded using the specified shift along either the green/magenta or blue/amber axis of the color grid.
If you're picky about stuff like this, you can modify the order in which the shots are recorded via the Bracketing Sequence Custom Function, found in the Exposure grouping of Custom Functions. Select setting 1 to get the blue/magenta image first, then the neutral shot, and then the amber/green image. Select setting 2 to go the opposite direction. The 0 setting gives you the default setup.
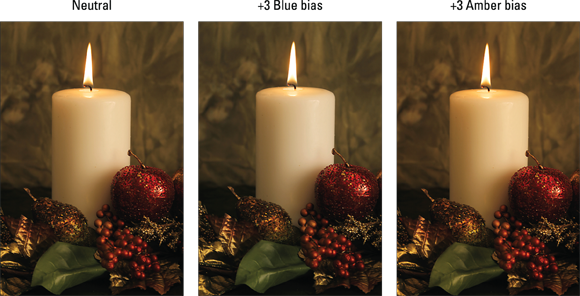
If all that is as clear as mud, just take a look at Figure 8-25 for an example. These images were shot using a single tungsten studio light and the candlelight. White Balance Bracketing was set to work along the blue/amber color axis. The camera recorded the first image at neutral, the second with a slightly blue color bias, and the third with an amber bias.
FIGURE 8-25: Julie captured one neutral image, one with a blue bias, and one with an amber bias.
To enable White Balance Bracketing, follow these steps:
Set the Mode dial to an advanced exposure mode.
Display Shooting Menu 2 and choose WB/Shift Bkt., as shown on the left in Figure8-26. Or select the option from the Quick Control screen, as shown on the right.
Either way, you see the screen shown in Figure 8-27.
Rotate the Quick Control dial to set the amount and direction of the bracketing shift.
Rotate the dial as follows to specify whether you want the bracketing to be applied across the horizontal axis (blue to amber) or the vertical axis (green to magenta).
Blue to amber bracketing: Rotate the dial right.
Green to magenta bracketing: Rotate the dial left.
As you rotate the dial, three markers appear on the grid, indicating the amount of shift that will be applied to your trio of bracketed images. You can apply a maximum shift of plus or minus three levels of adjustment.
You also can tap the markers on either side of the word Bracket, at the bottom of the screen. Tap the right arrow to move markers along the blue to amber axis; tap the left one to move the markers along the green/blue axis. After you reach the maximum marker positions (+/–3), the arrow dims, and then you can tap the opposite arrow to lower the bracketing amount until the marker returns to 0 (zero).
The Bracket area of the screen indicates the shift; for example, in Figure 8-27, the display shows a bracketing amount of plus and minus three levels on the blue/amber axis.
If you want to get truly fancy, you can combine White Balance Bracketing with White Balance Shift. See the preceding section to learn about White Balance Shift.
Tap the Set icon or press the Set button to apply your changes and return to the menu.
FIGURE 8-26: Access White Balance Bracketing through Shooting Menu 2 or the Quick Control screen.
FIGURE 8-27: Rotate the Quick Control dial to set the amount and direction of the bracketing shift.
When White Balance Bracketing is in effect, you see selected bracketing values on Shooting Menu 2, as shown on the left in Figure 8-28. In the Shooting Settings display, you see the symbol shown on the right in the figure. The Camera Settings display, which you bring up by pressing Info twice when the Shooting Settings screen is displayed, also reports the bracketing setting.
FIGURE 8-28: These symbols indicate that White Balance Bracketing is turned on.
By default, the bracketing setting remains in effect until you turn off the camera. If you don’t want that to happen, travel to the Exposure group of the Custom Functions menu and set Custom Function 3, Bracketing Auto Cancel, to Off. Just remember that this setting also affects exposure bracketing, which we cover in Chapter 7.
You can also cancel bracketing by revisiting the grid screen shown earlier, in Figure 8-27, and rotating the Quick Control dial until you see only a single grid marker. You also can wipe out both your bracketing setting and any White Balance Shift amount by pressing the Erase button or tapping its icon. Either way, tap Set or press the Set button to officially turn off bracketing.
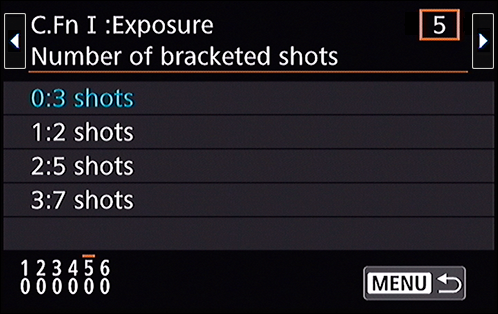
Now for the aforementioned option that enables you to capture more than three frames when you use White Balance Bracketing. You get to this option via the Number of Bracketed Shots option, found in the Exposure section of the Custom Functions menu and shown in Figure 8-29. Here's what you get at each setting:
3 shots: One neutral shot, flanked by one warmer and one cooler.
2 shots: One neutral shot and one that’s either warmer or cooler, depending on where you put the shift marker in the setup screen.
5 shots: One neutral shot, two that are progressively warmer, and two that are progressively cooler.
7 shots: One neutral shot, three that are progressively warmer, and three that are progressively cooler.
FIGURE 8-29: You can instead capture a series of 3, 2, 5, or 7 bracketed frames.
Although White Balance Bracketing is a fun feature, if you want to ensure color accuracy, creating a custom White Balance setting is a more reliable idea than bracketing white balance; after all, you can’t be certain that shifting the white balance a couple of steps is going to produce accurate colors. Shooting in the Raw format offers the best color safety net, however: You can assign a White Balance setting when you process the Raw images, whether you’re after a neutral color platform or want to lend a slight color tint to the scene.
Taking a Quick Look at Picture Styles
In addition to all the aforementioned focus and color features, your camera offers Picture Styles. Using Picture Styles, you can further tweak color as well as saturation, contrast, and image sharpening.
Sharpening is a software process that adjusts contrast in a way that creates the illusion of slightly sharper focus. The key word here is slightly: Sharpening cannot remedy poor focus but instead produces a subtle tweak to this aspect of your pictures.
The camera offers the following Picture Styles:
Auto: This is the default setting; the camera analyzes the scene and determines which Picture Style is the most appropriate.
Standard: This option captures the image by using the characteristics that Canon offers as suitable for the majority of subjects.
Portrait: This mode reduces sharpening slightly from the amount that’s applied in Standard mode, with the goal of keeping skin texture soft.
Landscape: In a nod to traditions of landscape photography, this Picture Style emphasizes greens and blues and amps up color saturation and sharpness, resulting in bolder images.
Fine Detail: Produces sharper photos that preserve fine textures and details with a colors similar to the Standard setting.
Neutral: This setting reduces saturation and contrast slightly compared to how the camera renders images when the Standard option is selected.
Faithful: The Faithful style is designed to render colors as closely as possible to how your eye perceives them.
Monochrome: This setting produces black-and-white photos — or, to be more precise, grayscale images. Technically speaking, a true black-and-white image contains only black and white, with no shades of gray.
If you set the Quality option to Raw (or Raw + Large/Fine), the camera displays your image on the monitor in black and white during playback. But during the Raw converter process, you can either choose to go with your grayscale version or view and save a full-color version. Or (even better) you can process and save the image once as a grayscale photo and again as a color image.
If you don’t capture the image in the Raw format, you can’t access the original image colors later. In other words, you’re stuck with only a black-and-white image.
The extent to which Picture Styles affect your image depends on the subject as well as on exposure settings and lighting conditions. Figure 8-30 shows you a test shot at each setting (except Auto) to give you a general idea of what to expect. As you can see, the differences are subtle, with the exception of the Monochrome option, of course.
FIGURE 8-30: Each Picture Style produces a slightly different take on the scene.
The level of control you have over Picture Styles, like most other settings in this chapter, depends on your camera’s exposure mode:
In Scene Intelligent Auto, Creative Auto, Flash Off, and the SCN modes: The camera sets the Picture Style for you.
In the advanced exposure modes: You can not only select any Picture Style, but also tweak each style to your liking and create up to three custom styles, which are listed as User Def. 1, 2, and 3.
Movie mode: If you set the Mode dial to P, Tv, Av, M, C1, or C2, you can select any Picture Style, including any custom styles you create. (Want to shoot a black-and-white movie? Set the Picture Style to Monochrome before you start recording.)
Chapter 4 explains how to select movie-recording options. For still photography, you can select a Picture Style in two ways:
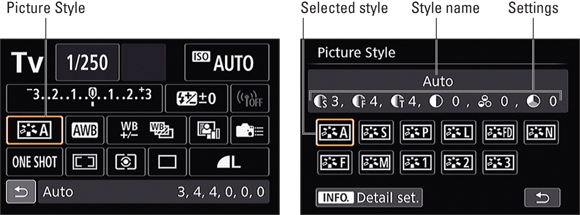
Quick Control screen: Highlight the Picture Style icon, as shown on the left in Figure 8-31, and then rotate the Main dial to cycle through the available styles. Again, the User Def. 1, 2, and 3 settings relate to custom Picture Styles that you can create; more on that topic momentarily. If you haven’t created a custom style, the Auto style is used if you select one of those three settings.
The numbers you see in the bottom-right corner of the screen represent the six characteristics applied by the style: Sharpness (Strength, Fineness, and Threshold), Contrast, Saturation, and Color Tone. (Using certain advanced options, you can adjust all four settings; more on that momentarily.)
If you want to see all available styles, tap the Picture Style icon or press Set to display the screen you see on the right in Figure 8-31. Highlight the style you want to use, and the six style values appear along with the style name, as shown in the figure. Tap the return arrow or press Set to exit the screen.
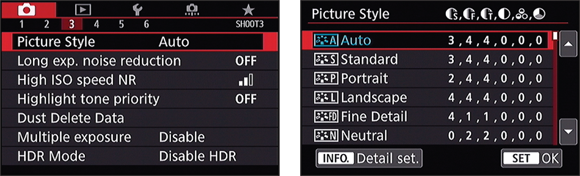
Shooting Menu 3: Choose Picture Style, as shown on the left in Figure 8-32, to display a list of all the styles, as shown on the right. You again can see the values for the six style characteristics on the screen shown on the right in the figure. To scroll the list of options, press the Multi-controller up/down or tap the scroll arrows along the right side of the screen. Choose an option and tap Set or press the Set button to exit the screen.
FIGURE 8-31: You can quickly select a Picture Style by using the Quick Control screen.
FIGURE 8-32: You also can access Picture Style options via Shooting Menu 3.
This discussion touches on just the basics of using Picture Styles. The camera also offers some advanced Picture Style features, including the following:
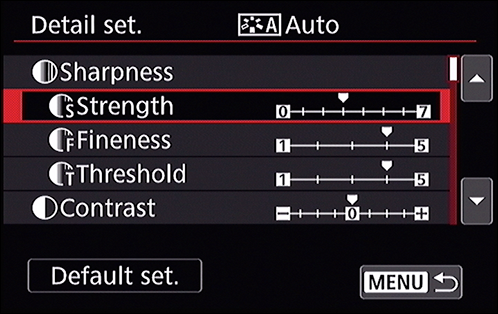
Modifying a Picture Style: You can tweak each style, varying the amount of sharpness (divided into strength, fineness, and threshold settings), contrast, saturation, and color tone adjustment that the style produces. After selecting a Picture Style — whether you’re doing so from the Quick Setting screen shown on the right in Figure 8-31 or the menu screen shown on the right in Figure 8-32 — tap the Info icon or press the Info button to access a screen similar to the one you see in Figure 8-33. Here, tap one of the adjustment options to display a screen where you can change the setting.
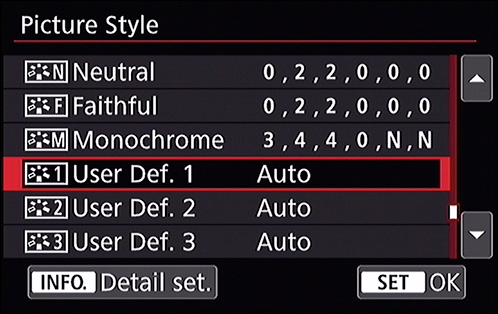
Storing a custom style: The process is the same as for modifying a style, except that instead of starting with an existing style, you choose one of the three User Defined options, as shown in Figure 8-34.
Using your computer to create and download styles: For übergeeks (you know who you are), you can download a software package named — are you ready? — Picture Style Editor, where you can create and save Picture Style files to your heart’s content. You then download the styles to your camera via the memory card. See Chapter 6 more more details on downloading Canon software.
And we would be remiss if I didn’t also mention that some Canon user groups swap Picture Styles with each other online. (We’d be equally remiss if we didn’t warn you that you play at your own risk any time you download files from persons unknown to you.)
FIGURE 8-33: You can adjust the characteristics of one of the preset styles.
FIGURE 8-34: Scroll down the list of Picture Styles to access the three User Defined options, which enable you to store your own Picture Styles.
Unless you’re just tickled pink by the prospect of experimenting with Picture Styles, we recommend that you just stick with the default settings. First, you have way more important camera settings to worry about — aperture, shutter speed, autofocus, and all the rest. Why add one more setting to your list, especially when the impact of changing it is minimal? Second, if you want to mess with the characteristics that the Picture Style options affect, you’re much better off shooting in the Raw (CR2) format and then making those adjustments on a picture-by-picture basis when you convert your Raw image. Chapter 6 shows you how to work with Raw files.
For these reasons, we opt in this book to present you with just this brief introduction to Picture Styles to make room for more details about functions that do make a big difference in your daily photography life, such as the white balance customization options presented earlier. But again, if you’re really into Picture Styles and you can’t figure out one of the advanced options from the descriptions here, the camera manual walks you step by step through all the various Picture Style features.
 If the camera is currently in Live View or Movie mode, exit to viewfinder mode before taking Step 1. If you move the focus switch on the lens while the Live View/Movie mode continuous autofocusing system is engaged, you can damage your equipment.
  Even in the manual-focus mode, you can confirm focus by pressing the shutter button halfway. The autofocus point or points that achieved focus flash for a second, the viewfinder focus lamp lights, and you hear the focus-achieved beep.
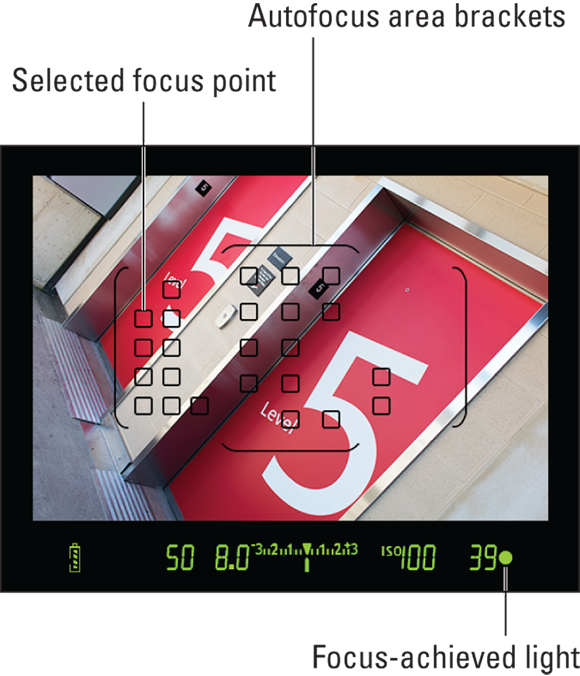

 The 80D features 45 dual cross-type AF points, a significant improvement on its predecessor, the 70D, which has 19. Dual cross-type AF points can detect and focus on horizontal and vertical lines in the scene, which gives them the capability to focus on a variety of subjects. Not only this, when you use a lens with a maximum aperture of f/2.8 or larger, the center point turns into a high-precision diagonal cross-type AF point, which includes a second cross-type pattern rotated 45-degrees to the original. This combination of patterns is even better at focusing than standard cross-type points. The catch is, of course, that not all lenses are able to use all 45 of the cross-type AF points, and only select lenses are able to use the center AF point in dual-cross mode. The manual organizes lenses into groups and explains what features they support.
 The fastest route to the option you want to use is the AF Area mode button, found on the top of the camera, just in front of the Main dial. (Look for the symbol shown in the margin here.) If the Shooting Settings display is active, the screen shown in
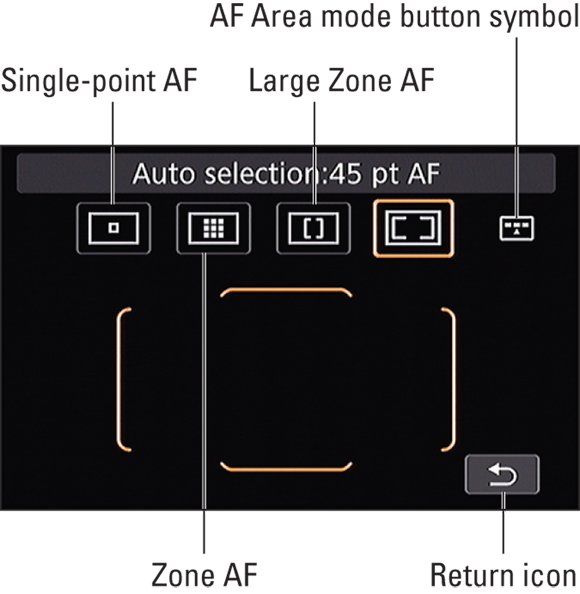
 If all four AF Area modes don’t appear as available, visit the Custom Functions menu, select the Autofocus category of options, and check the status of the item named Select AF Area Selec. Mode. On this screen, you can enable and disable the individual AF Area modes. By default, all four AF Area modes are enabled, and you see a check mark above each mode icon. If the check mark is gone, the mode is disabled. Bring it back into the game by pressing the Set button, and then tapping the mode icon or highlighting it and pressing the Set button again. Tap OK or highlight it and press the Set button to finalize your choice.
 You also can display the initial AF Area mode selection screen (refer to
  Quick Control screen: Select the AF operation mode icon, as shown in