Chapter 7
Getting Creative with Exposure
IN THIS CHAPTER
Exploring advanced exposure modes: P, Tv, Av, M, B, C1, and C2
Getting a grip on aperture, shutter speed, and ISO
Choosing an exposure metering mode
Tweaking exposure results
Taking advantage of Automatic Exposure Bracketing (AEB)
Using advanced flash options
By using the simple exposure modes we cover in Chapter 3, you can take good pictures with your Canon 80D. But to fully exploit your camera’s capabilities — and, more importantly, to exploit your creative capabilities — you need to explore your camera’s advanced exposure modes, represented on the Mode dial by the letters P, Tv, Av, M, B, C1, and C2.
This chapter explains everything you need to know to start taking advantage of these modes. First, you get an introduction to three critical exposure controls: aperture, shutter speed, and ISO. In addition, this chapter explains advanced exposure features, such as exposure compensation and metering modes, and digs deeper into the topic of flash photography.
Kicking Your Camera into High Gear
For full access to all your camera’s exposure controls, set the Mode dial to one of its advanced exposure modes, highlighted in Figure 7-1.
 Using these modes lets you manipulate two critical exposure controls, aperture and shutter speed. That’s not a huge deal in terms of exposure because the camera typically gets that part of the picture right in the fully automatic modes. But changing the aperture setting also affects the distance over which focus is maintained (depth of field), and shutter speed determines whether movement of the subject or camera creates blur. The next part of the chapter explains the details; for now, just understand that having input over these settings provides you with creative options that you don’t enjoy in the fully automatic modes.
Each advanced mode offers a different level of control over aperture and shutter speed, as follows:
- P (programmed autoexposure): The camera selects the aperture and shutter speed, but you can choose from different combinations of the two.
Tv (shutter-priority autoexposure): You select a shutter speed, and the camera chooses the aperture setting that produces a good exposure.
 Why Tv? Well, shutter speed controls exposure time; Tv stands for time value.
- Av (aperture-priority autoexposure): The opposite of shutter-priority autoexposure, this mode asks you to select the aperture setting — thus Av, for aperture value. The camera then selects the appropriate shutter speed to properly expose the picture.
M (manual exposure): In this mode, you specify both shutter speed and aperture. Although that prospect may sound intimidating, it’s actually the fastest and least complicated way to dial in exactly the exposure settings you want to use. And even in M mode, the camera assists you by displaying a meter that tells you whether your exposure settings are on target.
Setting the Mode dial to M has no effect on whether autofocusing or manual focusing is enabled. You set the focusing method via the switch on the lens and can use auto or manual focusing in any exposure mode.
B (Bulb): Bulb mode is a variation of Manual mode. You still control aperture and shutter speed, but instead of setting a specific shutter speed, you hold the shutter button down for the length of time you want the image to be exposed.
Bulb mode is great for night photography, catching lightning in action, and photographing thunderstorms and fireworks because it enables you to experiment with different shutter speeds simply by holding the shutter button down for different lengths of time. You don't have to fiddle with changing the shutter speed between each shot.
Bulb mode has its own timer feature if you’re interested in trying out timed exposures. You can find it on Shooting Menu 4. Set the Shooting mode to Bulb, then enable the timer and set the exposure time from 1 second to 99 hours, 59 minutes, and 59 seconds in the menu.
- C1 and C2 (Custom Shooting Modes): C1 and C2 are special modes. You can register (save) most camera settings (including exposure mode, menu options, and so forth) and instantly recall them by selecting C1 or C2 from Mode dial. To put it another way, you can create your own, custom exposure mode. We show you how to do it in Chapter 11.
Again, these modes won’t make much sense if you aren’t schooled in the basics of exposure. To that end, the next several sections provide a quick lesson in this critical subject.
Introducing Exposure Basics: Aperture, Shutter Speed, and ISO
Any photograph is created by focusing light through a lens onto a light-sensitive recording medium. In a film camera, the film negative is that medium; in a digital camera, it’s the image sensor.
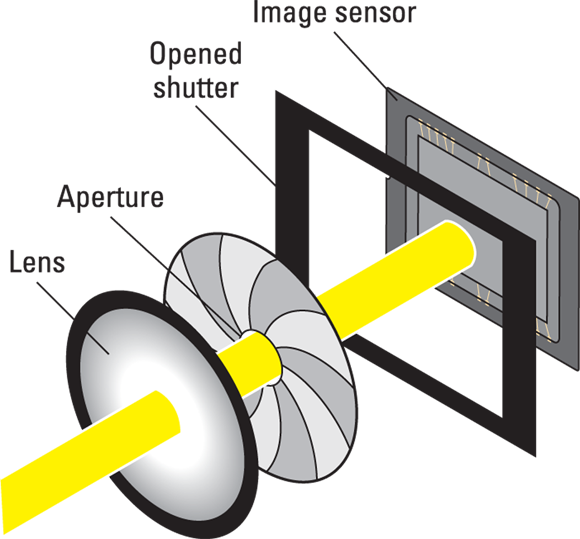
Between the lens and the sensor are two barriers, the aperture and shutter, which control how much light strikes the sensor. The design of the aperture, shutter, and sensor vary depending on the camera, but Figure 7-2 illustrates the basic concept.
The aperture and shutter, along with a third feature, ISO, determine exposure, which is what most of us would describe as picture brightness. This three-part formula works as follows:
Aperture (controls amount of light): The aperture is an adjustable hole in a diaphragm set inside the lens. By changing the size of the aperture, you control the size of the light beam that can enter the camera. Aperture settings are stated as f-stop numbers — or simply, f-stops — and are expressed with the letter f followed by a number: f/2, f/5.6, f/16, and so on. The lower the f-stop number, the larger the aperture opening, as illustrated in Figure 7-3.
The range of aperture settings depends on your lens; your lens manual should spell out which settings are available to you.
Shutter speed (controls duration of light): Set behind the aperture, the shutter works something like, er, the shutters on a window. When you aren’t taking pictures, the camera's shutter stays closed, preventing light from striking the sensor. When you press the shutter button, the shutter opens to allow light that passes through the aperture to hit the sensor. The exception is when you use Live View mode; in that mode, the shutter remains open so that your image can form on the sensor and be displayed on the monitor. When you press the shutter release in Live View mode, the shutter first closes and then reopens for the actual exposure.
The length of time that the shutter is open is the shutter speed and is measured in seconds: 1/60 second, 1/250 second, 2 seconds, and so on. The 80D offers a shutter speed range of 30 seconds to 1/8000 second. However, when you use the built-in flash, the top shutter speed is 1/250 second; this limitation is due to the way that the flash has to synchronize with the opening of the shutter. With some external Canon flash units, you can access the whole range of shutter speeds, however.
ISO (controls light sensitivity): ISO, which is a digital function rather than a mechanical structure on the camera, enables you to adjust how responsive the sensor is to light. The term ISO is a holdover from film days, when an international standards organization rated film stock according to light sensitivity: ISO 100, ISO 200, ISO 400, ISO 800, and so on. A higher ISO rating means greater light sensitivity.
On a digital camera, the sensor doesn’t actually get more or less sensitive when you change the ISO. Rather, the light “signal” that hits the sensor is amplified or dampened through electronics wizardry, sort of like how raising the volume on a radio boosts the audio signal. But the upshot is the same as changing to a more light-reactive film stock: A higher ISO means that less light is needed to produce the image, enabling you to use a smaller aperture, faster shutter speed, or both.
By default, your camera offers an ISO range from 100 to 16000 for still photos, but through a tweak we discuss in the section “Controlling ISO,” later in this chapter, you can raise the ISO ceiling as high as 25600.
Distilled to its essence, the image-exposure formula is this simple:
- Aperture and shutter speed together determine the quantity of light that strikes the image sensor.
- ISO determines how much the sensor reacts to that light.
The tricky part of the equation is that aperture, shutter speed, and ISO settings affect your pictures in ways that go beyond exposure. You need to be aware of these side effects, explained in the next sections, to determine which combination of the three exposure settings will work best for your picture.
Understanding exposure-setting side effects
You can create the same exposure with different combinations of aperture, shutter speed, and ISO, which Figure 7-4 illustrates. Although the figure shows only two variations of settings, your choices are pretty much endless — you’re limited only by the aperture range the lens allows and the shutter speeds and ISO settings the camera offers.
However, the settings you select impact your image beyond mere exposure, as follows:
- Aperture affects depth of field, or the distance over which focus remains acceptably sharp.
- Shutter speed determines whether moving objects appear blurry or sharply focused.
- ISO affects the amount of image noise, which is a defect that looks like specks of sand.
The next three sections detail these exposure side effects.
Aperture and depth of field
The aperture setting, or f-stop, affects depth of field, or the distance over which acceptable focus is maintained. With a shallow depth of field, your subject appears more sharply focused than faraway objects; with a large depth of field, the sharp-focus zone spreads over a greater distance from the lens.
When you reduce the aperture size — “stop-down the aperture,” in photo lingo — by choosing a higher f-stop number, you increase depth of field. For example, notice that the background in the left image in Figure 7-4, taken at f/13, appears sharper than the right image, taken at f/5.6.
Aperture is just one contributor to depth of field, however. The camera-to-subject distance and the focal length of your lens also play a role. Depth of field is reduced as you move closer to the subject or increase the focal length of the lens (moving from a wide-angle lens to a telephoto lens, for example). See Chapter 8 for the complete story on depth of field.
 One way to remember the relationship between f-stop and depth of field is to think of the f as focus: The higher the f-stop number, the larger the zone of sharp focus. Please don’t share this tip with photography elites, who will roll their eyes and inform you that the f in f-stop most certainly does not stand for focus but, rather, for the ratio between aperture size and lens focal length — as if that’s helpful to know if you aren’t an optical engineer.
Shutter speed and motion blur
At a slow shutter speed, moving objects appear blurry; a fast shutter speed captures motion cleanly. Compare the water motion in the photos in Figure 7-4, for example. At a shutter speed of 1/25 second (left photo), the water blurs. At 1/125 second (right photo), the water appears more sharply focused. The shutter speed needed to freeze action depends on the subject's speed.
 If your picture suffers from overall image blur, like you see in Figure 7-5, where even stationary objects appear out of focus, the camera moved during the exposure — which is always a danger when you handhold the camera at slow shutter speeds. The longer the exposure time, the longer you have to hold the camera still to avoid the blur caused by camera shake.
How slow is too slow? It depends partly on your lens: Camera shake affects your picture more with a lens that has a long focal length. For example, you may be able to use a slower shutter speed when you shoot with a 55mm lens than if you switch to a 200mm lens. And of course, how still you can hold the camera depends on your physical capabilities. The best idea is to do your own tests to find your handholding limit. Check out Chapter 6 to find out how to see each picture’s shutter speed when you view your test images using the Canon software.
To avoid the issue altogether, use a tripod or otherwise steady the camera. If you need to handhold, improve your odds of capturing a sharp photo by turning on image stabilization, if your lens offers it. (On the kit lenses, turn the Stabilizer switch to On.)
ISO and image noise
As ISO increases, making the image sensor more reactive to light, you increase the risk of noise. Noise looks like bits of sand and is similar in appearance to film grain, a defect that often mars pictures taken with high-ISO film. Figure 7-6 offers an example.
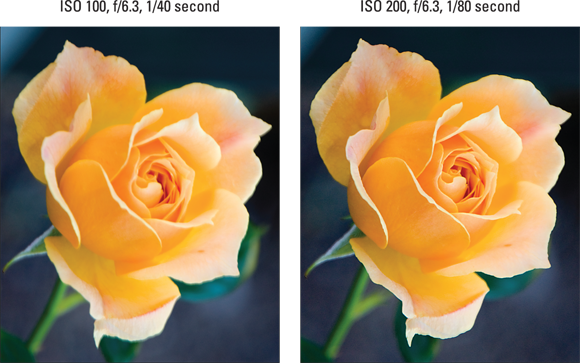
Ideally, you should always use the lowest ISO setting to ensure top image quality. Sometimes, though, the lighting conditions don’t permit you to do so. Take the rose image as an example. On Julie’s first attempt, taken at ISO 100, f/6.3, and 1/40 second, the flower was slightly blurry, as shown on the left in Figure 7-7. She was using a tripod, so camera shake wasn’t the problem. A very slight breeze was moving the flower just enough that a 1/40 second shutter speed wasn’t fast enough to freeze the action. The aperture was at the maximum opening the lens offered, so the only way to allow a faster shutter speed was to raise the ISO. By increasing the ISO to 200, she was able to use a shutter speed of 1/80 second, which captured the flower cleanly, as shown on the right.
Fortunately, you don’t encounter serious noise on the 80D until you really crank up the ISO. In fact, you may even be able to get away with a fairly high ISO if you keep your print or display size small. Some people probably wouldn't even notice the noise in the left image in Figure 7-6 unless they were looking for it, for example. But as with other image defects, noise becomes more apparent as you enlarge the photo, as shown on the right in that same figure. Noise is also easier to spot in shadow areas of your picture and in large areas of solid color.
A high ISO isn’t the only cause of noise, however. A long exposure time can also produce the defect, so how high you can raise the ISO before the image gets ugly varies depending on shutter speed.
Doing the exposure balancing act
When you change any of the three exposure settings — aperture, shutter speed, or ISO — one or both of the others must also shift to maintain the same image brightness.
Say you’re shooting a soccer game, and although the exposure looks great, the players appear blurry at the current shutter speed. If you raise the shutter speed, you have to compensate with either a larger aperture (to allow in more light during the shorter exposure) or a higher ISO setting (to make the camera more sensitive to the light). Which way you should go depends on whether you prefer the shorter depth of field that comes with a larger aperture or the increased risk of noise that accompanies a higher ISO. Of course, you can also adjust both settings if you choose to get the exposure results you need.
All photographers have their own approaches to finding the right combination of aperture, shutter speed, and ISO, and you’ll no doubt develop your own system when you become more practiced at using the advanced exposure modes. In the meantime, here’s how we suggest that you handle things:
- Use the lowest ISO setting unless the lighting conditions are such that you can’t use the aperture and shutter speed you want without raising the ISO.
- If your subject is moving, give shutter speed the next highest priority. Choose a fast shutter speed to ensure a blur-free photo, or on the flip side, select a slow shutter speed to intentionally blur that moving object, an effect that can create a heightened sense of motion. When shooting waterfalls, for example, using a slow shutter speed gives the water that blurry, romantic look. (Chapter 9 has an example.)
For nonmoving subjects, make aperture a priority over shutter speed, setting the aperture according to the depth of field you have in mind. For portraits, for example, try using a wide-open aperture (a low f-stop number) to create a short depth of field and a nice, soft background for your subject.
Be careful not to go too shallow with depth of field when shooting a group portrait, though. Unless all the subjects are the same distance from the camera, some may be outside the zone of sharp focus. A short depth of field also makes action shots more difficult because you have to be spot-on with focus. With a larger depth of field, the subject can move a greater distance toward or away from you before leaving the sharp-focus area, giving you a bit of a focusing safety net.
Keeping all this information straight is a little overwhelming at first, but the more you work with your camera, the more the whole exposure equation will make sense to you. You can find tips in Chapter 9 for choosing exposure settings for specific types of pictures; keep moving through this chapter for details on how to monitor and adjust aperture, shutter speed, and ISO settings.
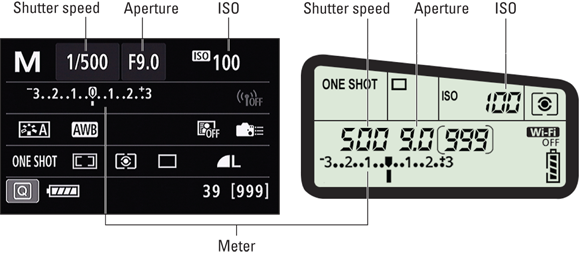
Monitoring Exposure Settings
When you press the shutter button halfway, the f-stop, shutter speed, and ISO speed appear in the viewfinder, as shown in Figure 7-8, and in the Shooting Settings display and LCD panel, as shown in Figure 7-9. In Live View mode, the exposure data appears at the bottom of the monitor and takes a form similar to what you see in the viewfinder. (See Chapter 4 for details about Live View.)
The value at the far right of the viewfinder and lower right of the Shooting Settings display — 39, in Figures 7-8 and 7-9 — indicates the number of frames that can fit in the camera’s memory buffer when you use the Continuous Drive modes, which we cover in Chapter 2. For purposes of exposure, don’t worry about it.
Also be aware that in the viewfinder, LCD panel, and on the monitor in Live View mode, shutter speeds are presented as whole numbers, even if the shutter speed is set to a fraction of a second. For example, for a shutter speed of 1/500 second, you see just the number 500. When the shutter speed slows to 1 second or more, you see quote marks after the number: 1″ indicates a shutter speed of 1 second, 4″ means 4 seconds, and so on.
In all exposure modes except B (Bulb), the displays also offer an exposure meter, labeled in Figures 7-8 and 7-9. The meter serves different purposes depending on your exposure mode:
In manual exposure (M) mode, the meter indicates whether your settings will properly expose the image. Figure 7-10 gives you three examples. When the exposure indicator (the bar under the meter) aligns with the center point of the meter, as shown in the middle example, the current settings will produce a proper exposure. If the indicator moves toward the minus side of the scale, as in the left example in the figure, the image will be underexposed. If the indicator moves to the right of center, as in the right example, the image will be overexposed. The farther the indicator moves toward the plus or minus sign, the greater the potential exposure problem.
Keep in mind that the information reported by the meter is dependent on the metering mode, which determines what part of the frame the camera uses to calculate exposure. You can choose from four metering modes, covered in the next section.
In P, Tv, and Av modes, the meter displays the current Exposure Compensation setting. Remember, in those modes the camera sets either the shutter speed or aperture, or both, to produce a good exposure — again, depending on the current metering mode. Because you don’t need the meter to tell you whether exposure is okay, the meter instead indicates whether you enabled Exposure Compensation, a feature that forces a brighter or darker exposure than the camera thinks is appropriate. (Look for details later in this chapter.) When the exposure indicator is at 0, no compensation is being applied. If the indicator is to the right of 0, you applied compensation to produce a brighter image; when the indicator is to the left, you asked for a darker photo.
In some lighting situations, the camera can’t select settings that produce an optimal exposure in the P, Tv, or Av mode, however. Because the meter indicates the Exposure Compensation amount in those modes, the camera alerts you to exposure issues as follows:
- Av: The shutter speed blinks to let you know that the camera can’t select a shutter speed that will produce a good exposure at the aperture you selected. Choose a different f-stop or adjust the ISO.
- Tv: The aperture value blinks to tell you that the camera can’t open or stop down the aperture enough to expose the image at your selected shutter speed. Your options are to change the shutter speed or ISO.
- P: Both the aperture and shutter speed blink if the camera can’t select a combination that will properly expose the image. Your only option is to change the ISO setting.
In B (Bulb) mode, you see neither the meter nor the shutter speed in the displays; just the aperture and ISO speed. Remember, in this mode, the shutter stays open as long as you hold down the shutter button, so the camera has no idea what shutter speed you’re going to use or how it will affect the exposure. Instead, the shutter speed readout says Bulb, and the elapsed shooting time (in seconds) appears in the area that normally shows the number of shots remaining.
As for the C1 and C2 modes, which are your custom exposure modes, the way the camera behaves depends on which exposure mode you used as the basis for the custom mode. Chapter 11 explains this feature.
Choosing an Exposure Metering Mode
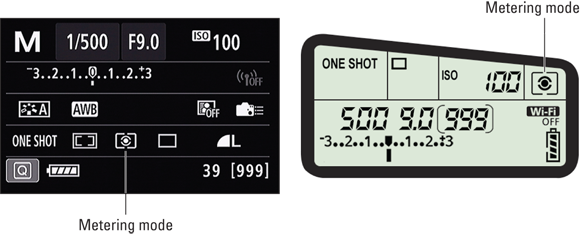
The metering mode determines which part of the frame the camera analyzes to calculate exposure. Your camera offers four metering modes, described in the following list and represented in the Shooting Settings display and LCD panel by the icons you see in the margin. (See Figure 7-11 for help finding the icons.) However, you can access all four modes only in the advanced exposure modes.
 Evaluative metering: The camera analyzes the entire frame and then selects exposure settings designed to produce a balanced exposure. This setting is always used for the fully automatic exposure modes.
 Partial metering: The camera bases exposure on an area covering about 6 percent of the center of the frame.
 Spot metering: Exposure is based on just the central 3.8 percent of the frame, with the metering area indicated by a circle in the viewfinder display, as shown in Figure 7-12.
 Center-Weighted Average metering: The camera bases exposure on the entire frame but puts extra emphasis — or weight — on the center.
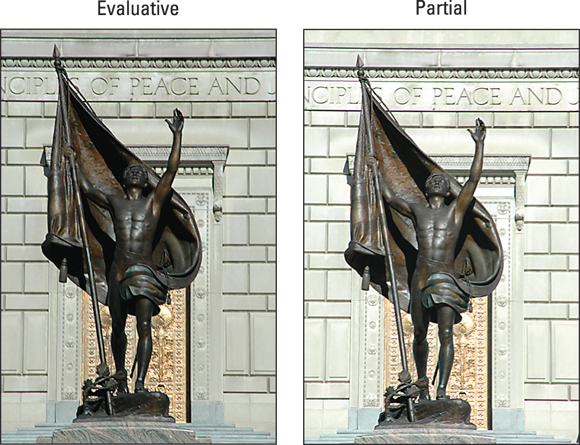
In most cases, Evaluative metering does a good job. But it can get thrown off when a dark subject is set against a bright background or vice versa. For example, in the left image in Figure 7-13, the bright background caused the camera to underexpose the statue, which was the point of interest for the photo. Switching to Partial metering properly exposed the statue. (Spot metering would produce a similar result for this particular subject. Center-weighted would be better than Evaluative but not as precise as the other modes.)
Of course, if the background is very bright and the subject is very dark, the exposure that does the best job on the subject typically overexposes the background. You may be able to reclaim some lost highlights by turning on Highlight Tone Priority, explored later in this chapter, or, if you want to expand the range of both shadows and highlights, by using HDR Mode, also covered later.
To change the metering mode, use these techniques:
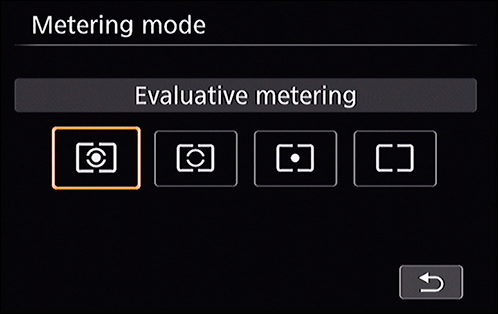
 Metering mode button: The button is located on top of the camera, at the right end of the LCD panel. When you press the button, all data except the metering mode icon disappears from the panel, and the screen shown in Figure 7-14 appears on the monitor. Use the Multi-controller, Main dial, or Quick Control dial to cycle through the available settings. You also can tap your selection on the monitor. Wrap up by pressing the Set button or by tapping the return arrow on the monitor.
 Quick Control screen: After shifting to the Quick Control screen, choose the icon highlighted in Figure 7-15 and rotate the Main dial or Quick Control dial to cycle through the four modes. Or tap the icon or press Set to display the screen showing all four modes together (refer to Figure 7-14).
In theory, the best practice is to check the metering mode before each shot and choose the mode that best matches your exposure goals. But in practice, it’s a pain, not just in terms of having to adjust yet one more setting but also in terms of having to remember to adjust one more setting. So until you’re comfortable with all the other controls on your camera, just stick with Evaluative metering. It produces good results in most situations. After all, you can see in the monitor whether you like your results, and if not, adjust exposure settings and reshoot. This option makes the whole metering mode issue a lot less critical than it is when you shoot with film.
However — and this is an important however — for viewfinder photography, your choice of metering mode determines when the camera sets the final exposure for your picture. In Evaluative mode, exposure is locked when you press the shutter button halfway, but in the other modes, exposure is adjusted up to the time you press the button all the way to take the picture. Should you want to lock exposure before that point, you can use the technique outlined in the later section, “Locking Autoexposure Settings.”
For Live View photography, exposure is always set at the moment you snap the picture, regardless of the metering mode.
Setting ISO, f-stop, and Shutter Speed
If you want to control ISO, aperture (f-stop), or shutter speed, set the camera to one of the advanced exposure modes. Then check out the next several sections to find the exact steps to follow in each of these modes.
Controlling ISO
To recap the ISO information presented at the start of this chapter, your camera’s ISO setting controls how sensitive the image sensor is to light. At higher ISO values, you need less light to expose an image. Remember the downside to raising ISO, however: The higher the ISO, the greater the possibility of noisy images. Refer to Figure 7-6 for a reminder of what that defect looks like.
In the fully automatic exposure modes, the camera controls ISO. In the advanced exposure modes, you can use auto ISO adjustment or select a specific setting. You also can specify limits for the camera to follow when you use auto ISO adjustment.
You can view the ISO setting in all three displays, as shown in Figure 7-16. To adjust the setting, you have these options:
ISO button: Press the ISO button (top of the camera, just above the LCD panel). The ISO value becomes activated in the panel and viewfinder, and the screen shown in Figure 7-17 appears on the monitor. Use the Main dial, Quick Control dial, or Multi-controller to adjust the setting, or if you're in a touchscreen mood, drag your finger along the scale or tap the left and right arrows. Close out the process by pressing the Set button or by tapping the return arrow on the monitor.
While the selection screen is displayed, you can tap the Info icon or press the Info button to quickly select Auto ISO mode.
- Quick Control screen: After shifting to the Quick Control screen, highlight the ISO setting and then rotate the Main dial or Quick Control dial to adjust the setting. Or, to access the selection screen shown in Figure 7-17, tap the ISO setting or press the Set button.
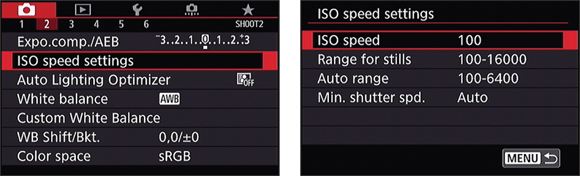
- Shooting Menu 2: Select ISO Speed Settings, as shown on the left in Figure 7-18, and then choose ISO Speed, as shown on the right, to set the ISO value you want to use.
The other menu options on the screen shown on the right in the figure enable you to modify the range of ISO values available and to control how the camera selects an ISO setting when you use the Auto ISO option. The menu options work as follows:
Range for Stills: This option controls the ISO range you have available to you when you take ISO off Auto and set it yourself (as shown on the left in Figure 7-19). The next menu option, Auto Range, allows you to limit the ISO range the camera uses when ISO is in Auto mode.
By default, you can select from ISO values ranging from 100 to 16000, as shown on the right in Figure 7-19. But via this menu option, you can select a higher minimum setting and expand the maximum value to 25600. After choosing the menu option, tap or highlight the value you want to change and press Set to display the adjustment controls. (The Maximum setting is selected in the figure.) A couple of fine points to note:
- The maximum setting for still shooting is ISO 25600, which is also shown as H(25600). The H stands for high, which should be a reminder to expect more noise at that ISO setting.
- If you enable Highlight Tone Priority, an exposure feature covered later in this chapter, the lowest possible ISO setting becomes 200. You also lose access to the expanded ISO setting H(26500). The funny thing is, you can still set the maximum ISO to H(25600) on the Range for Stills screen; you just won’t be able to select it when shooting.
- Auto Range: Use this option to set the minimum and maximum ISO settings you want the camera to use when you go with Auto ISO adjustment.
- Min. Shutter Speed: This setting relates to shooting in the P and Av exposure modes. If you leave the setting at Auto (the default), the camera automatically shifts the ISO so that a reasonable shutter speed is set, taking the current focal length into account. You also can select a specific shutter speed, in which case the camera shifts to auto ISO adjustment only if the shutter speed falls to your selected value or lower. This setting isn't applied when you use flash, however. Also, the camera will choose a slower shutter speed than you designate if that's the only way to produce a good exposure.
- Range for Movies: When in Movie mode, the Range for Stills option becomes Range for Movies. Here are few things to keep in mind:
- You can set a new minimum and maximum ISO to limit the ISO range you have available when you manually select an ISO (which only happens in manual exposure mode).
- Normal Auto ISO speed ranges when shooting movies is between ISO 100 and ISO 12800. You can expand this by setting the maximum to H(25600). If you set the minimum to ISO 200 and the maximum to ISO 3200 or lower, the range will default to ISO 100 to ISO 6400.
In Auto ISO mode, the Shooting Settings display, LCD panel, and Live View display initially show Auto (or A) as the ISO value. But when you press the shutter button halfway, the value changes to show you the ISO setting the camera selected. You also see the selected value rather than Auto in the viewfinder. Note: When you view shooting data during playback, you may see a value reported that isn't on the list of “official” ISO settings — ISO 320, for example. This happens because in Auto mode, the camera can select values all along the available ISO range, whereas if you select a specific ISO setting, you’re restricted to specific notches within the range.
Make sure to tap or select OK and press the Set button when changing the minimum or maximum ISO range for stills or movies. If you don’t, your choices won’t be saved.
Adjusting aperture and shutter speed
You can adjust aperture and shutter speed only in the advanced exposure modes.To see the current exposure settings, press the shutter button halfway. The following actions then take place:
- The exposure meter comes to life. If autofocus is enabled, the autofocus mechanism starts to do its thing.
- The aperture and shutter speed appear in the viewfinder, LCD panel, and the Shooting Settings display. (Refer to Figures 7-8 and 7-9.) In Live View mode, the settings appear at the bottom of the monitor, assuming that you’re using a display mode that reveals shooting data. (Press the Info button to cycle through the Live View display modes.)
- In manual exposure (M) mode, the exposure meter lets you know whether the current settings will expose the image properly. In the other modes, the camera indicates an exposure problem by flashing the shutter speed or the f-stop value. (See the section “Monitoring Exposure Settings,” earlier in this chapter, for details.)
The technique you use to change the exposure settings depends on the exposure mode:
- P (programmed autoexposure): The camera displays its recommended aperture and shutter speed. To select a different combination, rotate the Main dial. But note that your change applies only to the current shot. Also — and this is a critical point — you can't stray from the initial shutter speed and aperture when you use flash.
Tv (shutter-priority autoexposure): Rotate the Main dial to change the shutter speed. As you do, the camera adjusts the aperture as needed to achieve the proper exposure.
Changing the aperture also changes depth of field. So even though you’re working in shutter-priority mode, keep an eye on the f-stop, too, if depth of field is important to your photo. Also remember that if the aperture value blinks, the camera can't adjust the aperture enough to produce a good exposure at the current shutter speed. So you may need to compromise on shutter speed (or, in dim lighting, raise the ISO).
Av (aperture-priority autoexposure): Rotate the Main dial to set the f-stop. The camera automatically adjusts the shutter speed.
The range of possible f-stops depends on your lens and, with most zoom lenses, on the zoom position (focal length) of the lens. For the 18–55mm kit lens featured in this book, for example, you can select apertures from f/3.5 to f/22 when zoomed to the shortest focal length (18mm). At the maximum focal length (55mm), the aperture range is from f/5.6 to f/36.
If you’re handholding the camera, be careful that the shutter speed doesn’t drop so low that you run the risk of camera shake. If your scene contains moving objects, make sure that the shutter speed is fast enough to stop action (or slow enough to blur it, if that’s your creative goal).
- M (manual exposure): Select aperture and shutter speed like so:
- To adjust shutter speed: Rotate the Main dial.
- To adjust aperture: Rotate the Quick Control dial.
- B (Bulb exposure): Rotate the Main dial to set the f-stop. You control shutter speed through the shutter button: The shutter remains open as long as you hold the button down.
- C1 and C2 (Custom Shooting Modes): Use the same technique as for the exposure mode you used as the basis for your custom mode. For example, if you based the C1 mode on the Av mode, you can adjust f-stop by rotating the Main dial.
You also can use the Quick Control screen to adjust settings in all these modes except P. First, choose the setting you want to adjust. For example, in Figure 7-20, the aperture setting is highlighted, and the name of the option appears at the bottom of the screen. Rotate the Main dial or Quick Control dial to adjust the setting. You also can tap the f-stop or shutter speed to display a screen with a setting scale; drag your finger along the scale or tap the arrows above the scale to adjust the setting. Press the return arrow or the Set button to exit the screen.
Keep in mind that when you use P, Tv, and Av modes, the settings that the camera selects are based on what it thinks is the proper exposure. If you don’t agree with the camera, you have two options. Switch to manual exposure (M) mode and simply dial in the aperture and shutter speed that deliver the exposure you want, or if you want to stay in P, Tv, or Av mode, tweak the autoexposure settings by using Exposure Compensation, one of the exposure-correction tools described in the next section.
Sorting through Your Camera’s Exposure-Correction Tools
In addition to the normal controls over aperture, shutter speed, and ISO, your camera offers a collection of tools that enable you to solve tricky exposure problems. The next sections give you the lowdown on these features.
Overriding autoexposure results with Exposure Compensation
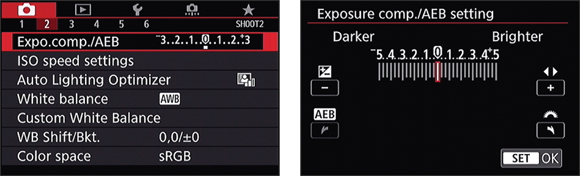
In P, Tv, and Av modes, you can enjoy autoexposure support but retain some control over the final exposure. If the image the camera produced is too dark or too light, you can use Exposure Compensation, sometimes called EV Compensation. (The EV stands for exposure value.) This feature tells the camera to produce a darker or lighter exposure than its autoexposure mechanism thinks is appropriate. Here’s how it works:
- Exposure compensation is stated in EV values, as in +2.0 EV. Possible values range from +5.0 EV to –5.0 EV.
Each full number on the EV scale represents an exposure shift of one full stop. In plain English, it means that if you change the Exposure Compensation setting from EV 0.0 to EV –1.0, the camera adjusts exposure settings to result in half as much light as the current settings. If you raise the value to EV +1.0, the settings are adjusted to double the light.
- A setting of EV 0.0 results in no exposure adjustment.
- For a brighter image, raise the EV value. For a darker image, lower it.
Exposure compensation is especially helpful when your subject is lighter or darker than the background. For example, see the first image in Figure 7-21. Because of the bright sky, the camera chose an exposure that made the tree too dark. Setting the Exposure Compensation value to EV +1.0 resulted in a properly exposed tree.
Sometimes you can cope with situations like this one by changing the Metering mode setting, as discussed earlier in this chapter. The images in Figure 7-21 were metered in Evaluative mode, for example, which meters exposure over the entire frame. Switching to Partial or Spot metering probably wouldn’t have helped in this case because the center of the frame was bright. In any case, we generally find it easier to simply adjust Exposure Compensation than to experiment with metering modes.
You can take several roads to applying exposure compensation. Here are the two most efficient:
Quick Control dial: First, make sure that the Lock switch under the dial is set to the unlocked position. Next, wake up the exposure system by pressing the shutter button halfway and releasing it. Now rotate the Quick Control dial to adjust the Exposure Compensation value. As you do, the meter in the LCD panel and Shooting Settings display updates to show you the current setting, as shown in Figure 7-22.
Julie finds it really easy to rotate the dial by accident and change the Exposure Compensation setting without being aware of her mistake. For this reason, she keeps the Lock switch set to the Lock position until she's in need of Exposure Compensation.
- Quick Control screen: Highlight the exposure meter and rotate the Quick Command dial to move the exposure indicator left or right along the meter. For this technique, the position of the dial’s Lock switch is irrelevant; rotating the dial moves the indicator along the meter even when the dial is locked.
You can also follow one of these two paths:
- Shooting Menu 2: Select Expo. Comp/AEB, as shown in Figure 7-23.
- Quick Control screen: Tap the exposure meter or highlight it and then press Set.
Either way, you see the screen shown in Figure 7-24. This is a tricky screen, so pay attention:
- The screen has a double purpose: You use it to enable automatic exposure bracketing (AEB) as well as exposure compensation. If you’re not careful, you can change the wrong setting.
- To apply exposure compensation, move the exposure indicator (the red line on the meter) along the scale by rotating the Quick Control dial, by pressing the Multi-controller left or right, or tapping the plus or minus signs, labeled Exposure Compensation controls in the figure. If you rotate the Main dial, you adjust the AEB setting instead.
- Tap Set or press the Set button to lock in the amount of exposure compensation and exit the screen.
When you dial in an adjustment of greater than three stops, the notch under the viewfinder meter disappears and is replaced by a little triangle at one end of the meter — at the right end for a positive Exposure Compensation value and at the left for a negative value. However, the meter on the Shooting Settings screen and on Shooting Menu 2 adjust to show the proper setting.
The way that the camera arrives at the brighter or darker image you request depends on the exposure mode:
- In Av (aperture-priority) mode, the camera adjusts the shutter speed but leaves your selected f-stop in force.
- In Tv (shutter-priority) mode, the camera opens or stops down the aperture, leaving your selected shutter speed alone.
- In P (programmed autoexposure) mode, the camera decides whether to adjust aperture, shutter speed, or both.
These explanations assume that you have a specific ISO setting selected rather than Auto ISO. If you use Auto ISO, the camera may adjust that value instead.
A final, and critical, point about exposure compensation: When you power off the camera, it doesn’t return you to a neutral setting (EV 0.0). The setting you last used remains in force until you change it, so always zero out the setting at the end of a shoot.
Improving high-contrast shots
When a scene contains both very dark and very bright areas, achieving a good exposure can be difficult. If you choose exposure settings that render the shadows properly, the highlights are often overexposed, and if you go the other direction, you lose detail in the shadows. Your camera offers three tools to try in this situation:
- HDR Backlight Control mode: This mode, which you access through the SCN setting on the Mode dial, captures three images at different exposures and blends them for a final result that contains a greater tonal range (range of shadows to highlights) than can be captured in a single frame. It’s easy to use (Chapter 3 provides details), but like all the fully automated modes, it prevents you from accessing the other exposure, color, and focus options available in the advanced exposure modes.
- Highlight Tone Priority: This option, explained next, takes a single shot but in a manner that renders highlights better without losing shadow detail.
- HDR mode: Like HDR Backlight Control mode, this mode captures three images at three different exposures and blends the three into a single image. The difference is that you have control over how much exposure varies between frames in this mode. Keep thumbing through the chapter for details.
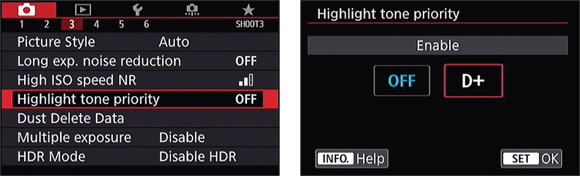
Enabling Highlight Tone Priority
Figure 7-25 offers an example of a subject that can benefit from Highlight Tone Priority. In the left image, the dark lamppost in the foreground looks fine, but the white building behind it became so bright that all detail was lost. The same thing occurred in the highlight areas of the green church steeple. In the right image, captured using Highlight Tone Priority, the difference is subtle, but if you look at that white building and steeple, you can see that the effect does make a difference. Now the windows in the building are at least visible, the steeple has regained some of its color, and the sky, too, has a bit more blue.
This feature is turned off by default, which may seem like an odd choice after looking at the improvement it made to the scene in Figure 7-25. What gives? The answer is that in order to do its thing, Highlight Tone Priority needs to play with a few other camera settings, as follows:
- The minimum ISO is raised to ISO 200–16000 (you cannot expand the ISO). The camera needs the more limited range in order to favor the image highlights. Losing the highest ISO is no big deal — the noise level at that setting can make your photo unattractive anyway. But in bright light, you may miss the option of lowering the ISO to 100 because you may be forced to use a smaller aperture or a faster shutter speed than you like.
- Auto Lighting Optimizer is disabled. This feature, which attempts to improve image contrast, is incompatible with Highlight Tone Priority. So read the upcoming section that explains Auto Lighting Optimizer, to determine which of the two exposure tweaks you want to use.
- Shadows may exhibit slightly more noise. Again, noise is the defect that looks like speckles in your image.
Enable Highlight Tone Priority via Shooting Menu 3, shown in Figure 7-26. Note that the “on” option is indicated by a D+ symbol — the D stands for dynamic range, which is the tech term for the tonal range of an image. So, D+ equals greater dynamic range.
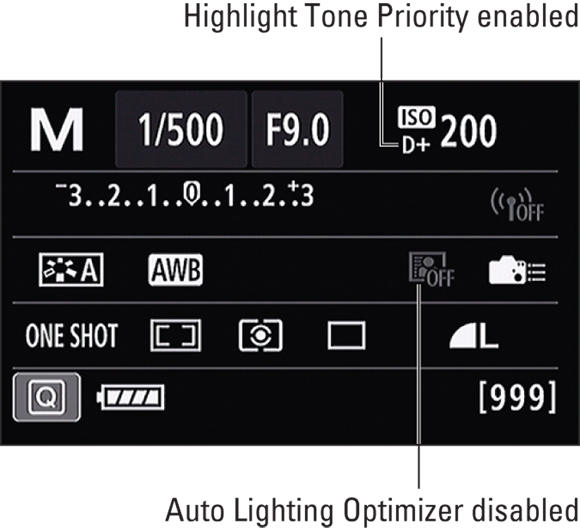
As a reminder that Highlight Tone Priority is enabled, a D+ symbol appears near the ISO value in the Shooting Settings display, as shown in Figure 7-27. The same symbol appears in the viewfinder and LCD panel. Notice in Figure 7-27 that the symbol that represents Auto Lighting Optimizer is dimmed because that feature is automatically disabled when you turn on Highlight Tone Priority.
Exploring automated HDR photography
HDR mode works similarly to the HDR Backlight Control Scene mode that we cover in Chapter 3: The camera automatically records three images at different exposures and then blends the three to create a photograph that contains a broader range of shadows and highlights than could be captured with a single exposure.
Another option when shooting a high-contrast interior/exterior scene is to use flash to light the interior instead of using HDR mode. Assuming that the exterior is beyond the reach of the flash, it will be exposed by the ambient light. The problem, as in this case, is that the flash light can be reflected in windows, doors, and in other reflective subjects.
You can take advantage of HDR mode in P, Tv, Av, M, C1, or C2 exposure modes. (B mode won't work.) Take these steps:
Select JPEG as the file format (Image Quality).
HDR mode is off limits when Raw shooting is enabled. (You can change the Image Quality setting via Shooting Menu 1 or the Quick Control screen; see Chapter 2 for details.)
- Make sure the following features are turned off:
- AEB (automatic exposure bracketing, Shooting Menu 2)
- White Balance bracketing (Shooting Menu 2)
- Multi Shot Noise Reduction (High ISO Speed NR option, Shooting Menu 3)
- Multiple Exposure (Shooting Menu 3)
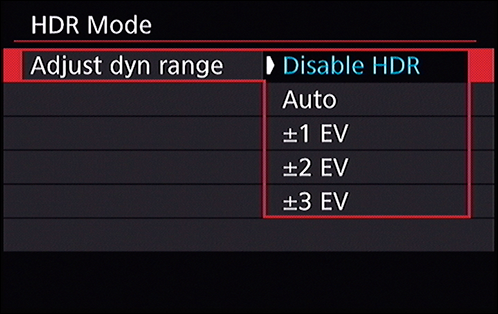
- Choose HDR Mode from Shooting Menu 3 to display the HDR Mode menu, as illustrated in Figure 7-28.
Specify the way you want the HDR frames to be recorded via the options shown on the right in Figure 7-28.
The options work as follows:
- Adjust Dyn Range: Select this option to display the menu shown in Figure 7-29. Here, you specify how you want the camera to adjust exposure between frames. At the Auto setting, the camera analyzes the scene and makes the call for you. Or you can specify that you'd like a 1-, 2-, or 3-stop exposure between frames.
- Effect: Select an effect. You can choose between Natural (the default), Art Standard, Art Vivid, Art Bold, or Art Embossed. Each setting varies the saturation, outlines, brightness, and tone of the final image by a different amount.
- Continuous HDR: By default, the camera captures just one HDR image and then returns to normal shooting. If you want to record a series of HDR images, set the option to Every Shot instead of 1 Shot Only. The camera remains in HDR mode until you disable the feature.
Auto Image Align: This feature, when enabled, analyzes your three captures and then fiddles with them to ensure that the images are aligned as closely as possible. Turn this option on when you’re handholding the camera; when you use a tripod, disable it.
When this feature is enabled, the resulting image area may be slightly less than what you saw through the viewfinder because the camera may need to crop the image slightly in order to align the images. The cropped image is then stretched to fill the frame.
Exit the menu, frame, focus, and shoot.
After you release the shutter button, the camera records and blends the three images. The three separate images aren't preserved; you get only the single HDR version.
While HDR is enabled, the letters HDR appear on the Shootings Settings screen, as shown in Figure 7-30, as well as next to the exposure meter in the LCD panel.
Note a few more caveats related to this feature:
- Enabling HDR mode disables certain other functions. Specifically, Auto Lighting Optimizer, Highlight Tone Priority, and Live View exposure simulation are unavailable, and the available ISO range tops out at ISO 16000 even if you have selected a higher maximum for the ISO range.
- Flash is unavailable. Even if the built-in flash is raised, it won’t fire in HDR mode.
- Moving subjects may appear blurry. The problem occurs if the subject moves within the frame as the three images are being captured. So this feature, as with the HDR Backlight Control mode, is best reserved for stationary subjects.
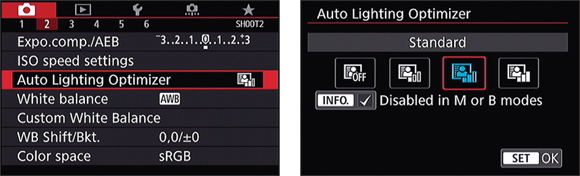
Experimenting with Auto Lighting Optimizer
When you select one of the JPEG Image Quality settings, the camera tries to enhance your photo while it’s processing the picture. By default, the camera applies a feature called Auto Lighting Optimizer, which, in essence, is a contrast enhancement.
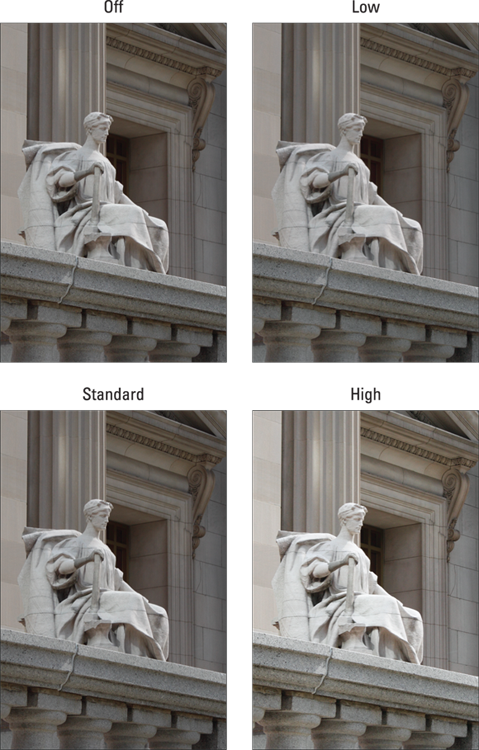
In the fully automatic exposure modes as well as in Creative Auto, you have no control over how much adjustment is made. But in the advanced exposure modes, you can decide whether to enable Auto Lighting Optimizer. You also can request a stronger or lighter application of the effect than the default setting. Figure 7-31 offers an example of the impact of each setting.
Given the level of improvement that the Auto Lighting Optimizer correction made to this photo, you may be thinking that you’d be crazy to ever disable the feature, but note a few points:
By default, the camera applies the Auto Lighting Optimizer feature at the Standard level except in M (Manual exposure) and B (Bulb) modes, in which case the feature is turned off by default. Here’s how to choose a different setting:
Shooting Menu 2: Select the option, as shown on the left in Figure 7-32, to display the screen shown on the right in the figure. Select your choice and then tap Set or press the Set button.
If you don’t want the feature to be disabled in the M and B exposure modes, tap the Info icon or press the Info button. Doing so removes the check mark from the Disabled in M or B Modes option, and the feature is set to the Standard setting by default for those exposure modes.
Quick Control screen: After highlighting the option, labeled in Figure 7-33, rotate the Main dial or Quick Control dial to set the level of adjustment. Or tap the option’s symbol to access the same setup screen shown on the right in Figure 7-32.
Notice the little vertical bars that appear as part of the setting icon — the number of bars tells you how much adjustment is being applied. Two bars, as in Figure 7-33, represent the Standard setting; three bars, High, and one bar, Low. The bars are replaced by the word Off when the feature is disabled.
If you’re not sure what level of Auto Lighting Optimization might work best or you’re concerned about the other drawbacks of enabling the filter, consider shooting the picture in the Raw file format. For Raw pictures, the camera applies no post-capture tweaking, regardless of whether this filter or any other one is enabled. Then, by using Canon Digital Photo Professional, the software you can download for free, you can apply the Auto Lighting Optimizer effect when you convert your Raw images to a standard file format. (See Chapter 6 for details.)
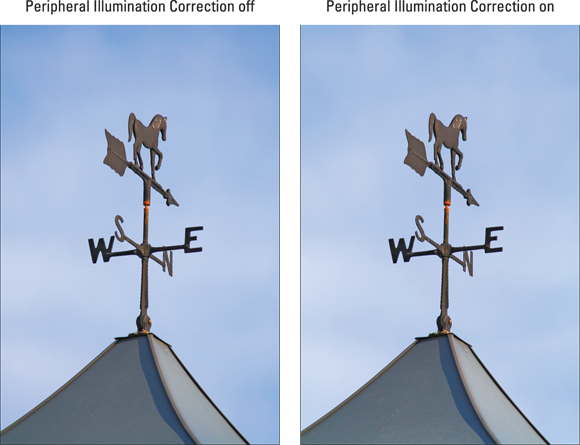
Correcting vignetting with Peripheral Illumination Correction
Because of some optical science principles that are too boring to explore, some lenses produce pictures that appear darker around the edges of the frame than in the center, even when the lighting is consistent throughout. This phenomenon goes by several names, but the two heard most often are vignetting and light fall-off. How much vignetting occurs depends on the lens, your aperture setting, and the lens focal length.
To help compensate for vignetting, your camera offers Peripheral Illumination Correction, which adjusts image brightness around the edges of the frame. Figure 7-34 shows an example. In the left image, just a slight amount of light fall-off occurs at the corners, most noticeably at the top of the image. The right image shows the same scene with Peripheral Illumination Correction enabled.
Now, this “before” example hardly exhibits serious vignetting — it’s likely that most people wouldn’t even notice if it weren’t shown next to the “after” example. But if you’re a stickler for this sort of thing or your lens suffers from stronger vignetting, it’s worth trying Peripheral Illumination Correction.
The adjustment is available in all your camera’s exposure modes, but a few factoids need spelling out:
- The correction is applied immediately to photos captured in the JPEG file format. For Raw photos, the setting is saved in the file, and you can apply the correction or change your mind during the Raw conversion process if you use Canon Digital Photo Professional or the in-camera Raw conversion tool, as detailed in Chapter 6.
For the camera to apply the proper correction, data about the lens must be included in the camera’s firmware (internal software). You can determine whether your lens is supported by opening Shooting Menu 1 and selecting Lens Aberration Correction, as shown on the left in Figure 7-35. You then see the right screen in the figure. If the screen reports that correction data is available, as in the figure, the Peripheral Illumination Correction feature is enabled by default. (See Chapter 8 for information about the Chromatic Aberration feature, which deals with a lens-related color defect.)
If your lens isn’t supported, you may be able to add its information to the camera; Canon calls this step “registering your lens.” You do this by cabling the camera to your computer and then using some tools included with the free EOS Utility software, available online (see Chapter 6). We must refer you to the software manual for help on this bit of business because of the limited number of words that can fit in these pages.
- For non-Canon lenses, Canon recommends disabling Peripheral Illumination Correction even if correction data is available. Just set the menu option to Disable.
In some circumstances, the correction may produce increased noise at the corners of the photo. This problem occurs because exposure adjustment can make noise more apparent. At high ISO settings, which also cause noise, the camera applies the filter at a lesser strength to avoid adding even more noise.
Dampening noise
Noise, the defect that gives your pictures a speckled look (refer to Figure 7-6), can occur for two reasons: a long exposure time and a high ISO setting. Your camera offers two noise-removal filters, one to address each cause of noise; the next two sections provide details. However, you can control whether and how they’re applied only in the advanced exposure modes; in other modes, the camera makes the call for you.
Long Exposure Noise Reduction
This filter, found on Shooting Menu 3 and featured in Figure 7-36, goes after the type of noise that's caused by a slow shutter speed. The settings work as follows:
- Off: No noise reduction is applied. This setting is the default.
- Auto: Noise reduction is applied when you use a shutter speed of 1 second or longer, but only if the camera detects the type of noise that’s caused by long exposures.
- On: Noise reduction is always applied at exposures of 1 second or longer. (Note: Canon suggests that this setting may result in more noise than either Off or Auto when the ISO setting is 1600 or higher.)
Long Exposure Noise Reduction can be fairly effective, but it has a significant downside because of the way it works. Say that you make a 30-second exposure. After the shutter closes at the end of the exposure, the camera takes a second 30-second exposure to measure the noise by itself, and then subtracts that noise from your real exposure. So your shot-to-shot wait time is twice what it would normally be. For some scenes, that may not be a problem, but for shots that feature action, such as fireworks, you definitely don’t want that long wait time between shutter clicks.
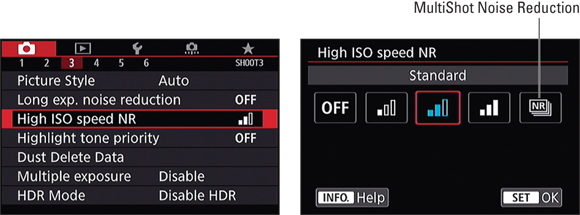
High ISO Speed Noise Removal
This filter, also found on Shooting Menu 3 and spotlighted in Figure 7-37, attempts to do just what its name implies: eradicate the kind of noise that's caused by using a very high ISO setting. You can select from these settings:
- Low: Applies a little noise removal.
- Standard: Applies a more pronounced amount of noise removal; this setting is the default.
- High: Goes after noise in a more dramatic way.
- MultiShot: Tries to achieve a better result than High by capturing four frames in a quick burst and then merging them together into a single JPEG shot. Although this mode can be effective, it comes with several caveats: flash isn’t possible, you risk having image alignment issues between the exposures, and you don’t get a Raw image. When enabled, the same symbol you see labeled in Figure 7-37 appears on the Shooting Setting screen and in the LCD panel. For more fine print, look up this feature in the camera manual.
- Off: Turns off the filter.
As with the Long Exposure Noise Reduction filter, this one is applied after you take the shot, slowing your capture rate. In fact, using the High or MultiShot setting reduces the maximum frame rate (shots per second).
It’s also important to know that High ISO noise-reduction filters work primarily by applying a slight blur to the image. Don’t expect this process to eliminate noise entirely, and expect some resulting image softness. You may be able to get better results by using the blur tools or noise-removal filters found in many photo editors because then you can blur just the parts of the image where noise is most noticeable — usually in areas of flat color or little detail, such as skies.
Locking Autoexposure Settings
When you combine Spot, Partial, or Center-weighted metering with the P, Tv, or Av exposure modes, your camera continually meters the light until the moment you press the shutter button fully to shoot the picture. The same thing happens with Evaluative metering if you use Live View.
For most situations, this approach works great, resulting in the right settings for the light that’s striking your subject when you capture the image. But on occasion, you may want to lock in a certain combination of exposure settings. For example, perhaps you want your subject to appear at the far edge of the frame. If you were to use the normal shooting technique, you would place the subject under a focus point, press the shutter button halfway to lock focus and set the initial exposure, and then reframe to your desired composition to take the shot. The problem is that exposure is then recalculated based on the new framing, which can leave your subject under- or overexposed.
The easiest way to lock in exposure settings is to switch to M (manual exposure) mode and use the same f-stop, shutter speed, and ISO settings for each shot. In manual exposure mode, the camera never overrides your exposure decisions; they’re locked until you change them.
 But if you prefer to use autoexposure, you can lock the current exposure settings by pressing the AE (autoexposure) Lock button while holding the shutter button halfway down. Exposure is locked and remains locked for four seconds, even if you release the AE Lock button and the shutter button. To remind you that AE Lock is in force, the camera displays an asterisk in the viewfinder and Shooting Settings display. If you need to relock exposure, just press the AE Lock button again.
Note: If your goal is to use the same exposure settings for multiple shots, you must keep the AE Lock button pressed during the entire series of pictures. Every time you let up on the button and press it again, you lock exposure anew based on the light that's in the frame.
One other critical point to remember about using AE Lock: The camera establishes and locks exposure differently depending on the metering mode, the focusing mode (automatic or manual), and on an autofocusing setting called AF Point Selection mode. (Chapter 8 explains this option thoroughly.) Here’s the scoop:
- Evaluative metering and automatic AF Point Selection: Exposure is locked on the focusing point that achieved focus.
- Evaluative metering and manual AF Point Selection: Exposure is locked on the selected autofocus point.
- All other metering modes: Exposure is based on the center autofocus point, regardless of the AF Point Selection mode.
- Manual focusing: Exposure is based on the center autofocus point.
By combining autoexposure lock with Spot metering, you can ensure a good exposure for photographs in which you want your subject to be off-center, and that subject is significantly darker or lighter than the background. Imagine, for example, a dark statue set against a light blue sky. First, select Spot metering so that the camera considers only the object located in the center of the frame. Frame the scene initially so that your statue is located in the center of the viewfinder. Press and hold the shutter button halfway to establish focus and then lock exposure by pressing the AE Lock button. Now reframe the shot to your desired composition and take the picture.
Bracketing Exposures Automatically
Many photographers use a strategy called bracketing to ensure that at least one shot of a subject is properly exposed. They shoot the same subject multiple times, slightly varying the exposure settings for each image.
To make bracketing easy, your camera offers Automatic Exposure Bracketing (AEB). When you enable this feature, your only job is to press the shutter button to record the shots; the camera automatically adjusts the exposure settings between each image. You can record from two to seven shots in your bracketed series (three shots is the default).
Aside from cover-your, uh, “bases” shooting, bracketing is useful for do-it-yourself HDR imaging — by which we mean HDR photos that you capture without the help of the HDR Mode or HDR Backlight Control Mode features discussed earlier in this chapter. Of course, you then have to merge the images using HDR software. The payoff is that HDR programs give you control over how the lightest and darkest areas of the image are blended. A popular program in this arena is Photomatix Pro (www.hdrsoft.com).
Whether you’re interested in automatic exposure bracketing for HDR or just to give yourself an exposure safety net, keep these points in mind:
Exposure mode: AEB is available only in the P, Tv, Av, M, C1, and C2 exposure modes.
How the camera arrives at the different exposures depends on your exposure mode. In Av mode, the shutter speed is adjusted and your selected f-stop is maintained, which ensures that depth of field doesn't change between shots. In Tv mode, the f-stop is adjusted; in P mode, the camera may adjust either shutter speed or aperture; in M mode, the camera maintains the selected f-stop if possible and instead varies shutter speed. However, in all cases, if Auto ISO is enabled, the camera may instead choose to vary ISO to achieve the exposure shift.
Flash, MultiShot Noise Reduction, and Creative Filters: AEB isn’t available when you use these features.
- Bracketing amount: You can request an exposure change of up to three stops, in 1/3-stop increments.
- Exposure Compensation: You can combine AEB with Exposure Compensation. The camera simply applies the compensation amount when it calculates the exposure for the three bracketed images.
- Auto Lighting Optimizer: Because that feature is designed to automatically adjust images that are underexposed or lacking in contrast, it can render AEB ineffective, so disable the feature when bracketing.
The next two sections explain how to set up the camera for automatic bracketing and how to record your bracketed shots.
Setting up for automatic bracketing
The following steps show you how to turn on automatic exposure bracketing via Shooting Menu 2. (More about another option for enabling the feature momentarily.)
Display Shooting Menu 2 and choose Expo. Comp./AEB, as shown on the left in Figure 7-38.
After you select the option, you see the screen shown on the right in the figure. This is the same dual-natured screen that appears when you apply exposure compensation, as explained earlier in this chapter. The figure shows the screen as it appears in the P, Tv, or Av modes.
In M mode, exposure compensation isn’t relevant. If you want a darker or brighter image, you just adjust the f-stop, shutter speed, or ISO. So the Exposure Compensation controls are dimmed on the Exp. Comp/AEB screen if the Mode dial is set to M. (What you see in C1 or C2 mode depends on the exposure mode on which you based that custom mode.)
Rotate the Main dial to establish the amount of exposure change you want between images.
What you see onscreen after you rotate the dial depends on your exposure mode.
- P, Tv, or Av modes: You see the scale for both the Exposure Compensation value and the AEB amount. The top meter expands, as shown in Figure 7-39, to show a range of +/- 8 stops. Where does the 8-stop thing come from? Well, if you turn on Exposure Compensation and set that value to +5.0 and then set the bracketed amount to +3.0, your brightest shot in the bracketed series is captured at +8.0. Your darkest shot is captured at +2.0, and the standard shot is captured at +5.0.
- M mode: In this exposure mode, only the AEB setting is active.
Either way, each whole number on the meter represents one stop. The red lines under the meter show the amount of shift that will occur in your bracketed series. For example, the settings in Figure 7-39 represent two stops of adjustment.
Tap Set or press the Set button.
AEB is now enabled. To remind you of that fact, the exposure meter for the menu item shows the three exposure indicators to represent the exposure shift you established in Step 2, as shown in Figure 7-40. You see the same markers with the meter in the viewfinder, LCD panel, and Shooting Settings display. In addition, you see three little boxes in the LCD panel, just to the right of the exposure meter.
If you prefer, you can also enable AEB through the Quick Control screen. Just tap the exposure meter (or highlight it and press Set) to access the screen you see in Figure 7-39, where you can set the amount of bracketing.
To turn off auto exposure bracketing, change the AEB setting to 0.
In addition to specifying the amount of exposure adjustment between frames, you can customize certain aspects of the bracketing feature through the following options, all residing in the Exposure section of the Custom Functions menu:
- C. Fn I-3: Bracketing Auto Cancel: By default, AEB is automatically turned off when you shut off the camera, engage the flash, or switch to Movie mode. But if you select Off for this option, the AEB function remains enabled even if you turn the camera off. If you use flash or set the camera to Movie mode, the AEB function is cancelled only while you’re using those features.
- C. Fn I-4: Bracketing Sequence: By default, the camera records your first exposure at the normal exposure, the second at the darker exposure, and the third at the brightest exposure. By selecting option 1 for this menu setting, you get the darkest exposure first, the standard exposure second, and the brightest exposure last. Option 2 takes things in the other direction.
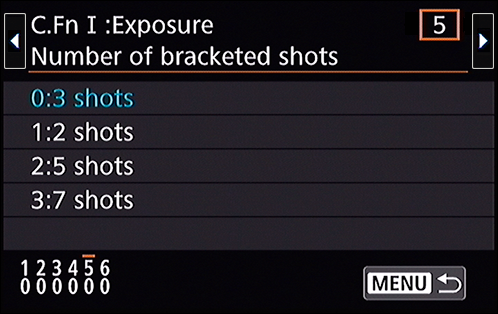
- C. Fn I-5: Number of Brackets Shots: Shown in Figure 7-41, this Custom Function enables you to set the number of pictures captured in each bracketed series. Here’s what you get at each setting:
- 3 shots: This is the default; you get one shot at standard, one darker shot, and one brighter shot.
- 2 shots: One standard exposure and one brighter or darker, depending on the bracketing amount you set in Step 2.
- 5 shots: One standard exposure, two incrementally darker shots, and two incrementally brighter shots.
- 7 shots: One standard exposure, and three incrementally brighter and three incrementally darker exposures.
Shooting a bracketed series
After you enable auto bracketing, the way you record your bracketed exposures depends on whether you set the Drive mode to Single or one of the Continuous modes. (Press the Drive button on top of the camera to adjust the Drive mode setting.)
- AEB in Single mode: You take each exposure separately, pressing the shutter button fully each time to record your series of images.
- AEB in Continuous modes: The camera records all exposures with one press of the shutter button. To record another series, release and then press the shutter button again.
- Self-Timer/Remote modes: All exposures are recorded with a single press of the shutter button, as with Continuous mode.
Using Flash in Advanced Exposure Modes
Sometimes, no amount of fiddling with aperture, shutter speed, and ISO produces a bright enough exposure — in which case you simply have to add more light. The built-in flash on your camera offers the most convenient solution.
Chapter 2 offers a primer in flash basics, but here’s a quick recap:
In Scene Intelligent Auto and Creative Auto modes, you can set the flash to on, off, or auto (the camera decides whether flash is needed). Some Scene (SCN) modes also give you this choice. Set the flash mode via the Quick Control screen.
 The advanced exposure modes leave flash decisions up to you. If you want to use the built-in flash, press the Flash button on the left side of the camera. The flash pops up and fires on your next shot. To turn off the flash, just press down on the flash assembly to close it.
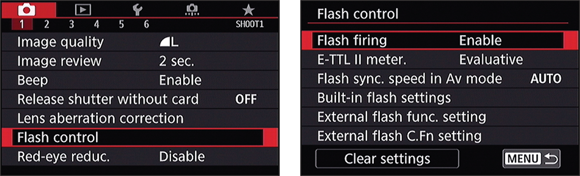
In order for the flash to fire, though, it must be enabled via the Flash Control option on Shooting Menu 1. After selecting that option, as shown on the left in Figure 7-42, set Flash Firing to Enable (the default setting), as shown on the right. For details about the other options on the menu, see the upcoming section, “Exploring more flash options.” To restore all the flash options to their defaults, use the Clear Settings option on the menu.
- You can set the flash to Red-Eye Reduction mode via Shooting Menu 1. When you take a picture with the feature enabled, the camera lights the Red-Eye Reduction lamp on the front of the camera for a brief time before the flash goes off in an effort to constrict the subject’s pupils and thereby lessen the chances of red-eye. See Chapter 2 for a few more pointers about using this feature.
When you use the built-in flash, the fastest shutter speed possible is 1/250 second. The limitation is needed for the camera to synchronize the timing of the flash with the opening and closing of the shutter. So, fast-action photography and the built-in flash really aren’t compatible. (If you use some compatible external flash units, you can access the entire range of shutter speeds.) This flash feature is known as high-speed sync.
- Pay careful attention to your results when you use the built-in flash with a long telephoto lens. You may find that the flash casts an unwanted shadow when it strikes the lens. For best results, try switching to an external flash head.
The next section goes into a little background about how the camera calculates flash power. This stuff is a little technical, but it will help you to understand how to get the results you want. Following that discussion, the rest of the chapter covers advanced flash features.
Understanding your camera’s approach to flash
When you use flash, your camera automatically calculates the flash power needed to illuminate the subject. This process is sometimes referred to as flash metering. Your camera uses a flash-metering system that Canon calls E-TTL II. The E stands for evaluative, TTL stands for through the lens, and II refers to the fact that this system is an update to the first version of the system. It isn’t important that you remember what the initials stand for or even the flash system’s official name. What is helpful to keep in mind is how the system is designed to work.
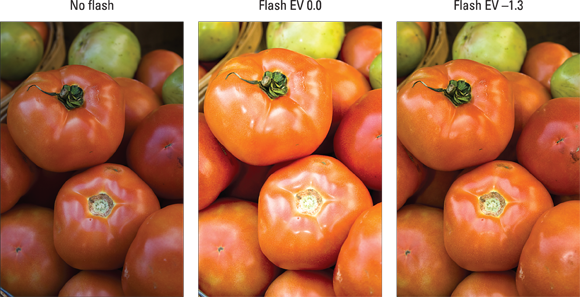
First, you need to know that a flash can be used either as the primary light source or as a fill flash. When flash is the primary light source, both the subject and background are lit by the flash. In dim lighting, this typically results in a brightly lit subject and a dark background, as shown on the left in Figure 7-43. This assumes that the background is far enough from the subject that it's beyond the reach of the flash, of course.
With fill flash, the background is exposed primarily by ambient light, and the flash adds a little extra illumination to the subject. Fill flash typically produces brighter backgrounds and, often, softer lighting of the subject because not as much flash power is needed. The downside is that if the ambient light is dim, as in this nighttime example, you need a slow shutter speed to properly expose the image, and both the camera and the subject must remain still to avoid blurring. The shutter speed for the fill-flash image, shown on the right in Figure 7-43, was 1/30 second. Fortunately, Julie had a tripod, and the deer was happy to stay perfectly still as long as she needed. Well, at least until the wind whipped up later that night and, sadly, blew him a few feet down the driveway.
Neither flash approach is right or wrong: Whether you want a dark background depends on the scene. If you want to diminish the background, you may prefer the darker background you get when you use flash as your primary light source. But if the background is important to the context of the shot, allowing the camera to absorb more ambient light and adding just a bit of fill flash may be more to your liking.
So how does this little flash lesson relate to your camera? Well, the exposure mode you use (P, Tv, Av, or M) determines whether the flash operates as a fill flash or as the primary light source. The exposure mode also controls the extent to which the camera adjusts the aperture and shutter speed in response to the ambient light in the scene.
In all modes, the camera analyzes the light both in the background and on the subject. Then it calculates the exposure and flash output as follows:
- P: In this mode, the shutter speed is automatically set between 1/60 and 1/250 second. If the ambient light is sufficient, the flash output is geared to providing fill-flash lighting. Otherwise, the flash is determined to be the primary light source, and the output is adjusted accordingly. In the latter event, the image background may be dark, as in the left example in Figure 7-43, depending on its distance from the flash.
Tv: After you select a shutter speed, the camera determines the proper aperture to expose the background with ambient light. Then it sets the flash power to provide fill-flash lighting to the subject.
You can select a shutter speed between 30 seconds and 1/250 second. If the aperture (f-stop) setting blinks, the camera can’t expose the background properly at the shutter speed you selected. You can adjust either the shutter speed or ISO to correct the problem.
Av: After you set the f-stop, the camera selects the shutter speed needed to expose the background using ambient light. The flash power is geared to fill in shadows on the subject.
Depending on the ambient light and your selected f-stop, the camera sets the shutter speed at anywhere from 30 seconds to 1/250 second. So be sure to note the shutter speed before you shoot — at slow shutter speeds, you may need a tripod to avoid camera shake. Your subject also must remain still to avoid blurring.
If you want to avoid the possibility of a slow shutter speed, visit Shooting Menu 1, choose Flash Control, and then choose the Flash Sync. Speed in Av Mode option, as shown in Figure 7-44. At the default setting, Auto, the camera operates as just described. You also have two other choices: 1/250-1/60 Sec. Auto (tells the camera to choose any shutter speed between 1/60 and 1/250 second) and 1/250 Sec. (fixed) (restricts the camera to always setting the shutter speed to 1/250 second when you use flash in Av mode).
The latter two options both ensure that you can handhold the camera without blur, but obviously, in dim lighting, it can result in a dark background because the camera doesn’t have time to soak up much ambient light.
- M: In this mode, the shutter speed, aperture, and ISO settings you select determine how brightly the background will be exposed. The camera takes care of illuminating the subject with fill flash. The maximum shutter speed you can select is 1/250 second; the slowest is 30 seconds.
- B (Bulb): In Bulb mode, which keeps the shutter open as long as you keep the shutter button pressed, the flash fires at the beginning of the exposure if the Shutter Sync setting is set to the 1st Curtain setting; with the 2nd Curtain setting, the flash fires at the beginning of the exposure and again at the end. You access this control by choosing Built-in Flash Settings from the screen shown on the left in Figure 7-44; see the last section of the chapter for more details.
If the flash output in any mode isn’t to your liking, you can adjust it by using flash exposure compensation, explained a little later in this chapter. Also check out the upcoming section “Locking the flash exposure” for another trick to manipulate flash results. In any autoexposure mode, you can also use exposure compensation, discussed earlier, to tweak the ambient exposure — that is, the brightness of your background. The big takeaway is that you have multiple points of control: exposure compensation to manipulate the background brightness, and flash compensation and flash exposure lock to adjust the flash output.
Again, these guidelines apply to the camera’s built-in flash. If you use certain Canon external flash units, you not only have more flash control but can also select a faster shutter speed than the built-in flash permits.
Using flash outdoors
Although most people think of flash as a tool for nighttime and low-light photography, adding a bit of light from the built-in flash can improve close-ups and portraits that you shoot outdoors during the day. After all, your main light source — the sun — is overhead, so although the top of the subject may be adequately lit, the front typically needs some additional illumination. And if your subject is backlit, or in the shade, getting no direct light, using flash is even more critical. For example, the two photos in Figure 7-45 show you the same scene, captured with and without flash. The fruit stand was shaded by an awning, so even though it was a bright, cloudless day, Julie popped up the built-in flash to bring just a smidge more light to the scene and produce a better result.
You do need to be aware of a couple issues that can arise when you supplement the sun with the built-in flash:
- You may need to make a White Balance adjustment. Adding flash may result in colors that are slightly warmer (more yellow/red), as in the flash example here, or cooler (bluish) because the camera’s white balancing system can get tripped up by mixed light sources. If you don’t appreciate the shift in colors, see Chapter 8 to find out how to make a white balance adjustment to solve the problem.
- You may need to stop down the aperture or lower ISO to avoid overexposing the photo. The top shutter speed for the built-in flash, 1/250 second, may not be fast enough to produce a good exposure in very bright light when you use a wide-open aperture, even if you use the lowest possible ISO setting. If you want both flash and the short depth of field that comes with an open aperture, you can place a neutral density filter over your lens. This accessory reduces the light that comes through the lens without affecting colors. In addition, some Canon external flash units enable you to access the entire range of shutter speeds on the camera.
Adjusting flash power with Flash Exposure Compensation
When you shoot with flash, the camera attempts to adjust the flash output to produce a good exposure in the current lighting conditions. On some occasions, you may find that you want a little more or less light than the camera thinks is appropriate.
You can adjust the flash output by using the Flash Exposure Compensation feature. Similar to exposure compensation, discussed earlier in this chapter, flash exposure compensation affects the output level of the flash unit, whereas exposure compensation affects the brightness of the background in your flash photos. As with exposure compensation, flash exposure compensation is stated in terms of EV (exposure value) numbers. A setting of 0.0 indicates no flash adjustment; you can increase the flash power to +3.0 or decrease it to –3.0.
Figure 7-46 shows an example of the benefit of this feature — again, available only when you shoot in the advanced exposure modes. The first image shows a flash-free shot. Clearly, a little more light was needed, but at normal flash power, the flash was too strong, blowing out the highlights in some areas, as shown in the middle image. Reducing the flash power to EV –1.3, resulted in a softer flash that straddled the line perfectly between no flash and too much flash.
As for boosting the flash output, well, you may find it necessary on some occasions, but don’t expect the built-in flash to work miracles even at a Flash Exposure Compensation of +3.0. Any built-in flash has a limited range, so the light simply can’t reach faraway objects.
Whichever direction you want to go with flash power, you have two ways to do so:
Quick Control screen: This path is by far the easiest. Highlight the Flash Exposure Compensation value, as shown on the left in Figure 7-47, and then rotate the Main dial or Quick Control dial to set the amount of flash adjustment. Or if you prefer to do things the hard way, tap the icon or press Set to display the second screen in the figure, where you can adjust the setting by using the Main dial, Quick Control dial, or Multi-controller; dragging your finger along the scale; or tapping the Brighter and Darker arrows. Tap the return arrow or press Set when you finish.
When flash compensation is in effect, the value appears in the Shooting Settings screen, in the area occupied by the icon in the left screen in Figure 7-47. You see the same plus/minus flash symbol in the viewfinder but without the actual value. If you change the Flash Exposure Compensation value to zero, the flash-power icon disappears from all the displays until you enter Quick Control mode again.
Unfortunately, this method of setting flash power isn't available in Live View mode; for Live View shooting, trudge through the steps outlined next.
- Shooting Menu 1: Display Shooting Menu 1 and select Flash Control to display the left screen shown in Figure 7-48. Choose Built-in Flash Settings to display the right screen. Now choose Flash Exp. Comp., as shown on the right in the figure, to display the same adjustment screen shown on the right in Figure 7-47.
As with exposure compensation, any flash-power adjustment you make remains in force until you reset the control, even if you turn off the camera. So be sure to check the setting before using your flash. Additionally, the Auto Lighting Optimizer feature, covered earlier in this chapter, can interfere with the effect produced by flash exposure compensation, so you might want to disable it.
Locking the flash exposure
You might never notice it, but when you press the shutter button to take a picture with flash enabled, the camera emits a brief “preflash” before the actual flash. This preflash is used to determine the proper flash power needed to expose the image.
Occasionally, the information that the camera collects from the preflash can be off-target because of the assumptions the system makes about what area of the frame is likely to contain your subject. To address this problem, your camera has a feature called Flash Exposure Lock, or FE Lock. This tool enables you to set the flash power based on only the center of the frame.
Unfortunately, FE Lock isn’t available in Live View mode. If you want to use this feature, you must abandon Live View and use the viewfinder to frame your images.
After raising the flash, follow these steps to use FE Lock:
Frame your photo so that your subject is in the center of the frame.
You can reframe the shot after locking the flash exposure, if you want.
Press the shutter button halfway.
The camera meters the light in the scene. If you’re using autofocusing, focus is set on your subject. (If focus is set on another spot in the frame, see Chapter 8 to find out how to select the center autofocus point.) You can now lift your finger off the shutter button, if you want.
Press and release the AE Lock button.
The camera emits the preflash, and the letters FEL display for a second in the viewfinder. (FEL stands for Flash Exposure Lock.) You also see the asterisk symbol — the one that appears above the AE Lock button on the camera body — next to the flash icon in the viewfinder.
If needed, reestablish focus on your subject.
In autofocus mode, press and hold the shutter button halfway. (Take this step only if you released the shutter button after Step 2.) In manual focus mode, twist the focusing ring on the lens to establish focus.
Reframe the image to the composition you want.
While you do, keep the shutter button pressed halfway to maintain focus if you’re using autofocusing.
Press the shutter button the rest of the way.
The image is captured using the flash output setting you established in Step 3.
Flash Exposure Lock is also helpful when you’re shooting portraits. The preflash sometimes causes people to blink, which means that with normal flash shooting, in which the actual flash and exposure occur immediately after the preflash, their eyes are closed at the exact moment of the exposure. With FE Lock, you can fire the preflash and then wait a second or two for the subject’s eyes to recover before you take the actual picture.
Better yet, the flash exposure setting remains in force for about 16 seconds, meaning that you can shoot a series of images using the same flash setting without firing another preflash at all.
Exploring more flash options
When you set the Mode dial to the advanced exposure modes, Shooting Menu 1 offers a Flash Control option. Using this menu item, you can adjust flash power, as we explain a couple of sections earlier (although using the Quick Control screen is easier). The Flash Control option also enables you to customize a few other aspects of the built-in flash as well as control an external flash.
To explore your options, choose Flash Control, as shown on the left in Figure 7-49, to access the screen shown on the right in the figure. Here’s the rundown of the available options:
Flash Firing: Normally, this option is set to Enable. If you want to disable the flash, choose Disable. However, you don’t have to take this step in most cases — just close the flash if you don’t want to use flash.
What’s the point of this option, then? Well, if you use autofocusing in dim lighting, the camera may need some help finding its target. To that end, it sometimes emits an AF-assist beam from the flash head. The beam is a series of rapid pulses of light. If you want the benefit of the AF-assist beam but you don’t want the flash to fire, disable flash firing. Remember that you have to pop up the flash unit to expose the lamp that emits the beam. You also can take advantage of this option when you attach an external flash head.
E-TTL II Meter.: This option enables you to switch from the default flash metering approach, called Evaluative. In this mode, the camera operates as described in the earlier section, “Understanding your camera’s approach to flash.”
If you instead select the Average option, the flash is always used as the primary light source. Typically, this results in more powerful (and possibly harsh) flash lighting and dark backgrounds.
- Flash Sync. Speed in Av Mode: This is the option that prevents the shutter speed from dropping beyond a certain level when you shoot in the Av exposure mode. See “Understanding your camera's approach to flash,” earlier in this chapter, for details.
- Built-in Flash Settings: Select this option, as shown on the left in Figure 7-50, to display the screen shown on the right. The options work like so:
- Flash mode: This option enables you to set the flash power manually instead of having the camera set it automatically. If you select the option, the Flash Exposure Compensation control on the menu (see the right screen in Figure 7-50) is replaced by a Flash Output option. Set the flash power through that option.
Shutter Sync: By default, the flash fires at the beginning of the exposure. This flash timing, known as 1st Curtain sync, is the best choice for most subjects. However, if you use a very slow shutter speed and you’re photographing a moving object, 1st Curtain sync causes the blur that results from the motion to appear in front of the object, which doesn’t make much visual sense.
To solve this problem, you can change the Shutter Sync option to 2nd Curtain sync, also known as rear-curtain sync. In this flash mode, the motion trails appear behind the moving object. The flash fires twice in this mode: once when you press the shutter button and again at the end of the exposure unless the Flash Mode is set to Manual. In that case, the flash only fires at the end of the exposure.
- Flash Exposure Compensation: This setting adjusts the power of the built-in flash; again, see the earlier section “Adjusting flash power with Flash Exposure Compensation” for details.
- Wireless Func.: When you enable this option, you can use the built-in flash to trigger remote flash units. See the sidebar, “Using one flash to control others” for more on this possibility.
- External Flash controls: The last two options on the Flash Control list relate to external flash heads; they don’t affect the built-in flash. They apply only to Canon EX-series Speedlites that enable you to control the flash through the camera. Refer to the flash manual for details.
- Clear Settings: Choose this option to access three settings that restore flash defaults. The first one, Clear Built-in Flash Set, restores the settings for the built-in flash. Sorry, you probably could have figured that out for yourself. The second option restores defaults for external flash settings, and the third restores the external flash head's Custom Function menu settings.
You can probably discern from these descriptions that most of these features are designed for photographers schooled in flash photography who want to mess around with advanced flash options. If that doesn’t describe you, don’t worry about it. The default settings selected by Canon will serve you well in most every situation — the exception is flash exposure compensation, which you can just as easily adjust via the Quick Control screen instead of digging through the menus.