CHAPTER 7
Exercising for Flexibility, Strength, and Balance: Making Life Easier
YOU CAN USE THE EXERCISES IN THIS CHAPTER in several ways: to get ready for aerobic exercise; to improve flexibility, strength, and balance; to stretch and strengthen your back and chest for better posture and breathing; and to warm up and cool down for your aerobic exercise routines.
The exercises are arranged in order from the head and neck down to the toes. Most of the upper-body exercises may be done either sitting or standing. Exercises done lying down can be performed on the floor or on a firm mattress. We have labeled the exercises that are particularly important for breathing and good posture “VIP” (Very Important for Posture). Exercises to improve balance by strengthening and loosening legs and ankles are marked “BB” (Better Balance). There is also a section of balance exercises that are designed to help you practice balance skills.
If you see this symbol  next to an exercise, this means that you can add weights (hand or ankle weights) to that exercise. This will make it a harder strengthening exercise. If you can do an exercise easily at least ten times, you can add weights. Start with 1 to 2 pounds (0.5 to 1.0 kg), and add weight gradually as you get stronger and the exercise gets easier. You can use homemade weights (cans, bags of beans, plastic bottles filled with water or sand) or buy weights in different sizes.
You can make a routine of exercises that flow together. Arrange them so you don’t have to get up and down too often. Exercise to music if you wish. An exercise CD has been designed to go with this book; see details under “Other Resources” at the end of this chapter.
The following tips apply to all the exercises in this chapter:
 Move at a comfortable speed. Do not bounce or jerk.
To loosen tight muscles and joints, stretch just until you feel tension, hold for 10 to 30 seconds, and then relax. Remember to breathe in and out.
Stop if your body starts to hurt. Stretching should feel good, not painful.
Start with no more than five repetitions of any exercise. Increase gradually as you make progress.
Always do the same number of exercises for your left and right sides.
Breathe naturally. Do not hold your breath. Count out loud to make sure you are breathing.
If you have more symptoms (such as pain) that last more than 2 hours after exercising, do less next time. If an exercise gives you problems, stop and try another exercise. Don’t quit exercising.
The following exercises are for both sides of the body and a full range of motion. If you are limited by muscle weakness or joint tightness, go ahead and do the exercise as completely as you can. The benefit of doing an exercise comes from moving toward a certain position, not from being able to complete the movement perfectly. In some cases you may find that after a while you can complete the movement and increase your available range of motion. At other times you will keep doing it your own way.
Neck Exercises
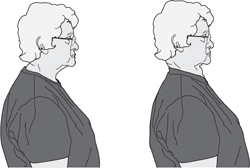
1. Heads Up (VIP)
This exercise relieves jaw, neck, and upper back tension or pain and is the start of good posture. You can do it while driving, sitting at a desk, sewing, reading, or exercising. Just sit or stand straight and gently slide your chin back. Keep looking forward as your chin moves backward. You’ll feel the back of your neck lengthen and straighten. To help, put your finger on your nose and then draw straight back from your finger. (Don’t worry about a little double chin—you really look much better with your neck straight!)
Clues for Finding the Correct Position
Ear over shoulder, not out in front
Head balanced over neck and trunk, not in the lead
Back of neck more vertical, not leaning forward
Bit of double chin
2. Neck Stretch
In heads-up position (Exercise 1) and with your shoulders relaxed, turn slowly to look over your right shoulder. Then turn slowly to look over your left shoulder. Next, tilt your head to the right and then to the left. Move your ear toward your shoulder. Do not move your shoulder up to your ear.

Hand and Wrist Exercises
A good place to do hand exercises is at a table that supports your forearms. Do them after washing dishes, after bathing or showering, or when taking a break from handwork. Your hands are warmer and more limber at these times.
3. Thumb Walk
Holding your wrist straight, form the letter O by lightly touching your thumb to each fingertip. After each O, straighten and spread your fingers. Use the other hand to help if needed.

Shoulder Exercises
4. Shoulder Shape Up
In heads-up position (Exercise 1), slowly raise the shoulders to the ears; hold the position and then drop them. Next, raise the shoulders again to the ears and then begin to slowly rotate them backward by pinching the shoulder blades together; bring the shoulders down and forward to complete a circle. Return to the heads-up position. Finally, reverse the direction of the shoulder circles.
This is a good exercise if the neck stretch (Exercise 2) is difficult for you.
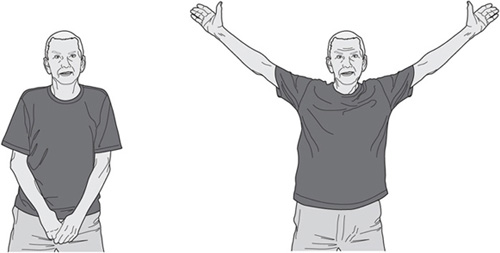
5. Good Morning (VIP)
Start with hands in gentle fists, palms down, and wrists crossed. Breathe in and stretch out your fingers while you uncross your arms and reach up for the sky. Breathe out as you stretch your arms and relax.
6. Wand Exercise
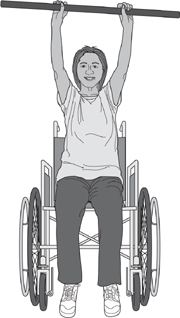
If one or both of your shoulders are tight or weak, you may want to give yourself a “helping hand.” This shoulder exercise and the next allow the arms to help each other.
Use a yardstick, mop handle, or cane as your wand. Place one hand on each end, and raise the wand as high overhead as possible. You might try this in front of a mirror. This exercise can be done standing, sitting, or lying down.
7. Pat and Reach
This double-duty exercise helps increase flexibility and strength for both shoulders. Raise one arm up over your head, and bend your elbow to pat yourself on the back. Move your other arm to your back, bend your elbow, and reach up toward the other hand. Can your fingertips touch? Relax and switch arm positions. Can you touch on that side? For most people, one position will work better than the other. Do not worry if you cannot touch. Many people cannot touch, but you will improve as you practice. If you wish, you may use a towel as if you were drying your back; this can provide you with feedback and assist in the motion.

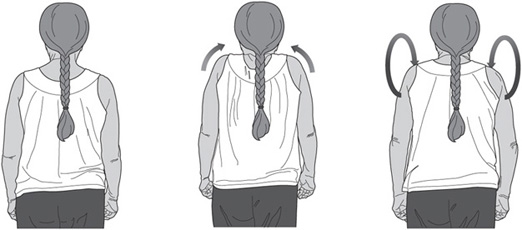
8. Shoulder Blade Pinch (VIP)

This is a good exercise to strengthen the middle and upper back and to stretch the chest, and it can be especially good for individuals with breathing problems. Sit or stand with your head in heads-up position (Exercise 1) and your shoulders relaxed. Raise your arms out to the sides with elbows bent. Pinch your shoulder blades together by moving your elbows as far back as you can. Hold briefly, and then slowly move your arms forward to touch elbows. If this position is uncomfortable, lower your arms or rest your hands on your shoulders.
Back and Abdominal Exercises
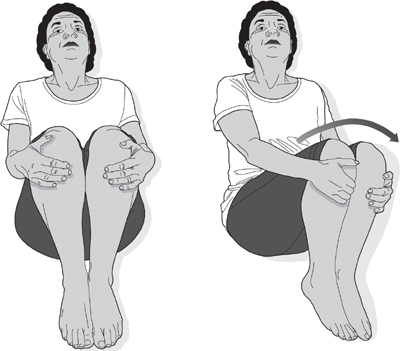
9. Knee to Chest Stretch
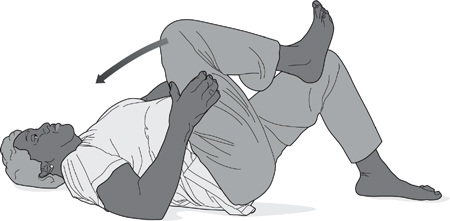
For a low back stretch, lie on the floor with knees bent and feet flat. Bring one knee toward your chest, using your hands to help. Hold your knee near your chest for 10 seconds, and lower the leg slowly. Repeat with the other knee. You can also tuck both legs at the same time if you wish. Relax and enjoy the stretch.
10. Pelvic Tilt (VIP)
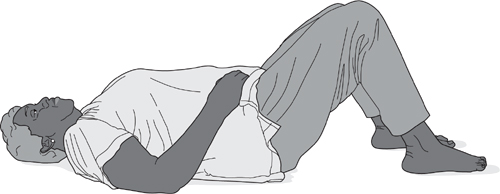
This is an excellent exercise for the low back and can help relieve low back pain. Lie on your back with knees bent, feet flat. Place your hands on your abdomen. Flatten the small of your back against the floor by tightening your stomach muscles and your buttocks. When you do this exercise, you will be tilting your tailbone forward and pulling your stomach back. Think about trying to pull your stomach in enough to zip a tight pair of trousers. Hold the tilt for 5 to 10 seconds. Relax. Arch your back slightly. Relax and repeat the pelvic tilt. Keep breathing. Count the seconds out loud. Once you’ve mastered the pelvic tilt lying down, practice it sitting, standing, and walking.
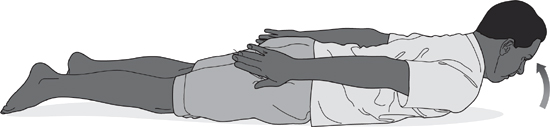
11. Back Lift (VIP)
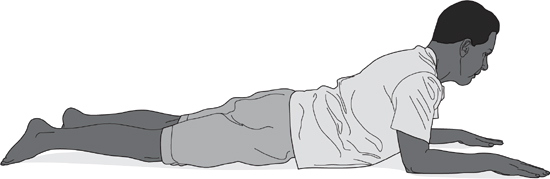
This exercise improves flexibility along your spine and helps you lift your chest for easier breathing. Lie on your stomach, and rise up onto your forearms. Keep your back relaxed, and keep your stomach and hips down. If this is comfortable, straighten your elbows. Breathe naturally and relax for at least 10 seconds. If you have moderate to severe low back pain, do not do this exercise unless it has been specifically prescribed for you.
To strengthen back muscles, lie on your stomach with your arms at your side or overhead. Lift your head, shoulders, and arms. Do not look up. Keep looking down with your chin tucked into that double-chin position. Count out loud as you hold for a count of 10. Relax. You can also lift your legs, instead of your head and shoulders, off the floor.
Note that lifting both ends of your body at once is a fairly strenuous exercise. It may not be helpful for a person with back pain.
12. Low Back Rock and Roll
Lie on your back, and pull your knees up to your chest. You can keep holding on to your legs with your hands behind the thighs or stretch your arms out to your sides to lie on the floor at shoulder level. Rest in this position for 10 seconds, and then gently roll your hips and knees to one side and then the other. Rest and relax as you roll to each side. Keep your upper back and shoulders flat on the ground.
13. Curl-Up (BB)
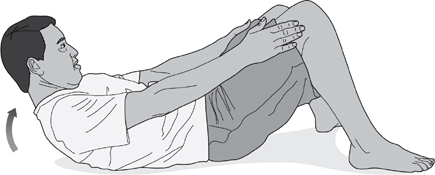
A curl-up, as shown here, is a good way to strengthen stomach muscles. Lie on your back, knees bent, feet flat. Do the pelvic tilt (Exercise 10). Slowly curl up in segments. Tuck your chin as you roll your head up and begin to lift the shoulders off the floor. Slowly uncurl back down, or hold for 10 seconds and slowly lower. Breathe out as you curl up, and breathe in as you go back down. Do not hold your breath. If you have neck problems or if your neck hurts when you do this exercise, try the next one instead. Never tuck your feet under a chair or have someone hold your feet!
14. Roll-Out
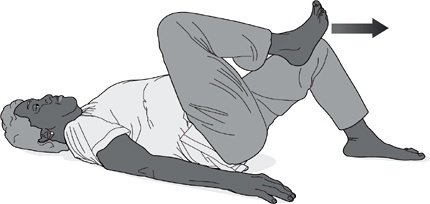
This is another good stomach strengthener, and it is easy on the neck. Use it instead of the curl-up (Exercise 13), or if neck pain is not a problem, do them both.
Lie on your back with knees bent and feet flat. Do the pelvic tilt (Exercise 10), and hold your lower back firmly against the floor.
Slowly and carefully, move one leg away from your chest as you straighten your knee. Move your leg out until you feel your lower back start to arch. When this happens, tuck your knee back to your chest. Reset your pelvic tilt and roll your leg out again. Breathe out as your leg rolls out. Do not hold your breath. Repeat with the other leg.
You are strengthening your abdominal muscles by holding your pelvic tilt against the weight of your leg. As you get stronger, you’ll be able to straighten your legs out farther and move both legs together.
Hip and Leg Exercises
15. Straight Leg Raises
This exercise strengthens the muscles that bend the hip and straighten the knee. Lie on your back, knees bent, feet flat. Straighten one leg. Tighten the muscle on the upper surface of that thigh, and straighten the knee as much as possible. Keeping the knee straight, raise your leg a foot or two (up to 50 cm) off the ground. Do not arch your back. Hold your leg up, and count out loud for 10 seconds. Relax. Repeat with the other leg.
16. Hip Hooray (standing only)
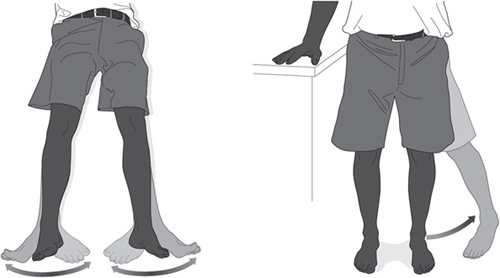
This exercise can be done standing or lying on your back. If you lie down, spread your legs as far apart as possible. Roll your legs and feet out like a duck, then in to be pigeon-toed, and then move your legs back together. If you are standing, move one leg out to your side as far as you can. Lead out with the heel and in with the toes. Hold on to a counter for support. You can make the muscles work harder while you are standing by adding a weight to your ankle.
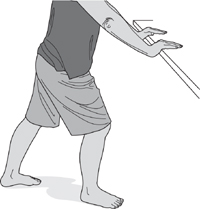
17. Back Kick (VIP) (BB)

This exercise increases the backward mobility and strength of your hip. Hold on to a counter for support. Move the leg up and back, knee straight. Stand tall, and do not lean forward.
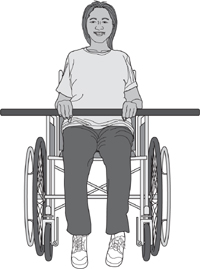
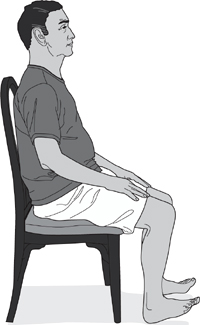
18. Knee Strengthener (BB)
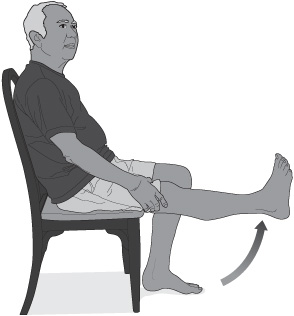
Strong knees are important for walking and standing comfortably. This exercise strengthens the knee. Sitting in a chair, straighten the knee by tightening up the muscle on the upper surface of your thigh. Place your hand on your thigh and feel the muscle work. If you wish, make circles with your toes. As your knee strengthens, see if you can build up to holding your leg out for 30 seconds. Count out loud. Do not hold your breath.
19. Power Knees
This exercise strengthens the muscles that bend and straighten your knee. Sit in a chair and cross your legs at the ankles. Your legs can be almost straight, or you can bend your knees as much as you like. Try several positions. Push forward with your back leg, and press backward with your front leg. Exert pressure evenly so that your legs do not move. Hold and count out loud for 10 seconds. Relax. Switch leg positions. Be sure to keep breathing. Repeat.
20. Ready-Go (BB)
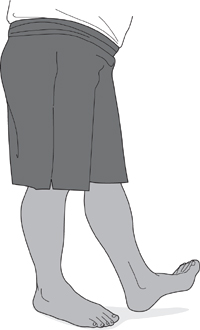
Stand with one leg slightly in front of the other with your heel on the floor as if ready to take a step with the front foot. Now tighten the muscles on the front of your thigh, making your knee firm and straight. Hold to a count of 10. Relax. Repeat with the other leg.
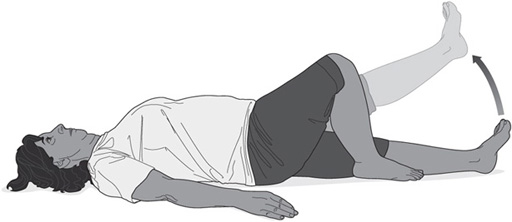
21. Hamstring Stretch

Do the self-test for hamstring tightness (page 122) to see if you need to do this exercise. If you have unstable knees or “back knee” (a knee that curves backward when you stand up), do not do this exercise.
If you do have tight hamstrings, lie on your back, knees bent, feet flat. Grasp one leg at a time behind the thigh. Holding the leg out at arm’s length, slowly straighten the knee. Hold the leg as straight as you can as you count to 10. You should feel a slight stretch at the back of your knee and thigh.
Be careful with this exercise. It’s easy to overstretch and end up sore.
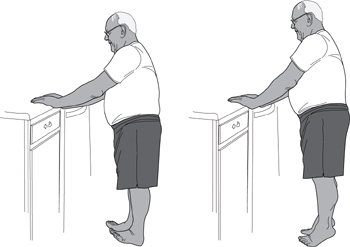
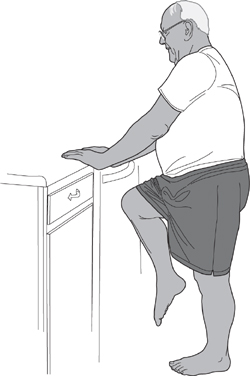
22. Achilles Stretch (BB)
This exercise helps maintain flexibility in the Achilles tendon, the large tendon at the back of your ankle. Good flexibility helps reduce the risk of injury, calf discomfort, and heel pain. The Achilles stretch is especially helpful for cooling down after walking or cycling and for people who get cramps in the calf muscles. If you have trouble with standing balance or spasticity (muscle jerks), you can do a seated version of this exercise. Sit in a chair with feet flat on the floor. Keep your heel on the floor and slowly slide your foot (one foot at a time) back to bend your ankle and feel some tension on the back of your calf (lower leg).
Stand at a counter or against a wall. Place one foot in front of the other, toes pointing forward and heels on the ground. Lean forward, bend the knee of the forward leg, and keep the back knee straight, heel down. You will feel a good stretch in the calf. Hold the stretch for 10 seconds. Do not bounce. Move gently. You can adjust this exercise to reach the other large calf muscle by slightly bending your back knee while you stretch the calf. Can you feel the difference? It’s easy to get sore doing this exercise. If you’ve worn shoes with high heels for a long time, be particularly careful.
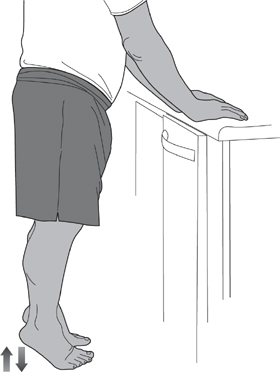
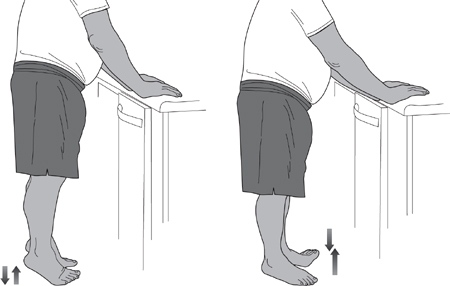
23. Tiptoes (BB)
This exercise will help strengthen your calf (lower leg) muscles and make walking, climbing stairs, and standing less tiring. It may also improve your balance. Hold on to a counter or table for support and rise up on your tiptoes. Hold for 10 seconds. Lower slowly. How high you go is not as important as keeping your balance and controlling your ankles. It is easier to do both legs at the same time. If your feet are too sore to do this standing, start doing it while sitting down. If this exercise makes your ankle jerk, stop doing it and talk to your therapist about other ways to strengthen these calf muscles if needed.
Ankle and Foot Exercises
Do these exercises sitting in a straight-backed chair with your feet bare. Have a bath towel and ten marbles next to you. These exercises are for flexibility, strength, and comfort. This is a good time to examine your feet and toes for any signs of circulation or skin problems and to check your nails to see if they need trimming.
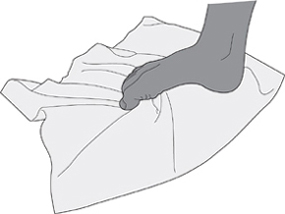
24. Towel Grabber
Spread a towel out in front of your chair. Place your feet on the towel, with your heels near the edge closest to you. Keep your heels down and your foot slightly raised. Scoot the towel back underneath your feet by pulling it with your toes. When you have done as much as you can, reverse the toe motion and scoot the towel out again.
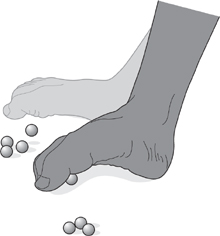
25. Marble Pickup
Do this exercise one foot at a time. Place several marbles on the floor between your feet. Keep your heel down, and pivot your toes toward the marbles. Pick up a marble with your toes, and pivot your foot to drop the marble as far as possible from where you picked it up. Repeat until all the marbles have been moved. Reverse the process and return all the marbles to the starting position. If marbles are difficult, try other objects, such as jacks, dice, or wads of paper.
26. Foot Roll
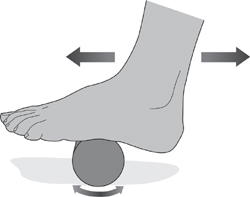
Place a rolling pin (or a large dowel or closet rod) under the arch of your foot, and roll it back and forth. It feels great and stretches the ligaments in the arch of the foot.
Balance Exercises
The exercises in this section are designed to let you practice balance activities in a safe and progressive way. The exercises are given in order of difficulty, so start with the first exercises and work up to the more difficult ones as your strength and balance improve. If you feel that your balance is particularly poor, exercise with someone else close by who can give you a supporting hand if needed. Always practice by a counter or stable chair that you can hold on to if necessary. Signs of improving balance are being able to hold a position longer or without extra support or being able to do the exercise or hold the position with your eyes closed. There may also be some balance exercise classes in your community to help continue your progress. Tai chi is a wonderful program to help you work on balance and strength. It is low-impact and gentle on your joints. The National Institute on Aging offers an exercise guide and video that includes other balance exercises, but you can use these to get started.
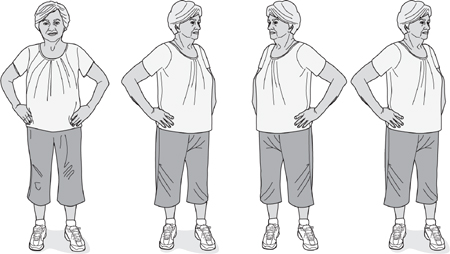
27. Beginning Balance
Stand quietly with your feet comfortably apart. Place your hands on your hips, and turn your head and trunk as far to the left as possible and then to the right. Repeat five to ten times. To increase the difficulty, do the same thing with your eyes closed.
28. Swing and Sway
Using a counter or the back of a stable chair for support, do each of the following five to ten times:
1. Rock back on your heels and then go up on your toes.
2. Do the box step (like dancing the waltz).
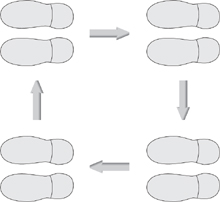
3. March in place, first with eyes open and then with eyes closed.
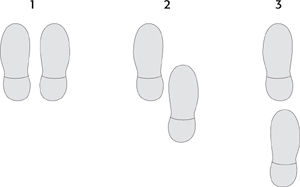
29. Base of Support
Do these exercises with standby assistance or standing close to a counter for support. The purpose of these exercises is to help you improve your balance by going from a larger to a smaller base of support. Work on being able to hold each position for 10 seconds. When you can do it with your eyes open, practice with your eyes closed.
1. Stand with feet together.
2. Stand with one foot out in front and the other back.
3. Stand heel to toe.
30. Toe Walk
The purpose of this exercise is to increase ankle strength and to give you practice balancing on a small base of support while moving. Stay close to a counter or support. Rise up on your toes and walk up and back along the counter. Once you are comfortable walking on your toes without support and with your eyes open, try it with your eyes closed.

31. Heel Walk
The purpose of this exercise is to increase your lower leg strength and give you practice moving on a small base of support. Stay close to a counter for support. Raise your toes and forefoot and walk up and back along the counter on your heels. Once you are comfortable walking on your heels without support and with your eyes open, try it with your eyes closed.
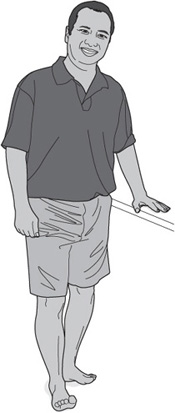
32. One-Legged Stand
Holding on to a counter or chair, lift one foot completely off the ground. Once you are balanced, lift your hand. The goal is to hold the position for 10 seconds. Once you can do this for 10 seconds without holding on, practice it with your eyes closed. Repeat for the other leg.
The Whole Body
33. The Stretcher
This exercise is a whole-body stretch to be done lying on your back. Start the motion at your ankles as explained here, or reverse the process if you want to start with your arms first.
1. Point your toes, and then pull your toes toward your nose. Relax.
2. Bend your knees. Then flatten your knees and let them relax.
3. Arch your back. Do the pelvic tilt (Exercise 10). Relax.
4. Breathe in and stretch your arms above your head. Breathe out and lower your arms. Relax.
5. Stretch your right arm above your head, and stretch your left leg by pushing away with your heel. Hold for a count of 10. Switch to the other side and repeat.
Self-Tests
Whatever our goals, we all need to see that our efforts make a difference. Because an exercise program produces gradual change, it’s often hard to tell if the program is working and to recognize improvement. Choose several of these flexibility and strength tests to measure your progress. Not everyone will be able to do all the tests. Choose those that work best for you. Perform each test before you start your exercise program, and record the results. After every 4 weeks, do the tests again and check your improvement.
1. Arm Flexibility
Do Exercise 7 (pat and reach) for both sides of the body. Ask someone to measure the distance between your fingertips. Goal: Less distance between your fingertips.
2. Shoulder Flexibility
Stand facing a wall with your toes touching the wall. One arm at a time, reach up the wall in front of you. Hold a pencil, or have someone mark how far you reached. Also do this sideways, standing about 3 inches (8 cm) away from the wall. Goal: To reach higher.

3. Hamstring Flexibility
Do the hamstring stretch (Exercise 21), one leg at a time. Keep your thigh (upper leg) perpendicular to your body. How much does your knee bend? How tight does the back of your leg feel? Goal: Straighter knee and less tension in the back of the leg.
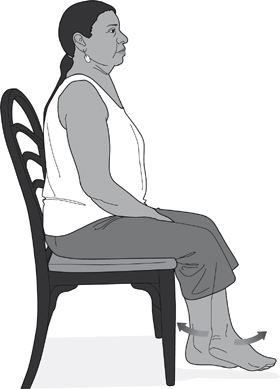
4. Ankle Flexibility
Sit in a chair with your bare feet flat on the floor and your knees bent at a 90-degree angle. Keep your heels on the floor. Raise your toes and the front of your foot. Ask someone to measure the distance between the ball of your foot and the floor. Goal: A distance of 1 to 2 inches (3 to 5 cm) between your foot and the floor.
5. Abdominal Strength
Do the curl-up (Exercise 13). Count how many repetitions you can do before you get too tired to do more, or count how many you can do in 1 minute. Goal: More repetitions.
6. Ankle Strength
This test has two parts. Stand at a table or counter for support.
Do Exercise 23 (tiptoes) as quickly and as often as you can. How many can you do before you tire?
Stand with your feet flat. Put most of your weight on one foot, and quickly tap the floor with the front part of your other foot. How many taps can you do before you tire? Goal: A total of 10 to 15 repetitions of each movement.
7. Balance
Do Exercise 31 (heel walk), and record how long you can stand on each foot without needing to reach for support. Record times with eyes open and closed. When you are ready to test your balance again, see if you can stand without support longer or if you can balance with eyes closed. The goal is to be able to balance on one foot with your eyes open and closed for 30 seconds each way.
Suggested Further Reading
Blahnik, Jay. Full Body Flexibility. Champaign, Ill.: Human Kinetics, 2007.
Knopf, Karl. Stretching for 50+. Berkeley, Calif.: Ulysses Press, 2005.
Knopf, Karl. Weights for 50+. Berkeley, Calif.: Ulysses Press, 2005.
Moccandanza, Roberto. Stretching Basics. New York: Sterling, 2007.
Torkelson, Charlene. Get Fit While You Sit: Easy Workouts from Your Chair. Alameda, Calif.: Hunter House, 1999.
Other Resources
 Asthma: Don’t Let Exercise-Induced Asthma Keep You Sidelined, American Lung Association, http://www.lungusa.org/about-us/our-impact/top-stories/active-exercise-asthma.html
Exercise: Arthritis Self-Management. [2-CD Audio] Bull Publishing Company, 2006
Exercises for midlife adults and seniors: Pep Up Your Life, President’s Council on Physical Fitness and Sport, http://www.nia.nih.gov/HealthInformation/Publications
Flexibility, strength, and balance: Sit and Be Fit [DVDs], http://www.sitandbefit.org
Physical activity: National Council on Aging, http://www.ncoa.org/improving-health/physical-activity
Physical activity publications: National Institute on Aging, http://www.nia.nih.gov/HealthInformation/Publications [DVD also available]
Preventing falls: National Council on Aging, http://www.ncoa.org/improving-health/falls-prevention
Strength training: Centers for Disease Control and Prevention, Growing Stronger for Older Adults, http://www.cdc.gov/physicalactivity/growingstronger/index.htm