Getting STARTED
Winning Strategies for Meal-Prep Success
A Stocked Pantry Saves Your Bacon
The Test Kitchen’s Top Tips for Meal Preppers
Make the Most of Your Microwave
Essential Equipment for Meal Prep
“what’s for dinner?” Whether a family member is asking you or you’re just silently asking yourself, if that question gives you a sinking feeling then you need this book. With the constant schedule juggling that we all do, meal planning and meal prep are invaluable skills to master if you want to avoid eating takeout every night.
What’s the difference between the two? Meal planning is the process of choosing recipes for the week ahead, while meal prep is the process of actually bringing those plans to fruition. This book comes to your rescue by showing you how to succeed at both.
While other meal-prep resources exist, many are rigid: If you don’t follow their road map to the letter, you’ll be thrown off course. Conversely, sometimes the information is just too vague to be a reliable guide. Or else the meal plans are geared toward a specific destination: meal planning to lose weight, for instance. With this book, we sought to create a wider, more flexible path down the middle that anyone could follow.
We’ve mapped out the meal planning for you with 25 weekly plans that include a menu, a grocery list and pantry list (both with plenty of substitution options), ingredient prep-ahead lists, and recipe make-ahead lists. We can’t do the actual meal-prep kitchen work for you, though! And that’s just as well, because that’s the part you’ll want to tailor to suit your ever-changing weekly schedule.
Our short grocery lists get you in and out of the store fast and our recipes inventively use up what you buy so that you avoid the unwelcome scenario of throwing food away at week’s end. You can make the recipes in whatever order you want—or you can pick and choose individual recipes if you don’t want to follow a full plan. And one meal every week is a pantry-friendly recipe that can be made without any additions to your weekly shopping list, so you can make it or skip it, as you like. Because takeout isn’t always bad: Who doesn’t sometimes succumb to that indulgence on a Friday night?
Our tested strategies will lower your what’s-for-dinner stress level, save you time and money, and make it not only easy but also enjoyable to serve home-cooked meals bursting with fresh, modern flavors.
WINNING STRATEGIES for MEAL-PREP SUCCESS
Efficient meal preppers take advantage of multiple strategies. Depending on your preferences and your available time in any given week, there are many different ways to customize meal prep.

PLAN INTENSIVE INGREDIENT PREP-AHEAD SESSIONS
Possibly the most valuable meal-prep habit to adopt is a “Sunday power hour,” during which time you can get well ahead of the weeknight scramble by completing as much advance kitchen work as possible. You can prep fresh ingredients (such as produce and protein) for your week’s meal plan ahead of time and also make recipe components in advance. For example, searing the chicken breasts, cooking the bulgur, and cutting the vegetables can all be done ahead of time for the Pan-Seared Chicken with Warm Bulgur Pilaf (this page). To make this habit even more useful, try a “pantry power hour” after a grocery-store trip to restock your pantry. Slice an entire jar of artichoke hearts or roasted red peppers or chop a whole deli container of olives or can of chipotles in adobo, and then put them back into their jar or another container for refrigerator storage. You can even freeze some bulk-prepped pantry ingredients for longer-term storage, such as toasted nuts, citrus zest, chopped onions, and more (see this page).
AVOID FOOD WASTE BY CROSS-UTILIZING FRESH INGREDIENTS
We designed these meal plans to use a limited number of ingredients in creative ways throughout the week. If you decide to experiment with creating your own plans, try to map out ways to efficiently use up what you buy at the grocery store while still keeping meals varied. For instance, in Meal Plan 2 we use all our purchased fresh spinach by quickly wilting some for Pan-Seared Chicken Breasts with Artichokes and Spinach (this page) and also serving it as a salad green in Shrimp and White Bean Salad with Garlic Toasts (this page). Likewise, when we ask you to buy herb bunches, we try to use them up in the plans. (Just in case, see this page for how to freeze fresh herbs and this page for how to dry them.

STORE ASSEMBLED MEAL COMPONENTS TOGETHER
If prepped ingredients get cooked together, you can store them together. For example, potatoes, shallots, and carrots are roasted together on a baking sheet in Rib-Eye Steaks with Roasted Vegetables and Sage Butter (this page), so after you prep those vegetables you can store them in one container in the fridge. For Spicy Pork Chops with Summer Vegetable Sauté (this page), the prepped onion, squash, poblanos, and corn are added to a skillet all at once, so you can store them together after prepping. Our foil packet recipes, where the assembled ingredients become an entire meal, take this concept a step further (see this page for a list of these recipes).

We’d never knock meatloaf as a reheat-and-eat classic, but we’ve elevated the make-ahead meal concept with dishes such as Chicken Curry with Tomatoes and Ginger (this page), Shiitake Mushroom Frittata with Pecorino Romano (this page), Spinach-Stuffed Portobello Caps (this page), and Italian Sausages with Balsamic Stewed Tomatoes (this page). And be sure to look at this page for our simple tips for reheating food so that it tastes freshly made. (Hint: The oven is often—but not always—better than the microwave.)

MAKE BIG BATCHES OF STAPLES TO SERVE ALL WEEK
Cook a big batch of rice or other grains to store in the refrigerator for the week. They can bulk up recipes such as Garlicky Stir-Fried Pork, Eggplant, and Onions (this page) or Spicy Beef Lettuce Wraps with Oyster Sauce (this page). You can also stir in any leftover vegetables and top with a fried egg for an emergency instant meal. (See this page for our white and brown rice recipes.) Whisk up a batch of Make-Ahead Vinaigrette (this page) to use on the Simplest Salad (this page), or mix a compound butter (this page) to melt over Chicken, Sun-Dried Tomato, and Goat Cheese Burgers (this page) or slather on crusty bread.

DOUBLE RECIPES FOR “FREEZER INSURANCE” OR INTENTIONAL LEFTOVERS
We tell you when a recipe doubles well for freezing. Soups and chili are often great choices, but most of our burger patties and the meatballs from Meatballs and Lemon Orzo with Mint and Dill (this page) freeze great, too. This doubling principle also applies to meal components, even if you can’t freeze them. For example, when you’re prepping Skirt Steak with Pinto Bean Salad (this page) for dinner, make a double batch of just the pinto bean salad. You can bring the extra for lunch and enjoy it on its own, over greens, or on top of those cooked grains you’re stocking in the refrigerator.

ALWAYS HAVE A MEAL IN YOUR BACK POCKET
Keep your pantry stocked and you will always be able to pull together a last-minute meal when a weekday throws you a curveball. Our Pantry Meals chapter (this page) offers 30 meals that do not require a grocery-store run and can be made on a moment’s notice, with no advance planning needed (although we do offer prep-ahead suggestions for those recipes, just in case you want to take advantage of that). In the section that follows, you’ll see how a well-stocked pantry can deliver all these pantry meals to your table—and provide a major assist with the rest of the meals in the book.

A STOCKED PANTRY SAVES YOUR BACON
Having a wide array of pantry items at your fingertips is a sanity-saving necessity when it comes to meal prep. What qualifies an ingredient as pantry-worthy? We think they are easy-to-find, seasonless, shelf-stable ingredients that keep for a least a week but often longer. And a well-stocked pantry is more than just a cupboard or closet; it also includes items stored in the refrigerator or freezer.
Part of making the most of your stocked pantry is keeping it organized, fully utilizing your available storage space, and knowing how to make substitutions when necessary.
Marry like items: Having a pantry full of open or almost-empty boxes isn’t efficient. If you are currently stocking multiple boxes of open pasta that take the same amount of time to cook, store them in one container. If your box of grains is nearly empty, transfer them to a smaller airtight container. You are both preserving their shelf life and opening up more space for less uniformly shaped foods (such as potatoes).
Practice FIFO (first in, first out): A good rule is that ingredients arriving in your kitchen first should be the first to leave. So store your most recently purchased pantry items at the back of the cupboard; and if you’re marrying like items, check the expiration dates and make sure the items to expire first get a spot at the top of the container.
Store produce smartly: Make sure pantry produce items such as potatoes, onions, shallots, and garlic live in a cool, dark, dry spot with space between them. This will slow down the sprouting process. If you want to get really serious, turn to an old trick from Maine and store your potatoes with an apple. The ethylene gas released by the apple, along with some other airborne compounds, will inhibit sprouting and keep your potatoes usable for up to 2 months.
In a pinch: Most cooking oils are interchangeable in recipes, so you don’t need to keep five different bottles on hand unless you want to. If all you stock is extra-virgin olive oil, go ahead and stir-fry with it! We do make an exception for oils to drizzle over a finished dish, so if we finish a recipe by drizzling extra-virgin oil over it, we call for using that oil in the recipe itself. Likewise, while it’s fun to stock different vinegars, they are often interchangeable in recipes. Throughout the book, we offer substitutions for a variety of pantry ingredients; also see this page for pointers on specific ingredient substitutions.
Now that you know how to store pantry items, turn the page to see our thorough list of what to store. You don’t have to buy every single ingredient to make great meals; and likewise, there may be things that you consider pantry must-haves that aren’t on our list.
Pasta and noodles: Spaghetti or other long shape; penne or other short shape; ditalini or other small shape; orzo; couscous; egg noodles; soba noodles
Rice: long-grain white, brown
Other grains: farro, cornmeal, polenta
Panko bread crumbs
Canned beans: chickpeas, black beans, red beans, cannellini or small white beans
Dried lentils: brown and green
Tomato products: tomato paste, canned diced, crushed, and whole peeled tomatoes
Canned tuna
Canned coconut milk
Nut butters
Cooking oils: one neutral-tasting vegetable oil, extra-virgin olive oil
Finishing oil: toasted sesame oil
Vinegars: some combination of red wine vinegar, apple cider vinegar, balsamic vinegar, white wine vinegar, rice wine vinegar, and sherry vinegar
Wines: White wine or dry vermouth, sake or dry vermouth, Shaoxing wine or dry sherry, Madeira or dry sherry, mirin or sweet sherry
All-purpose flour, cornstarch
Sweeteners: granulated sugar, brown sugar, honey
Table salt, flaky sea salt
Dried herbs and spices: At a minimum, black pepper, cayenne, chili powder, cinnamon, cumin, curry powder, ginger, herbes de Provence, oregano, paprika, red pepper flakes, sage, tarragon, thyme
Fruit: apples, dried currants, dried figs, raisins
Potatoes: small red or white, Yukon Gold, sweet
Alliums: garlic, red and yellow onions, shallots

Dairy: butter, milk, heavy cream, plain Greek yogurt, regular yogurt
Eggs
Cheese: Parmesan or Pecorino Romano; cheddar or other firm cheese; feta or other soft crumbly cheese; cream cheese
Broth: chicken or vegetable broth
Jarred artichoke hearts packed in water
Jarred roasted red peppers
Canned chipotle chiles in adobo
Olives: black, green
Condiments and sauces: As with spices, the more the merrier: Asian chili-garlic sauce, barbecue sauce, fish sauce, hot sauce, maple syrup, mayonnaise, mustards (Dijon, whole-grain), oyster sauce, soy sauce, sriracha, tahini, Thai curry paste
Carrots
Celery
Citrus: lemons, limes, oranges
Bread: crusty bread, sandwich bread, pita, naan, hamburger buns, tortillas
Puff pastry
Nuts and seeds: almonds, cashews, peanuts, pecans, pine nuts, walnuts, sesame seeds, sunflower seeds, pepitas
Frozen produce: corn, edamame, peas, spinach
Bacon or pancetta
Shrimp
FROZEN ASSETS
We consider frozen shrimp and certain frozen vegetables to be invaluable pantry staples.
In general, seafood’s high perishability means that a lot of the seafood you eat—even the “fresh” pieces you buy at the seafood counter—has been frozen. Most is frozen right at sea, so some argue that frozen seafood is even “fresher” than what’s on display at the counter.
We particularly love bagged frozen shrimp, as it’s easy to thaw exactly what you need. Extra-large shrimp (21 to 25 per pound) or large shrimp (26 to 30 per pound) are our go-to. Because peeled shrimp tend to be drier, we prefer to buy shell-on frozen shrimp and peel them ourselves. Be sure to check the label before purchasing: “Shrimp” should be the only ingredient listed. In an effort to prevent darkening or water loss during thawing, some manufacturers add salt or STPP (sodium tripolyphosphate). Our tasters found an unpleasant texture in salt-treated and STPP-enhanced shrimp; the latter also had a chemical taste.
We also stock frozen corn, peas, and edamame in our freezers. One of our most frequently used frozen veggies, though, is spinach. We found in recipe testing that we prefer a brand-name frozen spinach, such as Bird’s Eye or Green Giant. These brands were more tender and flavorful than generic and store-brand choices, qualities that become important especially when using frozen spinach as a stir-in for recipes such as our Fusilli Salad with Artichokes, Spinach, and Sun-Dried Tomatoes (this page) and Bulgur Salad with Spinach, Chickpeas, and Apples (this page).
Discover more ways to make your freezer work for you in meal prepping on this page.

INGREDIENT PREP SCHOOL
Most vegetables can be simply chopped a few days in advance and refrigerated in airtight containers, but some benefit from a little special handling to help preserve their flavor, texture, or color.
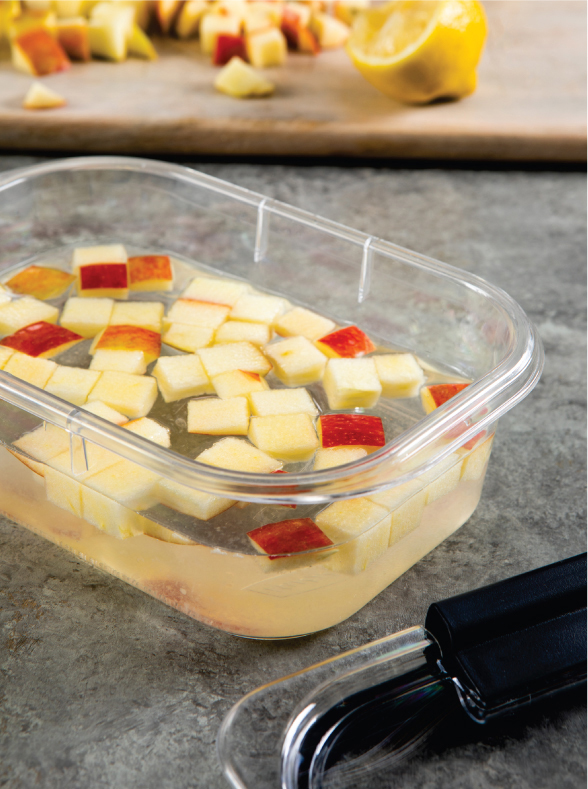
APPLES
Apples oxidize (turn brown) after cutting because enzymes and compounds stored separately in each cell of the fruit become available to interact with each other and with the air. Although oxidation doesn’t affect taste, we store chopped apples in acidulated water in an airtight container in the fridge to prevent browning. Use about ¾ tablespoon lemon juice or vinegar per 1 cup water. Drain and pat apples dry before using them in a recipe.
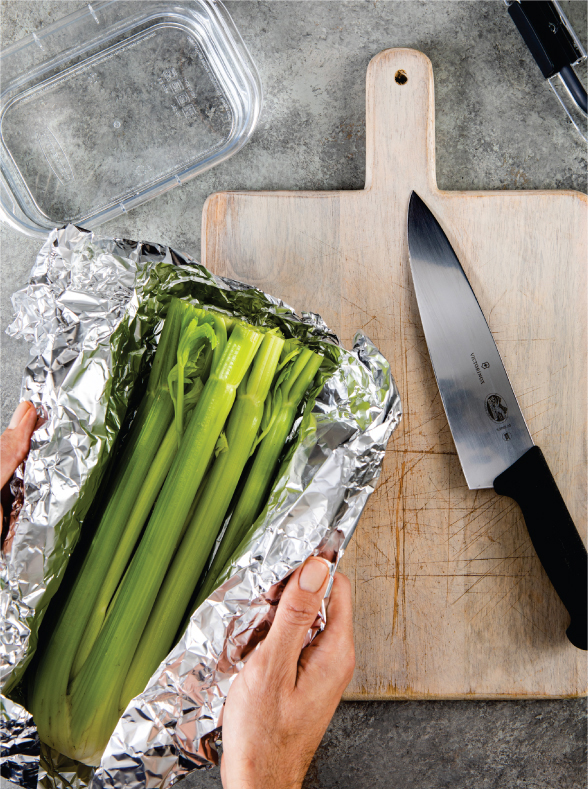
CELERY
Celery doesn’t turn brown after cutting, but it loses moisture and crispness rapidly. Wrap whole heads loosely in aluminum foil to prolong their crispness and life span. The foil allows ethylene gas (a ripening hormone) to escape while keeping moisture in. Store chopped or sliced celery in plain water in an airtight container in the fridge to keep it from drying out.

GREENS
Washing lettuce and hearty greens as soon as you get them home is not only good meal-prep practice, but it will also help prolong their freshness. Once you wash the greens, spin them dry in a salad spinner and then either store them right in the spinner (lined with paper towels to absorb excess moisture) or wrap them in paper towels and store them in a partially open zipper-lock bag in the refrigerator.

HERBS
We rely on fresh herbs to add loads of flavor to our prepped meals, but they spoil quickly. To extend their life, wrap the sprigs in a damp paper towel and store them in a partially open zipper-lock bag in the refrigerator. This storage method also works if you prep your herbs ahead by washing and picking the leaves and tender stems. Be sure to remove rubber bands or twist ties before storing herbs, since those will cause quicker spoilage.

EGGPLANT
Like apples, eggplant will oxidize after you cut it, but since it’s such a sponge you can’t store the pieces in water as you would apples or potatoes. Since the oxidation doesn’t affect its flavor or texture, and since the eggplant pieces brown anyway when cooked, we usually prep our eggplant ahead and simply store it in an airtight container in the refrigerator.
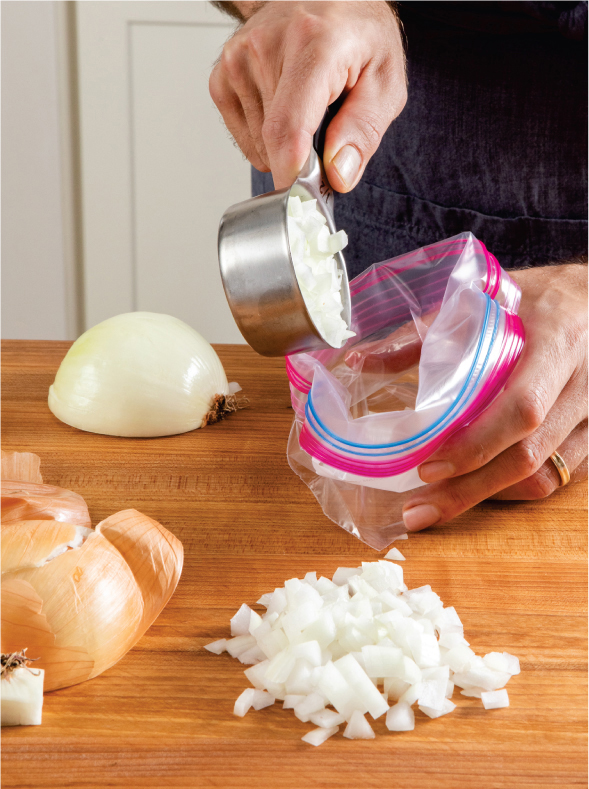
ONIONS
Chop or slice onions and store them in a zipper-lock bag or airtight container in the refrigerator. Prepped onions also freeze well (see this page), which is especially handy since they are so often needed in small amounts for a recipe. Because their odor is so strong, we think it’s a good idea to store prepped onions in either zipper-lock bags or a dedicated storage container.
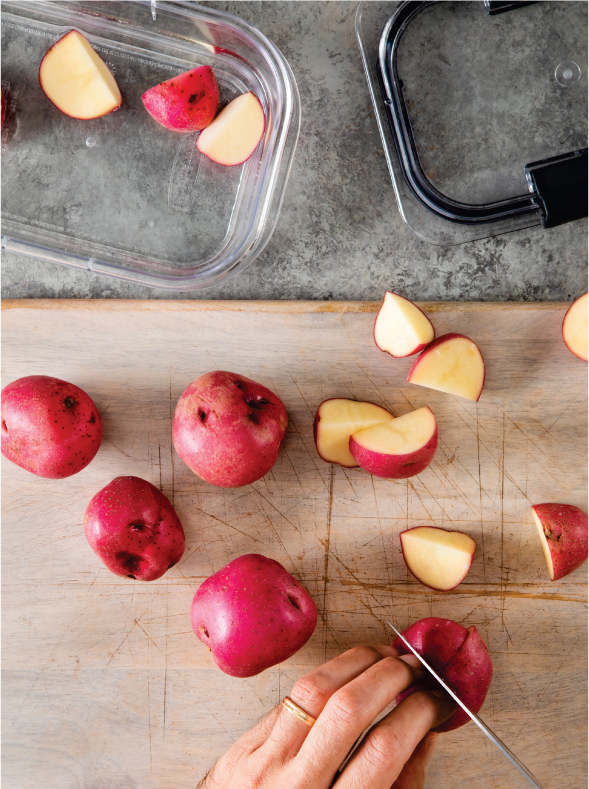
POTATOES
Cut potatoes will also oxidize, so we store sliced or chopped potatoes in water in an airtight container in the refrigerator to prevent browning. Unlike with apples, we don’t use acidulated water, as the acid will firm up the potatoes’ pectin too much and affect cooking times. We also suggest storing prepped potatoes for no longer than 1 day.

You can purchase pre-cut chicken and pork cutlets, and they are undeniably a boon for busy meal preppers. However, they are often packaged in irregular sizes, meaning they will cook at different rates—decidedly not a boon. When we have time, we prefer to buy boneless chicken breasts and pork tenderloin and cut our own cutlets to ensure uniformity. You can then refrigerate or freeze your custom cutlets until ready to cook.
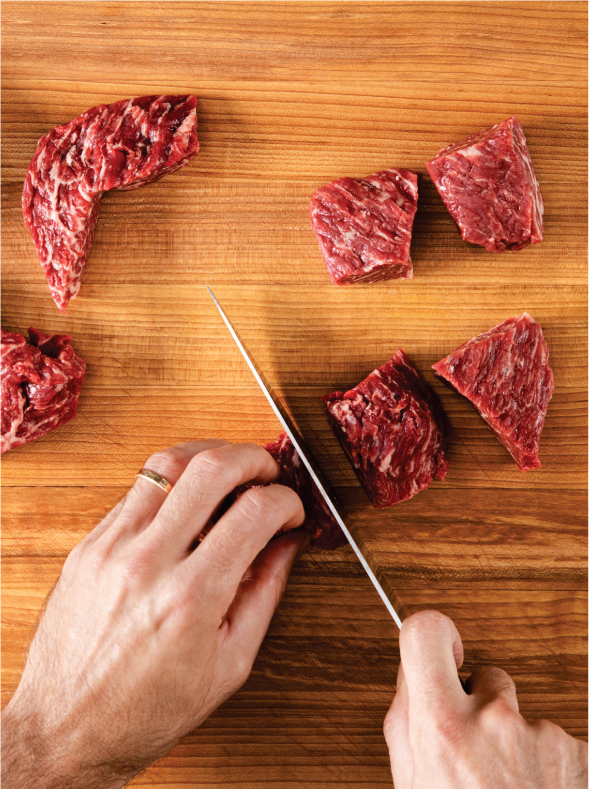
As with cutlets, you can buy pre-cut steak tips (they are most often labeled sirloin steak tips), but again, they are often irregularly sized, posing the same problem of uneven cooking. We specify what size to cut steak tips into in the recipes (generally 2-inch pieces). If you see flap meat at your butcher counter, you can buy that instead and cut your own steak tips.
PREP and FREEZE
You can store many prepped ingredients in the freezer for at least a couple of months. Keeping these freezer-friendly staples at the ready will make your weeknight cooking even easier.
Bread: We like to keep crusty bread, sandwich bread, burger buns, pita, and tortillas on hand at all times, and the freezer keeps them fresh for us. For maximum freshness and ease of use, wrap portions tightly in plastic wrap and then tightly seal (with as little air as possible) in a zipper-lock freezer bag.
Canned chipotle chiles in adobo: Spoon out each chile, along with a couple teaspoons of adobo sauce, onto different areas of a baking sheet lined with parchment paper and freeze. Transfer the frozen chile mounds to a zipper-lock freezer bag for storage.
Cheese: Wrap hard and semifirm cheeses such as Parmesan and cheddar tightly in plastic wrap, seal in a zipper-lock freezer bag, and freeze. Thaw in the refrigerator before using in a recipe. And freeze Parmesan rinds as well; you can add them to simmering soups to enrich and deepen flavor.
Citrus zest: Remove the zest from the entire fruit. Deposit the grated zest in ½- or 1-teaspoon piles on a plate and freeze. Once the piles are frozen, store them in a zipper-lock freezer bag.
Fish: We recommend cooking fish within 2 days of purchase. But if it hasn’t been previously frozen (ask at the counter), one of our favorite tricks is short-term freezing: After your weekend grocery run, simply toss it in the freezer for a couple of days and then enjoy it fresh at the end of the week. This allows you greater flexibility in planning the order of your meals.
Fresh herbs: Place 2 tablespoons chopped fresh mint, oregano, rosemary, sage, parsley, or thyme in each well of an ice cube tray and add water to cover (about 1 tablespoon), then freeze. Once frozen, transfer the cubes to a zipper-lock freezer bag or other freezer container. Add the cubes directly to soups, stews, or sauces.
Garlic: Peel the cloves, mince or press them through a garlic press, and place the minced garlic in a bowl. Add enough neutral-flavored oil to coat (about ½ teaspoon per clove), then spoon heaping teaspoons of the mixture onto a baking sheet and freeze. Transfer the frozen portions to a zipper-lock freezer bag. Thaw in the refrigerator (not at room temperature) or use directly from the freezer.
Ginger: Simply cut fresh ginger into 1-inch pieces and freeze in a zipper-lock freezer bag. Chop or grate directly from the freezer (no need to peel).
Onions: Freeze chopped onions in zipper-lock freezer bags in ¼-cup or ½-cup portions, and use directly from the freezer. We recommend using frozen onions only in cooked preparations, not in salads or salsas.
Wine: Measure 1 tablespoon wine into each well of an ice cube tray and freeze. Once frozen, store the wine cubes in a zipper-lock freezer bag or other freezer container.
SUBSTITUTE with CONFIDENCE
We’ve provided specific guidance in our meal plans on how to substitute both pantry staples and fresh ingredients. Sometimes it’s a 1:1 sub (such as substituting canned cannellini beans for canned chickpeas). But sometimes it’s less straightforward, as when you are substituting shallots for onions or frozen spinach for fresh spinach. Here’s a quick guide for substitutions that we suggest regularly. And remember—just because you can substitute an ingredient doesn’t always mean you should. Consider the overall flavor profile of your dish when making decisions.
A note on herb substitutions: We generally prefer fresh herbs to dried and often suggest alternative fresh herbs as substitution options in a given recipe. That being said, for sturdy herbs such as oregano, sage, and thyme, it’s OK to substitute dried for fresh. We don’t recommend substituting the dried version of delicate leafy herbs, such as basil, parsley, cilantro, tarragon, dill, and chives, because their flavor is inferior. If you do substitute dried herbs for fresh, you can add the dried herbs to the recipe at the same time that you would add the fresh herbs.
1 small onion = ¾ cup chopped
1 medium onion = 1 cup chopped
1 large onion = 1½ cups chopped
1 small shallot = 1 tablespoon chopped
1 medium shallot = 3 tablespoons chopped
1 large shallot = 4 tablespoons chopped
You need 4 large shallots or 5 or 6 medium shallots to substitute for 1 medium onion.
1 medium leek = 1½ cups sliced
1 medium vine-ripened tomato = 6 ounces cherry or grape tomatoes
1 lemon = 1½ limes
1 tablespoon citrus juice = 1 to 2 teaspoons vinegar (to taste)
1 portobello mushroom cap = 3 ounces cremini or white mushrooms
3 celery ribs = 1 fennel bulb
1 ounce fresh spinach = 1 cup = 1 ounce frozen spinach (in cooked recipe applications)
1 ounce fresh spinach = 2 ounces frozen spinach (in pasta salads or other uncooked recipe applications)
3 parts fresh herb = 1 part dried herb
1-inch piece fresh ginger = 1 tablespoon chopped = ¼ to ⅓ teaspoon ground ginger (to taste)
1 slice bacon = 1 thin slice pancetta (about 1 ounce) = 1 ounce salt pork
Pasta: When substituting different shapes, substitute by weight, not by volume.
Chiles: When substituting chiles, their heat level is more important than their volume when sliced or chopped. Add to taste and proceed with caution!
Jalapeño = 2,500 to 8,000 Scoville units
Serrano = 8,000 to 22,000 Scoville units
Thai chile = 50,000 to 100,000 Scoville units
Habanero = 150,000 to 575,000 Scoville units
the TEST KITCHEN’S TOP TIPS for MEAL PREPPERS
Make the A-list
For each meal plan, we provide you with a weekly shopping list, a list of pantry items (and amounts) you’ll need for the week, and prep-ahead lists for both the whole menu and each recipe. But the most important list is one you must make yourself each week: the list that maps out your schedule for the days ahead to remind yourself of exactly what—and when—you’ll be prepping.
Put a date on it
Everything you store should have a date on it; use whatever method works for you, be it freezer marker, permanent marker, masking tape labels, or something else. You might think you’ll remember more or less when you stashed that double batch of meatballs for the Meatballs and Lemon Orzo with Mint and Dill (this page) in the freezer, but time flies so trust us—you won’t.
Bulk it up
Buy frequently used pantry items in bulk to minimize shopping. Those eye-poppingly large tins of extra-virgin olive oil are more cost-effective than smaller glass bottles, and the opaque tin maintains quality longer. Buying in bulk doesn’t have to mean an overstuffed pantry, though. For example, a good-quality jarred concentrated chicken broth base takes up far less room than multiple bulky cartons of liquid, and the base keeps for a year in the refrigerator.
Develop labeling savvy
Sell-by dates on canned goods are about peak quality, not safety, and remembering this can help you minimize food waste. As long as the cans look good and have been stored well (in a dry pantry between 40 and 70 degrees), their contents should be safe to use indefinitely.
Reserve crunchy or crisp toppings such as toasted nuts and seeds, croutons, and fresh herbs to add to your dishes just before serving; this will prevent them from turning soggy or limp. Likewise, store dressings or vinaigrettes separately and combine them with your vegetable salad or other food just before serving.
Roll with it
Freeze food in a way that makes it easy to use in the amount that you need and that prevents food waste. We like to roll individual slices of bacon or pancetta for freezing in a zipper-lock bag, so you can remove just the number of slices you want. Cut a crusty loaf of artisan bread into slices or chunks before wrapping and freezing for the same reason.
Spice things up—with variety
Beyond logistics, meal planning often fails because no one wants to eat the same thing multiple nights in a row. But if you use the same ingredient in creative ways during the week—as we do with butternut squash in One-Pan Roast Chicken Breasts with Butternut Squash and Kale (this page) and Butternut, Poblano, and Cheese Quesadillas (this page)—you’ll hear compliments rather than complaints around the dinner table.
Bring TV dinners into the 21st century
If you can bake it in a foil packet, do it! Cod Baked in Foil with Leeks and Carrots (this page), Foil-Baked Chicken with Sweet Potatoes and Radishes (this page), Foil-Baked Cod with Black Beans and Corn (this page), Cod Baked in Foil with Potatoes, Zucchini, and Sun-Dried Tomatoes (this page), and Halibut and Creamy Coconut Couscous Packets (this page) are far more delicious than anything you’ll ever find in the frozen food aisle.
Flex your culinary muscles
Think of these recipes as guides rather than mandates. Don’t hesitate to swap one herb for another, one nut for another, or one condiment for another. If the scallops don’t look great at the fish counter, substitute shrimp in the Seared Scallops with Squash Puree and Sage Butter (this page). If someone doesn’t want pork cutlets, substitute chicken cutlets in the Parmesan-Crusted Pork Cutlets with Chive Smashed Potatoes (this page).
MAKE THE MOST of YOUR MICROWAVE
We all know that the microwave can be a lifesaver for quickly reheating leftovers as well as meal components or entire meals that you’ve made ahead and refrigerated. But savvy meal preppers also turn to their microwave to streamline recipe prep, speed up cooking times, and make their dinner preparation easier overall.

PARCOOK DENSE, HARD VEGETABLES
In our Herbed Steaks with Lemon-Garlic Potatoes (this page), we microwave 1-inch pieces of red potatoes for just 4 minutes to parcook them so that they need only a few minutes more to turn golden brown in the same hot skillet you use for the steak. For the Butternut, Poblano, and Cheese Quesadillas (this page), we microwave ½-inch cubes of butternut squash all the way to tenderness in just 8 minutes before using them to stuff tortillas.
Bonus: You can make a plain whole baked potato this way, too: While the oven heats to 450 degrees, microwave 1 russet potato (poke holes in it with a fork first) until slightly soft, 6 to 12 minutes, then pop it in the oven to finish cooking for another 20 minutes.
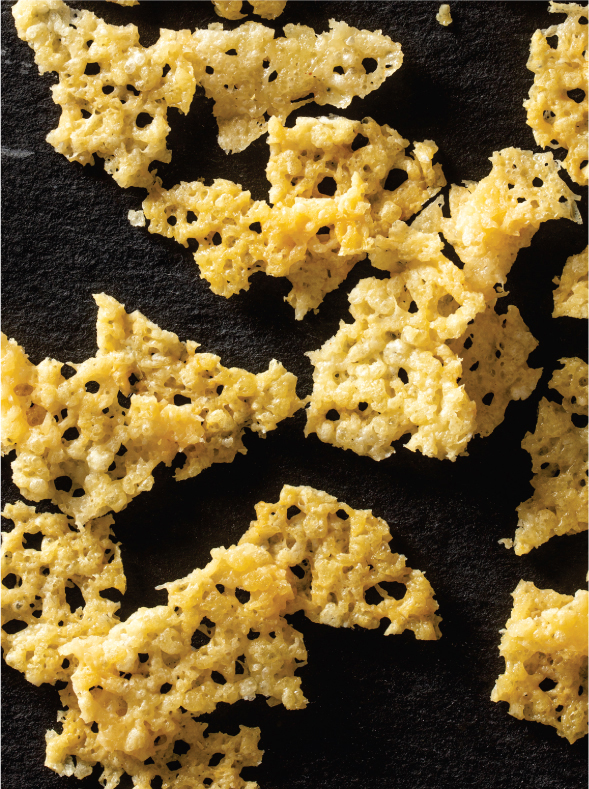
MAKE QUICK GARNISHES THAT ELEVATE YOUR MEAL
For our Sun-Dried Tomato and White Bean Soup with Parmesan Crisps (this page), we created a microwave rendition of Italian frico by shredding Parmesan, arranging it in neat piles on a large plate, and microwaving them until golden brown and crisped.

Place chopped nuts in a shallow bowl or a glass pie plate in a thin, even layer. Microwave, stirring and checking the color every minute. When the nuts start to color, microwave them in 30-second increments until golden brown. You can toast larger batches of nuts this way and store them in the freezer (they’ll stay crunchy for up to a month).
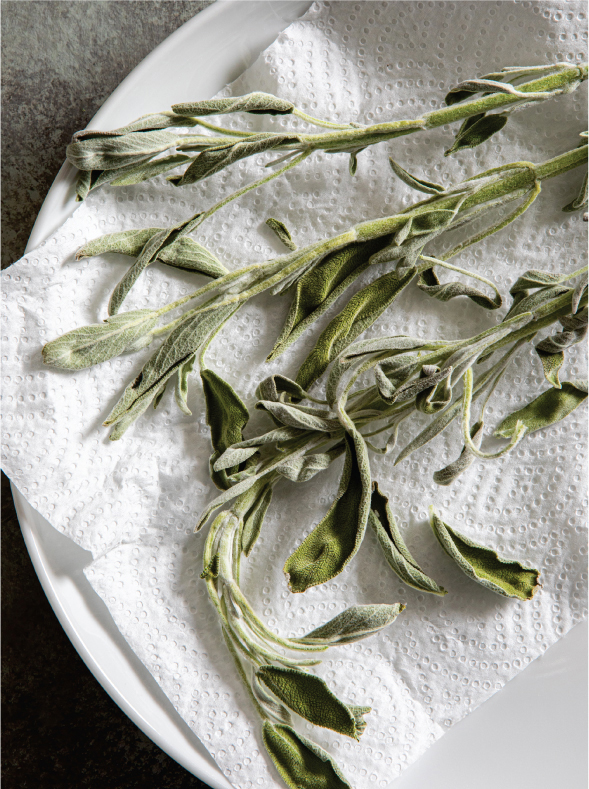
We’ve designed our meal plans to use up the fresh herbs that you purchase on your weekly grocery run, but if you find yourself with some left over, dry them in the microwave and store for later use. Place sturdy herbs (rosemary, thyme, sage, oregano) in a single layer between two paper towels on the turntable. Microwave on high power for 1 to 3 minutes, until the leaves turn brittle and fall easily from the stems. Store in an airtight container for up to 3 months.
REHEAT without RESERVATION
Making food ahead of time is an important part of successful meal prep—as is planning for intentional leftovers. Paying just a bit of attention to the smartest way to reheat and serve these foods will legitimize your leftovers and ensure that they always taste freshly made.
PROTEINS
From burger patties and meatballs to skin-on or skinless chicken to breaded pork cutlets, place them on a wire rack set inside a rimmed baking sheet, cover with aluminum foil, and reheat in a 350-degree oven. The wire rack allows for better air circulation and more even heating.
Meals such as Tortellini and Vegetable Soup with Pesto (this page) and Green Chicken Chili (this page) are best reheated in a pot on the stovetop. In a pinch, you can use the microwave.
Reheat dishes such as Cheese Enchiladas (this page) and Chicken and Rice with Chorizo and Artichokes (this page) in a baking dish covered with foil in a 350-degree oven.
PIZZAS, TARTS, AND QUESADILLAS
Reheat items such as Arugula Pesto and Potato Pizza (this page) and Butternut, Poblano, and Cheese Quesadillas (this page) on a rimmed baking sheet tented with foil in a 350-degree oven. Or reheat them in a loosely covered nonstick skillet over medium heat to crisp up the dough and melt the cheese.
RICE AND GRAINS
An uncovered dish in the microwave works best. Add a tablespoon of water to up to 4 cups of cooked rice or grains and heat until steaming, stirring once about halfway through.
PASTA
Casserole-style pastas such as Creamy Stovetop Macaroni and Cheese (this page) and stewy pastas like Pasta and Chickpeas with Tomato and Parmesan (this page) can be reheated in a covered baking dish in a 350-degree oven. We don’t recommend reheating other pasta dishes.
Revive Flavor and Texture: An easy way to dramatically elevate reheated food is through seasoning, and we mean more than just salt and pepper. Refreshing reheated foods before serving with a drizzle of extra-virgin olive oil, a spritz of vinegar, or a squeeze of citrus juice enriches and wakes up any flavors that might have gone quiet with storage. Often, soups and stews thicken when refrigerated, so they benefit from the addition of a little water or broth during reheating to help return them to their original consistency. If you do add water, don’t forget to taste and reseason, if necessary, before serving.

ANATOMY of a FRIDGE
While your freezer should always be set to the coldest possible setting, refrigerators have natural temperature zones that you should take advantage of when storing raw, prepped, and cooked food.
To avoid temperature fluctuations within these natural zones and to keep your refrigerator consistently cold, let cooked items cool on the counter before refrigerating or freezing them. Perishable foods should be refrigerated with 2 hours, and the food should be cooled to room temperature (70 to 75 degrees) before storing. This is often achieved within 1 hour of the food resting on the counter; you can transfer large batches of items such as soups or chilis to smaller containers to help them cool faster. (The food should then cool down to 40 degrees in the fridge within 4 hours to be considered in the “safe zone.”)
Within the natural temperature zones of the refrigerator, we follow what’s known as “swim-walk-fly,” which is a top-to-bottom storage arrangement for the highest level of food safety. In this arrangement, ready-to-eat foods such as dairy and cooked proteins go on top. Uncooked seafood (stored on a bed of ice in a container) goes below, then whole cuts of uncooked meat and poultry, and finally, uncooked ground meats and poultry on the bottom. Store raw meats in bags or on plates to prevent any juices from dripping onto the shelves or other foods.
The refrigerator is also your best tool for safe, proper thawing. With very few exceptions (such as frozen nuts), defrosting should always be done in the refrigerator—not on the counter at room temperature where bacteria can rapidly multiply. Place food on a plate or in a bowl while defrosting to prevent any liquid it releases from coming into contact with other foods. And don’t forget to plan ahead: Some foods can take up to 24 hours to thaw fully.
Even if your refrigerator has a built-in thermometer, we suggest you invest in a separate high-quality thermometer that tracks the temperature of your refrigerator and freezer over time and alerts you if their temperature veers out of the safe range (see this page).

COLD ZONE (BACK, TOP TO BOTTOM)
The area of the shelves at the back of the fridge and the shelves at the bottom of the door are normally the coldest spots. What to store here: prepared foods, leftovers, meat, dairy, and fruit that is not prone to chilling injury, such as cherries and grapes.
MODERATE ZONE (FRONT, TOP TO BOTTOM)
The areas at the front of the refrigerator, top to bottom shelves, are more moderate in temperature. This also includes the top shelves of the door, which should be reserved for items such as condiments. What to store here: eggs, butter, and fruit that is sensitive to chilling injury, such as berries and citrus.
HUMID ZONE (CRISPER DRAWER)
The crisper drawer provides a humid environment that helps keep produce with a high water content from shriveling and rotting. If the humidity is too high, moisture can accumulate and hasten spoilage. The more cold air that is let in through the vents, the less humid the environment will be. What to store here: vegetables.
DOUBLE DOWN
These recipes are easily doubled for freezing in some significant fashion, whether it’s the entire recipe, as for the Chicken Curry with Tomatoes and Ginger, or a major component of the recipe, as for the burger patties and meatballs.
Freeze an Entire Meal
Chicken Curry with Tomatoes and Ginger (this page)
Spicy Corn and Tomato Soup (this page)
Beef and Bean Chili (this page)
Green Chicken Chili (this page)
Sun-Dried Tomato and White Bean Soup with Parmesan Crisps (this page)
5-Ingredient Black Bean Soup (this page)
White Bean Soup with Lemon and Oregano (this page)
Red Lentil Soup with North African Spices (this page)
Cheese Enchiladas (this page)
Freeze a Meal Component
Skillet Turkey Burgers with Tomato and Arugula Salad (this page)
Ground Beef Tacos (this page)
Shrimp Burgers (this page)
Meatballs and Lemon Orzo with Mint and Dill (this page)
Ground Beef Stroganoff with Egg Noodles (this page)
Salmon Burgers with Asparagus and Lemon Mayo (this page)
Spiced Pork Lettuce Wraps with Avocado and Mango (this page)
Chicken Noodle Soup (this page)
Chicken, Sun-Dried Tomato, and Goat Cheese Burgers (this page)
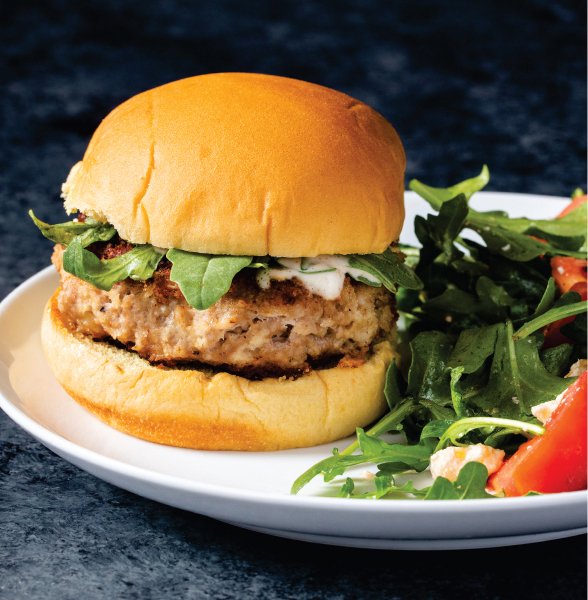
Skillet Turkey Burgers with Tomato and Arugula Salad (this page)

Meatballs and Lemon Orzo with Mint and Dill (this page)

Ground Beef Tacos (this page)
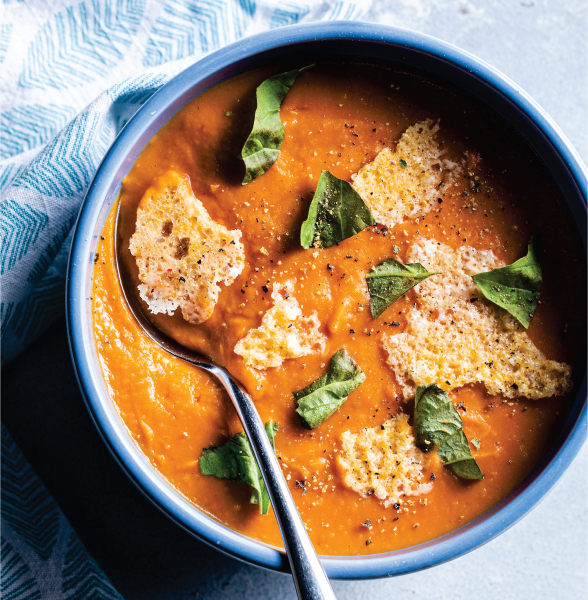
Sun-Dried Tomato and White Bean Soup with Parmesan Crisps (this page)

USE A HALF-GRILL FIRE FOR FAST WEEKNIGHT GRILLING
For the most efficient weeknight grilling with the biggest flavor payoff, high and fast is the way to go. A half-grill fire allows you to sear items such as pork chops or tenderloin quickly over the hotter side of the grill and then move them to the cooler side until the specified internal temperature is reached.
To build a half-grill fire in a gas grill, simply turn all the burners on high to preheat the grill for about 15 minutes; once heated, leave the primary burner on high and turn off the other burners. For a charcoal grill, bank the hot coals on one side of the grill and leave the other side empty.
To keep your food from sticking, don’t forget to clean and oil the grate before starting to grill. After preheating the grill, scrape the cooking grate clean with a grill brush. Then, using tongs, dip a wad of paper towels in vegetable oil and thoroughly wipe the cooking grate before adding food.
ESSENTIAL EQUIPMENT for MEAL PREP
The name of the game is storage when it comes to our most-wanted equipment for successful meal prepping. Beyond wraps and containers, you might also get a lot of use from a vacuum sealer. And to keep all that stored food in tiptop shape, keep a good thermometer in your fridge.
PREP IT
Plastic wrap, aluminum foil, and zipper-lock plastic bags are essential meal-prep equipment.
PLASTIC WRAP
For meal-prepping purposes, we prefer plastic wrap made from low-density polyethylene (LDPE); while it’s less clingy than wrap made from PVC, it’s impermeable and keeps food fresher longer. If you are trying to minimize plastic wrap waste, we suggest Bee’s Wrap, a washable and reusable alternative to standard plastic wrap.

ALUMINUM FOIL
We find heavy-duty foil easier to work with and stock standard 12-inch rolls and extra-long rolls.

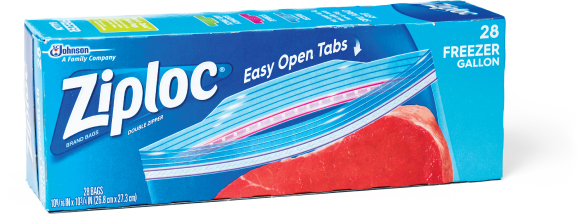
We use freezer-safe zipper-lock bags to hold prepped ingredients, since they are thicker and sturdier than standard bags and will protect food for a longer time in the fridge as well as the freezer. Smaller sizes can hold a variety of ingredients (and you can often wash and reuse the bags), while larger sizes can hold marinating meat and be used for freezing cutlets, burger patties, and more.
STORE IT
There’s no getting around the fact that as a meal prepper you need plenty of reusable storage containers in a variety of sizes, from small ones to hold prepped ingredients to medium ones to hold single meals to large ones to hold a whole batch of chili or soup. Whether you choose plastic or glass containers is up to you. Plastic is lightweight and easy to transport, but it can stain, absorb odors, and warp, and it can’t go into the oven. Glass containers can go from fridge to oven to table and don’t stain, absorb odors, or warp, but they are heavier to transport and are breakable.
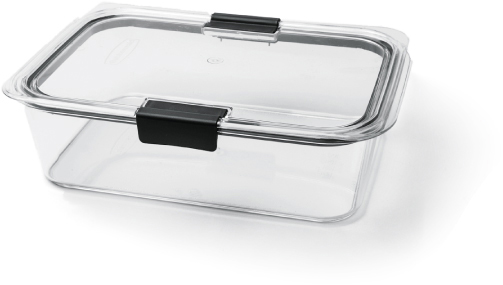
We found a clear winner when testing plastic storage containers: the Rubbermaid Brilliance Food Storage Container line. They are airtight, with strong, sturdy latches and flat tops that make for secure, compact stacking in the refrigerator and freezer. They are sold both in individual sizes and in sets. If you’re looking for multiple identical containers for individual meal servings, we like the 3.2-cup size. The 4.7-cup will hold a baking sheet’s worth of roasted vegetables, a big batch of rice, or a large portion of leafy greens, while the 9.6-cup will store a whole batch of soup or chili. And the 1.3-cup size is great for storing prepped ingredients and dressings.
GLASS CONTAINERS
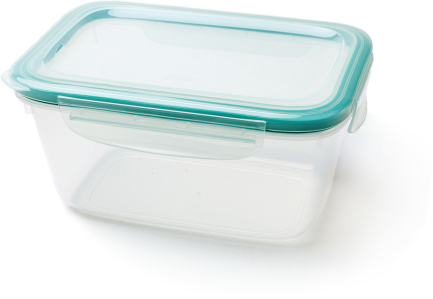
Our favorite glass storage containers are OXO Good Grips Smart Seal, which also come in multiple sizes, from 8 cups down to 4 ounces, and are sold both individually and in sets. They have durable latches and airtight, leakproof seals. We like the rectangular containers for their efficient stackability and the larger round containers for their depth, which adds to their versatility. For multiple identical containers for individual meal servings, try the 3.5-cup rectangle or the 4-cup round, which are also good for storing roasted vegetables and cooked grains. The 7-cup and 8-cup sizes can store a full batch of soup. Smaller sizes, including the 1.6 cup and the 1 cup, are good for prepped ingredients, dressings, etc.
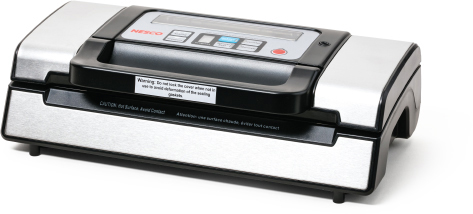
You’ll get a lot of use out of this meal-prep helper. These machines remove air from customized storage bags before sealing them tightly, protecting the foods inside the bags from moisture loss or gain, whether they’re stored for long periods in the freezer or at room temperature in the pantry. We recommend the Nesco Deluxe Vacuum Sealer, which is sturdy but relatively compact, with an easy-to-use display screen and a roll storage compartment with built-in slicer so you can easily cut the storage bags to size.
REFRIGERATOR AND FREEZER THERMOMETER
To keep all your stored food at its freshest for as long as possible, it’s vital to know your refrigerator’s and freezer’s temperatures. Even if your refrigerator has a built-in thermometer, it’s a good idea to set up an independent thermometer as backup. We like the ThermoWorks RT8100 Fridge/Freezer Thermometer, which is a single, fully programmable thermometer with two probes, one for the refrigerator and one for the freezer. An alarm alerts you when the temperature goes out of safe limits, and it keeps track of the duration as well as what the highest and lowest temperatures were during the monitoring cycle.

How to NAVIGATE THIS BOOK
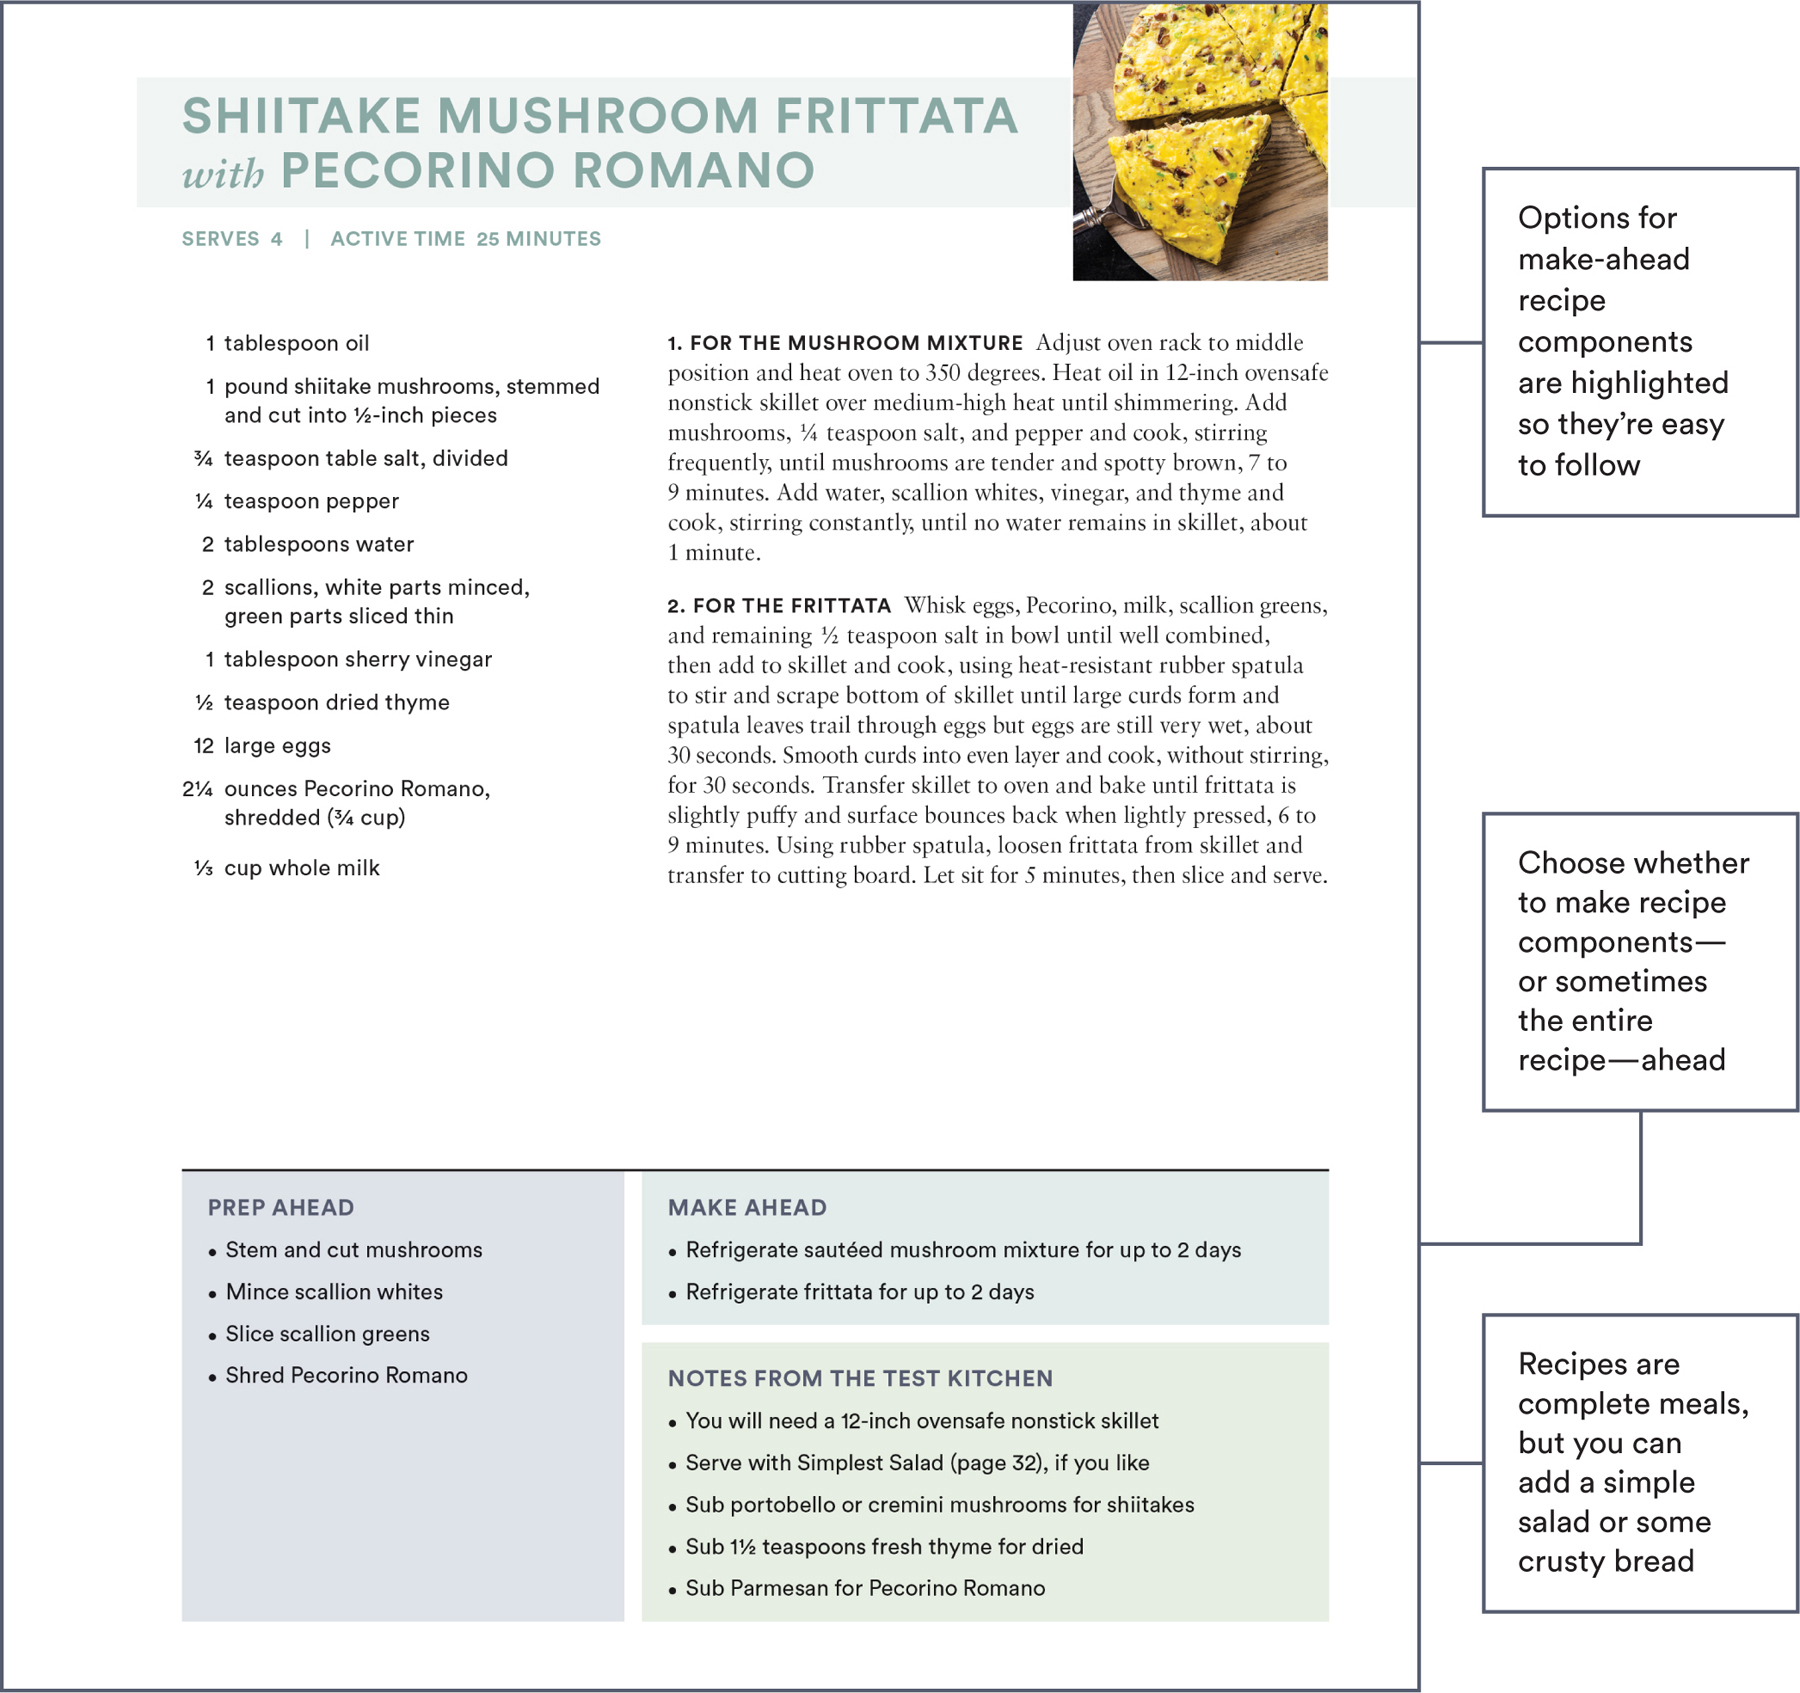
Every meal plan includes a “dashboard” that introduces the meals for the upcoming week and walks you through your grocery shopping list, the list of pantry items you need to have on hand to complete the plan, your ingredient prep-ahead options, and your meal-component make-ahead options. Here’s an example.
How to PREP A MEAL
BUILDING-BLOCK RECIPES
The recipes in our weekly plans stand on their own, saving you the quandary of what to serve alongside. But if you want a green salad to go with a homey soup, a bed of rice for a stir-fry, or a simple flavored butter to slather on crusty bread, here are our go-to recipes.
SIMPLEST SALAD
serves 4
This incredibly simple green salad requires the bare minimum of ingredients, no measuring, no whisking, and (virtually) no thought. We like to rub the bowl with the halved and peeled garlic clove to add just a hint of flavor. Use whatever vinegar you have on hand or you prefer. Because this salad calls for so few ingredients, try to use interesting and flavorful leafy greens such as mesclun, arugula, Bibb, or romaine.
½ garlic clove, peeled
8 ounces (8 cups) lettuce, torn into bite-size pieces if necessary
Extra-virgin olive oil
Vinegar
Rub inside of salad bowl with garlic. Add lettuce. Slowly drizzle oil over lettuce, tossing greens very gently, until greens are lightly coated and just glistening. Season with vinegar, salt, and pepper to taste, and toss gently to coat. Serve.
MAKE-AHEAD VINAIGRETTE
makes about 1 cup
This versatile dressing will stay emulsified for a week in your refrigerator, and you can use white wine vinegar, balsamic vinegar, apple cider vinegar, or sherry vinegar, as you like. To keep the oil and vinegar from separating, we added mustard and mayonnaise, two natural emulsifiers. A little molasses stabilized the dressing and further prevented separation without lending a strong flavor. Cutting the olive oil with some vegetable oil ensured that our refrigerated dressing was always pourable.
1 tablespoon mayonnaise
1 tablespoon molasses
1 tablespoon Dijon mustard
½ teaspoon table salt
¼ cup vinegar
½ cup extra-virgin olive oil
¼ cup vegetable oil
1. Combine mayonnaise, molasses, mustard, and salt in 2-cup jar with tight-fitting lid. Stir with fork until mixture is milky in appearance and no lumps of mayonnaise or molasses remain. Add vinegar, seal jar, and shake until smooth, about 10 seconds.
2. Add ¼ cup olive oil, seal jar, and shake vigorously until combined, about 10 seconds. Repeat, adding remaining ¼ cup olive oil and vegetable oil in separate additions, shaking vigorously until combined after adding each and vinaigrette is glossy and lightly thickened, with no surface pools of oil. Season with salt and pepper to taste. (Vinaigrette can be refrigerated for up to 1 week; shake briefly to recombine before using.)
CLASSIC BASIL PESTO
makes about 1½ cups (enough for 2 pounds pasta)
Pesto is super versatile and it freezes very well. It’s great with pasta, but you can also dollop it on cooked chicken or fish or use it as a sandwich condiment or a dip for crusty bread. If you’re tossing the pesto with pasta, don’t forget to add some pasta cooking water to achieve the proper sauce consistency. Pounding the basil helps to bring out its flavorful oils.
6 garlic cloves, unpeeled
½ cup pine nuts
4 cups fresh basil leaves
¼ cup fresh parsley leaves
1 cup extra-virgin olive oil
1 ounce Parmesan cheese, grated fine (½ cup)
1. Toast garlic in 8-inch skillet over medium heat, shaking skillet occasionally, until softened and spotty brown, about 8 minutes. When garlic is cool enough to handle, remove and discard skins and chop coarsely. Meanwhile, toast pine nuts in now-empty skillet over medium heat, stirring often, until golden and fragrant, 4 to 5 minutes.
2. Place basil and parsley in 1-gallon zipper-lock bag. Pound bag with flat side of meat pounder or with rolling pin until all leaves are bruised.
3. Process garlic, pine nuts, and herbs in food processor until finely chopped, about 1 minute, scraping down sides of bowl as needed. With processor running, slowly add oil until incorporated. Transfer pesto to bowl, stir in Parmesan, and season with salt and pepper to taste. (Pesto can be refrigerated for up to 3 days or frozen for up to 3 months. To prevent browning, press plastic wrap flush to surface or top with thin layer of olive oil. Bring to room temperature before using.)
GARLIC-HERB COMPOUND BUTTER
makes 8 tablespoons
Compound butters are a secret weapon in the meal-prepper’s arsenal. Stirring seasonings into softened butter is an easy way to make a rich, flavor-packed condiment for meat, fish, and vegetables that can be refrigerated for several days or frozen for a couple of months. They are also a great way to use up small amounts of leftover herbs.
8 tablespoons unsalted butter, softened
2 tablespoons minced fresh sage or 1½ teaspoons dried
1 tablespoon minced fresh parsley
1 tablespoon minced fresh thyme or ¾ teaspoon dried
2 garlic cloves, minced
Whip butter with fork until light and fluffy. Mix in sage, parsley, thyme, and garlic and season with salt and pepper to taste. Wrap in plastic wrap and let rest to blend flavors, about 10 minutes, or roll into log and refrigerate. (Compound butter can be refrigerated in airtight container for up to 4 days or frozen, wrapped tightly in plastic, for up to 2 months.)
Omit sage, parsley, thyme, and garlic. Mix in 5 tablespoons whole-grain mustard and 3 tablespoons minced fresh chives after whipping butter.
WHITE RICE PILAF
serves 4 to 6
For stovetop white rice with distinct, separate grains and fluffy texture, we rinsed the rice of excess starch and then sautéed the grains in butter before covering them with water to simmer. Once the rice was cooked, we placed a dish towel under the lid to absorb excess moisture.
1 tablespoon unsalted butter or oil
1½ cups long-grain white rice, rinsed
2¼ cups water
½ teaspoon table salt
1. Melt butter in large saucepan over medium heat. Add rice and cook, stirring often, until grains begin to turn translucent, about 3 minutes. Stir in water and salt and bring to simmer. Reduce heat to low, cover, and continue to simmer until rice is tender and water is absorbed, 16 to 18 minutes.
2. Remove pot from heat and lay clean folded dish towel underneath lid. Let sit for 10 minutes. Fluff rice with fork, season with salt and pepper to taste, and serve.
BOILED BROWN RICE
serves 4 to 6
We cook stovetop brown rice differently than white rice. Boiling it in an abundant amount of water speeds up its cooking time (which is typically longer than white rice) and helps it cook more evenly.
1½ cups long-grain brown rice
1 teaspoon table salt
Bring 4 quarts water to boil in large pot. Add rice and salt and cook until tender, 25 to 30 minutes. Drain well and serve.
BIG-BATCH BAKED WHITE RICE
serves 8 to 10
Wanting a hands-off version of everyday rice, we turned to the oven. Be sure to rinse the rice before combining it with the water, or else the excess starch clinging to the rice will make it gluey. It’s also important to use boiling water or the rice will take forever to cook through in the oven. For an accurate measurement of boiling water, bring a full kettle of water to a boil, then measure out the desired amount. Basmati, jasmine, or Texmati rice can be substituted for the long-grain rice. To halve this recipe, use an 8-inch baking dish; the baking time remains the same.
2⅔ cups long-grain white rice, rinsed
2 tablespoons unsalted butter or oil
1 teaspoon table salt
5½ cups boiling water
1. Adjust oven rack to middle position and heat oven to 450 degrees. Spread rice in 13 by 9-inch baking dish.
2. Stir butter and salt into boiling water and pour water over rice in baking dish. Cover baking dish tightly with double layer of aluminum foil. Transfer baking dish to oven and bake rice until tender and no water remains, about 20 minutes.
3. Remove dish from oven and uncover. Fluff rice with fork, scraping up any rice that has stuck to bottom. Cover dish with clean dish towel and let stand for 10 minutes. Serve.
BIG-BATCH BAKED BROWN RICE
serves 8 to 10
Even using the hands-off oven method, brown rice still takes longer to cook than white rice. We also needed to experiment with the water-to-rice ratio to achieve the results we wanted—brown rice that was tender yet chewy and was neither scorched nor waterlogged. For an accurate measurement of boiling water, bring a full kettle of water to a boil, then measure out the desired amount. To halve this recipe, use an 8-inch baking dish; the baking time remains the same.
3 cups long-grain, medium-grain, or short-grain brown rice
4⅔ cups boiling water
4 teaspoons unsalted butter or oil
1 teaspoon table salt
1. Adjust oven rack to middle position and heat oven to 375 degrees. Spread rice in 13 by 9-inch baking dish.
2. Stir butter and salt into boiling water and pour water over rice in baking dish. Cover baking dish tightly with double layer of aluminum foil. Transfer baking dish to oven and bake rice until tender and no water remains, about 1 hour.
3. Remove dish from oven and uncover. Fluff rice with fork, scraping up any rice that has stuck to bottom. Cover dish with clean dish towel and let stand for 5 minutes. Uncover and let rice stand 5 minutes longer. Serve.


