

“The best performances involve maximum, efficient effort with the body and no effort with the conscious mind—a state of relaxed concentration.
Arno Ilgner
Ah, the joy of sport climbing. You carry a small pack to the crags and then safely clip your way up a line of bolts, enjoying the gymnastic movement without much worry about the consequences of a fall. You can push your physical limits, because bolts are (usually) easy to clip, allowing you to focus on the moves. You may even hang liberally on the rope to practice a route, but the end goal is to ascend from the bottom to the top under your own power, clipping the bolts as you go—to redpoint the route. Most sport routes are half a rope length or less. After reaching the top, your belayer lowers you back to the ground; if the weather goes bad, or you get tired or lose motivation, you just go home.
Sport climbing had a rocky start in the United States during the mid- to late-1980s. Some top French climbers had been impressed by the high standards of the Yosemite climbers a few years earlier and went home inspired to push the standards. The limestone that’s so extensive in Europe does not generally accept natural protection as well as granite or sandstone, so the French liberally bolted their routes, which allowed them to focus on making incredibly hard ascents—and sport climbing was born.
Back in the States, the first climbers to employ the French tactics of liberal bolting and hanging on the rope to work out moves were ostracized by their fellow climbers; the staunch traditionalists put up a good resistance to this new way of climbing. As a result, many of the early sport routes are bolted rather boldly, because their developers were under pressure not to overbolt the lines. Ultimately, sport climbing gained widespread acceptance around the United States. Many crags originally overlooked by traditional climbers because they lacked protection opportunities were turned into fine sport-climbing areas once bolts were added. Nowadays, you can even catch many of the former staunch trad climbers clipping their way up sport routes.
With diligence, you can progress quickly as a sport climber. Sport climbing is not like climbing in a gym, though—it’s much more serious outside, and you need to be vigilant not to let all the fun distract you from good judgment. Observe proper safety techniques and be aware of hazards.
When sport climbing on overhanging routes, it’s often safe to fall because there’s nothing to hit but air—though in many overhanging situations, if you fall and the belayer does not feed some slack into the rope, you can swing and slam your ankles hard into the wall. Some sport routes have relatively long runouts—sections without protection—between bolts. These runout sections are often on easy climbing where the rock is less than vertical or has ledges you could hit should you fall. You need to be aware of such dangers and climb with absolute control, or know how to retreat safely by downclimbing or leaving a carabiner on a bolt to lower off. Sketching your way through dangerous sections of a route is a quick path to broken bones or worse.
Research how well a route is bolted before heading up it so you’ll know what you’re getting into.
Always assess the quality of the rock you’re planning to climb on; rock is not always solid. If a hold seems loose, don’t pull on it, and warn your belayer and anyone else below that you’re in a loose section. Sometimes a loose hold will be marked with an “X” in chalk, but don’t count on all loose holds to be marked. Instead, be constantly aware of rock quality. If you must pull on a questionable hold, pull down rather than out to decrease the chance of breaking it. Belayers must be positioned out of the drop zone; when a hold breaks, it comes down fast and often unexpectedly. If the belayer is using an autolocking device and gets knocked unconscious by a falling rock, the climber will be held if he falls; if the belayer is using a standard belay device, the climber will be dropped.
Bolts on sport routes are usually good, but some are not. If the bolt is loose in its hole, corroded or rusty, or less than ⅜ inch in diameter, it may not hold a fall. A movement to replace bad or aging bolts has been underway for many years, but plenty of bad bolts still remain on the cliffs.
Bolting a route is a hard, expensive, and sometimes dangerous job that a few climbers live for. Consider contributing to a bolting fund or one of the rebolting organizations if you are able. Appreciate the efforts of those who took the usually thankless job of setting the routes.
Make sure your rope is long enough for the route. A 60-meter rope will get you down from most—but not all—one-pitch sport routes. Always have the belayer tie into the other end of the rope or tie a stopper knot in the end.
The ultimate style in which to climb a route is onsight—climbing from bottom to top on the first try with no falls or hangs on the rope, and with no prior information about the route other than what you can see from the ground. If the route is at all within your grasp, fight hard to onsight it; it’s an amazing feeling to fight your way up a climb, hanging on through the doubt and pump, and finally clipping the top anchors. Avoid making a habit of giving up and hanging on the rope every time a move challenges you.
Climbing a route on the first try, but with some prior knowledge about the moves, is a flash. This is also a great style in which to climb a route. The only difference from an onsight is that you received information about the moves or hidden holds, or specific strategies on climbing the route, before or during your climb.
Redpointing a route used to mean climbing it, after previously working out the moves, while placing all the protection or quickdraws along the way. It still means this in traditional climbing, where placing the gear can require finesse plus mental and physical energy. In sport climbing, though, you can have the quickdraws preplaced and still claim a redpoint.
If you hang on the rope to rest or because you fell and then start again from your high point, it’s called hangdogging. This technique can also be called working the route, if your ultimate goal is to work out the moves and later return for a redpoint.
Regardless of the style in which you climb a route, be honest in reporting your accomplishments to others. If a climber says he “climbed” a route when, in fact, he hung all over the rope, he’s making a dishonest claim. There’s no shame in admitting that you did the route “with three hangs”; it’s certainly better than misrepresenting your accomplishments.
When you show up at the sport crag for a day of climbing, choose a couple of easy routes to warm up on. This will get your muscles warm, your joints loose, and your brain focused before you start cranking. After the easy pitches, do a few stretches to get your body limber. A good warm-up routine will help you avoid injuries and set you up to climb well.
Distribute quickdraws equally on your right and left harness gear loops, unless you know that you’ll be clipping mostly with one hand or the other. Some climbers like to carry the quickdraws with the gates toward their body, while others clip the gates away from their body. Determine your preference and always clip them all the same way.
Before anyone leaves the ground, run through the double-check ritual to be sure that everything is rigged correctly. Use standard climbing commands to avoid confusion. (See Chapter 6, Belaying.)
Preview your route from the ground before starting up it. Look for the bolts, rests, hidden holds, the anchor at the end of the route—anything that will help you on the climb.
When you step up to the route, take a deep breath, relax your mind, grasp the starting holds, and begin climbing. As you climb, look for the best holds. You may need to feel around on a hold to find the best spot for your hand. Move efficiently, stay relaxed and confident, place your feet with precision, and consciously put as much weight as possible on your feet. When the climbing gets hard, it’s easy to get tense, grip the rock for dear life, and lose control of your feet, which makes the climbing even harder. Staying calm, focused, and positive is your ticket to success on hard routes; getting gripped, where fear saps your confidence, is your ticket to big air. Always look a few moves ahead so you can follow the best path. Often, chalk marks from previous climbers will help you find the best holds, but not always. In popular areas there are lots of “sucker” holds—holds that are chalked but not helpful. If things get tenuous, tell your belayer, “Watch me.” He’ll be more attentive, and you’ll feel safer knowing this.

There are a couple of different techniques for clipping. One option is to pull the carabiner with your middle finger, and press the rope in the carabiner (top) with thumb and index finger. Another is to hold the rope between your index and middle fingers (bottom left) and then pinch it into the carabiner (bottom right). Practice both techniques to become proficient since different situations may call for different techniques.

Clip from a good handhold when possible. Avoid clipping from poor handholds if you can make another move to a good hold. Also, don’t strain to clip quickdraws that are too high—you’ll waste energy, and if you blow the clip with all that slack out, you’ll fall a long way.
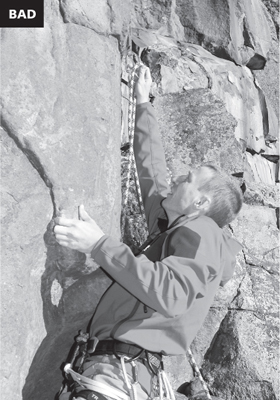
Clipping too high from a poor hold. A much better hold for clipping is just one move higher.
You might ask for a spot from your belayer until you clip the first bolt. Once you reach the bolt, find a good clipping handhold, get balanced on your feet, then pull the rope up and clip it. Your belay system is now engaged.
When you clip a bolt that is extremely important, such as the first few bolts or any bolt keeping you off a ledge or protecting you from an otherwise bad fall, clip it with the gates of both carabiners facing away from the direction you are going. This way, when the rope tugs against it, the gates are pulled away from the bolt hanger rather than toward it, which could potentially open the gates.
Use care when clipping bolts near the ground or above ledges—if you slip while clipping with an armload of slack, the extra rope could cause you to take a bad fall. It is often safer to do one more move to a good hold rather than pull up slack to clip off of bad holds.
The most likely time to accidentally unclip from a bolt is while climbing past it. Use care not to kick your quickdraw, or rub against it with your body in such a way as to unclip it from the bolt.
While it is important to know how to clip bolts correctly, once you have several bolts between you and a dangerous fall, stop worrying about how you clip them. Just get the rope clipped and keep climbing. If one comes unclipped, which is extremely rare anyway, you’ll just fall onto the one below.

Correct carabiner clip position
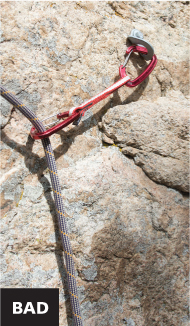
Incorrect carabiner clip position
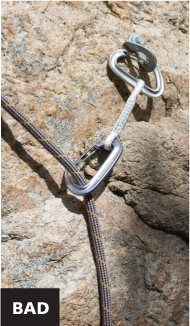
Compromised carabiner position: Gate caught on the bolt hanger
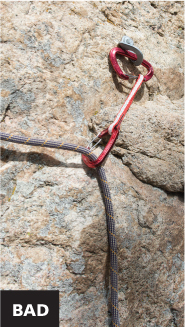
Compromised carabiner position: Spine of carabiner leveraged in bolt hanger
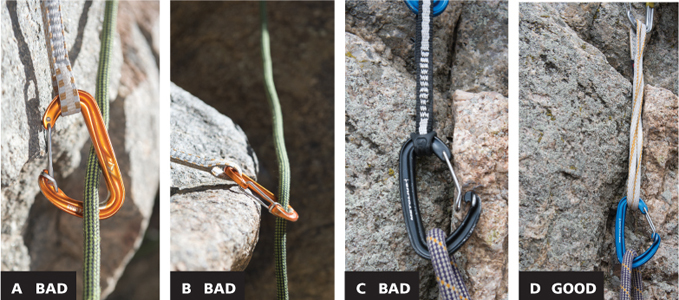
Compromised carabiner position: Gate pressing against an edge (A). Compromised carabiner position: Carabiner levered over an edge (B). Another hazard is created when the length of your quickdraw aligns the carabiner gate perfectly with a rock protrusion or corner that will open the gate if the carabiner is weighted (C). In this scenario, use a longer quickdraw or a sling to extend the lower carabiner away from the protrusion (D).

When climbing above your last bolt, avoid having the rope run behind your leg. It can flip you upside down in a fall, possibly cracking your skull and giving you a nasty rope burn.
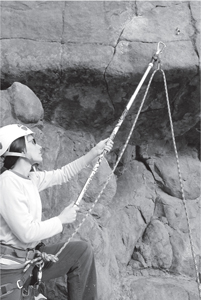
If the first bolt is higher than you care to climb unprotected, you can stick clip it from the ground. Buy a commercial stick clipper or a light bulb changer, or fashion one at the crags with a stick and some tape (please don’t break branches off the trees). Wrap the tape so it holds the gate open for clipping the bolt, then comes free when you pull the stick away. Put the rope in the bottom carabiner of the quickdraw, then stick clip the upper carabiner to the first bolt.
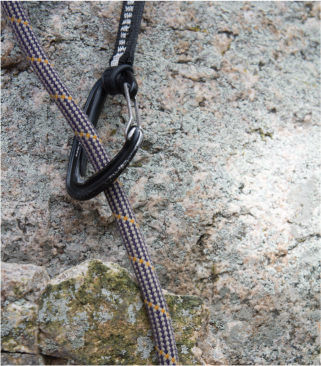
Correctly clipped quickdraw biner
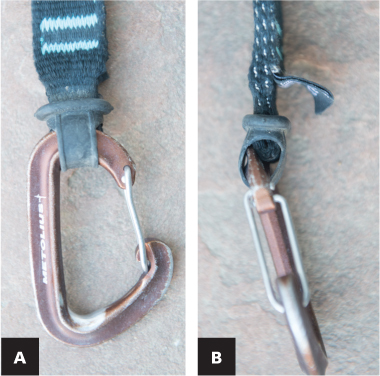
This quickdraw appears perfectly safe (A). However, upon closer inspection it becomes clear that the carabiner is only clipped through the rubber retaining band, not the nylon quickdraw (B). This quickdraw would fail under mere ounces of force.
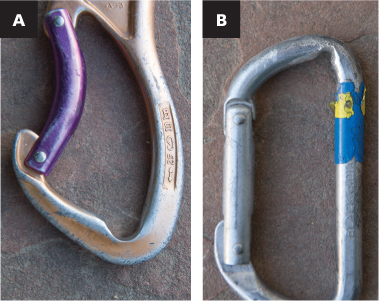
Left: Rope friction has worn the metal of this carabiner into a dangerously sharp edge that could potentially cut a rope (A). This carabiner was worn dangerously thin from the repeated wear of being fixed on a bolt hanger. Once the carabiner is removed from the hanger, this damage becomes clear, but remember that while it is clipped to the bolt, the damage will be hidden by the bolt hanger (B).
Backclipping is a confusing concept. The rope should be running from the back of the biner (the rock side) and out toward the leader so there is no twist in the quickdraw. Backclipping is when the rope runs backward through the biner, which can cause the rope to unclip from the biner. While most modern carabiners are designed to minimize the risk of unclipping, it is possible, especially if the carabiner is leaning against a protrusion of rock, making it easier for the rope to pass through the gate (unclipping it) with the force of a fall.
Some sport climbs, especially steep ones, are equipped with fixed quickdraws. Stainless steel carabiners on chains make for the most durable fixed quickdraws, but often the quickdraws are standard aluminum carabiners and nylon webbing. These are usually perfectly reliable, but it is essential to assess fixed quickdraws thoroughly before trusting them. Sun, time, and wear can weaken both the webbing and carabiners.
The issues with the quickdraws may look obvious in the close-up photos, but wearing of the carabiner and improper setup of the quickdraw have both resulted in fatal accidents.
Once you reach the top of a route, it’s time to be lowered back to the ground.

Lowering off of two quickdraws, one rigged with locking carabiners
If your partner will be climbing the route after you:
1.Clip a quickdraw into each anchor bolt. For maximum security, face the carabiner gates reversed or, even better, use locking carabiners on one or more of the draws.
2.Clip the rope into both (or all three) quickdraws and yell, “Take!”
3.Look down to make sure your belayer heard you and yell, “Lower me!”
4.Hold onto the belayer’s side of the rope until you feel tension from the belayer.
5.Once you’re sure that the belayer has you, lean back onto the climbing rope and lower to the ground.
Never call, “Off belay!” at the top anchors when you intend to be lowered. This command tells the belayer to remove the rope from her belay device, which is the last thing you want. Lean back to get lowered now and nothing will slow you but air. If you are belaying and your partner calls, “Off belay!” when you expected to lower him, clarify that he intends to rappel under his own power before taking him off belay.
Once you’re on the ground, you can pull the rope down so your partner can lead the pitch, or leave the rope up to top-rope her through the quickdraws you left at the top. If she top-ropes the pitch, she can clean all the quickdraws on her way up.
Don’t top-rope through fixed rings on the anchor, because they wear out and are difficult to replace. It’s better to leave the rope running through quickdraws until you are finished top-roping.
If no one else intends to climb the pitch, you’ll want to remove the top two quickdraws as well as all the quickdraws on the way down as you’re lowered. If there are radical traverses or overhangs on the pitch, it may be easiest for the second climber to clean the quickdraws while following the pitch. For descending, you have two options: be lowered to the ground or rappel. Ninety-five percent of the time while sport climbing it is best and safest to be lowered rather than to rappel the route. When lowering, the belayer can hold you so both of your hands are free to remove the quickdraws; and you avoid the transition from belaying to rappelling, a time accidents commonly happen.
There are two ways to thread the rope for lowering: the bight method and the retie method. DO NOT say, “Off belay” to your belayer, no matter which method you use! You will want your belayer to keep you on belay throughout the process even though you will clip into the anchors. Numerous accidents have occurred when a climber yelled, “Off belay!” and then expected to be lowered on belay minutes later.
If you are less than half a rope length from the ground, and the rings on the anchor are big enough to accommodate a bight of rope being passed through, the bight method is the safest way to thread an anchor because you are never entirely untied from the rope, and it requires less gear to execute safely than the retie method. Always stay on belay when threading an anchor to lower.
1.Clip into the anchor with a quickdraw, sling, or even a single carabiner; but don’t block the lowering rings—leave room to thread a bight of rope through them. The clip-in does not need to be redundant, because you are still on belay (A).
2.Pull up about 6–8 feet of rope, and pass the loop of rope through the rings (B).
3.Tie a figure eight on a bight in the end of the bight (C).
4.Clip the figure eight into your harness with a locker or two nonlocking biners with the gates reversed and opposed (D).
5.Untie your lead knot and pull the lead end through the anchor. If you are less than half a rope length from the ground, there is no need to retie into the end. If the pitch is exactly half a rope length long, retie into the end and untie the bight (E).
6.Double-check your system and yell, “Take!” to your belayer before lowering (F).
If there is a stance at the anchor so you can stay on belay but let go with both hands without being clipped in, the bight method allows you to safely thread an anchor with only two biners or a locker. By using a bowline on a bight, you can thread the anchor using no biners at all, but this uses a few more feet of rope. Make sure there is a knot in the belayer’s end of the rope to avoid being lowered off the end of the rope.
Knowing the retie method is an important basic climbing skill. Although the bight method has quickly become the method of choice, the retie method is necessary on climbs with rings that are not big enough to accommodate the bight. Regardless of which method you use, always be sure that there is a knot in the end of the belay rope before climbing.
1.Clip into both of the top anchors (or all the anchors if there are more than two) with a redundant system (two slings or two chains of quickdraws) attached to your harness belay loop—not the rope! Double-check to be sure you’re well secured to all the anchors (never less than two) (A).
2.Pull up about 4 feet of slack, tie a figure eight on a bight, clip it to your harness belay loop with a locking carabiner, and lock the carabiner (B).
3.Untie your original tie-in knot and thread the rope through the steel anchor rings (C).
4.Tie the rope back into your harness (D and E).
5.Untie the figure eight that was holding the rope and call, “Take!” (F).
 Double-check your new tie-in knot and make sure your belayer has you.
 Hold your weight on the belayer’s side of the rope until you feel tension from the belayer.
6.Unclip the slings from the anchor and lean back to lower. Clean the quickdraws as you’re lowered to the ground (G).
Never lower with the rope passing through webbing, cord, or thin aluminum rings—the weighted, moving rope melts quickly through nylon and thin aluminum rings. If you encounter anchors with fixed webbing, inspect all of the webbing in the anchor—sometimes a worn area will be hidden by the gear or rock.
To clean an overhanging or traversing pitch while lowering, clip a quickdraw into your belay loop and into the rope strand that goes to the belayer. This tramming technique pulls you to each quickdraw so you can clean it. On very overhanging routes you may need to pull yourself in on the rope to reach the bolts.

Retie method. Due to the sharp edges on bolt hangers, do not thread the rope through standard bolt hangers. Fat, round-edged hangers like the Metolious Rap Hangers shown here are okay to thread the rope through.
Be careful when you unclip from the lowest quickdraw on very steep or traversing routes. When you unclip the last bolt, a lot of slack is created—potentially enough to drop you to the ground. It is best to clip your harness directly to the last bolt with a quickdraw chain, unclip the rope from the bolt, and allow the belayer to take in the extra slack before weighting the rope again. (See illustration on page 196.)
Check your trajectory first so you don’t hit any obstacles when you swing out after cleaning the quickdraw from the lowest bolt. You might reach down from the second quickdraw to remove the lowest, then get as high as possible and jump off, or consider cleaning the first bolt after returning to the ground rather than risking a dangerous swing.
Rappelling to remove the quickdraws from an extremely steep pitch will be difficult or impossible. Leaving carabiners and lowering, or even downclimbing, is a better choice than rappelling on wildly overhanging terrain. However, there are times when the friction created by lowering can cause issues. These include:
 The top anchors are rigged with webbing and lack steel rings or fixed carabiners. It is okay to rappel with the rope running through two or more redundant loops of webbing in good condition, because the rope does not travel across the webbing as you rappel downward.

Tramming
 The route has an abrasive or sharp edge that may damage the rope if you get lowered.
 You’re trying to help preserve the hardware on top of the climb.
To rappel:
1.Clip yourself into the top anchors with the same redundancy as for the retie method. Double-check this. Call, “Off belay!”
2.Pull up 30 to 40 feet of rope. (This way, when you begin threading the rope, the rope’s weight will keep it in the rings—preventing you from dropping it when you have to remove the knot from the rope to pass it through the anchor.) Tie the rope to the anchors or to a carabiner on your harness to prevent dropping it.
3.Untie your lead knot, feed the rope through the anchor rings, and pull the rope through until the rope’s midpoint is set at the anchors (so you have two equal-length strands of rope, both reaching the ground).
4.Set the rappel device and an autoblock backup on both rope strands.
5.Double-check the rappel setup then unclip from the anchors and clean the gear from them.
6.Rappel back to the ground.
Sport climbing creates a few special considerations for belaying. Although any standard belay device works for belaying a sport route, many sport climbers favor assisted lock devices or high-friction tubes because they easily catch falls and hold a hanging climber.

If a climber falls on a steep rock with a tight belay . . .
On steep sport routes, the leader quickly places a quickdraw and clips the rope in. When belaying, anticipate feeding slack fast when your partner clips a bolt so she can clip the rope in without resistance. It’s frustrating (and sometimes scary) on a hard sport route when you can’t get enough slack from your belayer to clip the rope into the next quickdraw—it can even cause a fall. If the belayer is having trouble feeding the rope fast enough, the climber can call: “Clipping!” each time she needs slack to clip a bolt. A skilled belayer should be able to perform the security aspects of belaying without the leader ever feeling the rope pulling down on them. This is not as easy as it sounds; it is one of the skills that come with practice and is required to be an expert belayer.

. . . the climber and belayer can hit the wall.
It’s even more difficult to feed slack fast enough when the quickdraws are preplaced because the climber often clips without warning. It helps to be ready to feed slack anytime he’s near a bolt. You can move in and out from the climb’s base to quickly add and subtract rope slack. A few steps is enough—step too far away and you will get slammed into the cliff if the leader falls.
Once the climber is clipped into several bolts on steep terrain where falling a few extra feet is inconsequential, it is best to belay with 2–3 feet of slack in the system. This enables the leader to clip fast and climb dynamically, as well as helps to prevent the hard, slapping falls discussed in Chapter 6, Belaying.
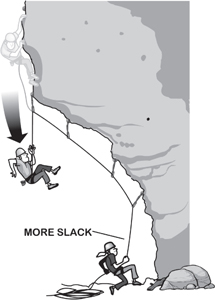
Soft catch—give some slack for a better belay.
When it’s time for the climber to come down, make sure you have a knot in the end of the rope. Lower him nice and steadily, not fast and jerkily. Slow the lowering rate when he approaches any obstacles, such as the lip of a roof, and when he’s approaching the ground.
Onsighting a route well within your limits is usually no big deal. You just get up there and climb your best—planning ahead, resting when possible—and make intelligent moves. Occasionally you’ll make a mistake by grabbing the wrong hold, getting slightly off-route, or botching the sequence. In these situations, keep your cool and climb back down to a rest if possible so you can regroup. Recover your strength, then sort out the proper sequence and finish the pitch. It’s good to climb loads of routes within your limits to get into the flow of efficient, confident movement.
Onsighting a route near your limit is another thing entirely. Here you’ll need a maximum performance to pull it off. Do everything possible to tip the odds in your favor. If the onsight is important to you, start preparing the day before by resting your muscles, eating wholesome foods, hydrating, and getting plenty of sleep. When you arrive at the crag, warm up well and see how you’re feeling. If you don’t feel “on,” you may choose to save the onsight attempt for another day—remember, you only get one chance to onsight a route.
Scope the route from the ground. Consider how some of the sequences might go. Visualize the moves and envision yourself cruising through the climb. Once you start up, climb smart, smoothly, and with confidence. Look for obvious big holds, chalk marks, and unobvious holds to help you find the path of least resistance. Familiarity with the rock type can also help you gain key holds, and having a good repertoire of moves, based on experience and practice, will increase your efficiency and ability to quickly solve the cruxes. Seek out rests, especially after pumpy sections that max your forearms and before obvious cruxes. Milk the rests until you get near-complete recovery.
Avoid hesitating if you don’t have good resting holds. Punch it through the steeper sections; “hanging out” rapidly depletes your strength reserves. If a move feels wrong, or much harder than the grade, back off, find a rest if possible, and reconsider the sequence. Sometimes you may decide to crank through the move, just to get through and avoid getting stalled—even though you know there should be a better way to do it. It’s important to keep your momentum up. If the going gets tough, fight hard—don’t give up. You’ll succeed more often and improve faster if you learn to fail by falling (provided that falling is safe), rather than quitting.
If you can’t send a route on the first try, you can always work it, practicing the moves and clips while hanging liberally on the rope. The idea is to learn the moves then go for the redpoint, linking the entire route without hanging on the rope. If a route is obviously beyond your onsight ability, you may choose to work it without even attempting an onsight or flash, just to save energy. Don’t always focus on routes that require tons of work to send, though, or you may develop a choppy style and lose the knack for climbing on unknown terrain.
On your first attempt of a route, you might go “route shopping” to preview the moves, hang the quickdraws, and see if you’re even interested in working on the route. In a sense, you’re interviewing the route to see if it offers what you want to keep you interested through a few tries, or even a few days or weeks of working the moves. On this test run you’ll rest liberally on the rope, exploring holds and different options for making the moves.
Once you’ve decided to make the route a project, your job is to learn and practice the moves and sequences so you can efficiently link them in one push from the ground. One of the quickest ways to learn the moves is to seek beta from other climbers, both by asking them directly and by watching them on the route. It’s best to get beta from climbers similar to you in size and climbing style; otherwise, you may get tips that don’t work for you. Even if another climber is your size and has a similar style, his beta may not be well suited for you; stay open-minded and seek the best solutions. It can be helpful to get a “cheering” section going, a group of friends on the ground who will encourage you and feed you information or beta when you get stifled. This positive energy infusion can be a great boost on hard routes. Some climbers prefer silence, though; so know your partner’s preference.
Break the climb into different sections and practice the moves, especially the cruxes, and rest on the rope between sections. Once you’ve figured out all the sections, practice the transitions between sections to put the whole thing together. Once you feel you can link all the moves from the ground to the top, it’s time for a redpoint attempt.
Resting is one of the key elements to climbing at your limit. Finding rests can make the difference between climbing the hardest pitch of your life and melting off the holds for an airy fall. Resting requires equal parts patience and creativity. First of all, the best position for resting is not always the best position for climbing, so you have to watch for unobvious and creative ways to rest. Use everything (except the rope) to improve the rest. Anything goes—consider pressing your hips, head, knees, elbows, stomach, back, and shoulders against the rock to take weight off your arms.
When you’re working a route, practice the rests as well as the moves. Next, you must be patient and rest long enough to regain some strength. A good indicator of adequate rest is when your breathing slows down. Once your breathing slows, get on with it! Watch out for sucker rests, though—sometimes it is best to keep charging and not waste energy trying to rest in a strenuous place.
An important redpoint starts the day (or days) before you head to the crag. If you’ve worked the moves extensively, visualize the entire sequences a few times each day before you head out for the redpoint. To visualize, you “dream” your way up the route, grabbing each hold, moving your feet, shaking out at the rests, and twisting your body to set up for the reaches in your mind. Visualization allows you to “practice” the route, even at home or on your lunch break at work, without using physical energy. It can also instill confidence so the moves feel familiar when you get to them.
Preparation for the route can also include specific training. You may work on gym routes that “mimic” the climb with similar moves and length, or you may build your contact strength for the route by training on a campus board (see Chapter 13, Training). If the route requires tons of endurance, work on that. Need more power? Train for power. Again, anything that simulates the climb will be good training, as long as you don’t overdo it and get injured.
Make sure you’re in good mental shape for the route. Refrain from partying the night before your redpoint, get lots of sleep, and rest your body for a day or two before the climb. Warm up well when you arrive at the crag and then take some time to visualize the moves again. It’s sometimes a good idea to take another test run before you go for the redpoint, to reacquaint yourself with the moves and put the quickdraws in place.
Success on the route often depends more on your mental strength than your physical strength. Failure frequently comes from a mental lapse—a mistake in the sequence or a loss of confidence that causes you to stall and waste energy. Train your brain to be tenacious, and don’t give up when your muscles are pumped. Hang on and keep on working toward your goal; success often depends on persistence. Keep your momentum up and avoid the “hesitation blues,” except when you arrive at a good rest spot.
Once you complete your redpoint, you’ll have the elation of a job well done as you enjoy the fruits of your efforts. Remember though, it’s just a game—keep it fun and safe for a long-lasting and rewarding climbing career.
If a climb’s too hard or dangerous and you can’t reach the top anchors, the easiest and safest way to bail is to leave carabiners in the top two bolts and be lowered. You’ll lose some carabiners, but it will cost less than a tank of gas and won’t risk your life like some other bailing techniques.
To bail:
1.Clip the rope through a single carabiner in the highest bolt you reached, then remove the quickdraw and hang on the rope.
2.Lower down to the next bolt. Place a single carabiner in the hanger, clip the rope to it, and remove your quickdraw. If the bolt is at all dubious, clip a third bolt.
3.Lower to the ground while removing the rest of the quickdraws.
CLIPPING
New sport climbers often have a tough time getting the rope into the quickdraws. It’s worth spending some time practicing the clips so you can drop the rope into the quickdraws at will.
1.Put on your harness and tie into a rope.
2.Hang a quickdraw near eye level. Practice clipping right-handed with the gates facing right, then left-handed. Now turn the quickdraw so the gates face left, and clip it right-handed, then left-handed.
3.Move the quickdraw higher, and practice the routine again.
4.Set the quickdraw off to one side of your body and practice all the clips, then move it to the other side.
You’ll reap the benefits when you get to a challenging sport pitch. You’ll have one less thing to worry about, because now it will be easy to get the rope in that dang quickdraw.
GOING FOR BROKE
Pick a day to head to an overhanging sport-climbing area, or if you don’t have an overhanging area, use a top-rope on some less-than-vertical routes. The routes you climb on this day should all be at or just beyond your limit (with the exception of your warm-up routes). Once you start climbing, fight hard to complete the moves, and don’t give up, unless you fall. You’ll be amazed at how you can often climb past your limit because you kept trying. Hanging on the rope without a fight is a bad habit that will deprive you of many onsights and redpoints—but don’t be tenacious when it’s dangerous to go for it.