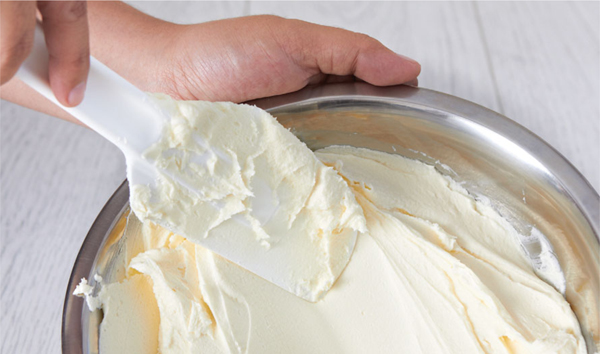
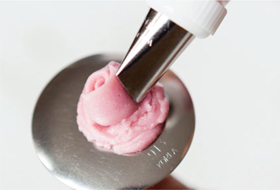
With this recipe, the one thing you should remember is never over-beat your buttercream. If you do it will become grainy and the edges are likely to ‘break’ when you pipe your flowers, borders and textures. When you over-beat, you incorporate lots of air in your buttercream, thus, the surface will have holes or ‘air-pockets’ when you spread it on the cake, making it hard to smooth. This is a ‘crusting’ buttercream that we developed to suit all climates.
A hand-held mixer is not usually as powerful as a stand mixer, so if you are using a hand-held one, make sure you fold your mixture manually first until the ingredients are incorporated. This helps to avoid over-beating as well.
What is so good about our recipe is that a little less or more of a certain ingredient is fine. So if your buttercream is too stiff, add water or milk. If it is too thin, just add icing (confectioners’) sugar. Adjust it as you need to – all in moderation of course. You may use your buttercream straight away to cover and decorate your cakes but if you think it is too soft, we suggest you chill it in the fridge for about an hour, or touch the surface – if it is hard enough, you may take it out of the fridge. DO NOT add more icing sugar just to make it stiff.
Keep your buttercream in the refrigerator and store it in an air-tight container or food storage bags. You can freeze it for up to a month, letting it defrost thoroughly at room temperature before use. Do not beat it again in a mixer, just mix it manually. But of course, nothing is better than lovely fresh buttercream!
1. Beat the butter at medium speed until soft and pale (about one to two minutes). Some brands of butter are more yellow in colour, so to make it paler you can increase the beating time to about two to five minutes.
2. Add the vegetable fat (shortening) and beat for another 20 to 30 seconds or less. Make sure that it is well incorporated and that there are no lumps.
Important note: As soon as you add anything to the butter, you must limit your beating time to 20–30 seconds or even less.
3. Add vanilla essence, or your flavour of choice and water, or milk, then beat at medium speed for about 10 to 20 seconds until well incorporated.
4. Slowly add the sifted icing (confectioners’) sugar and beat at medium speed for another 20 to 30 seconds or until everything is combined. You may want to fold the ingredients together manually before beating to avoid puffing clouds of sugar round your kitchen. Make sure you scrape the sides and bottom of your bowl, as well as the blade of your mixer, so you don’t miss any lumps of icing sugar.
5. Lastly, after scraping the bowl, beat again for about 20 to 30 seconds and do not over-mix. This yields a perfect piping consistency of buttercream.
You may add milk but if you do you can only keep your buttercream for two to four days, as milk has a shorter shelf-life. If you use water, you will be able to keep it for longer – about five to ten days. If you find the vegetable shortening does not incorporate well enough to the butter and you see lumps or you think that it is a really hard consistency, in future, beat the vegetable shortening separately first and then proceed as normal.
If you make the basic buttercream recipe with the amounts given, one batch will yield approximately 1–1.1kg (2lb 71⁄2oz) of buttercream. This will be enough to cover the top, the sides and fill a 20cm (8in) round or square cake depending on the design. This can be your guide to determine how much frosting you need to prepare. If you have any left over, just label it with the date you made it and store it in the fridge.
This is a white solid fat made from vegetable oils, and is usually flavourless or at least bland. You can find it in most supermarkets, next to the butter and margarines. It plays a very important role in our recipe as it helps make our buttercream stable, so you do not need to add too much icing sugar to make a stiff consistency, thus your frosting will have just the right sweetness. It also allows the surface of the decorated cake to ‘crust’ so it is not too sticky.
Different brands of vegetable fat (shortening) have different consistencies. If the consistency of your shortening is hard, defrost it in the microwave first to soften and use 113g (4oz). If it is somewhat medium-soft to slightly hard, like Trex, use 113g (4oz) as well. If it is soft and very spreadable, like Crisco, you will have to double the amount to 227g (8oz).

Colours bring your cake to life, can set a mood, attract attention, or make a statement. Hence, it is important to choose and prepare your tinted buttercream properly. Since this book is all about different themes, it is best to research the perfect colour palette to be able to get the appropriate colours to use per project.
We have highlighted the things you should remember when mixing colours.
Because the cakes in this book are single-tier ones they can be quite small, and therefore you do not need to surround them with an elaborate range of props. You can enhance your cake display with the simplest things that you can find at home or even in your garden. For example, you could place a single hibiscus flower beside the cake or scatter a few around it. If you can’t find a real one, you could make a paper flower.
Alternatively, try wrapping a strip of burlap lace around an empty tin and add your birthday message onto it for a shabby chic theme. Then present the tin together with the cake. We could go on and on about ideas, but what we are simply trying to emphasize here is that adding some props when you set up your cake will show it at its very best.

Besides propping, another way to add glamour to your cake is by dressing up your cake boards. This is a blind spot for some, and so often people leave their boards uncovered. Even if your cake is good, if it’s poorly presented it may disappoint. Therefore, take it from us, say ‘NO’ to naked cake boards!
You will see from the projects in this book that we have covered our boards with vinyl sticker paper (a 5m/51⁄2yd roll costs very little and can cover about eight or more 25cm/10in boards), gift wrap, scrapbooking papers, fabrics etc. You can even write a letter or lyrics of your favourite song on a large piece of paper and use that to cover your board. We have also used slate boards, chopping boards and placemats (board and glass types) to replace the usual boards. There are so many inexpensive things that you can use or even create yourself, but balance the cake design with the board and, unless your cake is very plain, don’t make everything too elaborate.

This recipe makes a nice dense sponge cake that is easy to carve and stack – and it’s absolutely delicious! The quantities given below will make a 20cm (8in) round cake.
1. Pre-heat the oven to 160°C or 325°F. Grease your cake tin, line the base with baking (parchment) paper and grease the paper.
2. Cream the butter and sugar in a large bowl until light, fluffy and pale. Sift the flours together in a separate bowl.
3. Beat in the eggs, one at a time, beating the mixture well between each one and adding a tablespoon of flour with the last egg to prevent the mixture curdling.
4. Gently fold in the flour and salt, with enough milk to give a mixture that falls slowly from the spoon.
5. Transfer to the lined cake tin and bake for an hour to an hour and a half. When the cake is ready it will be well risen, firm to the touch and a skewer inserted into the centre will come out clean.
6. Turn it out onto a wire rack to cool completely.
This recipe makes a dense cake that behaves well when you use it for stacking and carving.
1. Preheat your oven to 160°C or 320°F, then grease and line your baking tins.
2. Combine the butter, water and coffee in a saucepan over heat until they come to a slow boil. Turn off the heat and pour in the chocolate, stirring until it is completely melted. Set aside.
3. Sift the flours, cocoa powder, sugar and bicarbonate of soda (baking soda) together in a large bowl, and make a well in the centre.
4. Pour in the eggs, buttermilk, oil and chocolate mixture and stir vigorously with a wooden spoon until there are no lumps.
5. Pour into your prepared tins and bake for approx 45 minutes for a 15cm (6in) cake or an hour and 15 minutes for a 20cm (8in) cake. Remove the cake from the oven when a skewer inserted in the middle comes out clean.
6. Allow the cakes to cool completely in the tins before removing them.
These quantities will make a 23 x 7.5cm (9 x 3in) round cake, a 20 x 10cm (8 x 4in) round cake, a 15 x 10cm (6 x 4in) round cake and approx. eight cupcakes, or a 20 x 7.5cm (8 x 3in) square cake.
As your cake becomes taller you must add some structure to support it, to make it sturdy so that it will not collapse. You will need plastic or wooden dowels (or even large plastic straws) inserted properly into the lower layers of the cake, to bear the weight of the cake above and to make sure that each layer does not get squashed and collapse.
You can stack as many as three cake sponges without needing to dowel but as soon as you need to increase the height with more cake sponges, make sure you support the structure with dowels.
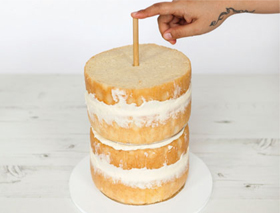
To cut dowels that are exactly the same height as the layer of cake to be dowelled, you can push a dowel right into it from the top until it touches the cake board, then mark the place on the dowel that the top surface of the cake reaches, using a pencil or a pen, then remove the dowel and cut it off at the marked length.

1. Use a cake leveller or serrated knife to trim the top surface of all the cake sponges to make them level.

2. Cut the thin boards about 5–10mm (1⁄4– 1⁄2in) bigger than the size of the cake or slightly bigger if you want the buttercream to be thicker. Usually you can use the bottom of the baking tin that you used to bake the cakes as your guide. Glue two thin boards together back to back (with the silver-coating outwards) and insert a dowel through the middle to create a hole. Keep turning the dowel around to make the hole slightly bigger so that it is easier to insert later.

3. Place the first two cake sponges on the third thin board, filling between them with buttercream. Measure and, using the wire cutters or heavy-duty scissors, cut dowels that are exactly the same height as the cake.

4. Insert the dowel rods into the bottom layer, evenly spaced about 4cm (11⁄2in) in from the edge of the marked outline. Push the dowel rods straight down until each touches the cake board. The number of dowels to use depends on the size of the cake.
5. Apply a thin layer of buttercream on the top of the cake, just enough to cover the protruding dowels, then secure and stick the thin board to your cake drum using the glue. Do not just use buttercream or royal icing to stick the thin board to the drum as it could still slide about.

6. Repeat the process described in steps 3 and 4 to stack the other two cake sponges onto the glued-together thin boards, then position on top of the bottom two cakes.
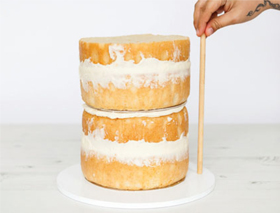
7. Measure and cut a long dowel which is the height of the whole cake.
8. Insert the long dowel centrally right the way to the bottom of the cake.
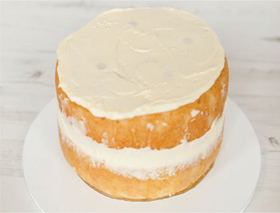
The first step, before you can add any wonderful decoration, is to know how to cover the cake, making sure that the buttercream sticks to it and provides a clean base. You need to crumb coat, and then create a smooth surface. Further techniques for creating textured surfaces can be found within the cake projects.
Crumb coating means applying a thin layer of buttercream all over your cake to secure the loose crumbs. This is a very important step that you should not miss as this makes your outer layer of buttercream stick to the cake, giving the heavy piped and textured designs something to adhere to.

1. Use a round nozzle or just snip the end off a piping bag, then, using the same buttercream that will go on the rest of the cake, pipe around the cake with a good firm pressure so the buttercream sticks to the cake.

2. Use a palette knife to spread the buttercream all over the cake, applying even pressure and making sure to remove any excess buttercream with the edge of the palette knife.

3. You can use a cake scraper to even the thickness out or leave it as it is.
Chill the crumb coated cake in the fridge for about 20 to 30 minutes or until the surface is firm. It is better if you can place the cake in the freezer to speed up the process. If you don’t chill the cake, it will be much more difficult to apply further decoration, such as a smooth layer of buttercream.
After the cake has been chilled for a while you can apply another layer of buttercream. The thickness of this layer will be a matter of taste. You can also use the thin board as your guide as to how thick your buttercream will be. For this stage you will need non-woven cloth, such as the interfacing used in sewing projects. This can be sourced online or from any reasonably large haberdashery.

1. Use a cake scraper to even out the thickness of buttercream all the way around the cake. Air-dry the cake at room temperature to allow it to crust for about 10 to 20 minutes.

2. When the cake is fully crusted (see tip below), place the non-woven cloth on the surface of the cake and rub gently with your fingers to smooth the surface. Repeat the same process all over the cake.

3. To make it perfectly smooth, place the non-woven cloth on the surface of the cake again and use the scraper, running it up and down over the cloth.

4. Use a small knife or the cake scraper to remove any excess buttercream on the edge of the cake.
Do not put it in the fridge or freezer again as the moist environment inside will prevent the buttercream from crusting. If the cake is dry and not tacky to touch, it means the cake is ready for smoothing.
Coating a sphere with buttercream presents its own particular problems. However, follow these steps to make an impressively smooth job of it.
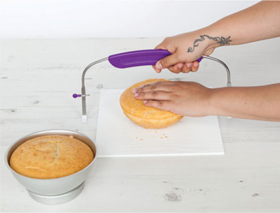
1. Bake two half dome cakes using suitably shaped cake tins or heat-resistant bowls, such as Pyrex. Then level the cakes using a cake leveller or a serrated knife.

2. Cut off a small piece of cake at the top of one of the domes so it will sit steady on the board without rolling, then apply buttercream before sticking it to the board.
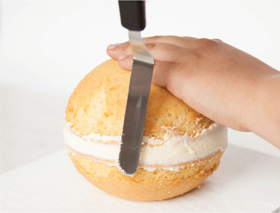
3. Fill the middle and place the other half of the cake on top of it to make a sphere. Use a short palette knife to spread out any excess buttercream.
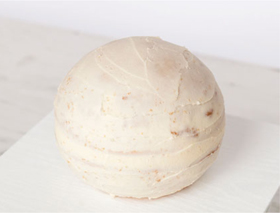
4. Crumb coat the cake using the same buttercream that you will use for the top layer of cake covering.

5. Apply the thicker layer of buttercream and even out with a flexible Mylar scraper (or you can use any flexible plastic). Follow the curve of the cake then leave it to crust.
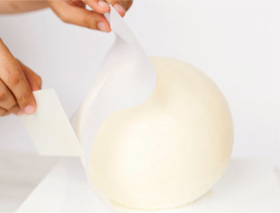
6. Dowel if the cake is large, then smooth the top coat with non-woven cloth, making sure that you follow the contours of the cake.
Some of the textures you will need to pipe to create the cakes in this book, are described within the projects themselves. However, where the method is a bit more involved or has cropped up several times, we have referred you to this section where we can explain the technique more thoroughly.
Pipe a shell border by cutting a small hole at the tip of a piping bag or by using various nozzles. Hold the piping bag at a 30-degree angle with the tip of the nozzle touching the cake surface. Firmly squeeze the piping bag until the buttercream builds up and creates a small blob, then slightly lift the piping bag and pull down as you also gradually relax the pressure on the bag to create a pointed end of the shell. Start your next shell so that the wide end just covers the tail of the preceding shell to form a chain.

Using a small petal nozzle, such as Wilton 103 or 104, hold your piping bag at an angle with the cake surface, with the wide part of nozzle touching the surface of the cake. Continuously squeeze the piping bag with constant pressure and drag it along your border. Apply slight pressure to ensure that the ruffles stick to the cake. You can also slightly wiggle your piping bag to make wavy ruffles. Repeat the process for any succeeding ruffles making sure that they are close to each other and maintaining the angle. Variations can be ‘back to back’ (orange), ‘upwards’ (green), ‘downwards’ (yellow), wiggly etc.

The loop border that is used on our Vintage Birdcage and Steampunk Hat cakes is very simple to achieve. Fill a piping bag with your chosen colour and choose a suitable nozzle. Pipe with a tight circular motion, clockwise, making your circles tight so there are no gaps between the loops.

Fill a piping bag with buttercream and use scissors to cut a tiny hole at the tip, or you can use a nozzle. Hold the piping bag straight on to the cake and gently squeeze the bag until a small dot appears. Make sure you stop squeezing the bag before you pull it away. Pipe dots in a neat row with each one touching its neighbour to create a border.

Floral designs are amongst the most popular, and we often feature flowers, or whole bouquets on our cakes. The instructions for piping many flowers will be found within the cake projects, but if a flower appears often, we have referred you to this section to avoid repeating ourselves over and over again.
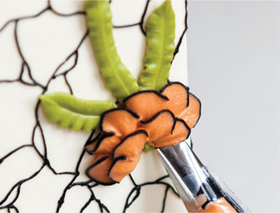
A leaf nozzle will produce a perfect petal for a sunflower, if you follow the instructions below, but this technique can also be used to create waterlilies like those on our Impression of Waterlilies cake, the orange flowers on the Autumn Wreath, and to pipe simple leaves. All you need is to select the right nozzle and colour of buttercream.
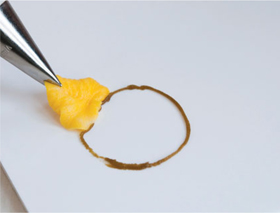
1. Pipe a guide circle, then using a leaf nozzle such as Wilton 67 or 352 held at a 20 to 30 degree angle with one of the points touching your guide, squeeze the piping bag to create a wide base to the leaf. Pull slowly away, reducing the pressure on the bag until you reach the desired length, then stop squeezing and pull away abruptly.

2. Repeat the same process to pipe a layer of petals around the guide circle.
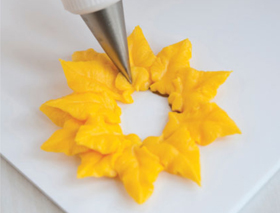
3. Pipe another layer of petals with a slightly steeper angle than the first, about 30 to 40 degrees, and make sure that they are close to the first layer of petals to avoid gaps.
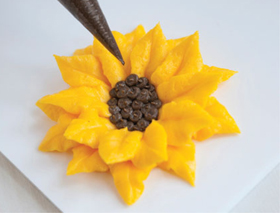
4. Finally, using brown buttercream in a piping bag with a small hole at the tip, pipe little dots to create the centre of the flower.
Tiny buds can be added in sprays or singly to fill gaps in a design, or to add delicate features. We’ve used them in the Bas Relief and Country Window cakes.
To pipe a bud, take a small petal nozzle, such as Wilton 104, and hold your piping bag so the nozzle is flat on the cake surface with the wide end of the opening to the left. Gently squeeze the piping bag until it creates a half petal then pull the nozzle slightly to the right and upwards, then fold towards the centre. Pipe another petal over the first to overlap it, but this time work it in the opposite direction, so the wide part of the nozzle points right and you pull the petal left. Repeat until the bud is the size you require (in the case of small buds like those on the Country Window cake, this might only take two petals), then add a calyx using a piping bag with a small hole at the tip.

We use a wide variety of piping techniques to create flower petals, but here are two very simple ones. The first is used on the Lace Romance cake and the second for piping the frangipani on the Totally Tropical cake.
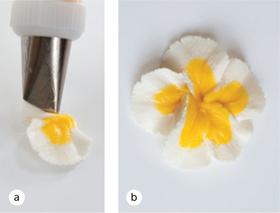
With two-tone buttercream (see the Lace Romance cake) in a bag with a Wilton 104 petal nozzle, position the nozzle at a 20 to 30 degree angle with the wide end of the opening touching the cake surface. The narrow end should be pointing outwards and in a 12 o’clock position. Give the piping bag a good squeeze without moving the nozzle at all. Stop when the petal is the right size. Repeat in curved overlapping rows, one below the other, reducing the number of petals in each row until the flower is complete.
Using a Wilton 103 petal nozzle and two-tone yellow and white buttercream (see the Lace Romance cake for the two-tone effect) and holding the piping bag at a 20 to 30 degree angle with the yellow buttercream at the bottom, squeeze evenly and move the nozzle to the desired petal length. Make a tight turn to create a rounded tip, but do not make an arch. With the same pressure, pull the nozzle back to the base of the petal (a). Repeat and pipe four more petals all starting at the same central point (b).
The petals of the exotic hibiscus flowers on the Totally Tropical cake share the same piping technique with the leaves on the Sparkling Sensation cake. Use just steps 2 and 3 with green buttercream to achieve two-stroke leaves.
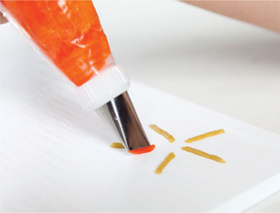
1. Pipe five guide marks radiating from a central point. Then start piping one side of the first petal by positioning your nozzle facing left, and positioned flat on the surface.

2. Squeeze the piping bag with constant, even pressure in a jiggling up and down motion until you reach the tip of your petal.

3. Turn the piping bag straight after piping the first side of the petal and continue piping the other side of the petal.
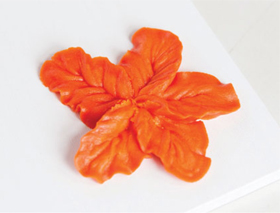
4. Repeat to pipe the other four petals.

5. For the flower centre, fill a piping bag with orange buttercream and cut a medium hole at the tip. Squeeze firmly and gradually pull upwards to create the central cone. Pipe yellow dots on the flower centre using a piping bag with a small hole cut at the tip.
These floral flourishes are perfect in so many designs – we find that we use them a lot! You can achieve a variety of effects with different nozzles but the basic technique is very simple. Here are some examples that you can try; we’ve shown them on a flower nail for clarity, but actually ruffle flowers should normally be piped directly onto the cake.

Start from the outer edge for both ruffles one and two, hold the piping bag at a 20 to 30 degree angle and squeeze with even pressure, moving your hand up and down in a tight jiggling motion, while gradually moving clockwise (or counter-clockwise for left-handers). Repeat the same process for the succeeding layers.

Hold the piping bag with the nozzle flat to the surface of the cake. Squeeze with good pressure while slightly rotating left and right as you gradually pull the bag away.


For both these ruffles, starting from the outer edge, hold a piping bag at a 20 to 30 degree angle and squeeze a simple petal (see Piping Flowers). Repeat to pipe petals in a circle until you finish the first layer. Pipe two or three more layers of petals. This ruffle makes the basic shape for a camellia.
Hold the piping bag with the nozzle in an upright position. Squeeze the bag as you drag the nozzle downwards and slightly wiggle it to create a wavy petal. Repeat to pipe more rows of petals.
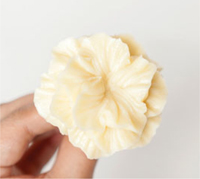
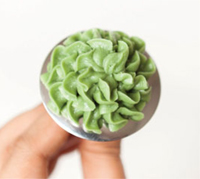
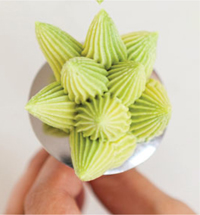
For the rose-like succulents for the Terrarium cake, pipe a blob of buttercream onto a flower nail to create a central mound. Onto this, pipe ‘petals’ like a rose (see Roses) starting at the centre and using a Wilton nozzle 150. Turn the flower nail and build up the layers until the succulent is the desired size. For the spikey succulent, pipe a cluster of fat spikes onto a flower nail with a Wilton open star nozzle 68. Pipe with even pressure then stop squeezing and pull the bag away. The succulents should be placed in the freezer until firm, usually about 10 to 20 minutes.
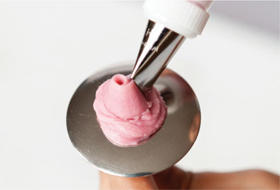
Surely the most popular of flowers, especially for enhancing a cake design, roses are easiest to create when piped onto a flower nail. We’ve used them extensively in this book, particularly on the Pail of Roses and Ball of Flowers cakes.

1. Position the Wilton 104 petal nozzle flat against the flower nail and squeeze the piping bag as you turn the nail to create a base.
2. Hold the nozzle vertically with the wide end touching the surface and slightly tilted inward, so that your central bud will have only a small opening. Squeeze the piping bag as you turn the nail until you make both ends meet.
3. While the nozzle is still slightly tilted inwards, turn the nail and pipe a curved petal in an arch-shape around the bud, slightly pushing the petal against the bud so there are no gaps. Each subsequent petal should begin slightly past the middle of the previous one and overlap it. Pipe about two to four short petals.

4. After creating the bud with few petals around it, hold the nozzle vertically and pipe four to five slightly longer and higher arched upright petals.

5. When piping the last few petals, tilt the nozzle slightly outwards and make the arches longer instead of higher. Pipe four to five outer petals.
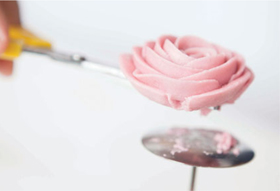
6. Use scissors to lift the rose up from the flower nail. Gently slide the rose onto a board, ready to go into the freezer for 10 to 20 minutes.
Versatile wafer paper is perfect for creating large appliqués for decoration. It is stiff and very light, so it makes wonderful feathers, leaves and flowers that don’t need to be supported by anything. And it can be painted so that you can give it any colour or pattern you desire.

1. Cut strips of wafer paper of the same width. The width will depend on your pattern. The feathers for the Steampunk Hat are about 4–5cm (11⁄2–2in) wide. On one side of the wafer paper, apply a thin layer of piping gel then position the florist wire in the centre and stick another piece of wafer paper on top of it.
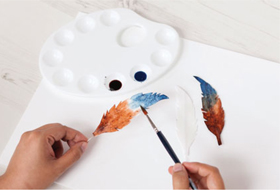
2. Ideally, leave to dry for several hours or overnight. Sketch your leaf or feather pattern, cut it out and transfer it to the wafer paper by tracing or drawing round it. Next cut around the pattern shape. Paint as desired. Make sure not to oversaturate the paint with lots of alcohol as it may cause the wafer paper to wrinkle.
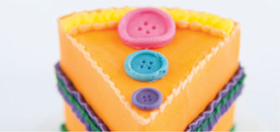
You can make a huge range of beautifully detailed shapes to add to your cakes using silicone moulds, which can be purchased in most specialist stores and online. We’ve made good use of them in our Eccentric cakes, the Steampunk Hat, Alice in Wonderland and Nicely Sliced cakes. To use the moulds press your chosen colour of buttercream in firmly with a palette knife to avoid any air bubbles. Freeze the mould for 10 to 20 minutes, then ease the shape out, touching it as little as possible with warm fingers, and apply it to your cake.
Do not freeze buttercream flowers or moulded shapes for too long, definitely not overnight, as condensation will form on the buttercream. This can make colours run and ruin your hard work. Freezing for 20 to 30 minutes, or until firm to the touch is enough.