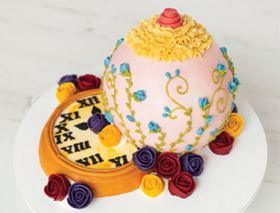
This is a really eccentric cake – it reflects our very active imaginations! We wanted to create a fun design that plays with colours in an appealing and cheerful way. The result is a cake fantasy that is actually produced using some pretty simple techniques. And what could be more whimsical than a Mad Hatter’s tea party theme?


1. Pre-pipe and freeze around 20 roses in red, violet and yellow buttercream (see Piping Flowers). Join the two half dome cakes to make a sphere. Using the serrated knife, trim off the rounded top, then make a downward cut from the top centre about 2.5cm (1in) deep, and another horizontal cut from the side to take out a segment as shown.

2. Flip the cake over and sit it on the clock as shown, with the part with the missing segment resting on the clock.

3. Trim off the rounded top of the cake to make it flat, then crumb coat (see Buttercream Basics). Cover the cake with a smooth coat of light pink buttercream. Using a large cake board (about 30cm/12in diameter) secure the cake firmly with a good amount of buttercream, or you may use a dowel (see Buttercream Basics) that goes through the cake board for added support.

4. Pipe ruffles all around the flat top part of the teapot using light yellow buttercream and petal nozzle 103. Fill the centre as you pipe each layer of ruffles to make it into a slight dome.

5. Stack three or four pink buttons, created and frozen using a mould (see Moulds) on top of the ruffles in the centre, to look like the knob of the teapot lid.

6. Pipe some scrolls for stems onto the side of the teapot using light green buttercream in a piping bag with a small hole at the tip.
For the clock you can use a real cake, but we used a 15cm (6in) round, 2.5cm (1in) thick styrofoam board. Just trim the top edge of the board to make it slightly rounded. Cover the top with plain buttercream and blend in some dark yellow buttercream with a palette knife then smooth the surface (see the sky instructions in the Country Window cake). Next, cover the side with dark yellow buttercream then pipe a simple border around the top with the round nozzle no.10, then a narrower one inside that with the writing nozzle no. 5. Finally, pipe the hands and Roman numerals on the clockface using black buttercream in a piping bag with a small hole at the tip.


7. Pipe small buds in blue buttercream using the petal nozzle 103 (see Piping Flowers) and even smaller buds with just a piping bag with a small hole at the tip. Pipe some spikes with fat bases and tapering points on the side of the stems for leaves using light green buttercream and a piping bag with a medium hole at the tip.

8. Position the roses around the cake, as shown, using cocktail sticks (toothpicks) to manoeuvre them if necessary. Secure them with blobs of buttercream.

9. Pipe the leaves in between the flowers using dark green buttercream and the leaf nozzle 352.

10. Use the open star nozzle 1M and dark pink buttercream to pipe the base where you will attach the handle of the teapot. Hold the nozzle straight on to the cake and firmly squeeze the piping bag to build up a big star.

11. Melt the pink Candy Melts and cover a couple of pretzels. Allow them to cool, then attach them on the star you piped for the handle. Or you can create a handle using wafer paper (see Using Wafer Paper in the techniques section).

12. Pipe the spout by positioning the nozzle a little below the midline of the cake then squeezing the piping bag with slow steady pressure until you reach the desired length of the spout. Slowly pull away as you continue to squeeze. Stick a pink moulded button at the tip.